SEARCH FINESCALE.COM

Enter keywords or a search phrase below:

Tamiya Jagdpanther WIP UPDATED 11/28 ... More Painting...

13795 views
72 replies
1 rating 2 rating 3 rating 4 rating 5 rating
  • Member since
    July 2004
  • From: Texas
Posted by wbill76 on Monday, November 27, 2006 12:48 PM

Well on its way to being a beautiful hunk of junk Kenneth. Wink [;)]

  • Member since
    June 2006
  • From: Highland IN
Posted by TGregory on Monday, November 27, 2006 11:29 AM
Wow!! [wow] Wow, superb job.Bow [bow]
Tony Gregory
  • Member since
    June 2006
  • From: Michigan
Posted by ps1scw on Monday, November 27, 2006 10:43 AM
I like that green alot as well as the red-brown.
  • Member since
    August 2006
  • From: Arkansas
Posted by K-dawg on Monday, November 27, 2006 10:05 AM

The base color was a mixture of Burnt Orange (cheap craft paint from Hobby lobby), Testors Leather, and a touch of Testors Rust.... Mostly on the orange side...

Kenneth Childres, Central Arkansas Scale Modelers

  • Member since
    June 2006
  • From: Michigan
Posted by ps1scw on Monday, November 27, 2006 9:55 AM
What were your base colors before the "burn"?
  • Member since
    August 2006
  • From: Arkansas
Posted by K-dawg on Monday, November 27, 2006 9:43 AM

Scott...

I picked up this particular technique for filtering from Bernhard Lustig. Colors vary depending on the base colors and the effects you're looking for. For this one I set out some Black, White, Blue, Green and a couple of earth brown tones. You just add tiny specks of color randomly then blend them all together with a brush damp with thinner. It's done with oil paints for a long working time and fine grain... The thing to remember is Less is More... You can always do it again to build up the effect but too much paint would be bad... very bad.... Big Smile [:D] If done right it adds a subtle patina of hues and colors to age the paint...

Hope that explains it... Big Smile [:D]

Kenneth Childres, Central Arkansas Scale Modelers

  • Member since
    August 2006
  • From: Amherst, MA
Posted by M1 A1 A2 Tanker on Monday, November 27, 2006 9:17 AM

Hey

          I just read the posting on your build to date. And for me I think your project is going to look AWESOME when done. The new paint job already looks like a good recovery from your mistake on the first one. 

 One question: What is the "dot" method?


Seeya

Scott 


“Computers are like Old Testament gods; lots of rules and no mercy.”  ~ Joseph Campbell


  • Member since
    November 2005
Posted by Anonymous on Monday, November 27, 2006 9:13 AM

Very impressive.  Great work and great recovery.  Can't wait to see the final outcome.


  • Member since
    August 2006
  • From: Arkansas
Posted by K-dawg on Monday, November 27, 2006 8:49 AM

Ok... Back to square one... Painting...  Since I had nothing to lose I figured this would make a perfect subject for another burned out paint job that employed the techniques from an article in Tamiya Model Magazine written by Miguel Jimenez...

Step 1... Camo

Step 2... Laying in the burned areas with a mixture of burnt orange and rust brown

Step 3... Filtering the un-burned areas via the "dot" method...

Step 4-872... Blending many many colors of rust and burnt orange with a brush... This was done with acrylics as well as oils...

And this is it so far... It has a long long way to go but I think it's on the right track...

As always... comments and suggestions welcome...

Kenneth Childres, Central Arkansas Scale Modelers

  • Member since
    April 2005
  • From: I am at play in the fields of the Lord. (Texas)
Posted by m60a3 on Thursday, November 23, 2006 8:26 AM

 "It ain't all gravy"   Oh how well I know that!! LOL!!  Smile [:)]  Keep us posted if you want. I still want to see the final outcome.

                                                         -60
 

"I lay like a small idea in a vacant mind" - Wm. Least Heat Moon "I am at the center of the earth." - Black Elk My FSM friends are the best.
  • Member since
    August 2006
  • From: Arkansas
Posted by K-dawg on Wednesday, November 22, 2006 7:42 AM

Bill, Indeed...Mischief [:-,] Big Smile [:D] Hopefully it works...

60, One more thing.... you were talking about showing mistakes... well now thats just part of it, if I didn't show mistakes.... I'd never show much of anything... Big Smile [:D]  It ain't all gravy you know...


Thanks y'all...

Kenneth Childres, Central Arkansas Scale Modelers

  • Member since
    July 2004
  • From: Texas
Posted by wbill76 on Tuesday, November 21, 2006 10:26 PM
I'm sure you'll salvage it Kenneth, the brewed-up option sounds like a good plan, can't wait to see what your evil genius comes up with. Wink [;)]
  • Member since
    August 2006
  • From: Arkansas
Posted by K-dawg on Tuesday, November 21, 2006 10:16 PM
 m60a3 wrote:

 Thanks for having the guts to show everybody how it looks after being messed up. I think you'll do fine with brewed up version, but if you get too mad, I can always send you a pm with my address and you can send all the damage to me. I love making something out of a damaged kit. Matthew9 sent me some good parts and I was able to make two pretty good scratchbuilt kits out of them.
 But I know you'll do fine. Just don't get angry and throw it away, please!

                                                                               -60


Throw it out... No... Voyager PE, Fruils and a boat load of scratchbuilt stuff... nah... the trash is the last place this thing will end up... Big Smile [:D]


Thanks for the vote of confidence Y'all...

Kenneth Childres, Central Arkansas Scale Modelers

  • Member since
    April 2005
  • From: I am at play in the fields of the Lord. (Texas)
Posted by m60a3 on Tuesday, November 21, 2006 6:55 PM

 Thanks for having the guts to show everybody how it looks after being messed up. I think you'll do fine with brewed up version, but if you get too mad, I can always send you a pm with my address and you can send all the damage to me. I love making something out of a damaged kit. Matthew9 sent me some good parts and I was able to make two pretty good scratchbuilt kits out of them.
 But I know you'll do fine. Just don't get angry and throw it away, please!

                                                                               -60
 

"I lay like a small idea in a vacant mind" - Wm. Least Heat Moon "I am at the center of the earth." - Black Elk My FSM friends are the best.
  • Member since
    March 2003
  • From: Rain USA, Vancouver WA
Posted by tigerman on Tuesday, November 21, 2006 5:23 PM
Wow, that just bites. That is why I AB acryls, so easy to fix up a poor camo. I've done it more times than I care to recount.

   http://i7.photobucket.com/albums/y269/wing_nut_5o/PANZERJAGERGB.jpg

 Eric 

  • Member since
    August 2006
  • From: Oromocto, Canada
Posted by Gun Tech on Tuesday, November 21, 2006 3:22 PM
Don't despair!  You still can get something really well done out of it!

Jean-Michel    "Arte et Marte"

  • Member since
    August 2006
  • From: Arkansas
Posted by K-dawg on Tuesday, November 21, 2006 7:40 AM

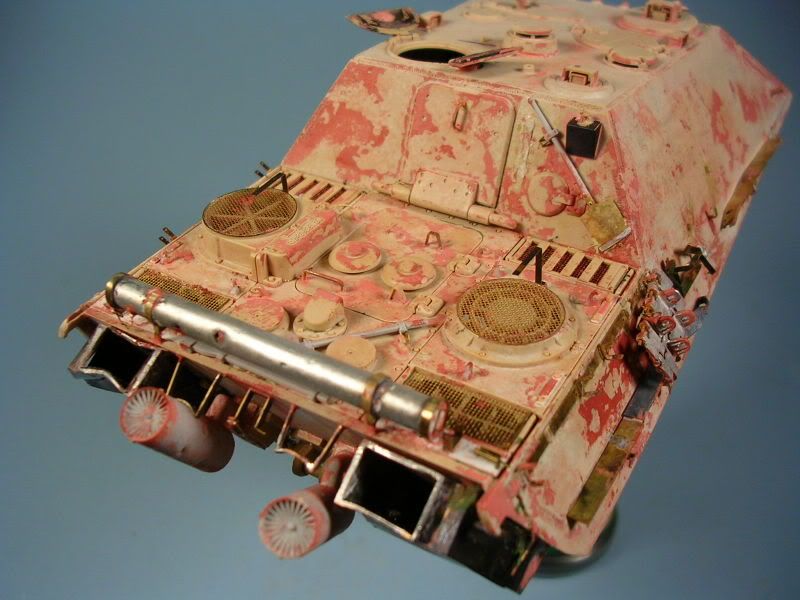
Ok... So the weekend wasn't good to me...

 I began painting by priming with Red Oxide primer from a rattle can like I always do... I decided to try my hand and a hand brushed hard edge camo... well long story short... I wasn't happy with how it was going so I stripped it with oven cleaner... Not the first time for that at all...

Well the primer was some sturdy stuff so I had to leave the oven cleaner on for a long time and do it several times... In the process many of the smaller brass parts began to fall off. Also much of the paint didn't come off leaving blotches and patches of primer everywhere...

SO.... I have decided to change horses and model a completely burned out JP... I've begun prep on a set of Tank Workshop burned Panther wheels to go with it... Also shot holes were formed into the right side...

Ok... Here's some pics of the paint fiasco... I am slowly gluing parts back on that fell off...


here are the two new entry holes, he one on the right is still being worked on...
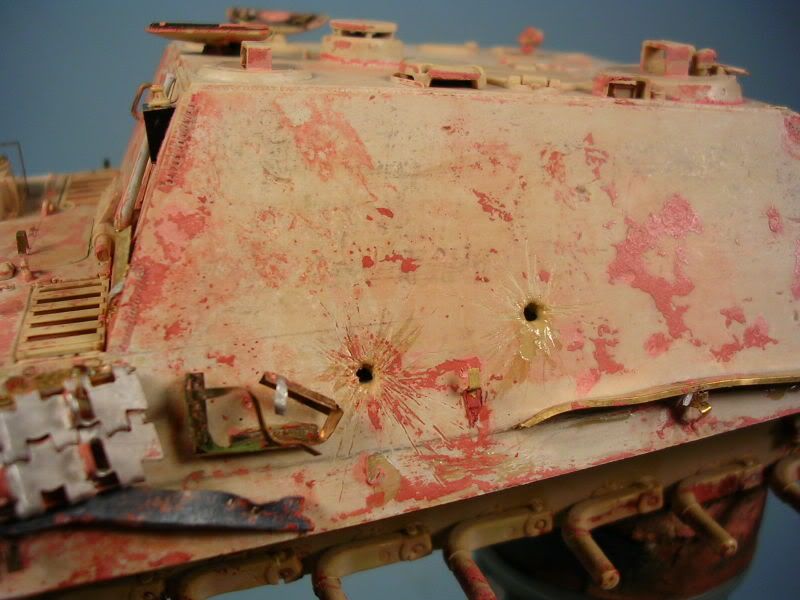
and finally the lowered suspension arms... I got pretty brutal with this process... i was still very T'd off so i just grabbed them with pliers and broke/bent them into the position i wanted, then reglued them...

As I mentioned earlier... I think the patches of paint will actually help when it comes to doing a burned out scheme...

I hate that this is how this all turned out but maybe something good will come of it... Wish me luck...

Kenneth Childres, Central Arkansas Scale Modelers

  • Member since
    November 2006
  • From: Massachusetts
Posted by jadgpanther302 on Wednesday, November 15, 2006 3:04 PM
cool
  • Member since
    April 2005
  • From: I am at play in the fields of the Lord. (Texas)
Posted by m60a3 on Tuesday, November 14, 2006 4:43 PM

 What a work of art! Thanks for sharing.

                                              -60
 

"I lay like a small idea in a vacant mind" - Wm. Least Heat Moon "I am at the center of the earth." - Black Elk My FSM friends are the best.
  • Member since
    August 2006
  • From: Oromocto, Canada
Posted by Gun Tech on Tuesday, November 14, 2006 3:25 PM
Nice metal work.

Jean-Michel    "Arte et Marte"

  • Member since
    July 2003
  • From: On my kitchen counter top somewhere in central North Carolina.
Posted by disastermaster on Tuesday, November 14, 2006 2:20 PM
Looking "REALLY" good. Should be a beautiful build. Steve

 https://i.imgur.com/LjRRaV1.png


  • Member since
    March 2003
  • From: Rain USA, Vancouver WA
Posted by tigerman on Tuesday, November 14, 2006 1:02 PM
Awesome work so far, she's gonna be a beaut when done.

   http://i7.photobucket.com/albums/y269/wing_nut_5o/PANZERJAGERGB.jpg

 Eric 

  • Member since
    July 2004
  • From: Texas
Posted by wbill76 on Tuesday, November 14, 2006 8:27 AM
Nice work with the metal details Kenneth, coming along nicely. You'll have to call this a FrankenJagd by the time you're done. Smile [:)]
  • Member since
    August 2006
  • From: Arkansas
Posted by K-dawg on Tuesday, November 14, 2006 7:47 AM

Alright Y'all... Here is a whole crop of updates... I've been working hard on it the few days I've been home...

The fenders are on...

with the flat rivets being made from lead foil punched out with a homemade brass punch (turned in the dremel tool...)


The engine deck is very busy now with the field made sheilds over the grills  and the relocated tools... The barrel cleaning tube was scratchbuilt from aluminum, styrene and brass tube, then the Voyager parts fitted to that...

Here's more relocated tools along with the beautiful Ausfwerks fire bottle in the voyager bracket...

More of the shot damage and torn up fenders...

Still a little more work to be done but I should be able to start painting by the weekend... Hopefully...


Oh.. BTW... The voyager engine screens (square ones) DID NOT fit this kit... I had to cut all four of them down to get them to fit. I cut nearly 1mm off of them...


Thanks for looking, Comments and suggestions welcome....


Kenneth Childres, Central Arkansas Scale Modelers

  • Member since
    August 2006
  • From: Arkansas
Posted by K-dawg on Monday, October 23, 2006 12:50 PM

Zoran, Thanks for the comments brother... Re, the roadwheel damage... Flipping through refs which included the heavily damaged Panther A at Aberdeen, roadwheel damage wasn't uncommon at all... Various holes appeared from simple shot holes from Russian AT rifles to having large pieces broken off (ala the Aberdeen Panther A) from larger shots or artillery splinters... I have thought about removing one completely as you say but haven't decided yet....

Thanks for the input...

Kenneth Childres, Central Arkansas Scale Modelers

  • Member since
    July 2003
  • From: Toronto, Ontario, Canada
Posted by zokissima on Monday, October 23, 2006 12:25 PM

Looking pretty sweet so far. I'm a sucker for heavily weathered builds. Anticipating how this one will look painted up.

I have just one quick thing to throw in; the battle dammage on some of those roadwheels, ie the gaping holes, is pretty damn severe. I don't think any small arms fire could have done that ,and anything bigger would probably have warped some part of the mounting mechanism. I guess what I'm trying to suggest is that if you're going to portray such heavy damage on the wheels, you should probably take one or two off completely.

  • Member since
    August 2006
  • From: Arkansas
Posted by K-dawg on Monday, October 23, 2006 9:40 AM

Oh sure... You're nice to me here.... Bah!

Kenneth Childres, Central Arkansas Scale Modelers

  • Member since
    November 2005
Posted by Anonymous on Monday, October 23, 2006 9:31 AM

Superb work Kenneth, Always a pleasure to watch you work.


  • Member since
    August 2006
  • From: Arkansas
Posted by K-dawg on Monday, October 23, 2006 9:14 AM

Bob, Thanks a lot bro... I always learn from step by step so thats how I present stuff....

60, I appreciate it... I got a lot more done this weekend but i have to go to Canada in the morning so I'll post them when I get back next Monday...

Kenneth Childres, Central Arkansas Scale Modelers

  • Member since
    April 2005
  • From: I am at play in the fields of the Lord. (Texas)
Posted by m60a3 on Friday, October 20, 2006 9:54 PM
 K-Dawg, you are rocking on this one. Excellent job. Can you work faster though? I want to see more!!

                             -60
"I lay like a small idea in a vacant mind" - Wm. Least Heat Moon "I am at the center of the earth." - Black Elk My FSM friends are the best.
JOIN OUR COMMUNITY!

Our community is FREE to join. To participate you must either login or register for an account.

SEARCH FORUMS
FREE NEWSLETTER
By signing up you may also receive reader surveys and occasional special offers. We do not sell, rent or trade our email lists. View our Privacy Policy.