SEARCH FINESCALE.COM

Enter keywords or a search phrase below:

1971 "Grabber Lime" Mach I Mustang FINISHED!

12830 views
48 replies
1 rating 2 rating 3 rating 4 rating 5 rating
  • Member since
    January 2007
1971 "Grabber Lime" Mach I Mustang FINISHED!
Posted by the doog on Monday, August 29, 2011 10:16 PM

Hi guys,

Well, having just completed that "Heavy Metal Mustang" MPC Boss 351, I thought that, having the flaws and corrections fresh in my mind, that I'd give a second, more colorful Mach I a build! I've chosen the AMT '71 Mustang for this kit, which is really just a re-pop of the old MPC kit, and, unfortunately,  just as inaccurate and challenging!

I'm not going to go bonkers trying to accurize it completely, but at least the interior is pretty close for a '71 Mach I.....I think? Anyway, it looks correct, with the wooden side panels and whatnot.

First thing is to take care of that darned front end. In the following photos, the TOP shows the CORRECTED piece; in the BOTTOM the KIT Piece AS IS. You'll be able to get some idea of the amount of sanding, drilling, filing and Dremeling that I did to get a more-correct shape. It's been reduced in size, and the bottom piece bored out and side reflectors installed and braces also put in.

See how the kit piece is one-piece? Yuck...oh yeah--the pieces are upside-down, just to clarify.

You can see the braces and reflectors put in from behind here....

The license plate area was cut out and sanded to shape....from the bottom view

and from the top..

And you can see the piece now added to the front..

That's looking a little better! I'm cleaning up the engine and parts right now for painting, and sanding the body a bit before adding the missing trim...stay tuned!

Karl the doog

  • Member since
    June 2010
  • From: Australia
Posted by OctaneOrange on Tuesday, August 30, 2011 10:52 PM

I'm interested in seeing this done. i think you are correct about the interior for the 71, but unfortunately they also used it for the 73, but it was already butchered to make it a trans-am kit, they just threw all that in in a box and stuck a picture of a factory stock car on the top.

i was lucky that at the time i was building my 73 mustang i needed those transam parts for another mustang (69), so just did a straight swap.

  • Member since
    January 2007
Posted by the doog on Friday, September 2, 2011 4:04 PM

OctaneOrange

I'm interested in seeing this done. i think you are correct about the interior for the 71, but unfortunately they also used it for the 73, but it was already butchered to make it a trans-am kit, they just threw all that in in a box and stuck a picture of a factory stock car on the top.

i was lucky that at the time i was building my 73 mustang i needed those transam parts for another mustang (69), so just did a straight swap.

Very interesting to know that history, OctaneOrange; thanks for the info! That explains a lot about this kit!

Well, I ave an update;

I'm going to show how to put a nice detail in here--hollowing out the front hood air inlets. This isn't as easy as it sounds, but a Dremel tool makes it a lot easier. In this first pic, you can see the "before" and "after" comparison from both front and back. I have also filled in the troughs for opening up the hood if you want to blow the engine as an option.

Here's the tiny tip that I used--it's a metal tip,I think it's a "cutting" tip?

And here's the first step; from the front C-A-R-E-F-U-L-L-Y bore two holes out at the ends of the openings. Be very careful here because that tip will want to wander, and also, you can inadvertently wind up scoring the surface of the hood with the Dremel colette (like I did!) if you're not not careful (like I wasn't!). Then, use the Dremel to connect the two holes by carefully pushing the tip through the plastic to the other side.

I said to go from the front, because if you go from the back, you can run the risk of not being in the center of the openings. Here's what you should have once you do the two sides--notice how the holes are not exactly where you would expect them to be if you started from the back! If you start from back here, your holes on the front of the hood will be too high, and ruin your hood.

Ok, so once you have them bored out, use an Exacto blade and even a modified emery board to open and smooth the holes. Be careful, and check the appearance every few strokes.

Here's one side done;

I'm also using a contour gauge here to get a template for the front spoiler. Every modeler should have one of these handy tools.It wasn't easy taking this photo! Tongue Tied

Then trace it onto an index card, and cut it out...

Here's what I have so far. I'll be honest that I just "eyeball" the shape and size. I mean, where WOULD you find the dimensions unless you have the real thing sitting in your garage? Surprise....Stick out tongue I'm still working on filing it down to the shape and size that I want. I did one on my Boss 351 just like this, and it came out pretty convincingly.

Next, you should be aware of the rear spoiler mount--if you mount it as it is with the mounts provided, you'll be taking out small birds going down your scale highway, as it sits way high. I cut the mounts approximately here at the line....I've also considerably thinned-down the actual spoiler itself.

And this is approximately where it will sit when modified. You can see that that's about right for scale?

Well, that's where I am so far. I have some other details I'm working on, but don't have 'em to where I want to show anything yet. Hope you enjoyed this installment, and have yourselves a happy holiday weekend!

Stay tuned for more!

Smile the doog...


  • Member since
    January 2007
Posted by the doog on Saturday, September 3, 2011 11:00 PM

Hey guys! Here's the last installment of building before the primer goes down!

OK, so here's the final template for the spoiler, traced on an index card. The measurements are in millimeters. Take into account that these will be dependent upon the filed shape of the front bumper itself, but at least here's a rough estimate!

And here's the piece added.

I also built a new shifter to match ones I've seen in reference photos. I added window handles too.

I'll be primering the whole affair and starting painting soon. Give me about another week to put up some new first-steps pics...!

All comments and questions welcomed!!!!  Big Smile

  • Member since
    October 2006
  • From: Lakewood, CO
Posted by kenjitak on Sunday, September 4, 2011 6:32 PM

This will be fun to watch! I especially like those interior bits you've added.

Ken

  • Member since
    June 2010
  • From: Australia
Posted by OctaneOrange on Sunday, September 4, 2011 8:10 PM

the doog


Here's the tiny tip that I used--it's a metal tip,I think it's a "cutting" tip?

http://i170.photobucket.com/albums/u244/heydoog/Model%20Cars/100_0314.jpg


i think that's actually an Engraving tip. i use it the same way, as a small grinding tool (because we don't do a lot of engraving in this hobby, and it doesn't work on plastic)

  • Member since
    January 2007
Posted by the doog on Thursday, September 8, 2011 6:23 PM

Thank you, kenjitak, for the comment! Smile

OctaneOrange, "engraving bit"--got it! Thanks!

Well here's a short update--I have primed it with Duplicolor Gray Primer, sanded it with 1500 grit paper, and laid down the first coat of Model Car World "Grabber Lime". If you have never used it, this is, I believe, the finest model car paint available today. It's lacquer, and sprays perfectly. The drying time on it is almost instant, and the color match and durability is superb! This is three coats, and I still have to sand and do a final wet coat...

I'm working on a lot of little details and painting now--soon up; the interior and dash...gimme a few days! Big Smile

Thanks all for looking in and taking the time to comment! Smile

  • Member since
    April 2004
  • From: Boston MA
Posted by vespa boy on Thursday, September 8, 2011 6:33 PM

Karl all those little details with the spoiler and the intakes really pay off. This looks the part 100% The colour is like a handful of sour patch!! keep it coming.

http://public.fotki.com/nkhandekar

This ain't no Mudd Club, or C.B.G.B.,
I ain't got time for that now

  • Member since
    January 2007
Posted by the doog on Thursday, September 8, 2011 7:30 PM

Thanks, Narayan!

Yeah, I LOVE this color!  It's like "Kawasakl Green", lol. I'm going to want to jump this car off a 60-foot triple! ha ha!

  • Member since
    April 2013
Posted by nomad68 on Monday, September 12, 2011 9:29 PM

Nice car will be watchin this one Big Smile

  • Member since
    March 2010
  • From: Buffalo, NY
Posted by macattack80 on Tuesday, September 13, 2011 9:39 PM

Nice work as usual Doog.  Opening up those hood scoops adds so much to the look of the car.  The color really does pop.  Good choice.  I have heard a lot of good things about that paint.  I plan on ordering some for my next auto build.

Kevin

[


  • Member since
    January 2007
Posted by the doog on Tuesday, September 13, 2011 9:49 PM

THANKS, NOMAD!!!

macattack80

Nice work as usual Doog.  Opening up those hood scoops adds so much to the look of the car.  The color really does pop.  Good choice.  I have heard a lot of good things about that paint.  I plan on ordering some for my next auto build.

Thanks, too, Mac, I appreciate the comments!--and you won't be sorry about the paint order. Well worth it!

I always was partial to this type of green. MOPARS and cool cars of any sort just look good in this color!

The real pain is going to be the masking of the hood--no decals to use whatsoever! Time to get out the BMF!

  • Member since
    April 2008
  • From: Philadelphia PA
Posted by smeagol the vile on Wednesday, September 14, 2011 7:37 PM

Sweet Karl is doing a WIP!  I'm excited cant wait to see this girl finished.


  • Member since
    January 2007
Posted by the doog on Thursday, September 15, 2011 10:42 AM

smeagol the vile

Sweet Karl is doing a WIP!  I'm excited cant wait to see this girl finished.

Glad to have you onboard, Stephen! Thanks for looking in!

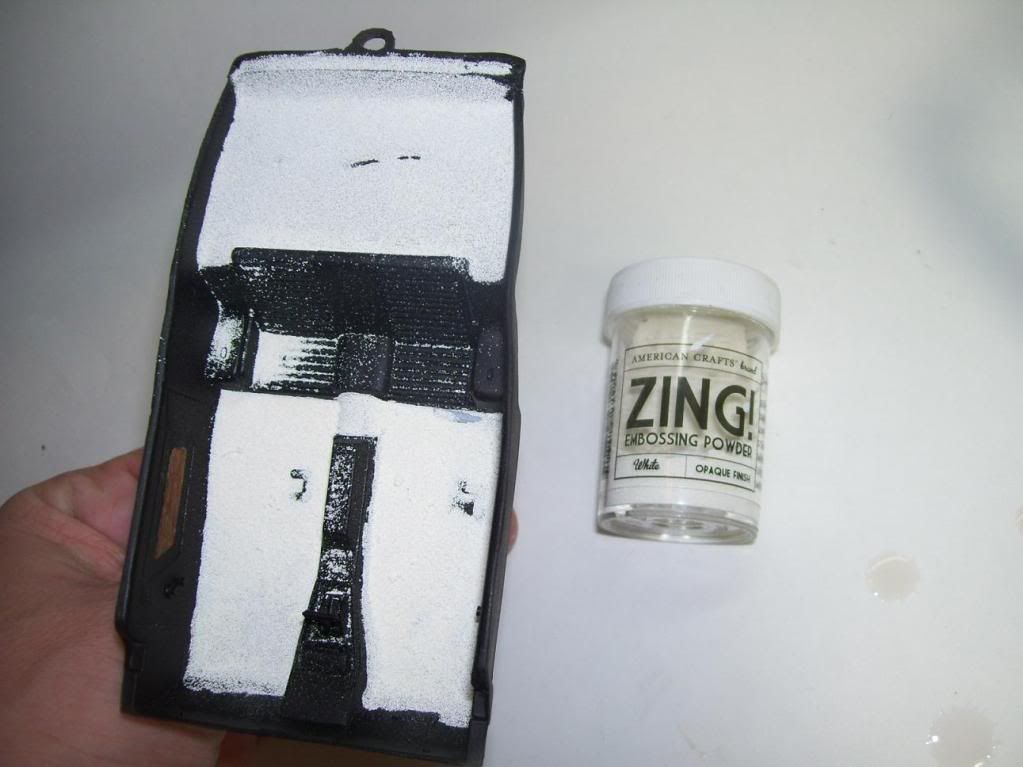
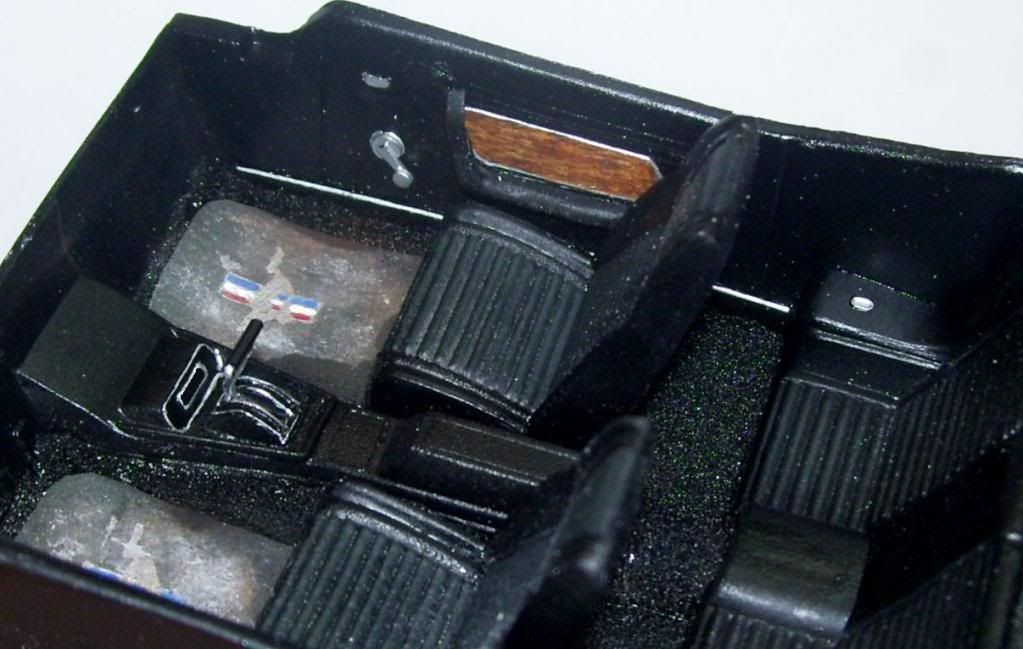
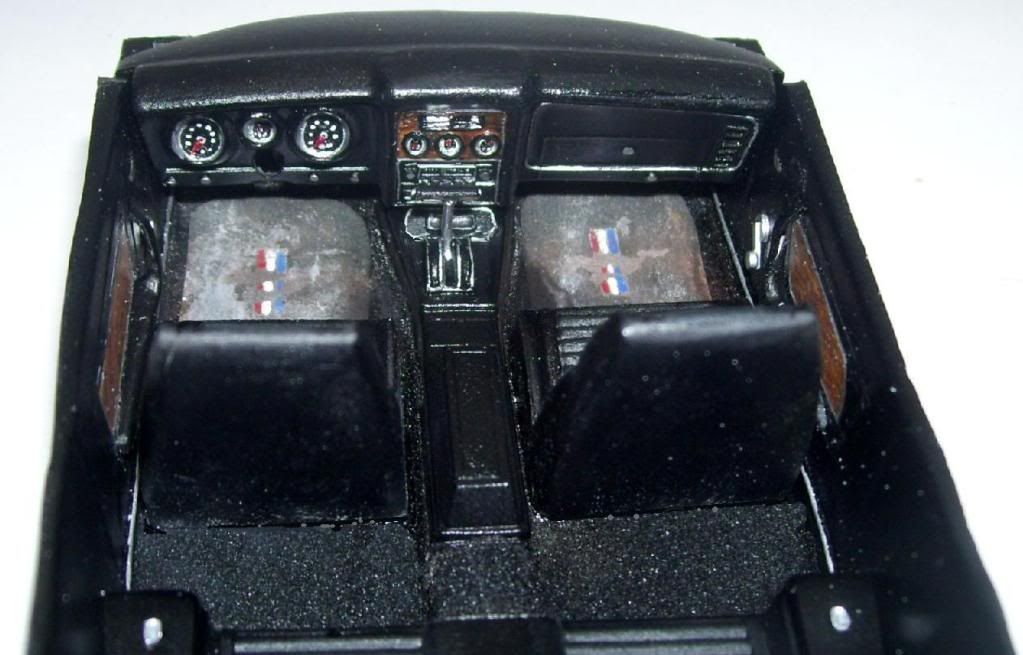
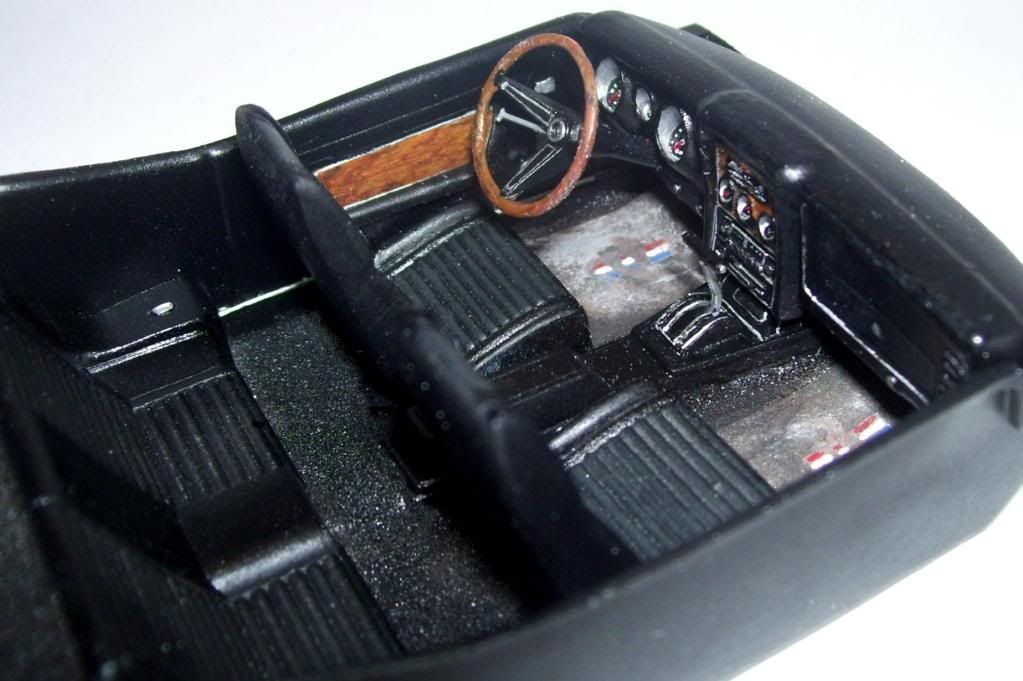
Well I have another update, and I've finished  the interior. Once again, I used embossing powder to simulate the flocking--I like this stuff MUCH better for a scale appearance of carpeting. Just lay down a coat of white glue and sprinkle on a copious amount. This can then be painted with your airbrush in whatever color you need!

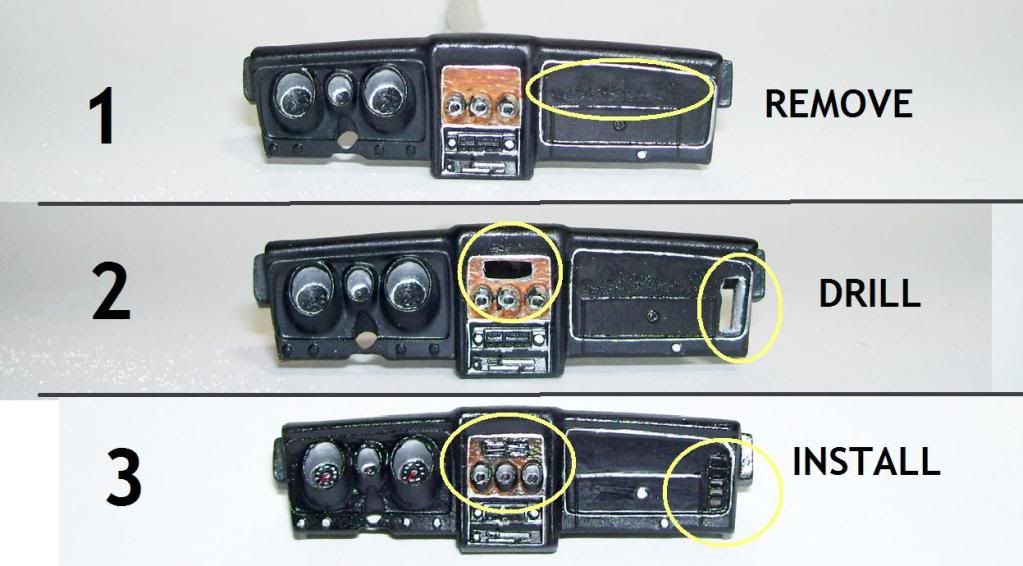
Next, I got looking at the dashboard, and considering the inaccuracy of the piece, and thought. "Hmm, what can I do to make this a little more accurate?" The first thing I did as to remove the...."handle"?...that is on the dash in front of the passenger seat.

Well, you know what happened then....you start out remodeling the bathroom and before you know it, you're picking out cupboards for the kitchen and building a deck on the back of the house! I figured that I couldn't forgive myself if I didn't put in those two vents over the radio and to the right of the glove compartment. You can kinda see them here....

So I cut out the areas, and made some reasonable similes of them.

Next, I figured that since I'd built the deck, I might as well put in a pool? lol. I went to work on creating an impression of the door handles which go over the wood inserts. I also made some "Mustang" floor mats from old sandpaper, painting on the emblem as best as I could, and weathering it (to show a daily driver) with MIG's weathering powders and an oil paint stain, which I use extensively in my Armor modeling. The wood inserts, by the way, were painted freehand with Windsor & Newton's artists' acrylics--yellow ochre, raw sienna. and raw umber colors. Oh yeah--and on the seats, I painted them with Tamiya Semi-Gloss Black, but then lightly drybrushed a flat hobby paint, Folk Art's #925, "Wrought Iron" on the interiors to make a slight tonal difference in the inner seat area. This seems to match the photos in my reference car.

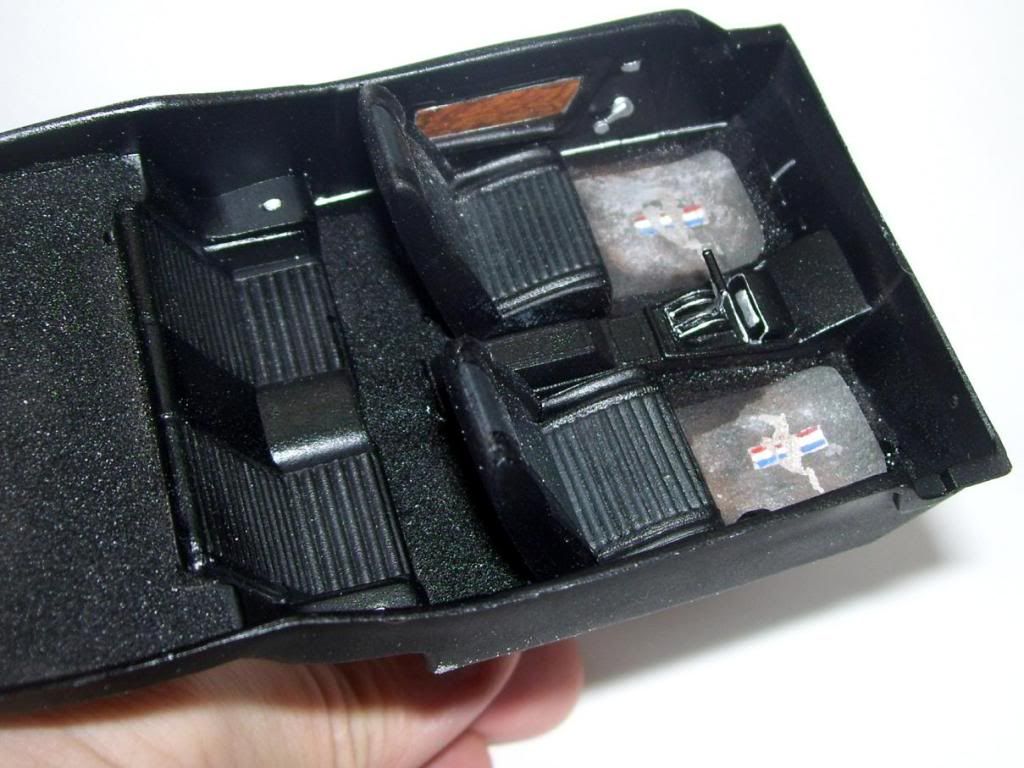
YOu can see the weird shape of the door handles here...

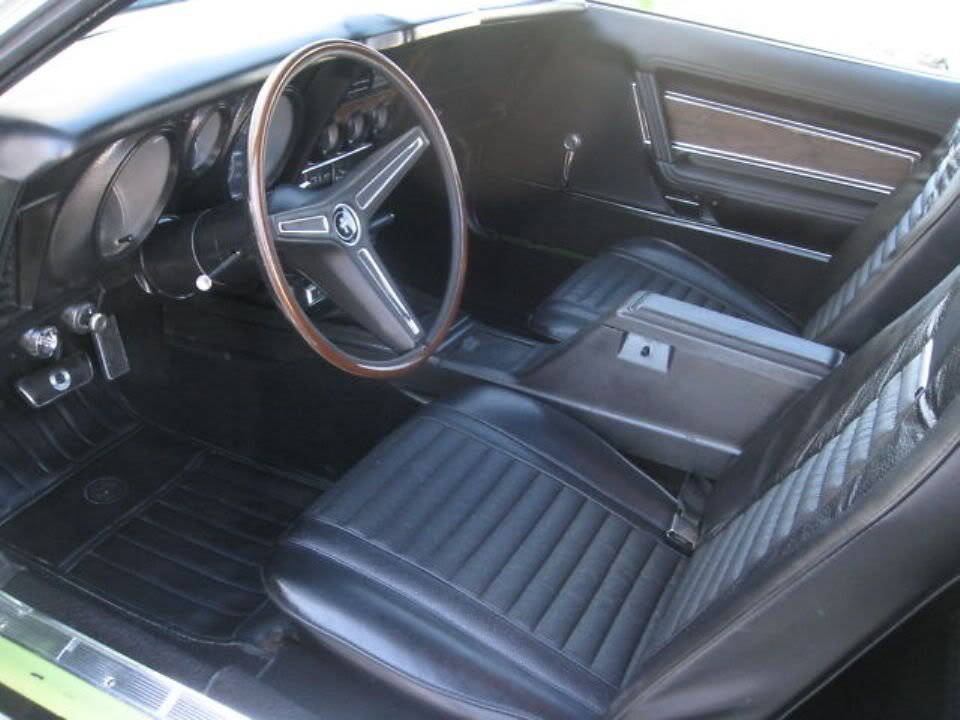
Another look: I made hem out of a thick 80 x 80 piece of styrene, to which I glued a 4 x 10 strip, and then coats it with Squadron's White Putty. I then filed it to shape. I think it suggests the shape close enough?

I painted up the dash and shifter...

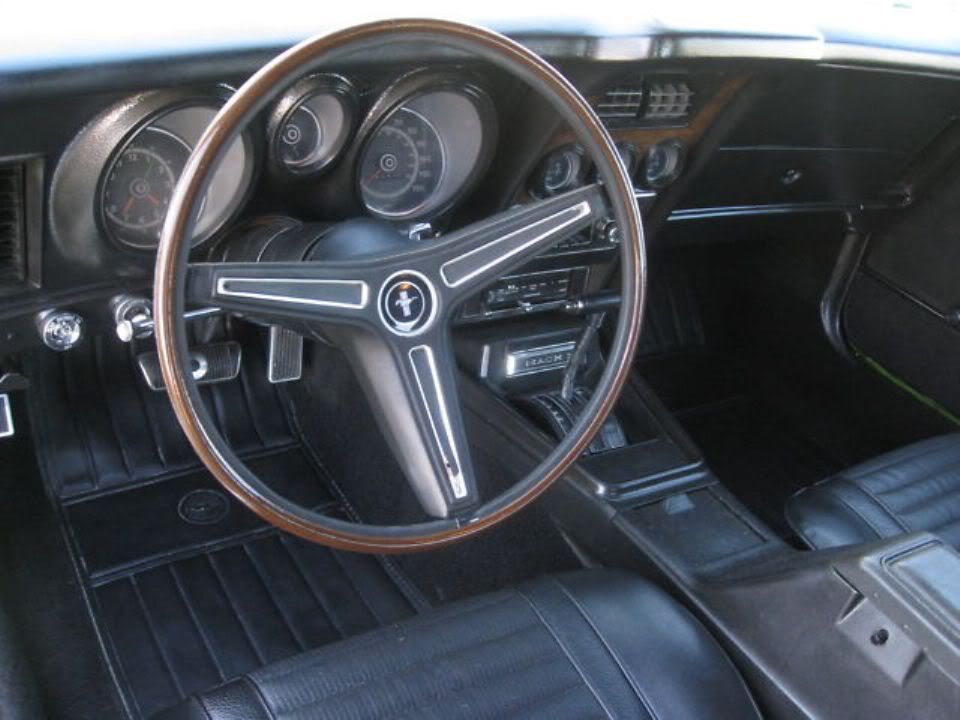
Then I added in the last thing-the steering wheel--I don't know if a woodgrain was stock or not, but I liked the look of it from my reference photos. I also painted in the trim, and added a sprue rod for the lever there on the left side.

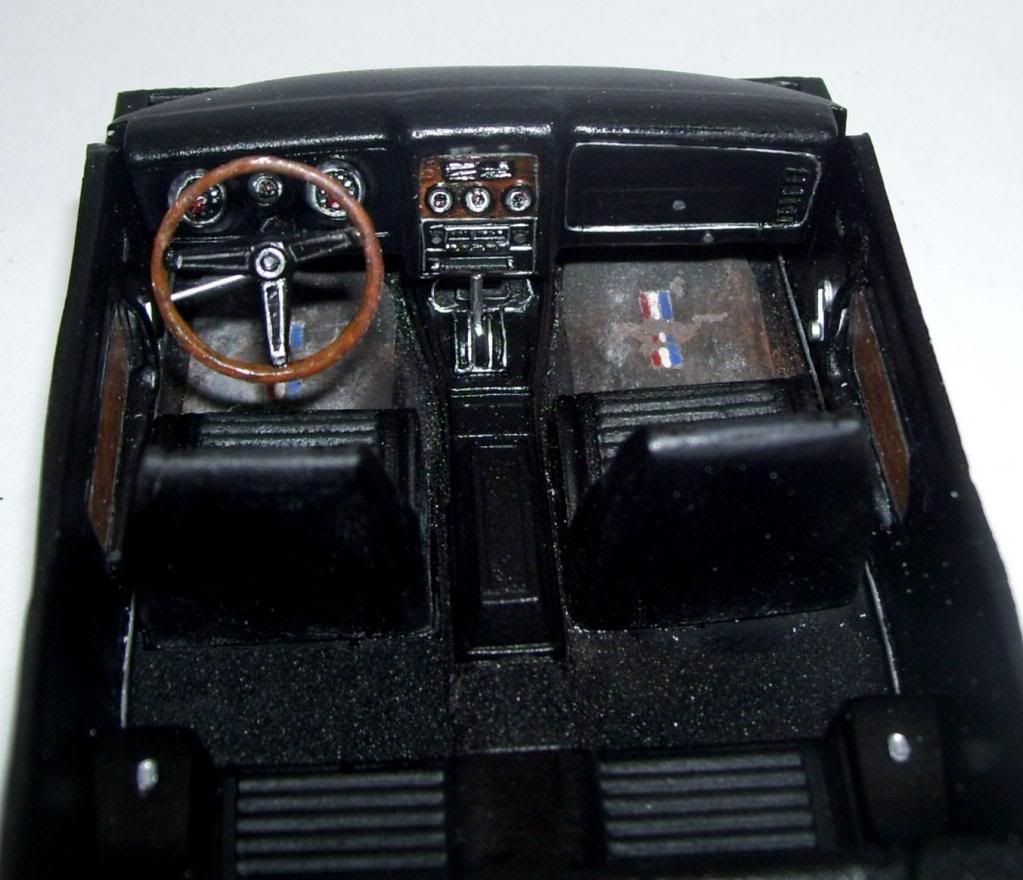
Here's the last photos...

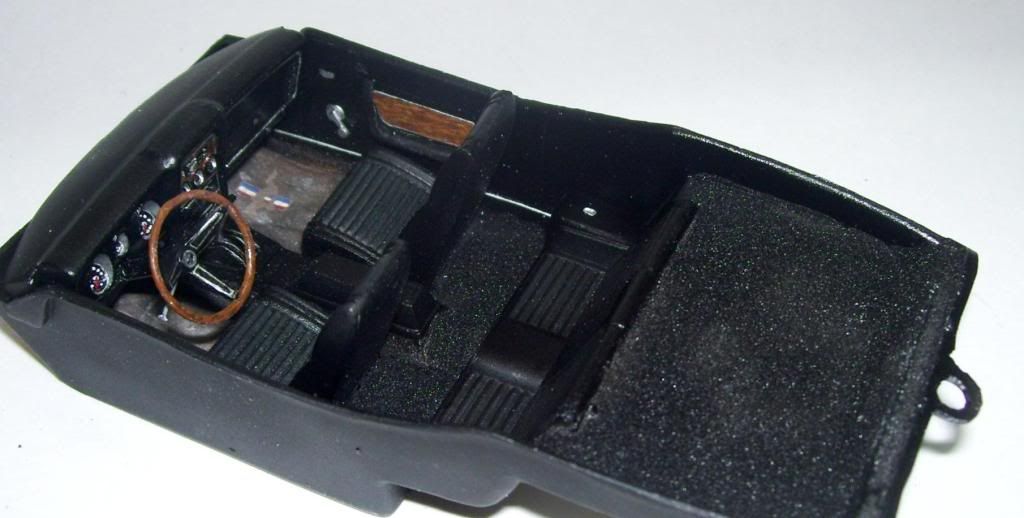
Well, I hope you're enjoying this WIP! I think I've made a decent "dent" in making the interior a little more accurate. I'll be working on the body next--man, I gotta mask that hood now, with the blackout pattern and that thin stripe around it. Ugh. I hope it doesn't take too many tried to get it right?!

Comments and questions welcomed! Thanks for looking in, guys!


  • Member since
    March 2010
  • From: Buffalo, NY
Posted by macattack80 on Thursday, September 15, 2011 10:27 PM

Great job fixing up that interior.  I have to try that embossing powder.  That looks nice.  I have trouble getting the flocking to work.  Is the embossing powder easier to work with or does it just look better or both? 

Kevin

[


  • Member since
    January 2007
Posted by the doog on Thursday, September 15, 2011 10:37 PM

macattack80

Great job fixing up that interior.  I have to try that embossing powder.  That looks nice.  I have trouble getting the flocking to work.  Is the embossing powder easier to work with or does it just look better or both? 

Thank you, Mac! I'm happy to answer our questions!

I prefer the embossing powder over the flocking for several reasons. One, it's more "to scale" than the flocking. Second, it can easily be painted any color. Third, it's a lot easier to work with in my experience. With the flocking, you have to tamp it down and make sure it "grabs" the medium that you're using to secure it. With the embossing powder, I just lay down a coat of white glue with an old paintbrush and sprinkle it on and let it lie--I never touch it after that until I tip the tub over to shake the excess loose when the glue dries.

That flocking stuff used to seem to get all over sometimes--it would cling to parts, and seemed prone to static cling. The powder just falls away without mucking up the rest of the model. Smile

  • Member since
    January 2009
  • From: Edmonton, Alberta
Posted by Griffin on Thursday, September 15, 2011 10:43 PM

Hey Doog, this is a great-looking build so far. Your vehicles are what I hope mine look like one day. Bow Down

  • Member since
    January 2007
Posted by the doog on Thursday, September 15, 2011 11:17 PM

Griffin

Hey Doog, this is a great-looking build so far. Your vehicles are what I hope mine look like one day. Bow Down

Hey thanks Griffin! I appreciate those kind sentiments! Smile

  • Member since
    August 2006
  • From: Cygnus X-1
Posted by ogrejohn on Friday, September 16, 2011 3:47 AM

That is some fine looking work on the interior Doog! Where do you get those embossing powders? Once I finish off a couple of armors I'm working on I'm thinking of doing an AAR Cuda I have in the stash.

  • Member since
    January 2007
Posted by the doog on Friday, September 16, 2011 7:38 AM

ogrejohn

That is some fine looking work on the interior Doog! Where do you get those embossing powders? Once I finish off a couple of armors I'm working on I'm thinking of doing an AAR Cuda I have in the stash.

Thanks, Jon!

I found my powders at Hobby Lobby, but I'm sure that Michael's or AC Moore's has em too! They're under $10.00, I believe?

That AAR kit is cool--I have one myself! Stick out tongue

  • Member since
    September 2005
  • From: Illinois: Hive of Scum and Villany
Posted by Sprue-ce Goose on Friday, September 16, 2011 8:10 AM

Very nice interior detailing for the Mustang kit!

You are going to need to upgrade the magnification on your loupe if you continue modifying those very small areas.

I especially like the floor mat and wood grain additions. The sand paper re-cycled as floor mats is an excellent, earth friendly idea .Yes

They make the interior shine ( metaphorically speaking ) Cool

Sorry about the late post, been busy watching people " improving " each other's forum existence on the Improve the forum experience - Ditch the post count!

thread.....SurpriseWink

Please post more of your excellent builds- even if it does increase your post count.Embarrassed

  • Member since
    February 2003
  • From: Rothesay, NB Canada
Posted by VanceCrozier on Friday, September 16, 2011 8:19 AM

Gorgeous work again Doog, I love those muscled-up Mustangs. I do have one complaint though... I'm sure I ordered mine in orange!! Wink

On the bench: Airfix 1/72 Wildcat; Airfix 1/72 Vampire T11; Airfix 1/72 Fouga Magister

  • Member since
    March 2010
  • From: Democratic Peoples Republic of Illinois
Posted by Hercmech on Friday, September 16, 2011 8:19 AM

Another fantastic build log! Can't wait to see this one done. I really like the carpet. My wife has a car in work and I was wondering what she could use to sim the carpet. Off to Hobby Lobby. Thanks for the tip Karl!


13151015

  • Member since
    January 2007
Posted by the doog on Friday, September 16, 2011 8:58 AM

Spruce-ce Goose -- thanks for the comments and compliments! Smile This car is one of my favorites, and I'm just trying to do it justice. The kit is pretty rough--I wish they'd do a re-pop, and with proper decals! I'm going to have to mask off that hood and try to get that fine line around the blackout somehow! Hmm

Yeah, I've been watching that discussion too.....Confused...I hope I"m doing my part here in this WIP to show that people with high post counts also are actually still modeling while posting replies to "off topic" threads too...Wink This is the way I'd prefer to see post counts increased! Big Smile

Hercmech--Thank you also, and great!!-- I'm happy to hear that you've picked up the idea of the powder too! Smile It was a great tip that James of "JTRacing" gave to me, and it's been a BIG improvement to my Auto modeling! Credit where credit's due! I'm sure she'll love the ease of working with it and the realistic texture! Good luck, and thanks again for looking in!

Vance-- Thanks too, for looking in and leaving a comment! It got me thinking--Orange '71 Mach 1's seem to be a rarity? However, I found yours here...Big Smile Yeah, I gotta admit; it's a pretty hot color...the, uh...car, I mean..Stick out tongue

Anyway---I want to thank you guys again for looking in and for taking the time to comment even after some of the more contentious threads in the O&E forum might have seen us on opposite sides of the argument...I just want you to know that it is appreciated and genuinely appreciated. After all is said and done, modeling is really what brings us all here. Thanks, guys! Wink

  • Member since
    September 2005
  • From: Illinois: Hive of Scum and Villany
Posted by Sprue-ce Goose on Friday, September 16, 2011 11:19 AM

Doog:

Thanks for the comments.

Please continue being a build-posting example to all of us.

As to the photo of the Orange '71 Mach 1....I admit I'm attracted to that model's long....er..............hood Embarrassed

ever since the movie " Diamonds Are Forever " .

  • Member since
    March 2010
  • From: Buffalo, NY
Posted by macattack80 on Friday, September 16, 2011 3:19 PM

Thanks for the advice and info Doog.  Much appreciated.  I will give the embossing powder a try. 

Kevin

[


  • Member since
    August 2006
  • From: Cygnus X-1
Posted by ogrejohn on Friday, September 16, 2011 6:43 PM

the doog


 ogrejohn:


That is some fine looking work on the interior Doog! Where do you get those embossing powders? Once I finish off a couple of armors I'm working on I'm thinking of doing an AAR Cuda I have in the stash.


Thanks, Jon!


I found my powders at Hobby Lobby, but I'm sure that Michael's or AC Moore's has em too! They're under $10.00, I believe?

That AAR kit is cool--I have one myself! Stick out tongue

Thanks Karl, I'll check the local Hobby Lobby. I've going to paint my AAR up in either Sub-lime green or the Plum-crazy purple.

  • Member since
    January 2007
Posted by the doog on Saturday, September 17, 2011 2:18 PM

Kevin--I know you'll love that powder! Smile

John--those are EXACTLY the colors I would use, lol!

MCW paints have exact matches for both, by the way--I wouldn't use anything else! Wink

  • Member since
    March 2006
  • From: Right Side of a Left State
Posted by Shellback on Sunday, September 18, 2011 12:31 AM

the doog


http://i170.photobucket.com/albums/u244/heydoog/Model%20Cars/100_0562.jpg


Sweet looking color "the doog " ! Interior is top notch also .Yes

Told you i'd be over to take a look .Beer

  • Member since
    January 2007
Posted by the doog on Sunday, September 18, 2011 9:11 AM

Shellback


 the doog:


Sweet looking color "the doog " ! Interior is top notch also .Yes

Told you i'd be over to take a look .Beer

Thanks, Carl--I appreciate that! Beer ("clink"!) Big Smile

JOIN OUR COMMUNITY!

Our community is FREE to join. To participate you must either login or register for an account.

SEARCH FORUMS
FREE NEWSLETTER
By signing up you may also receive reader surveys and occasional special offers. We do not sell, rent or trade our email lists. View our Privacy Policy.