SEARCH FINESCALE.COM

Enter keywords or a search phrase below:

M55 Quad 50 Vietnam crew - Completed 06/15/2010

16741 views
43 replies
1 rating 2 rating 3 rating 4 rating 5 rating
  • Member since
    May 2009
  • From: Poland
M55 Quad 50 Vietnam crew - Completed 06/15/2010
Posted by Pawel on Thursday, October 15, 2009 8:12 AM

Hello everybody!

I'd like to share my current work with you all. It's a gunner for my M55 Quad 50 serving in Vietnam. I'm building it from the recent relase of the company which sponsors strange bloggers (aka Dragon). Well the kit gets you a gunner, but he wears a very typical WWII uniform, so I decided to modify him. Here's what I did so far: I sawed off his boots and replaced them with jungle boots taken out of older Dragon figure kit. I had to bend the tips some, so the fit inside the armor. I did it Hans von Hammer style (means using open flame - Danke Schon Hans!) and then puttied them a bit and rescribed the soles. I also puttied and sanded the parka an added six pockets in total - two for the pants and four for the parka. In order for the lower pockets to fit I lengthened the body a bit (under the belt) withsome sheet styrene. The pockets are also thin sheet styrene glued with plastic putty and softened with liquid glue (nail lacquer remover would do also) and preshaped while soft. 'Nuff said here is the picture:

M55 Quad 50 Vietnam gunner

As always, I'm waiting for your comments. Thanks in advance and have a nice day

Pawel

All comments and critique welcomed. Thanks for your honest opinions!

www.vietnam.net.pl

Mic
  • Member since
    June 2009
  • From: AusTx, Live Music Capitol of the World
Posted by Mic on Thursday, October 15, 2009 8:51 AM

Nice conversion work goin' on here. Looking forward to seeing more.

Steve


Steve M.

On the workbench: every tool, paint, brush, glue I own

  • Member since
    May 2009
  • From: Poland
Posted by Pawel on Monday, October 19, 2009 9:08 AM

Thanks for Your comment, Steve. I'm on a business trip in Germany now and I'll get back to work as soon as I'm in Poland again. Stay tuned and have a nice day

Pawel

All comments and critique welcomed. Thanks for your honest opinions!

www.vietnam.net.pl

  • Member since
    December 2003
  • From: Colorado
Posted by psstoff995 on Monday, October 26, 2009 11:29 PM
Wow- looking great so far, can't wait to see him finished up- and also with the M55!

-Chris

US Army Infantryman

  • Member since
    May 2009
  • From: Poland
Posted by Pawel on Wednesday, October 28, 2009 6:42 AM

Hello everybody!

Thanks for the comment Chris, how's Your Vietnam dio movin' on? Just can't get enough of nice 1/35 M151'sBig Smile [:D]

And now! ... here's an update.What I did last week was converting the gunner's arms to something more resembling the uniforms worn in Vietnam. I resculpted the cuffs, using pin files and a scalpel with a triangular blade. Let's see two of my favourite before&after photos. On the right - before, on the left - after:

Quad 50 gunner Vietnam

Quad 50 gunner Vietnam

Next came the time to put the main parts together. At this time I had to ensure the man will fit the machine. My method for such things is to join the parts with acetone or other solvent, that melts the plastic and add some acetone-soluble filler to the joint. This allows for joint that stay somewhat flexible for like half an hour plus after it all dries you don't have to putty the joint, just sand it. I dry-fitted the gunner to the gun mount ant also put the steereing yoke in, to adjust the arms, and this is what it looked like in the end:

Quad 50 gunner Vietnam

I'll let the figure dry really good and then sand it some. In the meantime I'd like to ask You all for help:

What would be the correct cover/headgear for the Quad 50 gunner in Vietnam? Thanks a lot in advance,have a nice day

Pawel

All comments and critique welcomed. Thanks for your honest opinions!

www.vietnam.net.pl

  • Member since
    December 2003
  • From: Colorado
Posted by psstoff995 on Wednesday, October 28, 2009 11:57 PM

Hey- thanks for remembering that one- I'm sorry to say is hasn't moved along much at all. I had a hang up trying to figure out what to use for vegitation. Then durring the down time I, of course, started a few other projects. I have it sitting right next to my bench though and really want to start back into it- I managed to find some good materials for vegitation at Michaels so we'll see how it turns out, I hope to get started on it again before Xmas.


Let me just say WOW!! That's a great fit, he looks right at home. Nice work on the cuffs.

As for the head gear, I'd think the standard M1 would work fine, although after a quick Google search, it looked like the only pictures of M55 gunners looked like they were from WWII.


-Chris

US Army Infantryman

  • Member since
    May 2009
  • From: Poland
Posted by Pawel on Thursday, October 29, 2009 3:13 AM

Thanks a lot Chris, looking forward to see more of Your Vietnam dio!

Steel helmet won't be too hard to do, it still leaves me three options: without liner, with liner but not too heavily loaded or packed with cigarettes, TP and bug juice. As the gunner doesn't wear the web gear, I don't thing going for the "loaded" helmet would be correct, what do you think? Anyhow, happy modeling and have a nice day

Pawel

All comments and critique welcomed. Thanks for your honest opinions!

www.vietnam.net.pl

  • Member since
    May 2009
  • From: Poland
Posted by Pawel on Tuesday, November 10, 2009 5:45 AM

Hello everybody,

movin on with the build. Recently I dry-fitted the steel pot and primed the face and the hands with Humbrol paint. One it dries, I'll do the hard work - I'll paint the face. For now it looks like this:

Quad 50 Vietnam gunner 1:35

It looks like there are going to be some problems with fitting the shield, due to his feet, but that'll have to wait a little, until he's permanently fixed.

Please stay tuned, looking forward to your comments, have a nice day

Pawel

All comments and critique welcomed. Thanks for your honest opinions!

www.vietnam.net.pl

  • Member since
    December 2003
  • From: Colorado
Posted by psstoff995 on Tuesday, November 10, 2009 7:51 AM
Steel pot's looking good- sorry to hear about the feet, but other than that- can't wait!

-Chris

US Army Infantryman

  • Member since
    May 2009
  • From: Poland
Posted by Pawel on Monday, November 16, 2009 7:43 AM

Hello everybody!

I moved on with painting the flesh. First I painted the shadows with diluted artist oil, the only one I have, dark brown (I think it's called burnt umbra):

Quad 50 Vietnam gunner 1:35

Then, after it dried slightly I mixed some humbrols andstarted painting the highlights. The shadows didn't want to "stay down", the face was to dark and to brown for me:

Quad 50 Vietnam gunner 1:35

So I mixed more white and yellow and went on with the highlights. I also start to see my lighting is insufficient. Now the fig looks like this:

Quad 50 Vietnam gunner 1:35

How do you like the fingernails? By the way, I think Dragon did a really good job on sculpting this face. Looking forward to your comments, have a nice day

Pawel

All comments and critique welcomed. Thanks for your honest opinions!

www.vietnam.net.pl

  • Member since
    May 2009
  • From: Poland
Posted by Pawel on Wednesday, November 18, 2009 5:10 AM

Hello!

No comments? Pity.. Movin' on! I finished the face, painted the eyes, eyebrows and lower lip. I tried to use subdued colors, that means light gray instead of white, dark grey instead of black and for the lip I mixed tan and a little red.

In the meantime I made the helmet. I took it from Dragon's 1st Cav kit (number 3312) together with the insect repellant bottle (I think it was dubbed Bug Juice in vietnam). I replaced the missing part of the universal strap with thin styrene sheet. Like this:

Vietnam Quad 50 gunner 1:35

Vietnam Quad 50 gunner 1:35

Vietnam Quad 50 gunner 1:35

Then I primed the helmet with olive drab, and after it dried I went to paint the mitchell pattern on the helmet cover. I began with a light coat of sand with a little green mixed in. On this coat I painted the "leaves", first with dark green, then with a little lighter green. Finally I added a few tan spots and to finish it off I lightly dry-brushed the helmet with the sand/green base coat. Here's what it looks like now:

def

Then I primed the uniform with dark green, and finally here comes the picture of the whole figure:

Vietnam Quad 50 gunner 1:35

Vietnam Quad 50 gunner 1:35

After that I painted the shadows and highlights and the figure started to look like this:

Vietnam Quad 50 gunner 1:35

Vietnam Quad 50 gunner 1:35

And that would be it for now, like they say, critics and comments welcome. Happy modelling to all and have a nice day

Pawel

All comments and critique welcomed. Thanks for your honest opinions!

www.vietnam.net.pl

  • Member since
    April 2009
  • From: Carmel, IN
Posted by deafpanzer on Wednesday, November 18, 2009 9:57 PM

Nice work on the helmet camo!  Your figure looks better now.  I followed Bodge's toot he posted a while ago about figure painting and it helped me alot... but still needs lots of practice to make do it right.  It is a nice break for us to see GI from Vietnam War era instead of WW2 or Gulf Wars...

Andy

  • Member since
    May 2009
  • From: Poland
Posted by Pawel on Wednesday, December 9, 2009 4:36 AM

Thanks for the comment deafpanzer, and please excuse me you had to wait for my reply that long. It's always good to see a tutorial but due to different materials everybody uses and even different perception of many things, in the end you just have to practice - it's a bit like playing music, reading about it doesn't get you very far, does it? So here I am, practicing on a Vietnam GI. I thought the jacket had a bit too little shadows, so I tried to add more, I painted the jungle boots and the helmet and the belt. I'm not entirely satisfied, but I think I'm going to call the gunner mission capable now Smile. Here's what he looks like:

Quad 50 Vietnam gunner

Quad 50 Vietnam gunner

Quad 50 Vietnam gunner

One more note, the boot tips look a bit funny, because they need to be trimmed some more in order not to interfere with the front shield of the quad 50. Watch the armor forum HERE for more details. As always I look forward to hear your comments and wish everybody a nice day

Pawel

All comments and critique welcomed. Thanks for your honest opinions!

www.vietnam.net.pl

  • Member since
    September 2004
  • From: Tulsa, Oklahoma
Posted by mm23t on Friday, December 11, 2009 4:03 PM

Nice job on the figure. Be interesting to see everything in position when the quad is finished.

Medals are not "Won", they are "Earned".

Mike..


  • Member since
    May 2009
  • From: Poland
M55 Quad 50 Vietnam crew chief
Posted by Pawel on Wednesday, February 10, 2010 6:31 AM

Hello everybody, it's been a long time since I did something with figures, but my quad 50 diorama is movin' on and I decided to add more figures. I'm planning to build a crew chief, I think I'll call him "sarge" and two ammo loaders. I plan to modify the old Tamiya 35079 "Command" set, since it's a good source of Vietnam-era US soldiers WITHOUT load carrying equipment.

So here comes the sarge, out of the box he looks like this:

US NCO in Vietnam 1:35 by Pawel Mroczkowski

The resin head is from Squadron's head set number 7, just after taking the foto I saw that mean air bubble right on the tip of his nose. Gonna hafta fill that - wonder how... Anyhow I plan to transplant this head onto the rest of the figure.

US NCO in Vietnam 1:35 by Pawel Mroczkowski

There's also quite a bit of a sink hole on his back, this is going to be filled too. Sarge is going to carry a pistol with holster, other than that he's going to travel light.

As usual I'm looking for your comments, thanks for reading and have a nice day

Pawel

All comments and critique welcomed. Thanks for your honest opinions!

www.vietnam.net.pl

  • Member since
    May 2009
  • From: Poland
Posted by Pawel on Tuesday, March 9, 2010 9:31 AM

Hello!

It's been a while, but I have some progress for you - if anybody is interested, that is. What I did is I filled the hole in sarge's back and glued the pockets on his trousers. They were made of sheet styrene and then soaked in MEK (nitro thinner) and glued on with a mixture of MEK and surface putty and left to dry throughly. It looked like on the foto:

1:35 Vietnam Quad 50 crew by Pawel Mroczkowski

In the meantime I filled the nasty pinhole just on the tip of sarge's nose. I did this by glueing a little piece of stretched sprue in the hole, like on the foto below - just can't seem to get it in focus. Then I cut off the excess and gently sanded the remainder.

1:35 Vietnam Quad 50 crew by Pawel Mroczkowski

1:35 Vietnam Quad 50 crew by Pawel Mroczkowski

Then I sculpted the trousers' pockets with a tip of a scalpel, and then sarge lot his head - cut off with a razor saw:

1:35 Vietnam Quad 50 crew by Pawel Mroczkowski

Then I drilled out the old neck and cut the resin head to fit. This allowed to shape the collar nicely, by the way.

1:35 Vietnam Quad 50 crew by Pawel Mroczkowski

The foto below shows the test fit of the new head - sarge starts to look mean now.

1:35 Vietnam Quad 50 crew by Pawel Mroczkowski

I already primed the face and started to work on the hands. Please stay tuned and let me know, what do you think. I wish you all a nice day

Pawel

All comments and critique welcomed. Thanks for your honest opinions!

www.vietnam.net.pl

  • Member since
    April 2008
  • From: Ventura (at the beach) in California
Posted by *INDY on Tuesday, March 9, 2010 9:35 PM

Looking very cool here Pawel!  Good to see somebody doing some real modelling!! the Gunner looks tuff Man--keep that up!


"Well...you gunna pull them pistols, or just whistle Dixie?"

  • Member since
    May 2009
  • From: Poland
Posted by Pawel on Wednesday, March 10, 2010 10:13 AM

Thanks for the comment, Indy!

Glad you like it, I hope the sarge is going to look even a little tuffer - let's see if I can pull this off. That still leaves two loaders I have to do yet. Please stay tuned and have a nice day

Pawel

All comments and critique welcomed. Thanks for your honest opinions!

www.vietnam.net.pl

  • Member since
    May 2009
  • From: Poland
M55 Quad 50 Vietnam crew chief and loader
Posted by Pawel on Thursday, March 25, 2010 5:39 AM

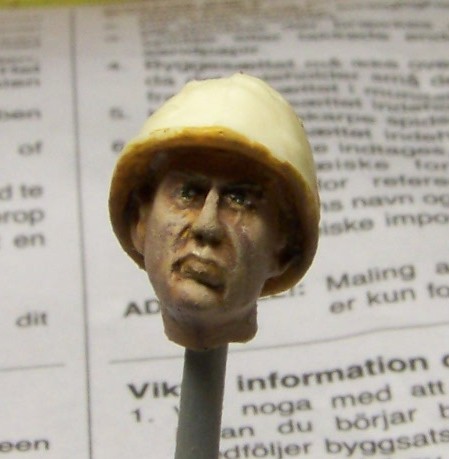
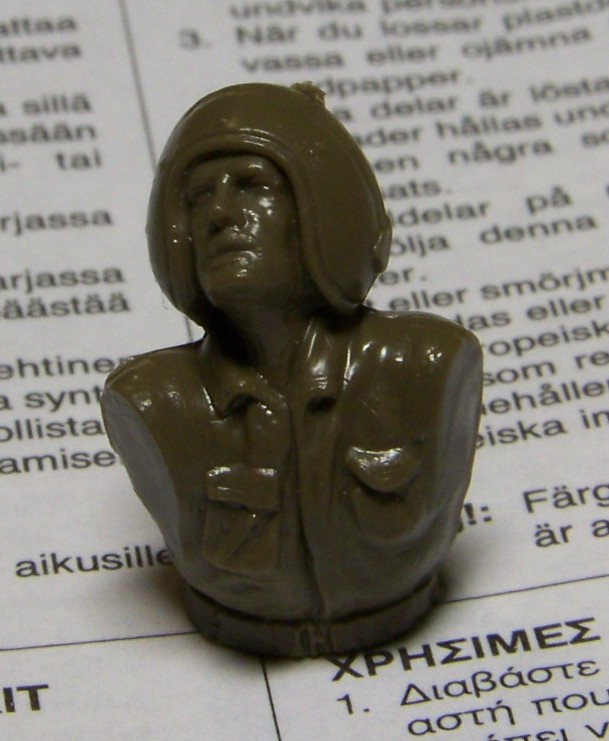
OK gennulmen (and maybe even ladies - who knows?), I'm movin' on with the figures. After priming sarge's face and hands with Humbrol 63 I left the parts to dry for several days (just because I didn't feel like touching it). Then I was doing a dark brown oil was for my dio and had a little left, so in an impulse I used it up on sarge. When that was done I had no other option as to proceed, to get that wet-on-wet effect. I used Humbrol flat white mixed with a little fleshtone for the highlights. Here's what it looked like after the shading:

1:35 Quad 50 Vietnam crew by Pawel Mroczkowski

1:35 Quad 50 Vietnam crew by Pawel Mroczkowski

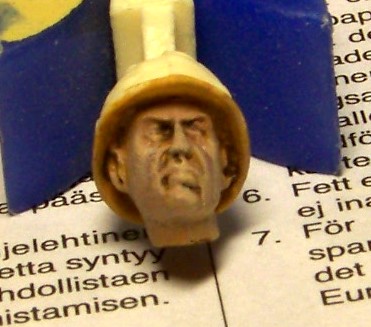
Then I left it to dry for a day or two and went on and painted the lower lip, eyes and eyebrows. For eyes I used light gray for the whites and dark gray for the iris (and for the eyebrows). I also applied minimal quantities of black future wash to the eyes and the lips so they look a little wet. Now the sarge looks like this:

1:35 Quad 50 Vietnam crew by Pawel Mroczkowski

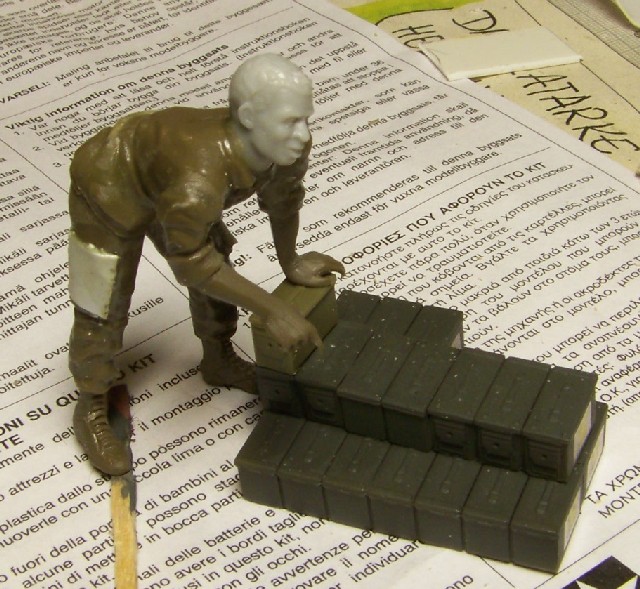
Motivated by results I liked, I went on to the first ammo loader figure. I used the "leaning tanker" from the same Tamiya command figure set as basis. Out of the box he looks like this:

1:35 Quad 50 Vietnam crew by Pawel Mroczkowski

1:35 Quad 50 Vietnam crew by Pawel Mroczkowski

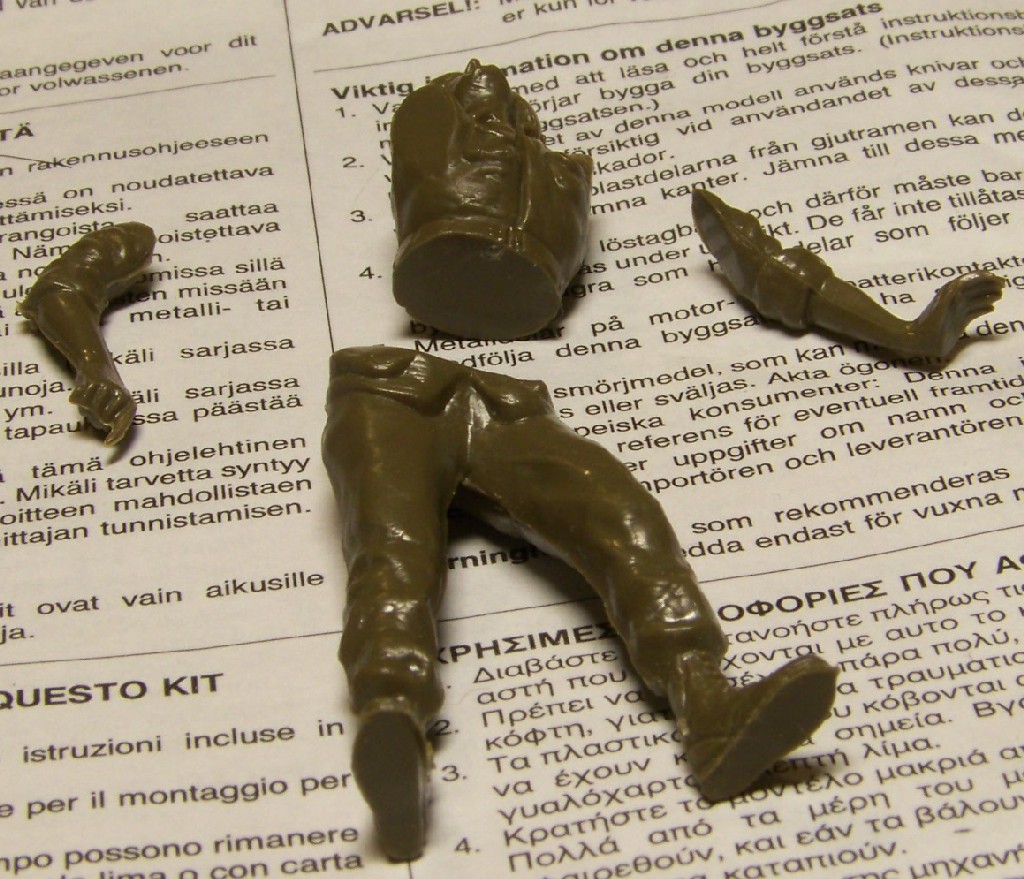
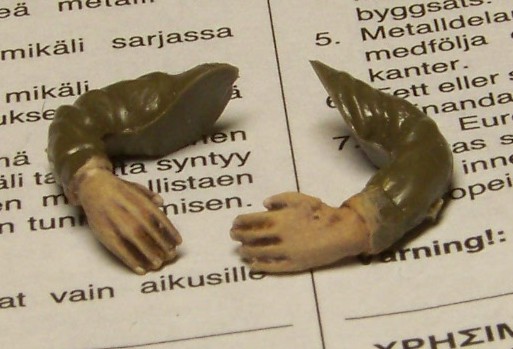
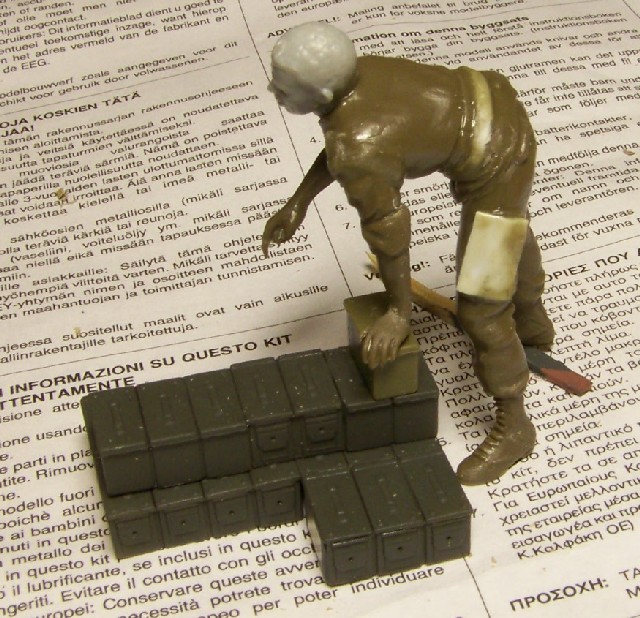
Let's see what I can do out of this. First I chopped the head off (but carefully - those tanker helmets are hard to come by) and drilled the neck out. I found a nice head in the Dragon set number 3305 U.S. MARINE (TET OFFENSIVE, 1968) - it was intended for the guy caring his wounded buddy on his back. I was able to mate the torso and the head. I inserted a shim between torso and legs, to make the figure bend a little lower. I also modified the legs with cargo pockets for the trousers, again using my old trick with plastic sheet and filler. The Tamiya figure can really benefit from a through cleanup. Using the tip of the blade you can do wonders on the jungle boots, for example. Then I started putting the man together using nitro solvent mixed with plastic filler. This way I get a joint that is posable for about half an hour and I can shape the excess with brush soaked in solvent to smooth the joint, so that when it dries no filling is necessary - just filingBig Smile. The downside to it is the joints need a few days to cure completely - but I have enough other work to switch to, so it's no big deal. That's what I got at this point:

1:35 Quad 50 Vietnam crew by Pawel Mroczkowski

1:35 Quad 50 Vietnam crew by Pawel Mroczkowski

I think the guy's name is Brownie. That still leaves one loader to do. Please write me what do you think, and have a nice day

Pawel

All comments and critique welcomed. Thanks for your honest opinions!

www.vietnam.net.pl

  • Member since
    May 2009
  • From: Poland
Posted by Pawel on Thursday, April 22, 2010 8:31 AM

And after almost a month later and no commnets I got myself together to start building the second loader - the last figure I need for the dio. I still have two figs left from the Tamiya Command Set so I decided to modify one of them. But I also chose one of many heads I have in stash for the figure:

1:35 Quad 50 Vietnam loader by Pawel Mroczkowski

Were talking about the one that's foremost in the foto above. Though it can't be seen, the hat is damaged and I didn't like the hat itself anyhow (too civilian looking for me), so I cut it away. I'll substitute a boonie hat from the Dragon's Green Berets set instead.

So here's what I have to work with:

1:35 Quad 50 Vietnam loader by Pawel Mroczkowski

We have the rather ridiculously posed "leaning against a table" figure from the command set, the resin Verlinden head with the hat cut off and a boonie hat from Dragon. Let's see what can be done! First I cut the styrene head off and drilled out the neck. After that fitting the resin head was easy. Then I cut off the lower portion of the torso. In the upper part I cut off the pockets, that were ugly anyhow, and drilled two holes: one for the "backbone" and one for the arm. I made the "backbone" from copper wire and glued it in, watching for proportions of the fig. The legs is the only part of the figure that I'm leaving uncut. Then I took the right arm and cut it in three pieces. I drilled a hole in each part and connected them with a single piece of copper wire. The left hand, which will be holding a jerry can, didn't need that much modifications - I only cut the hand off, modified the fingers and the thumb and reattached it with a short piece of wire. At last the foto of my work so far, posed to show what I have in mind:

1:35 Quad 50 Vietnam loader by Pawel Mroczkowski

There is all the filling and cleaning left, but I hope to be moving in the right direction. I think the guy is called "Scarecrow". Please let me know what do you think, have a nice day

Pawel

All comments and critique welcomed. Thanks for your honest opinions!

www.vietnam.net.pl

  • Member since
    April 2009
  • From: Carmel, IN
Posted by deafpanzer on Thursday, April 22, 2010 8:05 PM

WOW!  Looking great... you are brave enough to chop those figures up.  I haven't reached this point yet.  I have been following your process and I am looking forward to see it completed. Yes

Andy

  • Member since
    April 2008
  • From: Ventura (at the beach) in California
Posted by *INDY on Thursday, April 22, 2010 10:04 PM

Hey PaweL ~~!

What's up Buddy? Sorry  I missed that last post (musta been on the wrong day or somthing?) I thought I was looking out for updates on this----

~~What I think is....these figures are really cool conversions and this build is going to be great when it comes together!!

~~What I think is-- this photo alone reveals much about how-to convert  figures!


http://www.vietnam.net.pl/M55/scarecrow03.jpg

He will be great---one thing---work on this more and post more often! Wink

"Well...you gunna pull them pistols, or just whistle Dixie?"

  • Member since
    May 2009
  • From: Poland
Posted by Pawel on Friday, April 23, 2010 4:23 AM

Andy & Adam -thanks for the comments!

Andy - as I checked personally, the border between courage and stupidity is thin and pretty softBig Smile Plus, what other options do I have to get the figs I want? Plus, the Tamiya figs gor really cheap, so the risk isn't big, and the potential gain is attractive, don't you think? Go get a cheap figure set and try to tweak it, it's a lot of fun!

Adam - well I tried to be more like you Stick out tongue so people can learn from my posts too. Now updates are going to be a problem for next two weeks, as I have to go for a business trip the next days, but I hope as a modeller you are patient, aren't you?

And here are my attempts at sculpting. I filled the gaps in Scarecrow's figure wiith black Milliput, and after I had some excess Milliput left, I decided to go on and did the six pockets on his uniform. I decided to depict a pose often seen in the fotos, but not done in scale - a figure with no load bearing equipment and with the jacket worn "outside". Here's what it looks like before cleanup:

1:35 Quad 50 Vietnam ammo loader by Pawel Mroczkowski

1:35 Quad 50 Vietnam ammo loader by Pawel Mroczkowski

Hope you like it, waiting for your opinnions. See you later

Pawel

All comments and critique welcomed. Thanks for your honest opinions!

www.vietnam.net.pl

  • Member since
    May 2009
  • From: Poland
Posted by Pawel on Wednesday, May 26, 2010 6:11 AM

OK, I painted Brownie's and Scarecrow's faces recently. Scarecrow was easy because of the sunglasses. Brownie gave me some more challenge, because of the dark skin tone. So I used brown instead of sand for base and black instead of brown for the first wash. And it seems to be working - judge yourselves:

1:35 Quad 50 Vietnam crew by Pawel Mroczkowski

Still waiting for your comments, have a nice day

Pawel

All comments and critique welcomed. Thanks for your honest opinions!

www.vietnam.net.pl

  • Member since
    May 2010
Posted by OttoVonStapleNuber on Thursday, May 27, 2010 12:36 AM

This is looking real interesting. I look forward to seeing this take shape.

  • Member since
    May 2009
  • From: Poland
Posted by Pawel on Thursday, May 27, 2010 4:23 AM

Thanks a lot for your comment Otto! If you like my work, you can also check the related threads here and here. Thanks again and have a nice day

Pawel

All comments and critique welcomed. Thanks for your honest opinions!

www.vietnam.net.pl

  • Member since
    April 2008
  • From: Ventura (at the beach) in California
Posted by *INDY on Thursday, May 27, 2010 9:24 AM

Eh,Pawel, whata ya say 'ole Buddy? I'm happy to see you've been working on this some--that guy is black-no doubt about it--a challenge to get right, Im sure--good job--I haven't tried much racially speaking with modelling...pretty interesting--there's no accounting for the light guest count--nothing really moves on this forum--a true static model forum Dead

I hope to see more from you on this soon~! I promise to keep my eyes peeled this time Hmm

"Well...you gunna pull them pistols, or just whistle Dixie?"

  • Member since
    May 2009
  • From: Poland
Posted by Pawel on Thursday, May 27, 2010 9:46 AM

Hello Adam, good to hear from you. Yeah, I worked on my dio some, if you'd be so kind as to check in the armor forum you could find my Quad 50 completed at last!

Now I'm trying to paint the uniforms with nice shading and then I'll be able to move to the final assembly of the dio. I sure move on slowly, but - whaddya gonna do?Big Smile

Bad thing is the forum is even slower - last time I counted three new posts to the figures forum A DAY. Clearly the customers aren't satisfied - bad on ya FineScale! Suppressing the freedom of speech and not responding to complaints on time comes back, not only hurting Finescale, but also the community. Pity.

But let's not be too pesimistic - I'm waiting for your next build Adam and wish you, as always, a nice day

Pawel

All comments and critique welcomed. Thanks for your honest opinions!

www.vietnam.net.pl

  • Member since
    May 2009
  • From: Poland
Posted by Pawel on Wednesday, June 2, 2010 4:42 AM

Hello!

Not a big thing today - I painted the helmets. They turned out a little dark, so maybe I'll totally repaint one of them. I also painted Scarecrow's boonie hat. Here's what it looks like:

1:35 Vietnam Quad 50 crew by Pawel Mroczkowski

1:35 Vietnam Quad 50 crew by Pawel Mroczkowski

Hope you like it, have a nice day

Pawel

All comments and critique welcomed. Thanks for your honest opinions!

www.vietnam.net.pl

  • Member since
    April 2009
  • From: Carmel, IN
Posted by deafpanzer on Thursday, June 3, 2010 12:49 AM

Looking great especially the camo... I recall it goes lighter as its color fades over time.  I am not a veteran but looking at hundreds of pictures so your work looks good to me. 

Andy

JOIN OUR COMMUNITY!

Our community is FREE to join. To participate you must either login or register for an account.

SEARCH FORUMS
FREE NEWSLETTER
By signing up you may also receive reader surveys and occasional special offers. We do not sell, rent or trade our email lists. View our Privacy Policy.