SEARCH FINESCALE.COM

Enter keywords or a search phrase below:

1/24 A-Wing buildup

5008 views
51 replies
1 rating 2 rating 3 rating 4 rating 5 rating
  • Member since
    March 2007
  • From: Atlanta, Ga.
Posted by MrSquid2U on Saturday, December 5, 2009 5:25 PM

This one is wrapped up.Party [party]


  • Member since
    March 2007
  • From: Atlanta, Ga.
Posted by MrSquid2U on Saturday, December 5, 2009 3:33 AM

A final tweeking was needed on the canopy assembly which once I had glued the "glass" inside the frame caused it be more rigid and no longer fit as I had tested it prior to paint.
 So I fashioned a shim which once glued below the framing allowed me to sand and fine tune it.
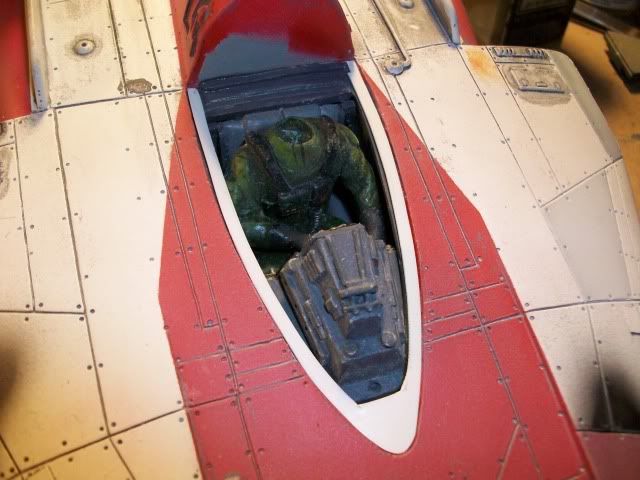
 The canopy now snaps down into the trench and remains removable in case you want to turn/elevate the pilots head or just see the instrument lights display easier.Wink [;)]


Next, work up the final display shots.


  • Member since
    March 2007
  • From: Atlanta, Ga.
Posted by MrSquid2U on Friday, December 4, 2009 11:36 AM

 TD4438 wrote:
Lookin' good dude.Can't wait to see this one finished.


Thanks for that, and I'm hoping we'll all see the finished product later tonite even.Dinner [dinner]


  • Member since
    March 2006
Posted by TD4438 on Friday, December 4, 2009 9:30 AM
Lookin' good dude.Can't wait to see this one finished.

  • Member since
    March 2007
  • From: Atlanta, Ga.
Posted by MrSquid2U on Friday, December 4, 2009 4:24 AM

Meanwhile on the bench, the canopy and guns were detailed and finished up while the final spraying, of blast marks and engine "soot" were wrapped up.


  • Member since
    March 2007
  • From: Atlanta, Ga.
Posted by MrSquid2U on Tuesday, December 1, 2009 7:34 PM

 richter111 wrote:
That is looking really good.  The lighting is kicking this up a whole new level.


Sorry to catch this "late"- but thanks for the kind words.Cool [8D]


  • Member since
    March 2007
  • From: Atlanta, Ga.
Posted by MrSquid2U on Tuesday, December 1, 2009 7:25 PM

Just a quick shot of some weathering:


(And-thanks JG!)


  • Member since
    June 2004
  • From: The House of Blues Clues
Posted by Griffworks on Friday, November 27, 2009 4:46 PM

Excellent work, as always, Don.


The greatest measure of a man is his children and what kind of people they are.


  • Member since
    November 2003
Posted by richter111 on Friday, November 27, 2009 1:58 PM
That is looking really good.  The lighting is kicking this up a whole new level.
  • Member since
    March 2007
  • From: Atlanta, Ga.
Posted by MrSquid2U on Thursday, November 26, 2009 10:47 AM
And here it is in basic paint. All the weathering is yet to come.


  • Member since
    March 2007
  • From: Atlanta, Ga.
Posted by MrSquid2U on Monday, November 23, 2009 6:53 PM
 427 Cobra wrote:

Damn it,Don! Slow down,and give me a chance to catch up with you! Smile,Wink, & Grin [swg]  I'm still in the planning stages of the fuselage for my X kit. The tiny details are the best. They're also my favourite part of any build. I think this is one of the best I've seen in a while.

~ Cobra

Well. It's obviously easier to modify a kit than to scratchbuild something from nothing! You're making your own excellent progress and I'm hoping to see you move towards paint soon as well. Meanwhile though, thanks for the kind words!Big Smile [:D]


  • Member since
    September 2009
Posted by Cobra 427 on Monday, November 23, 2009 4:07 PM

Damn it,Don! Slow down,and give me a chance to catch up with you! Smile,Wink, & Grin [swg]  I'm still in the planning stages of the fuselage for my X kit. The tiny details are the best. They're also my favourite part of any build. I think this is one of the best I've seen in a while.

~ Cobra

Maybe a picture of a squirrel playing a harmonica will make you feel better?


  • Member since
    March 2007
  • From: Atlanta, Ga.
Posted by MrSquid2U on Monday, November 23, 2009 7:00 AM

 TANGO 1 wrote:
Nice work, all those little details will certainly add to the overall finish of the model.Thumbs Up [tup]


Of course that's what I hope?

We'll see soon since it moved into paint last night.Wink [;)]

And, thank you.Cool [8D]


  • Member since
    December 2002
  • From: A secret workshop somewhere in England
Posted by TANGO 1 on Sunday, November 22, 2009 10:47 AM
Nice work, all those little details will certainly add to the overall finish of the model.Thumbs Up [tup]
Regards, Darren. C.A.G. FAA/USNFAW GB
  • Member since
    March 2007
  • From: Atlanta, Ga.
Posted by MrSquid2U on Saturday, November 21, 2009 9:36 PM
Wrapping up some final details caused me to notice those elbow pipes from rear fuselage bulkhead to engine cans. While they were just "fine" I wanted a little 'more' so chopped up some tubing and put it on the ends.


  • Member since
    December 2002
  • From: A secret workshop somewhere in England
Posted by TANGO 1 on Friday, November 20, 2009 6:30 PM
You're welcome. I'll have to find myself something nice n' easy to start off with.Wink [;)]
Regards, Darren. C.A.G. FAA/USNFAW GB
  • Member since
    March 2007
  • From: Atlanta, Ga.
Posted by MrSquid2U on Friday, November 20, 2009 6:09 PM

 TANGO 1 wrote:
Looks great! I love all the lighting effects, I really must have a go at something like that one day. I love the engine pics! Nice work on the 'pit and guns too!Thumbs Up [tup]


Yeah, go get yourself something like it and have fun!

Thanks for the kind words CAG.Smile,Wink, & Grin [swg] 


  • Member since
    December 2002
  • From: A secret workshop somewhere in England
Posted by TANGO 1 on Friday, November 20, 2009 1:35 PM
Looks great! I love all the lighting effects, I really must have a go at something like that one day. I love the engine pics! Nice work on the 'pit and guns too!Thumbs Up [tup]
Regards, Darren. C.A.G. FAA/USNFAW GB
  • Member since
    March 2007
  • From: Atlanta, Ga.
Posted by MrSquid2U on Friday, November 20, 2009 1:20 PM
After some redetailing and rescribing went ahead and added the remaining parts to move towards paint.


  • Member since
    March 2007
  • From: Atlanta, Ga.
Posted by MrSquid2U on Monday, November 16, 2009 9:35 PM

And I gave em those lil transfer tubes but decided to add "fittings" at their ends.


  • Member since
    March 2007
  • From: Atlanta, Ga.
Posted by MrSquid2U on Monday, November 16, 2009 4:17 PM
I'd found the panel mount rocker switch at an auto=parts store and it was meant for twelve volts. Two problems, I'm running nine and it was an incandescent bulb. While there wasn't much room inside the case after the mechanism is accounted for I did squeeze a new red led into it which now shines much better through the switch when it's "on". Nevermind the blue lens. That's off another "donor" switch.


 And I completed the new guns. I wanted a better mount between the upper and lower assemblies, with more contact area to glue and stay put. So I fashioned one piece brackets that are then sunk into each barrel.


  • Member since
    March 2007
  • From: Atlanta, Ga.
Posted by MrSquid2U on Thursday, November 12, 2009 8:10 PM

Here's the base painted up with the connections finished. To service the battery you just lift the lid off. It still needs one more application of "stained glass leading" around the edge of the mirror, after this cures and shrinks.


  • Member since
    March 2007
  • From: Atlanta, Ga.
Posted by MrSquid2U on Tuesday, November 10, 2009 7:15 PM

 3d-modeler wrote:
It makes a lot of sense....thought you were safe here nice try!!!LOL
Looking excellent all over the place looking forward to paint and
beauty shots of my favorite fighter!!!


Are you stalking me?


LOOK, over there. SHINEY! (As I runaway!)


Tongue [:P]

Thanks MP!Wink [;)]


  • Member since
    October 2009
Posted by 3d-modeler on Tuesday, November 10, 2009 5:40 PM
It makes a lot of sense....thought you were safe here nice try!!!LOL
Looking excellent all over the place looking forward to paint and
beauty shots of my favorite fighter!!!
  • Member since
    March 2007
  • From: Atlanta, Ga.
Posted by MrSquid2U on Tuesday, November 10, 2009 3:37 PM

After studying the studio filming mini I realized all of the sidewall detail with that torpedoe launch bay had been "added"? Now the Studio mini has a flat rear wall but I went with the thought that any engineer would have made it a "tube".

I've "frenched" styrene tubing into the sides and just need to do some finish work. IMHO it will look the part but also in my opinion, it will just look "right", if that makes sense?


  • Member since
    March 2007
  • From: Atlanta, Ga.
Posted by MrSquid2U on Saturday, November 7, 2009 7:53 PM

So, here's an engine light test.


BTW- those darker pictures aren't taken in the "dark". They're just one with no flash and regular bright room lighting and then the direct look in is with flash as well?
Ummmm, it's so bright that I made the mistake of looking into it? I'm still "sunspotted"??? ::)


  • Member since
    March 2007
  • From: Atlanta, Ga.
Posted by MrSquid2U on Saturday, November 7, 2009 9:28 AM
And the cleaned up backplate in place.

With it's surround mocked in place as well.


  • Member since
    December 2002
  • From: Third rock from the sun.
Posted by Woody on Saturday, November 7, 2009 8:49 AM
What a great idea for forming ring shapes in styrene.

" I wish to have no connection with any ship that does not sail fast; for I intend to go in harm's way." --John Paul Jones
  • Member since
    March 2007
  • From: Atlanta, Ga.
Posted by MrSquid2U on Saturday, November 7, 2009 8:36 AM
The back plate had some nicked and chipped "rings" so new ones were fashioned up and grafted on. A suitable/matching size brass collet was cut and then used to form the styrene strip. The whole thing was then glued onto the flattened bases and let dry. Later they'll be sanded down to height and generally cleaned up.


JOIN OUR COMMUNITY!

Our community is FREE to join. To participate you must either login or register for an account.

SEARCH FORUMS
FREE NEWSLETTER
By signing up you may also receive reader surveys and occasional special offers. We do not sell, rent or trade our email lists. View our Privacy Policy.