SEARCH FINESCALE.COM

Enter keywords or a search phrase below:

Death Star 2 Port Attack Diorama

15095 views
45 replies
1 rating 2 rating 3 rating 4 rating 5 rating
  • Member since
    September 2007
  • From: Milwaukee, WI
Death Star 2 Port Attack Diorama
Posted by OTnROTSfan on Saturday, August 11, 2012 6:54 PM

[see original thread of the same name for Phases I-III...  Onto Phase IV:

Took a break after finishing the top outer port structure... back starting on the twelve inner port structures.  First three framed up and tacked up for positioning test...

Kevin

Inspire onto others as you would have them inspire onto you... or something like that...

  • Member since
    April 2010
  • From: San Diego, CA, USA
Posted by Gerry on Wednesday, August 15, 2012 11:47 AM

Stunning! Original!

Gerry ...Young at Heart - Other parts slightly older.

  • Member since
    November 2006
Posted by Mike H. on Wednesday, August 15, 2012 12:20 PM

Great idea!

  • Member since
    July 2006
  • From: San Francisco, CA
Posted by telsono on Monday, August 20, 2012 1:38 PM

What can be said, except for Brilliant!!

Mike T.

Beware the hobby that eats.  - Ben Franklin

Do not fear mistakes. You will know failure. Continue to reach out. - Ben Franklin

The U.S. Constitution  doesn't guarantee happiness, only the pursuit of it. You have to catch up with it yourself. - Ben Franklin

  • Member since
    March 2010
  • From: Democratic Peoples Republic of Illinois
Posted by Hercmech on Monday, August 20, 2012 2:05 PM

As I said in the other tread...FANTASTIC!


13151015

  • Member since
    September 2007
  • From: Milwaukee, WI
Posted by OTnROTSfan on Sunday, September 2, 2012 11:20 PM

Thanks... feels good to be back at it!

A few days off for once, much more progress... Big Smile

Got all twelve of the inner structures built. Started around the rest of the hole. Was scratching my head as to why the new alignment was off the more I added, then realized that I still had to cut the hole to final size. Got them tacked together and mostly aligned half way around... Also threw in a pic of the display area, as that is where I moved it to work on assembly easier. Kinda shows the massive size of this thing. More soon...

Kevin

Inspire onto others as you would have them inspire onto you... or something like that...

  • Member since
    November 2009
  • From: SW Virginia
Posted by Gamera on Monday, September 3, 2012 9:09 AM

Let me say again, great idea and great job. Looking forward to seeing her finished!

"I dream in fire but work in clay." -Arthur Machen


  • Member since
    January 2010
Posted by Klik on Wednesday, September 5, 2012 6:32 PM


Your Model room is very impressive!

I would love to see more of your sweet collection. Is that a split s-foil Z-95 I see on your desktop? (If yes, where can I get one?!)

Please keep up the great work!

Klik

oneyearwar1

The hardest part of flying isn't flying...it's landing.

  • Member since
    December 2006
  • From: Phoenix, AZ
Posted by Fly-n-hi on Wednesday, September 5, 2012 6:53 PM

Very cool!  I'm guessing you're using the 1/144 Falcon?

  • Member since
    January 2006
  • From: NW Washington
Posted by dirkpitt77 on Thursday, September 6, 2012 4:49 PM

That IS cool!  But, how ya gonna get it through the door if you  have to move? Looks like it'll be a tight squeeze.  Stick out tongue

    "Some say the alien didn't die in the crash.  It survived and drank whiskey and played poker with the locals 'til the Texas Rangers caught wind of it and shot it dead."

  • Member since
    September 2007
  • From: Milwaukee, WI
Posted by OTnROTSfan on Saturday, September 8, 2012 8:37 PM

Thanks.  Fun to be working on it again.

Got all 12 structures tacked in to see if it would connect up...  what a PITA.  Got a couple to reposition, putty, sand, prime... rinse, repeat..., but they all basically fit.  Only the tops are tacked in, so figured would get a pic before it falls in the hole, lol.  When I get it all positioned right, then have to flip it and glue up all of the bottom connections.  Math and guessing... it works pretty swell.  Trying to get the structures done this month, then finally, on to the surface.


Kevin

Inspire onto others as you would have them inspire onto you... or something like that...

  • Member since
    September 2007
  • From: Milwaukee, WI
Posted by OTnROTSfan on Saturday, September 8, 2012 8:39 PM

The top comes off on positioning pins and will have handles built under it, just like the bottom.  The bottom just fits through the doors.  Yeah, almost forgot about that early on, but tested it out.  Plus it is upstairs... I'm more worried about the weight to carry it down... lol

Yes, it's built in 1/144.

Well, if you mean the McQuarrie Concept X-Wing, then yes... never was good with the technical ship names, lol Big Smile.  The litte one and the big one just getting started were from Rich/REL at Sovereign Replicas.  You see them pop up from time to time.  Both are very nice kits.

Kevin

Inspire onto others as you would have them inspire onto you... or something like that...

  • Member since
    September 2007
  • From: Milwaukee, WI
Posted by OTnROTSfan on Thursday, January 3, 2013 7:34 PM

Have been pouring through the Blu-ray for the surface details... thought this detail was funny - man did they cheat in a few spots to make the port align - at high-speed you dont notice it.  Man - mine had to at least look symmetrical and aligned at no-speed passes...  :P 
 

 Started laying out the general surface elements... some will need to be recessed into the surface.  Other parts are just placeholders... been looking for my stash of Death Star tiles... had one set under the bench.  Need to run to storage and see if I have them there.  Just "cleaned" recently so now I can't find them... LOL.  Also started design of the partial tower.  On vacation, so will be working on general surface layout and positioning over the next couple of days, then another round of materials gathering.

Kevin

Inspire onto others as you would have them inspire onto you... or something like that...

  • Member since
    April 2010
  • From: San Diego, CA, USA
Posted by Gerry on Thursday, January 3, 2013 9:18 PM

That is such an original idea for a scratch build.

And so well executed.

Inspiring.... .Inspiring!

Gerry ...Young at Heart - Other parts slightly older.

  • Member since
    November 2009
  • From: SW Virginia
Posted by Gamera on Friday, January 4, 2013 1:35 PM

Yeah great progress!

I can hear the TIE fighter sounds in my mind... WAAAAAAAAAAAAUUUUUUUUOOOOOOMMMMMMM!!!!!!

"I dream in fire but work in clay." -Arthur Machen


  • Member since
    July 2012
  • From: Douglas AZ
Posted by littletimmy on Saturday, January 5, 2013 6:12 PM

You sir   have too much free time on your hands! Might I suggest you get a hobby or something:)     All kidding aside I think its cool! B.T.W.  what do you feed the imperial walker in the aquarium?

 Dont worry about the thumbprint, paint it Rust , and call it "Battle Damage"

  • Member since
    April 2010
  • From: San Diego, CA, USA
Posted by Gerry on Sunday, January 6, 2013 1:35 AM

Aren't you done yet?

Devil

Gerry ...Young at Heart - Other parts slightly older.

  • Member since
    September 2007
  • From: Milwaukee, WI
Posted by OTnROTSfan on Wednesday, January 9, 2013 10:42 PM

Haha.  I feed it little resin goldfish that I cast, and cast, and cast... lol

Done? lol - been working on this so long I'm soon going to fall under the "um, juristiction of the Empire"...

I'm still at a loss trying to find my box of DS surface tiles I had collected for this... that's what I get for cleaning up storage over vacation...  had a few at home, so...

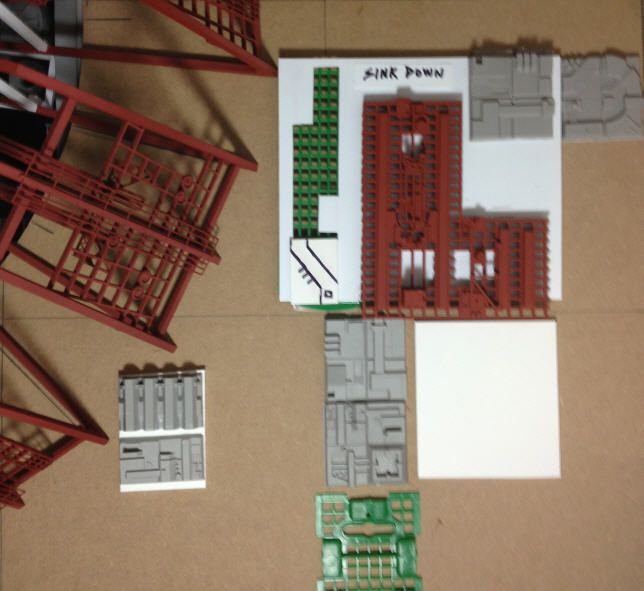
Started layout and detail of the first section... needed a slightly rectangular grid with some height to it... found a gutter product that once turned inside out, was about exactly right.  One was out of the box in the store so I got lucky... you wouldn't notice the grid from the outside.  This general whole "area" of the layout will be sunk to the surface.  Did I mention how much I've been looking forward to doing the surface part...  :P
Kevin

Inspire onto others as you would have them inspire onto you... or something like that...

  • Member since
    January 2003
  • From: Washington, DC
Posted by TomZ2 on Wednesday, January 9, 2013 11:12 PM

Tags: YES !!!

Occasional factual, grammatical, or spelling variations are inherent to this thesis and should not be considered as defects, as they enhance the individuality and character of this document.

  • Member since
    September 2007
  • From: Milwaukee, WI
Posted by OTnROTSfan on Sunday, March 3, 2013 3:49 PM

Man I love this part... (when I get to work on it)...

Threw together some more surface tiling (some scratched) and the small tower structure in the lower right quadrant...


Kevin

Inspire onto others as you would have them inspire onto you... or something like that...

  • Member since
    September 2007
  • From: Milwaukee, WI
Posted by OTnROTSfan on Friday, March 8, 2013 8:01 PM

Finally got around to fixing the "L"-shaped red structure... had originally prototyped it up wrong (too short and wrong cut-off).  Stripped the left half and added the extender... then laid out a full run of surface all the way up the side... and... suddenly...  [drum roll] SHAZAAM - it all lined up from the original planning!   Now THIS is where the fun begins!
 

Kevin

Inspire onto others as you would have them inspire onto you... or something like that...

  • Member since
    September 2007
  • From: Milwaukee, WI
Posted by OTnROTSfan on Saturday, March 9, 2013 10:29 AM

New extended "L" painted up with better lighting in that area... lots of sanding, tweaking, and painting in the future once I get the whole surface laid out...

Kevin

Inspire onto others as you would have them inspire onto you... or something like that...

  • Member since
    September 2007
  • From: Milwaukee, WI
Posted by OTnROTSfan on Sunday, March 10, 2013 10:23 PM

A little tweaking around the under-construction tower... and started laying out the upper middle.  Should get the top laid out this week.  Then onto the left, denser area that the Falcon flies over as it approaches the port... once it is all generally laid out, then will start on the tower and detailing up all the tiled areas...

Kevin

Inspire onto others as you would have them inspire onto you... or something like that...

  • Member since
    October 2010
  • From: Hoodsport, WA
Posted by Dogfish_7 on Thursday, March 21, 2013 9:39 AM

Quite a project! Are you an architect?

Bruce

  • Member since
    September 2007
  • From: Milwaukee, WI
Posted by OTnROTSfan on Wednesday, March 27, 2013 9:59 PM

Funny you ask... I actually wanted to be an architect at one time.  Have scratched a lot of model houses for fun over the years.  Always liked to do open/cut-away mockups.  This was right up my alley... :)

Kevin

Inspire onto others as you would have them inspire onto you... or something like that...

  • Member since
    September 2007
  • From: Milwaukee, WI
Posted by OTnROTSfan on Sunday, April 7, 2013 9:48 PM

Had an afternoon to work on it again...  got the larger red structure on the left side mostly done.  Working on the back gray grid structure next...

Kevin

Inspire onto others as you would have them inspire onto you... or something like that...

  • Member since
    September 2007
  • From: Milwaukee, WI
Posted by OTnROTSfan on Saturday, May 11, 2013 11:19 PM

Was finally home on the weekend once... got more laid out and more grid structures roughed out on the left side and top.  Hopefully the weather will stay warm soon and stop raining so I can finally paint the whole red middle port section...


Kevin

Inspire onto others as you would have them inspire onto you... or something like that...

  • Member since
    September 2007
  • From: Milwaukee, WI
Posted by OTnROTSfan on Friday, May 24, 2013 10:08 PM

Getting there with the surface layout...  next back to the corner with the partial tower and three surrounding red structures.  Woo, finally get to build the tower.

Kevin

Inspire onto others as you would have them inspire onto you... or something like that...

  • Member since
    September 2007
  • From: Milwaukee, WI
Posted by OTnROTSfan on Tuesday, May 28, 2013 12:58 PM

Another cold rainy weekend, so lots of progress (for once)...

Got the core structures for the tower area laid out as well as the frame and shell for the partial tower.  This phase is so much fun!

Lots of clean-up and sanding of all the surface parts, then onto superdetailing and painting of all the surface elements...

Kevin

Inspire onto others as you would have them inspire onto you... or something like that...

  • Member since
    September 2007
  • From: Milwaukee, WI
Posted by OTnROTSfan on Sunday, October 27, 2013 1:11 PM

Finally found somebody local to make acrylic cases and cut large styrene/ABS... spec'd out the large ABS surface piece with the "official" hole that will be clad to the MDF.  In the meantime, getting cold out, so time to paint the port (since I had to remove it anyways).  Forgot I had only tacked the inside structures in the corners... was hanging that way all summer, but didn't fall into the hole!  I remembered when I tried to pick it up and they started falling inside the port... lol.  All is good... built a quick temporary cardboard carrier so I can get at most angles of it.  First time all the port sections were fully attached and painted.  A few sand and putty spots, but actually not too bad overall for first crack at it... will work on that until the surface cladding is done.

Kevin

Inspire onto others as you would have them inspire onto you... or something like that...

JOIN OUR COMMUNITY!

Our community is FREE to join. To participate you must either login or register for an account.

SEARCH FORUMS
FREE NEWSLETTER
By signing up you may also receive reader surveys and occasional special offers. We do not sell, rent or trade our email lists. View our Privacy Policy.