SEARCH FINESCALE.COM

Enter keywords or a search phrase below:

ICARUS/LIBERTY 1 BUILD (Completed 4-18-21)

100537 views
2158 replies
1 rating 2 rating 3 rating 4 rating 5 rating
  • Member since
    July 2014
  • From: Franklin Wi
Posted by Bakster on Wednesday, April 7, 2021 7:22 PM

Gamera
BTW: That much be one big kitten to leave a huge shadow on the moon like that

Or maybe it's a small moon. Wink

Gamera
I am eagerly waiting for more progress shots of the Icarus!  

Sorry for the lack of posts. More to come soon maybe.


  • Member since
    July 2014
  • From: Franklin Wi
Posted by Bakster on Wednesday, April 7, 2021 8:26 PM

I guess... here is something I can post. I had originally planned to order an engraved plate that I'd attach to the base. With recent changes to the plan--that idea went out the window too. For the new plan...they don't make them as narrow as I need. That leaves me with designing something on my own. Under consideration are a few graphics I came up with, shown below. 


  • Member since
    November 2009
  • From: SW Virginia
Posted by Gamera on Thursday, April 8, 2021 10:27 AM

Bakster

I guess... here is something I can post. I had originally planned to order an engraved plate that I'd attach to the base. With recent changes to the plan--that idea went out the window too. For the new plan...they don't make them as narrow as I need. That leaves me with designing something on my own. Under consideration are a few graphics I came up with, shown below. 


I like it, that's gonna look really cool! 

"I dream in fire but work in clay." -Arthur Machen


  • Member since
    July 2012
  • From: Douglas AZ
Posted by littletimmy on Thursday, April 8, 2021 8:48 PM

I like the last one.

I may have found Clapper....

He is working as a trunk monkey for Suburban Auto Group in Sandy or.

I'm typing on my phone, so I cant post a link .... just google "trunk monkey" 

 Dont worry about the thumbprint, paint it Rust , and call it "Battle Damage"

  • Member since
    July 2014
  • From: Franklin Wi
Posted by Bakster on Friday, April 9, 2021 8:21 AM

littletimmy
I may have found Clapper.... He is working as a trunk monkey for Suburban Auto Group in Sandy or. I'm typing on my phone, so I cant post a link .... just google "trunk monkey" 

Hey Tim-- that may be him. I found this video.

littletimmy
I like the last one.

Yeah that is my first pick. But ask me on another day and I might pick something else. Weird how that works. 

  • Member since
    July 2014
  • From: Franklin Wi
Posted by Bakster on Friday, April 9, 2021 8:24 AM

Gamera
I like it, that's gonna look really cool! 

Thanks Gam. Fingers crossed because it ain't over until the fat monkey sings. Surprise

  • Member since
    May 2013
  • From: Indiana, USA
Posted by Greg on Friday, April 9, 2021 8:31 AM

Bakster
it ain't over until the fat monkey sings

Do you mean Micky Dolenz?

Oh wait, that's a completely different subject, and he isn't really fat anyway, sorry.......

I like your graphics. I envy you guys who can come up with that stuff. Wish I'd get off my lazy duff and learn graphics, I have all the software.

Don't rush to the finish line. I don't know where I'll go to be silly and have a laugh or two when it's over.

  • Member since
    July 2014
  • From: Franklin Wi
Posted by Bakster on Friday, April 9, 2021 9:09 AM

Greg
Do you mean Micky Dolenz?

Dang! I had to really think about that one, Greg. It took me a minute. I get it now. He was a former Monkeys singer. Phew. I havn't had my morning coffee yet. LOL

Greg
I like your graphics. I envy you guys who can come up with that stuff. Wish I'd get off my lazy duff and learn graphics, I have all the software.

You know, it's kind of funny. I learned graphics by my interest in photoshopping gag images. In short, my monkeying around is paying off for this project! LOL. 

Greg
Don't rush to the finish line. I don't know where I'll go to be silly and have a laugh or two when it's over.

Hey--don't be too concerned. I have a new project in mind that should start a whole new journey of fun. I can't start that one until I end this one. Smile

  • Member since
    May 2013
  • From: Indiana, USA
Posted by Greg on Friday, April 9, 2021 9:23 AM

Bakster
Dang! I had to really think about that one, Greg.

Whoa, catching you off-guard is challenging. I'm pretty proud of myself.

Bakster
Hey--don't be too concerned. I have a new project in mind that should start a whole new journey of fun. I can't start that one until I end this one.

Whew, that's a relief. Toast

  • Member since
    July 2014
  • From: Franklin Wi
Posted by Bakster on Friday, April 9, 2021 9:31 AM

Greg
Bakster Dang! I had to really think about that one, Greg. Whoa, catching you off-guard is challenging. I'm pretty proud of myself.

Lol. Well done sir. Kudos!


Greg
Bakster Hey--don't be too concerned. I have a new project in mind that should start a whole new journey of fun. I can't start that one until I end this one. Whew, that's a relief.

Cheers!

  • Member since
    November 2009
  • From: SW Virginia
Posted by Gamera on Friday, April 9, 2021 11:44 AM

littletimmy

I like the last one.

I may have found Clapper....

He is working as a trunk monkey for Suburban Auto Group in Sandy or.

I'm typing on my phone, so I cant post a link .... just google "trunk monkey" 


The little Censored would make a great trunk monkey. He's got the attitude for it... 

"I dream in fire but work in clay." -Arthur Machen


  • Member since
    July 2012
  • From: Douglas AZ
Posted by littletimmy on Friday, April 9, 2021 10:48 PM

There are at least 7 of the trunk monkey commercials.

My favorite is the one where the motorist hits a tree, and trunk monkey is about to " revive" him ..... with a difibulater!


 Dont worry about the thumbprint, paint it Rust , and call it "Battle Damage"

  • Member since
    July 2014
  • From: Franklin Wi
Posted by Bakster on Saturday, April 10, 2021 12:30 AM

littletimmy

There are at least 7 of the trunk monkey commercials.

My favorite is the one where the motorist hits a tree, and trunk monkey is about to " revive" him ..... with a difibulater!

Hey Tim, those are awesome. That is Clapper for sure. I think my favorite is when Clapper opens a can of whoop ### on that space alien. I taught him to do that you know. You may remember how I feel about them space demons. I have a zero tolerance policy for them. You get them before they get you. 

  • Member since
    July 2014
  • From: Franklin Wi
Posted by Bakster on Sunday, April 18, 2021 12:19 AM


The Final Chapter--Part 1

I had mentioned having a problem that you won't believe. And let me tell you, I still can't believe it. Basically--the problem started when I sprayed the water color. It came out splotchy. I determined that this will not do--so I decided to strip the paint with IPA and start over. I used IPA because it was a light coat of paint and I knew IPA would make quick work of removing it.  And--it did. What I didn't expect is what I found after removing the masking. The image below speaks for itself.

Wow! I suspect IPA leached into the joins and somehow--chemically--it caused stress fractures. I NEVER would have seen that one coming. Thanks a bunch--Gremlins. You got me on that one.

There is NO WAY I am buying another case. This submerged dio idea is not all that genius that I should double down and do it again. Replacing it would be expensive too. As Dana Carvey would say in his best Bush voice,"It wouldn't be prudent."

Nope. It is time to dumb down this project. But guess what? Doing so lead me to a result that I like even more. And there it is, there is the silver lining.

Out goes the soak, in comes the plunge

I purchased an acrylic base to create an inflight Icarus. (Only $8.00 and I wish I ended up here sooner). Truly, this was a work in process, and how I got to the end was quite the journey. Here is how it all developed:

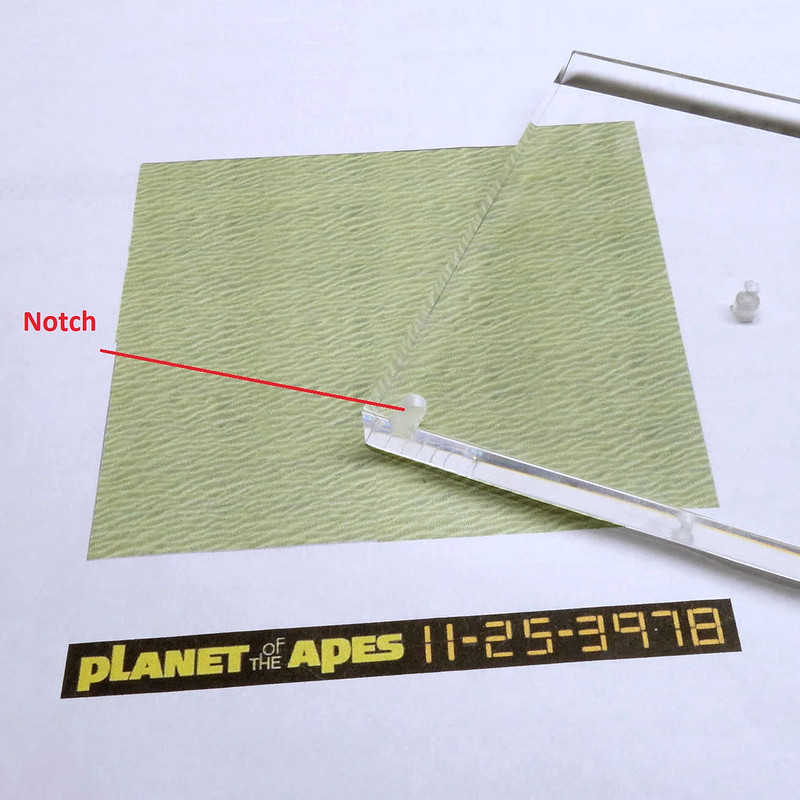
As mentioned in a previous post I am designing a detachable power supply. SO, a connector is needed. I started by cutting a notch for the connector to nest in. Doing it this way provides the clearance I need and at the same time, it will provide a stronger mechanical hold. There will be stresses with plugging and unplugging and I don't want it popping off.
 

A case for testing

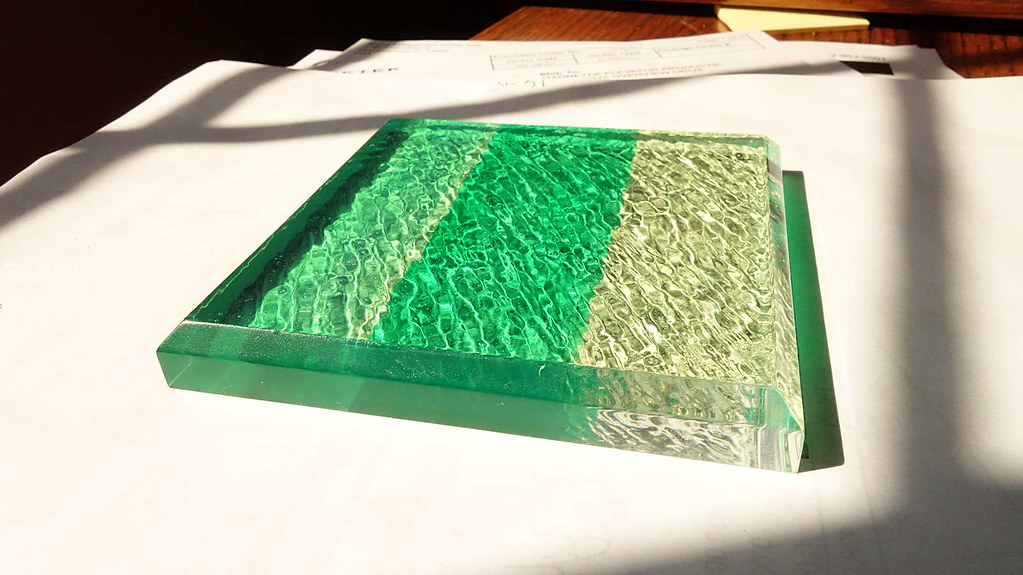
This acrylic is thicker than the enclosure and the water effect that worked well in that instance might not work well here. So--I did a test piece where I broke it out into thirds. The left has paint on top, the middle has paint below, and the right has no paint at all. The latter would use colored paper mounted from below.
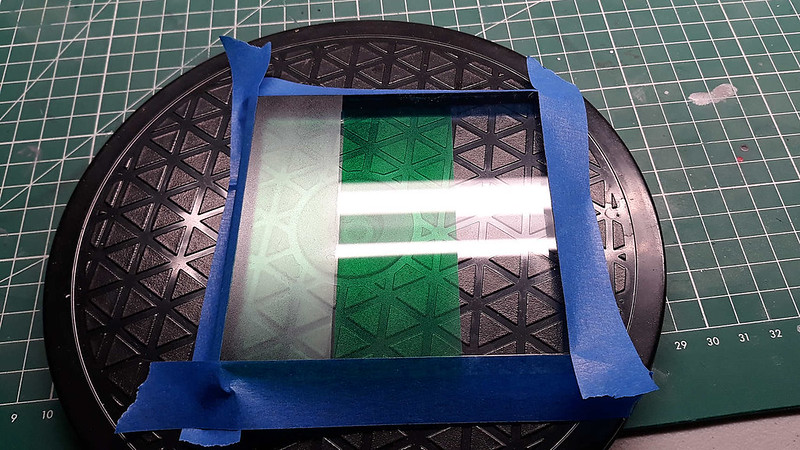
My initial thought is that the left section looked terrible, the middle section looks good with great contrast, and the right has its merits too. I thought for sure the middle section would win but...

not so fast. After applying the AK water gel, the section on the left looked the best to me. I never would have thought it. That horrid flat finish magically disappears and instead you get good contrast, depth, color tone, and clarity. The section in the middle didn't change much, maybe now having a slightly richer appearance. The right section looks nice, but the color doesn't translate much via the paper. What you DO get is the appearance of CRYSTAL-CLEAR water. I did like it though. It is like water you'd find on some remote island, or on some distant unspoiled planet. But--I set out on this journey to have green water and that leaves the other two. In the end--I feel the middle section appears as too green and there is something about the water characteristics that strikes me as not correct. That leaves the left section, and that is what I went with. 

Test piece below is with AK applied and a graphic that I talk about later.
The graphic

As you know I made my own graphic. The dilemma is in how to apply it. My first inclination was to make it into a decal. Considering all the decal issues, homemade or purchased, I was not a fan of this option. In short--it has the most potential pitfalls and at this point, I am in no mood for more setbacks. 

I then explore printing the graphic on photo paper and mounting it via double sided tape. While chewing on that option--it occurred to me that maybe I could make a plate out of styrene, thus giving it more formal look. The graphic then applied using either paper or decal. I was about to settle on trying this when there was a happy accident: 

By happenstance, the graphic ended up under the acrylic base and while I was moving around in my chair, I notice something flash. I thought, "What was that? Did I imagine that?" I bend towards the base for a closer look and holy ape--like magic--the graphic pops on. The front of the base has a bevel and by quirk of diffraction the image appears or disappears depending on your position to it. The beauty of it is it does so in an almost magical way. It acts like if it were an LCD. It goes from a complete off state to complete on state, or vice versa, and it does so with clarity and with minimal distortion.

I was stunned that this presented itself. With a little more experimentation, heck yeah, this is the way to go. Also--when I view from the sides the graphic appears as if it's submerged within the water. This adds yet another dimension to it. So, not only does it look and function cool as all heck, but it also vastly simplifies the job. All that I need to do is mount the graphic below deck. There is no need to pretty it up--no need to make a decal--just no need. And in the end it looks lightyears better than something I would have printed and applied to the outer bevel.

Seafloor by the seashore

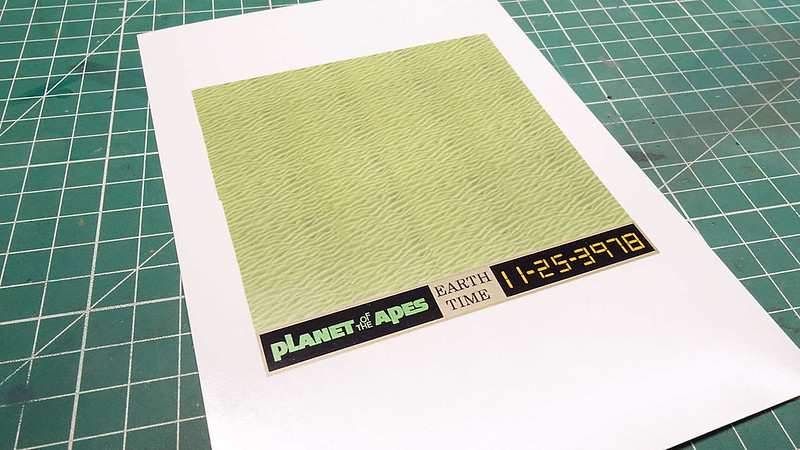
I thought it might work well to graphic ripples and use them as the basis for the sea floor. So, I captured an image off the net and with the magic of photoshopping, I scaled and stitched together swatches to the size I need. And I was right. The graphic plays really well against the AK gel ripples and they look best when aligned a right angle to each other. The combination helps create an illusion of depth and it promotes the feel of actual water. I tinted the graphic light green because in testing I found it brought balance to the overall water effect. This then is the basis for the seafloor.

As a side note: I tested images of rocks formations and such, but they did not translate well because of how their shadows play. Using sand ripples makes the piece pop.

Below is the actual base, freshly painted.

Below is the final graphic. I combined both the bevel graphic with the ripple graphic onto one print. This made applying the graphic easy, all in one piece. I printed the graphic on photo paper at highest quality. The actual photo has more color and it looks better than this image. 

This then must be trimmed for install.
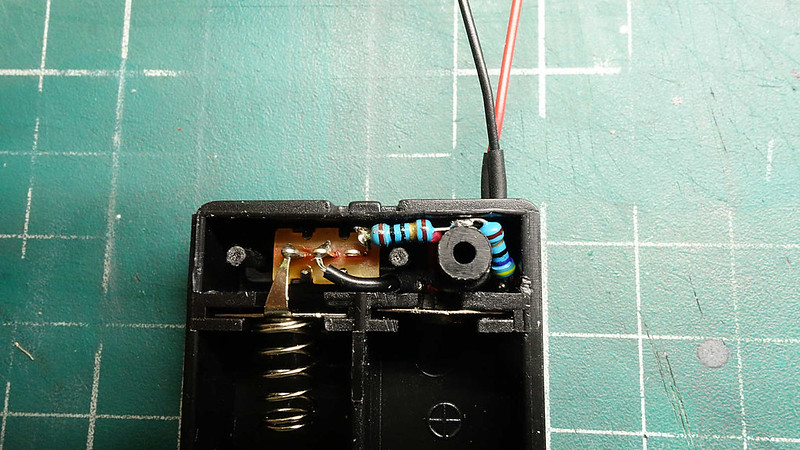
If I had 20/20 vision of how this dio will end, I would have done some things different. For instance, the current limiting resisters for the LED. Had I known what I know now--I would have tried burying the resistors within the ship behind the firewall. Also--I would have moved the wire port to where the stand connects.

Anyhow--I was left with a little dilemma. I don't want them hanging below the base, and I certainly didn't want to cut another nest into the acrylic. They would be seen from above. I could mount them in-line with the wiring from the battery pack but that won't look very nice either. Fortunately--I was able to cram them into the battery pack where they won't be seen.

There are other things I had to make compromises on but overall--it is within my tolerance of good to go.

Thus ends, The Final Chapter--Part One. It is a long read--for a long WIP. Why change now?

Icarus is completely done. More time is needed to image it and then I will post the final part.

Ape on Dudes.


  • Member since
    July 2014
  • From: Franklin Wi
Posted by Bakster on Sunday, April 18, 2021 3:09 PM

The Final Chapter--Part 2

And here are the images. 

A few things to note. I posed the ship to angle in on its tail as if to slow its momentum before nosing into the water.

Wiring is routed through the brass tube and it's sandwitched between the graphic and a felt pad. So the wiring is not seen from above or below. I forgot to image that. Most everything else is self-explanatory. 

Below

This is how the base looks as with the graphic turned off. Raise your head some and the graphic pops on.

And that is it folks. It's been a fun ride and the race is won. Thanks to everyone that participated.


Steve

  • Member since
    November 2009
  • From: SW Virginia
Posted by Gamera on Sunday, April 18, 2021 4:41 PM

WOW!!! Sorry to hear about all the issues with the base but I love the results!!! 

Heart

Even Clapper loves her!!! 


And I know what you mean, the tank I just posted I had loads of issues with the base going all wonky.  

"I dream in fire but work in clay." -Arthur Machen


  • Member since
    November 2005
  • From: Formerly Bryan, now Arlington, Texas
Posted by CapnMac82 on Sunday, April 18, 2021 6:36 PM

Bakster
It's been a fun ride and the race is won.

And, it turned out outstanding.

You'll be needing something simple and quick to get you back into the groove--perhaps a 1/32 Gotha, or the Preussen Big Smile

  • Member since
    July 2014
  • From: Franklin Wi
Posted by Bakster on Sunday, April 18, 2021 9:04 PM

Gamera
Sorry to hear about all the issues with the base but I love the results!!! 

Thanks Gam!


Gamera
Even Clapper loves her!!! 

Thanks Clapper!


Gamera
And I know what you mean, the tank I just posted I had loads of issues with the base going all wonky.  

Yeah it bites everyone from time to time. Part of the deal. Blah.

  • Member since
    July 2014
  • From: Franklin Wi
Posted by Bakster on Sunday, April 18, 2021 9:14 PM

CapnMac82
And, it turned out outstanding.

Thanks Capn!

CapnMac82
You'll be needing something simple and quick to get you back into the groove--perhaps a 1/32 Gotha, or the Preussen

LOL. NO THANK YOU! Ugh. Laughing.

I have something in mind and you guys will probably laugh if I do it. It is a pretty basic model but of course, it wouldn't be an OOTB. There would be plenty of mods setting  me up for more hair pulling.  

  • Member since
    July 2012
  • From: Douglas AZ
Posted by littletimmy on Tuesday, April 20, 2021 6:54 PM

Hair pulling ???

Stay away from mine, ......( gotta protect my fabulous Fabio locks)

Glad to see the finished product...  what a long, strange trip it's been. 

And, I think you win the " thread with the most views" prize......

Which ironically, is a 1/1 scale Icrus..... they will be delivering it in two large containers..... glue and paint not included...

 Dont worry about the thumbprint, paint it Rust , and call it "Battle Damage"

  • Member since
    May 2013
  • From: Indiana, USA
Posted by Greg on Wednesday, April 21, 2021 7:51 AM

Whoa, she's done! I love it, Steve.

Very impressive how you changed gears after the dio base disaster. There is no way to avoid this sounding like sour grapes, but as much as I liked your submerged Icarus plan, always had a nagging feeling that so much of the detail you put into her would be lost. I'm glad you're happy with the last minute change, I sure am.

This has been lots of fun, looking forward to your next one.

Oh, and....

Gamera
BTW: That much be one big kitten to leave a huge shadow on the moon like that.

I missed this on my first read a couple weeks back.

That's what I call attention to detail, Gammy. I'm impressed. Yes

  • Member since
    July 2014
  • From: Franklin Wi
Posted by Bakster on Wednesday, April 21, 2021 12:04 PM

Greg
Whoa, she's done! I love it, Steve.

Hey Greg--thank you!

Greg
always had a nagging feeling that so much of the detail you put into her would be lost. I'm glad you're happy with the last minute change, I sure am.

I agree with you and maybe that is why it fought me so hard, from the ripping of decals to the fractured case. I thought it was a cool idea, but I had the same nagging feeling it would look so-so. And what I like too about the new base is that it has a small footprint. I can easily fit it on my entertainment center shelf. It is done in a nice little package.

I am very happy with how it turned out and better than I thought it would. It is hard to believe that I started all this with an empty and badly printed 3D shell. There were a lot of obstacles to overcome. It is not perfect for sure, but considering, I think it came out well. 

So this is my personal tribute to the 1967 movie that had given me so much joy as a kid. That once in a lifetime day where everything clicked, sending me on this journey some 54 years later. The circle is complete. Wink


  • Member since
    July 2014
  • From: Franklin Wi
Posted by Bakster on Wednesday, April 21, 2021 10:27 PM

Hey Greg-- for you and anyone else interested-- my new build can be found at the link below.


http://cs.finescale.com/fsm/modeling_subjects/f/19/t/188362.aspx?sortorder=desc


  • Member since
    November 2005
  • From: Formerly Bryan, now Arlington, Texas
Posted by CapnMac82 on Saturday, April 24, 2021 2:52 PM

Had a scary thought while browsing a catalog of add-on "touch" switches:  Have a touch switch connected to an EPROM with this audio clip:

http://goo.gl/UUqQX

  • Member since
    July 2014
  • From: Franklin Wi
Posted by Bakster on Saturday, April 24, 2021 3:38 PM

CapnMac82

Had a scary thought while browsing a catalog of add-on "touch" switches:  Have a touch switch connected to an EPROM with this audio clip:

http://goo.gl/UUqQX


Ha! I love it.  That would have been cool to do. 

  • Member since
    July 2013
Posted by steve5 on Thursday, May 20, 2021 4:24 AM

steve where the hell are you ? the link you put up took me back to 2014 .


  • Member since
    July 2014
  • From: Franklin Wi
Posted by Bakster on Thursday, May 20, 2021 6:43 PM

steve5

steve where the hell are you ? the link you put up took me back to 2014 .


Hey Steve--that is weird. The link works for me and Greg was able to find me. But look in Dioramas, Bullion Express (Boot Hill Express). That is my new project.  Hope to see you there.

  • Member since
    October 2019
  • From: New Braunfels, Texas
Posted by Tanker-Builder on Friday, May 21, 2021 11:50 AM

Ahem!

 Would someone hand me that very large heavy Trophy? This is definitely best in Show for Sci-Fi! I especially like the way it looks inside with the warning lights flashing! That's some awesome interior work there!

  • Member since
    July 2014
  • From: Franklin Wi
Posted by Bakster on Friday, May 21, 2021 2:40 PM

Tanker-Builder

Ahem!

 Would someone hand me that very large heavy Trophy? This is definitely best in Show for Sci-Fi! I especially like the way it looks inside with the warning lights flashing! That's some awesome interior work there!


It does sort a look like a trophy doesn't it. 

Thanks for the kind words TB!

JOIN OUR COMMUNITY!

Our community is FREE to join. To participate you must either login or register for an account.

SEARCH FORUMS
FREE NEWSLETTER
By signing up you may also receive reader surveys and occasional special offers. We do not sell, rent or trade our email lists. View our Privacy Policy.