SEARCH FINESCALE.COM

Enter keywords or a search phrase below:

Bandai 1/100 Macross Missile Phalanx

4271 views
34 replies
1 rating 2 rating 3 rating 4 rating 5 rating
  • Member since
    October 2021
Bandai 1/100 Macross Missile Phalanx
Posted by PhoenixG on Wednesday, April 19, 2023 1:03 PM

This here is the kit I'm using to get back into the swing of things.

mp1

This is the first Bandai Macross kit I've tried.  All my others have been ARII.  The kit is straightforward and I've already pieced together the main body and started on the legs.  Will try to grab some of photos of that tonight.

This will be a fun one to paint and weather.

On the Bench:

Bandai Starblazers 2202 Garmillas Zoellugut

  • Member since
    May 2011
  • From: Honolulu, Hawaii
Posted by Real G on Wednesday, April 19, 2023 4:52 PM

Any thoughts on the strange "headlight" head?  I would think a missile platform would need to be equipped with radar equipment, i.e. scan and track antennas.  Or I suppose you could go modern and just have a single phased array scanner.

“Ya ya ya, unicorn papoi!”

  • Member since
    October 2021
Posted by PhoenixG on Monday, April 24, 2023 5:24 PM

So the day I posted this the company I work for announced they would be conducting layoffs.  They finished the process near the end of the week and thankfully the cuts didn't include my team. For the moment gainful employment continues to be mine.

Stress levels have dropped sufficiently and thanks to a beautiful day out here in Washington I am back at the bench.  Minor progress made.

A photo of the mess of parts I've started working on.

spruestuff

Started priming the missile arrays and the exhaust vents.

missiles

For the bell I am going to leave the inside black but will once again attemp a heat discolored steel for the outside.  Similar to what I did for the space submarine.  Going to attempt to make it a little stronger this time as the affect on the sub's engine was a little to subtle in my opinion.

exhaust

I glued together the leg on the left before remembering the accordian joint on the inside is supposed to be a different color.  There are challenges to painting the joint before assembly as well as after assembly.  Haven't come to any conclusions as to what I'll do.

legs

Most of the main body is assembled.  Looking at it I am left wondering about several parts on it.  Are they engine exhaust?  Backup lights?  Turn signals?  These things are supposed to be protoculture powered so why would you need exhaust?

body


pilot

From the boxart the circled above look to be the pilots windows but the shape doesn't really lend itself to being painted as such.  The windows stick out instead of being recessed.  Possibly an engineering mistake.

On the Bench:

Bandai Starblazers 2202 Garmillas Zoellugut

  • Member since
    October 2021
Posted by PhoenixG on Monday, April 24, 2023 5:33 PM

Real G

Any thoughts on the strange "headlight" head?  I would think a missile platform would need to be equipped with radar equipment, i.e. scan and track antennas.  Or I suppose you could go modern and just have a single phased array scanner.


Hi RealG,

I think they are actually lower tech than that.  Taking a close look at the boxart they look more like floodlights than radar. 

closeup

I've misplaced my copy of the Robotech Visual Archive which might have given a clue.

The paint directions suggest a silver color for them.  No clear plastic parts in this kit either. I'd say it can be whatever we want.  Let our imaginations roam. 

As with many things sci-fi, sometimes looking cool trumps practical.  Big Smile

On the Bench:

Bandai Starblazers 2202 Garmillas Zoellugut

  • Member since
    November 2009
  • From: SW Virginia
Posted by Gamera on Monday, April 24, 2023 8:43 PM

Wow, now that is cool! Looking forward to more Phoenix! 

"I dream in fire but work in clay." -Arthur Machen


  • Member since
    October 2021
Posted by PhoenixG on Friday, April 28, 2023 11:34 PM

Gamera

Wow, now that is cool! Looking forward to more Phoenix! 


I'm looking forward to it as well!  Smile Per my usual I'm going to try something new/different with it.  In the boxart I noticed the artist used shades of green for the shading rather than black.   I'm thinking I can do some preshading around the major edges with a  dark green before applying the main sand/buff color.  No idea how it will turn out but I am curious to discover the results.

Long term goal is to someday build this guy with all those missilles firing at once. 
super cool robot
Working my way there.Stick out tongue


On the Bench:

Bandai Starblazers 2202 Garmillas Zoellugut

  • Member since
    November 2009
  • From: SW Virginia
Posted by Gamera on Monday, May 8, 2023 7:20 PM

Ohhhhhhhh, having the missiles firing sounds awesome! 

"I dream in fire but work in clay." -Arthur Machen


  • Member since
    October 2004
  • From: Orlando, Florida
Posted by ikar01 on Wednesday, May 10, 2023 10:34 PM

The cockpit windows are just below the flood lamps.  This machine as well as the others used in the series were designed to fight invaders and defend teh very large space craft Macross.  This ship had crashed on an island and as they inspected the wreck they realized that there were still a couple aliens on boars who were quite large.  This made them build their various heavy fighting machines large enoiugh to stop an attempt to take back the ship.

The day of the dedication ceremony of the rebuilt ship they got a surprise when its sensors discovered some ailen shout ships near Earth and it activated its main weapon and destroyed them as they neared Earth.  It also destroyed a good piecd of the island in the process.  They didn't know the ship as well as they thought.  Everything went diwbhukk after that.

  • Member since
    October 2021
Posted by PhoenixG on Thursday, May 11, 2023 6:59 PM

Gamera

Ohhhhhhhh, having the missiles firing sounds awesome! 


Those anime missile volleys are much fun!

On the Bench:

Bandai Starblazers 2202 Garmillas Zoellugut

  • Member since
    November 2009
  • From: SW Virginia
Posted by Gamera on Thursday, May 11, 2023 9:27 PM

Ohhhhhh sounds cool guys! 

"I dream in fire but work in clay." -Arthur Machen


  • Member since
    July 2014
  • From: Franklin Wi
Posted by Bakster on Saturday, May 13, 2023 10:01 AM

Hey PG, cool project. It looks like you are making progress and it looks good. Keep up the good work


  • Member since
    October 2021
Posted by PhoenixG on Thursday, July 13, 2023 9:47 PM

Construction & painting resumed this week.  Started picking out the missiles nose cones in red. 

Began painting the inside of the missile pod covers red but stopped after the first coat.  Decided I liked the sloppy look of just a little red showing on top of the black primer.

progress update

Next up will be assembling the missile pods and priming them and cleaning up the searchlight to get it prepped for priming.

Hoping to get some of the pre-shading done on the other parts of the body this week.

On the Bench:

Bandai Starblazers 2202 Garmillas Zoellugut

  • Member since
    November 2009
  • From: SW Virginia
Posted by Gamera on Thursday, July 13, 2023 10:19 PM

Ohhhhhh, looks good!!! Yes

"I dream in fire but work in clay." -Arthur Machen


  • Member since
    October 2021
Posted by PhoenixG on Monday, July 17, 2023 3:06 PM

Did the preshading for the majority of the body and started blocking in the main sandy/buff color.  The green wasn't as dark as I expected it to be but that doesn't appear to be an issue.  Most importantly, the colors seem to work well together.    Meaning I won't have to strip it back to plastic.  Big Smile

preshaed

On the Bench:

Bandai Starblazers 2202 Garmillas Zoellugut

  • Member since
    November 2009
  • From: SW Virginia
Posted by Gamera on Monday, July 17, 2023 6:51 PM

Looks good to me! Looking forward to seeing she looks assembled. 

"I dream in fire but work in clay." -Arthur Machen


  • Member since
    October 2021
Posted by PhoenixG on Wednesday, July 19, 2023 1:54 PM

Continued preshading and blocking in the main color. I noticed after the fact that I forgot about the heel of the foot.  Just finished cutting them off the sprue.  They're the small pile of bare plastic parts. 

The initial coat of the main color is a mix of Vallejo Sandy Yellow + Buff.  I thought it was too light so added a couple of drops of Dark Earth to the mix and added that as another light coat.  You can see the difference it makes.  The main body only has the initial SY+B whereas the legs have final coat with DE included.

subtle

Really enjoying the subtle effect the green has on the overall look of the model.  It's coming along nicely.


On the Bench:

Bandai Starblazers 2202 Garmillas Zoellugut

  • Member since
    November 2009
  • From: SW Virginia
Posted by Gamera on Wednesday, July 19, 2023 7:51 PM

Looks good! 

I'm assuming you're doing colour modulation by spraying with the the yellow/buff with dark earth and then spraying again with plain yellow/buff from the top down too? 

"I dream in fire but work in clay." -Arthur Machen


  • Member since
    October 2021
Posted by PhoenixG on Thursday, July 20, 2023 1:10 PM

Gamera

Looks good! 

I'm assuming you're doing colour modulation by spraying with the the yellow/buff with dark earth and then spraying again with plain yellow/buff from the top down too? 


It had not crossed my mind, but now that you have called it out, it is absolutely something I will be doing.  Can't go wrong with zenithal highlighting.  Thanks Gamera!

On the Bench:

Bandai Starblazers 2202 Garmillas Zoellugut

  • Member since
    October 2021
Posted by PhoenixG on Friday, July 21, 2023 6:34 PM

Minor update.  The missile pods and searchlight have the main color blocked in.  The front fairing on the missile pod will eventually be painted a dark greeen.

The heels of the feet have been primed and preshaded.  I'm hoping that this weekend I'll be able to finish painting the major areas and start working on the detail.

podsblocked


On the Bench:

Bandai Starblazers 2202 Garmillas Zoellugut

  • Member since
    November 2009
  • From: SW Virginia
Posted by Gamera on Monday, July 24, 2023 7:29 PM

Looks great! You're making some solid progress there! 

"I dream in fire but work in clay." -Arthur Machen


  • Member since
    October 2021
Posted by PhoenixG on Monday, July 24, 2023 9:52 PM

Some significant progress made this weekend.  Finished the base color and completed the secondary.  Lots of masking involved.  Will save you the dreary details of that and share the results.


base color

secondaries

Gloss coat is currently curing and once dry pin washes are next.  To keep with the green shadows I picked up a bottle of Vallejo Dark Green Wash to try out.  Nothing on this model is black.  They are all shades of geen. I debated painting the cockpit windows but without them it makes the machine look headless.  I'll get to those after I finish up the pin washes.

On the Bench:

Bandai Starblazers 2202 Garmillas Zoellugut

  • Member since
    October 2021
Posted by PhoenixG on Monday, July 24, 2023 9:54 PM

Gamera

Looks great! You're making some solid progress there! 


Thanks Gamera.  Was able to put in some serious time at the bench and made some significant progress on it this weekend.

On the Bench:

Bandai Starblazers 2202 Garmillas Zoellugut

  • Member since
    October 2021
Posted by PhoenixG on Wednesday, July 26, 2023 12:47 AM

The Vallejo Dark Green Wash looks really good on the model.

wash

On the Bench:

Bandai Starblazers 2202 Garmillas Zoellugut

  • Member since
    October 2021
Posted by PhoenixG on Tuesday, August 1, 2023 2:28 PM

It's been a few days since my last post.  I've finished with pinwashes.  Decided the green wash made it look too much like it moss was growing on it so I did a second pass with a light brown pin wash.  That toned down the green nicely and strengthened the detail.

washpose

it's coming together nicely.  I've started adding the decals to body.  Been fighting a good deal of silvering with many of them.  For the most part it's been addressed.  The stripes on the legs were having trouble conforming due to the number and variety of raised surfaces by the ankle.  For the most part that's been addressed with judicious applications of Micro Sol and strategic cuts in the decal.

decaling

Next up is sealing the decals, after which the weathering can start in earnest. 

On the Bench:

Bandai Starblazers 2202 Garmillas Zoellugut

  • Member since
    November 2009
  • From: SW Virginia
Posted by Gamera on Thursday, August 3, 2023 6:16 PM

Gee friggin' whiz! I thought I'd commented here but I guess not! What you've got looks great! Love how she's coming along!!! Yes

"I dream in fire but work in clay." -Arthur Machen


  • Member since
    October 2004
  • From: Orlando, Florida
Posted by ikar01 on Saturday, August 5, 2023 9:23 PM

I have to find one of these as well as the Defender.  They were meant to be close in fighters for use in the city they built in the huge Macross alien ship.  They could  deploy on its outer hull to try and fight off the fighting pods of the Zentradi.  These aliens were very tall, maybe 20-30 feet tall.  The pods were one man units and looked kind of cramped.  Think of the ball turret on a B-17 or B-24 as an example.

  • Member since
    October 2021
Posted by PhoenixG on Sunday, August 6, 2023 2:05 AM

Final touches consisted of the following.

Edge highlighting with a mix of two drops sea grey and one drop olive green.  Really made all the softer edges around the legs.  On softer edges it really helped define the shape. Most notable on the upper legs and the bottom parts of the missile pods.

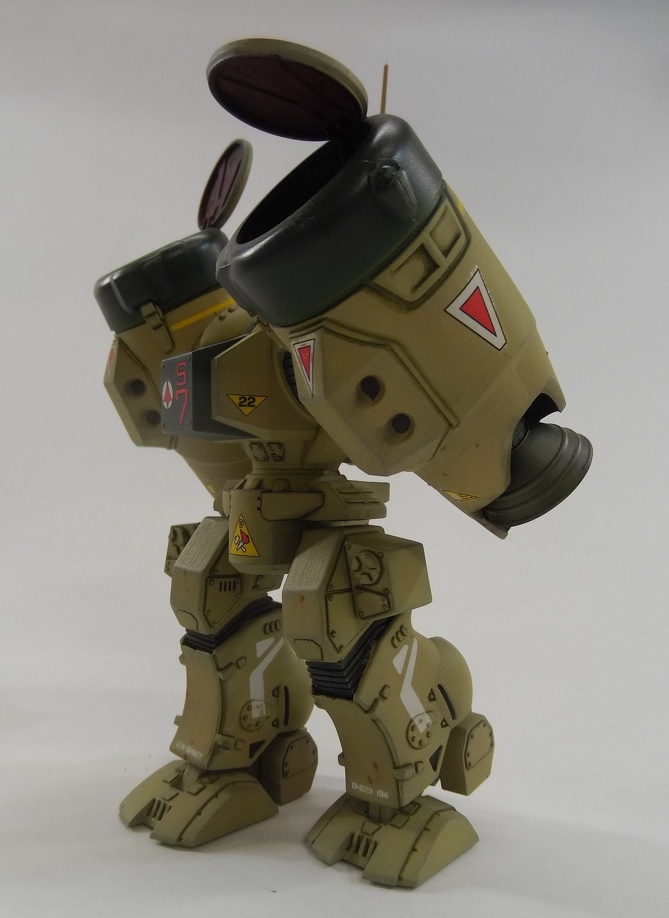
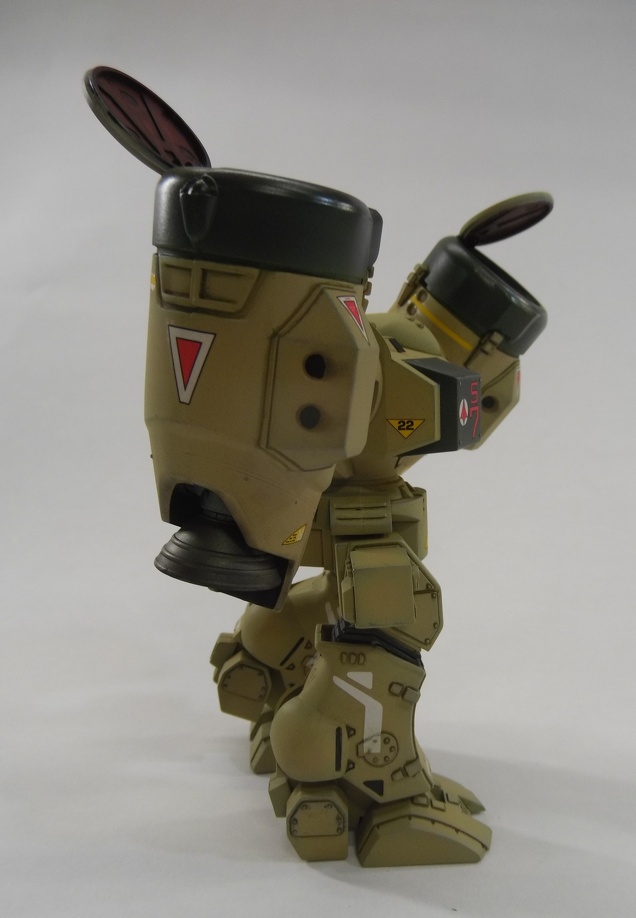
Added exhaust  soot stains to the inner rims of the front of the missile pods.  Brushed on black pastels.

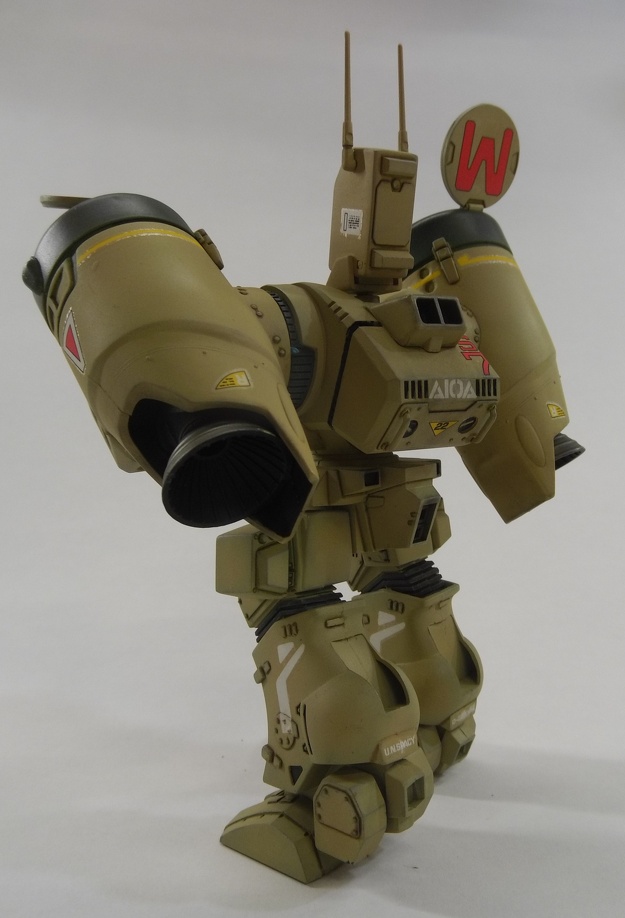
Did the same to the back of the missile pods in the areas around the exhaust bells.  Question, do missiles leave soot stains?  Regardless, this boot has soot stains from missiles.

Decided the all the square holes in the back where cooling exhaust vents so kept stains from that to minimum.  Large volume of air moving in near something like a vent invariably leaves some sort of stain.

I had been planning on dirtying up the lower half of the bot real good but after just a few rust chips it just didn't feel right to do more, and left it at that.  For me it was evocative a used but well maintained machine.

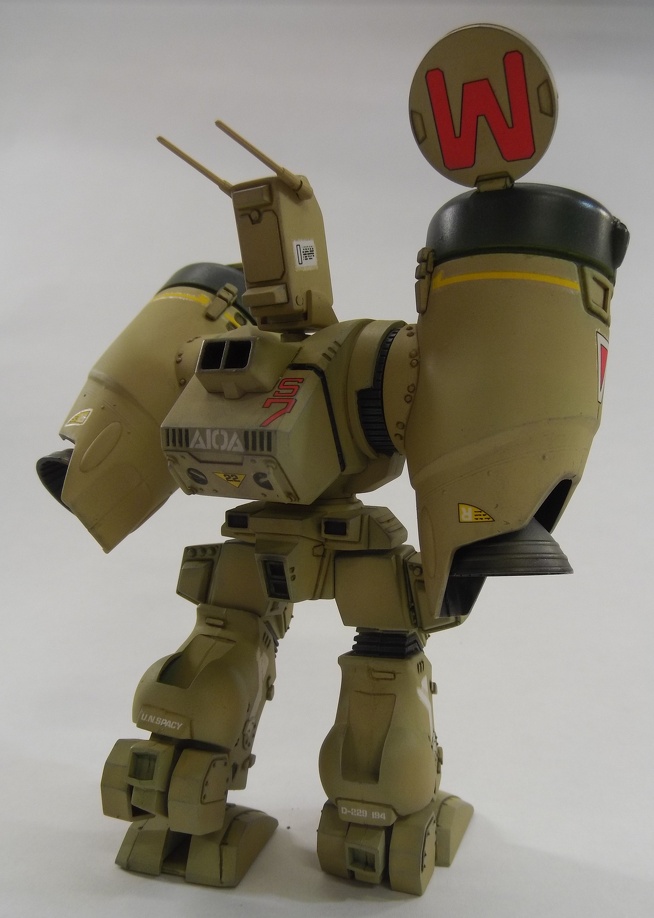
One major mistake that stands out is the searchlight on the head.  It suddenly became very apparent that I had forgotten to do the green preshade.  In contrast to the rest of the bot that nearly pure shade of brown really stands out.

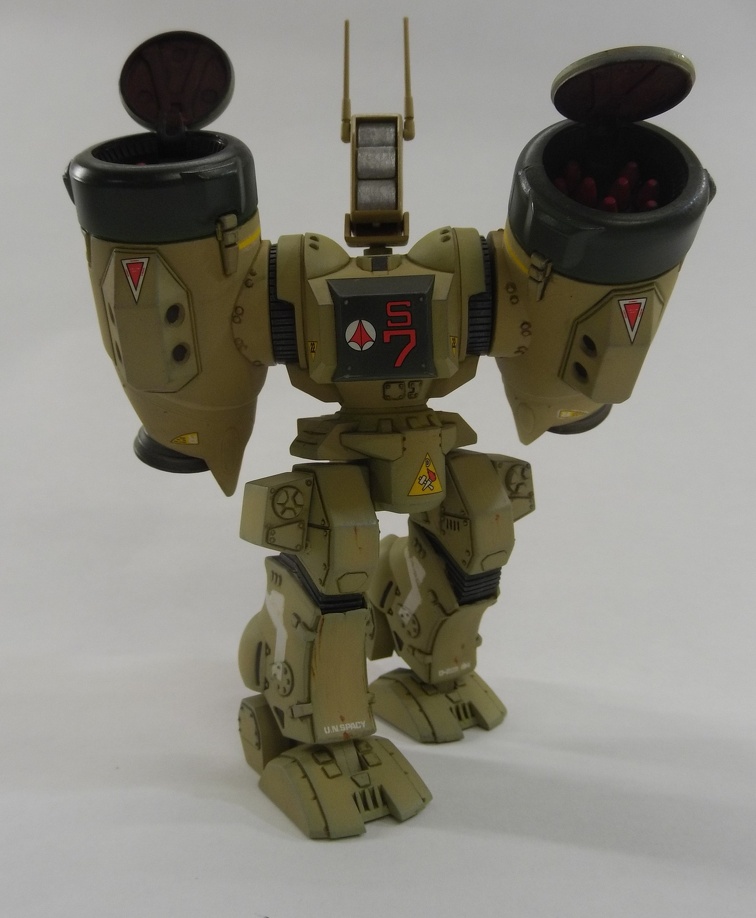
Final note.  Painted the central pane of where the cockpit would have been black.  Now it looks like it has a head.  Before, it felt like the headless horseman was staring at me.  Interesting how a strategically placed black square can change the feel of something.

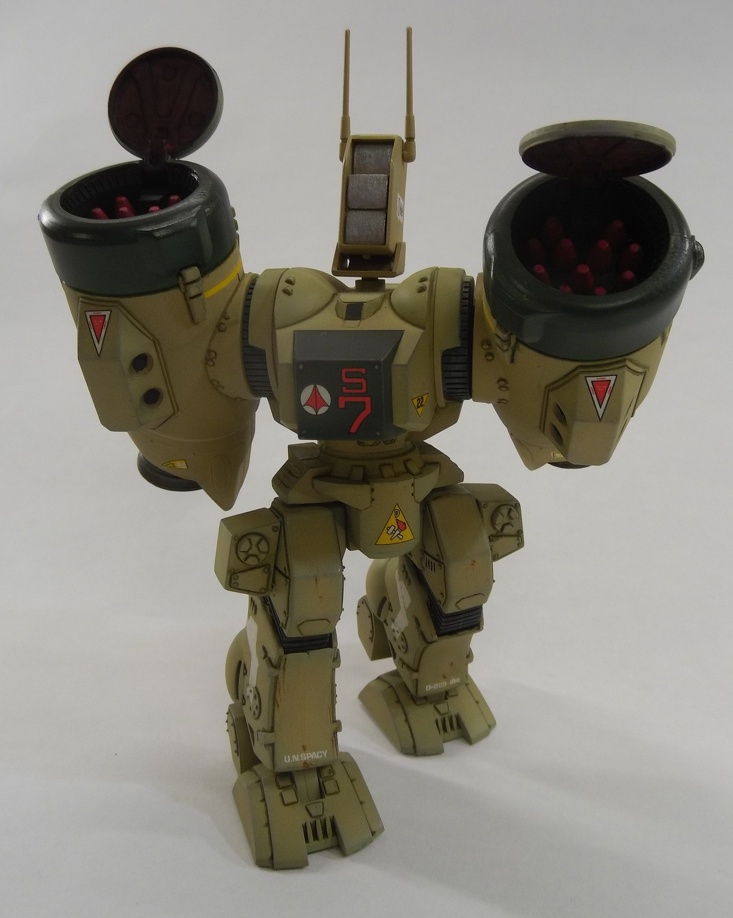
Without further ado.  The pics of the final work.

front1 final

front2 final

side final

rear1 finalrear2 final

profile2 final


Final thoughts:

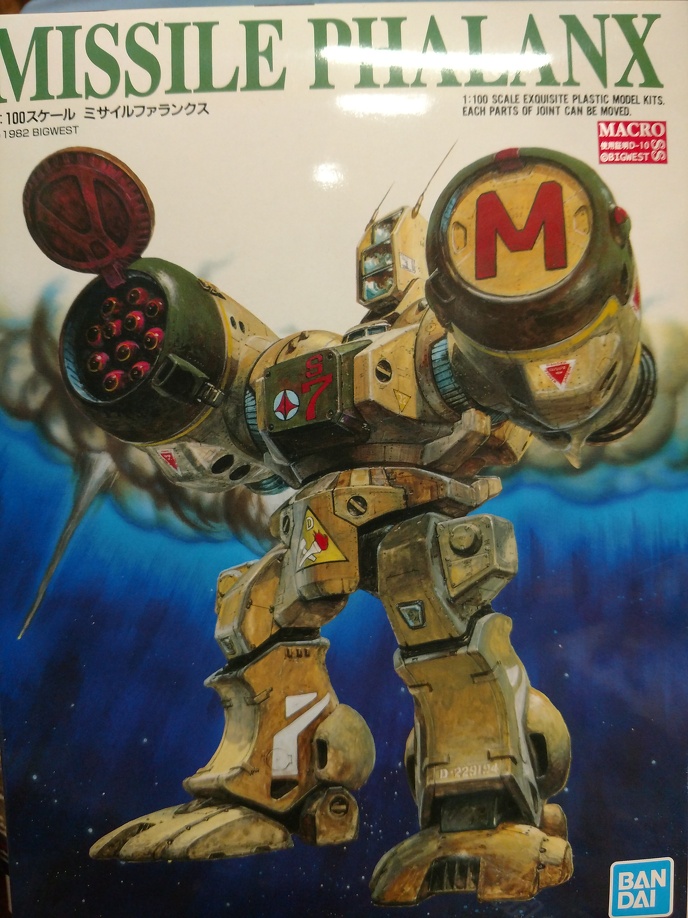
My goal was to create a model that was evocative the box art and I think I can call that a success.

boxart recap


Preshading with olive green under the buff/sandy yellow worked better than I expected and gave it a lot more character than any of my previous Robotech builds.  Still need a lot more practice with that technique, but the results make this something worth pursuing.

Biggest challenge with this build was the alignment of the missile pod halves and lower legs was garbage.  It require lots of sanding and filling and I was never able to get them completely eliminated (still can't fill with putty worth a damn) but despite the challenge it didn't distract to badly from the overall look of the finished model. 

The original Macross is my favorite giant mecha subject.  Maybe someday Gundam will find its way into my stash but for now Macross is king for me. :)

On the Bench:

Bandai Starblazers 2202 Garmillas Zoellugut

  • Member since
    October 2021
Posted by PhoenixG on Sunday, August 6, 2023 2:23 AM

ikar01

I have to find one of these as well as the Defender.  They were meant to be close in fighters for use in the city they built in the huge Macross alien ship.  They could  deploy on its outer hull to try and fight off the fighting pods of the Zentradi.  These aliens were very tall, maybe 20-30 feet tall.  The pods were one man units and looked kind of cramped.  Think of the ball turret on a B-17 or B-24 as an example.

Ikar01

I picked up this one and the defender off of eBay for under $20 each.  Hobby Link Japan gets them in stock periodically. 

I remember the scenes of the various Destroids, Tomahawk, Defender, Spartan, Phalanx, and Monster on the surface of the SDF-1 desperately trying to fight off the enemy Zentradi.  Unfortunately they always ended up being turned into giant fireballs.  The attrition rate for the pilots of Destroids must have been astoundingly high.

Unfortuantely it was the Veritech fighters who reigned supreme for screen time.  I always wanted to see more of the destroids.

I have the Bandai versions of the Monster, Defender, and Spartan in my stash.  They'll get their turn on my bench in due time.  I'm saving the Monster for last. 

monster

It is my absolute favorite of the destroids.

Wave released very well done 1/72 versions of the Phalanx and Tomahawk.  I recently picked up both of them up from HLJ.  The Tomahawk looks like it has a cockpit you can open and view the pilot within.  it looked exactly as you described.

On the Bench:

Bandai Starblazers 2202 Garmillas Zoellugut

  • Member since
    November 2009
  • From: SW Virginia
Posted by Gamera on Monday, August 7, 2023 8:29 PM

Looks really cool to me! Love those huge missile racks- it's a brutal looking mech. 

The pre-shading came out perfect. And the washes look good too! 

Great work all around! Heart


"I dream in fire but work in clay." -Arthur Machen


  • Member since
    October 2004
  • From: Orlando, Florida
Posted by ikar01 on Thursday, August 10, 2023 8:27 PM

Here's the Monster in Battletech markings being marshalled out of its parking spot.  This one is the 160th scale model.  It didn't have decals or instructions when I found it for 5.00 at a contest.

JOIN OUR COMMUNITY!

Our community is FREE to join. To participate you must either login or register for an account.

SEARCH FORUMS
FREE NEWSLETTER
By signing up you may also receive reader surveys and occasional special offers. We do not sell, rent or trade our email lists. View our Privacy Policy.