SEARCH FINESCALE.COM

Enter keywords or a search phrase below:

Lindberg 1/95 Nantucket Lightship FINAL?? 6-03

45569 views
67 replies
1 rating 2 rating 3 rating 4 rating 5 rating
  • Member since
    June 2006
Posted by captain dave on Monday, March 15, 2010 9:31 AM

Dear Mike:

     thank you so much for your assistance. I was in Desert Storm and I know what you mean about the gray. We worked with Boston Whaler boats. Big difference from white to CG Gray with machine guns. Best wishes,

           Dave


  • Member since
    May 2006
Posted by thunder1 on Sunday, March 14, 2010 6:10 PM

Hey Cap

If you Google Life.com and type in Nantucket Lightship in the Search box, , you'll come across 20 photos of the Nantucket taken in 1946. There are three good photos of the masts and rigging, perhaps this will help you in determining the rigging layout. I'm currently finishing up my fifth Nantucket in it's WWII guise, it looks really different in gray paint!

 Regards

Mike M..

  • Member since
    June 2006
Posted by captain dave on Friday, March 12, 2010 9:41 PM

The problem is with the rigging instructions. If you view the real lightships, it appeared to me that their rigging was, in nautical terms, real rope. That means a braided metal as opposed to "line" of either manila or poly type. The masts require support and there are no real instructions for the halyards used to fly her flags or for these support shrouds. Your model, as posted, is a fine work and you should be proud of it. Having just completed the kit I know how difficult it is to get this vessel to look good. For myself, I used the spar color and then gave them depth with oils. Tended to work out real well and I'd love to send you pictures if you give me an idea how I do that. My son is an IT tech.

  • Member since
    January 2008
  • From: Chicago
Posted by DerOberst on Wednesday, March 10, 2010 5:30 PM

Dave,

Again, I am not sure what the point of this post is.  Do you have some suggestions where someone might find such a reference?

Do you have some specific thoughts on what rigging is missing?

Thanks!


  • Member since
    January 2008
  • From: Chicago
Posted by DerOberst on Wednesday, March 10, 2010 4:50 PM

Dave,

I am not sure what your point is here.  This thread includes an extensive discussion of the color schemes, including schemes for the various versions of the vessels over time.

Are you saying that information is "really off"?  And there are a number of pictures in the thread as well.  Are those "really off"?

Please clarify before someone runs off to take pictures.


  • Member since
    June 2006
Posted by captain dave on Wednesday, March 10, 2010 12:15 PM

Add-on to the kit. Take some time and investigate the rigging. The directions are woefully short of all of the lines and supports that she should have.

  • Member since
    June 2006
Posted by captain dave on Wednesday, March 10, 2010 12:13 PM

The modern kit is very poor. The plastic is soft and the color scheme is really off for a lightship. But, if you take your time, head to one of the existing ships and take photos, you can produce a pretty decent model.

  • Member since
    January 2008
  • From: Chicago
Posted by DerOberst on Tuesday, March 9, 2010 9:27 AM

Well, I am no expert, but the modern kit was pretty cheap, as I recall.

I might be tempted to keep the vintage one and build the new one, if I were you!


  • Member since
    May 2006
Posted by thunder1 on Tuesday, March 9, 2010 9:25 AM

Chris

 I have an unbuilt  NANTUCKET kit from 1956 and note the following:  the kit has a cellophane bag of figures, chain and black thread. The box is unremarkable(no divider cardboard) but the cover box art is dramatic, depicting the lightship at night in dirty weather. The plastic is molded in three colors, red, buff and light gray. What makes this version different from the later releases is the letters spelling "NANTUCKET" are molded in the side of each hull piece. The late 1960's version was molded in colors but with out the molded lettering. The box cover in that issue is a color painting of the lightship in calm seas.

Later versions(Lindberg) had the kit molded in white plastic with a color photograph of a  pitiful build, I don't know who builds  Lindberg's kits for the box cover,  my young grandson could do a much better job. The direction sheet had the NANTUCKET letters printed on them so the builder was required to cut them from the sheet and glue them to the hull, what a crappy way to letter the model!

As to the bottom of your model being painted....I have an unbuilt 1955 model of the Pyro HARRIET LANE. The hull is factory assembled and the bottom is factory painted a gold color. The box has blue cardboard dividers seperating  the hull, deck and other parts. As to the value of the kit...if you are a collector save the kit as an example of 1950's tech. It's monetary worth is debatable in this down economy, Evilbay seems to be a buyers market for OOP kits these days. It may sell for as much as $100 IF you find a buyer that REALLY wants to add it to their collection. Since the Lindberg NANTUCKET kit is currently available, I doubt if you'd get big money for your version of  it.   

The SOUTH GOODWIN lightship dates back to 1970, I believe UPC(or Frog) offered the model at the time. I recall building the GOODWIN in 1971, along with the NANTUCKET. As a young coastguardsman, I built every kit that had some coast guard theme associated with it.  When I was stationed on the NANTUCKET I even built a copy of Billings Model's German "ELBE" lightship. We had few amenities on that ship so I was always looking for a model to build to pass away the long weeks on station. . weather permitting.

Regards

Mike M.    

  • Member since
    March 2010
Posted by ouicb on Sunday, March 7, 2010 12:14 PM

Ahoy All!

I am new to this forum but i have been modeling going on forty years or so...I have a 1955 Pyro 1/95 scale Nantucket lightship kit serial number 238. i have added the pyro electric ship engine kit to go with it...I have a spare engine kit and another pyro kit that has the RELIEF lighship cutout decals that i want to build...my question is this: is the 1955 Pyro kit too valuable to assemble? It came with some things that i haven't seen in other Pyro kits of this great lightship, such as the crew figures, spool of thread, and anchor chain...the two halves look like they were glued at the factory and the black bottom paint also looks to be factory painted... also, the box has a woodgrain divider inside and another one painted duck egg blue...When i bought this several years ago the owner sent a letter explaining that their parents bought this for them in the 1950's but the owner never got around to building it. 

At any rate i am going to build one of these kits plus i have two more lindberg lightship kits for spare parts...I have a lot of articles and pics i have collected over the years of lightships and also have the Russian version of the South Goodwin lightship that i haven't built...i am working on a 1/700 scale scratchbuilt "Frying Pan" lightship that is in the drydock at he moment.

 i appreciate all the research and info posted here, it should grease the skids for my assembly!

chris


  • Member since
    November 2009
Posted by Dream Modeler on Saturday, November 21, 2009 5:58 PM
So far only come up with this :- http://www.jlunderwater.co.uk/old_site/photoix/lv83/index.htm
Interesting with a sketch of the wreck but no colour scheme !
  • Member since
    November 2009
Posted by Dream Modeler on Saturday, November 21, 2009 5:21 PM
Hi.
Just come across this thread." Dogger" as refered to by Tankerbuilder is actually in the North Sea between England (North) and Belgium/ Holland. Scotland is a bit further North but I have not checked the actual relationship by lat and longitude !
A map is shown at http://en.wikipedia.org/wiki/Dogger_Bank
Will dig a bit more on Lightships located there in the past.
cheers
Jericlin
  • Member since
    January 2008
  • From: Chicago
Posted by DerOberst on Tuesday, June 9, 2009 12:29 PM

Thanks, Julian.

I appreciate the comment!


  • Member since
    June 2006
  • From: Netherlands
Posted by Grem56 on Friday, June 5, 2009 11:49 PM

A very nice build ! You have done the real deal proud.

Julian


illegal immigrants have always been a problem in the United States. Ask any Indian.....................

Italeri S-100: http://cs.finescale.com/FSMCS/forums/t/112607.aspx?PageIndex=1

Isu-152: http://cs.finescale.com/FSMCS/forums/t/116521.aspx?PageIndex=1


  • Member since
    January 2008
  • From: Chicago
Posted by DerOberst on Friday, June 5, 2009 4:34 PM

The buff color is called SPAR.

and it is available from Snyder and Short at http://www.shipcamouflage.com/

According to the experts that chimed in earlier in this thread, it is the only correct paint to use!

It sprayed nicely from an airbrush, and brushed well.

(and the color you see on the final model has been washed with engine grey and drybrushed with a yellow.  The out-of-the-can look for the paint is visible in some pictures from earlier in the thread.)


  • Member since
    June 2009
Posted by mastrsn on Friday, June 5, 2009 4:08 PM
Where did you get the Buff color?
  • Member since
    January 2008
  • From: Chicago
Posted by DerOberst on Wednesday, June 3, 2009 11:44 PM

Well, I think she is just about done.

Here are some nearly final photos.   I will mess with the flags and some other details (the stern light needs fixing!) I have to remove some dust that got blown on during the dull coat application.

Comments, suggestions, and criticism welcome!  Enjoy.


  • Member since
    January 2008
  • From: Chicago
Posted by DerOberst on Tuesday, June 2, 2009 3:59 PM

Bob,

Thanks.


I have just about finished.  A quick spray of dull coat and it should be a wrap.  Oh, wait. I still have to add the flags. 

And I think the flag poles that came with the kit look wildly out of scale.

I might have to build new ones.


I will post some finished pictures when I am done.

  • Member since
    June 2009
Posted by mastrsn on Tuesday, June 2, 2009 11:09 AM

Your Nantucket is looking GREAT! My Dad turned me on to this model when it was put out by Pyro. The Linberg kits are pressed from the Pyro molds, but through the years, they have turning out less than good quality kits. I have spent a while on Ebay and have bought at least a dozen of these kits- both Pyro and Lindberg!

An overseas 'N' scale railroad company called Priester puts out some really excellent <sp?> sailors, all decked out in life perservers, both Officers and Enlisted, that will really compliment your model. I have even used some 'N' scale lights with strobe effects in the masts to simulate the lights. I used hollow plastic and rebuilt the masts so the wires would slide down inside the hull.

I am new to this forum, and haven't figured out how to submit pictures yet, but I have a website that has a lot of info...

http://lightshipmodeler.iwarp.com

It has been a while since I have done any maintenence, but maybe this project of yours will get me back into fixing it since the crash.

Keep up the good work!

Bob


Oh, by the way- The fly bridge is a carbon copy of the bridge inside the Pilot House. It was used to navigate the ship easier.


  • Member since
    January 2008
  • From: Chicago
Posted by DerOberst on Sunday, May 31, 2009 11:09 PM

UPDATE:  Almost there, but there is a setback!

I have fixed all the major structures in place, and finished most of the touch up painting. I dry brushed the Spar with a naples yellow oil paint, and dry brushed the hull with a mix of cadmium red and white.  I am trying to induce some sun faded look to everything.  Then I dry brushed white back over the deck houses to tone down the weathering and make the highlights pop. 

A detailed post with pictures will follow, but....


I LOST A PART!!!

There are only 9 of the gizmos that secure the rigging to the deck. So I am short one and will have to fabricate it.   OOPS!Banged Head [banghead]

Enjoy some update photos.  Ignore the loose fishing lines dangling. I am waiting for the CA to dry prior to trimming.


Comments and suggestions welcome!!


  • Member since
    January 2008
  • From: Chicago
Posted by DerOberst on Wednesday, May 27, 2009 6:33 AM

Ok, I have made a few changes to the bridge:

The telegraph is painted and re-oriented

The signal lamps are silver face with louvres attached

The wheel is covered with canvas and installed.

The running light are painted black and back again, still need some touch up.

The bell is brass (but not weathered, it will look more like the large fog bell in the bow)

The fire fog nozzle has been removed and replaced.

As always, comments and suggestions welcome!!


  • Member since
    March 2004
  • From: Spartanburg, SC
Posted by subfixer on Tuesday, May 26, 2009 11:38 PM

We have a lightship museum in our local area. I'm sorry this is late but here is a link to some pictures that might interest you: http://www.portsnavalmuseums.com/lightshiparchive.html


I'm from the government and I'm here to help.

  • Member since
    March 2007
  • From: Carmel, CA
Posted by bondoman on Tuesday, May 26, 2009 9:33 PM
A good way to model canvas is to soak kleenex in a dilute white glue and drape it on. Takes a litle practice, but not much. Paint afterwards.
  • Member since
    January 2008
  • From: Chicago
Posted by DerOberst on Tuesday, May 26, 2009 8:45 PM

Bondo, thanks for the tip.  I was thinking the same thing...Whistling [:-^]

I have rotated the telegraph and am in the process of adding louvres to the signal lamps.

I am also making a cover for the wheel.. so far I have my doubts about how it is progressing, but I will post the results for comments.  


  • Member since
    March 2007
  • From: Carmel, CA
Posted by bondoman on Tuesday, May 26, 2009 7:05 PM

Hi Der, neat model in every way. Your flying bridge made me think; the telegraph should probably point fore/aft motion of the lever. Just seems wrong sideways. Here's a pic from another ship, the Relief, and in the wheelhouse, but it is probably the same idea.

A great project.

  • Member since
    January 2008
  • From: Chicago
Posted by DerOberst on Tuesday, May 26, 2009 4:45 PM
 thunder1 wrote:

 however the face of the engine order telegraph should be painted black, as it was glass on the real ship with all the attendent lettering on it's face. Of course in this scale it would be a tough thing to achieve...Big Smile [:D] 

Ok, Mike, I dressed up the telegraph. 

And I painted around the running lights black, but I hate the way it looks.


  • Member since
    January 2008
  • From: Chicago
Posted by DerOberst on Tuesday, May 26, 2009 4:17 PM
 Grem56 wrote:

That really is a beautiful build. A bit too clean Big Smile [:D] Must be all those "Coasties" doing overtime Smile,Wink, & Grin [swg].

Julian Smile [:)]

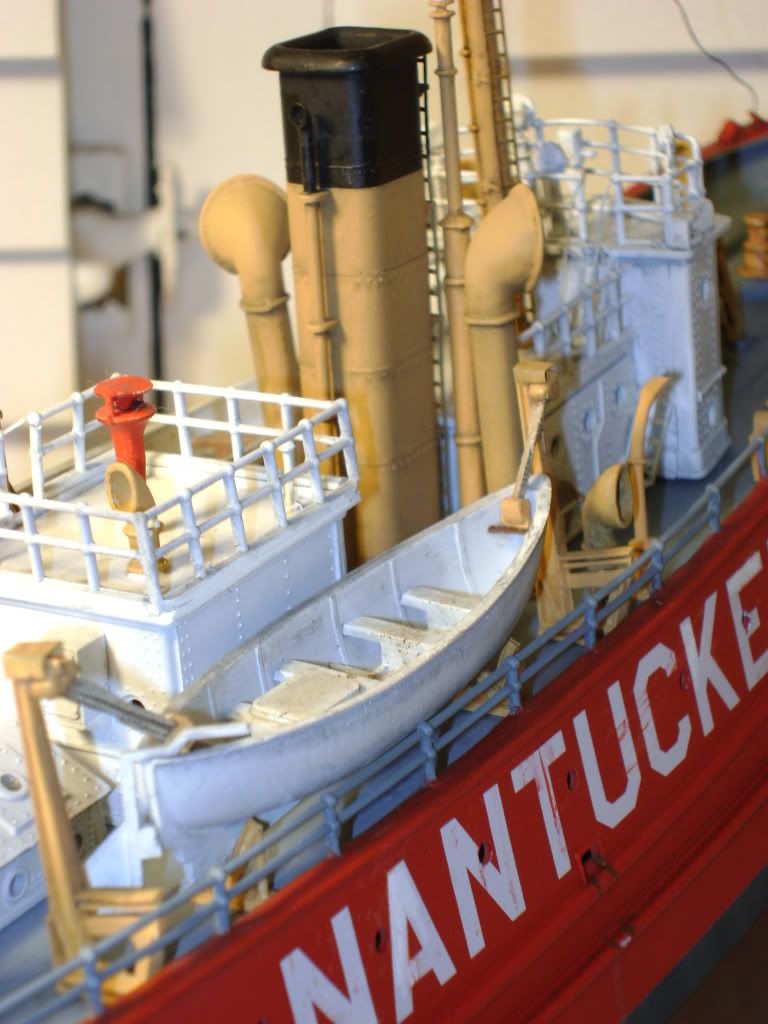
Funny that you think it is too 'clean'.  The pictures don't really show how dirty this model is.  Remember, I am a tank guy, so when I do weathering....

The life boats look like a rugby team was rescued from a muddy pitch.  The deck has been washed with enough black-wash to make it look like a coal freighter. The hull has rust and oil coming out of the scuppers.  The sides are scraped up like she was raising and lowering the boats in a Force 5 gale.

Nantucket Mike would have a heart attack if he saw it.

The photos wash it out a bit. 


Take a close look at this image.  It shows the weathering a bit better.  Look at the stack and the ventilators -- you can see the wash clearly there.

It also shows where I added a brass plate to attach the boat davit tackle.  I was not happy with the 'magic' attachment appearance of either end of the ropes and tackle. I added plates to the boat and at "cap" to the davit itself.  The caps are merely to hide the poor fit of the block to the davit.  It now looks better, methinks.  (the plate is left over PE, and the cap is wine bottle foil bent and painted.)

And you can almost see where I drilled out the pipe at the back of the stack.

Oh, one more thing.  The supports that the boat is resting on are made from evergreen I-beams and plate.  I would like to claim that I was improving on the kit stanchions, but the truth is that I lost the real ones along the way and had to make new ones.  Oops.  No one will ever know!


  • Member since
    June 2006
  • From: Netherlands
Posted by Grem56 on Tuesday, May 26, 2009 2:05 PM

That really is a beautiful build. A bit too clean Big Smile [:D] Must be all those "Coasties" doing overtime Smile,Wink, & Grin [swg].

Julian Smile [:)]


illegal immigrants have always been a problem in the United States. Ask any Indian.....................

Italeri S-100: http://cs.finescale.com/FSMCS/forums/t/112607.aspx?PageIndex=1

Isu-152: http://cs.finescale.com/FSMCS/forums/t/116521.aspx?PageIndex=1


  • Member since
    May 2006
Posted by thunder1 on Tuesday, May 26, 2009 1:53 PM

Peter

 The ship's wheel on the NANTUCKET were of brass construction, as was the pedestal. On the flying bridge the wheel was not painted(the wheel pedestal was painted white) but was usually kept protected with a canvas cover to minimize the dulling of the brass. Still the Atlantic sea envoirment would give the brass wheel a  green "patina" and depending on the ship's skipper, the flying bridge wheel was polished on a weekly basis, weather permitting. The wheel in the pilot house was polished daily, it gave the man on watch something to do... If you make a fog nozzle from brass wire(or stretched sprue) it would enhance the models appearence rather than just a "blob" on the bulkhead. Well, you're really going to town on this kit, I'll be interested to see how it turns out.

Mike

JOIN OUR COMMUNITY!

Our community is FREE to join. To participate you must either login or register for an account.

SEARCH FORUMS
FREE NEWSLETTER
By signing up you may also receive reader surveys and occasional special offers. We do not sell, rent or trade our email lists. View our Privacy Policy.