SEARCH FINESCALE.COM

Enter keywords or a search phrase below:

USS Missouri Build

34309 views
54 replies
1 rating 2 rating 3 rating 4 rating 5 rating
  • Member since
    May 2004
  • From: Mount Bretherton Model Aircraft Observatory
Posted by f8sader on Saturday, May 11, 2013 10:20 AM

Nice work..."micro modeling"...

Lon-ski

  • Member since
    March 2012
Posted by oscarwray on Tuesday, May 7, 2013 10:05 AM

A start...again. Got the hull painted on the bottom in Tamiya Hull Red. Boot topping painted as well. I don't have an airbrush so all is by hand. Took 4 coats on the hull to get a good coverage. Here is a shot of the hull in progress:

New Missouri

New Missouri

 I got the screws and rudder install last night as well. I started on the gun turrets, number 1 turret first. Using the Lion Roar super detail set. Been here before, but the barrels lined up better this time after learning that using the old eyeball is not precise. The barrels are not fixed in place yet and a few details are missing, like the ladders, railings but I was pleased with the progress. A few shots:

New Missouri New Missouri


  • Member since
    March 2012
Posted by oscarwray on Wednesday, May 1, 2013 1:29 PM

I too think it was blue at surrender time. I am painter her in 32/22D so it doesn't matter for me anyway. Apparently the PONTOS kit I ordered was the one titled 1/350 USS BB-63 Missouri BATTLESHIP Detail Up Set, kit number 35011F1. There is another one called 1/350 USS BB-63 Missouri 1991 Detail Up Set, kit number 35009F1. There is no difference between the kits that I can distinguish after the fact. The BATTLESHIP versionI have it not for WWII as it has radar introduced in 1975 and helicopters and hell deck configuration. I can only guess that it is maybe for the movie version of the ship? Disappointed that I spent the money without taking a harder look at the kit. But, I did get another lion roar set to replace the one I have lost in the storage unit. I will place the Pontos kit in the stash and maybe build a current version to have displayed along side the WWII version. Also coming in the mail today is some more paint to replace what I lost as well. Should get a good start as I have the next 2 days to work.

  • Member since
    December 2002
  • From: Lyons Colorado, USA
Posted by Ray Marotta on Saturday, April 27, 2013 4:14 PM

I can't swear the Mighty Mo's deck was still stained blue at the time of the surrender but, I did find this.

                           www.google.com/search

I guess it could be carpet but,...

All the best

Ray

 ]


  • Member since
    July 2006
  • From: Philippines
Posted by constructor on Friday, April 26, 2013 7:39 PM

This is getting to be very interesting. Actually I am on hold here hoping that Tamiya may yet come up with a superdetailed WWII Missouri like their Yamato. But if not , then I have to go your way that is why this post is very important to me. Do continue posting your build. Thanks.

  • Member since
    March 2012
Posted by oscarwray on Thursday, April 25, 2013 4:31 PM

One last thing for today, did you guys see the tip in the most recent issue about the jig for the battleship turret barrels? I will be using that one for sure, I had kinda made a jig but it did not work so well. The one in the picture looks much better. Updates coming soonest!

  • Member since
    March 2012
Posted by oscarwray on Thursday, April 25, 2013 4:30 PM

Thanks Surfsup and CapnMac82 for the comments. Stay tuned for more. 

  • Member since
    March 2012
Posted by oscarwray on Thursday, April 25, 2013 4:28 PM

Well, my mighty mo went out in a mighty fire. Had to place some things in storage and the building went up in flames (not really, but I was fairly hot about the ordeal). I was able to save some of the PE but the plastic was melted. It was a small fire and was extinguished quickly but plastic is plastic and melts at low low temperatures. I had insurance and it took a while to get things settled. However! New kit is on the way and I went with the Pontos detail kit so I can mix and match between the Lion Roar and the Pontos kit. Plus the pontos comes with a deck. All were ordered today, and I should be back to building in the next few weeks. Starting from scratch though, at least I did not get too far in the build….

  • Member since
    March 2012
Posted by oscarwray on Thursday, April 25, 2013 4:24 PM

Those came with the lion roar PE super detail set. They do look fantastic. Writing an update post in just a minute on the status of the build...

  • Member since
    March 2009
  • From: brisbane australia
Posted by surfsup on Wednesday, August 8, 2012 5:59 PM

Beautiful work so far. Am enjoying your Build.....Cheers Mark

If i was your wife, i'd poison your tea! If Iwas your husband, I would drink it! WINSTON CHURCHILL

  • Member since
    November 2005
  • From: Formerly Bryan, now Arlington, Texas
Posted by CapnMac82 on Sunday, August 5, 2012 2:49 AM

Those radars you have built up ever so well, are the fire control radar units for the 16" gun direction system.

While the individual turrets have "long base" stereoscopic rangefinders, those directors are for back-up, for engagements of only 10-11 miles or so.

The gundirectors up on the towers have shorter base stereo (this works by angling prisms at each end of the director arm until the target is aligned; trigonometry does the rest) but with significantly more height and a longer-18 to 22 miles--horizon line-of-sight..  

Now, adding radar means being able to range targets in the dark or in poor/no visibility.  Tracking 16" rounds with vacuum-tube technology aided by the dimensions.  You can see 16" shells in flight with Mk 1 Mod 0 eyeballs.  So, getting an RF signal off one is not that tough.

While on topic of main batteries, they are a unique operation at this scale. 

This is a sophisticated dance.  A target is identified.  The gun directors give range, bearing, speed and direction of target.  That is all entered into the fire direction computer (pure analog mechanical gears).  This information is passed to the Gunnery Officer, who duly reports it to the Captain.  The CO then decides on the tactical particulars.  He then passes that information to the Gunno, who then communications that to the direction people.  Who then plug in the data, and get back gun tube elevation and the train (rotation) angles for each of the engaged turrets.  At the same time the gun crews are given the order as t which kind of shell to load.  The turrets and gun tubes slew to the angles given by the directors.  The tubes dip to the loading angle the rammers require, and bob back up to the shooting elevation. 

Typically, two rounds are fired, to "range" the target (sometimes two per turret).  The fal lof shot is adjusted until the target is "bracketed" with one long and one short.  Said task being complicated by the target maneuvering, and likely shooting back.  The results of all this being passed back to CIC.  Once on target,  Gunns, in the CIC will send to fire for effect, so the shot volume goes up quite a bit.

However, with the target maneuvering and your own ship maneuvering, you do not want to invest a lot of rounds on any given volley if the target  is unlikely to be there during 60-80 seconds of flight time (at 20kt, that's 2000 feet traveled every minute).

  • Member since
    November 2010
Posted by Pembo on Wednesday, July 18, 2012 6:39 AM

Oscarwray,

In your beginning post showing all the parts where did you get the resin parts from in particular the 16 in blast bags and barrels, they look so much better than the kit ones

Cheers AllanP

  • Member since
    March 2012
Posted by oscarwray on Monday, May 14, 2012 11:08 AM

Well, this will be a labor of frustration in painting. I want to paint her the cammo scheme so I will be doing that last to save time masking (except for the turrets and towers and smoke stacks, etc those will be done individually) and that makes for some headaches. I will be forced to make a lot of custom masks to hide the beautiful pontos deck I laid down this weekend, pics below. I made a few mistakes, like glueing the lifeboats down before the deck Bang Head but I will have to cut some spare decking and fill in the gaps later. I have glued into place the fore, aft and mid decks. This was due to the need to place the decking down first before any more parts got put in place. I took the time to build a tricky little piece of PE. I am not sure what it is, some kind of radar, I am trying to look it up today while at work. It is final exam time so all I am doing is monitoring tests all day. Pics below. I was pleased with the result even though I lost one part to the hardwood floor monster (yes I know, the part really was that small!) and I need to go in and straighten all the little pieces once I install them. Every time I breath, the little parts bend out of shape. I finally got in the paint except for the hull color which should be here next week, that is the main reason for the delays, I need paint! Silly tamiya paints and there issue with labels. 

Aft deck

IMG_0226

Fore deck

IMG_0225

These are really small, forgot to put my dime in the shot, but that is regular hobby knife at the top Yes

IMG_0224 IMG_0223

  • Member since
    July 2006
  • From: Philippines
Posted by constructor on Friday, April 27, 2012 6:33 PM

I agree with you. Crewing a battlewagon is no joke. If I will I would prefer figures in the quality of the figures that Dragon has with their destroyers but they're very few.  BTW looking at the build I really think a new Big Mo in the quality of the new Yamato is now in order. Cutting unwanted ladders is a pain in these very old but the only one of its kind model.

  • Member since
    March 2012
Posted by oscarwray on Friday, April 27, 2012 10:33 AM

Tojo72

Your build is moving along nicely,nothing like a well detailed 1/50 ship model.

Did you ever see this AM kit for the surrender ceremony ? Awesome

http://www.freetimehobbies.com/images/products/detail/EDU53034.jpg

I have not seen that kit before, it is outstanding. I do not usually put people on my projects, I do not have the patience to put 2000 little men on my little ship! Embarrassed

  • Member since
    March 2003
  • From: Western North Carolina
Posted by Tojo72 on Friday, April 27, 2012 9:45 AM

Your build is moving along nicely,nothing like a well detailed 1/50 ship model.

Did you ever see this AM kit for the surrender ceremony ? Awesome

http://www.freetimehobbies.com/images/products/detail/EDU53034.jpg

  • Member since
    March 2012
Posted by oscarwray on Friday, April 27, 2012 8:38 AM

Started on the main superstructure lower level last night. Have to remove some ladders to add the much improved looking PE ones. Broke out the dremel but it was melting the plastic, I have to get a new one soon, mine only works on super speed, it will not work on the variable setting. Sad I managed to get one of the ladders out the old fashion way with my pin vise drill and an old pair of sprue cutters. I will work on removing the rest and then filling in the holes with some sheet styrene. It will be a couple of firsts for me, I have never worked with raw styrene in a model before! I will then fill the gaps with some tamiya putty I picked up the last time I was in san antonio at my not-so-local LHS and sand smooth. Will post pics this weekend once I get that done. 

Ladder to be removed. 

IMG_0211

Another one to be removed. There was 8 in all on the bottom structure. 

IMG_0210

Ladder completely gone on the right, partially removed on the left. Dremel tool got hot and started to melt things. 

IMG_0208

  • Member since
    March 2012
Posted by oscarwray on Thursday, April 26, 2012 1:19 PM

Got to work on the superstructure last night. I got the #1 funnel base completed and I started removing the plastic from the funnel outlet to add the much better looking and scaled PE funnel cover. I have to have the whole funnel done today. Here are a few shots of the work. I did drop the whole thing on the floor once and bent the front railing, I bent it back and reglued again. Here are a few pics:

One of the vent covers in place. The metal louvers look a lot better than the molded plastic ones (see the one on the far left compared to middle). 

IMG_0200


The decking with railing is a lot better than the one in the kit. 

IMG_0202

Side shot of the completed structure. Doors look 1000% better than the flat molded ones. I am thinking of doing some of the doors as open. 

IMG_0203


front view, I have gone back since this picture and fixed the railings to stand straight. 

IMG_0206

I started removing the plastic ladders from the main superstructure base, I am trying to find my dremel to make this easier, I was using my pin vise and a large bit to get the job done. Then cleaning up with a file and sand paper.  Wink

Cheers,

Oscar

  • Member since
    March 2012
Posted by oscarwray on Tuesday, April 24, 2012 11:02 AM

Well, I have hit a few more snags. The PONTOS deck needs to go on before I glue anything on the deck, and I have already glued a bunch of stuff down. Surgery will be required Bang Head...not happy. The problem is that I will have to glue all three deck pieces down before I can apply the decking, as the decking is longer than each individual deck section. This means I will have to do the main superstructure before the fore/aft decks. I am going to get started on it tonight. 

I have folded one of the PE catapults and the outcome is outstanding! Much better looking that the plastic parts. I will snap some pics tonight and post them tomorrow. 

  • Member since
    March 2012
Posted by oscarwray on Tuesday, April 24, 2012 10:55 AM

amphib

Oscar

In my opinion the best source of information regarding the Iowa class battleships is "Iowa Class Battleships, Their Design, Weapons, & Equipment" by Robert F. Sumrall. This should be available from Amazon or the Naval Institute press.
Amphib

My library actually had this book, I am going to pick it up in the next few days. 


  • Member since
    May 2010
Posted by amphib on Tuesday, April 24, 2012 5:24 AM

Oscar

In my opinion the best source of information regarding the Iowa class battleships is "Iowa Class Battleships, Their Design, Weapons, & Equipment" by Robert F. Sumrall. This should be available from Amazon or the Naval Institute press.
Amphib

  • Member since
    July 2006
  • From: Philippines
Posted by constructor on Monday, April 23, 2012 10:11 PM

Follow up.

Looking a the surrender picture, will the deck blue come close to the actual color and the turrets seem to look blue also.

  • Member since
    August 2005
  • From: Mansfield, TX
Posted by EdGrune on Wednesday, April 18, 2012 9:26 AM

constructor


 EdGrune:


http://www.history.navy.mil/photos/images/ac00001/ac02719.jpg


Decks were stained  20B - Weather Deck Blue at the time of the surrender.   


I noticed from this photo that the strip under the ladder on the turret is painted light grey. Is this true to all the main batteries?

The "A" turret, on the right side of the photo does not show the stripe.    Note too that there is no ladder in the same position relative to the range finder hoods on the "A" turret.   I have not been able to locate photos of the "Z" turret with sufficient detail and contrast to comment upon.

However, the "B" turret (the one with the stripe under the ladder) had a 40mm mount on its top.   One could assume that the white stripe was to add contrast and aid the gun crew in finding the ladder rungs when climbing the ladders during low-light general quarters.   

The "Z" turret also had the 40mm mount.   You could add the detail under the ladder and dare anyone to prove you wrong

  • Member since
    July 2006
  • From: Philippines
Posted by constructor on Tuesday, April 17, 2012 4:14 PM

EdGrune

http://floatingdrydock.com/books.html#PB

Order with confidence directly from Tom Walkowiak at Floating Drydock.  Item # BBPB-CD

He takes plastic or Paypal

http://www.history.navy.mil/photos/images/ac00001/ac02719.jpg


Decks were stained  20B - Weather Deck Blue at the time of the surrender.   

I noticed from this photo that the strip under the ladder on the turret is painted light grey. Is this true to all the main batteries?

  • Member since
    March 2012
Posted by oscarwray on Monday, April 16, 2012 8:42 AM

Well, due to my BASS club tournament this weekend I did not get much done. Other than attaching the main turret to the foredeck, it is completed and ready for install. Pics below. I have all the guns attached to the bofors mounts, now I just have to assemble the 39 other bases and flash deflectors (think thats the term for the metal covers in front of the guns, I need to read some books on this subject). I am going to table those for a while due to the total repetitive nature of putting them together. Also, I do not have a solid surface for cutting an bending the PE parts and the larger ones I cannot cut on the side of my razor saw blade! Whistling Once I get paid I am going to get a piece of glass of some kind to use as a cutting surface. My last piece got broke when I moved.

I started on the aft deck last night but did not get very far. Hope to get some work on it today. I am still waiting on my not-so-local LHS to get the paints in for me. I think I am just going to order them online somewhere if he does not get them in soon!

IMG_0193 IMG_0195

  • Member since
    July 2010
  • From: Harlan, Kentucky, U.S.A.
Posted by robtmelvin on Tuesday, April 10, 2012 8:49 AM

Good work, Oscar.  The PE looks really good.  Also gives me an idea of what I'm in for with that L'Arsenal foredeck.  Keep up the great work and I'll be looking forward to your next update.

Bob

Just launched:  Revell 1/249 U.S.S. Buckley w/ after market PE and guns.

Building: Italieri 1/35 P.T. 596 w/ Lion Roar PE.

  • Member since
    March 2012
Posted by oscarwray on Monday, April 9, 2012 8:13 PM

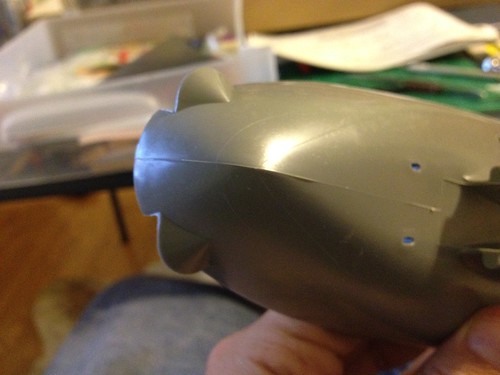
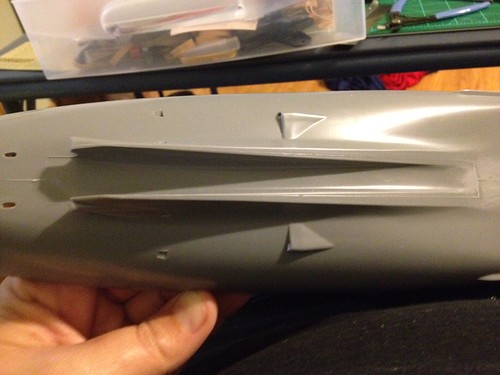
Ok, this will be a large update from my four day weekend fun! Had some family fun on Sunday with the Jetskis and fishing. First, I cleaned up the lines on the hull from the casting. There was a raised line running down the entire centerline of the hull and around the areas where the screws attach. I sanded them down starting with 150 grit and worked up to 1000 grit. Here is a few shots of before and after:

Before
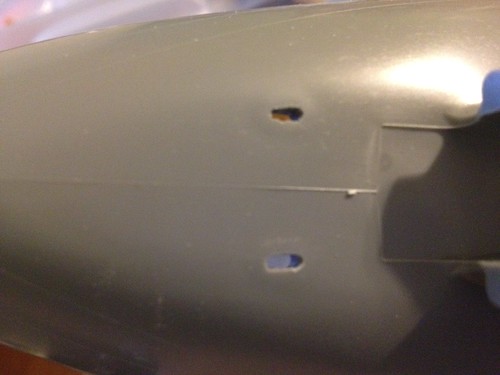
IMG_0169 IMG_0168 IMG_0167

After, the sanding scratches will be taken care of with primer later. It does not look like it, but it is smooth to the touch.
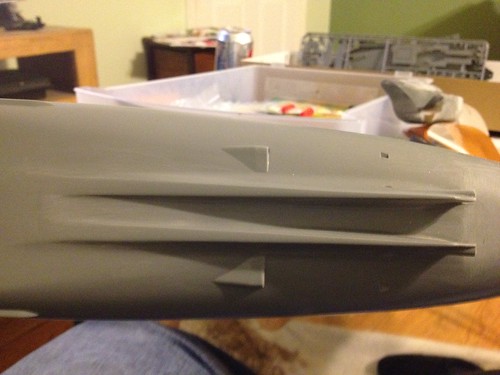
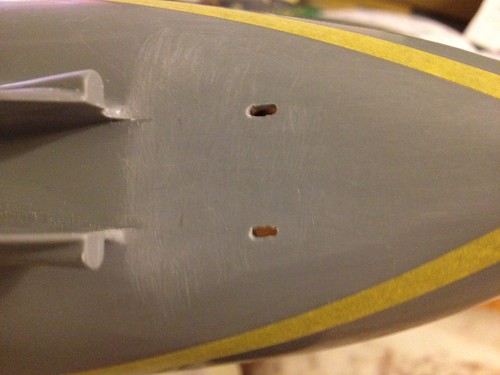
IMG_0170 IMG_0189 IMG_0188

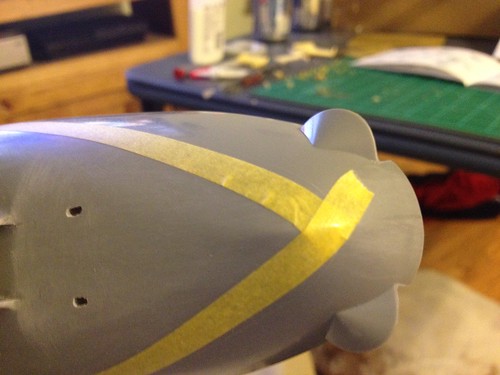
I also opened up the holes for the rudders and installed the outside screw shaft holders as they are the same color as the bottom of the hull. I also masked the hull in preparation for when I get in the red paint for the hull. Hopefully, my guy in San Antonio said he can get all the paint I need in about a week or so.

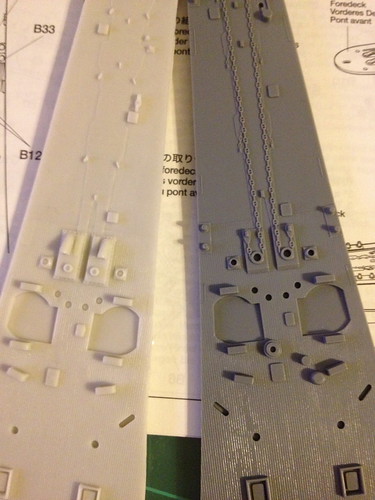
I then turned my attention to the foredeck from l'arsenal. One side of the deck fit perfectly, the other side had lots of rough edges and some large resin blocks from the casting that had to be removed. It took a lot of sanding and removing to get the deck to fit correctly and I am still not pleased with the result, more sanding will be required. I added a few parts to the foredeck as well.  

For comparison, both foredecks side by side. 
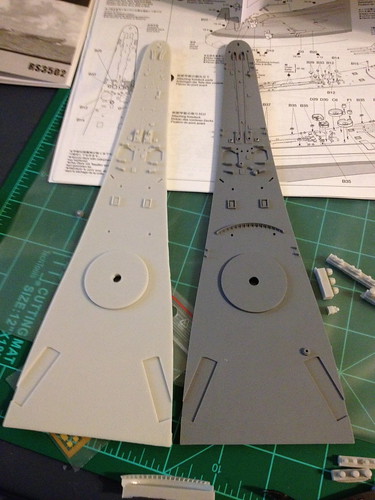
IMG_0173

Better shot of the front side of each. 

IMG_0175 IMG_0174

This gap will have to filled somehow, still noodleing how to do that...Confused

IMG_0178

Seam before I fixed most of it. 

IMG_0177

Same seam after, not the perfect fit on the port side straight out of the box, too bad both sides were not the same.

IMG_0181

When I got bored...I started on the 40mm bofors. The kit calls for 16 sets of quads and I have enough for 20 sets from the lion roar set. I am going to have to look at the floating dry dock plans once I get to work tomorrow, I have no CD drive on my laptop. More issues with the lion roar set, the instructions call for parts P1 and P2 to be the base of the boors and then call for part P1 to be the gun pedestal as well. The base parts are actually C1 and C2. Took a little while to figure that out! Attaching the seats gunsights to the bofors is frustrating, and I may leave them off as they are so small and cannot be seen very well. 
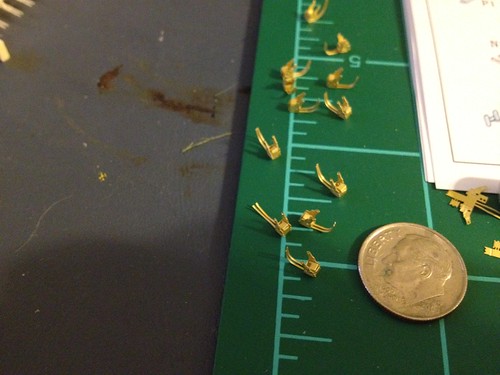
IMG_0187

See the really really same part, that is the seat and foot rest for the operator. Barely bigger than the ear on the dime! Here is my first 40mm bofors done, I was not pleased with the result and I am paying much more attention to the rest. 
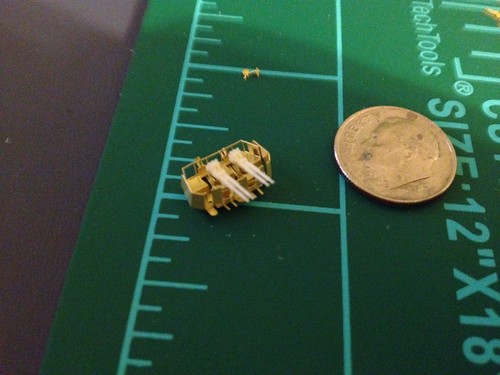
IMG_0186

More to come later

Cheers

Oscar

  • Member since
    March 2005
  • From: West Virginia, USA
Posted by mfsob on Sunday, April 8, 2012 12:51 PM

*laughs* When is "red" not "red" - When it goes on the bottom of a ship, of course!

  • Member since
    July 2010
  • From: Harlan, Kentucky, U.S.A.
Posted by robtmelvin on Thursday, April 5, 2012 12:41 PM

Looking good Oscar.  And, in my experience, LionRoar is not the easiest PE to work with, nor do they have the best instructions.  Keep up the great work.

Bob

Just launched:  Revell 1/249 U.S.S. Buckley w/ after market PE and guns.

Building: Italieri 1/35 P.T. 596 w/ Lion Roar PE.

JOIN OUR COMMUNITY!

Our community is FREE to join. To participate you must either login or register for an account.

SEARCH FORUMS
FREE NEWSLETTER
By signing up you may also receive reader surveys and occasional special offers. We do not sell, rent or trade our email lists. View our Privacy Policy.