SEARCH FINESCALE.COM

Enter keywords or a search phrase below:

Revell Sport Fishing Boat

7103 views
36 replies
1 rating 2 rating 3 rating 4 rating 5 rating
  • Member since
    January 2021
Revell Sport Fishing Boat
Posted by PFJN2 on Tuesday, November 9, 2021 10:34 PM

Hi,

I just picked this up off eBay at a pretty good price (I think) because it was missing a few small parts.  I can't wait to get started.  I'm thinking of maybe adding a cover for the open bridge, and updating its color scheme to look a bit more modern, with maybe a Blue, Green, or Gray hull, and White deckhouse with blacked out windows, and window trim.  For the underwater hull, I'm thinking maybe either light or dark Blue (depending on whatever color I make the upper hull, and maybe a White boot topping.

I'm thinking of also adding a swim off platform and door in the transom, so that it'll probaly be a bit more of a cruising boat than a fishing boat.   And finally I might add some planking to the open bridge and do all the decks in a light tan/Teak look.

Pat

Boat

  • Member since
    April 2003
  • From: USA
Posted by keavdog on Tuesday, November 9, 2021 11:01 PM

Looks like a fun project.

Thanks,

John

  • Member since
    August 2005
  • From: Mansfield, TX
Posted by EdGrune on Wednesday, November 10, 2021 7:14 AM

That is Revell, not Lindberg


  • Member since
    October 2019
  • From: New Braunfels, Texas
Posted by Tanker-Builder on Wednesday, November 10, 2021 7:30 AM

Oh Boy!

      Revell was so wrong with this. This mold goes back to the fifties. It represents a Chris Craft Tri Cabin Motoryacht. They were never or rarely used for a Sport-Fishing boat. The Rear cockpit is to small for that in real life.

   Now, that said, You can enclose the Flying Bridge area and create a style of boat you see many of in  Northern California Delta waters. They are modified to be Live-Aboards.

     The Tri-Cabins were usually 44 to 54 ft. long. They were intended for the boat owner to have his or her Quarters in the Aft Lower cabin. With an entry to the cabin from the Great cabin and the Aft deck area.

    In reality Putting a walk through in the transom would not work. It would weaken the boat in following seas. They were designed to be coastal open water boats. Although it would be neat with the Wood style swim Platform.

  • Member since
    July 2015
Posted by MR TOM SCHRY on Wednesday, November 10, 2021 7:51 AM

Funny story about this kit.  About 20 years ago we hired a contractor to remodel our basement rec. room.  While working the contractor noticed my stash of model kits and built kits.  We got to talking and he said that he had recently found two old model kits at a recent demolition project and asked if I would want them.  Well, one of the kits was this actual Revell Sport fishing boat.  It was partially started and still in a reddish-brown plastic color that was similar to the color of stained wood.  The other kit was a small scale horse drawn fire dept. water pumper cart.  I haven't done anything with either kit but somedays I just take them out to see how far this hobby has gone over the years.

TJS

TJS

  • Member since
    January 2021
Posted by PFJN2 on Wednesday, November 10, 2021 10:09 AM

EdGrune

That is Revell, not Lindberg

Hi,

Thanks.  It was right in front of me in the picture and I still got it wrong.  Surprise.  I have fixed the title now.

Pat

  • Member since
    November 2005
  • From: Formerly Bryan, now Arlington, Texas
Posted by CapnMac82 on Wednesday, November 10, 2021 2:50 PM

Rather a lot of more-modern fiberglass boats do not have a "bottom" color at all.

The modern "bottom" paints come in a wid varieties of colors, as the protective chemistry is "in" the finish, the pigment can be anything.  As in turquoise, magenta, sky blue, the whole gamut.

(Petit vivid color chart:  https://pettitpaint.com/products/antifouling-bottom-paint/antifouling-speed-coatings/vivid/)

Your model your choice.

For adding wood, you might consider using thin basswood strips, which will stain like, well, wood.

You may want to invest in a Molotov paint pen in chrome silver for the rails and similar accessories.

The flying bridge "lid," at 1:1 scale might be a fiberglass shell supported by a folding chromed metal frame, which would have a vinyl/canvas dodger for inclement weather.

You might want to add a radar unit--these are in various sizes.  Or a gps antenna.

Here's a West Marine link to a numer of radar sets:  https://www.westmarine.com/WestAdvisor/Selecting-Marine-Radar

Some GPS antennae:  https://www.defender.com/category.jsp?id=2029056&path=-1|344|2028695

Happy modeling

  • Member since
    January 2021
Posted by PFJN2 on Wednesday, November 10, 2021 3:11 PM

CapnMac82,

Cool, thanks.  That helps alot. Smile

Pat

  • Member since
    January 2021
Posted by PFJN2 on Wednesday, November 10, 2021 3:41 PM

Tanker-Builder,

Hi.  Your right, that aft cockpit space does liike pretty tight.  Looking at the model it is almost exactly 9" (without the bow pulpit) which scales out to about 42ft.  Doing a quick search on the internet does show several 42ft Chris Craft boats from the early 1950s of relatively similar layout, like in the links below.

And here are a couple other larger scale models of similar vessels.

 
As such, it probably does make more sense to convert the model to a Live Aboard cruiser than a sport fishing boat Smile
 
Using the pictures in some of these links and the rough layout sketch in the link below I might even be able to mock up a little bit of the interior if I really want to. Smile
 
 
Pat
  • Member since
    January 2021
Posted by PFJN2 on Sunday, November 14, 2021 10:47 PM

Hi,

I was able to find a second (complete) copy of this kit on eBay, so I decided to do a little kitbashing with this initial kit (that I bought knowing it was missing a few small parts).

Looking at the original boat, you can see that it is a bit short and stocky (Length overall/Beam overall of about 42/12.83 = 3.3 or so).  I started thinking about making the boat longer, but noticed that for a lot of power boats the L/B seems to go up a bit as length increases.  In general I noticed that for the hull, its bottom rake (slope) varies constantly over its length.  However, I found that if I cut the boat roughly in half I could add some mid section while smoothing over any discontinuities in the bottom since the bottom slope/rake was very low in that area.

The next issue though was that I couldn't really change the beam by much very easily, and that a beam of 12.83ft (or about 2.75in for the scale model) was kind of narrow for anything larger than the original boat size (of about 42ft).  I began to realize though that if I changed the scale of the model a little I could make a model of a bigger boat without adding too much midbody. 

In addition, I also realized the a larger boat would likely have a bit more hull depth, and that if I added some additional "strakes" above the existing top of the hull, the beam overall would go up a little more since the hull has a bit of flare in it.

In the end I decided on  changing the scale to 1/87 (HO scale) as opposed to its original scale of 1/56 since my (semi-) local hobby store stoicks some model train related stuff in 1/87 scale (including platic ladders and railings) Stick out tongue

The pictures below show where I was earlier today, with one side modified, and the other still only partially done.  One issue that I ran into was that when I cut the model in half I found that the basic hull was a bit asymmetric in shape with the sections being a bit concave on one side of the keel but a bit convex on the other side, as shown below.

Front

Aft

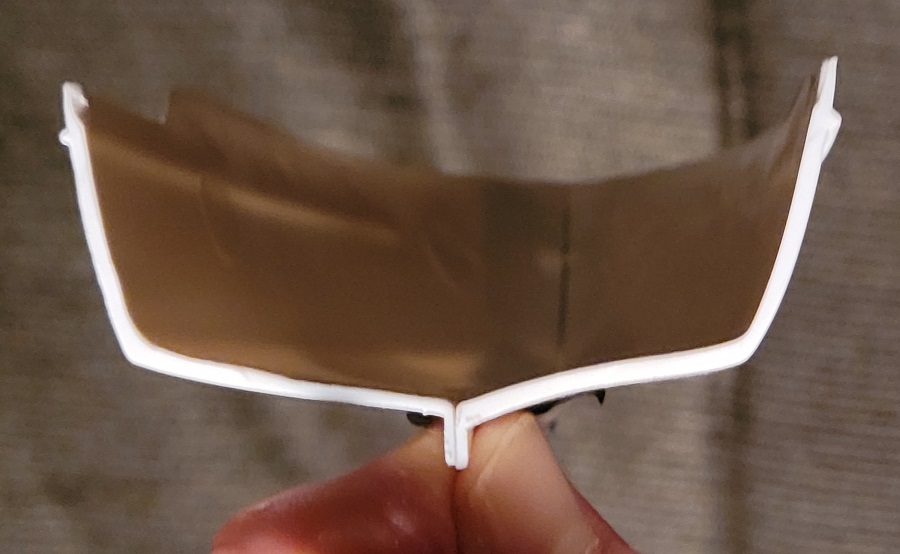
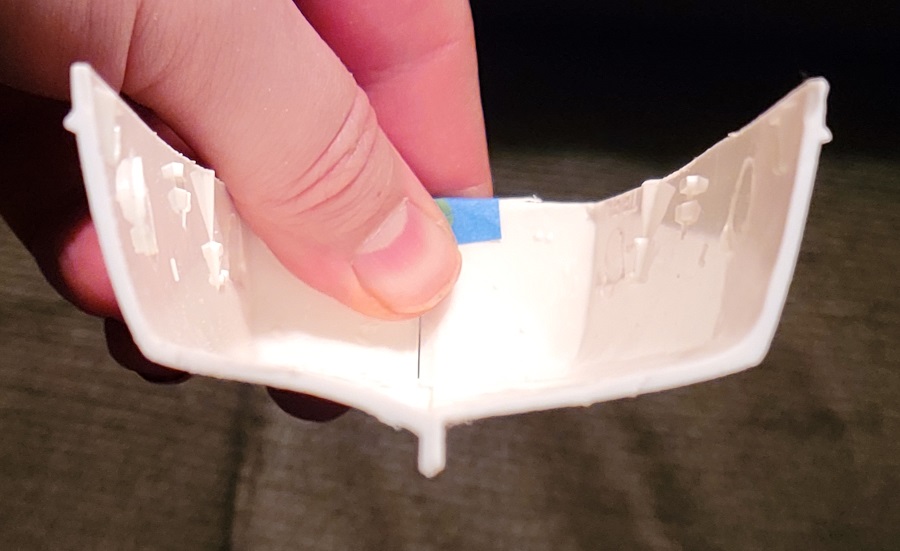
As such I ended up gluing a thin sheet of styrene to the bottom of the hull to etither side of the keel to try and hide this weirdness in shape and to also help hide any "discontinuities" or flat spots in the bottom of the hull due to the added midbody.  In the end I also added a thin sheet of styrene to the modified sides of the hull too, to help clean up the relatively messing joints in the hull and to also add strength to the lengthened hull, as shown below (sorry that the images turned out a little fuzzy).

PortStbd

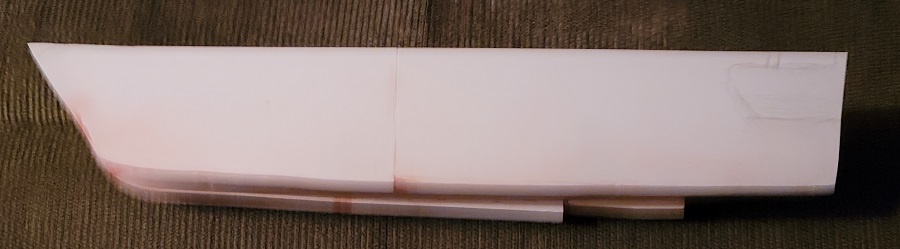
GThe 1st picture shows the port side of the hull with some strakes added on top to increase the hull depth and with its "outer plating" while the 2nd picture shows the starboard side before I added the upper strakes to increase depth and without its outer plating to make it look cleaner.  In this second picture you can also see the inside of the prt side of the hull where I added the extra strakes to increase its depth.

I was able to finish up the starboard side today, but am still working to clean up the "styrene sheet" joints and such.

In general, I'm hoping to try and make something roughly similar to the boat in this link, but not necessarily exactly the same as that boat.

Pat

  • Member since
    January 2021
Posted by PFJN2 on Tuesday, November 16, 2021 9:35 PM

Hi,

Here are some updates to the hull.

Side

Top

Front

Although the original hull looked to be a single chine hullform, when I initially rescaled it to a larger boat I hadn't realized that the front end of the chine would look kind of low on the hull for the larger size.  As such, I'm kind of modifying it a little to make it a double chine hull with a higher upper chine, while also trying to smooth out the front end of the lower chine a little.

Pat

PS.  I don't know why the pictures are showing as links rather than inserted images, as I entered them the same way that I have done in the past.  But I think that the links (hopefully) will take you to the images, but I may be mistaken because sometimes I think computers will show an image from my cache instead of whats at the link, so please let me know if there is an issue in seeing them Zip it!

  • Member since
    January 2021
Posted by PFJN2 on Friday, November 19, 2021 1:15 PM

Hi,

Here is a quick image of the hull with its main deck in place (though not glued down yet) and another with a quick mock up of a rough notional superstructure.

Pat

Boat1

Boat2

fox
  • Member since
    January 2007
  • From: Narvon, Pa.
Posted by fox on Friday, November 19, 2021 9:18 PM

Back in the "good old days" of RC boating, the guys in the club used to do a lot of modifications to the Dumas series of wooden Cabin Cruisers. 

https://photos.app.goo.gl/G92vFiHAnrwsHWJZ8

This isn't one of the 42'. Don't remember which one of the cruisers this is but I used to run it in the tank at the Phila. Boat Show in between the R/C sailboat races. Fwd., Rev., Port & Stbd. with dual 12 Volt engine control, all lights and a small tape deck with party noises & music. One of the Vendors wanted to play a joke on me by sending one of the guys from the Coast Guard booth over to inspect the boat. The joke was on them as it passed with flying colors. The signal flags were in their place in the locker with  the flare gun and the fire extinguishers had up to date inspection tags. Those Dumas kits were great fun and easy to build and easy to modify into many different designs.

Jim Captain

Stay Safe.

 Main WIP: 

   On the Bench: Artesania Latina  (aka) Artists in the Latrine 1/75 Bluenose II

I keep hitting "escape", but I'm still here.

  • Member since
    January 2021
Posted by PFJN2 on Friday, November 19, 2021 11:56 PM

Cool Stick out tongue

  • Member since
    January 2021
Posted by PFJN2 on Wednesday, November 24, 2021 12:10 AM

Hi,

Although it may not show it much, I've been making some progress on the hull.  First I reinforced and trimmed up the deck edge bulwarks, better shaped the deck into the hull, added some rub rails, trimmed back the transom and added a swim platform, and a rough shape for a stern "garage" (that I hope to clean up a bit).

I also bought some small generaic 1/87 scale people to place on deck.  

Regards

Pat

Next


  • Member since
    January 2021
Posted by PFJN2 on Friday, November 26, 2021 5:52 PM

Hi,

I wish that I could figure out why my photos are now showing up as links, all of a sudden, but in  the mean time here is an image showing a little progress.

Stern Garage

Unfortunately when working on a project like this, sometimes I don't always think things through too well, and end up experimenting a bit.  Fortunately, the stern locker/garage and swim platform seem to look ok for now, from above at least.  I have noticed though that from below, things may look a little crooked, maybe in part because the original hull was a bitt off, but also maybe becuase I wasn't careful enough when measuring and cutting the hull insert Confused

Anyway, you can see how things are progressing along with a couple small 1/87 figures that I have.  I eventually also found some "beach scene" figures on eBay that I also hope to use, but they have not arrived yet.

I'm hoping soon to have the basic hull mostly finished up soon.

Pat

  • Member since
    January 2021
Posted by PFJN2 on Saturday, November 27, 2021 12:49 AM

Hi,

I decided totry and print up some windows with my new 3D printer.  The blue stripe is just the tape that I am using to hold them in place for now.

Windows

I've also printed some freeing ports/lines hadling openings for the bulwarks and have downloaded a 3Dmodel for an anchor that I hope to print later this weekend.

Pat

  • Member since
    October 2019
  • From: New Braunfels, Texas
Posted by Tanker-Builder on Saturday, November 27, 2021 9:13 AM

Hi Pat!

   Listen, When I was doing the Live-Aboard thing, Outside of Antioch Ca. in Bethel Island, I saw quite a few Chris-Craft and Owens Tri-Cabins from that era being used as well restored Live-Aboards. Beautiful Boats for the time!.

  • Member since
    January 2021
Posted by PFJN2 on Sunday, November 28, 2021 9:19 PM

Hi,

I've started messing around with some color ideas.

Pat

Yacht Paint

  • Member since
    April 2003
  • From: USA
Posted by keavdog on Monday, November 29, 2021 5:47 AM

Hey Pat lots of surgery on this project.  She's looking good

Thanks,

John

  • Member since
    January 2021
Posted by PFJN2 on Wednesday, December 1, 2021 6:06 PM

Hi,

Thanks Keavdog. 

Below is a picture of my latest progress.  I finally have decided on an Aqua Green upper hull with a light blue/turquois bottom and a white boot striping.

Pat

Green

fox
  • Member since
    January 2007
  • From: Narvon, Pa.
Posted by fox on Wednesday, December 1, 2021 6:47 PM

Shaping up nicely!

Jim Captain

Stay Safe. 

 Main WIP: 

   On the Bench: Artesania Latina  (aka) Artists in the Latrine 1/75 Bluenose II

I keep hitting "escape", but I'm still here.

  • Member since
    January 2021
Posted by PFJN2 on Thursday, December 2, 2021 8:23 PM

Hi,

I got two packages of sunbathers in the mail today, for hanging out onboard the model once I'm done Stick out tongue

Sunbathers

Pat

PS.  Here also is an image with the white boot topping.  It still needs a little work, especially forward, andI need to figure out how to add an anchor pocket.  (I probably should have thought of that earlier Surprise)

Boot Topping

  • Member since
    January 2021
Posted by PFJN2 on Saturday, December 4, 2021 10:09 PM

Hi,

Although it may not look much different, I did manage to carve out an anchor pockets (on both sides) and 3D print some anchors and rudders.  I am still working on the props and shafts though.  I also had a chance to try and get the other side of the boat further along as well. Smile

Pat

Port

Stbd

PS.  I've made a start at trying to addon the prop shafts and riudders, but may need to adjust them some.

Bottom

  • Member since
    January 2021
Posted by PFJN2 on Sunday, December 5, 2021 9:55 PM

I'm really happy with my new 3D printer.  The detailis pretty impressive.  These props areboth about 12.5mm.  Right now they both turn the same way, but I hope to trim them both and mount one backwards.

Pat

Props

PS.  I alsoneed toclean up the paint a bit.  Its kind of hard paiting them because of their size Stick out tongue

  • Member since
    January 2021
Posted by PFJN2 on Tuesday, December 7, 2021 10:53 AM

Things are slowly progressing.  I've got the propellers and rudders in place now.

Pat

Hull Bottom

  • Member since
    August 2021
Posted by lurch on Sunday, January 9, 2022 11:34 AM

I havent noticed anymore updates. How is the project going?

  • Member since
    January 2021
Posted by PFJN2 on Sunday, January 9, 2022 6:01 PM

Hi,

Thanks for the interest.

Although I am still working on the boat, between the holidays, and some issues with painting, signs of visible progress have been really limited.  Most of the work that I have getten done lately has involved trying to smooth out some seems, reshape the stern area, and clean up the waterline boot topping.  Fortunately, I am pretty close tobeing able to put a gloss coat on the hull bottom.  But the hull sides still need some cleaning, sanding and buffing, before they will be ready to get glossed.

Hopefully I may be able to show some more progress later this week.

Pat

  • Member since
    March 2005
  • From: West Virginia, USA
Posted by mfsob on Sunday, January 9, 2022 7:37 PM

Don't know why it's happening, but my Malwarebytes program is blocking your photo links because it thinks they're trojans. Huh?

  • Member since
    January 2021
Posted by PFJN2 on Monday, January 10, 2022 1:42 PM

Hi,

Sorry about that.  I will look into the settings on my website provider.

Pat

JOIN OUR COMMUNITY!

Our community is FREE to join. To participate you must either login or register for an account.

SEARCH FORUMS
FREE NEWSLETTER
By signing up you may also receive reader surveys and occasional special offers. We do not sell, rent or trade our email lists. View our Privacy Policy.