SEARCH FINESCALE.COM

Enter keywords or a search phrase below:

Alclad Natural Metal Finish with Low Effort and Low Expectations

5836 views
38 replies
1 rating 2 rating 3 rating 4 rating 5 rating
  • Member since
    June 2023
Posted by burrito king on Sunday, October 15, 2023 12:22 PM

Hi keavdog, that is an amazing polished finish on your DC-3. The reflections are like a mirror. There are many different methods in the forums for the gloss black undercoat. Some say to use alclad gloss black base, some say that stuff never dries. Some say the earlier batches of alclad gloss black base had that problem, but has been cured in later batches. Some use decanted gloss black krylon primer. Some use tamiya gloss black primer, either decanted or from the rattle can. Some use testors gloss black enamel airbrushed. Seems like there are many ways to get a good result. One day I will try for a high shine polished finish. When that day comes I will probably try gloss black krylon straight from the rattle can. Mainly because it's cheap and available from Walmart or Michael's, and also because no special technique is required.

I am using regular alclad aluminum alc-101 for this P-38. So it doesn't require the gloss black primer. I am hoping for a smooth but dull satin finish. After that I will apply oxidation, stains, and worn spots. I want the plane to say, "I get into bare knuckle brawls with the enemy, my ground crew barely has time to keep me flying, and if I don't get shot down I'm going straight to the boneyard after the war."

  • Member since
    June 2023
Posted by burrito king on Sunday, October 15, 2023 11:14 AM

Hi eaglecash867, thanks for the tip about the Apoxie clay. I am very grateful for the wealth of knowledge shared by you and all the expert modelers in this forum. And the detailed explanations are appreciated, my thanks go to you and everyone else for all the details! I have a list where I write down all of the tips I get, so I can bring these up when the need arises.

I have been wondering what to use as a top coat to protect high shine alclad finishes. Sounds like the AK Gauzy Agent Shine Enhancer is perfect for that. And I love the engine photos. The tone and gloss variations and the details are amazing!

  • Member since
    April 2020
Posted by Eaglecash867 on Saturday, October 14, 2023 8:02 PM

Very cool, Keavdog!  I'll have to check my collection.  I don't think I have that color yet...definitely need to get it if I don't already have it.

"You can have my illegal fireworks when you pry them from my cold, dead fingers...which are...over there somewhere."

  • Member since
    April 2003
  • From: USA
Posted by keavdog on Saturday, October 14, 2023 2:48 PM

For super shiny try Alclad airframe aluminum - ALC 119.  Did this tiny DC-3 with it.

ALC 119 over gloss black


Thanks,

John

  • Member since
    April 2020
Posted by Eaglecash867 on Saturday, October 14, 2023 12:16 PM

Since you like bulding your aircraft in wheels-up configuration, have you ever tried Apoxie Clay?  In situations where you want to close up the gaps around the doors, without eliminating them completely, Apoxie Clay is great for that.  Its a 2 part clay that is water-soluble/workable until it cures.  I like to mix up little bits of it, roll it into little ropes, and then work those ropes into gaps with a toothpick.  After that, there is no sanding involved.  Instead, you use a dampened Q-tip to smooth out the clay and remove any excess around the filled area.  Then you can take a damp toothpick and gently engrave nice, even lines into the clay at whatever depth you want.  Once you're happy with how it looks, just give it about 24 hours to finish curing and its ready to prime and paint...no putty, sand, repeat dance.  There are other water-soluble putties out there, but unlike those, this stuff is extremely strong when its cured, and doesn't become brittle, so it won't ever crack when subjected to flexing or twisting...or an impact, like those times a model slips out of your hands and comes crashing down on the bench top just hard enough to crack putty in a seam which you don't see until you're at the point of putting on decals. Angry  Hate it when that happens!  LOL

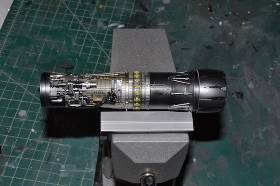
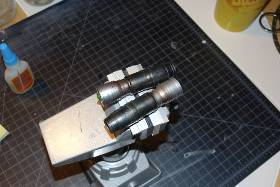
Alclad does best with a gloss black or gloss dark blue undercoat, and just so you're aware, its always going to be a fragile finish, no matter what you put underneath it.  You can get lots of different tonal variations and sheen variations with it just by how heavy or light you put it on in one area or another.  You get the best results by lightly misting it on in multiple passes, and you can vary how many times you go over a particular area to give it an uneven, marbled look if you are shooting for that.  You can also layer different colors and sheens of Alclad to get different oxidation and heat staining effects.  The stuff is a lot of fun to play around with...gives you a really good way to put some artistic expression into it when trying to re-create a real-world item.  Personally, I like to seal my Alclad finishes with AK Gauzy Agent Shine Enhancer.  That protects it and keeps it from rubbing off, without causing it to color-shift like most other clearcoats will.  You can mist on some flat clear coat after that in the areas you want to look more worn and oxidized.  Really makes painting and detailing/weathering aircraft engines a lot of fun and very rewarding.

Sorry about the text wall.  I get carried away with details sometimes.  Big Smile

"You can have my illegal fireworks when you pry them from my cold, dead fingers...which are...over there somewhere."

  • Member since
    June 2023
Posted by burrito king on Friday, October 13, 2023 9:58 PM

Hi keavdog, thanks for the tip on the Novus.  Too late for this P-38, but I googled it and it would really help on my future builds.  Especially where I am trying for a polished finish.  I love F-104's with polished aluminum, one day I want to try it.  This P-38 is going to get a "working bird" finish, with oxidation, stains, worn areas, etc.  Like the photo below.  Except for the nose, there is no reflection.

 Screenshot_20230909_161559_Gallery

  • Member since
    June 2023
Posted by burrito king on Friday, October 13, 2023 9:53 PM

It should go without saying that I am not a decanting type of guy.  I tested it on some scrap, then sprayed it straight from the rattle can.  I used several light mist coats and got good coverage with little effort.  It didn't obliterate the panel lines so I am happy.  My surface prep skills suck, so I was fully expecting to see horrible waves, scratches, etc. but to my amazement it seems to be ok.  Even the landing gear doors!  It won't win any awards, but it's good enough for my low expectations.  Tomorrow I will add some black primer to selected panels to get some tonal variation with the Alclad, then sand it with 8000 grit.  If all goes well, the Alclad will go on this Sunday.

 20231013_184353

 20231013_184302

  • Member since
    June 2023
Posted by burrito king on Friday, October 13, 2023 9:41 PM

So today was the big day: priming.  I never ever primed a model before, but everything I read said Alcad needs a primer to adhere.  I read forums and watched videos, and primer application for Alclad seemed like mastering the dark side of the force.  Eventually I decided to use Krylon primer as stated on the Alclad website.  It says to use automotive primer, but the automitive primers I found were for metal, not plastic.  So I said F it and got some Krylon colormax primer from Michaels for $5.99.  The label says it's for plastic, so that was good enough for me.

 20231013_185642


  • Member since
    April 2003
  • From: USA
Posted by keavdog on Friday, October 13, 2023 9:32 PM

Looks good in the pic.  I'll hit the plastic with Novus plastic polish (1, 2 & 3) once my seams look okay.  Doesn't take long and puts a nice surface on the plastic.

Thanks,

John

  • Member since
    June 2023
Alclad Natural Metal Finish with Low Effort and Low Expectations
Posted by burrito king on Friday, October 13, 2023 9:28 PM

I got through the assembly and surface prep of my 1:48 Hasegawa P-38J Lightning.  It took over a month, mainly because the landing gear doors were designed to be with the gear down, but I am one of the tiny minority who likes to build gear up.  A lot of filing, putty, and sanding was required to make the doors fit.  I used various files and copious amounts of Vallejo Plastic Putty.  For final sanding I started with 800 grit and worked my way to wet sanding with 7000 grit.  It was tedious and frustrating, and eventually I got to the point where I said enough!  Below is a photo of the final surface prep.  I know it's pretty primitive, but I will never claim to be a skilled model maker.  I am doing this to have fun, and tbh there is a limit to my patience when it comes to surface prep.  Maybe there are others like me who take a more casual approach, and hopefully we can find ways to get decent results with minimal effort, skill, and expense.

 20231011_213818


JOIN OUR COMMUNITY!

Our community is FREE to join. To participate you must either login or register for an account.

SEARCH FORUMS
FREE NEWSLETTER
By signing up you may also receive reader surveys and occasional special offers. We do not sell, rent or trade our email lists. View our Privacy Policy.