SEARCH FINESCALE.COM

Enter keywords or a search phrase below:

French POW dio WIP **update: 2/26/09 pg 11**

42055 views
229 replies
1 rating 2 rating 3 rating 4 rating 5 rating
  • Member since
    June 2006
  • From: AusTx, Live Music Capitol of the World
French POW dio WIP **update: 2/26/09 pg 11**
Posted by SteveM on Friday, July 11, 2008 7:44 PM

Hi gang! 

Like most projects I start, I’m slowing down. I’m gonna go back to posting a WIP to keep me motivated.

This dio is (very) loosely based on, and inspired by, a war story of my grandfather’s. The details are much different, but the idea is the same. Relates to a situation where he (they) were taking prisoners that still cracked him up 50 years later.

In my story, a squad of Germans, circa summer 1940 during the invasion of France, discover a couple of French hide-outs who have taken refuge in a French farm barn.

I’ve assembled 10 figures, and threatening myself with an 11th. Somewhere in the painting stages, I got a little bored and moved on to the barn, where the prisoners were hiding out. Along the line, I have experimented with the trees and shrubs.

I have posted some progress shots of the barn and veg... glue stains, sanding dust and all. Will be painted proper later. Feel free to comment, correct, critique...


Steve 


Steve M.

On the workbench: ginormous Kharkov dio


  • Member since
    November 2005
Posted by Anonymous on Friday, July 11, 2008 8:43 PM

Very nice work...some questions:

1) is that balsa and basswood?

2) gonna leave the barn open so the viewer can see inside or close 'er up?

3) freakin' nice shrubbery---how'd you make 'em? 


  • Member since
    June 2006
  • From: AusTx, Live Music Capitol of the World
Posted by SteveM on Saturday, July 12, 2008 6:07 AM

Hey Manny. Thanks fer lookin'.

Combo of balsa and basswood: bass for strength in the main frame, and then balsa where softer wood more convenient.

I'm gonna leave all doors open for sure. In addition, I'm making the roof sections removable. I am contemplating having the garage door(s) off completely, and stored inside the barn itself, a la "these doors are old, and I'll get around to fixing them one day". It'll also leave more space for the figure placing.

Here's one of the ref pics I've been working from:

The smaller shrub is made by "planting" small  twigs, from a porch broom (from Michael's), in that little, cut, square of styro. Then small sections of Woodland Scenics foliage branches, scraped mostly clean of the foliage itself, were glued on. The larger shrub is Hudson and Allen branches glued to an armature of real twings.

Thanks again for the comments. I know, of all of the people on here, you'll keep me honest with my refs. Feel free to chime in anytime, if I start to get lazy. It will reveal my impatience- which I'm trying to overcome.

Steve 

Steve M.

On the workbench: ginormous Kharkov dio


  • Member since
    February 2003
  • From: USA
Posted by senojrn on Wednesday, July 16, 2008 10:22 AM

Steve!

FREAKIN OUTSTANDING WORK!!!  Bow [bow] Thumbs Up [tup]Thumbs Up [tup] I am anxiously waiting to see more!!!  Propeller [8-]The barn looks awesome!  You've inspired me to start work on a dio that I've been milling about in the back of my mind for years now that includes a barn very similar to yours!!!  Thanks for the inspiration; seeing excellent work like yours always makes me want to get my projects going!! 

Do you have any pics of the figures yet? 

The background story sounds like a pretty good one; I'd very much like to hear...er, read it if you'd like to share it!!!

Keep posting!!! Looking forward to the update!

  • Member since
    March 2003
  • From: Newport News VA
Posted by Buddho on Wednesday, July 16, 2008 8:20 PM
Steve...this is going to be one heck of a diorama...your barn and shrubbery are top notch stuff...excellent.

  • Member since
    November 2005
Posted by Anonymous on Wednesday, July 16, 2008 8:44 PM
 SteveM wrote:

Hey Manny. Thanks fer lookin'.

Combo of balsa and basswood: bass for strength in the main frame, and then balsa where softer wood more convenient.

I'm gonna leave all doors open for sure. In addition, I'm making the roof sections removable. I am contemplating having the garage door(s) off completely, and stored inside the barn itself, a la "these doors are old, and I'll get around to fixing them one day". It'll also leave more space for the figure placing.

Here's one of the ref pics I've been working from:

The smaller shrub is made by "planting" small  twigs, from a porch broom (from Michael's), in that little, cut, square of styro. Then small sections of Woodland Scenics foliage branches, scraped mostly clean of the foliage itself, were glued on. The larger shrub is Hudson and Allen branches glued to an armature of real twings.

Thanks again for the comments. I know, of all of the people on here, you'll keep me honest with my refs. Feel free to chime in anytime, if I start to get lazy. It will reveal my impatience- which I'm trying to overcome.

Steve 

If I were you I would leave the whole backside open to be viewed...nice...
  • Member since
    June 2006
  • From: AusTx, Live Music Capitol of the World
Posted by SteveM on Thursday, July 17, 2008 6:10 AM

Hey guys, thanks for looking in...

senojrn: thank you very much, I'm glad you're gonna get to making your barn. I'll throw my grandpop's story in there when the figs are completed- it'll have a bit more relevance then. I'll add some in progress pics ofsome of the figs; I left them out at first because, after importing the photos, I can finally see how they are covered in sawdust (from the barn raising). A hundred more disclaimers could follow, but what the heck...


Buddho: thank you for your compliments!

Manny: yeah, the barn will be completely open from the back. I am building this on a 14" (thereabouts) turntable- lazy susan- so the viewier can spin it around to view the inside. The roof sections a be also removable. Finished ground floor last night, and began 2nd floor. I'll take some shots and post.

Thanks again, guys, for your comments.

Steve 

Steve M.

On the workbench: ginormous Kharkov dio


  • Member since
    August 2007
  • From: The Plains of Kansas
Posted by doc-hm3 on Thursday, July 17, 2008 8:48 AM
 Looking GREAT! Your Inspiring me to try a dio. I have built structures years ago, but only in styrofoam. Your storyline is very interesting. 

All gave some and some gave all.

  • Member since
    August 2006
  • From: The Green "Mountains", Vermont
Posted by IanIsBored2000 on Thursday, July 17, 2008 11:03 AM

Steve, as great as the barn looks, it's the figures that are drawing me in.  Your figure painting has improved immensely since I first saw your work just a year or two ago.  Your style of subtle shading is something I'm working on improving in with some figures right now.  Are you using oils or acrylics?  I've been sticking with oils lately, since it gives me, oh, about 4 days to fix my mistakes while I attempt to teach myself some shading and highlighting. 

"Scanlon: work your knobby hands on the table in front of you, constructing a make-beleive bomb to blow up a make-beleive world."
  • Member since
    February 2003
  • From: USA
Posted by senojrn on Thursday, July 17, 2008 11:03 AM

Excellent work on the figures!  I really like the shadows and shading you're doing!  Do you start out with a black base coat/primer then paint up from there?  It kinda looks that way; just curious, always trying to improve my figure painting techniques... 

Fantastic detail work, too!  Are those Dragon/DML figs or resin? 

I'm still hungry for more!!! Dinner [dinner] 

Also, what are the dimensions on your barn?  Foundation to roof peak and also from floor to floor?  Are you going with 10 scale foot ceiling per floor or a little less?

  • Member since
    July 2003
  • From: Toronto, Ontario, Canada
Posted by zokissima on Thursday, July 17, 2008 11:59 AM

Those figures are looking very nice. Clean edges and some very good detail.

I'm having a hard time visualizing what your overall dio will look like though.

  • Member since
    June 2006
  • From: AusTx, Live Music Capitol of the World
Posted by SteveM on Thursday, July 17, 2008 12:47 PM
Ya'll are too kind. Thank you for the compliments about the figures; they are, as for many, my weakest link. I think I can answer everyone's questions in one fee swoop:

The figures (all resin, yes- I'm admittedly an official resin snob) are mostly reworked poses (except for the two examples I've posted). Primed in black MM enamel, base coated in Vallejo acrylics. The first figure is shaded and highlighted in oils; the second figure is my experimenting with shading and highlighting using the Vallejos (on the tunic only, that is). You guys tell me which method looks better to you.

zokissima: I know the layout seems unclear. I'll try to get some layout shots a little later on. Thanks for the encouragement regarding the figures.

Steve

Steve M.

On the workbench: ginormous Kharkov dio


  • Member since
    August 2006
  • From: The Green "Mountains", Vermont
Posted by IanIsBored2000 on Thursday, July 17, 2008 1:28 PM
Personally, I like the ones done with oils better. 
"Scanlon: work your knobby hands on the table in front of you, constructing a make-beleive bomb to blow up a make-beleive world."
  • Member since
    November 2005
Posted by Anonymous on Thursday, July 17, 2008 2:35 PM
I think it is too early to tell which paints suit your style best---I say keep experimenting and it will come...they both look great. Is the canteen on the soldier depicting a torn felt cover with the metal canister showing through???...If so, you are 'da man...talk about tiny details...WOW, crazy good...
  • Member since
    June 2006
  • From: AusTx, Live Music Capitol of the World
Posted by SteveM on Thursday, July 17, 2008 2:53 PM
 Mansteins revenge wrote:
Is the canteen on the soldier depicting a torn felt cover with the metal canister showing through???.


Yes, but I can only take partial credit. The real credit lies in the fact that I failed to notice the imperfection in the molding until after I primed it. I figured torn felt was the best way to resolve, since that's what it looked like.

Thanks for your input Manny and Ian. I want to be better at oils because, when done right, I like the way they look more than the acrylic shading technique. It's just a matter of taste.

Steve


Steve M.

On the workbench: ginormous Kharkov dio


  • Member since
    June 2006
  • From: AusTx, Live Music Capitol of the World
Posted by SteveM on Friday, July 18, 2008 5:43 AM

Continued working on the 2nd floor last night. Took some SBS shots, just for laughs.

One thing I wish I started doing at the beginning of this barn's construction is to make the wood look a little more real, more like scale lumber, with texturizing before I attached it. I can still go back and do that to the structure, but realized some areas would be harder than others to retro-texturize. I figured I'd do it to the flooring before I laid it. Here's what I did:

Cut 7cm planks (about 8 scale feet):

Made deep grooves with embossing tool: 

Made lighter gooves, with razor saw, to texturize:

Sanded this down with fine grit sandpaper:

Here's what it looks like:

On the planks that will have exposed ends, I texturized in cross-hatching pattern:

Glued 'em down with carpenter's glue, with (hopefully) equal spacing. Some ref shots showed floors with about 3 - sometimes 4" spacing, others had no gaps at all between planks. I opted for gap:

With a dental tool, I "hammered" in the planks:

Here's the rear of the dio so far:
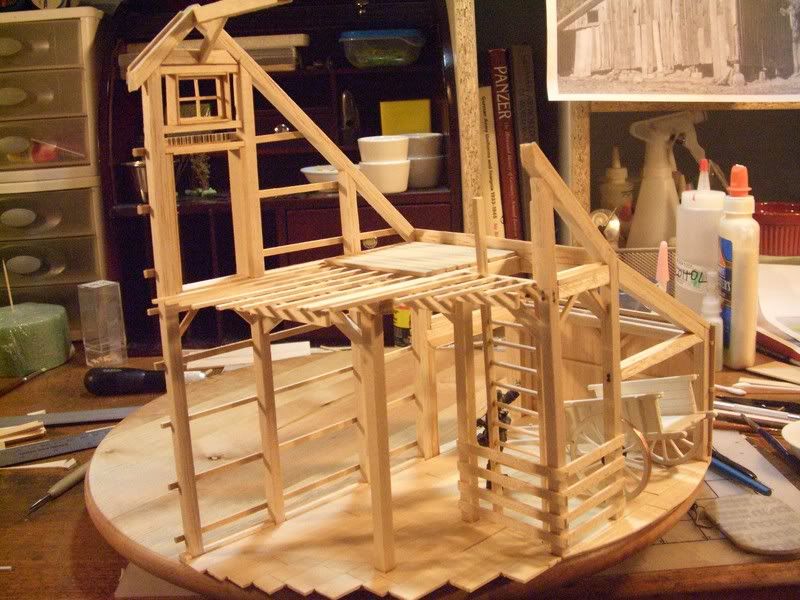
How the barn sits, from the front:
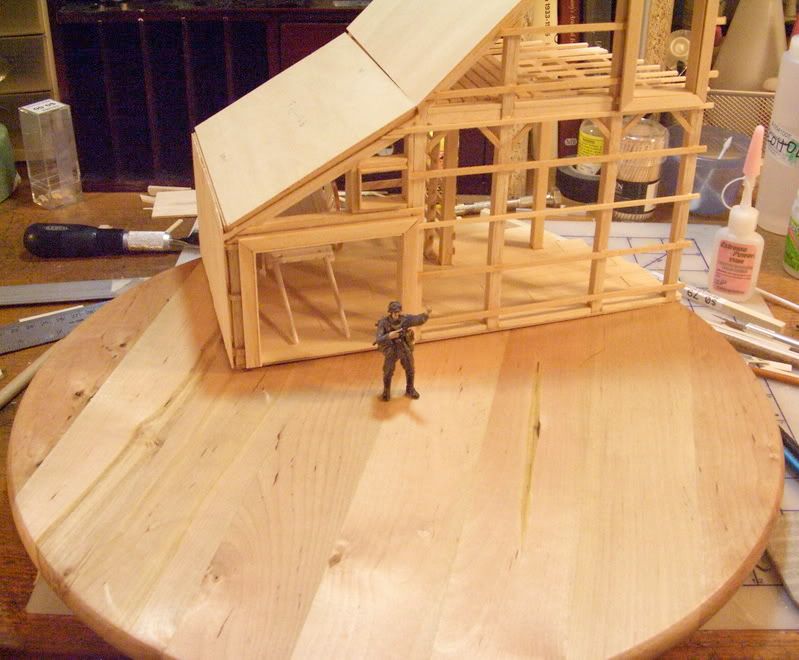
The unfinished farm cart, where it will be parked... I just wanted to get the cart built up enough to be able to see how much room it would need. Will detail later:
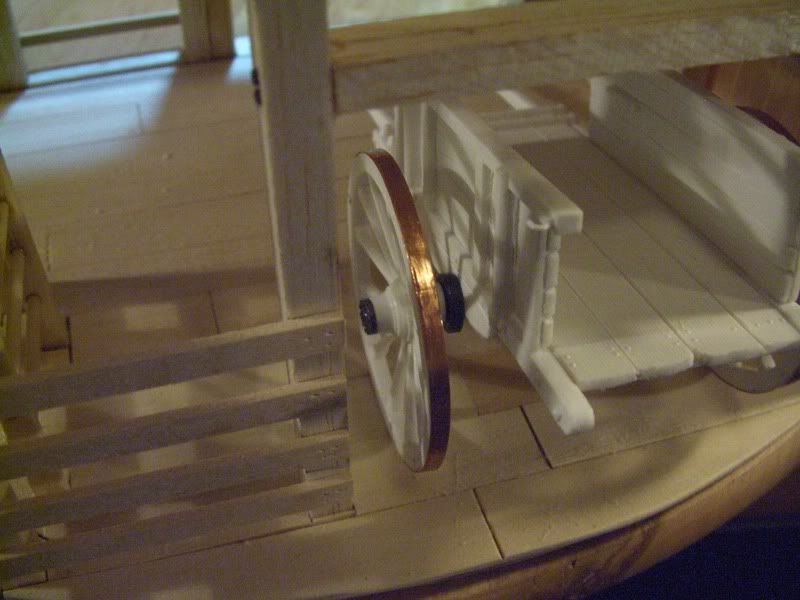
 

That's as far as I got last night. Tonight, finish 2nd floor, and continue on with roof detail.

If you're looking, thanks. Comments and suggestions always welcome. I haven't stepped foot in a real barn in years, so chime in if you see missing detail, or if I've added something that shouldn't be there. I'll be glad to hear it.

Steve


Steve M.

On the workbench: ginormous Kharkov dio


  • Member since
    February 2008
  • From: ladner BC Canada
Posted by stick man on Saturday, July 19, 2008 2:48 PM

Wow your realy putting some efort into this barn I hope it turns out very very very very well. Can't wait to see more!

Smile [:)]

I'm 15 and I model I sk8board and I drum what could be better.
  • Member since
    February 2003
Posted by Jim Barton on Saturday, July 19, 2008 6:07 PM

So where will the Neil Peart drum kit go?Whistling [:-^]

Seriously, that's going to look beautiful.Thumbs Up [tup]Thumbs Up [tup] I'll be keeping an eye on this one for sure. How will you make the wood look aged? Use that patina that Floquil or somebody makes?

"Whaddya mean 'Who's flying the plane?!' Nobody's flying the plane!"

  • Member since
    October 2007
  • From: N.H.
Posted by panzerguy on Saturday, July 19, 2008 7:35 PM


  Steve, man this is coming along great. Nice touch texturing the wood. nice job on those figs also.  Is that the mini art wagon? 

"Happiness is a belt fed weapon"

  • Member since
    March 2003
  • From: Newport News VA
Posted by Buddho on Sunday, July 20, 2008 1:32 AM
Steve,,,this is eye poppin, jaw droppin work that you are doing...the figgies, barn...wow!

  • Member since
    June 2006
  • From: AusTx, Live Music Capitol of the World
Posted by SteveM on Sunday, July 20, 2008 9:39 AM

stick man: thanks! I'll get more shots up, as soon as I can get motivated out of my Sunday morning ritual of splitting two pots of coffee with my wife, and then doing nothing at all for a couple of hours Laugh [(-D]

Jim: I think I have too many careless glue splotches to actually age the wood. I'll paint it instead. The drums could pe packed into the cart, as mine are usually packed into my CRV. Warping and melting is part of my sound, man!

panzerguy: thanks a lot! The cart is from ADV / Historex. Been sitting in my stash for a good while, and glad to finally use it.

Buddho: much appreciated. I believe, however, that the bridge you are working on makes my barn look Lego-level. Bow [bow]

Thanks for looking and commenting, guys.

Steve


Steve M.

On the workbench: ginormous Kharkov dio


  • Member since
    September 2007
  • From: Relocating
Posted by Mobious on Friday, July 25, 2008 12:28 PM

 Hello steveM,

 That is fantastic work on barn raising! I really liked your mini toot, detailing the planks. One detail that I don't know if you're planning on adding, is maybe some pegs for tackle storage. We used horse shoes to hang tack on. There is alot of tack to harness a horse to a cart. Just my My 2 cents [2c].

 I don't spend enough time in the dio forums and would have missed this fine project if it weren't for Manny posting in the Armour forum. Thanks Manny.

 Best Regards,


"It's a problem of applied physics" Roy Brown

  • Member since
    January 2007
Posted by the doog on Friday, July 25, 2008 5:58 PM

Man!

You're serious about this dio, aren't ya?! Tongue [:P]

You're doing some incredible work! I'm like, at a loss for superlatives! Just amazing work all around!

WOW!!!!!

  • Member since
    June 2006
  • From: AusTx, Live Music Capitol of the World
Posted by SteveM on Saturday, July 26, 2008 6:17 AM

Thanx, gents!

Mobious: thanks! Yeah, I've got plans for hanging all of the stuff I can think of, deal is- I can't think of much. Somewhere in my stash I have parts for a workhorse. Gonna dig that up shortly, so I can get an idea for the storage. If you want to throw in some ideas for what needs to be hangin', please chime in (Shock [:O]).

Doog: yer too kind! I appreciate your eye for realism and detail, so feel free to fire away.

I have applied the texturizing technique to the outer plank siding, and have almost finished. Been kinda tedious, but it looks better than just throwing some cut planks up there. I'll post a pic or two when that's done.

My wife smiles at it, like I've gone off the deep end. I believe that to be some measure of success.

Thanks again, guys, for the comments and compliments. All comments and critique still welcome.

Steve


Steve M.

On the workbench: ginormous Kharkov dio


  • Member since
    August 2006
  • From: The Green "Mountains", Vermont
Posted by IanIsBored2000 on Saturday, July 26, 2008 12:04 PM
 SteveM wrote:

My wife smiles at it, like I've gone off the deep end. I believe that to be some measure of success.


That one had me laughing for a while. Big Smile [:D]  Every time my mom gives me the look, I kindly remind her that she spends thousands of dollars a year and half of her free time to keep a horse. Whistling [:-^]

"Scanlon: work your knobby hands on the table in front of you, constructing a make-beleive bomb to blow up a make-beleive world."
  • Member since
    February 2003
  • From: USA
Posted by senojrn on Monday, July 28, 2008 8:49 AM

Steve,

OUTSTANDING WORK!!  This is simply amazing!!  As Doog noted, this project definitely deserves a WOW!!!  I am on the edge of my seat anxiously awaiting more!!! 

Just a wood-weathering technique idea for you to do with as you please.  I use a blackish-brown acrylic wash to weather the balsa and basswood that I have used in my Willie & Joe dioramas; it has always turned out really well.  I start out with just a brush-on base coat, allowing the natural wood color show through some.  Once that is mostly dry, I add another wash coat to darken the shadow and water-streaked/heavy weather areas.  For the lighter, sun-bleached highlights, just keep the base coat and/or add a little gray-brown wash overtop.  I have also done a gray-brown dry-brush coat that works well too.  On the glue stains, you may have to do a little sanding or shave off a sliver layer of the glue and wood.  Or, if it's a spot I can't get to really easily, I just add a little thicker wash in those areas and it covers the glue stain really well.  I like the wash method because the wash color will settle into the recesses of the wood texture and create a realistic look. 

Looking forward to your next post!! 

  • Member since
    June 2006
  • From: AusTx, Live Music Capitol of the World
Posted by SteveM on Monday, July 28, 2008 12:57 PM

Thanks, senojrn! I truly appreciate your enthusiasm! I will get more shots up very soon. It's really time for me to get this dio in high gear... I've got other projects that want out Big Smile [:D]

Ian- I think that, sometimes, the women in our lives don't understand why we modeling dudes can't apply our patience and eye for detail to the things that matter to them Laugh [(-D] My mom is an avid scrabooker, so she can relate.

However, my wife wonders (out loud), since I have built a detailed 1/35 barn out of wood, why haven't I built her a 1:1 shed or deck out back. 

Confused [%-)]

Steve


Steve M.

On the workbench: ginormous Kharkov dio


  • Member since
    August 2006
  • From: The Green "Mountains", Vermont
Posted by IanIsBored2000 on Monday, July 28, 2008 1:28 PM
I'd say staining/washing the natural wood is worth a shot.  If it doesn't come out quite right, you were planning to paint them anyways, so there's nothing lost, and you can just paint over the stain/wash.  Then again, I've seen some painted wood that, to be honest, looked more convincing the natural miniature stained wood IMO.
"Scanlon: work your knobby hands on the table in front of you, constructing a make-beleive bomb to blow up a make-beleive world."
  • Member since
    February 2003
Posted by Jim Barton on Friday, August 1, 2008 5:06 PM
 SteveM wrote:

Thanks, senojrn! I truly appreciate your enthusiasm! I will get more shots up very soon. It's really time for me to get this dio in high gear... I've got other projects that want out Big Smile [:D]

Ian- I think that, sometimes, the women in our lives don't understand why we modeling dudes can't apply our patience and eye for detail to the things that matter to them Laugh [(-D] My mom is an avid scrabooker, so she can relate.

However, my wife wonders (out loud), since I have built a detailed 1/35 barn out of wood, why haven't I built her a 1:1 shed or deck out back. 

Confused [%-)]

Steve


Hmmm...time to get out the ol' power saw, Steve.Whistling [:-^]Big Smile [:D]


"Whaddya mean 'Who's flying the plane?!' Nobody's flying the plane!"

  • Member since
    June 2006
  • From: AusTx, Live Music Capitol of the World
Posted by SteveM on Sunday, August 3, 2008 6:13 PM

Some progress pictures on the barn. 2 doors = 12 hours... told ya'll I'm slow. Still have to do the 2 doors for the ventalation windows, but I'll probably keep them off the structure until after painting (at least the one above the larger door).

All commens, critiques welcome.


Making the hinges and bolts:


These glue spots make it evident that the barn will be painted, not stained. But I'd rather make sure the doors, hinges, latches stay put:

Oh, yeah... still need to attach the hinges on the hinges on this one Blush [:I]


Thanks for looking.

Steve

Steve M.

On the workbench: ginormous Kharkov dio


JOIN OUR COMMUNITY!

Our community is FREE to join. To participate you must either login or register for an account.

SEARCH FORUMS
FREE NEWSLETTER
By signing up you may also receive reader surveys and occasional special offers. We do not sell, rent or trade our email lists. View our Privacy Policy.