SEARCH FINESCALE.COM

Enter keywords or a search phrase below:

1/48 Monogram B-17G Flying Fortress

233355 views
590 replies
1 rating 2 rating 3 rating 4 rating 5 rating
  • Member since
    June 2005
  • From: Novi, Mi
1/48 Monogram B-17G Flying Fortress
Posted by Lancair IV on Thursday, March 5, 2009 8:22 PM

I'm starting with the tail wheel assembly.  The kit tail wheel starts with 2 posts glued into the bulkhead.  After reviewing several pictures and details, I decided to scratch build a new assembly.  All thats left to do know is the electric motor and jack screw that operates the gear.

These are the parts that came in the kit 


New parts in brass ready for assembly


New assembly attached to the bulkhead

Temp put into the fuselage

Cheers

Rob Byrnes

Novi, Mi

  • Member since
    January 2009
  • From: hamburg michigan
Posted by fermis on Thursday, March 5, 2009 8:56 PM

 Alright Mr. Modest, you're scratchin like that, and you worried about the show..c'mon!

Looks like a great start, lookin forward to more!


( see ya saturday!!!)

  • Member since
    April 2008
  • From: SE Alabama
Posted by Retired Gunpilot on Thursday, March 5, 2009 9:06 PM

What a great start. Look forward to following the thread!

Charlie

  • Member since
    January 2007
  • From: Northern California
Posted by trexx on Thursday, March 5, 2009 9:49 PM

Holy bee-geezus! Quite the detail goin' on there.

What are you, a brain surgeon on your off time? You're definitely a nano expert. Wow.

It looks as if you soldered the metal parts. Must be a teensy little soldering iron for that!

  • Member since
    December 2002
  • From: Whidbey Island, Washington
Posted by chukw on Thursday, March 5, 2009 10:02 PM

Fantastic!  Personally, I think every greta project starts out with the tailwheel. ;D  I look forward to watching your progress- cheers!


chuk

  • Member since
    September 2003
  • From: South Central Wisconsin
Posted by Daywalker on Thursday, March 5, 2009 10:36 PM
That is some serious fabrication work there!  This builds looks to be off to a great start. Thumbs Up [tup]

Frank 


  • Member since
    December 2003
  • From: Indiana
Posted by hkshooter on Thursday, March 5, 2009 11:03 PM
Neat-o. I wonder if one of those so called cold solder pens would work on that stuff?
  • Member since
    March 2008
  • From: Ohio
Posted by B-17 Guy on Friday, March 6, 2009 12:43 AM
Wow! If your doing that with the tail wheel assembly, I can not wait to see what you do with the rest of her. I will be watching this thread, and steal/borrow some of what you are doing, great work so far.
  • Member since
    February 2003
  • From: A Spartan in the Wolverine State
Posted by rjkplasticmod on Friday, March 6, 2009 8:00 AM

Some great scratchin, that's for sure.  Keep us posted as you progress.

Regards,  Rick

RICK At My Age, I've Seen It All, Done It All, But I Don't Remember It All...
  • Member since
    November 2008
  • From: Biding my time, watching your lines.
Posted by PaintsWithBrush on Friday, March 6, 2009 9:35 AM
With a start like that, I can only imagine what is next. Thank you for the first taste and please keep it coming!

A 100% rider on a 70% bike will always defeat a 70% rider on a 100% bike. (Kenny Roberts)

  • Member since
    February 2007
  • From: Bournemouth UK
Posted by Luftwoller on Friday, March 6, 2009 11:53 AM

Great start and stunning scratchbuilding. I take it that the tail assembly was soldered?

...Guy

..'Your an embarrassment to the human genus, makes me ashamed to call myself Homo'.
  • Member since
    May 2003
  • From: Abbotsford, B.C. Canada
Posted by DrewH on Friday, March 6, 2009 11:53 AM
Whoa! Here comes the pro! Man I can't wait to see what he comes up with next! Does he work from the tail to the nose? Or is the main gear next? Oooooooooh the anticipation
Take this plastic and model it!
  • Member since
    September 2006
  • From: Bethlehem PA
Posted by the Baron on Friday, March 6, 2009 12:20 PM

I'd like to join in with the rest of the gang, very nicely done!  You've got some really great precision work there.  I'm not confident enough with a soldering iron to try what you're doing.

The strut and the box both look fantastic!

Regards,

Brad

The bigger the government, the smaller the citizen.


  • Member since
    June 2008
  • From: Iowa
Posted by Hans von Hammer on Friday, March 6, 2009 1:56 PM
Don't fergit th' toilet that's forward of the bulkhead...Big Smile [:D]

  • Member since
    January 2007
Posted by Gigatron on Friday, March 6, 2009 2:16 PM

That is friggin' cool.  I'm curious as to what pictures you may have used as reference.  Every picture I have of the tail wheel assembly shows the upper brace attached to the oleo strut and then disappearing into a giant bag/tarp-like thing.

I scratched something similar out of styrene for my build.  Not to hijack, but to show comparisons, here's a picture of what I came up with for that assembly

-Fred


  • Member since
    June 2005
  • From: Novi, Mi
Posted by Lancair IV on Friday, March 6, 2009 2:56 PM
 Gigatron wrote:

That is friggin' cool.  I'm curious as to what pictures you may have used as reference.  Every picture I have of the tail wheel assembly shows the upper brace attached to the oleo strut and then disappearing into a giant bag/tarp-like thing.

I scratched something similar out of styrene for my build.  Not to hijack, but to show comparisons, here's a picture of what I came up with for that assembly

-Fred

Hi Fred,

    Here are a few pictures that sold me on the structure

I looked for 3 days gathering information before I even cut the parts off the tree.  I know it's not perfect, but it's close.


Cheers

Rob Byrnes

Novi, Mi

  • Member since
    February 2003
  • From: Northeast Bavaria, Burglengenfeld, Germany
Posted by kielers on Friday, March 6, 2009 8:00 PM

Lancair,

Great detailing, this is the kind of stuff I like to see in the forum.  Looking forward to seeing more of your work on this build. 

Thanks for posting. 

Steve

"To stand upon ramparts and die for our principles is heroic, but to sally forth to battle and win for our principles is something more than heroic." -- Franklin Delano Roosevelt. "Never in the field of human conflict was so much owed by so many to so few." -- Winston Churchill

  • Member since
    June 2005
  • From: Novi, Mi
Posted by Lancair IV on Thursday, March 12, 2009 8:27 PM

Thanks for all the kind words.  I ordered Big Eds PE so while I wait for that, I continue on the tail area.  I rebuilt the Tail Wheel electric motor support.  The 1st one was too big.  The tail wheel housing is ready for paint.  I'll make the canvas cover after it is installed.  Most of the bulkheads are complete that support the Horizontal Spar attachments, the Elevators have been cut apart and hinged and will be joined by the elevator torque tube.  Tomorrow I'll concentrate on the elevator torque tube and the arms that the cables attach too, and start the rudder pivots and torque tube.

Tail Components 

Elevator Hinge Components

Elevator in the down position

Elevator in the up position


Thanks for looking

Rob Byrnes

Novi, Mi

  • Member since
    March 2003
  • From: Lafayette, LA
Posted by Melgyver on Thursday, March 12, 2009 8:52 PM

I made a similar one out of plastic, don't know if it will support the aircraft, but that was over 20 yrs. ago and it's sitting in a box on the shelf.  I don't think I had any detail shots of the retract mechanism, just the good side shot of it showing the bracing.  I crawled from the waist past the tail wheel assy on the CAF's bird in flight but that was way back in 1979.  Only thing I really remember was ducking under the elevator spar and rudder post to get into the tail gunners seat.  Great work with the brass!  When you get to the main gear they need to be lengthened at least an 1/8 of an inch.  The main tires are way too close to the wheel wells.  I cut some spacers out of brass tubing to keep them from setting into the sockets too far.

Clear Left!

Mel

  • Member since
    June 2005
  • From: Novi, Mi
Posted by Lancair IV on Friday, March 13, 2009 10:29 PM

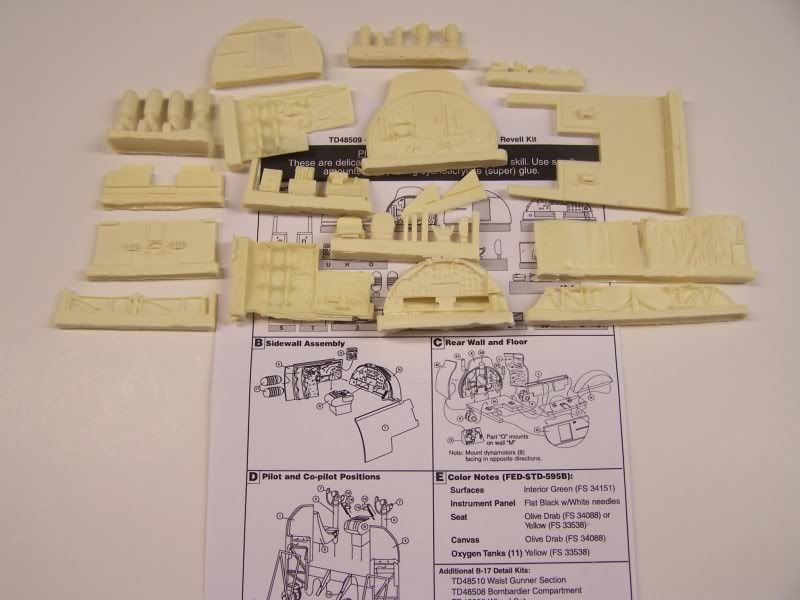
These are some of the after market parts I have acquired for this build.
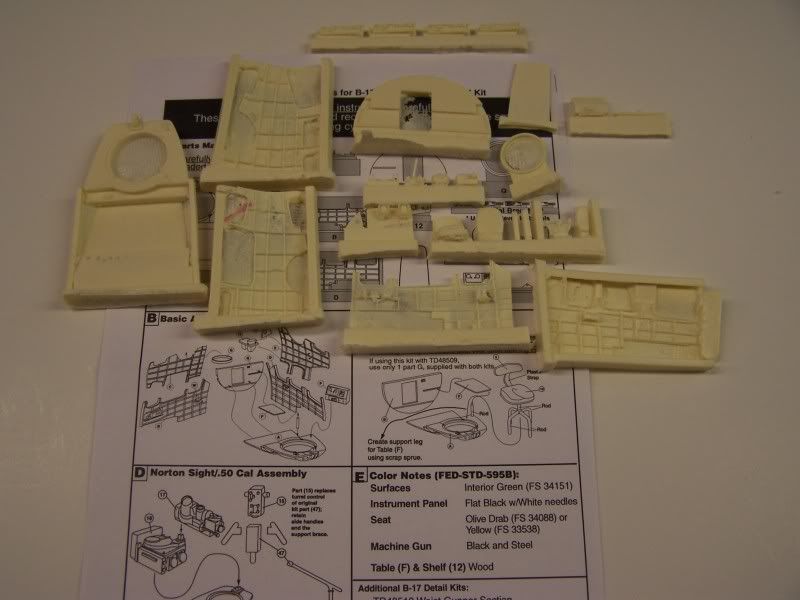
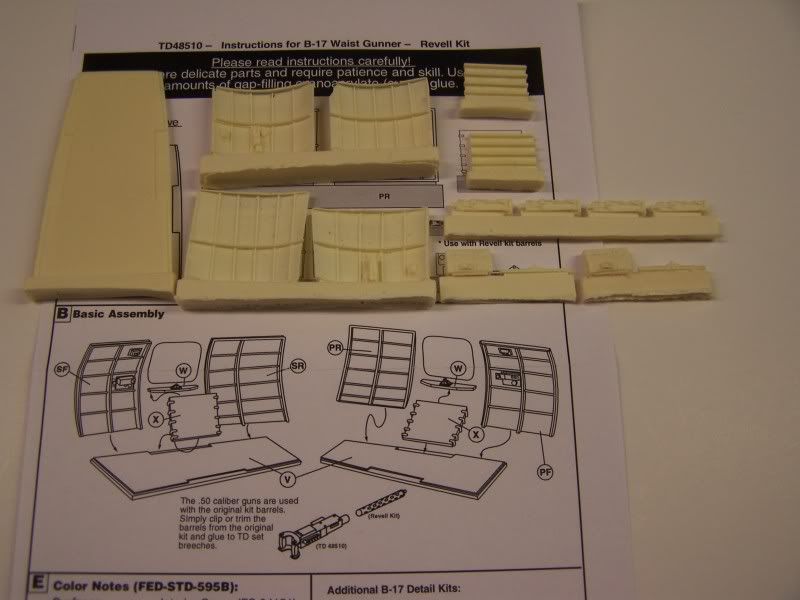
True Details
Cockpit Section


Bombardier Section


Waist Gunner Section


Tires


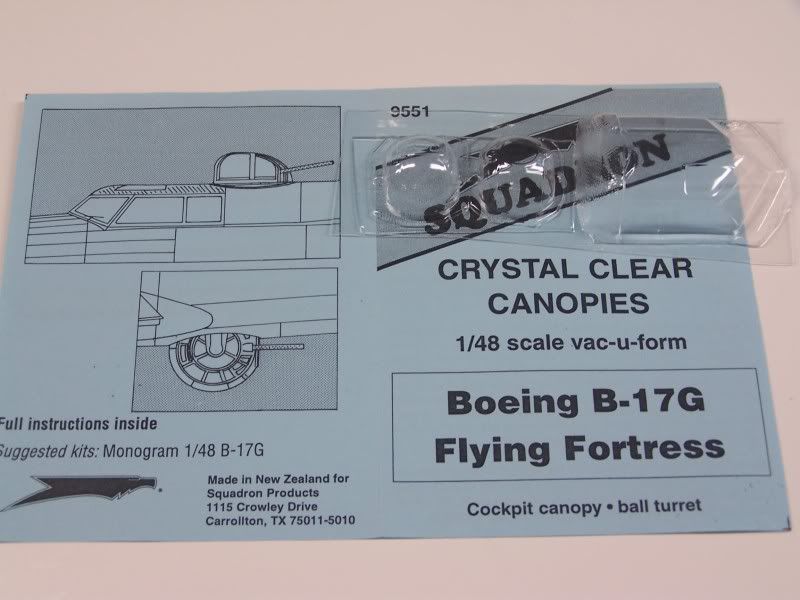
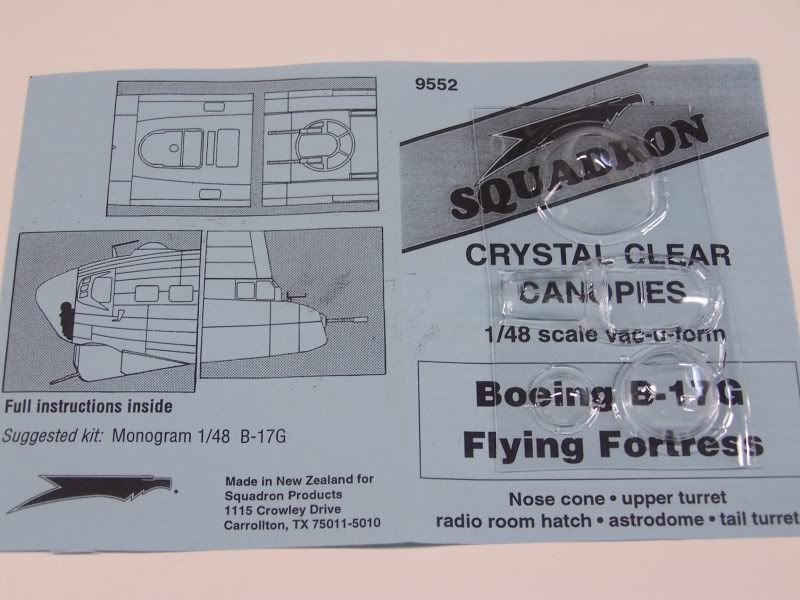
Crystal Clear Canopies
Cockpit canopy & Ball Turrent


Nose Cone, Upper Turrent, Radio Room Hatch, Astrodome, Tail Turrent
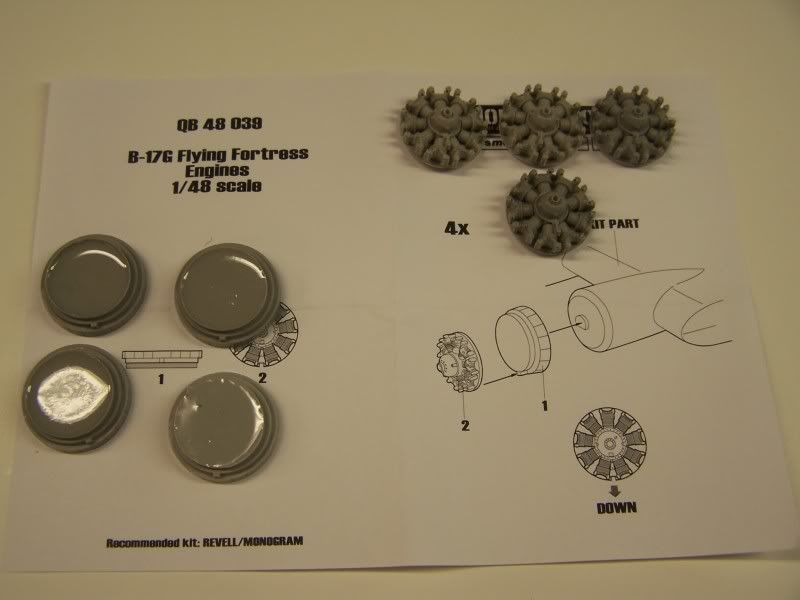


Quickboost.net
Radial Engines


Gun Barrels


Eduards PE was shipped yesterday from Czech Republic.

Cheers

Rob Byrnes

Novi, Mi

  • Member since
    September 2003
  • From: South Central Wisconsin
Posted by Daywalker on Friday, March 13, 2009 10:52 PM
Excellent work Rob, looks like you are going to town.  By the time it's finished, it will be half brass! Shock [:O]

Frank 


  • Member since
    March 2008
  • From: Ohio
Posted by B-17 Guy on Saturday, March 14, 2009 1:44 AM
Hey rob, I've got the cockpit set to, I noticed mine has only one control column and yoke, same with yours?
  • Member since
    October 2004
  • From: League City, Texas
Posted by sfcmac on Saturday, March 14, 2009 4:38 AM
 Pretty cool! Looks like its going to be detailed out of this world!  Still an awesome kit in my eyes! Thumbs Up [tup]
  • Member since
    June 2005
  • From: Novi, Mi
Posted by Lancair IV on Saturday, March 14, 2009 7:20 PM

 B-17 Guy wrote:
Hey rob, I've got the cockpit set to, I noticed mine has only one control column and yoke, same with yours?


Ya mine is the same way.  That's the bad news.  The good news is that there is another in the bombardier kit.  This stuff is a pain getting it to fit right.  I'm stopping the cockpit until I get my Eduards PE.  There's going to be a lot of mixing and matching.

Cheers

Rob Byrnes

Novi, Mi

  • Member since
    March 2008
  • From: Ohio
Posted by B-17 Guy on Saturday, March 14, 2009 9:46 PM
 Lancair IV wrote:

 B-17 Guy wrote:
Hey rob, I've got the cockpit set to, I noticed mine has only one control column and yoke, same with yours?

Ya mine is the same way.  That's the bad news.  The good news is that there is another in the bombardier kit.  This stuff is a pain getting it to fit right.  I'm stopping the cockpit until I get my Eduards PE.  There's going to be a lot of mixing and matching.

Cheers

That's really stupid, not much really makes me angry, but this does for the principle of it. I should not have to buy a differant set to get the parts to finnish another set, those two parts dont even belong in that area of the plane, so why would they come in that set? i dont get it.

  • Member since
    January 2009
  • From: Central CA
Posted by Division 6 on Saturday, March 14, 2009 9:55 PM
 B-17 Guy wrote:

That's really stupid, not much really makes me angry, but this does for the principle of it. I should not have to buy a differant set to get the parts to finnish another set, those two parts dont even belong in that area of the plane, so why would they come in that set? i dont get it.

Marketing, how else are they going to get you to buy more of their products.Wink [;)]


Eric... 

  • Member since
    December 2003
  • From: Indiana
Posted by hkshooter on Saturday, March 14, 2009 10:05 PM
Very nice work, will be tracking this one. I like the B-17, there's something romantic about it. Very neat to watch your come together in such detail.
  • Member since
    July 2004
  • From: Northern KY
Posted by mucker on Sunday, March 15, 2009 8:32 AM

wow, Rob! Very ambitious....I like it. I, too, will be following what you do closely. Some day I'll get to my B-17, and seeing your build will both speed that date up and also provide a lot of tips.

  • Member since
    June 2005
  • From: Novi, Mi
Posted by Lancair IV on Monday, March 16, 2009 4:19 PM

The Eduards PE arrived today.  WOW.  They really have nice looking stuff.  Can't wait to start adding it to the model.

Eduards Masking


Eduards Seat Belts


Eduards Engine Details


Eduards Exterior


Eduards Flaps


Eduards Nose Interior


Eduards Rear Interior


Eduards Cockpit


Eduards Mid Section Interior

Cheers

Rob Byrnes

Novi, Mi

  • Member since
    March 2008
  • From: Ohio
Posted by B-17 Guy on Monday, March 16, 2009 6:01 PM
WOW man!! I love the B-17....but MAN! I dont think I would shell out for all that PE, but hey I cant wait to see how she builds up with all that. Did I see gun barrels in the PE?
JOIN OUR COMMUNITY!

Our community is FREE to join. To participate you must either login or register for an account.

SEARCH FORUMS
FREE NEWSLETTER
By signing up you may also receive reader surveys and occasional special offers. We do not sell, rent or trade our email lists. View our Privacy Policy.