SEARCH FINESCALE.COM

Enter keywords or a search phrase below:

"Foiled" Again: B17G Build

21303 views
101 replies
1 rating 2 rating 3 rating 4 rating 5 rating
  • Member since
    December 2013
"Foiled" Again: B17G Build
Posted by seadog30 on Wednesday, December 18, 2013 4:36 PM

Hi,

I'm new to the Forum although I have been following it for years.  I'm partial to building B-17's and wanted to post the project I've been building for quite some time.  I'm a long time military collector/model builder and have always wanted to do something unique.  Several years ago, I acquired artifacts from a pilot in the 384th Bomb Group.  His B-17, "Chaplain's Office", was damaged by German fighters on November 26, 1943.  When the crew bailed out, the ball turret gunners parachute got caught on the plane so the pilot and bombardier stayed behind to try and help him.

The German fighter pilots saw what was taking place and instead of shooting "Chaplain's Office" down, they escorted the stricken bomber back to a German Luftwaffe base.  The pilot and bombardier could not pull the wounded gunner back inside the plane and they crashed landed at the base.  The Germans later took several photos of the crashed bomber and it was clear to me that this would be the basis for my project.

I began with Monogram's 1/48 B-17 G and the challenges began almost immediately!  

Above: "Chaplain's Office" did not have modified windows on the port side nose. I therefore had to use an additional kit and conform the nose to match that particular aircraft. 

  • Member since
    March 2010
  • From: MN
Posted by Nathan T on Thursday, December 19, 2013 8:30 AM

Nice project and cool story. Bad place to be that ball turret.


  • Member since
    February 2011
  • From: Mobile, AL
Posted by RotorHead10 on Thursday, December 19, 2013 9:07 AM
Sounds like this will be a good build. Going to follow this one.

http://i301.photobucket.com/albums/nn48/MikeTheModeller/GB_Badges/Phantom2011_1.jpg

  • Member since
    May 2013
  • From: Indiana, USA
Posted by Greg on Thursday, December 19, 2013 9:34 AM

That is a truly fascinating story.

Welcome, glad you finally decided to sign on. Look forward to watching your progress on this cool project of yours, seadog.

  • Member since
    March 2012
  • From: Corpus Christi, Tx
Posted by mustang1989 on Thursday, December 19, 2013 9:47 AM

I like stories like this alot. People who do not know better classify all germans as the Nazi "war criminal" types until a small amount of reading clearly shows that most germans, especially pilots, were just ordinary men doing their job. I have recently finished reading a book called "A Higher Call" by Adam Makos and THAT is really a good story much like this one here. If you guys are in the market for a remarkable read that's the one to get.  I'm looking forward to seeing this build out of you seadog. Looks like you've got a great start.


 Forum | Modelers Social Club Forum (proboards.com) 

  • Member since
    March 2008
  • From: Ohio
Posted by B-17 Guy on Thursday, December 19, 2013 10:51 AM

I will be following this build! The more pics the better!!

  • Member since
    December 2013
Posted by seadog30 on Thursday, December 19, 2013 3:37 PM

Thanks guys for the kind words! 

above: "Chaplain's Office" was a Douglas built B-17 and not a Boeing.  The starboard side nose had a window configuration that was different from the Monogram kit.  Using parts from another kit I made the corrections.  After putty and sanding I got the nose completed but as you can see, all of the surface detail was lost in the process.

above: port side nose finished. Because I switched the windows to opposite sides on the fuselage, it changed the nose shape which required additional sanding to get it correct.  I lost a lot of surface detail which led to my next problem, how do I fix this this? Indifferent

  • Member since
    March 2010
  • From: MN
Posted by Nathan T on Thursday, December 19, 2013 3:56 PM

Well, with raised panel lines, you cant really re-scribe, unless you want to just rescribe the whole nose section. There is a company out there that makes raised panel lines as decals, I wanna say either HGW or Archer fine transfers. I've seen them online and they look really good. Otherwise, maybe small strips of thin evergreen strip and glue them on with liquid cement and sand them down some??


  • Member since
    February 2003
  • From: Cameron, Texas
Posted by Texgunner on Thursday, December 19, 2013 4:14 PM

I have used lengths of very fine stretched sprue, laid on with slight amounts of liquid cement, to good effect in the past.  But, I'd say this was a grand opportunity to try those decals that Nathan mentioned.  Good luck with whatever you try!

Gary


"All you mugs need to get busy building, and post pics!"

  • Member since
    December 2013
Posted by seadog30 on Thursday, December 19, 2013 4:15 PM

When trying to figure out how I wanted to get the detail back, I started out scribing panel lines.  After trying on my scrap fuselage for practice, I did not like the way it looked.  I then saw a post where another modeler had used a "Rosie the Riveter" tool to make the rivet patterns and I was hooked!  I quickly ordered one online and went to work as soon as I got it.  It's a great tool and I highly recommend trying it if you never have.  When I got to the nose, the tiny gear teeth on the tool would not make clean rivet marks where there was putty and again I was stuck.

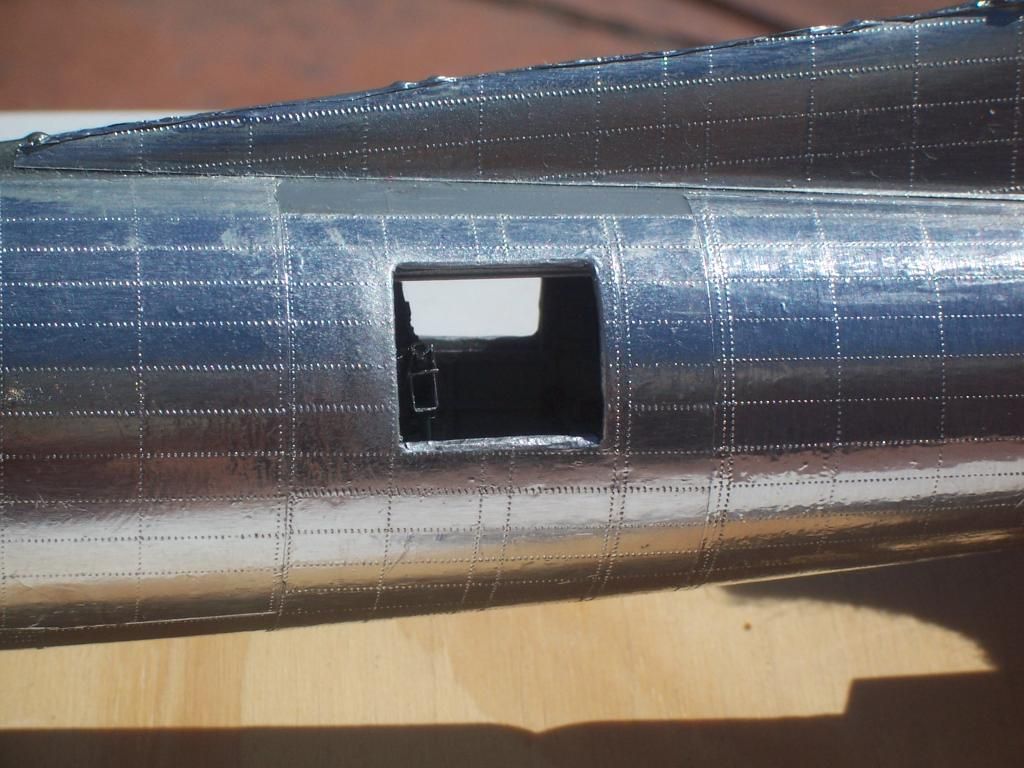
It was at this point that I came up with the idea to use Reynolds Wrap aluminum foil.  I cut square sheets and using dividers and a square, made my rivet lines in the foil.  I then glued the foil in place and was pleased with the results.  The post name  "Foiled Again" was a poke at my progress.  It took MONTHS and MONTHS to get this the way I wanted it.  I think I went through an entire roll of Reynolds Wrap, hence the name, "Foiled Again". 

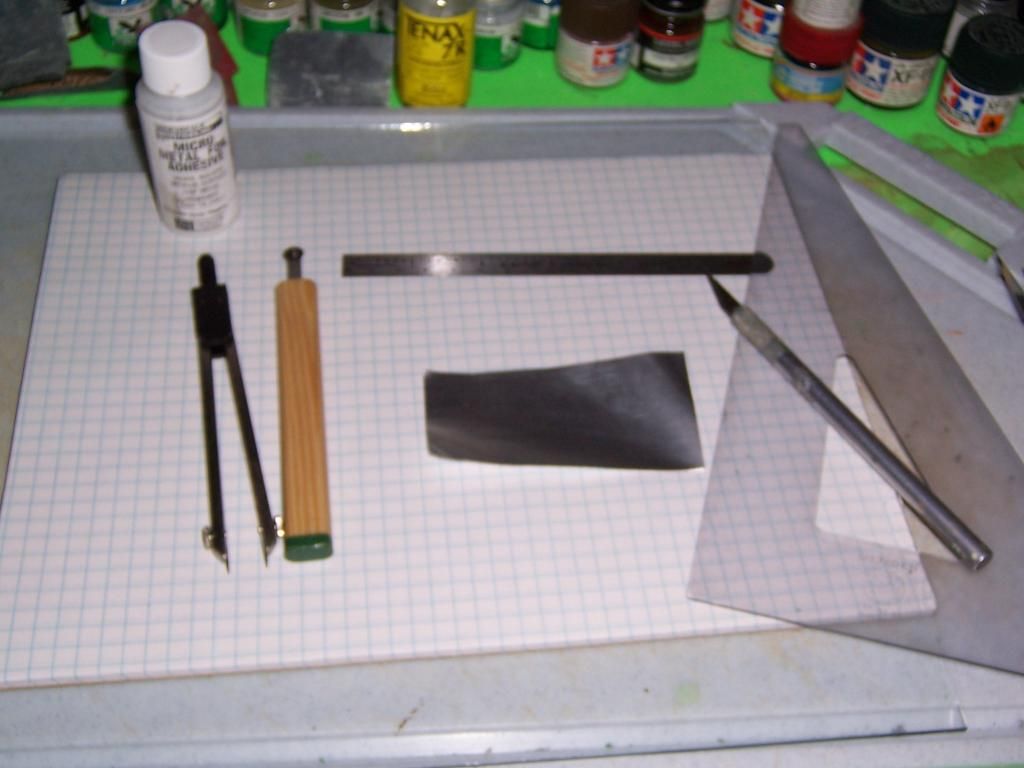
above: tools need to get started.

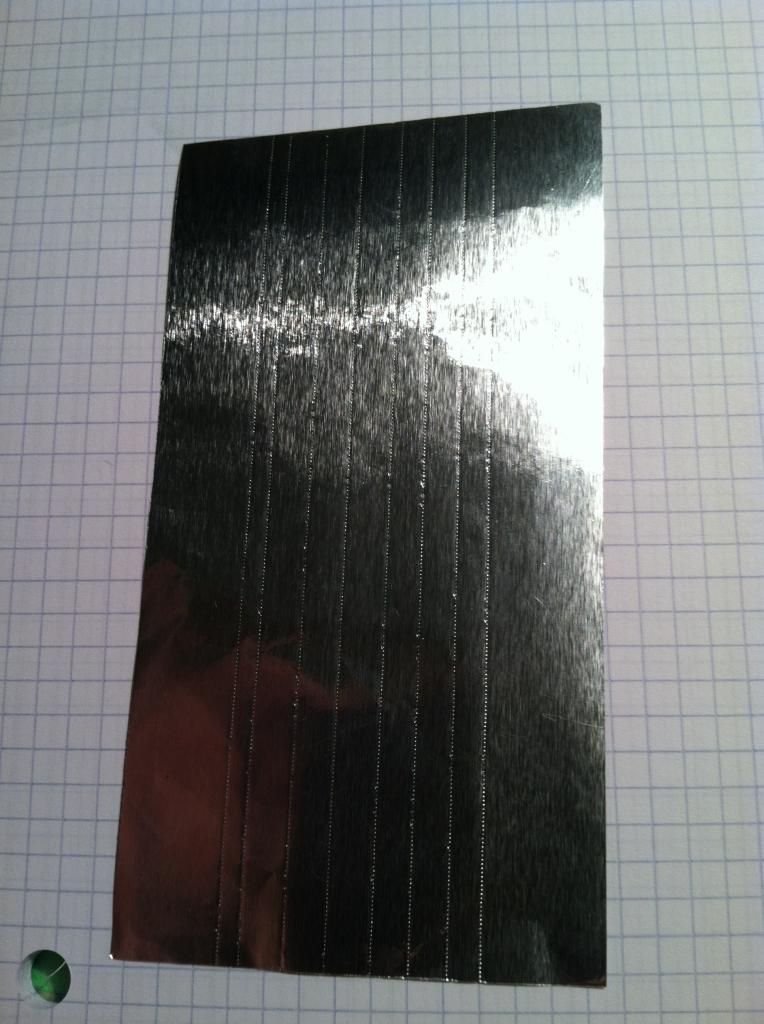
above: making the panels gets easier with practice, lining it all up was difficult though.  Here's a panel in the process of being completed.

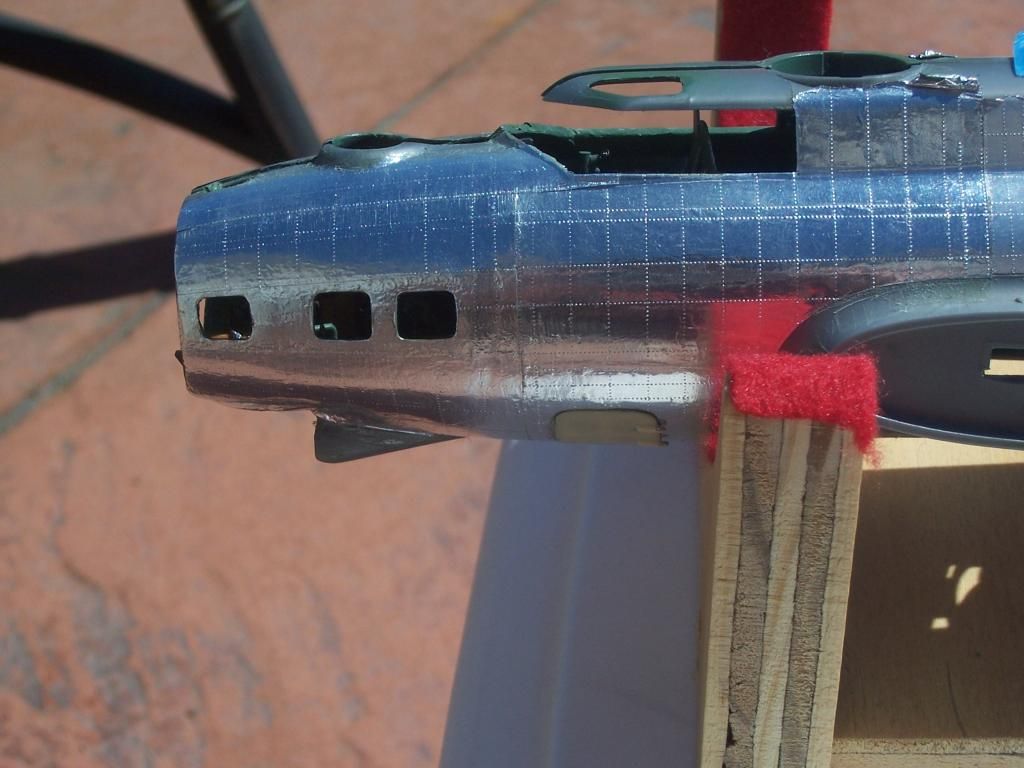
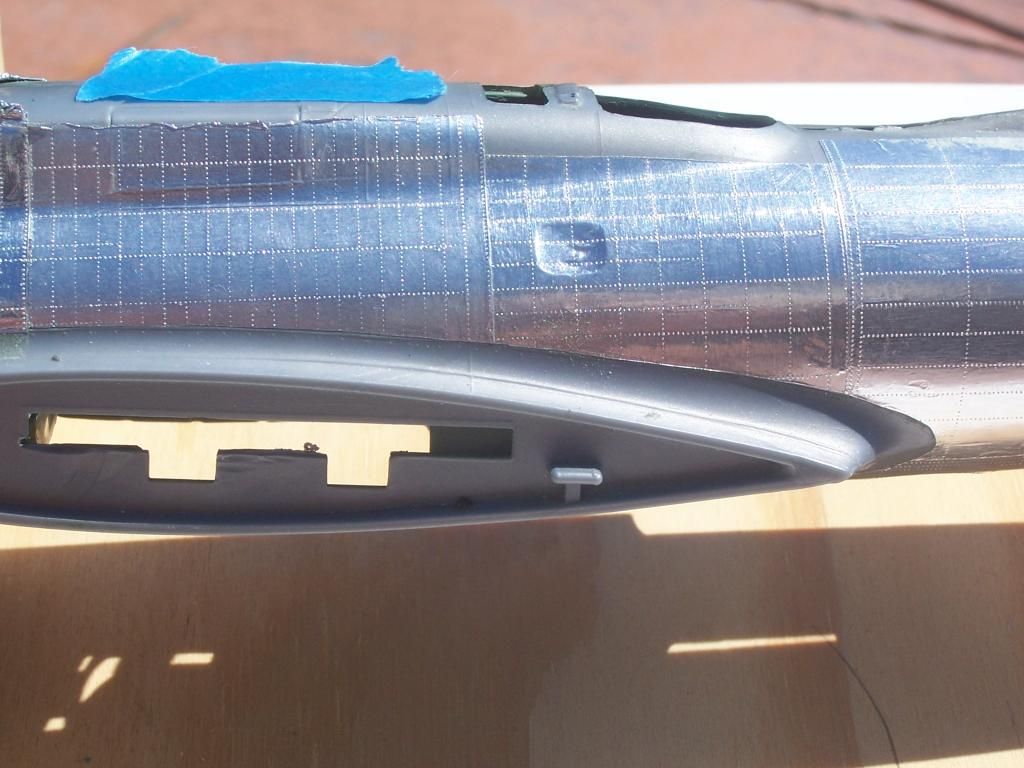
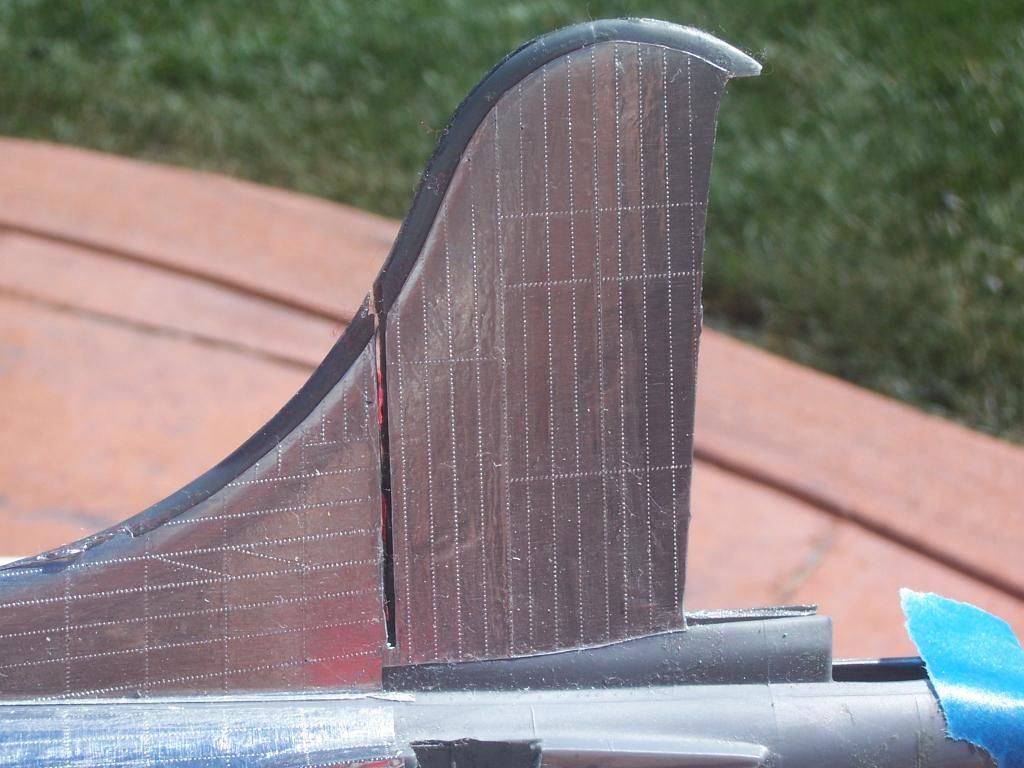
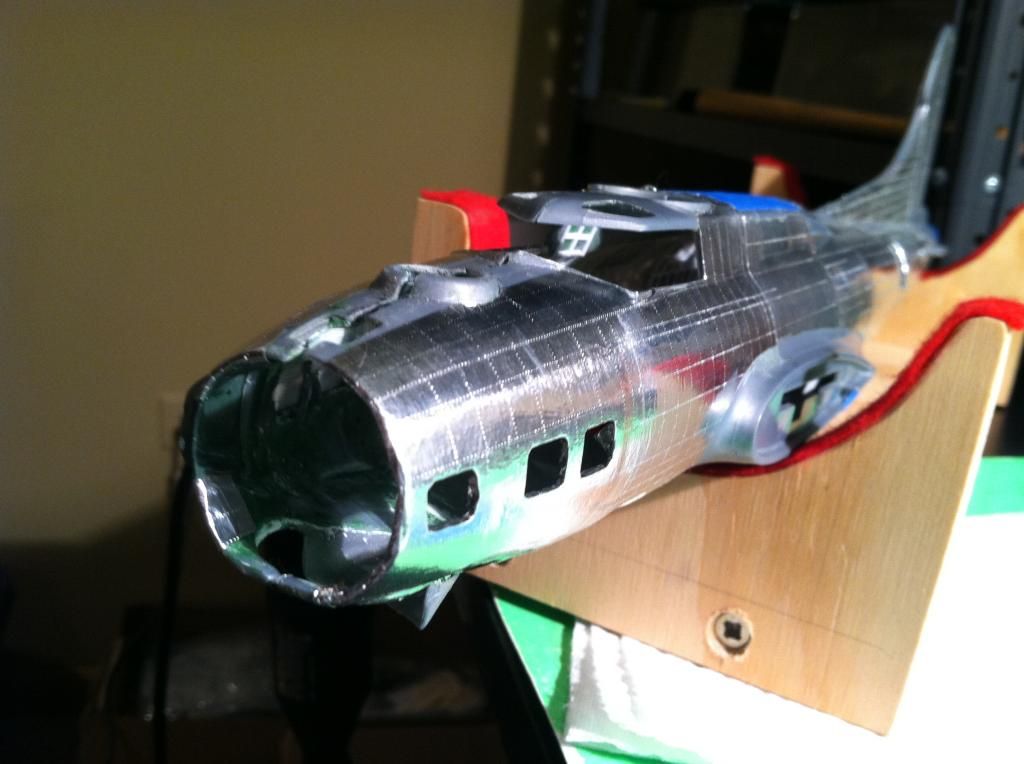
above: port side views of the different sections.  I think I did every panel at least 5 times or more to get what I wanted but was pleased the way it turned out.  Thanks for looking.

  • Member since
    December 2013
Posted by seadog30 on Thursday, December 19, 2013 4:35 PM

More photos, this time of the starboard side.

above: starboard side nose taking shape.

above: slowly it all came together, battle damage to the nose which is in the original photos of "Chaplain's Office".  I'm surprised nobody in the crew was actually wounded with the all the damaged sustained!

Thanks for looking. I'll post more of the outside if anybody wants different angles and will begin with the interior soon. Wink

  • Member since
    February 2012
  • From: Olmsted Township, Ohio
Posted by lawdog114 on Thursday, December 19, 2013 6:08 PM

Looking great Seadog....and nice history tidbit.   My grandfather flew 13 missions in a ball turret out of the 390th BG 570th BS.  He was shot down and POW'ed  on October 10th, 1943 (Munster Raid).  I had the same problem when I converted Monogram"s old G back to the plane he flew 11 of those mission in, a Lockeed Vega  F.  I'm glad you found a solution to the panel lines.  I just scribed the detail back in, but I ended up scribing the whole kit (never again).  I wish someone would just give us a new B-17 and provide options with all the different nose configurations.  I suppose there's too many variations for this to be feasible. Then again, someone made a $300.00 1/32 scale version so I suppose anything is possible.  I can dream I suppose. I'll be following your progress.  

Joe    

 "Can you fly this plane and land it?...Surely you can't be serious....I am serious, and don't call me Shirley"


  • Member since
    December 2013
Posted by seadog30 on Thursday, December 19, 2013 6:15 PM

Thanks Joe.  Major Anton "Toni" Hackl was officially credited with shooting down "Chaplain's Office".  The 384th was on  a mission to Bremen when "Chaplain's Office" came under attack.  When Sgt. Robert Rimmer bailed out, his parachute opened but got caught in the bomb bay leaving him hanging below the plane.  Lt. Frank Pelley was in the process of bailing out, but stayed behind in an attempt to pull him back up.  Lt. Charles "Ted" Zitnik stayed at the controls to give Lt. Pelley as much time as possible to help Sgt. Rimmer.  When the Luftwaffe pilots saw what was taking place, they turned the B-17 towards the closest Luftwaffe base without firing a shot.

I'm not sure if Major Hackl was one of the pilots but according to a witness, three Luftwaffe planes were present.  They allowed Lt. Zitnik to circle their base giving Lt. Pelley more time, but the stricken bomber eventually belly landed.  Sgt. Rimmer was killed while Zitnik and Pelly were taken POW.  The heroism and valor on both sides is beyond words in my opinion.................I hope my project is worthy of the story.

Rick

  • Member since
    January 2012
  • From: Hatfield
Posted by Misty on Thursday, December 19, 2013 7:11 PM

I admire your patience with the riveting, but the results are well worth it. I have foiled a couple of planes and know how time consuming it can get. Rosie the riveter may have to be bought too.

  • Member since
    February 2011
  • From: Mobile, AL
Posted by RotorHead10 on Thursday, December 19, 2013 7:24 PM
The foil looks great! I'd like to do that sometime. Couple questions..1) What adhesive do you use to attach the foil to the model? 2) How small do you cut your foil pieces to make them managable?

http://i301.photobucket.com/albums/nn48/MikeTheModeller/GB_Badges/Phantom2011_1.jpg

  • Member since
    December 2013
Posted by seadog30 on Thursday, December 19, 2013 10:11 PM

I originally started using Bare Metal Foil.  When I started purchasing it at an alarming rate (I was making a lot of mistakes!) my friend Bob at Walt's Hobby Shop in Cresthill, IL told me about Micro Foil Adhesive.  It comes in a bottle and is very similiar to white glue.  Goes on easy and cleans up well.  You can see the bottle in the photo with the other tools I use.

When making my panels, I would usually cut a strip of foil approximately 3 inches wide and 5 inches in length.  I would make my pattern of rivets length wise along the entire strip aluminum.  After measuring, I would then make the width rivets and  cut the piece to fit.  If I messed it up, I just went back to the foil strip which had enough on it for several more tries.  

Did that make sence?

  • Member since
    February 2011
  • From: Mobile, AL
Posted by RotorHead10 on Friday, December 20, 2013 9:45 AM
It did. I figured you would attach the foil to the model and "burnish" your rivets into it. Thanks for sharing.

http://i301.photobucket.com/albums/nn48/MikeTheModeller/GB_Badges/Phantom2011_1.jpg

  • Member since
    December 2013
Posted by tomdavid on Friday, December 20, 2013 1:04 PM
Those "foil" panel lines look great. Interestingly, my dad worked at Douglas as an assembly Leadman all during the war.Maybe I can dig around and find a photo of the assembly line. If so it is yours but don't hold you breath.
  • Member since
    December 2013
Posted by seadog30 on Friday, December 20, 2013 4:45 PM

I have seen it done this way too but then the rivets are "indented".  If you put them in the foil you actually get raised rivets when the foil is applied to the model.

  • Member since
    December 2013
Posted by seadog30 on Friday, December 20, 2013 4:46 PM

Thanks!

  • Member since
    November 2007
  • From: Wisconsin Rapids, WI
Posted by moose421 on Saturday, December 28, 2013 9:13 AM

Since I am new to the aircraft section of the forum.  Where would I get the riveter tool?  My daughter gave me the G for Christmas and I want to go all out on this.  

  • Member since
    December 2013
Posted by seadog30 on Saturday, December 28, 2013 2:01 PM

The tool is Rosie the Riveter and is from Europe.  The sellers e-mail is dousekp@quick.cz.  There are several tools to choose from, I purchased the 0.55mm size.  It also corresponds pretty good with the Archer Transfer raised rivets which help for some added detail.  Good Luck!!

  • Member since
    December 2002
  • From: Bury St Edmunds, Suffolk, England
Posted by Bish on Saturday, December 28, 2013 6:40 PM

That's a nice looking build and some great background to it.

I have to ask, what happened to the ball gunner. You say the crew were not able to pull him in, so was he under the plane when it came down.

I am a Norfolk man and i glory in being so


On the bench: Airfix 1/72nd Harrier GR.3/Fujimi 1/72nd Ju 87D-3

  • Member since
    December 2013
Posted by seadog30 on Saturday, December 28, 2013 10:49 PM

As "Chaplain's Office" made the final approach to crash land,  they passed over the buildings around the base.  Sgt. Rimmer was still hanging under the plane and his body swung into the second story of a building tearing him loose.  He was killed on impact so he did not get crushed by the plane which landed wheels up on its belly.  The people at the field came out to watch and all witnessed this and it was documented at the end of the war.  Sgt. Rimmer was buried at a church near the field and was brought home after the war ended.  

  • Member since
    December 2013
Posted by seadog30 on Sunday, December 29, 2013 7:44 PM

Progress a bit slow because of Christmas but I'm completing the top working my way back to the tail.  I'm also saving the the top of the nose for last.  

  • Member since
    January 2011
Posted by Christian Theodotou on Sunday, December 29, 2013 11:19 PM

seadog30 - This is fantastic work, I look forward to seeing this every time I come on here.  I've been avoiding NMF for a while now but I might have to try this out, thanks for sharing.

........

  • Member since
    December 2013
Posted by seadog30 on Sunday, December 29, 2013 11:44 PM

Thanks for the comments, I appreciate it!  I have to add that during this build, I've stopped and started many times.  It seems there were times I couldn't get anything to line up and needed to walk away.  Because I needed to see some progress, when frustrated I would build the sub-assemblies.  I'm hoping to complete the remainder of the outside fuselage soon so I can get to the wings!

  • Member since
    March 2008
  • From: Ohio
Posted by B-17 Guy on Monday, December 30, 2013 12:02 PM

More pics!!!!!!

  • Member since
    May 2004
  • From: Mount Bretherton Model Aircraft Observatory
Posted by f8sader on Monday, December 30, 2013 2:40 PM

B-17 Guy

More pics!!!!!!

You are very brave and very patient!  Nice work!

Lon-ski

  • Member since
    December 2002
  • From: Bury St Edmunds, Suffolk, England
Posted by Bish on Monday, December 30, 2013 3:20 PM

Lovely work there seadog30.

And thanks for the info on the gunner. I am sure this will be a fitting tribute.

I am a Norfolk man and i glory in being so


On the bench: Airfix 1/72nd Harrier GR.3/Fujimi 1/72nd Ju 87D-3

JOIN OUR COMMUNITY!

Our community is FREE to join. To participate you must either login or register for an account.

SEARCH FORUMS
FREE NEWSLETTER
By signing up you may also receive reader surveys and occasional special offers. We do not sell, rent or trade our email lists. View our Privacy Policy.