SEARCH FINESCALE.COM

Enter keywords or a search phrase below:

1:48 Academy P-38J Lightning (Completed)

26962 views
71 replies
1 rating 2 rating 3 rating 4 rating 5 rating
  • Member since
    February 2012
  • From: Olmsted Township, Ohio
Posted by lawdog114 on Tuesday, June 26, 2018 12:33 PM

Thanks Britt with the info about the white glue. I’m going to give that stuff a try.....and again, beautiful Lighting. 

 "Can you fly this plane and land it?...Surely you can't be serious....I am serious, and don't call me Shirley"


  • Member since
    June 2013
Posted by bvallot on Tuesday, June 26, 2018 4:37 AM

Thanks Mike. I couldn’t agree more about the EZ line. For a better reference on painting with Alclad paints I‘d suggest also taking a look at a more recent build I did. I’ve since refined some of these steps a little and come away with a more convincing NMF. Without rambling too much about it I am maintaining the tonal shifts between panels without the use of the Gloss Black base. Most of the Alclad line up suggests a grey primer except in the case of high shine metals. Both primers will work fine ...it really just depends on your goals. 


Here’s s link. 

http://cs.finescale.com/fsm/modeling_subjects/f/2/t/176684.aspx

On the bench:  

Tamiya F4U-1  Kenneth Walsh


  • Member since
    December 2010
  • From: Salem, Oregon
Posted by 1943Mike on Sunday, June 24, 2018 10:20 PM

Fine job on the kit.

I use EZ Line all the time and find it's a much simpler solution to rigging aircraft and some ships other than sailing ships.

I have Alclad paints but unless I beef up the exhaust system I built for my paint booth I'm not sure I'll ever get around to using them. I do have a good respirator/mask so I might experiment with the stuff some day.

I'll reference this thread when I get around to building my Eduard Pacific Lightnings kit. I believe it has the Academy plasitc.

Mike

"Le temps est un grand maître, mais malheureusement, il tue tous ses élèves."

Hector Berlioz

  • Member since
    June 2013
Posted by bvallot on Sunday, June 24, 2018 1:54 PM

Thanks Greg. This build is from a few years ago so it’s a little out of current topics I’m sure. That AM cockpit fit did set me back for a while. I nearly did concede. But after some time and fresher eyes I did manage to convince her. If I recall, the answer came to me through someone here on the forum. So I’m always happy to pay it forward myself. 

On the bench:  

Tamiya F4U-1  Kenneth Walsh


  • Member since
    May 2013
  • From: Indiana, USA
Posted by Greg on Sunday, June 24, 2018 11:49 AM

Man oh man did you do a beautiful job on this P-38.

I love what you did with the Alclad, it looks so very convincing.

Sorry I missed this whole thread until now, what what a pleasure to read. That fit issue due to the cockpit resin tub might have been a deal-stopper for me, my hat is off to you.

  • Member since
    June 2013
Posted by bvallot on Sunday, June 24, 2018 11:31 AM

Makes since why I never came across one. =] happy to help in whatever way that I can. I hear you on slow. I’m currently in the “golden age” of toddlers and infants...which is sarcasm for we don’t sleep anymore and virtually all extracurricular activities cease to exist unless it centers around them. But my kids are virtually angels compared to some so I shouldn’t complain too much. I have managed to piece together a cockpit for a Hellcat I’m working on. Hopefully it goes together faster than the Wildcat I did last. That was a lot more involved with converting it to a -3...and with the undercarriage so visible. So maybe by September. Lol. 

DM me if there’s anything I can help with. 

On the bench:  

Tamiya F4U-1  Kenneth Walsh


  • Member since
    August 2013
Posted by Jay Jay on Sunday, June 24, 2018 11:13 AM

I'll just have to keep you informed BV because I posted no W.I.P. for this. Also I build VERY slowly especially since summer is upon us. I simply glean the info on here and try little bites at a time to see if it works for me in incremental steps.


 I'm finally retired. Now time I got, money I don't.

  • Member since
    June 2013
Posted by bvallot on Saturday, June 23, 2018 3:37 PM

The obstacle is the way.  Keep working it and I’m sure you’ll whip her into shape Jay. =]

I’ll have to catch up on your build to see where your at with things. 

On the bench:  

Tamiya F4U-1  Kenneth Walsh


  • Member since
    August 2013
Posted by Jay Jay on Saturday, June 23, 2018 11:46 AM
Fabulous build there Mate. just to update my last post , I did get this kit and started on it. I must have gotten a "Monday " kit because so far i have about a pound of putty and many hours of sanding on it even though I tried to emulate your building process. But I endeavor to perservere.


 I'm finally retired. Now time I got, money I don't.

  • Member since
    June 2013
Posted by bvallot on Saturday, June 23, 2018 4:26 AM
I know I’ve already responded on the messenger but I figured I’d take the opportunity to discuss it here as well. I use a white glue that is very strong but very forgiving if you need more than one attempt at getting it right. The label reads “Crafters Pick. The Ultimate.” I imagine some of these stronger white glues are a dime a dozen to some extent. This is what I had recommended by my LHS. I doubt I’ll ever use anything else.

On the bench:  

Tamiya F4U-1  Kenneth Walsh


  • Member since
    June 2018
Posted by dsustello on Friday, June 22, 2018 8:18 AM

what did you use to glue the canopy together?


  • Member since
    June 2013
Posted by bvallot on Monday, June 30, 2014 10:29 PM

Thanks Steve, Gary, and MS.  I'll definitely do another one sooner or later.  Perhaps an earlier model.

Joe: I had a joke about her being a devil and a bad girl...but it wasn't translating well into just plain text. =/  So maybe not.  But Thanks.  I just realized I didn't put any pictures of her from underneath.  Nothing much you're missing, the weathering just reflects dirty landings and takeoffs...a few oil leaks.  Maybe if I get around to it tomorrow I'll put one up.  I am still looking forward to doing one of Robin Olds' Lightnings.

Gamera:  Of course! Use it...it's for all to share.  Just be sure to keep it snug and even.  If not you'll get an elliptical shape.  You should be able to see the panel line on the cone to know you're where you need to be.  =]

On the bench:  

Tamiya F4U-1  Kenneth Walsh


  • Member since
    November 2009
  • From: SW Virginia
Posted by Gamera on Monday, June 30, 2014 10:05 PM

Yes, she's gorgeous!  The weathering on the NMF is indeed superb!

And those masks for the front of the spinners- I've tried painting them with a brush and never got them even- I'm going to have to swipe your technique there.

"I dream in fire but work in clay." -Arthur Machen


  • Member since
    December 2003
  • From: Charleston, SC
Posted by sanderson_91 on Monday, June 30, 2014 9:39 PM

Great looking build!!  


GAF
  • Member since
    June 2012
  • From: Anniston, AL
Posted by GAF on Monday, June 30, 2014 9:04 PM

I ditto the comments concerning the NMF.  Great shading work to bring out variations in the color.

Well done!

Gary

  • Member since
    November 2003
  • From: State of Mississippi. State motto: Virtute et armis (By valor and arms)
Posted by mississippivol on Monday, June 30, 2014 8:12 PM

Sweet build!

  • Member since
    February 2012
  • From: Olmsted Township, Ohio
Posted by lawdog114 on Monday, June 30, 2014 8:09 PM

Awesome Der Gabelschwanz Teufel!  Your supercharger stains are convincing as well.  Thanks for taking us along for the ride with another ghost pilot.  

Joe

 "Can you fly this plane and land it?...Surely you can't be serious....I am serious, and don't call me Shirley"


  • Member since
    April 2014
Posted by r13b20 on Monday, June 30, 2014 6:30 PM

One of my favorites. Good job. Turnbuckle is good enough for me. Bob

  • Member since
    March 2003
  • From: Western North Carolina
Posted by Tojo72 on Monday, June 30, 2014 6:06 PM

great job,weathering of metal looks great

  • Member since
    June 2013
Posted by bvallot on Monday, June 30, 2014 4:53 PM

Thanks guys.  Greentracker, it really wasn't so bad a kit even for a first-timer like me.  Just be patient and tackle those booms first and the rest pretty much goes together.  =]

Fly-in:  I'm hooked on these NMFs now.  I can't wait to do another one.  I need to hurry up and get moving through this P-40 GB so I can do another one.

On the bench:  

Tamiya F4U-1  Kenneth Walsh


  • Member since
    December 2006
  • From: Phoenix, AZ
Posted by Fly-n-hi on Monday, June 30, 2014 3:39 PM

Nice work!  The weathering on the metal looks goodYes

  • Member since
    October 2009
  • From: Oil City, PA
Posted by greentracker98 on Monday, June 30, 2014 1:32 PM

Looks Great   I also recomend this kit. It makes a great model, no matter what version you build it into.

A.K.A. Ken                Making Modeling Great Again

  • Member since
    June 2013
Posted by bvallot on Monday, June 30, 2014 12:21 PM

Okay.  I've finally managed to wrap this up and clean off my bench.  Since this kit from Academy has a tricky way of doing the props, I thought I'd drop a couple of quick photos of what I came up with and share what I might do next time.  So buckle up and strap in cause I'm going to load this post with pictures! =D

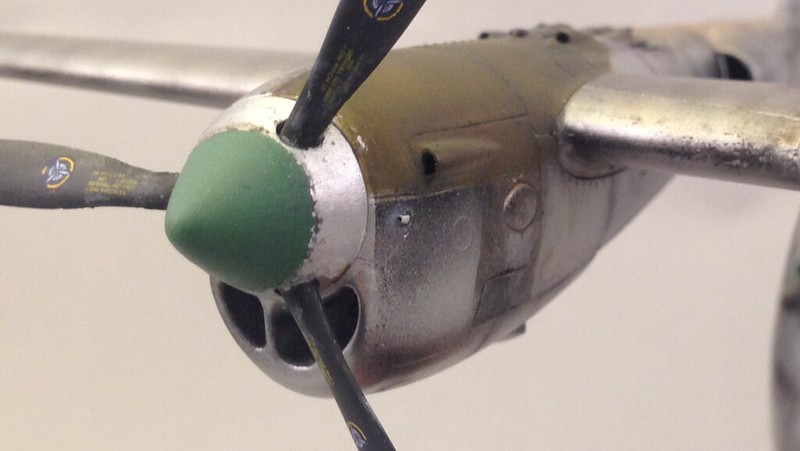
To start...this is what the Academy kit sets up for the props.  If they would have just formed the cone a little higher up it would have negated the need to remove the seam it leaves behind and the panel line they have could take it's place.
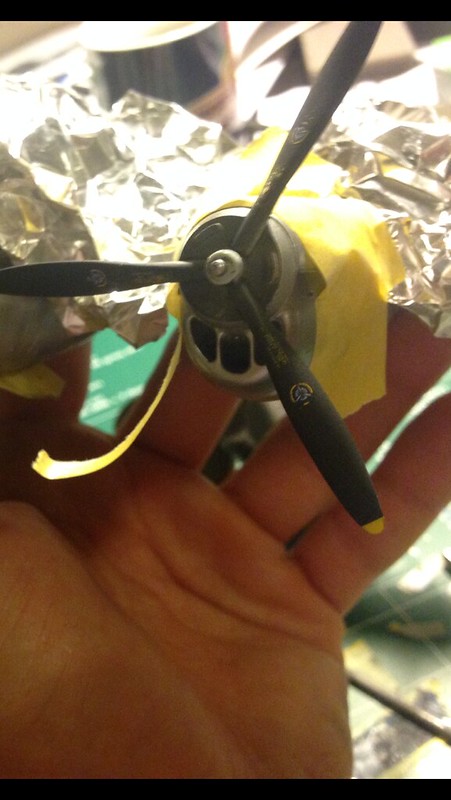
 image by brittvallot, on Flickr

This time around I wanted to ensure that these props would spin, so before I placed the stopper onto the prop assembly I put a drop of mineral oil onto the rod that receives the prop.  Just occurred to me as I was doing it and it works like a charm. =]  As far as taking care of the seam here, I wasn't having the same luck with the CA I was using for some reason so I tried my hand at some Milliput for the first time and man that stuff is sweet.  I think it made all the difference.  To paint the cone of the spinner, I cut a 1/2 in circle and placed over the cone to mask it for paint/clearcoat/flat finishes.
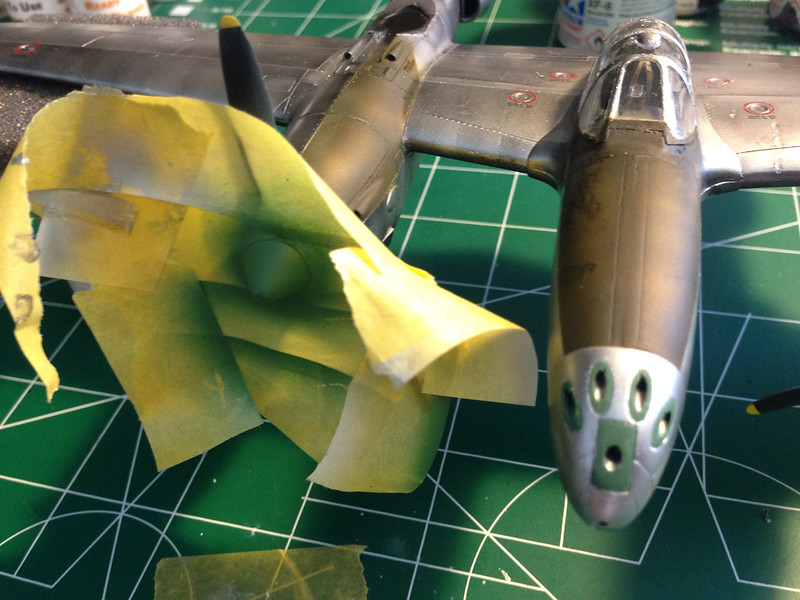
 image by brittvallot, on Flickr

I went back and scratched away a little paint here and there to show the work that would've been done by removing it to get to the props themselves.

Okay. So that's that.  Next time I think what I might do is to use a tube cutter to cut the bottom half of this cone to match up the first part of the prop assembly and take care of the seam before I even place it on the plane.  That way the painted part of the cone can be painted and then glued on after if you're careful about such things.  Either way it will make it loads easier to take care of the seam if it's something that's important to you.  That's my thoughts on that.  Did I mention I have perfect hindsight. lol 

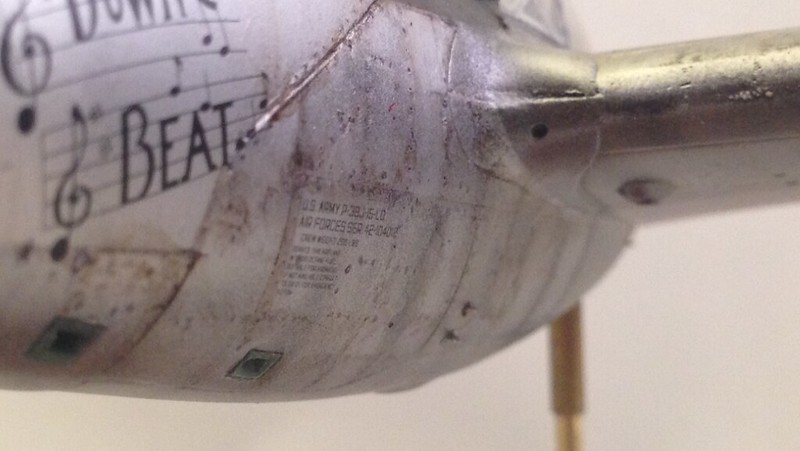
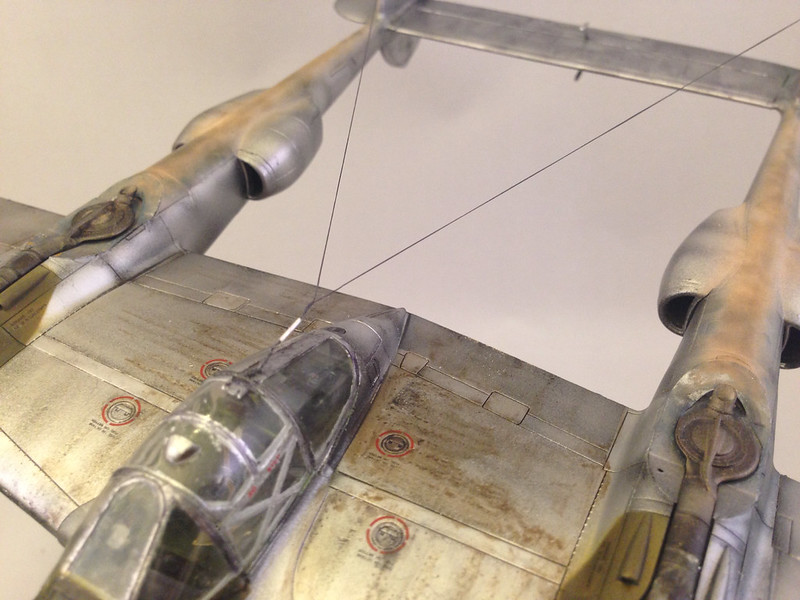
And here's the finished set of pictures.  I have found that my new lightbox doesn't exactly accommodate planes larger than a that of a single engine fighter at 1:48.  So I apologize for some of these.  I did the best I could with what I've got.  Next time I do one this big I'll try something a little different.
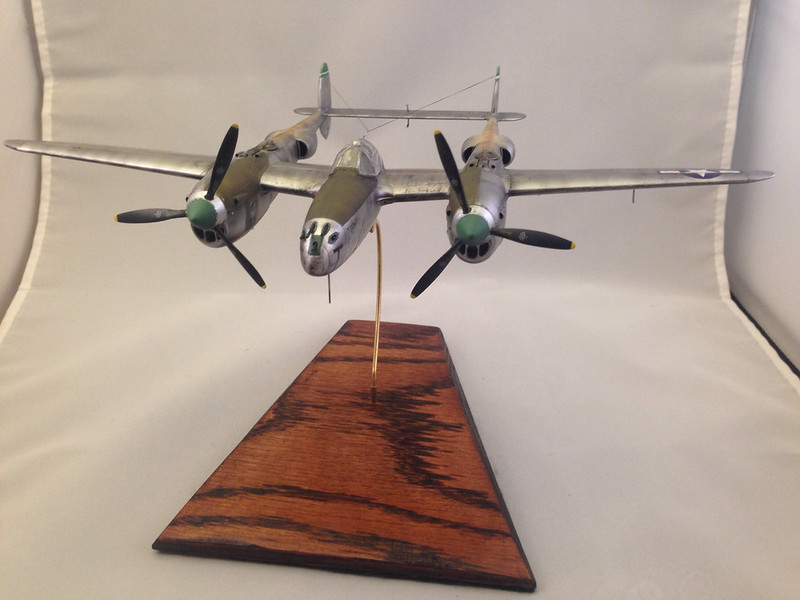
 image by brittvallot, on Flickr

 image by brittvallot, on Flickr
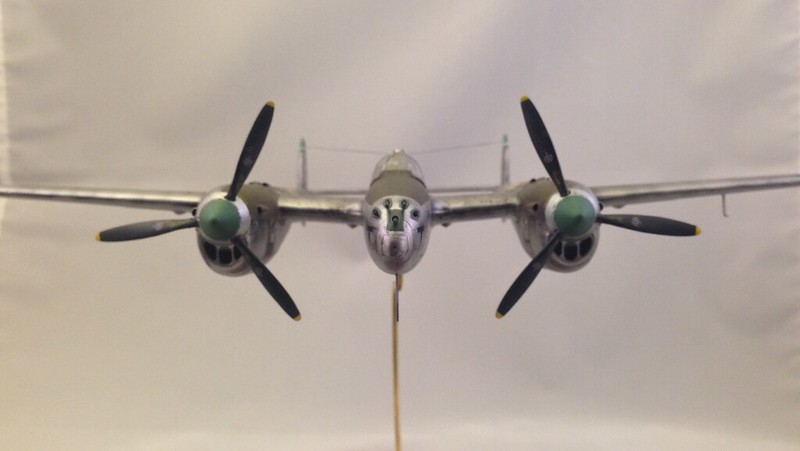
 image by brittvallot, on Flickr

 image by brittvallot, on Flickr
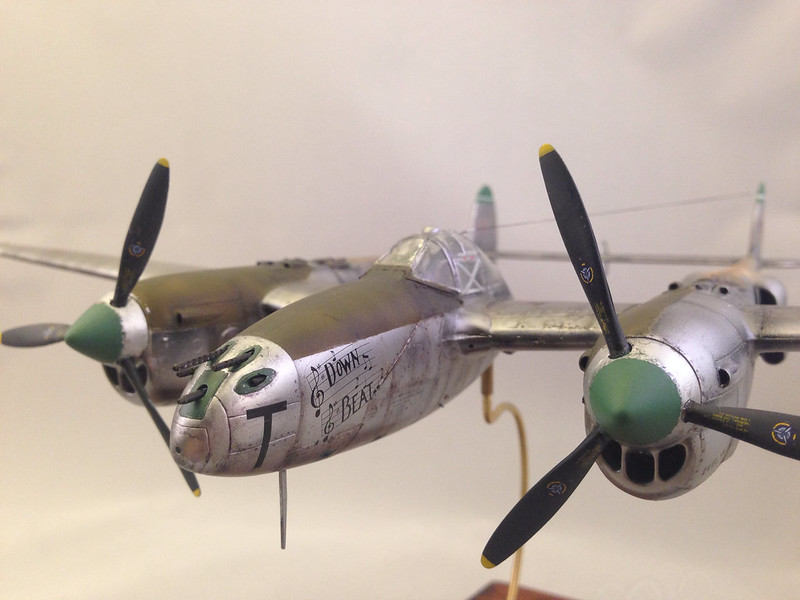
 image by brittvallot, on Flickr
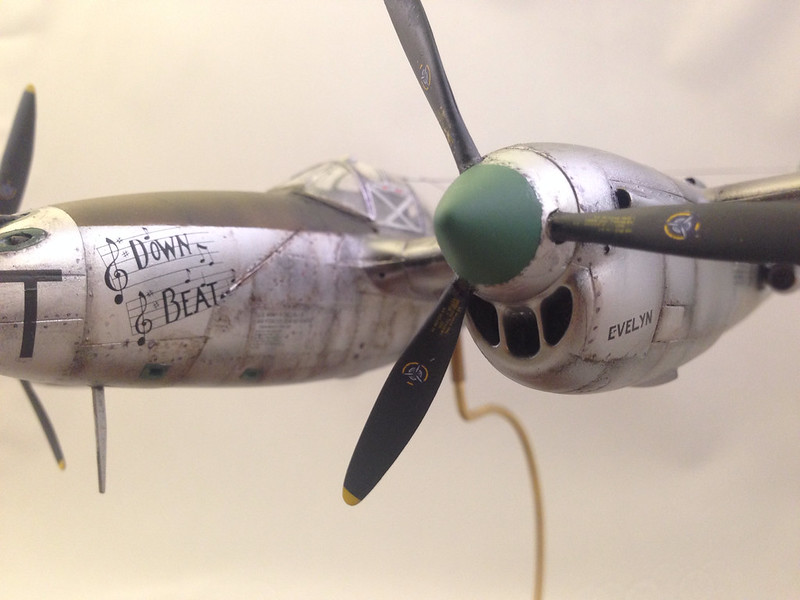
 image by brittvallot, on Flickr
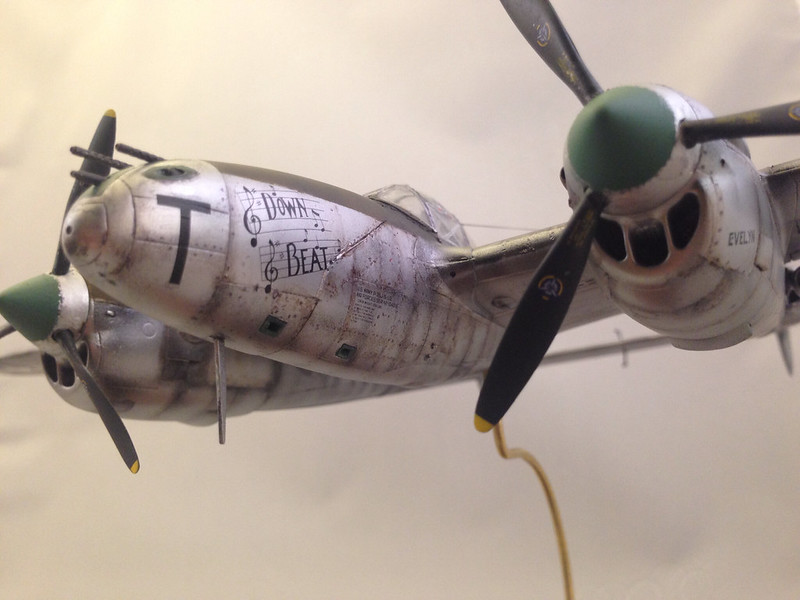
 image by brittvallot, on Flickr
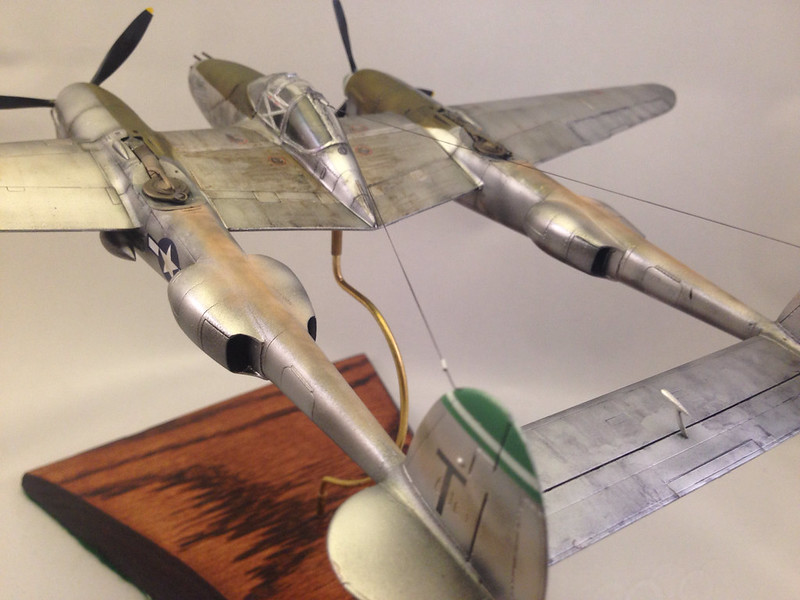
 image by brittvallot, on Flickr
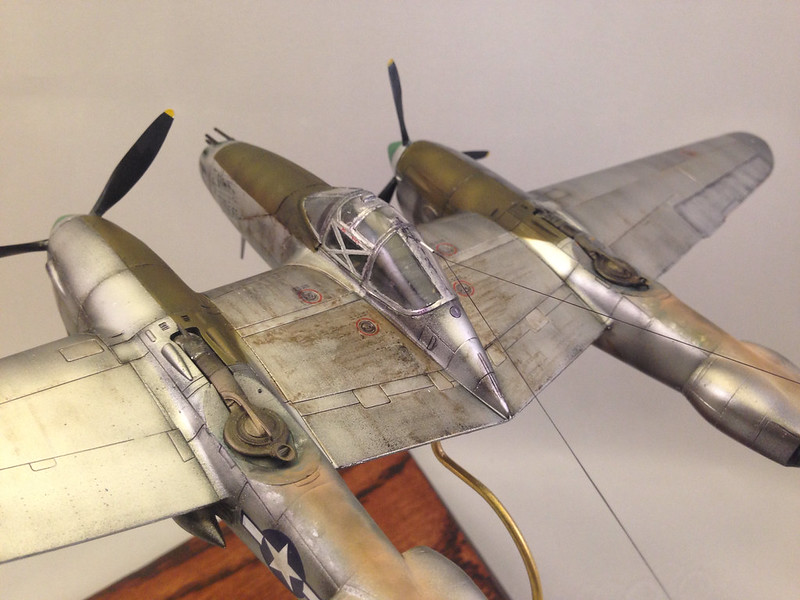
 image by brittvallot, on Flickr
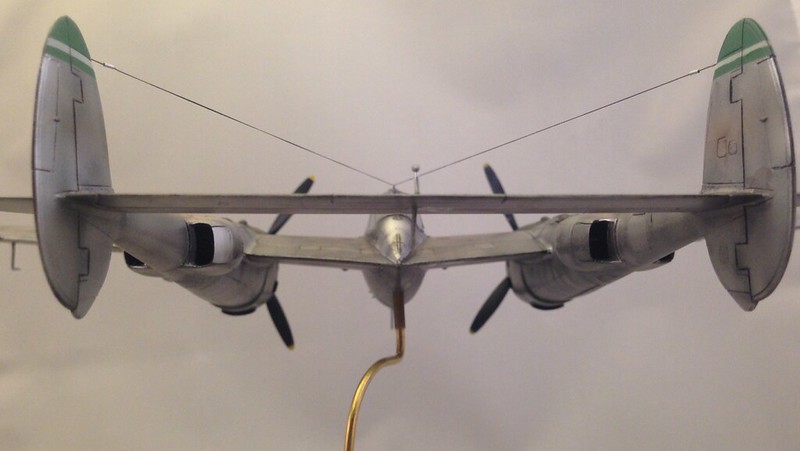
 image by brittvallot, on Flickr
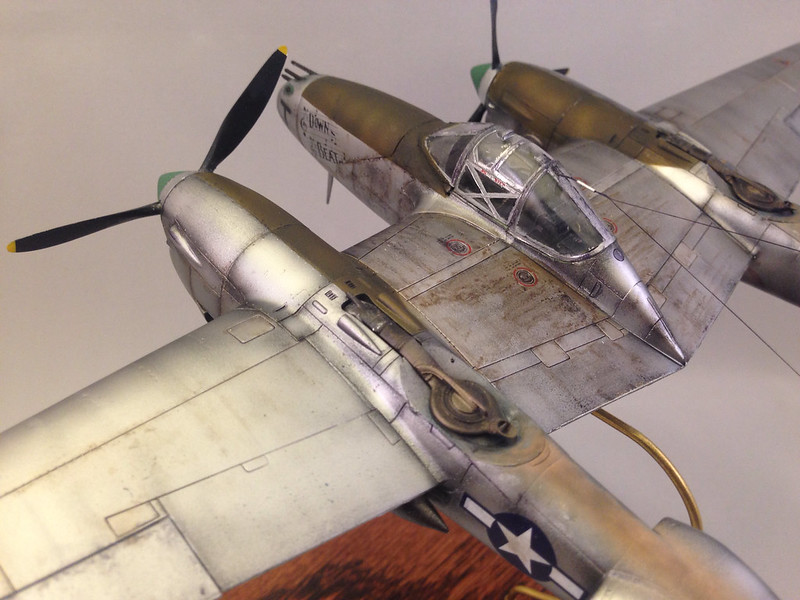
 image by brittvallot, on Flickr
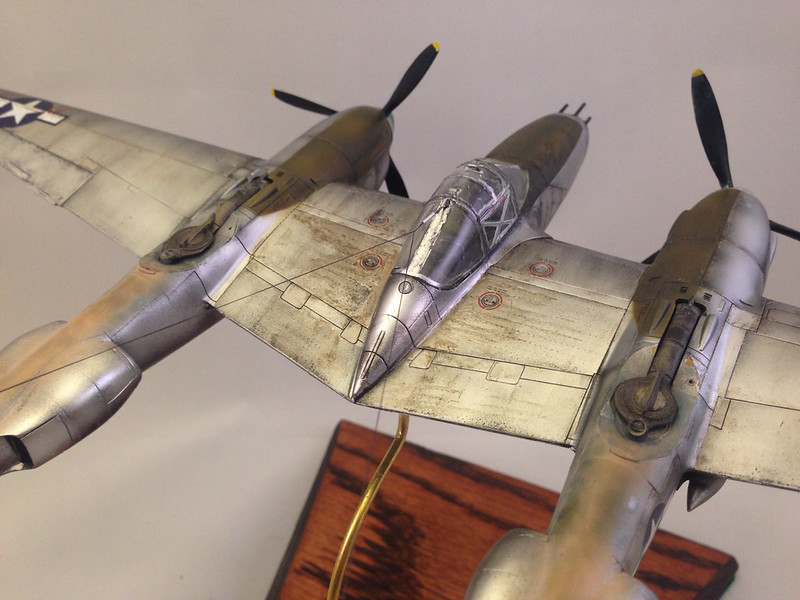
Here's a detail of the seam cleaned up. I also replace this intake with an Albion nickel tube.  Some were just the piping and not a sleeker intake.

 image by brittvallot, on Flickr

Detail of static pitot tube.

 image by brittvallot, on Flickr

 image by brittvallot, on Flickr

For the radio aerials, I have finally found the way I always want to make these!!  I forget who it was on here that turned me on to EZ Line, but I did pick up the smaller gauge it comes in and it has made all the difference.  This combined with the Albion tube set has allowed me to keep from pulling my hair out and has made this part of the build much more rewarding. I start by cutting two short lengths to act as the turnbuckles(term?? the word escapes me...any help here is appreciated. =]) and a longer one for the main attachment to the back of the cockpit.  I slide the EZ Line through the smaller tube and place a drop of glue on each end of it to secure it's place along the line.  Next, I secure the line to the vertical stabilizer with a small dab of CA.  I pulled an appropriate length of line and passed it through the longer piece of tube and the left about a half inch here and doubled it back through being careful not to pull it all the way out.  I place a drop of CA on the rear side to lock it down and then twist up the forward part of the line and tack it down with a dab of CA carefully onto the back hinge just behind the canopy door.  Then, I pull the line taut so that it's equidistant on each side, repeat with the other smaller tube, and secure the line.  Simple.  I've never had a radio line come out so well before and be so tough to breaking.  I have to laugh at how happy that makes me.  =]

 image by brittvallot, on Flickr

 image by brittvallot, on Flickr
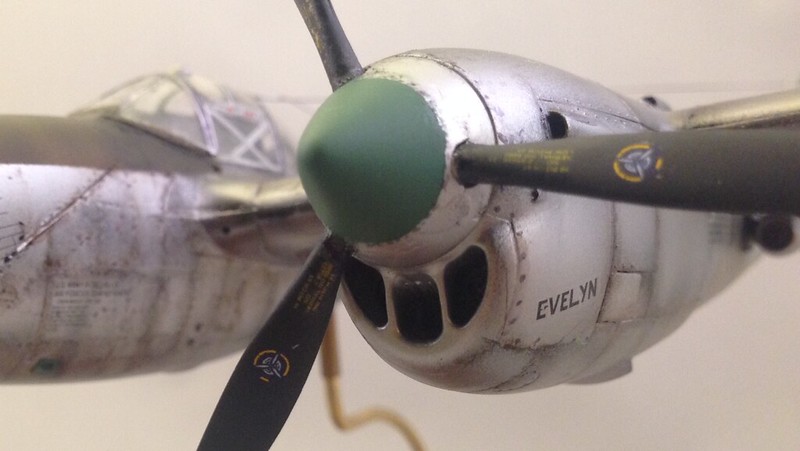
 image by brittvallot, on Flickr
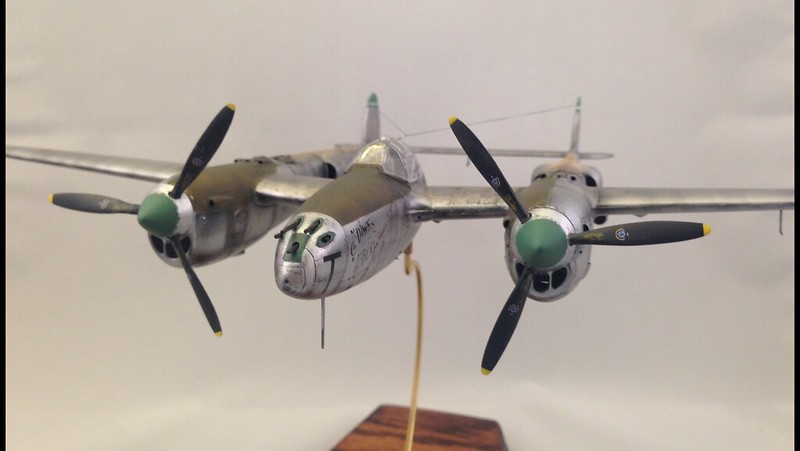
Figured I'd show those spinning props too.  =P

Any and all thoughts are welcome.  Aside from the cockpit debacle, this was a very rewarding kit to build and with a little extra TLC here and there you'll get more bang for buck.  I'd recommend this kit to anyone to try and do.  Thanks for stopping to look. 

On the bench:  

Tamiya F4U-1  Kenneth Walsh


  • Member since
    June 2013
Posted by bvallot on Saturday, June 21, 2014 6:43 PM

Thanks Joe.   I've got some in-betweener pics that I might post, but honestly some of that stuff is nothing new or different that warrants attention.  Not very exciting.  I might show the part about the props to illustrate what I was speaking about above.  Mostly, I'll just skip ahead to the finalé.  You're not missing much with the last bit of weathering.  Once I get the lighting right...I'll post them.

On the bench:  

Tamiya F4U-1  Kenneth Walsh


  • Member since
    February 2012
  • From: Olmsted Township, Ohio
Posted by lawdog114 on Friday, June 20, 2014 7:20 PM

Can't wait to see it done....looking great

Joe

 "Can you fly this plane and land it?...Surely you can't be serious....I am serious, and don't call me Shirley"


  • Member since
    June 2013
Posted by bvallot on Thursday, June 19, 2014 11:41 PM

I forgot to mention Dflu78...the props are a little peculiar.  If you want them to spin at all, it seems you need to attach them on the rod that's provided, then place a spacer that fits snug onto it and locks it in place and then glue the prop spinner onto the rest of the prop assembly.  For a NMF, this means taping off the nacelle after you've fixed everything...sanding your seam since it shouldn't be there and then doing your NMF paint over what you've cleaned up.  The problem with that is it becomes difficult to move around the prop blades while sanding and smoothing.  So it's important to get it right the first time...unless you're handy with Milliput.  

My two cents on the props.  That's the only part I feel iffy on Dflu.

On the bench:  

Tamiya F4U-1  Kenneth Walsh


  • Member since
    June 2013
Posted by bvallot on Thursday, June 19, 2014 11:14 PM

dflu78

Looking good, sir. I've not heard a single good thing about this kit. :P You're doing a bang up job though. The NMF is really nice on this one.

I meant to comment on this before Dflu78...sorry I'm just getting to it now.  Truthfully, I haven't found this kit to be much of a problem at all.  Save for the problem (that I no doubt created) with the AM cockpit...the rest of this build has been a breeze.  I would definitely recommend this to anyone.  There are a few things that I do wish I'd paid attention to a little better before starting.  The landing lights differ depending on the version you're building. There is no cut-out or molded light.  For the version I'm building I need to drill out a light on the left wing.  Really wish I would have caught that sooner!! =[  So that's one thing I'd say to look out for.  They do offer a glass piece for the light on the leading edge if you're modeling one like that.  You'll just need to cut out that spot before hand.  But otherwise, this has been a rather enjoyable kit to build.  

Jay:  Thank you.  That's very kind for you to say.  This Lightning is definitely far from perfect but it is my first and I am pleased with it.  I still have a couple of things to clean up here.  The next one will certainly be a bit more involved.  I'd like to showcase the gunbay and an Allison engine with all the Lockheed modified fixings.  =]  But first things first...I have a P-40B to complete.  =D

On the bench:  

Tamiya F4U-1  Kenneth Walsh


  • Member since
    August 2013
Posted by Jay Jay on Thursday, June 19, 2014 7:50 AM

Very nice, and very inspirational .  i have to add this kit to my stash and someday attempt to do as well.


 I'm finally retired. Now time I got, money I don't.

  • Member since
    June 2013
Posted by bvallot on Wednesday, June 18, 2014 11:26 AM

So, I've been waiting around for some time now for my new light box to film with so I can stop taking these high contrast photos of everything.  Well, I'm still waiting on it, but I figured I could drop a few more for now since these work out well enough.

These pics are of the canopy put together.  It did go together without much fuss.  Patience was the key.  =]  The inside "seam" that you see present on the underside of the glass is a tad thicker than I wanted.  Not by much, but at this scale it sure amounts to more.  I'm okay with it though on account of the fact that the outside canopy is in Polished Aluminum.  I did try to dirty up the top on the inside where hands would go to open the canopy door, but I'm not sure that I'm totally pleased with the result.  If anybody out there has something they do that works well, I'd be all ears.

 image by brittvallot, on Flickr

 image by brittvallot, on Flickr
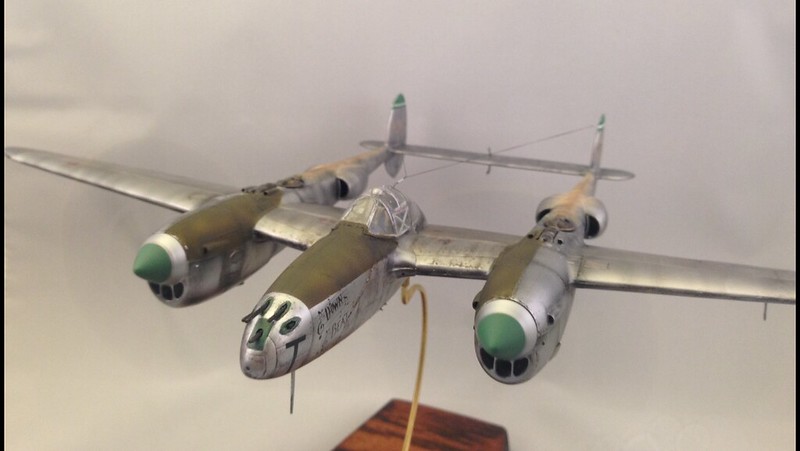
 image by brittvallot, on Flickr

Here's a better pic of the Turbosuperchargers. I used the Alclad Jet Exhaust as a color to start and then mixed a little Exhaust Manifold with mostly Pale Burnt Metal to lightly coat around where I've noted discoloration from photos.

 image by brittvallot, on Flickr

And here's what I mean by high contrast in my pictures. I can't wait for the mail to come in.  =P

 image by brittvallot, on Flickr

Here I thought I'd just throw in the anti-glare surfaces just to show with the rest.

 image by brittvallot, on Flickr

 image by brittvallot, on Flickr

I left the coat a little lighter on the panels for the nacelles since those would actually come off.

 image by brittvallot, on Flickr

And that's it for now.  Comments and suggestions are always appreciated.  =]

On the bench:  

Tamiya F4U-1  Kenneth Walsh


JOIN OUR COMMUNITY!

Our community is FREE to join. To participate you must either login or register for an account.

SEARCH FORUMS
FREE NEWSLETTER
By signing up you may also receive reader surveys and occasional special offers. We do not sell, rent or trade our email lists. View our Privacy Policy.