SEARCH FINESCALE.COM

Enter keywords or a search phrase below:

Improving the Revell 1:48 P-40B (Complete)

25407 views
109 replies
1 rating 2 rating 3 rating 4 rating 5 rating
  • Member since
    June 2013
Posted by bvallot on Friday, June 5, 2015 11:47 PM

Gamera

Super cool, I love the weathered chipped off paint-off walk-on section of the wings.

Then again I can't say much bad about a P-40!

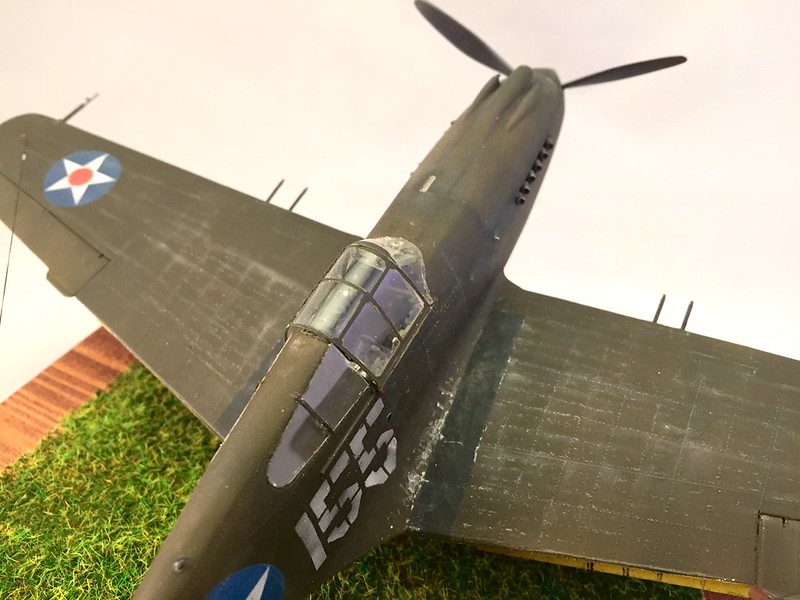
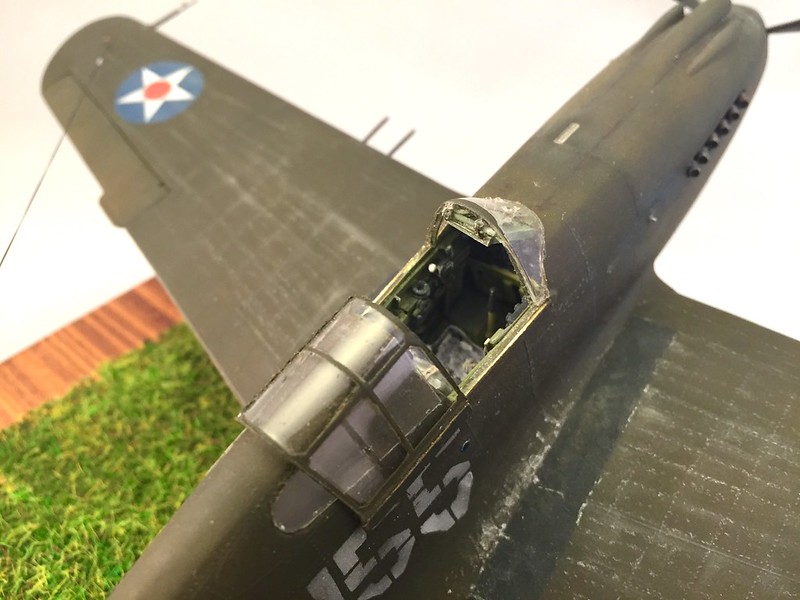
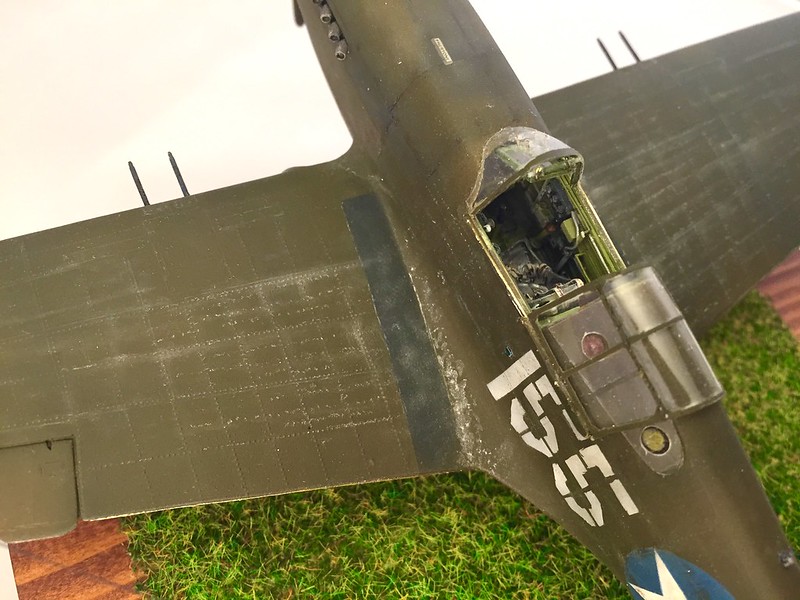
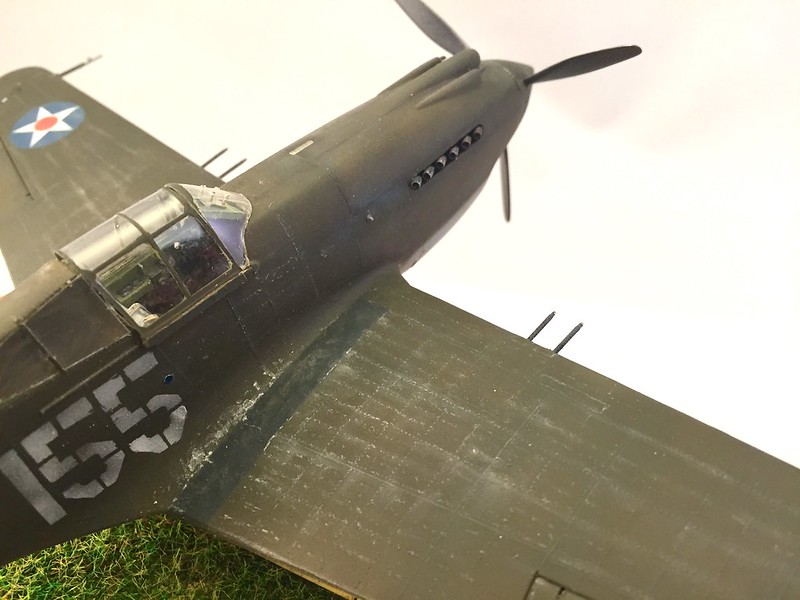
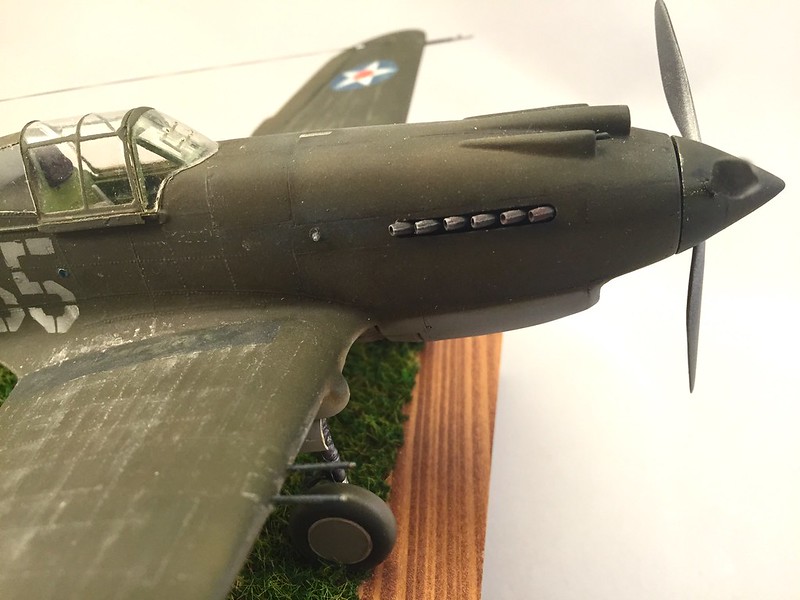
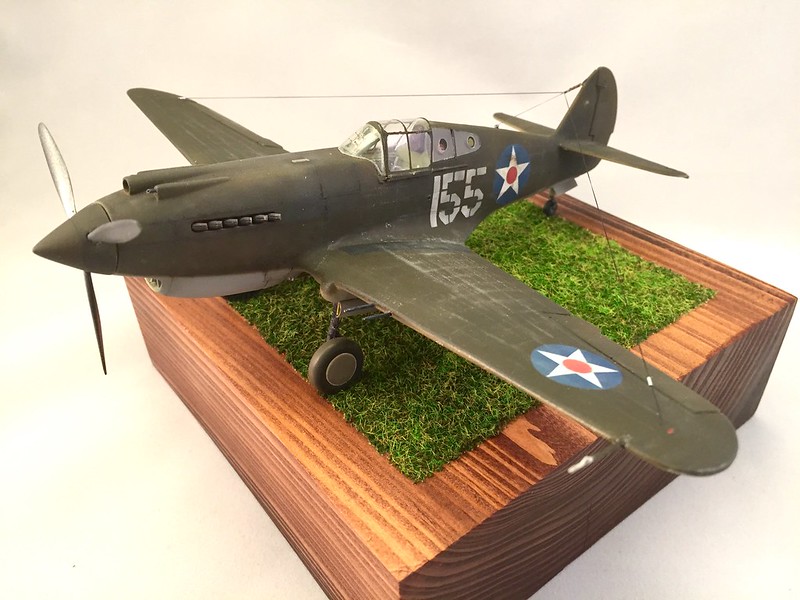
Thanks y'all. =]  If I recall I believe it was GAF who mentioned the weathering as well, and I meant to say something about it.  I haven't really taken the time to comment about what I had in mind so I'll share a little here.  I didn't want a P-40 totally beaten to hell.  I did hope to include some of the characteristics of the OD Green paint that weathered and baked in the sun.  The colors varied in their weathering going into browns and some into greens.  So I taped off certain places like the cowl panels that would get removed and often laid down if not stacked on a cart.  I allowed these panels to appear a little lighter and towards the brown.  The same went for some places along the top of the spine of the fuselage.  I went over my insignia on the wing with extremely diluted Tamiya Buff to lighten up the color and I did the same to the top of the fuselage insignias too.  As for the wings, the riveted surface would get a little beaten up when walked over and it would collect sand and dust.  I left a big squared off spot on the left wing alone where mats would often go to protect the surface from tools when servicing the engine and such.  And for the paint scuffing and chipping...I kept it simple and limited it the wing roots for normal traffic. It's done by thinning down Tamiya Flat Aluminum with a fine brush and moving it around patterned after photos.  Tamiya Olive Drab was thinned and dabbed over this on a couple of spots where I felt it was needed   =]  A little oil spillage underneath and that about sums it up.

On the bench:  

Tamiya F4U-1  Kenneth Walsh


  • Member since
    June 2013
Posted by RobGroot4 on Friday, June 5, 2015 5:07 PM

This is really an awesome build.  Thanks for sharing all of your upgrades to the kit!

Groot

"Firing flares while dumping fuel may ruin your day" SH-60B NATOPS

  • Member since
    November 2009
  • From: SW Virginia
Posted by Gamera on Friday, June 5, 2015 1:19 PM

Super cool, I love the weathered chipped off paint-off walk-on section of the wings.

Then again I can't say much bad about a P-40!

"I dream in fire but work in clay." -Arthur Machen


  • Member since
    June 2013
Posted by bvallot on Friday, June 5, 2015 10:43 AM

Silver
The trumpeter 1:32 scale P-40B is perfect for you.

Silver:  I'm sorry, I'm just seeing this.  My email only just alerted me to it a moment ago but it's dated to yesterday.  Curious?   I've never attempted anything that monumental as of yet.  Mostly on account of space! =D  I have seen others out there that people have built and it looks enticing.  I'm sure I'd have an easier time adding the little extras I enjoy seeing come together.  Maybe one day...

Have you built it before?

On the bench:  

Tamiya F4U-1  Kenneth Walsh


  • Member since
    June 2013
Posted by bvallot on Thursday, June 4, 2015 8:16 PM

Thanks Joe! You were right about the grass being a piece of cake to put together.  I just needed the right tools for the job.  =]  I know Osprey has a couple of books out that could point you in the right direction.  I always see some in my LHS, but I'm sure you could find one cheap on Ebay.  Looking forward to seeing what you come up with.  Now I'm finally ready to start that Dauntless.  lol.

On the bench:  

Tamiya F4U-1  Kenneth Walsh


  • Member since
    February 2012
  • From: Olmsted Township, Ohio
Posted by lawdog114 on Thursday, June 4, 2015 7:18 PM

Stunning....thanks for taking us along for the ride.  I'm going to dive into the Hasegawa P-40 E in the next couple of days.  Still trying to decide on a scheme...

Joe

 "Can you fly this plane and land it?...Surely you can't be serious....I am serious, and don't call me Shirley"


  • Member since
    January 2014
Posted by Silver on Thursday, June 4, 2015 11:35 AM
The trumpeter 1:32 scale P-40B is perfect for you.
  • Member since
    June 2013
Posted by bvallot on Wednesday, June 3, 2015 9:46 AM

Thanks everyone!  Buckeye, your welcome of course.  =]  It really was a lot of fun building and fixing but in all honesty, I'm glad to put it behind me.  I just realized the other day that I've been working on P-40Bs for the last 16 months.  I'm absolutely ready to move onto something simpler.  Something that almost builds itself... =D

On the bench:  

Tamiya F4U-1  Kenneth Walsh


  • Member since
    February 2003
  • From: Cameron, Texas
Posted by Texgunner on Tuesday, June 2, 2015 11:57 AM

Beautiful work Britt!   What a job you've done on that old warbird!!Bow Down

Gary


"All you mugs need to get busy building, and post pics!"

  • Member since
    February 2007
  • From: Brunswick, Ohio
Posted by Buckeye on Tuesday, June 2, 2015 11:25 AM

Thanks for that rigging info!  That really came out great.

Mike

  • Member since
    November 2003
  • From: State of Mississippi. State motto: Virtute et armis (By valor and arms)
Posted by mississippivol on Monday, June 1, 2015 10:11 PM

Wow! That is really somethin'!

  • Member since
    June 2013
Posted by bvallot on Monday, June 1, 2015 4:06 PM

Thanks guys.  =]  I hope to see some more P-40's out there in the forum over the summer ;)  This is so fun to build! =D

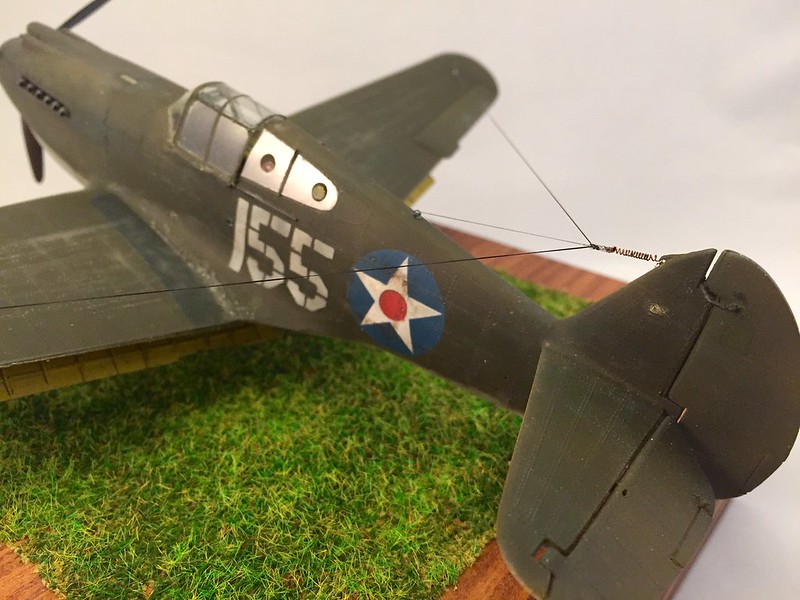
Buckeye:  I'm sorry I forgot to add a quick explanation of how I rigged the aerials.  It's pretty simple really.  EZ line makes up the actually radio line (it's the smaller of the two options 0.3mm I think), 0.6mm aluminum tube for the attachment points on the wings.  The wire is from the TINIEST brass wire I could find.  I'll look for it and update this.  I've wrapped it around a slightly larger brass rod as tight as I could. Removed the rod and viola.  Primed it lightly, and painted it with a fine brush with thinned Tamiya paint so as not to clump.  A small, thin strip of plastic was cut into a rectangle to represent the (what I presume is a lead weight of sorts) as a tie down spot.  I drilled two holes with a sharp exacto blade No. 11 to keep them tiny.  Passed my easy line through them and a drop of CA and you're done.  A tiny sliver of a small plastic rod makes up the attachement to teh fuselage were the radio equipment would have been stored.  A second, shorter line is attached with a drop of CA at both ends to complete that portion.  Easy.  I kit-bashed a Corsair for the pitot tube.  Easy.

Hope you've all enjoyed this thread.  =]

On the bench:  

Tamiya F4U-1  Kenneth Walsh


  • Member since
    January 2015
  • From: Tumwater, WA.
Posted by M. Brindos on Monday, June 1, 2015 12:05 PM

That turned out really well. You give me hope for the one I'm working on. Well done!

- Mike Brindos "Lost Boy"

  • Member since
    February 2007
  • From: Brunswick, Ohio
Posted by Buckeye on Monday, June 1, 2015 11:31 AM

Outstanding!  Very nice job all around.  Love how you rigged the antennae.Toast

Mike

  • Member since
    June 2014
Posted by BrandonK on Monday, June 1, 2015 9:06 AM

You really poured your heart into this one and it shows. Fantastic build. Bow Down

On the bench:

A lot !! And I mean A LOT!!

2024 Kits on deck / in process / completed   

                         14 / 5 / 2  

                              Tongue Tied

  • Member since
    January 2015
Posted by BrandonD on Monday, June 1, 2015 2:21 AM

Many have said it before, and many more will say it, but it bears repeating a LOT - FANTASTIC WORK!

I've really been amazed watching this one come together. I remember building this kit as a kid, and what I'm looking at here is really this kit taken to its full potential by someone who really knows how to spin straw into gold, as it were.

Very, very well done!

-BD-

  • Member since
    June 2013
Posted by bvallot on Sunday, May 31, 2015 8:43 PM

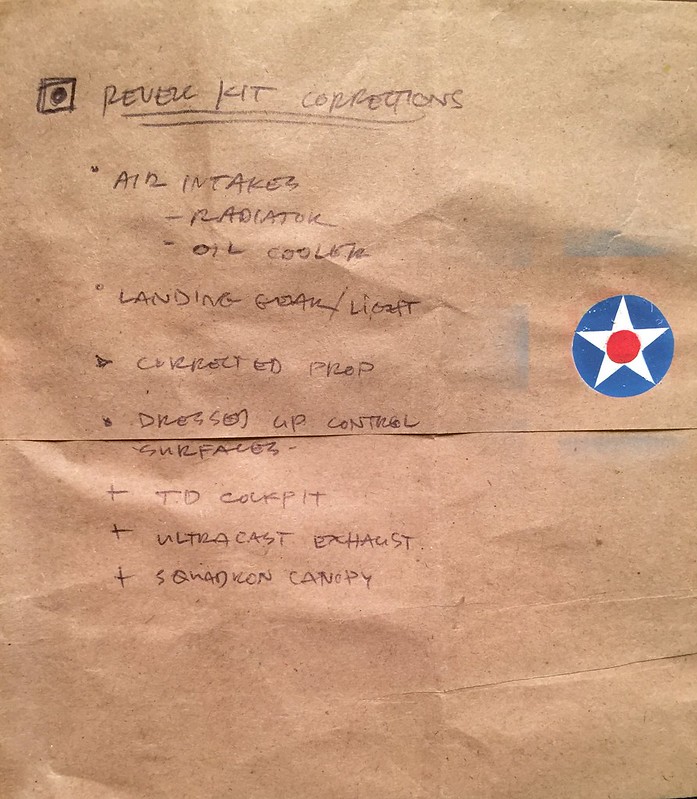
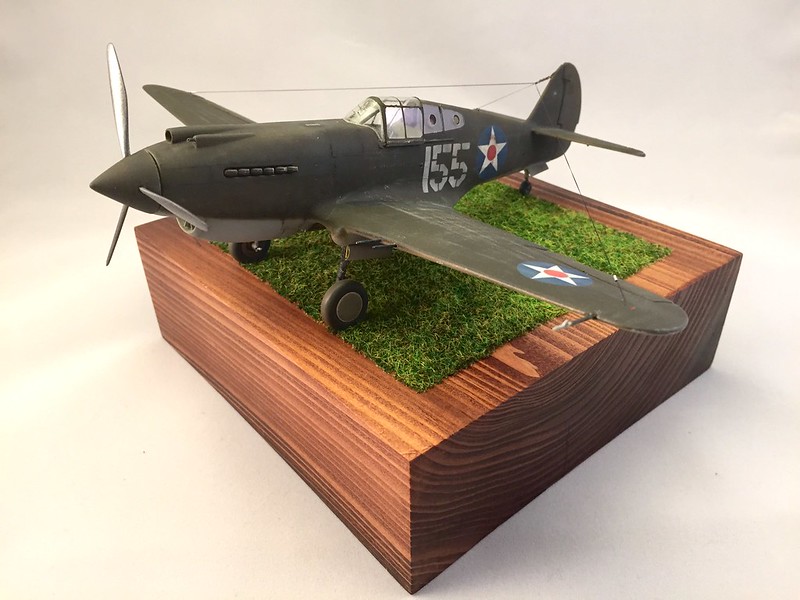
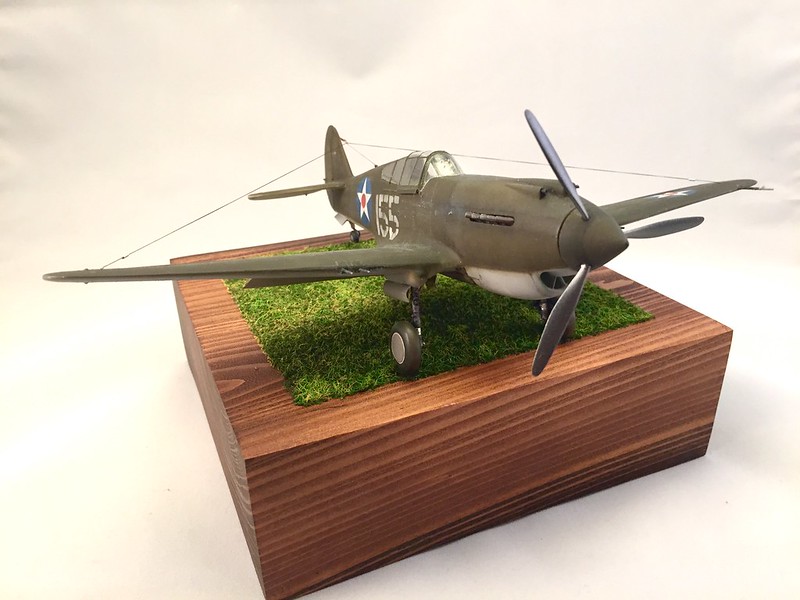
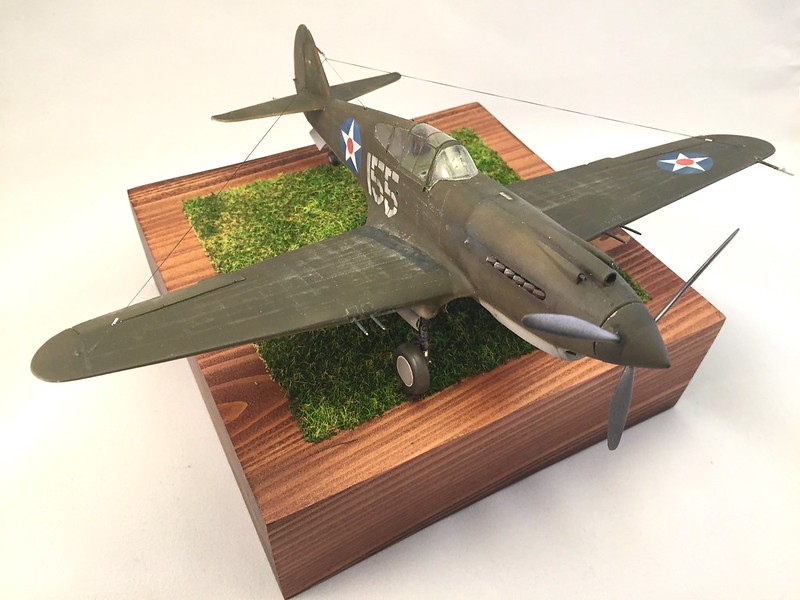
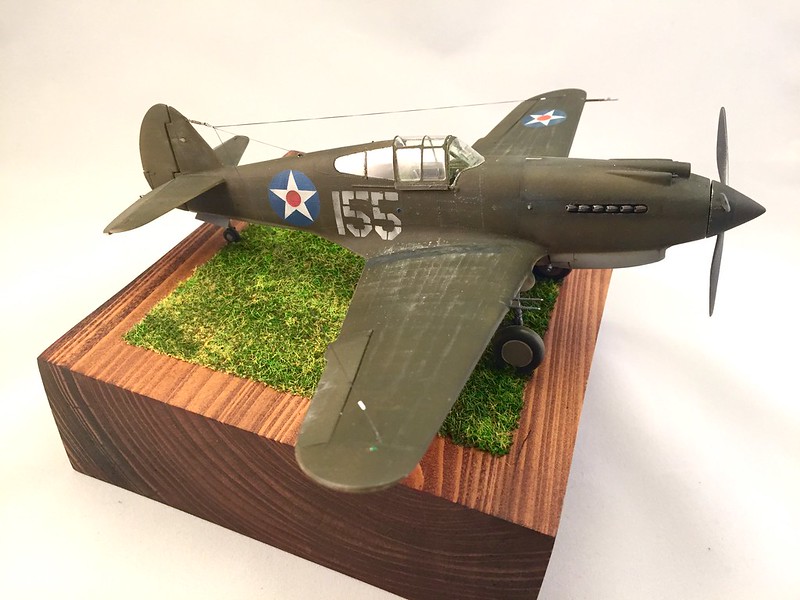
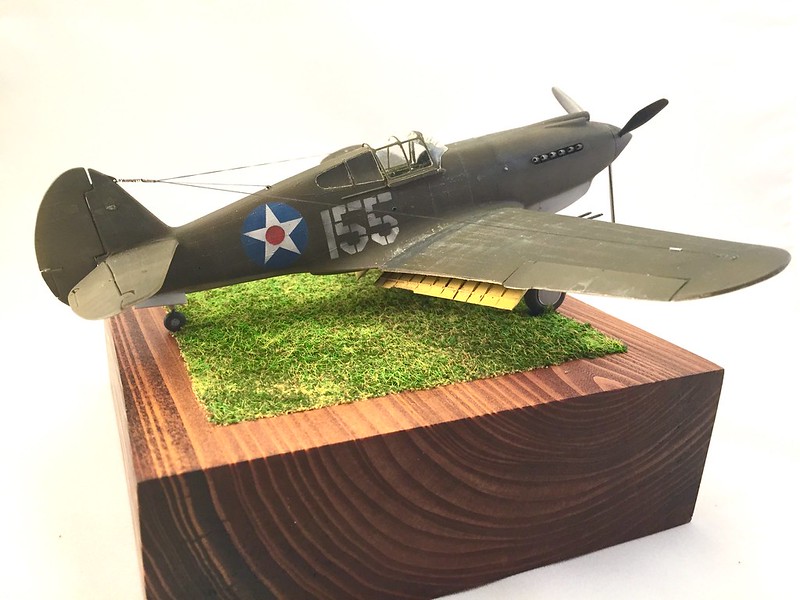
Thanks everyone!  I'm so glad to finally call this one complete.  So here's what we've done with Kenneth Taylor's P-40B:
 Untitled by Britt Vallot, on Flickr

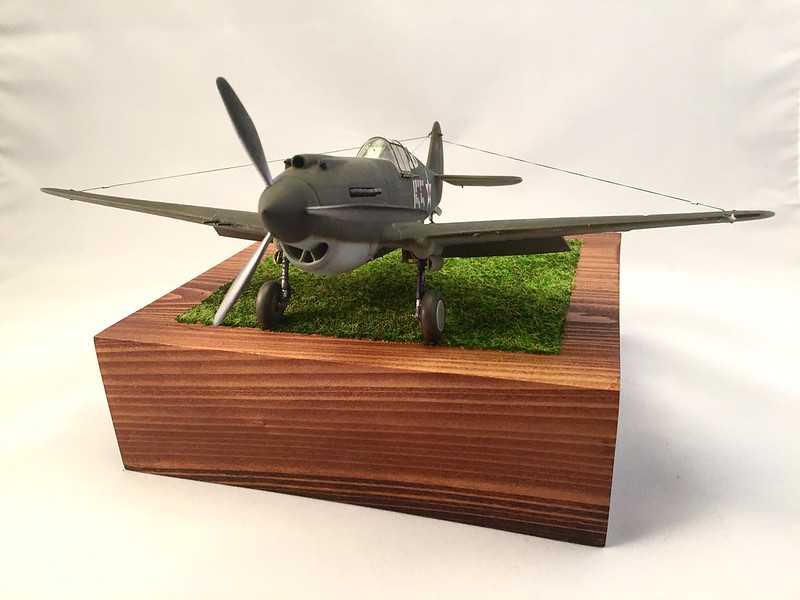
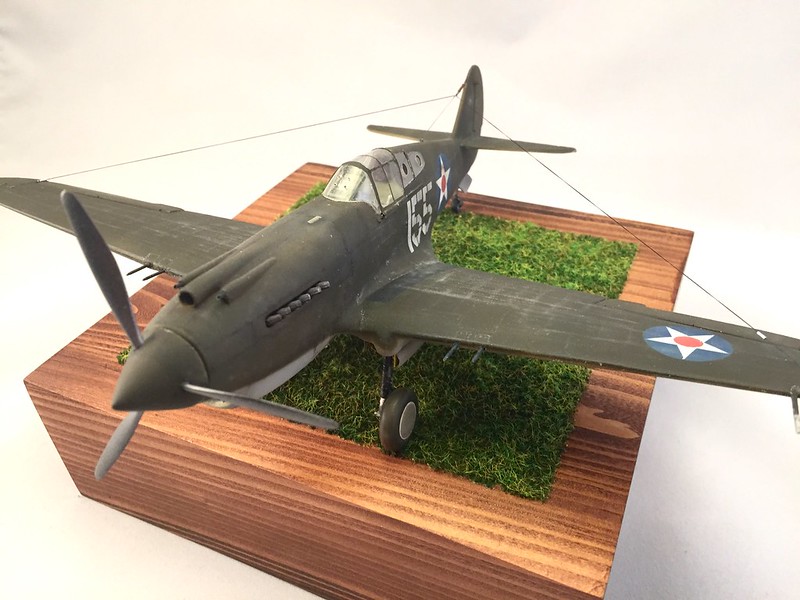
Fixing the intakes for the oil cooler and radiator, goes a long way to dressing up this hawk.  The landing gear/bay and landing light are also nice additions.  Both of these are fairly simple and can be done by anyone with enough patience for it.  The rest are really your run of the mill add ons to polish an already nicer build.  =]

I apologize if this is too photo heavy.  I wanted to give a once around and a couple of details of what's going on.
 Untitled by Britt Vallot, on Flickr

 Untitled by Britt Vallot, on Flickr
 Untitled by Britt Vallot, on Flickr
 Untitled by Britt Vallot, on Flickr
 Untitled by Britt Vallot, on Flickr
 Untitled by Britt Vallot, on Flickr
 Untitled by Britt Vallot, on Flickr
 Untitled by Britt Vallot, on Flickr
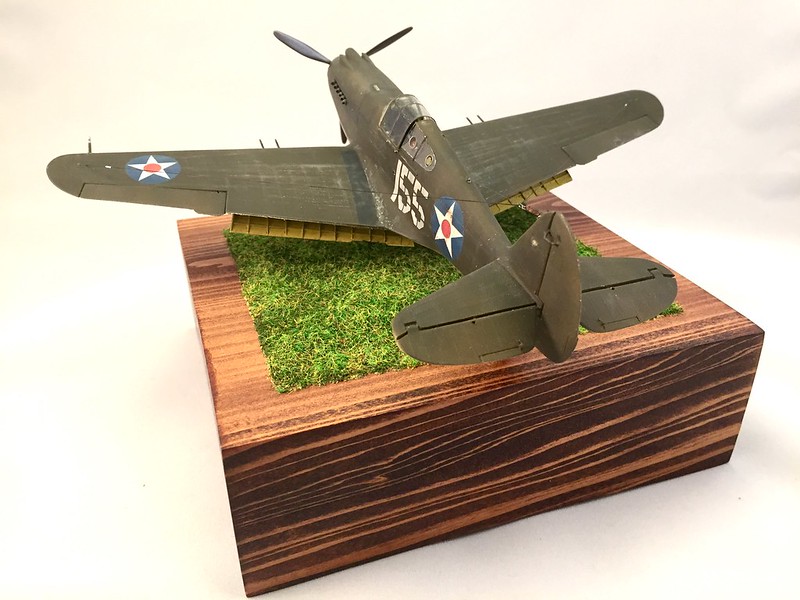
 Untitled by Britt Vallot, on Flickr
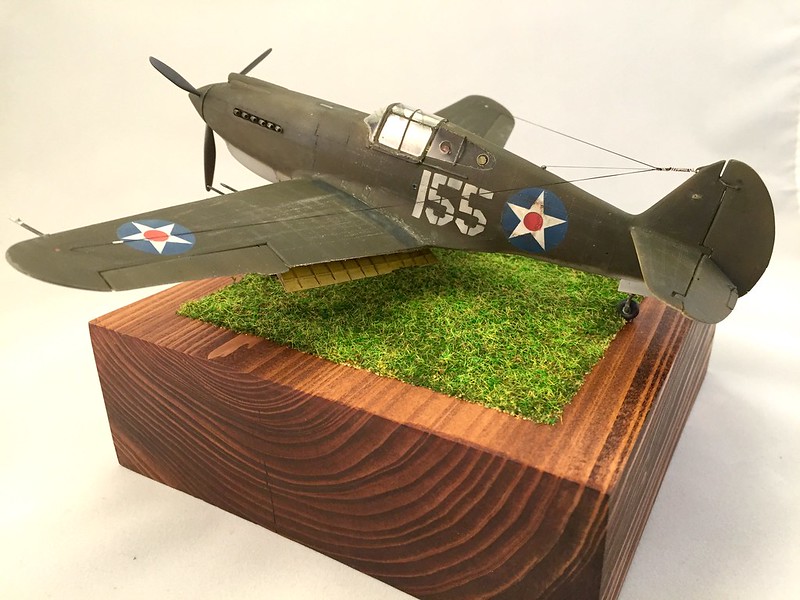
Detail of the spring and tie down for the aerials
 Untitled by Britt Vallot, on Flickr

Detail of flap interior
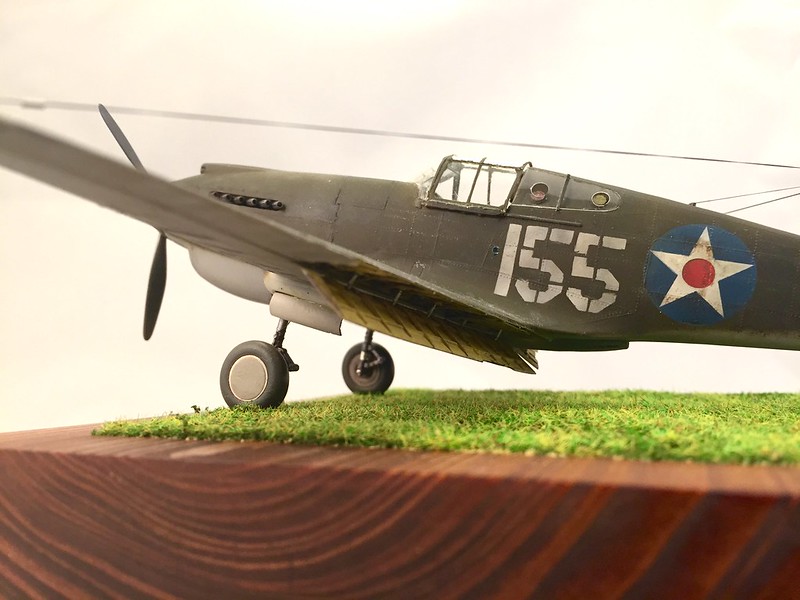
 Untitled by Britt Vallot, on Flickr

Detail of cockpit
 Untitled by Britt Vallot, on Flickr

 Untitled by Britt Vallot, on Flickr
 Untitled by Britt Vallot, on Flickr
Detail of exhaust, .30 machine guns, static pitot tube, and rivet detail and weathering
 Untitled by Britt Vallot, on Flickr

 Untitled by Britt Vallot, on Flickr
 Untitled by Britt Vallot, on Flickr
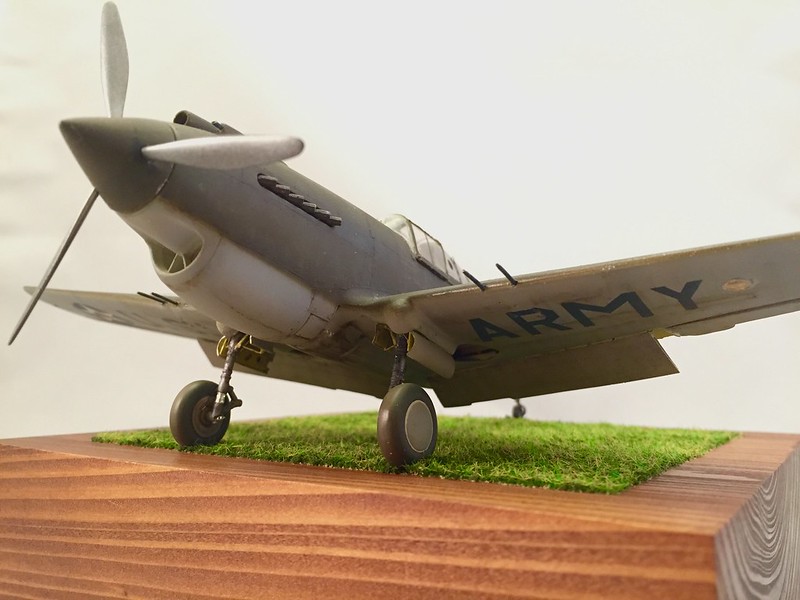
She's a beautiful thing! I love the lines on this plane and I could stare at her for hours.  =]  I hope others out there try some of these tricks.  I'm already happier with this one knowing I went the distance.  It's really not so bad.
 Untitled by Britt Vallot, on Flickr

Comments, questions, critiques are all welcome.  

On the bench:  

Tamiya F4U-1  Kenneth Walsh


  • Member since
    June 2014
Posted by BrandonK on Wednesday, May 27, 2015 1:05 PM

Just when I think you've done all you can to detail this kit up, you go and add more. Amazing work!!

On the bench:

A lot !! And I mean A LOT!!

2024 Kits on deck / in process / completed   

                         14 / 5 / 2  

                              Tongue Tied

  • Member since
    March 2015
  • From: Streetsboro, Ohio
Posted by Toshi on Wednesday, May 27, 2015 10:01 AM

Exceptional and superb!

Toshi

On The Bench: Revell 1/48 B-25 Mitchell


Married to the most caring, loving, understanding, and beautiful wife in the world.  Mrs. Toshi


  • Member since
    September 2011
Posted by fightnjoe on Wednesday, May 27, 2015 8:57 AM

Beautiful work on one of my favorite kits.  Skills of a master builder being shown here.

Joe

Veterans,

Thank You For Your Sacrifices,

Never To Be Forgotten

Where you can find me:

Workbench on FaceBook  Google Plus  YouTube

  • Member since
    February 2003
  • From: Cameron, Texas
Posted by Texgunner on Wednesday, May 27, 2015 8:48 AM

Very impressive Britt!   You've done a fantastic job on her, thanks for taking us along on the journey.

Gary


"All you mugs need to get busy building, and post pics!"

GAF
  • Member since
    June 2012
  • From: Anniston, AL
Posted by GAF on Wednesday, May 27, 2015 8:42 AM

Britt,

Just goes to show what you can do with a $13 kit.  IF you want to put the detail into it, you can.  If not, then it's only $13.

bvallot

Looking at these images, I'm impressed by the amount of "weathering" already present.  This looks like an aircraft that has been used.  I doubt any post work (except for some minor touch-up) will be needed.

Well done!

Gary

  • Member since
    June 2013
Posted by bvallot on Wednesday, May 27, 2015 7:57 AM

Well thanks for saying so PJ. =]   I think you're right...a little bit of love and she comes around for you.  I am very happy with this Hawk.  I finally feel redeemed over a few points I didn't address with the AVG Hawk.

On the bench:  

Tamiya F4U-1  Kenneth Walsh


  • Member since
    November 2008
  • From: Central Florida
Posted by plasticjunkie on Wednesday, May 27, 2015 7:26 AM

Improved is an under statement! Some of the old Monogram kits can be improved with a little detailing but you have done a labor of love on this one. The scratch work is simply outstanding. Toast

 GIFMaker.org_jy_Ayj_O


Too many models to build, not enough time in a lifetime!!

  • Member since
    June 2013
Posted by bvallot on Tuesday, May 26, 2015 11:26 PM

Here's the last update concerning the flaps for this build.

The actuating arms are built from 0.6mm aluminum tube and 0.4mm brass tube.  These slid to fit and the total length are cut to a 3/16in.  They are first fit into the upper flap assembly into the holes of the aluminum tube parts that are fit on the main rod.  The taped lower flap has already been set to 40 degrees and the tubes are just set to fit just above and onto the upper horizontal ribbing of the lower flap.

 Untitled by Britt Vallot, on Flickr

 Untitled by Britt Vallot, on Flickr

 Untitled by Britt Vallot, on Flickr

A drop of CA on each end and viola! You should be set to go.

 Untitled by Britt Vallot, on Flickr

And that's that.  Homemade flaps!  That pretty much concludes updating and improving our Revell P-40B.

Next to follow are completed pictures of the machine guns, pitot tube, and aerials.

Critiques, comments, questions.... =]

On the bench:  

Tamiya F4U-1  Kenneth Walsh


  • Member since
    June 2013
Posted by bvallot on Tuesday, May 19, 2015 10:20 PM

Damn guys! Many thanks on such high praise.  Although I don't think I could quite count myself in that number.  If you stared long enough you'd eventually find a spot here and there worth redoing.

Martin, you're right about the kit having some serious drawbacks and being a bit of a bear to tackle, but I do agree with Gary that you just can't get a better P-40B currently out there these days.  That was really the whole motivation for this post.  I felt I could take a kit with some good "bones" and help to show how to easily improve some of the key problem areas.   I do hope you all enjoy the finish.  I am kind of bummed about not finding a better solution to moving the flaps up and down.  Next time Gadget....  =]

Home stretch.

On the bench:  

Tamiya F4U-1  Kenneth Walsh


  • Member since
    February 2003
  • From: Cameron, Texas
Posted by Texgunner on Tuesday, May 19, 2015 11:03 AM

UKguyInUSA

Wow, cracking build on a terrible cheap kit that is as flimsy as paper when handling it. Fabulous scratch building work additions! Some of the additions will undoubtedly give it some rigidity, strength and weight that this kit so much lacks. I look forward to seeing this come to fruition! Cheers, Martin : )

While it might be relatively cheap, in my opinion, it's not a "terrible" kit.  In fact, I believe it's widely acknowledged that the Monogram kit is the most accurate representation (shape-wise for sure) of a P-40B in 1/48 scale.  Britt has shown what can be done with it in the hands of a great builder.  

Gary


"All you mugs need to get busy building, and post pics!"

  • Member since
    April 2015
  • From: New Hampshire, USA
Posted by UKguyInUSA on Tuesday, May 19, 2015 10:45 AM

Wow, cracking build on a terrible cheap kit that is as flimsy as paper when handling it. Fabulous scratch building work additions! Some of the additions will undoubtedly give it some rigidity, strength and weight that this kit so much lacks. I look forward to seeing this come to fruition! Cheers, Martin : )

  • Member since
    December 2003
  • From: 37deg 40.13' N 95deg 29.10'W
Posted by scottrc on Tuesday, May 19, 2015 8:26 AM

Hi Brit,

I built this same kit a few years ago for a group build and had a lot of fun with it.  You are doing a superb job of showing us what you can do with a $13 kit.

Congrats!

Scott

JOIN OUR COMMUNITY!

Our community is FREE to join. To participate you must either login or register for an account.

SEARCH FORUMS
FREE NEWSLETTER
By signing up you may also receive reader surveys and occasional special offers. We do not sell, rent or trade our email lists. View our Privacy Policy.