SEARCH FINESCALE.COM

Enter keywords or a search phrase below:

Revell 1/32 Supermarine Spitfire Mk.IIa "FINAL REVEAL!" (9.13.15)

9123 views
53 replies
1 rating 2 rating 3 rating 4 rating 5 rating
  • Member since
    April 2015
  • From: New Hampshire, USA
Revell 1/32 Supermarine Spitfire Mk.IIa "FINAL REVEAL!" (9.13.15)
Posted by UKguyInUSA on Tuesday, July 21, 2015 5:41 PM

Hello Guys, This will be my first entry into the "Battle of Britain 75th Anniversary Group Build" being hosted by fellow modelers on YouTube - the Revell 1/32 Supermarine Spitfire Mk.IIa. I plan to do a second build to accompany this one- the Eduard 1/32 Messerschmitt BF109E-3. Introduction to the kit: The Box Art:   The Box Contents The Box Contains 3 clear bags of light grey sprues; 5 in one bag, and 4 in each of the two other bags making a total of 13 light grey sprues. There is another small clear bag containing 3 small clear sprues. There is a 12 page black and white assembly/painting and decaling instruction booklet that includes two options of paint scheme and squadron markings, and lastly, a sheet of cartograf decals;  Sprues A + B:    Sprues C + D + D- NO, that's not a mistake, but it is one by Revell of Germany!! I have two sprue D's which are the portside upper wing sections and no Sprue E which is the starboard side upper wing section! Aaaarrrrrggggghhhh!!! I went to Revell's website to order the missing sprue E and it can take up to 8 weeks to be delivered from Germany!!!!!????!!!! Bloody hell!!     Sprue F    Sprue G    Sprue Q   Sprue T  Sprue S (x2)  Sprue H (x2)  Clear Sprues I, R + U      A 12 page black and white Assembly/Painting and Decaling Instruction Booklet Front Page 1 and Back Page 12  Pages 2 + 3  Pages 4 + 5  Page 6 + 7  Pages 8 + 9  Pages 10 + 11  The Decal Sheet  The molded parts are very crisp and clean with zero flash apart from a couple of little areas. The parts have nice fine recessed panel lines and lots of rivet details. The clear molded parts are very clear with zero aberrations except for one side of the sliding canopy which is slightly "glazed". The decals are excellent looking with zero carrier film beyond the decal edges. The black and white instruction booklet appears to be clear and concise, but the two paint and decal options would be better in color. The color call outs are in Revell colors only. I will make a final report when the build is complete indicating any issues that I come across. In the meantime, thanks for taking a look and I hope you enjoy following along with my build. In the meantime, if you'd like to see my "in-Box-Review" video for this kit, here is the link: https://youtu.be/SWiiFXlU6zA Let the build begin!! :) Cheers! Martin :)

  • Member since
    January 2015
Posted by BrandonD on Tuesday, July 21, 2015 11:48 PM

Can you just take it back to where you got it and exchange it for a complete kit and let them deal with the wait?

In any case, I look forward to seeing this one come together.

-BD-

  • Member since
    February 2012
  • From: Olmsted Township, Ohio
Posted by lawdog114 on Thursday, July 23, 2015 6:45 PM

That's weird.  I guess it happens.  Agreed, take it back.  Should be a beaut...

 "Can you fly this plane and land it?...Surely you can't be serious....I am serious, and don't call me Shirley"


  • Member since
    November 2008
  • From: Central Florida
Posted by plasticjunkie on Thursday, July 23, 2015 8:14 PM

I got one not long ago and just inventoried it and all is complete. I would take it back to the store and exchange it for a complete one. This happens once in a while. Last Christmas I ordered a Kitty Hawk F-94 from Squadron and the pe fret was missing. Squadron sent me a replacement 2 weeks later.

 GIFMaker.org_jy_Ayj_O


Too many models to build, not enough time in a lifetime!!

  • Member since
    April 2015
  • From: New Hampshire, USA
Posted by UKguyInUSA on Thursday, July 23, 2015 10:45 PM

Hey Brandon, thanks for taking a look, much appreciated. I bought this kit from my local hobby store (LHS) in March. I called them when this came to my attention and asked if they had another in stock...they said they had, and so, I said that I'd like to come in a swop the kits, because of the missing part. The owner replied "We have a 30 day return policy, but you're more than welcome to come in and buy the kit we have in stock and return the one you have"??!!! Great customer service, NOT!! Especially when I've spent around $1,200.00 there in the last 16 months. They won't be getting y business anymore and from hereon, I'll be ordering from my nearest online distributor which is a lot cheaper and will save me money...I was just trying to support my LHS, but they seem to not want to reciprocate!

I'm going to start my second build entry for the YouTube "Battle of Britain 75th Anniversary" Group Build on Monday, and today, I did my "In-Box-Review" for it which I will be posting shortly. I will continue with this Spitfire build when the parts arrive, but, I d have my "Build Update #1" report to post...which shows how far I can get without missing parts....

Cheers,

Martin :)

  • Member since
    April 2015
  • From: New Hampshire, USA
Posted by UKguyInUSA on Thursday, July 23, 2015 11:01 PM
Revell 1/32 Supermarine Spitfire Mk.IIa "Build Update #1" Well, chaps, during the last few days, I managed to get some work done on this build, but during the build, I came across another issue that prevents me from going any further; more on this as we get into this update.... As always, I started off by washing the parts and letting them air-dry. I then started the assembly off by fitting the wheel well wall sections into the lower wings, followed by gluing the portside upper wing section into place. I couldn't fit the starboard side upper wing section, because as discussed in my "In-Box-Review" it was missing from the kit and instead, there were two portside sections...    Next, I assembled the halves together for the ailerons, flaps, elevators, horizontal stabilizers, wing-tips and rudder and after they were done, I assembled the halves for each exhaust stack...     Next, I moved onto the undercarriage by assembling the wheel halves together followed by the wheel struts/axles and wheel doors...     I then assembled a couple of air-intakes and glued them into their corresponding locations on the belly of the fuselage and beneath a wing...      After that was completed, I temporarily stuck the spinner and back-plate together using putty and inserted a cocktail stick in preparation for painting. I then glued some small blisters onto the sides of the front ends of the fuselage halves...    I was ready to start painting, and so I started off by airbrushing a black base-coat onto parts followed by interior green...   I then airbrushed aluminum onto the propeller spinner assembly, the propeller blades, radiators and wheel struts followed by painting the spinner Sky color and the propeller blades black toned down with white...     I could now make a start on building and detailing the individual sub-assemblies of the cockpit and place the two instrument panel decals into place...     Following the cockpit sub-assemblies, I moved onto the fuselage side walls...      This next step is where the second issue with this build became apparent. I assembled the rear wheel and then went to glue it into the portside fuselage half and was shocked to see that the tail end where the wheel was to be fitted was distorted as if it had melted due to heat!!! AAAaaaarrrggghhhhhh!!!!! I was bamboozled, how did this happen? I have been modelling at a table next to a large bedroom window to aid my poor eye-sight with the direct sun-light, as working at the dining table was causing me eye-strain. The average Vicat softening point of Styrene is around 97`C and the melting point around 210`C!! Could the 93`F sunlight have been magnified by the window enough to do this? And if so, that type of heat is enough to start a fire! But, this was the only area affected, no other parts on the table suffered and neither did the plastic table they were all sitting on? It's a strange one?!! Anyway, I ordered a replacement portside fuselage half following the starboard side upper wing section that I ordered last week, but I have to wait 8 weeks for them to be delivered from Revell Germany...     The last thing I did was to mask the tips of the propeller blades and paint the yellow tips on. I then glued the propeller assembly together permanently...   This was as far as I could go, and so, I laid everything that I completed onto my table and took photos of the progress so far...          I'm not going to lose any sleep over the two issues and will continue with this build when the replacement parts arrive from Revell Germany. in the mean-time, I will move onto my next build for this Sig- the Eduard 1/32 "Weekend Edition" Messerschmitt BF109E-3. Look out for my "in-Box-Review" for this kit, coming soon! In the meantime, if you'd like to see my YouTube "Build Update #1" video for this update, then here is the link for that... https://youtu.be/6WW3OHnKniQ Thanks in advance for following this build thread, leaving comments and watching the update video, much appreciated! :) Until the next update in 8-9 weeks time, happy modelling and have fun! Cheers Martin :)
  • Member since
    March 2015
  • From: Streetsboro, Ohio
Posted by Toshi on Friday, July 24, 2015 5:47 AM

You've done a stellar job, like you I await the parts from Revell of Germany.  Great job!

Toshi

On The Bench: Revell 1/48 B-25 Mitchell


Married to the most caring, loving, understanding, and beautiful wife in the world.  Mrs. Toshi


  • Member since
    November 2009
  • From: SW Virginia
Posted by Gamera on Friday, July 24, 2015 7:28 AM

Looks really cool! May be a 'jinx' kit though, I've been modeling almost forty years and only had the wrong sprues like that less than half a dozen times luckily. And the only melted parts were where I set a model down in front of a small space heater with the heat turned down to try to dry the paint faster- well seems the heat wasn't turned down nearly enough!

"I dream in fire but work in clay." -Arthur Machen


  • Member since
    January 2015
  • From: Indiana USA
Posted by BlackTulip109 on Friday, July 24, 2015 11:02 AM

Hi Martin

Just wanted to let you know how helpful and appreciative it is that you take us through a build step by step. Our young builders as well as the rest of us learn SO much. I remember when my brother and I had the old British Profiles series as reference and would have to go on verbal advice from others.

Thelearning curve was slow and long NOW it is exponential keeps the kids focused and interested and their builds look great and keeps them in the "game'!!

Best wishes Martin !!  

  • Member since
    June 2013
Posted by bvallot on Friday, July 24, 2015 11:53 AM

I was going to say how it's shaping up pretty well, but after seeing that mishap with the vertical stabilizer....yeeesh!  I looked back up above and saw how it was in the your inventory of the build and it was as it needs to be from the beginning...so it had to have happened some how after it came out of the box.  Tough break.  =[  Without another source of heat via friction from a dremel/sander or heat gun of sorts, the only other explanation might be the sun.  I mean hell!  You need some kind of source of heat to do that, and it had to have been localized as the rest of the fuselage is not deformed.

Stay on top of it Martin.  Looking to see you get back on your feet with this one.  =]

On the bench:  

Tamiya F4U-1  Kenneth Walsh


  • Member since
    November 2008
  • From: Central Florida
Posted by plasticjunkie on Friday, July 24, 2015 1:40 PM

The damage to the plastic possibly looks like something very hot sat on it like a cup of coffee for example. Sometimes we do things without realizing it. At least its not an OOP kit and your replacement parts will eventually arrive. I have dealt with both ROG  and Revell USA and both are excellent. The parts from Germany do take a while to arrive.

You did the right thing by not shopping anymore at that LHS. The least they could have done to accommodate a customer was to take the kit back and give you a replacement. All they had to do was to return it to the supplier for a credit or replacement but they are too lazy to do that.

Great job so far on the Spit.

 GIFMaker.org_jy_Ayj_O


Too many models to build, not enough time in a lifetime!!

  • Member since
    March 2013
Posted by patrick206 on Friday, July 24, 2015 4:36 PM

Martin - My only hobby shop in town is 4th generation owners, I was once a bit scolded for not simply returning a kit with defective parts, rather just making it right myself. They said "just bring it back," I said if I can set it right I'd rather not trouble the shop. Their response floored me, the owner said if the suppliers and manufacturers aren't made to deal with their screw ups rather than the customers doing it, they will never be more careful with what they deliver to the folks that ultimately purchase their goods.

So, in order to hold them accountable defective kits should be returned to the shop, they in turn should feel obligated to replace the kit. Telling a loyal customer "sorry, 30 days," is inexcusable and an insult. Did the kit develope the defects after the thirty days expired???? NOPE, the kit not only left their shop with the defects, the kit left the manufacturer with faulty bits. Hobby shops such as that don't deserve any sort of continued customer loyalty.

Still, very nice work that you so far have accomplished, once it's finished you'll have a super Spit.

Patrick  

  • Member since
    April 2015
  • From: New Hampshire, USA
Posted by UKguyInUSA on Wednesday, August 26, 2015 11:04 PM

BrandonD

Can you just take it back to where you got it and exchange it for a complete kit and let them deal with the wait?

In any case, I look forward to seeing this one come together.

-BD-


Hey Brandon,


I tried to return it, but because it had passed the stores 30 day return policy they wouldn;t swop it out with a new kit that they had on their shelf. I've spent a lot of money with the store, and so, because of their failure in customer service that day, I;ve stopped going there and now order everything off line....which turns out to be a lot cheaper. But, I wanted to support my local hobby store as I know it;s tough for them to survive.


Anyway, I ordered a new kit on line and am back here to post my "Build Update #2"!


Cheers,

Martin Big Smile

  • Member since
    April 2015
  • From: New Hampshire, USA
Posted by UKguyInUSA on Wednesday, August 26, 2015 11:07 PM

lawdog114

That's weird.  I guess it happens.  Agreed, take it back.  Should be a beaut...


I took it back but they wouldn't accept it because it had passed the 30 day return policy...no more going to my Local Hobby Store to support their business. I ordered a new kit off line and started back on her on Monday. I'm on here now to pst my "Build Update #2" rport!


Cheers,

Martin Big Smile

  • Member since
    January 2015
Posted by BrandonD on Friday, August 28, 2015 2:25 AM

Oh, man! I just saw the rear stabilizer damage. What a tough break. Hopefully the boat gets a favorable current, a tailwind and a captain eager to visit his lady in the U.S. who pushes it here as quickly as possible.

-BD-

  • Member since
    April 2015
  • From: New Hampshire, USA
Posted by UKguyInUSA on Saturday, August 29, 2015 8:12 AM

plasticjunkie

I got one not long ago and just inventoried it and all is complete. I would take it back to the store and exchange it for a complete one. This happens once in a while. Last Christmas I ordered a Kitty Hawk F-94 from Squadron and the pe fret was missing. Squadron sent me a replacement 2 weeks later.


I called the store where I got it from- HobbyTownUSA, and asked if they had another in stock and they said yes. I then told them that the one I had bought from them previously had the issues outlined above and I'd like to swop it out. Their response "You bought it more than 30 days ago, it's gone beyond our 30-day return policy! So, after using them as my Local Hobby Store for 19 months and sepending more than a $1,000.00 there, I decided that their poor customoer service practise doesn't warrant my money anymore. So, I ordered one, much cheaper from Hobbylinc.com so that I don't have to wait weeks for replacement parts from Revell Germany and I can just replace the parts I remove fro this new kit with those parts when they do arrive. Anyway...I made more progess and I'm about to make a post....

Cheers Smile

  • Member since
    April 2015
  • From: New Hampshire, USA
Posted by UKguyInUSA on Saturday, August 29, 2015 8:15 AM

Toshi

You've done a stellar job, like you I await the parts from Revell of Germany.  Great job!

Toshi


Thanks Toshi, greatly appreciated! I couldn't wait any longer ater completing my BF109E-3, and so, I just got a new kit and will replace the parts that I take from it with those that i await arrival from Germany! New posting of progress to date coming shortly!


Cheers Smile

  • Member since
    April 2015
  • From: New Hampshire, USA
Posted by UKguyInUSA on Saturday, August 29, 2015 8:31 AM

Gamera

Looks really cool! May be a 'jinx' kit though, I've been modeling almost forty years and only had the wrong sprues like that less than half a dozen times luckily. And the only melted parts were where I set a model down in front of a small space heater with the heat turned down to try to dry the paint faster- well seems the heat wasn't turned down nearly enough!


Thanks Gamera! It's was definitely a jinxed kit, no heaters involved it was 93`F outside the day it happened...and I only drink bottled water, so no hot mugs of coffee or Tea left sitting on the tail. I'm guessing just a freak magnification incident where the magnified heat, through the large window I sit next to, was concentrated onto the tail area? That said, that's quite worrysome that the window can magnify the heat to a temperature great enogh to soften styrene....the Vicat softening point of the average Styrenes is around 200`F and the melting point is around 430`F!! Those temperatures can start fires on other materials! Blinds closed on hot days from hereon!

Cheers,

Martin Big Smile

  • Member since
    April 2015
  • From: New Hampshire, USA
Posted by UKguyInUSA on Saturday, August 29, 2015 8:34 AM

BlackTulip109

Hi Martin

Just wanted to let you know how helpful and appreciative it is that you take us through a build step by step. Our young builders as well as the rest of us learn SO much. I remember when my brother and I had the old British Profiles series as reference and would have to go on verbal advice from others.

Thelearning curve was slow and long NOW it is exponential keeps the kids focused and interested and their builds look great and keeps them in the "game'!!

Best wishes Martin !!  


Thanks for your kind comment BT! And, you;re welcome for the step by step build reports, i enjoy doing them and they help me fill my free-time since retiiring two years ago, along with the uilding and making videos for YouTube! If what i dod helps others, then I'm honored and happy that they serve some usefulness!

Thanks again!

Cheers,

Martin Big Smile

  • Member since
    April 2015
  • From: New Hampshire, USA
Posted by UKguyInUSA on Saturday, August 29, 2015 8:40 AM

Revell 1/32 Supermarine Spitfire Mk.IIa "Build Update #2"

Hello Chaps,

Well, after completing my Eduard 1/32 BF109E-3, I couldn't wait another 3 to 4 weeks for replacement parts for the missing upper wing starboard side and the damaged portside fuselage half, so, I just bought myself another kit! When those parts finally arrive from Revell, Germany, I'll have another full kit in the stash, but, I'm giving it away as a prize to a group build that I have been hosting on YouTube since May 1st and which ends on August 31st.

Anyway, that aside, continuing on from "Build Update #1" I airbrushed a clear coat onto all the parts that I had previously painted in preparation for cockpit decals and for applying a dark dirt wash and some chipping:


After finishing the cockpit decals and wiping off the excess of the dark dirt wash, I then gathered the cockpit tub parts in preparation for building the cockpit assembly:


I started the assembly by fitting the pedals and steering column sub-assembly into place, followed by fitting the seat assembly and rear bulkhead:


I then applied a matt clear coat to the cockpit assembly and the starboard side fuselage half, and when dry, I then moved onto fitting the starboard side cockpit wall section, followed by the portside wall sections around the cockpit interior assembly:


It was time to take the two parts from the new kit that I needed to complete this kit that I was working on. So, I took the starboard side upper wing section and the portside fuselage half from the kit and airbrushed a black base coat onto the areas that are visible. When that had dried, I then airbrushed a interior green onto the black base coat, and, when that was dry, I airbrushed a gloss clear coat in readiness to apply a dark dirt wash and some chipping:


I had to remove the oxygen cylinders and the radio parts from the original portside fuselage half that got damaged and glue them into this new fuselage half. After that, I applied a dark dirt wash, allowed that to dry for 30 minutes, then rubbed the excess off with Q-Tips leaving some on to give a desired effect:


After that was completed, I sealed everything in with a matt clear coat, along with the cockpit door, radiator housing and the flaps:


It was now time to assemble the cockpit assembly into the starboard side fuselage half. I used super-glue to fix it solidly and quickly:


When it was set, I temporarily taped the fuselage halves together and dry-fitted the fuselage assembly into the wing assembly to see how it fitted. It fitted well on the starboard side, but on the portside, there was a gap at the wing root to fuselage joint:


I removed the tape from the temporarily fitted assemblies and then glued the starboard side upper wing section onto the lower wing assembly, followed by gluing the two fuselage halves together and taping them until the glue had set:


When the assemblies were set, I then did a second dry-fit of the fuselage into the wing assembly, and as before, there was still a gap on the portside at the wing root to fuselage joint. I cured this by cutting a piece of sprue to a length that I could push into the fuselage assembly between the cockpit tub side panel and the portside wall section. This forced the wall section outwards enough to close the gap when checking again with a dry fit. Once happy with how it fit, I glued the piece of sprue in place with super glue. I then glued the fuselage into the wing assembly. A little filler was required on the underside where the rear area of the wing assembly joined with the fuselage assembly:


Next, I glued the belly and air intake assembly onto the underside of the nose of the aircraft:


This was followed by gluing the portside and starboard side wing tips into location. There was a small gap on the starboard side that would require some filler:


I then assembled the ailerons, the horizontal stabilizers, the elevators and finally, the rudder:


I'd now gone as far as I wanted to go for this update, and so, I laid everything out on my table to see how everything looked;


Well, that's it for this update, and until the next one, if you'd like to watch my YouTube "Build Update #2" video for this build, here is the link:


https://youtu.be/TLyeM8M-jZU


Thanks in advance for following this build, watching the video and leaving comments, both on here and on YouTube! Big Smile Yes

Until the next update, happy modeling and have fun!!  Yes

Cheers!
Martin Big Smile

  • Member since
    April 2015
  • From: New Hampshire, USA
Posted by UKguyInUSA on Tuesday, September 1, 2015 9:23 AM

Revell 1/32 Supermarine Spitfire Mk.IIa "Build Update #3" (9.1.15)


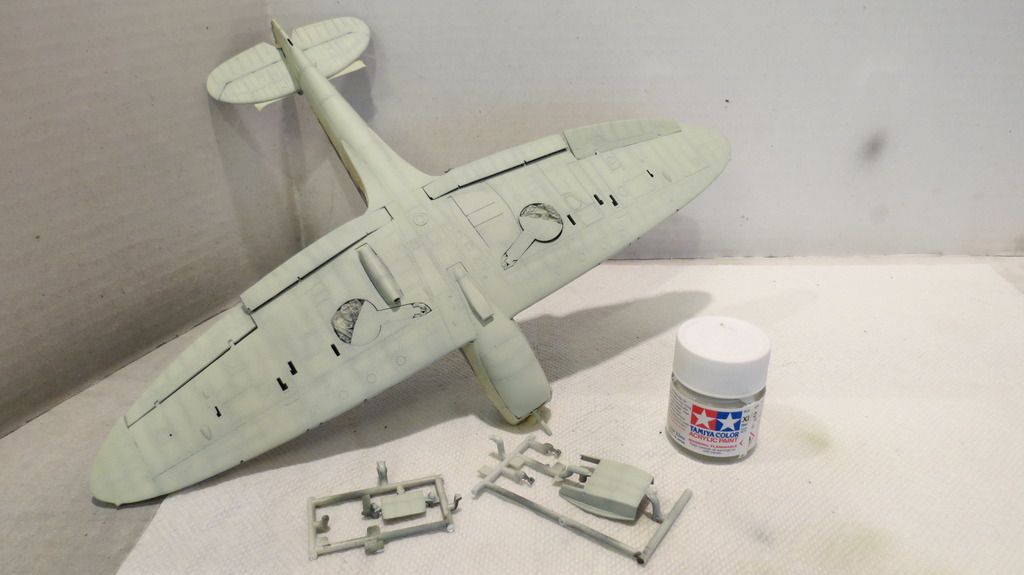
It's been almost a week since my last update, and since that one, I've progressed quite a way! Below describes my journey from where I left off at "Build Update #2" and where I'm presently at with this build....


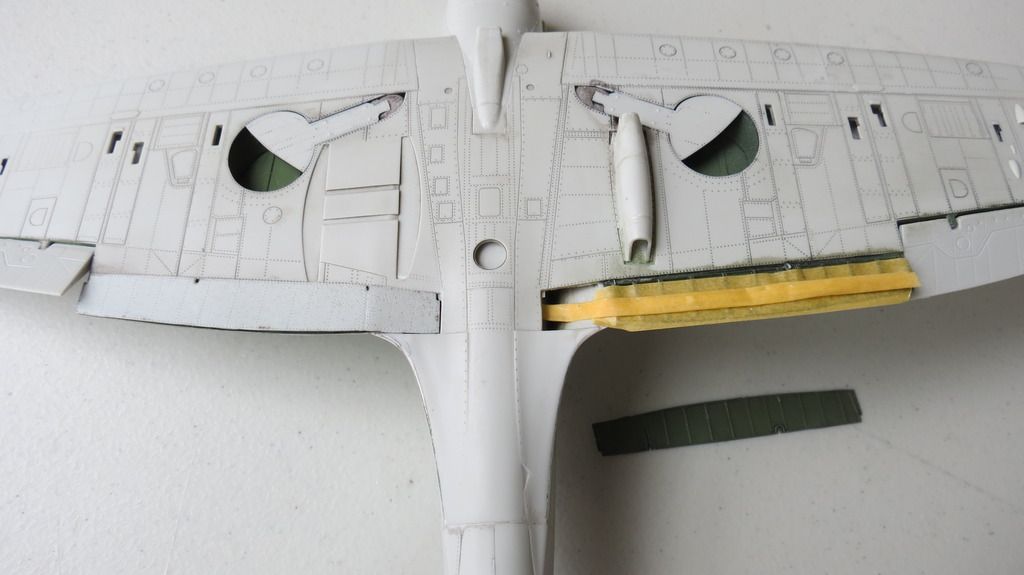
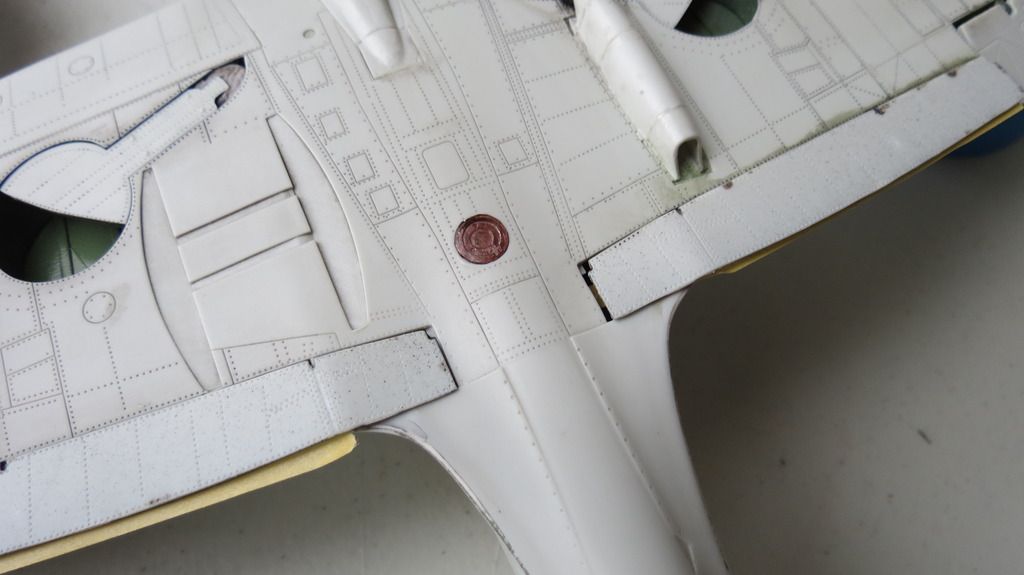
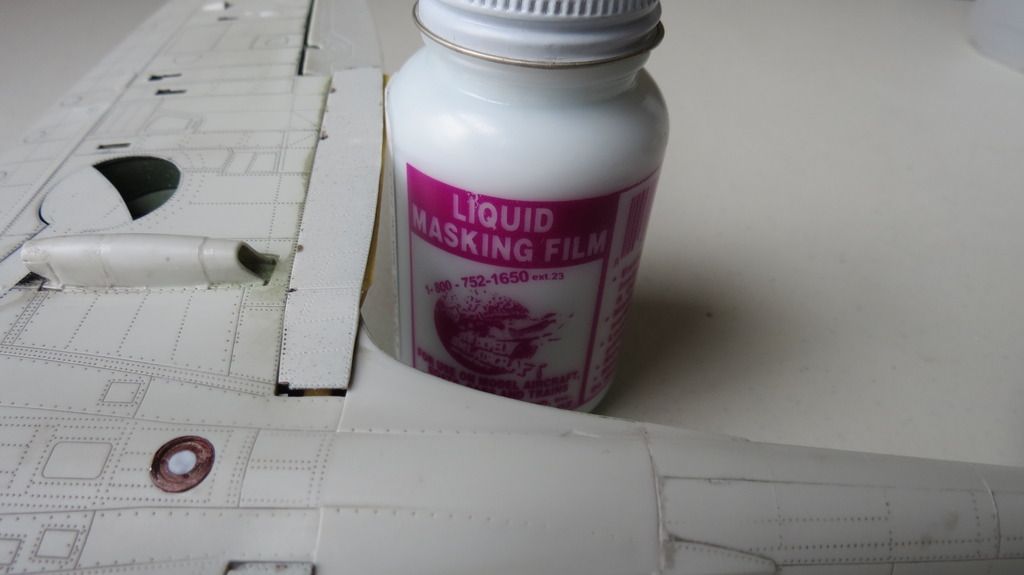
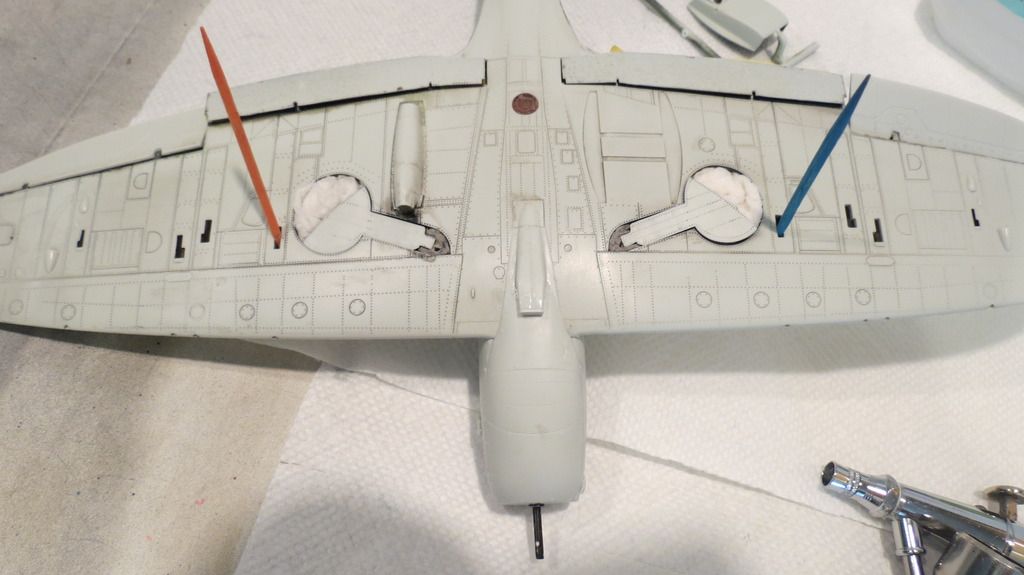
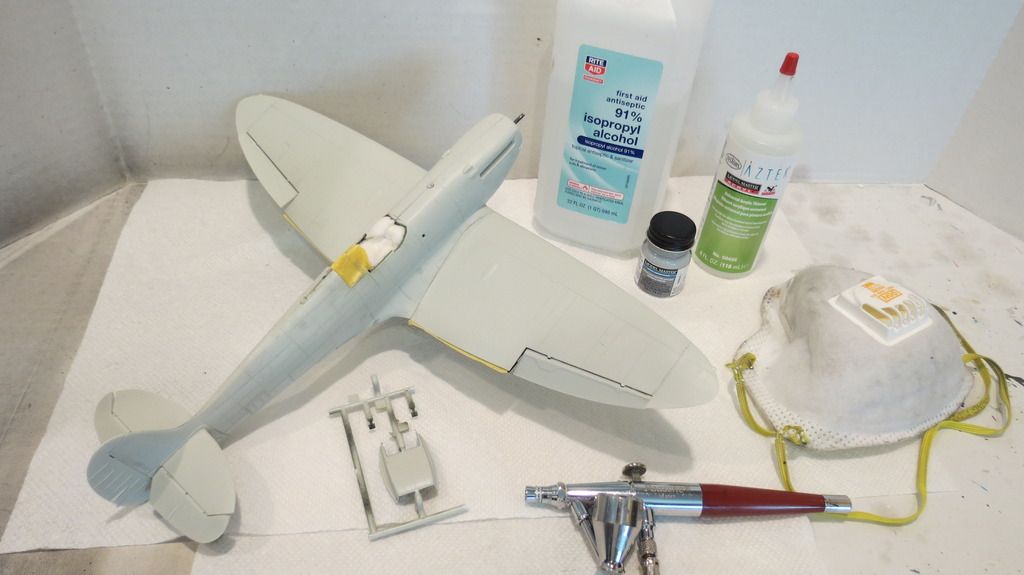
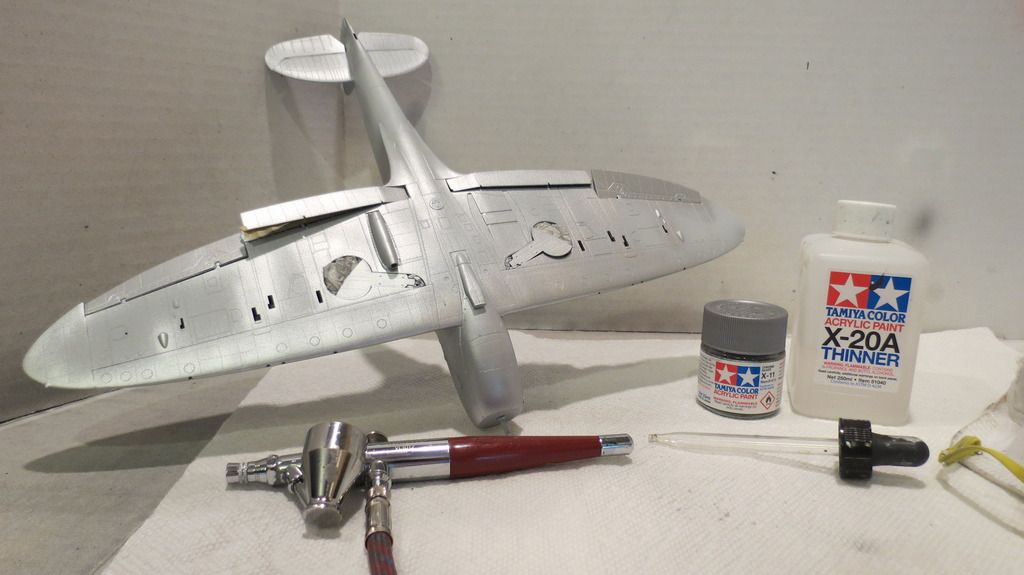
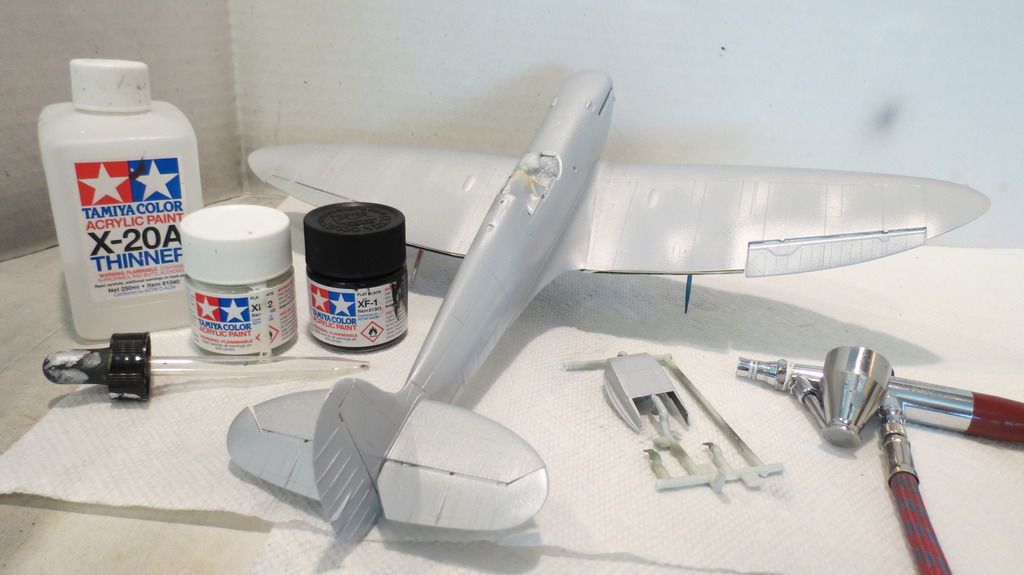
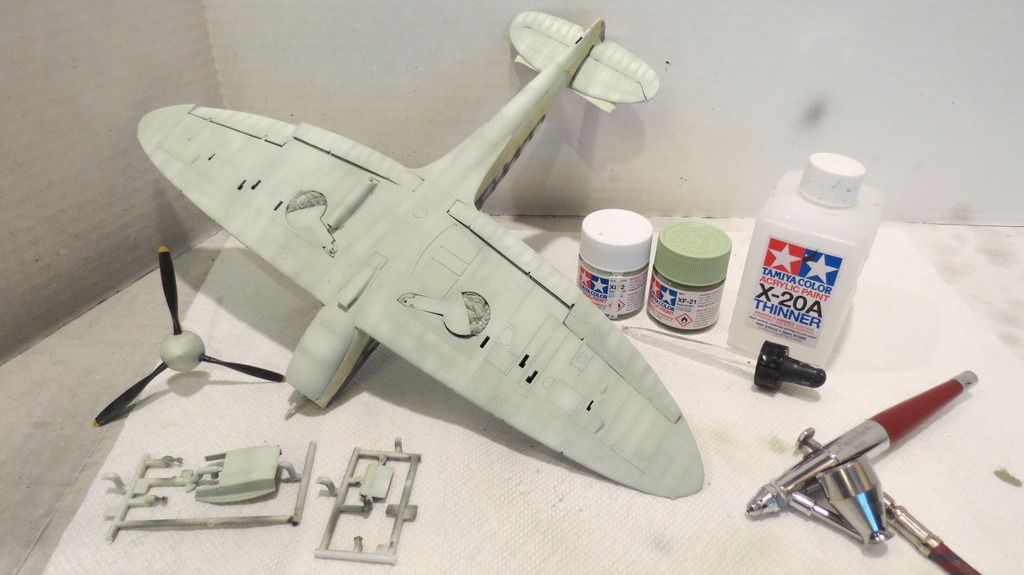
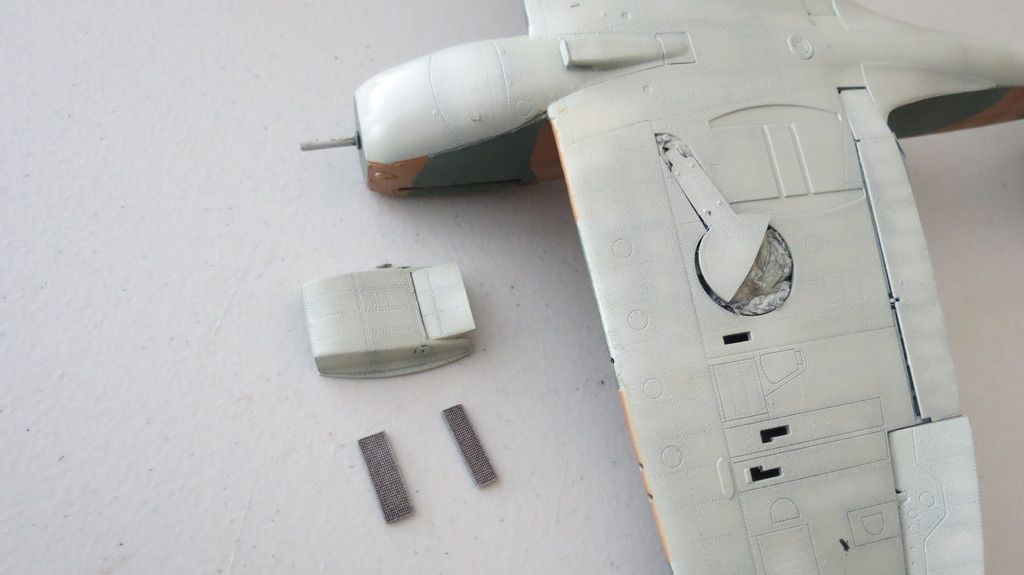
With the plane built up, it was time to mask in readiness for priming. I temporarily located the wheel bay doors with putty, taped the ailerons into their locations. I then fitted the underside lens and masked the center of it with liquid masking solution. The wheel wells were then masked with damp tissue followed by masking the cockpit with damp tissue, too. I then cleaned the plane down with Isopropyl Alcohol to make her ready for the primer;


IMG_2690_zpszbwtwnl7.jpg


IMG_2691_zpsx3me872o.jpg


IMG_2692_zps4h2cmzdj.jpg


IMG_2694_zpslq4u7jnx.jpg


IMG_2693_zpsx9aznh4k.jpg


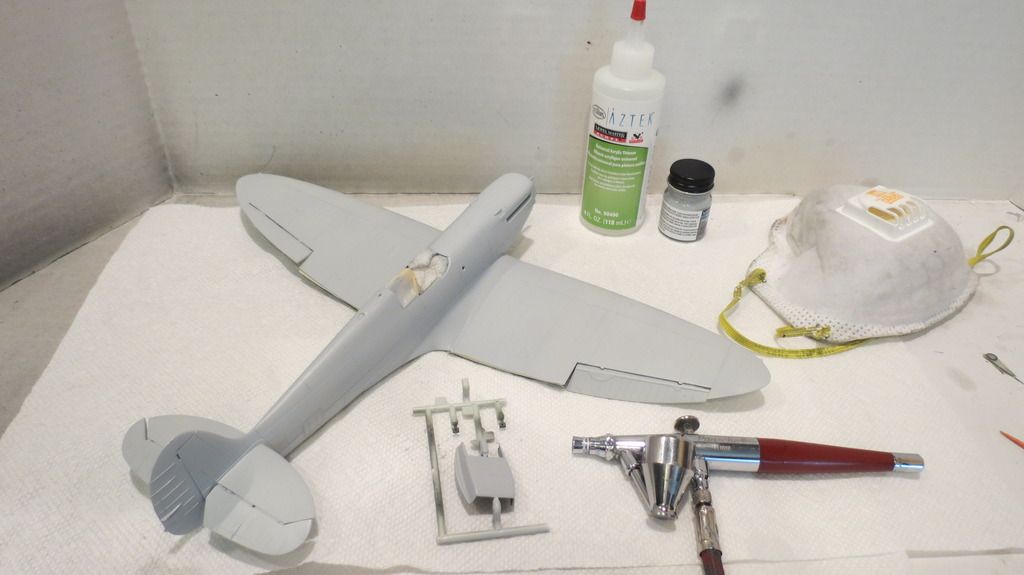
After all the masking and cleaning was completed, I airbrushed Model Masters Grey Primer onto her:


IMG_2695_zps2yvtc1ru.jpg


IMG_2696_zpsj0ppxwtx.jpg


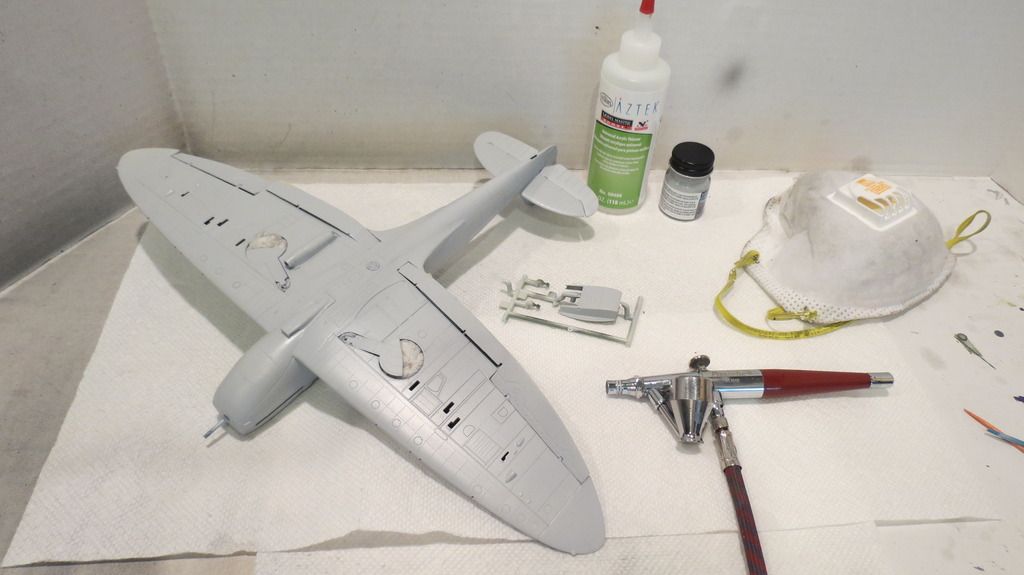
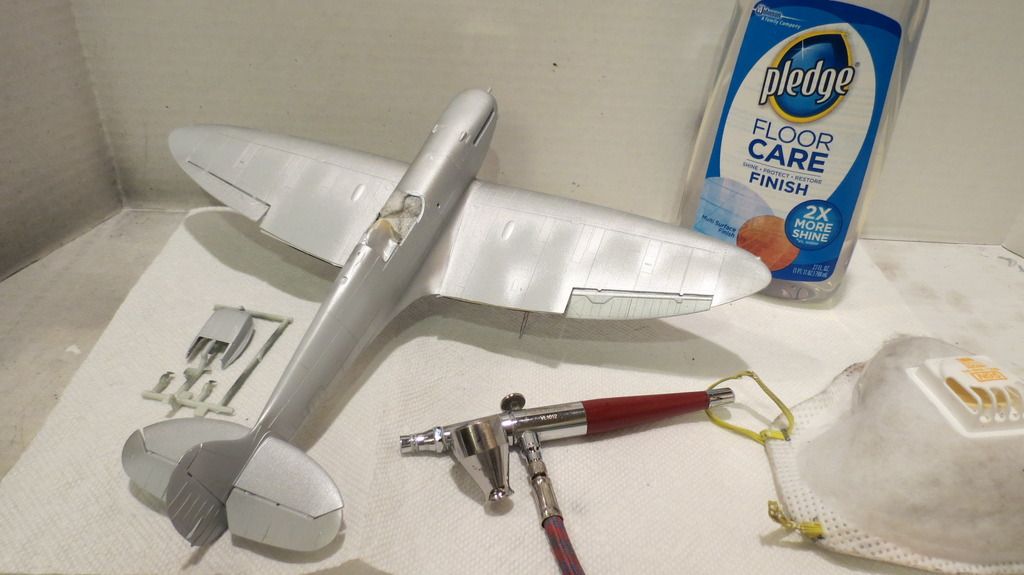
When the primer was dry, I then airbrushed silver onto the areas where paint chipping could occur, both on the top and bottom surfaces:


IMG_2697_zps1pzgw8d7.jpg


IMG_2698_zps22phza2n.jpg


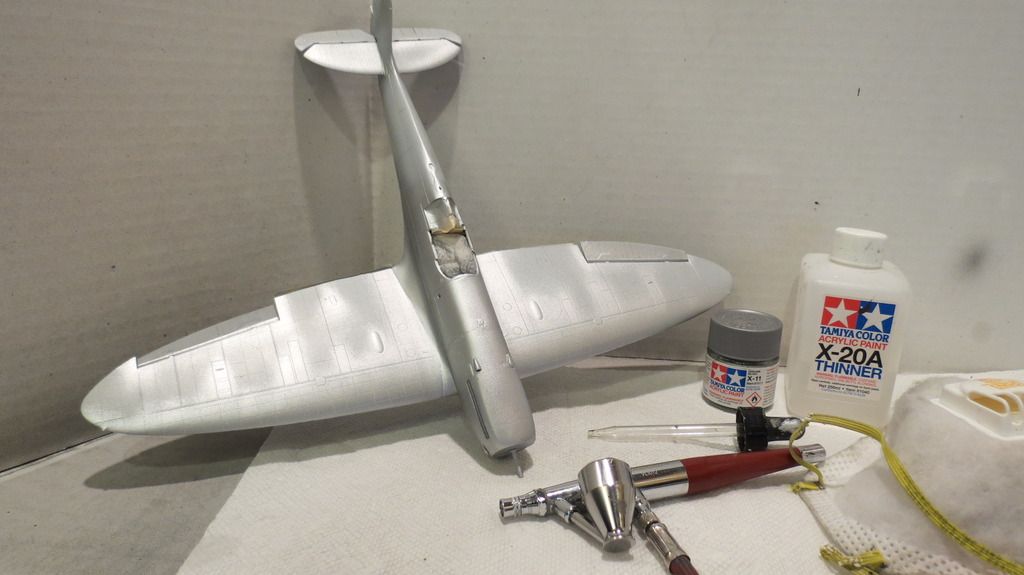
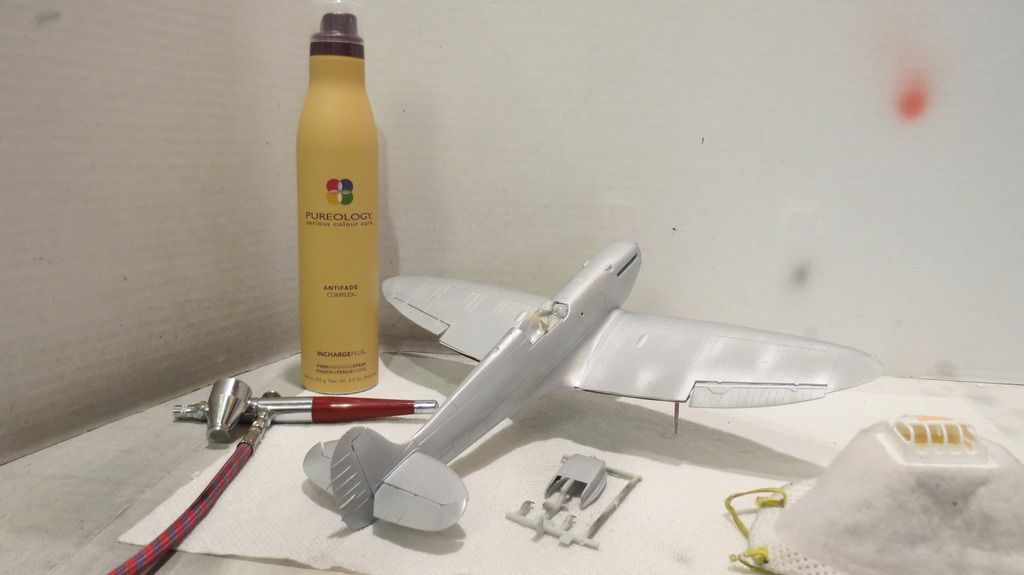
I allowed the silver to dry then I airbrushed a clear coat over it to seal and protect it and allowed that to dry overnight. The following morning, I decanted hairspray into my airbrush cup and airbrushed it over the silvered areas.


IMG_2699_zpsipmz4wht.jpg


IMG_2702_zpstatc5ozz.jpg


IMG_2701_zpscon8foy9.jpg


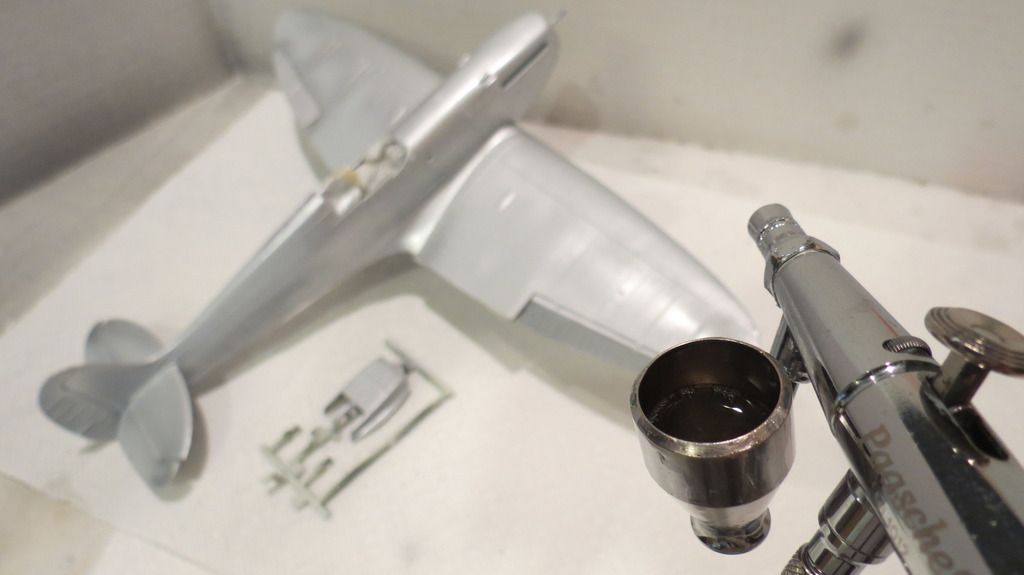
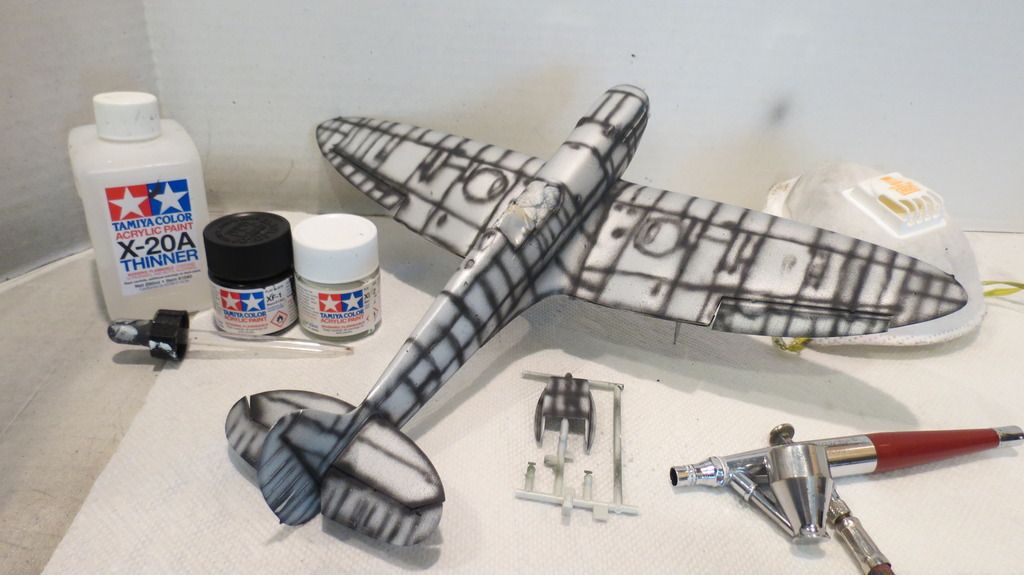
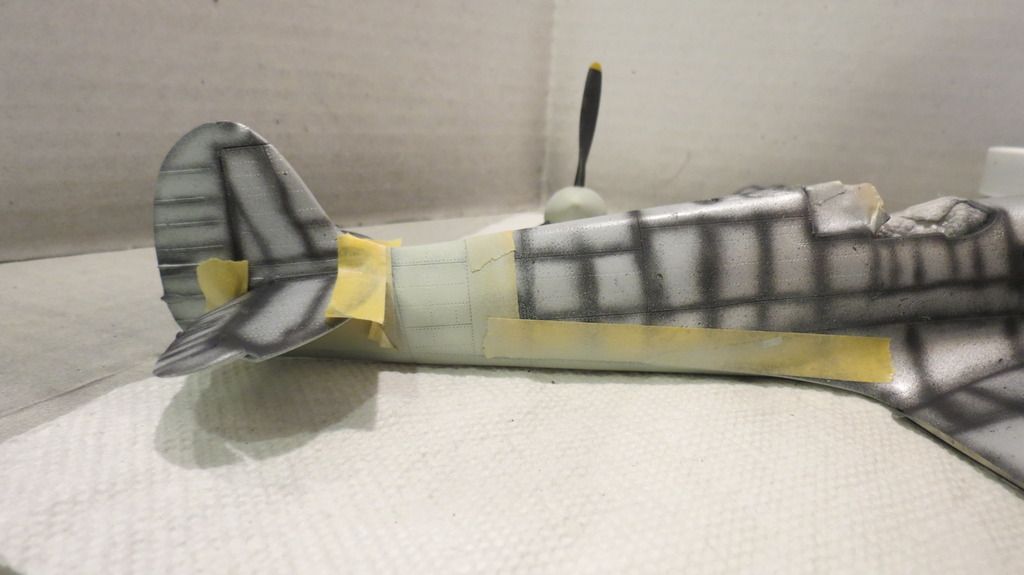
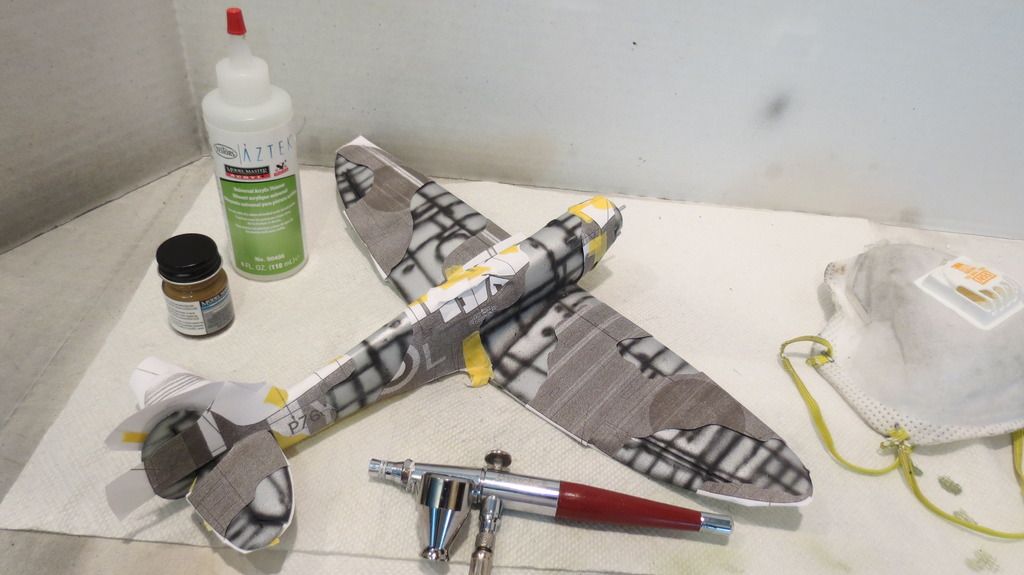
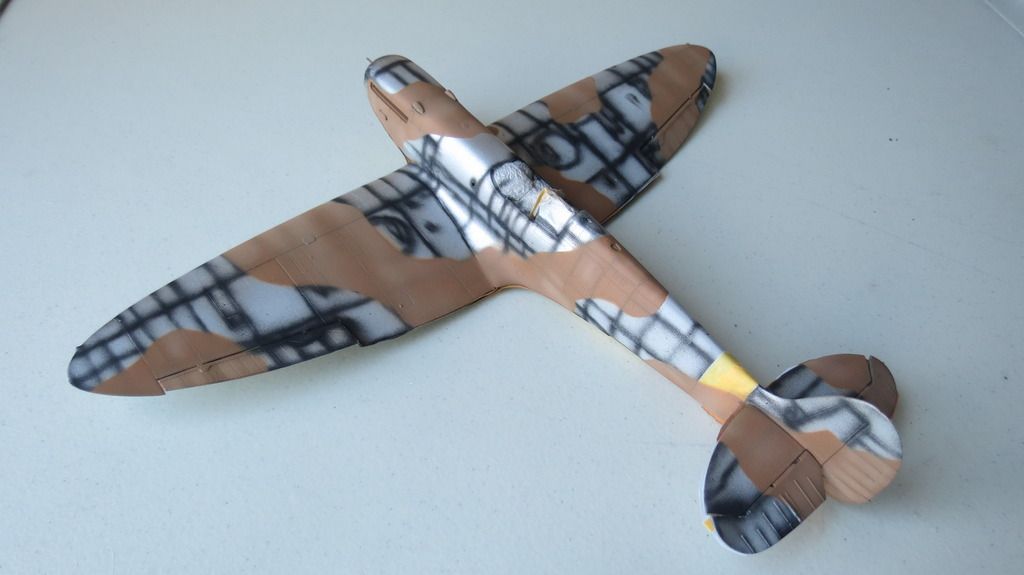
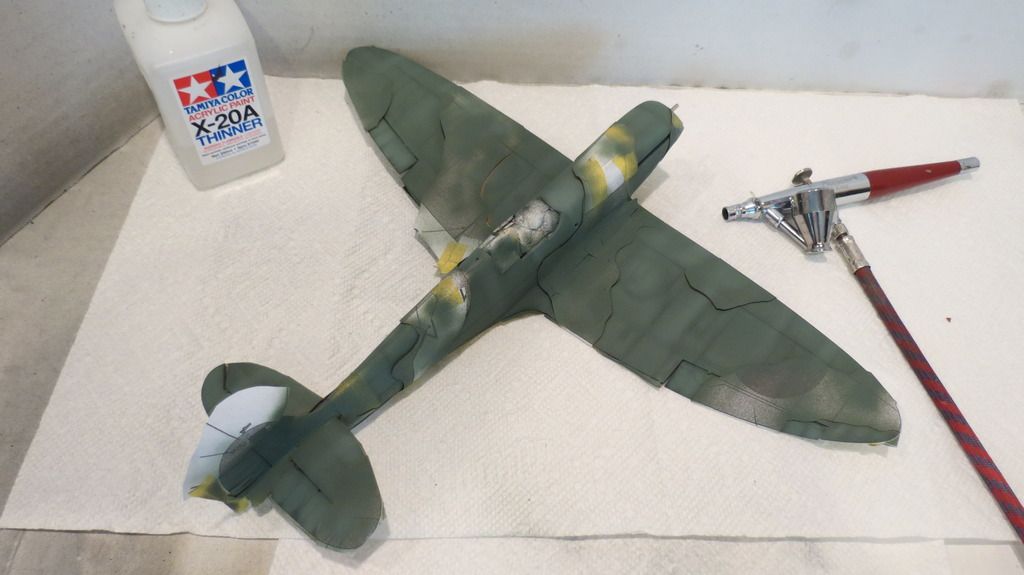
When the hairspray had dried, it was time to move on with pre-shading, starting with the top side and moving onto the underside:


IMG_2703_zpsmtnnlvek.jpg


IMG_2704_zpsomuvbohq.jpg


IMG_2705_zpsmt9jxbkc.jpg


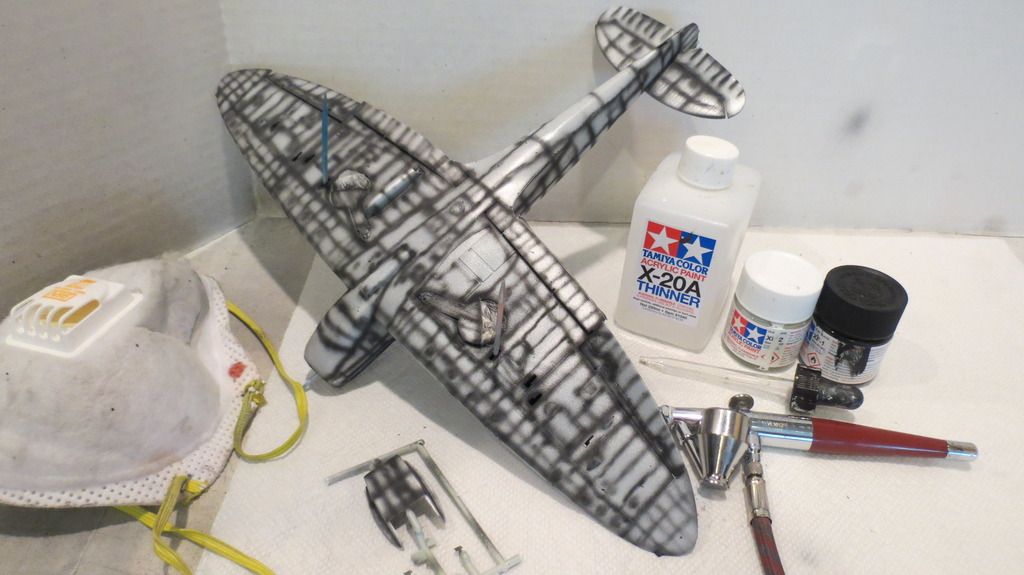
The pre-shading dried very fast because of how well thinned it is, and so, I was able to quickly start masking the plane in readiness for airbrushing the underside Sky color, along with the tail band. I used Tamiya XF-21 Sky toned down around 25-30% with Tamiya XF-2 Flat White. I then added more white to what remained in the cup and airbrushed some highlights on top:


IMG_2706_zpsdqidrbcd.jpg


IMG_2707_zpsk3vijrs4.jpg


IMG_2708_zpsfbkt4xsg.jpg


IMG_2709_zpsddlrhq9l.jpg


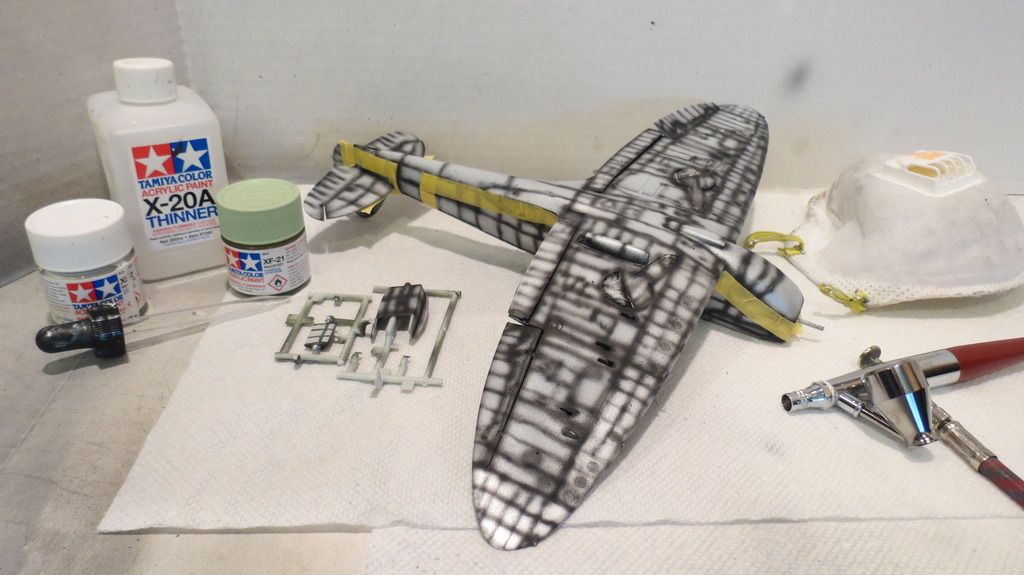
This was allowed to dry for 3 hrs before I airbrushed a gloss clear coat onto the Sky painted areas to seal it all in;


IMG_2712_zpsmwkhwsfg.jpg


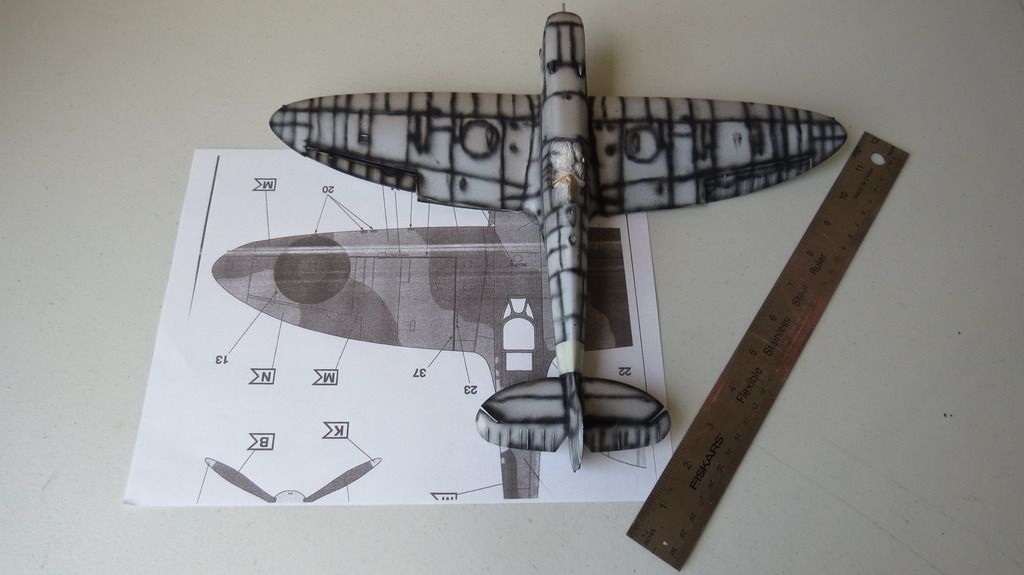
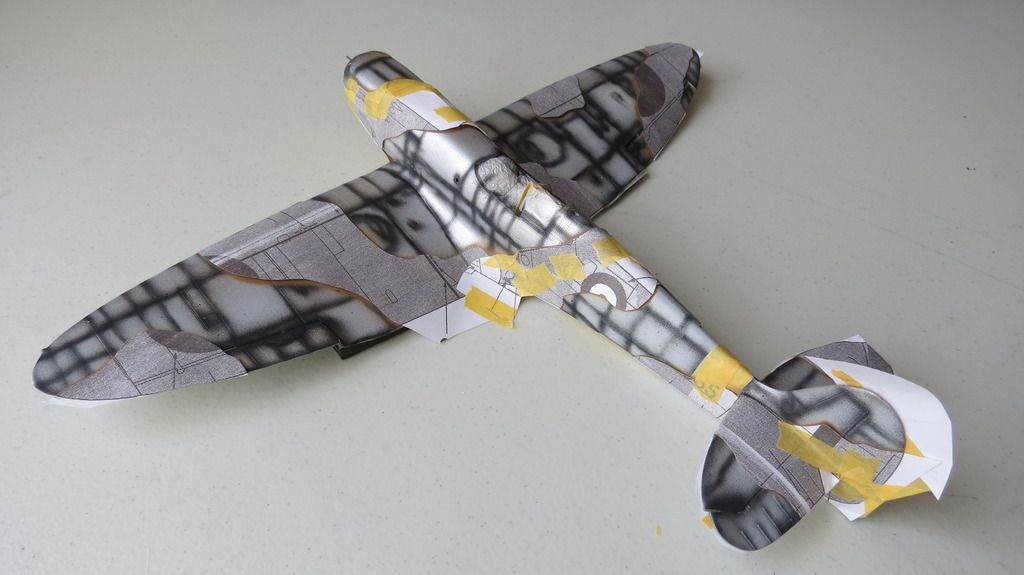
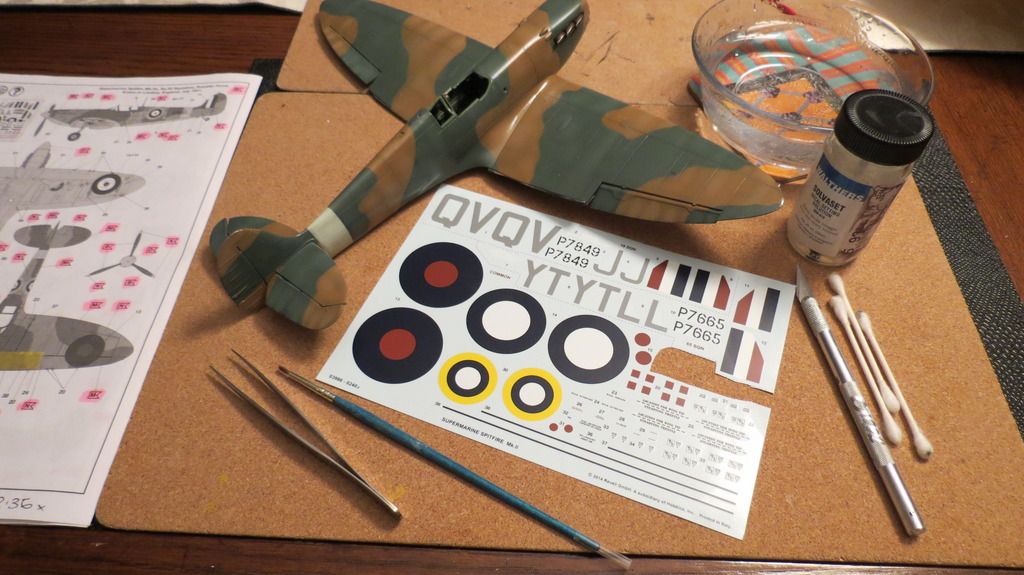
I allowed the gloss clear coat to dry overnight, and the following morning, I created my "full-sized" paper masks from the views shown in the painting guide. To do this, I measured the distance from wing tip to wing tip on the model and did the same on the plan view diagram shown in the paint guide. I then divided the larger number by the smaller number to get a scale factor which was 2.36x. Using the zoom function on my photo-copier, I then copied the views on the paint diagram and increased their size by the scale factor of 2.36 magnification. First, I created the starboard side fuselage paper mask, followed by the portside fuselage, the starboard wing and the portside wing upper views. I was now set to cut the patterns out to mask the plane for the upper camouflage colors;


IMG_2713_zpsldt6lvvo.jpg


IMG_2714_zpsh8fwpy9z.jpg


IMG_2715_zpssmyll8v1.jpg


IMG_2716_zpsyr0ema23.jpg


IMG_2717_zps45sboaru.jpg


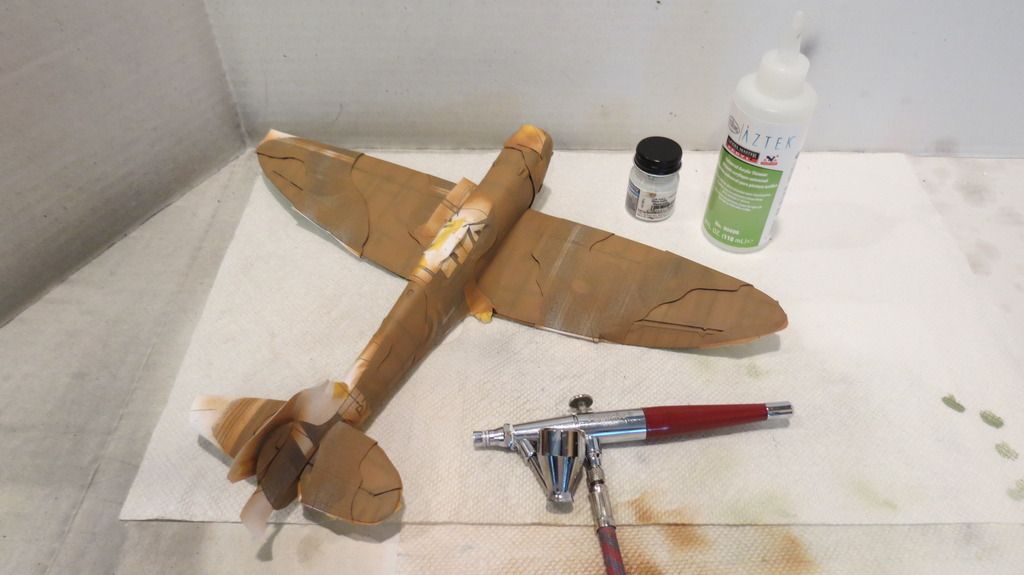
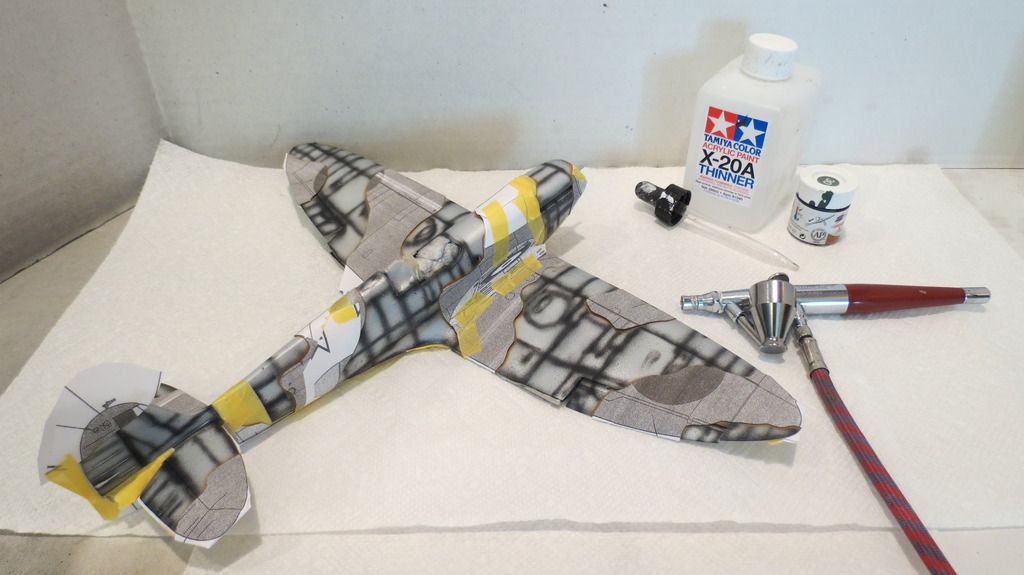
I wanted to airbrush the Dark Earth brown color onto the plane first, so, I cut out the "Dark Green" camouflage areas from the paper masks and stuck them down to the plane in their corresponding locations using Tamiya tape folded over to create "two-sided" tape. I then airbrushed the "Dark Earth" color over the exposed areas. I used Model masters Dark Tan 4709 toned down 20% with Model Masters Flat White 4769 and thinned about 40% with Tamiya X-20A. After completing airbrushing that mix onto the plane, I then toned the mix down further with more white and then airbrushed highlights on top of the previously airbrushed "Dark Earth":


IMG_2718_zpsv0udlchc.jpg


IMG_2719_zpsuaitwjwj.jpg


IMG_2720_zpsvlc1gjk0.jpg


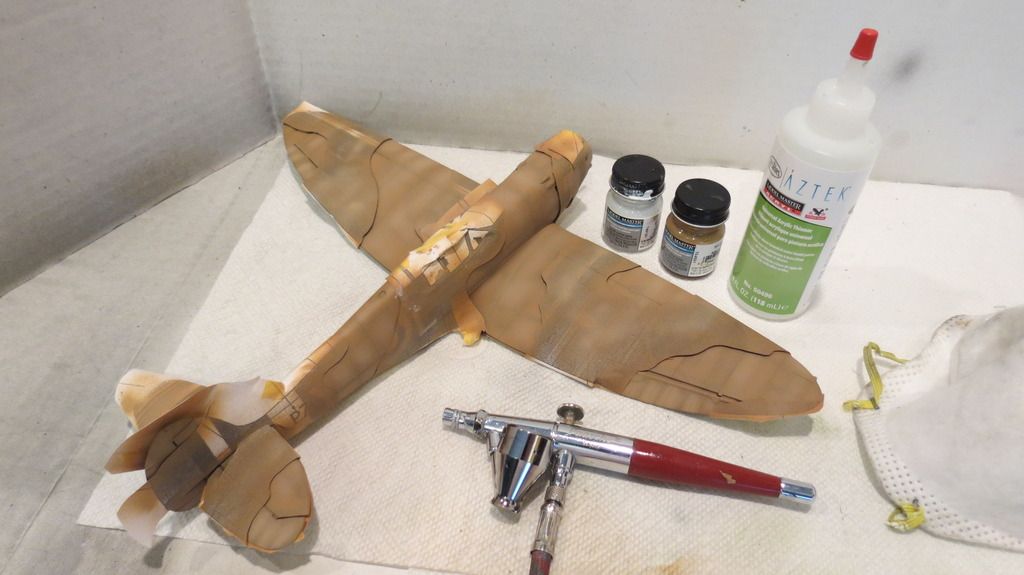
When the paint was touch dry, I carefully removed the masks and checked how the paint work had turned out. I was happy with the result:


IMG_2722_zps6udeyqis.jpg


IMG_2723_zps2zd5voga.jpg


I allowed the Dark Earth paint to dry for 3 hours before I started masking for the Dark Green color. I cut out the areas that represented the Dark Earth color on the paper masks and used those to mask over the previously painted Dark Earth. Again, using folded Tamiya tape to create "double-sided" tape. When the masking was complete, I then airbrushed Dark Green over the exposed areas. I used Humbrol 30 toned down 15% with Model Masters Flat White 4769 and thinned 40% with Tamiya X-20A. Yes, I know what you're thinking..."He's mixing three different brands of paints and thinner?!"....It works for me, especially when using the Tamiya X-20A thinner, the different paint brands mix well. I then added more Flat White to what was left in my cup and airbrushed highlights onto the Dark Green;


IMG_2726_zpsiraj2bif.jpg


IMG_2727_zpsruk5ivu4.jpg


IMG_2728_zpso94f6enq.jpg


IMG_2729_zpspcs1le7r.jpg


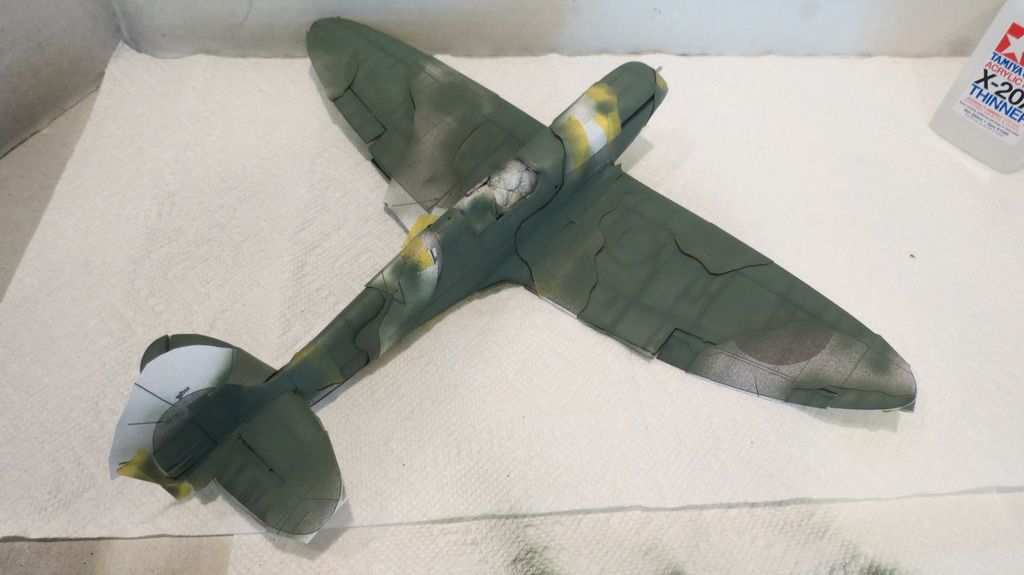
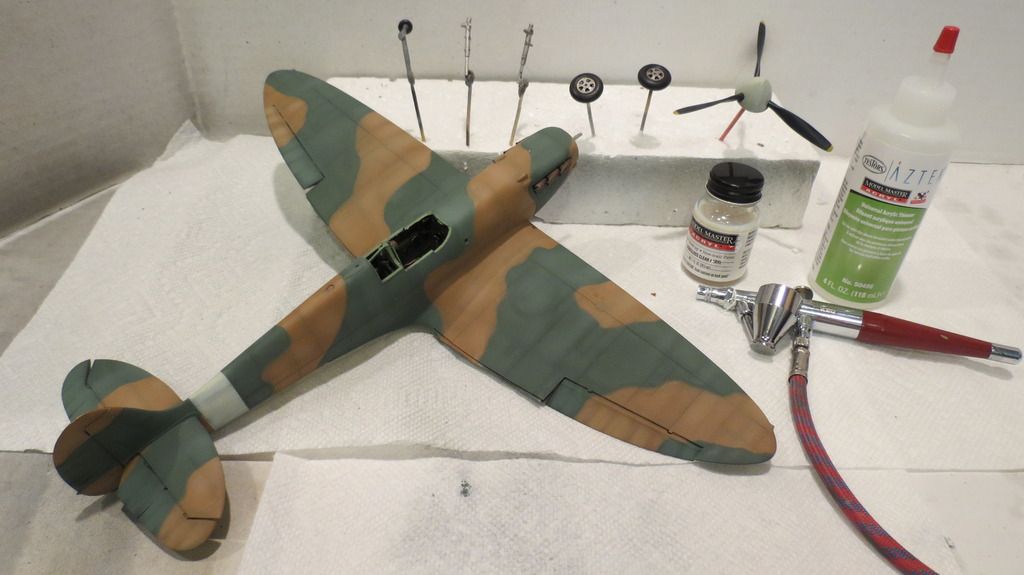
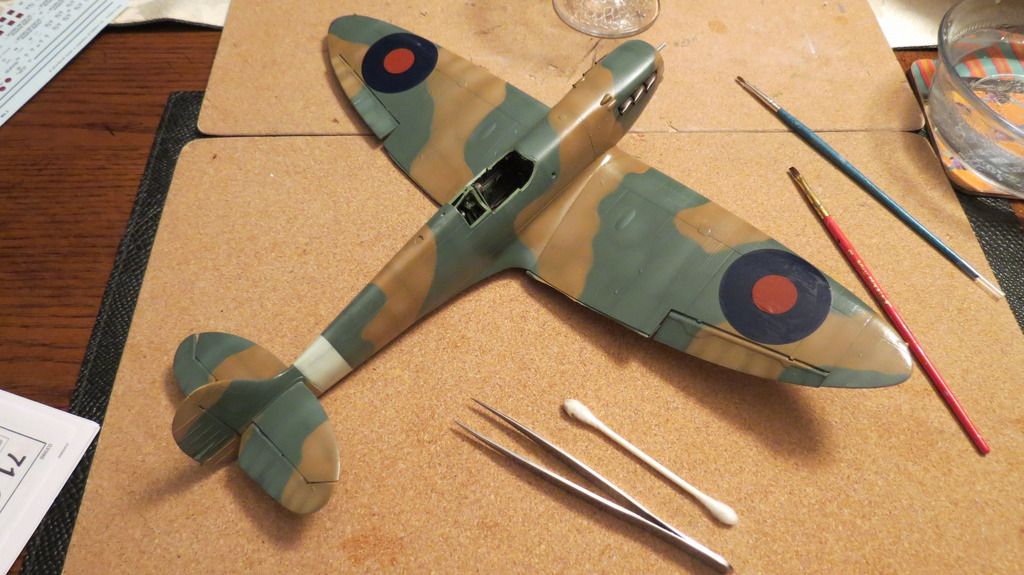
When the paint was touch dry, I carefully removed all masking and then checked to see how everything was looking, and again, I was reasonably happy with the results, bearing in mind that these are only my base colors to work with that I will be applying filters and weathering to later on;


IMG_2730_zpsou0o6u7t.jpg


IMG_2731_zps3lavxosp.jpg


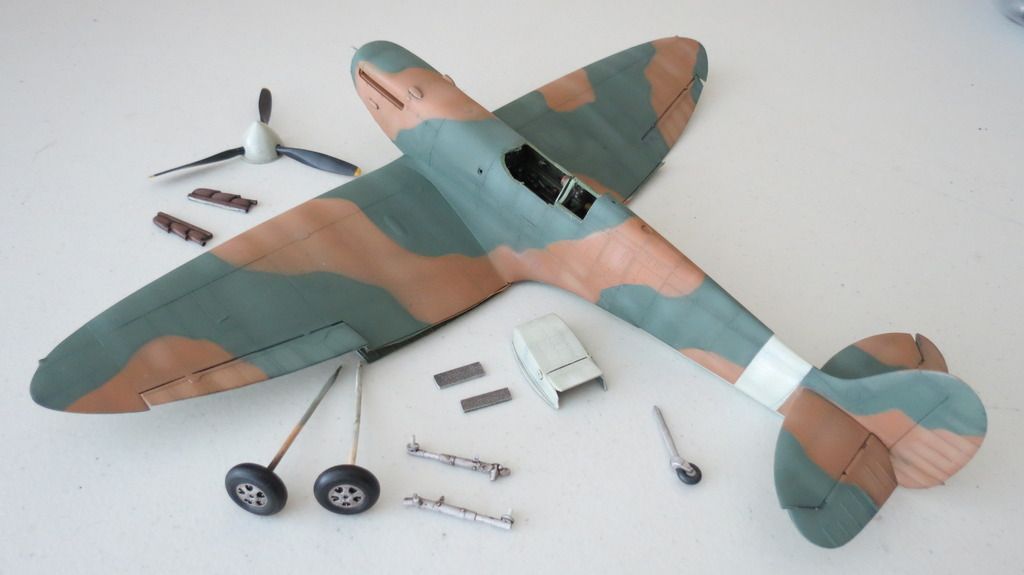
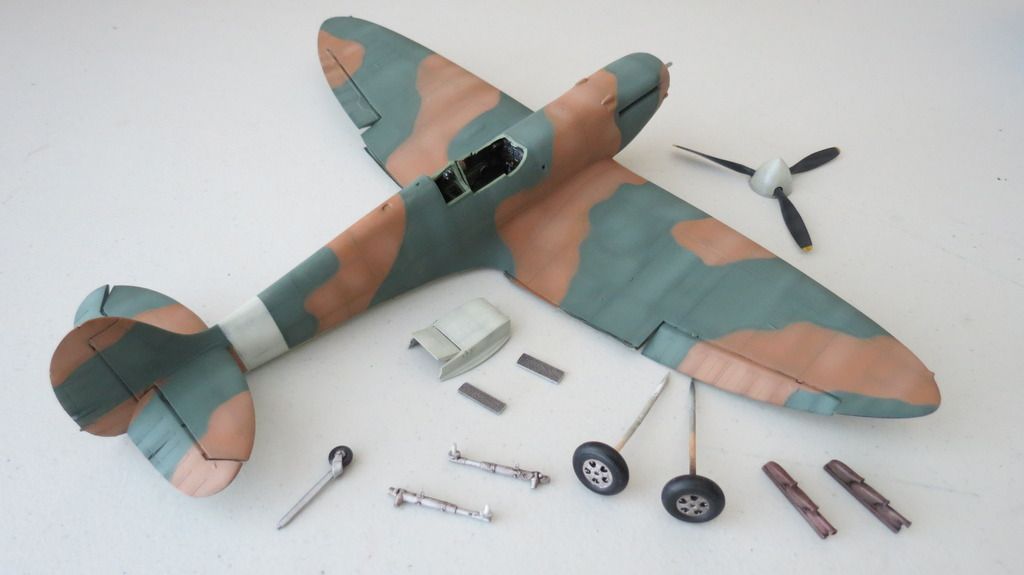
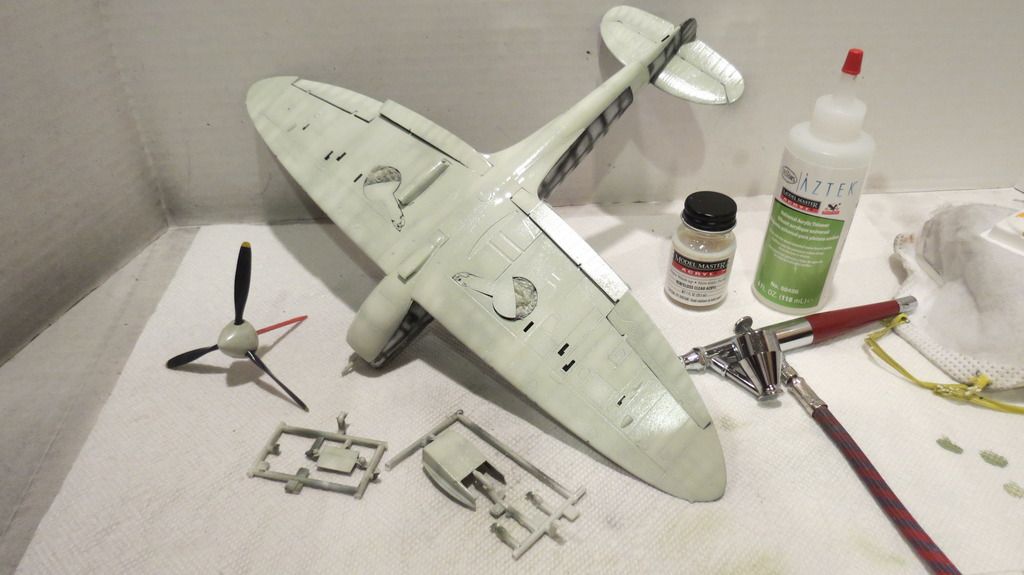
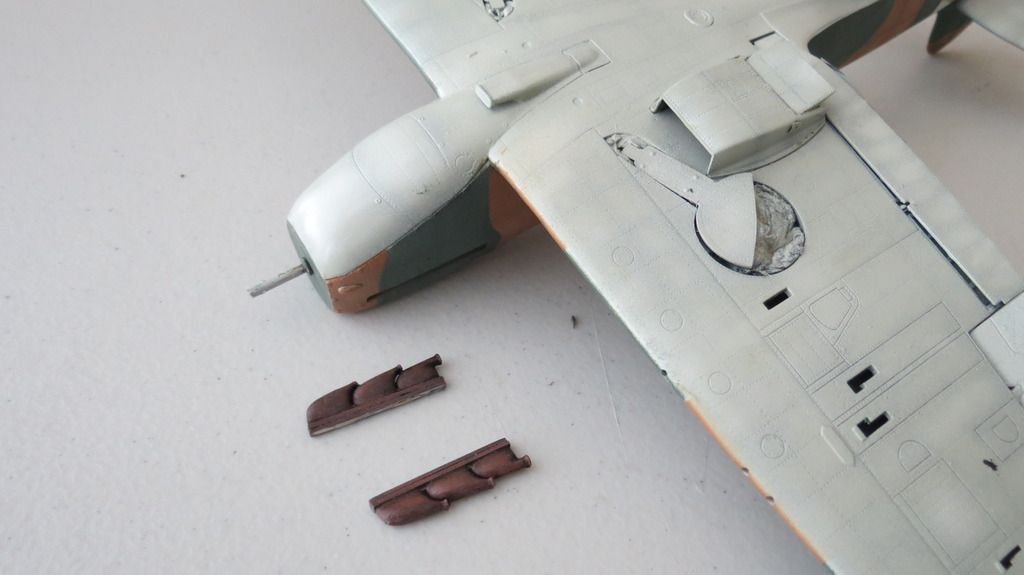
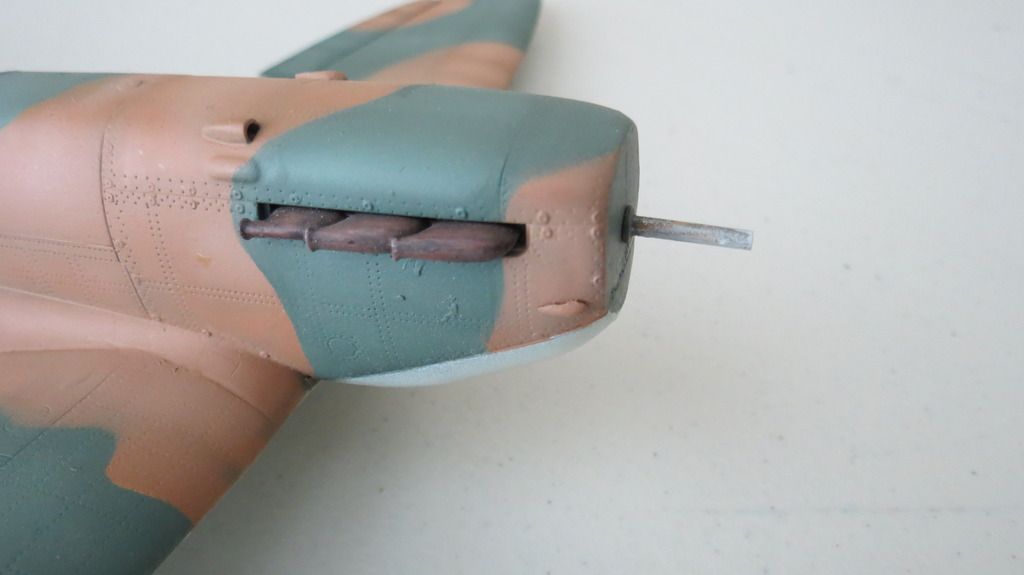
When the paint was completely dry, I then assembled the radiator housing to the underside followed by both exhaust stacks:


IMG_2738_zpsvnid2kq3.jpg


IMG_2739_zpskz0ypen9.jpg


IMG_2740_zps85urwjpq.jpg


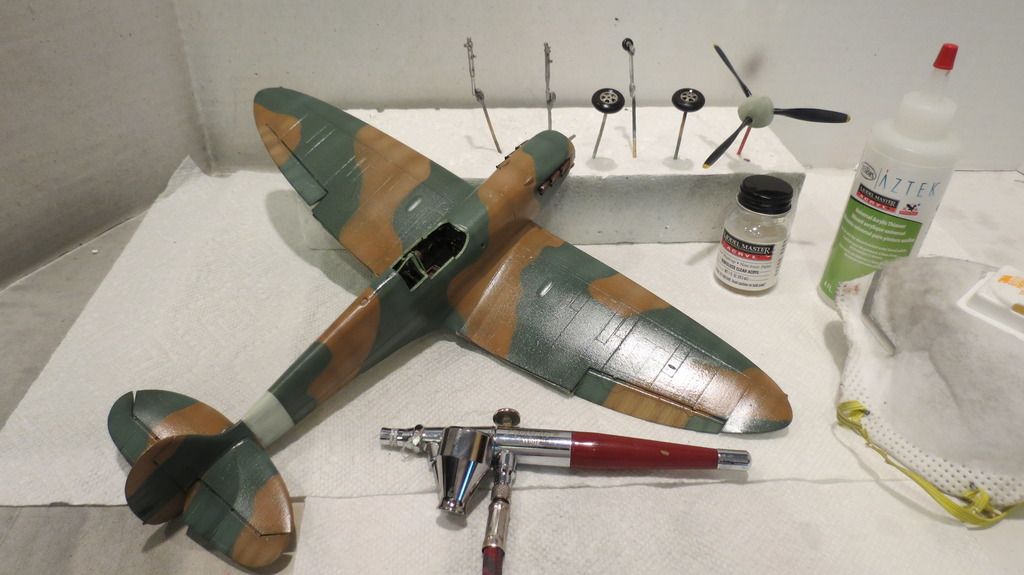
She was now ready to be airbrushed with a gloss clear coat to seal all the paint-work in prior to applying decals. I used Model Masters Gloss Acrylic clear-coat:


IMG_2742_zpsqceeo5go.jpg


IMG_2743_zpshiom5grn.jpg


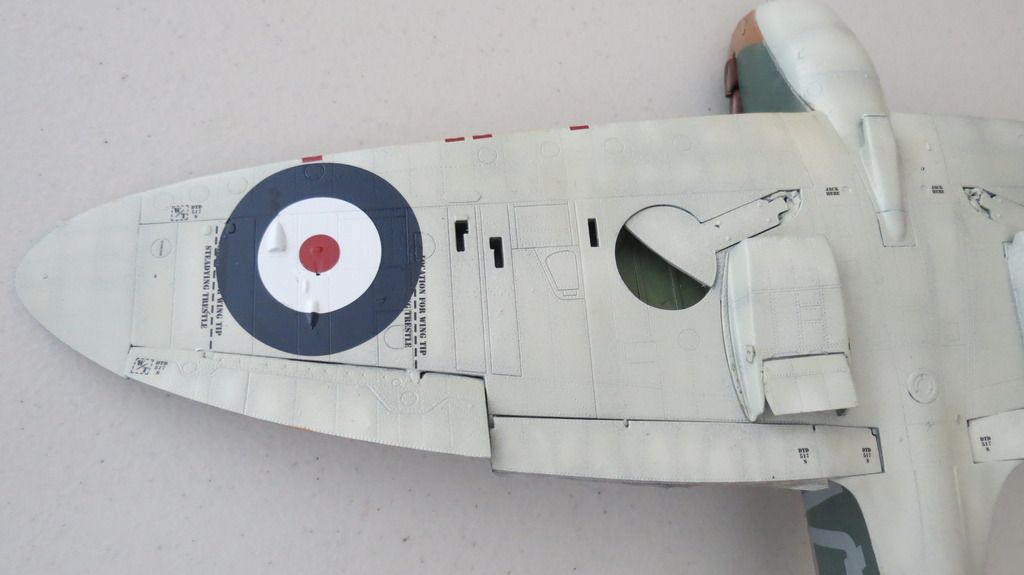
I allowed the gloss clear coat to dry over-night and then the following morning I applied the decals. I started off with the upper side, followed by the portside, the starboard side and finally the underside:


IMG_2744_zpsk17m52w9.jpg


IMG_2745_zpsgrmkgorl.jpg


IMG_2746_zpsvlaoowf2.jpg


IMG_2749_zpsxbcwad6n.jpg


IMG_2758_zpsnaeo20fi.jpg


IMG_2759_zpshx5oaeai.jpg


IMG_2760_zps7uooyi5d.jpg


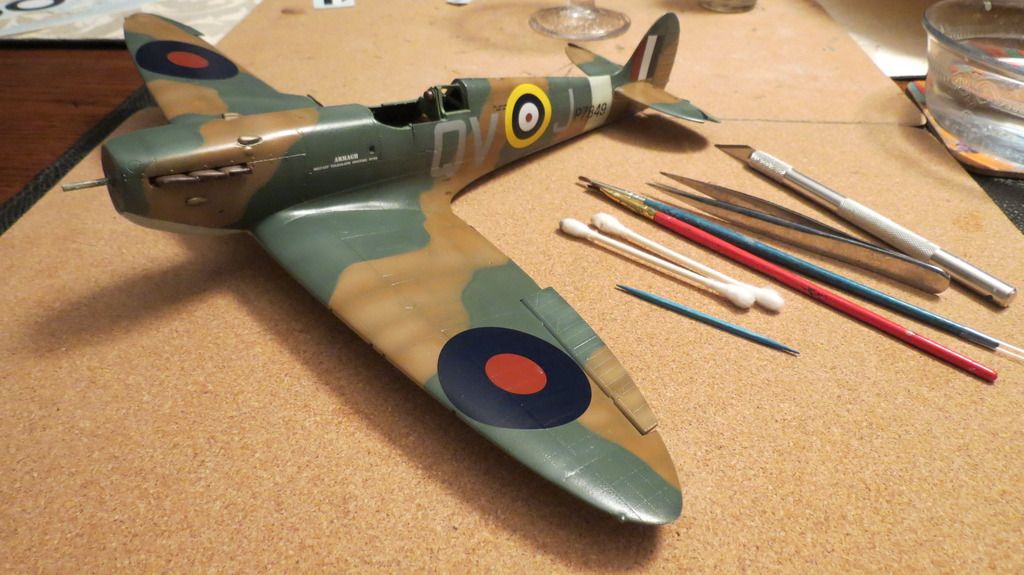
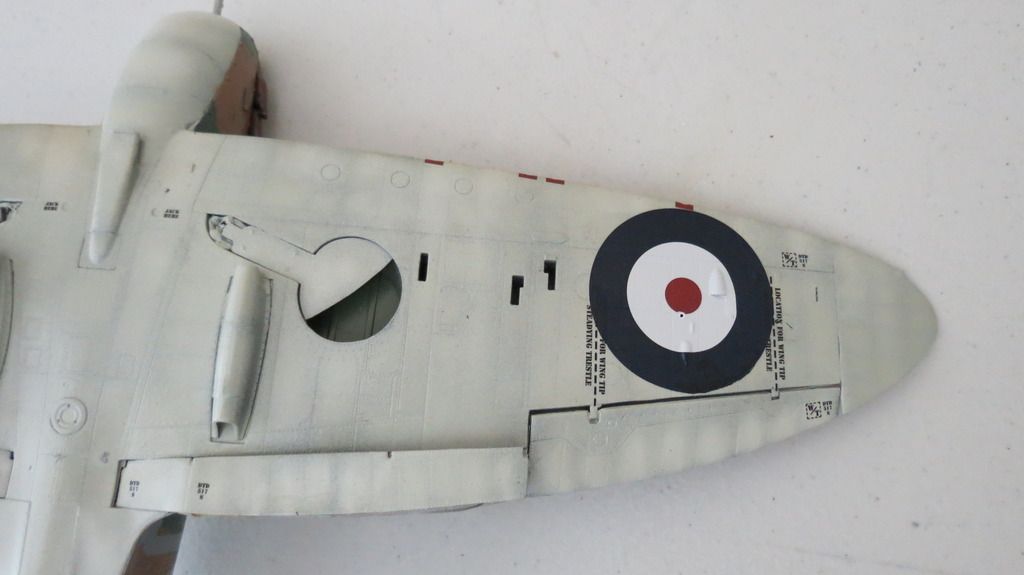
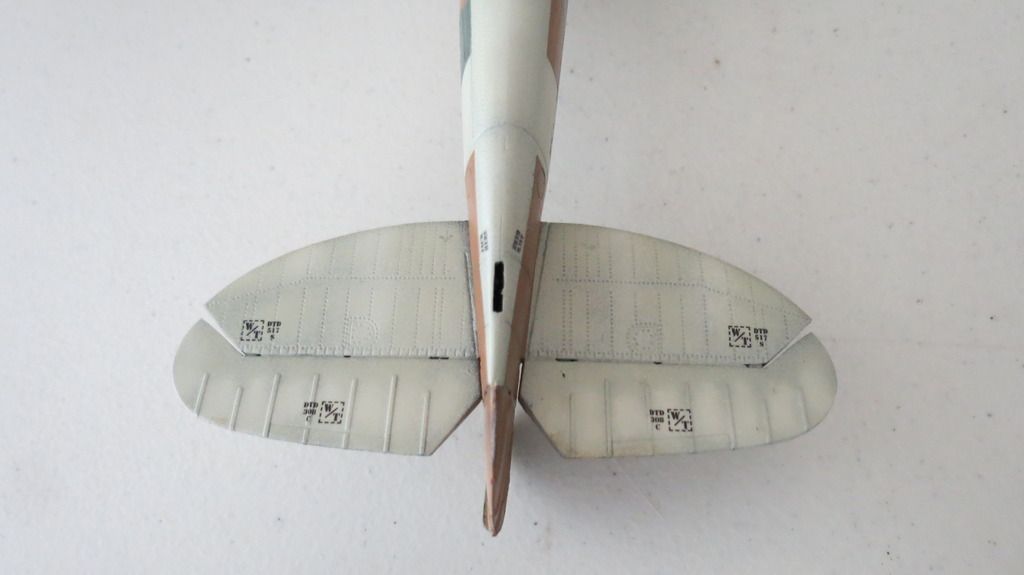
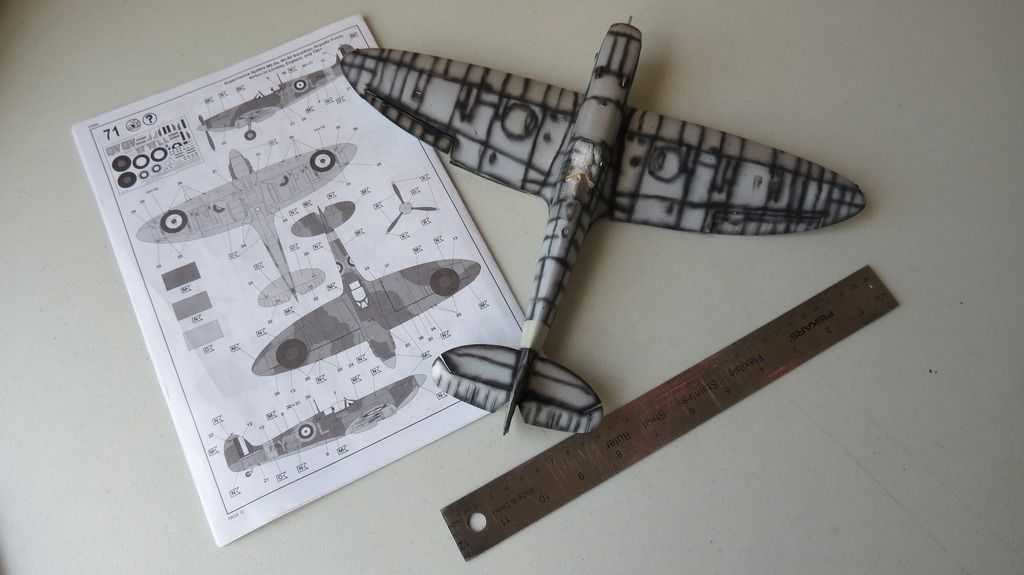
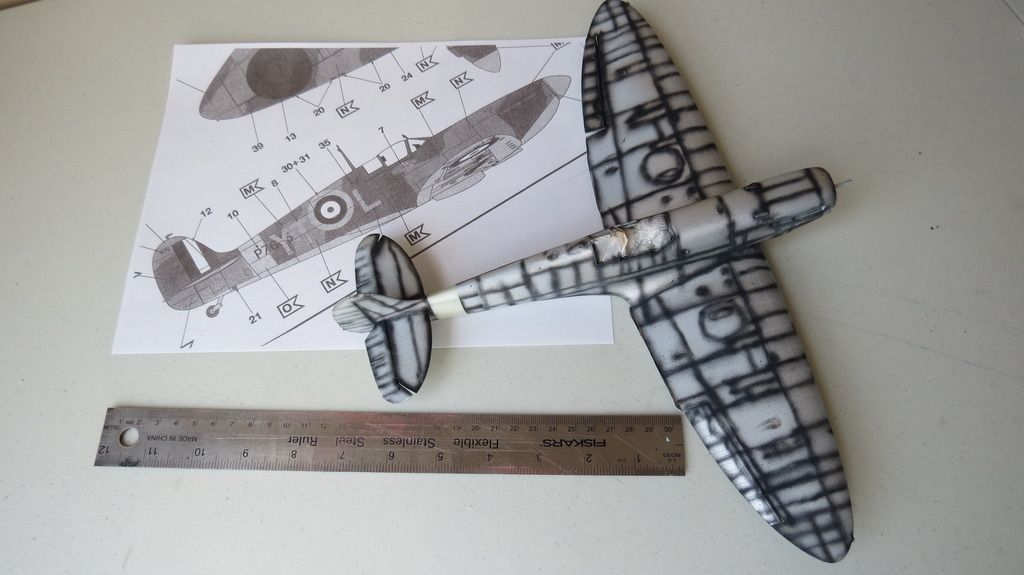
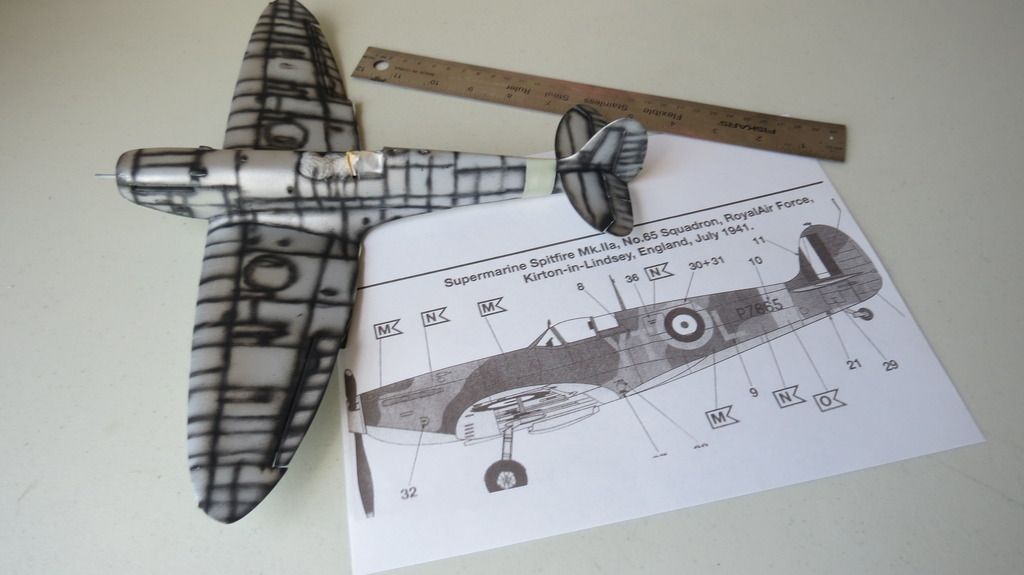
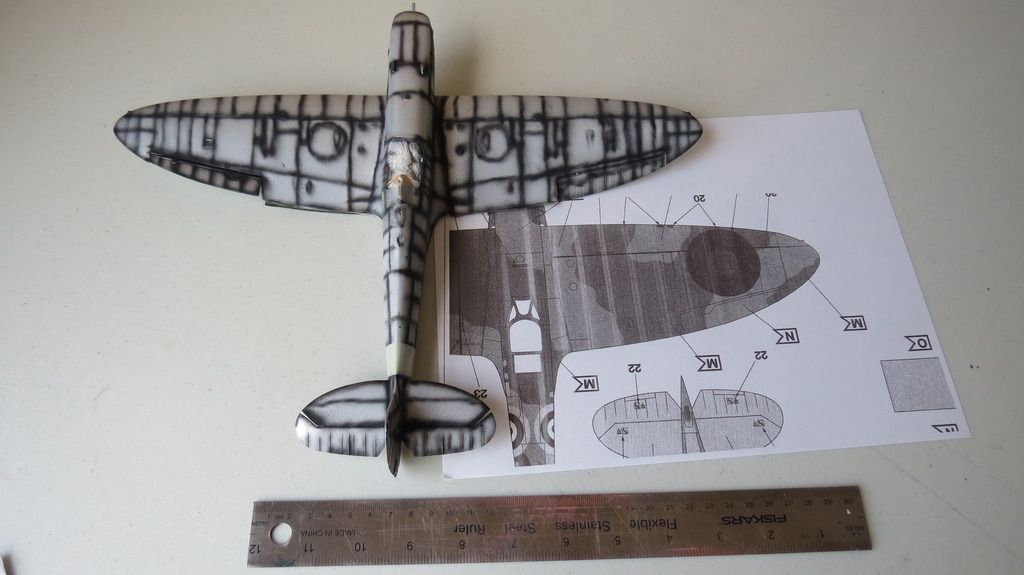
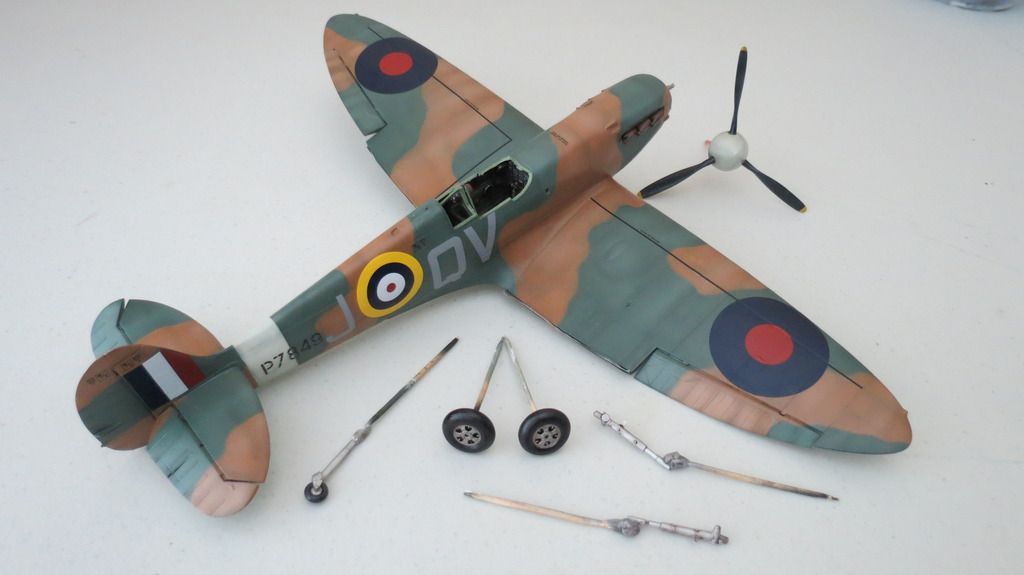
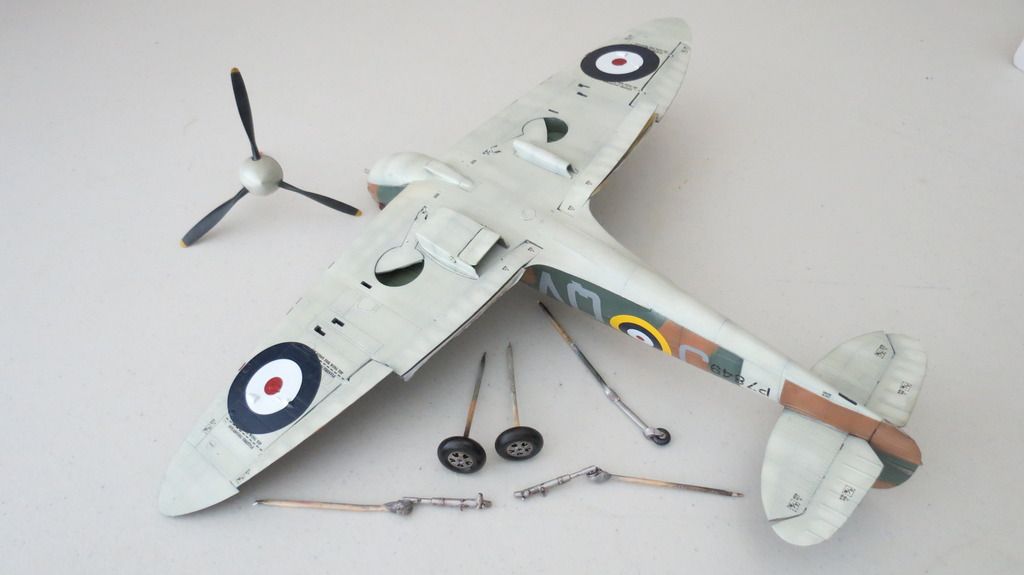
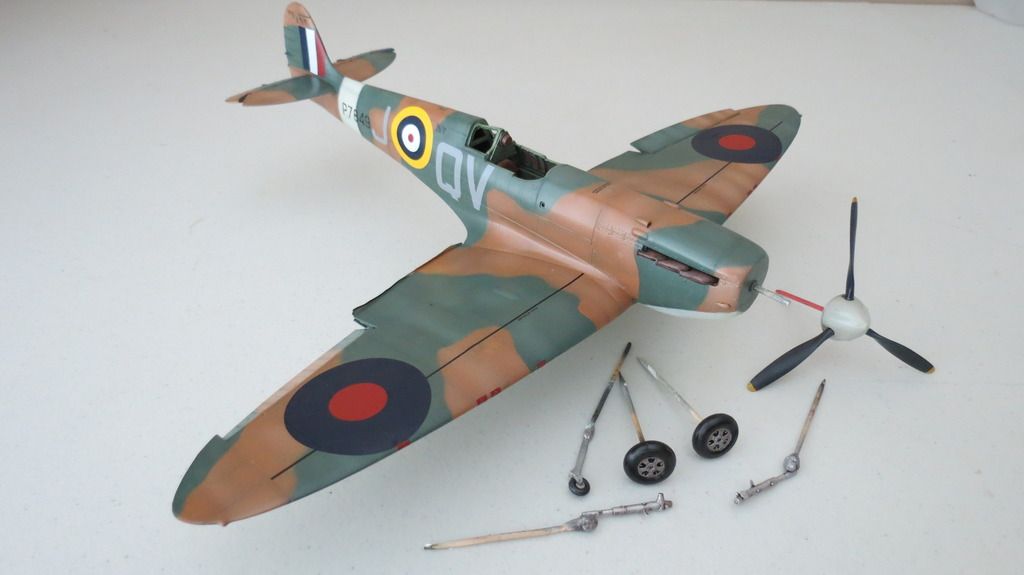
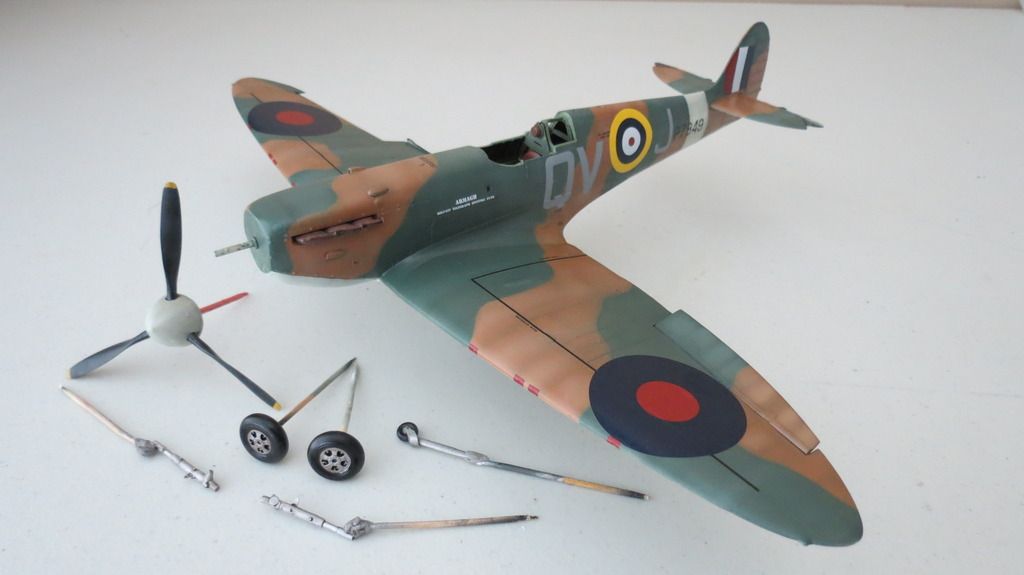
When the decals were completed, I decided that this was as far as I wanted to go with this update, and so, I laid everything out on my table, checked over my progress and took a few photos to show how she was looking so far:


IMG_2753_zps0qmltlar.jpg


IMG_2754_zpszpvje1wn.jpg


IMG_2757_zpsohkfazrc.jpg


IMG_2755_zpson3tcuev.jpg


IMG_2756_zpshu6x7t3e.jpg


After completing the decals, I suddenly realized, when thinking about the next stage- weathering, that I had applied a clear coat over the paint and moved on with the decaling before making the most of the "Hairspray Chipping Technique" and applying ater to the freshly painted surfaces to activate the hairspray beneath, so that the paint could easily be chipped away with a tooth-pick!! SUPER BRAIN-FART moment!! Oh well, maybe I can scratch through the clear coats to expose the silver paint now? If not, I'll just have to apply aluminum paint with a fine brush and the previously applied "hairspray technique" applications were wasted effort.


Well, that's it for this update! From hereon, I will seal the decals in with a clear coat and then begin the weathering and "Final assembly" stage which will include masking and painting the canopy sections, fitting the wheels, the propeller, the pitot tube, the rudder actuator, counterbalance weights, the aerial and antenna cables.

Until my next update, if you would like to watch my "Build Update #3" video on YouTube, here is the link for that:


https://youtu.be/KIFePoj0KTQ


Thanks in advance for following this build thread, watching my video and leaving comments, much appreciated!


Until next time, happy modeling and have fun!


Cheers    
Martin


  • Member since
    February 2014
  • From: Michigan
Posted by silentbob33 on Tuesday, September 1, 2015 10:52 AM

Great work Martin!  Your preshading shows through in just the right amount.  Bummer about forgetting to chip the paint before you got as far along as you did.  But as you pointed out, there's a fix for that.  I can't wait to see the next update.

On my bench: Academy 1/35 UH-60L Black Hawk

  • Member since
    June 2014
Posted by BrandonK on Monday, September 7, 2015 11:41 AM

So nicely done. Super work there. 


When I saw that warpped tail I instantly thought of doing a Dio of a downed Spitfire with tail damage. But, you most likely already tossed the bad part. Anyway, it's what came to my mind. Something like this with tail damage also.

BK

On the bench:

A lot !! And I mean A LOT!!

2024 Kits on deck / in process / completed   

                         14 / 5 / 2  

                              Tongue Tied

  • Member since
    April 2015
  • From: New Hampshire, USA
Posted by UKguyInUSA on Thursday, September 10, 2015 2:14 PM

bvallot

I was going to say how it's shaping up pretty well, but after seeing that mishap with the vertical stabilizer....yeeesh!  I looked back up above and saw how it was in the your inventory of the build and it was as it needs to be from the beginning...so it had to have happened some how after it came out of the box.  Tough break.  =[  Without another source of heat via friction from a dremel/sander or heat gun of sorts, the only other explanation might be the sun.  I mean hell!  You need some kind of source of heat to do that, and it had to have been localized as the rest of the fuselage is not deformed.

Stay on top of it Martin.  Looking to see you get back on your feet with this one.  =]


Hey BV,


Sorry for my very late repsonse, life has gotten in the way of things, but anyway, yes, it was obviously lcalised heat, and because it was 93`F outside, no heaters on in the house, and, I don't drink hot tea or coffee during the day, just the Tea I have with my breakfast, so, not hot cups seated on the tail. But that said, I never model with a hot drink next to me....always bottled water. No other heat sources, such as soldering irons or a lamp etc, just the heat coming through the large window that my modeling table is situated beneath!

Never mind, I just completed her yesterday and I'm on here to post my "Build Update #4" report.


Cheers and thanks for taking a look!

Martin :)

  • Member since
    April 2015
  • From: New Hampshire, USA
Posted by UKguyInUSA on Thursday, September 10, 2015 2:18 PM

plasticjunkie

The damage to the plastic possibly looks like something very hot sat on it like a cup of coffee for example. Sometimes we do things without realizing it. At least its not an OOP kit and your replacement parts will eventually arrive. I have dealt with both ROG  and Revell USA and both are excellent. The parts from Germany do take a while to arrive.

You did the right thing by not shopping anymore at that LHS. The least they could have done to accommodate a customer was to take the kit back and give you a replacement. All they had to do was to return it to the supplier for a credit or replacement but they are too lazy to do that.

Great job so far on the Spit.


Thanks for taking a look at my build thread and glad you like her so far.


Also, sorry for my very late reply, life has gotten in the way for while!


Anyway, in answer to your suggestions; no heat sources near to my modeling table except the sun shining through the window. I only drink bottled water during the day, except for a cup of tea with breakfast before I do anything else.


Yes, I have stopped using the LHS after their poor customer service and order all my stuff from Hobbylinc.com or Scalehobbyist.com, it's cheaper anyway!

I'm back on here now to upload by "Build Update #4" report!


Cheers,

Martin :)

  • Member since
    April 2015
  • From: New Hampshire, USA
Posted by UKguyInUSA on Thursday, September 10, 2015 2:23 PM

patrick206

Martin - My only hobby shop in town is 4th generation owners, I was once a bit scolded for not simply returning a kit with defective parts, rather just making it right myself. They said "just bring it back," I said if I can set it right I'd rather not trouble the shop. Their response floored me, the owner said if the suppliers and manufacturers aren't made to deal with their screw ups rather than the customers doing it, they will never be more careful with what they deliver to the folks that ultimately purchase their goods.

So, in order to hold them accountable defective kits should be returned to the shop, they in turn should feel obligated to replace the kit. Telling a loyal customer "sorry, 30 days," is inexcusable and an insult. Did the kit develope the defects after the thirty days expired???? NOPE, the kit not only left their shop with the defects, the kit left the manufacturer with faulty bits. Hobby shops such as that don't deserve any sort of continued customer loyalty.

Still, very nice work that you so far have accomplished, once it's finished you'll have a super Spit.

Patrick  


Hey Patrick,


Firstly, sorry for my very late response, life got in the way a little, and secondly, yes, I totally agree, I've stopped using my only LHS since this show of poor customer service and I now use a couple of on-line distributors that actaully works out cheaper for me.

And, they wonder why they go out of business?!!

Thanks for your compliment regarding my build, I'm back on here now to upload ny "Build Update #4" report!


Cheers,

Martin :)

  • Member since
    April 2015
  • From: New Hampshire, USA
Posted by UKguyInUSA on Thursday, September 10, 2015 2:26 PM

BrandonD

Oh, man! I just saw the rear stabilizer damage. What a tough break. Hopefully the boat gets a favorable current, a tailwind and a captain eager to visit his lady in the U.S. who pushes it here as quickly as possible.

-BD-


Hey Brandon,

Sorry for my late reply, life got in the way a little.


Anyway, I didn't wait for the delivery of parts from Revell GmbH, which still haven't arrived, and I ordered another kit from off-line. It came a couple of weeks ago and I've been busy putting her together and painting her as you can see in my last "Build Update #3" report.

When those parts arrive, I'll just put them into the new kit that I took parts from and have another new Spitfire kit!


Cheers,

Martin :)

  • Member since
    April 2015
  • From: New Hampshire, USA
Posted by UKguyInUSA on Thursday, September 10, 2015 2:31 PM

Revell 1/32 Supermarine Spitfire Mk.IIa "Build Update #4" (9.10.15)


Well, 9 days have passed since my last update, but, it was the Labor Day weekend here in the States and he missus took Thursday and Friday off to take a 5 day break from the office. Her sister from Florida was with us, too. Therefore, nothing done until Tuesday and yesterday (Wednesday) of this week. That said, I completed her, and this update shows what I did since "Build Update #3" to reach completion.


First, I sealed the previously applied decals with a gloss clear coat and in preparation for adding my weathering:


IMG_2761_zpswdeypqnv.jpg


IMG_2762_zpstsgbmkma.jpg


I started my weathering by adding chipping to the model. I had originally intended to use the "Hairspray" technique, but after applying silver paint, sealing it in with a clear coat, then applying hairspray before painting the plane, I sealed the paint with a clear coat ready for decaling, complete brain fart moment! Ha well, there's always more ways to skin a cat, and so, I used files to remove the camo paint to expose the silver beneath:


IMG_2763_zps9eihccal.jpg


IMG_2765_zpsule8tzqc.jpg


IMG_2766_zps7wt6ug60.jpg


IMG_2767_zpsnmtynjvq.jpg


After the chipping was done, I then mixed a green/olive drab color oil filter and applied that all over the upper side camo colors. I allowed it to dry for 30 minutes, then removed the excess with kitchen towel, leaving enough on to provide the tonal variation I was looking for. I allowed it to dry for 3 hrs then sealed it with a gloss clear coat:


IMG_2768_zpslrnr8emi.jpg


IMG_2771_zpsb5siuzrp.jpg


IMG_2773_zpsmecqdtye.jpg


IMG_2775_zpsaraxqyw1.jpg


I let the clear coat dry overnight and then I mixed a dark dirt wash with black oil paint and odorless spirit, adding a smidgeon of white to make it look dark brown/black. I applied it liberally all over the plane, allowed it to dry for 30 minutes, then removed the excess with kitchen towel, leaving on an amount that was pleasing to my eyes:


IMG_2778_zpsrsalbcrv.jpg


IMG_2779_zps65drbs0e.jpg


IMG_2780_zpsqcjawkjq.jpg


IMG_2781_zpsiehzrwjc.jpg


IMG_2785_zpstqiqkass.jpg


IMG_2786_zpsotk7ao1b.jpg


IMG_2787_zpsmubxpsgv.jpg


IMG_2788_zpsq4uhiu6z.jpg


IMG_2790_zps1dicprrc.jpg


I then mixed a reddish/brown oil wash and applied some streaks and stains here and there, allowed it to dry for a few hours then airbrushed my final matt/flat clear coat onto everything:


IMG_2797_zpslcg16tnt.jpg


IMG_2801_zps4yqisir6.jpg


IMG_2803_zpsvztp8ijd.jpg


IMG_2810_zpsl4warqwb.jpg


While the flat clear coat was drying on everything, I moved onto the canopy sections. First I masked all the separate parts, then airbrushed interior green onto the exposed frames and let it dry for 1 hr. I then airbrushed the exterior Dark Green camo color on top, allowed that to dry for 1 hr, then sealed it all with a matt/flat clear coat. I then carefully removed the masking tape, but some paint peeled in spots, and so, I touched up those areas. I then glued the front bullet proof shield to the windshield:


IMG_2811_zpstggac7bi.jpg


IMG_2813_zpsp0ruqdge.jpg


IMG_2815_zpsdflee9ci.jpg


IMG_2816_zpsonunbx08.jpg


IMG_2818_zpsk9oeyaqu.jpg


IMG_2819_zpssdjuawhp.jpg


When the matt/flat clear coat had dried on the plane, I then applied the exhaust stains and the stains around the 8 .303" browning machine guns- 4 in each wing leading edge. I used Tamiya XF-1 Black mixed with some Tamiya XF-52 Dark Earth thinned down with X-20A thinners at a 20/80 ratio.  then thinned down some Tamiya XF-55 Deck Tan with X-20A thinners at a 20/80 ratio and airbrushed some on top of the previously airbrushed darker exhaust stains:


IMG_2821_zpsvfievblc.jpg


IMG_2822_zpsptijn7bw.jpg


IMG_2823_zpsrfkfhgag.jpg


IMG_2824_zps3wru6tvj.jpg


When that was completed, it was now time to gather up all the lose parts in readiness for the final assembly!


IMG_2820_zpsln4phvwk.jpg


I started the final assembly with the rudder actuator, followed by the gun-sight:


IMG_2825_zpscqqc28gd.jpg


IMG_2826_zps0z5bdoso.jpg


IMG_2827_zpsxyrxqulc.jpg


I then fitted the Pilot's door in the open position followed by gluing the windshield and rear canopy section into place. There were some small gaps around the front windshield which I filled in:


IMG_2829_zpsmtn8yrxg.jpg


IMG_2830_zpscfnmvkoh.jpg


IMG_2832_zpsyk7jnmcy.jpg


IMG_2834_zpsmxwcds6s.jpg


Next, I fitted the propeller which spins, then followed that by fitting the rear wheel:


IMG_2836_zpslcmeuptv.jpg


IMG_2840_zpsifsuszig.jpg


I then assembled the undercarriage parts together and glued them into their corresponding locations beneath the plane:


IMG_2837_zps8vvnnfdj.jpg


IMG_2849_zpsmsrjanji.jpg


Next, I fitted the flaps, but first, I had to slice the end section on both flaps to help separate it for the change in angle on the underside of the aircraft where they fitted to:


IMG_2841_zpsgvvybmei.jpg


IMG_2848_zpswpn5hdep.jpg


Next, I fitted the aerial, followed by the upper dorsal light lens and then the tail mounted antenna tensioner. This was painted to match the camo colors around it:


IMG_2843_zpsjhjxialg.jpg


IMG_2844_zpslaascfqk.jpg


IMG_2845_zps45jvp4c2.jpg


IMG_2846_zpsqlnyjeor.jpg


I then fitted the pitot tube, painted it, then fitted the Pilot's rear view mirror:


IMG_2847_zpsm4qydhqg.jpg


IMG_2851_zpslxhehrac.jpg


IMG_2852_zpsfy65tgha.jpg


IMG_2853_zpslpksxpkg.jpg


The last part of the assembly was to fit the antenna cables using 1.010" black EZ-Line:


IMG_2979_zpspqfeaqbv.jpg


She was now complete and ready for a "Final Reveal" photo shoot, but, until that time comes, I hope you enjoyed this update, and, if you'd like to watch my YouTube "Build Update #4" video, here is the link to that:


https://youtu.be/9hji8HogpgA


Until my "Final Reveal", thanks for watching and commenting, much appreciated!


Happy modeling and have fun!


Cheers!    
Martin


  • Member since
    December 2002
Posted by 7474 on Thursday, September 10, 2015 6:58 PM

Looks great. Thanks for the build report. 

  • Member since
    September 2014
Posted by rooster513 on Friday, September 11, 2015 7:07 AM

Another beauty my friend! Can't wait to see the final pics!

-Andy

JOIN OUR COMMUNITY!

Our community is FREE to join. To participate you must either login or register for an account.

SEARCH FORUMS
FREE NEWSLETTER
By signing up you may also receive reader surveys and occasional special offers. We do not sell, rent or trade our email lists. View our Privacy Policy.