SEARCH FINESCALE.COM

Enter keywords or a search phrase below:

Revell Pro-Modeler 1/32 Junkers Ju 88A-1 Bomber - "FINAL REVEAL!!" (3.18.16)

7336 views
94 replies
1 rating 2 rating 3 rating 4 rating 5 rating
  • Member since
    August 2009
  • From: Borlando Fla home of the rat
Posted by TREYZX10R on Friday, March 25, 2016 3:02 PM

Excellent looking Ju-88 the attention to detail is stunning! Very nicely done Sir

  • Member since
    April 2015
  • From: New Hampshire, USA
Posted by UKguyInUSA on Thursday, March 24, 2016 9:47 PM

1943Mike

Simply outrageously gorgeous!!

This will be my "Bible" for building my 1/48 Pro Modeler Ju 88A-4.

Thanks for the super WIP - an inspirational tutorial to be sure.

Mike


   Thanks for your very kind compliment, Mike, greatly appreciated!  SmileYes 


Cheers    BeerBeer

Martin 

  • Member since
    April 2015
  • From: New Hampshire, USA
Posted by UKguyInUSA on Thursday, March 24, 2016 9:44 PM

Toshi

That is one of the most fantastic builds here on FSM forum.

Toshi


  Thanks for your extremely kind compliment, Toshi, greatly appreciated!  SmileYes


Cheers  BeerBeer   

Martin  

  • Member since
    April 2015
  • From: New Hampshire, USA
Posted by UKguyInUSA on Thursday, March 24, 2016 9:43 PM

Hunter

Martin - 

WOW!! HOLY WOW!! What an amazing build and such awesome depth and detail in your paint job. I have really enjoyed watching this build and learned a lot at the same time. Outstanding build and thank you for sharing it with all of us. 


  Hello Hunter, firstly, you're welcome for me sharing it with you, I hope it provides some inspiration to some modelers who have thought about building this kit.

Secondly, thanks for your very kind compliment, much appreciated!  SmileYes


 Cheers   BeerBeer

Martin

  • Member since
    February 2012
  • From: Olmsted Township, Ohio
Posted by lawdog114 on Wednesday, March 23, 2016 1:29 AM
What they said. Outstanding. You should be proud. thanks for the ride....

 "Can you fly this plane and land it?...Surely you can't be serious....I am serious, and don't call me Shirley"


  • Member since
    January 2015
  • From: Katy, TX
Posted by Aggieman on Monday, March 21, 2016 11:32 AM

Your 88 turned out beautifully.  This is truly a work of modeling art.

I have this same kit in the stash, so thank you for all the detail you give regarding its construction.

  • Member since
    March 2015
  • From: Streetsboro, Ohio
Posted by Toshi on Sunday, March 20, 2016 4:12 AM

This is so in depth I almost can't believe it.  Outstanding job, just amazing.

Toshi

On The Bench: Revell 1/48 B-25 Mitchell


Married to the most caring, loving, understanding, and beautiful wife in the world.  Mrs. Toshi


  • Member since
    January 2015
  • From: Indiana USA
Posted by BlackTulip109 on Saturday, March 19, 2016 11:32 AM

Dear Martin


WHAT A SUPERB BUILD!!!!!!!!!!!!!!!!!!

You truly knocked this build "out of the park" as they say in Baseball!!

It is truly a privelge to be a witness to a build like that.

This Forum has so many generous builders with great skills, who have NO problem sharing their skills and you are without a doubt one of them. I believe ALL of us are so grateful as it inspires the rest of us to "carry on" in such a wonderful hobby.

That JU-88 is breathtaking to see and mega thank yous for sharing and for the enormous time and dedication to that build!!!

Thank you!!!!!!

  • Member since
    December 2002
  • From: Whidbey Island, Washington
Posted by chukw on Saturday, March 19, 2016 10:18 AM

That's a real beauty, Martin- cheers!

  • Member since
    January 2015
Posted by BrandonD on Saturday, March 19, 2016 2:29 AM

Wow!!

-BD-

  • Member since
    June 2014
Posted by BrandonK on Friday, March 18, 2016 11:18 PM

Ditto on all the above and I am in awe. Simply awesome work. AWESOME !!

BK

On the bench:

A lot !! And I mean A LOT!!

2024 Kits on deck / in process / completed   

                         14 / 5 / 2  

                              Tongue Tied

fox
  • Member since
    January 2007
  • From: Narvon, Pa.
Posted by fox on Friday, March 18, 2016 9:56 PM

Outstanding!! Bow Down Bow Down Bow Down 

Ditto on the build for the magazine!!

Jim  Captain

 Main WIP: 

   On the Bench: Artesania Latina  (aka) Artists in the Latrine 1/75 Bluenose II

I keep hitting "escape", but I'm still here.

  • Member since
    January 2016
  • From: A Galaxy Far, Far Away
Posted by Hunter on Friday, March 18, 2016 3:46 PM


IMG_5241_zpsp4glttnw.jpg


IMG_5420_zpsgcwwbr0o.jpg


IMG_5421_zpsviyhojs2.jpg


IMG_5511_zpsgakdkjv4.jpg


IMG_6287_zps8qhkqksu.jpg


IMG_6292_zps7pyvpyra.jpg


IMG_6293_zpssuxk0s4m.jpg


IMG_6298_zpsdifsskjo.jpg


IMG_6303_zpsjnlzdxnw.jpg


IMG_6320_zpsbqlp7tzy.jpg


IMG_6326_zpsx4sdpzxh.jpg


IMG_6327_zpsvjpckymx.jpg


IMG_5973_zpslasgqis8.jpg


IMG_6025_zps1pyudhs5.jpg


IMG_6247_zpsjye2rnpq.jpg


IMG_6251_zpsfh32mlcr.jpg


IMG_6297_zpscg6jvfre.jpg


IMG_6294_zpsekcijlab.jpg


IMG_6280_zpsem3clptj.jpg


IMG_6299_zpskj8eqwq5.jpg


IMG_6304_zpsyuvt56m0.jpg


IMG_5969_zpsw6ltchqj.jpg


IMG_5967_zps4bjigwxd.jpg


IMG_6288_zpsp00gvcjq.jpg


IMG_6324_zpsqiq40hhw.jpg


IMG_6322_zpsjakswaao.jpg


IMG_6319_zpsq2r8wsjl.jpg


IMG_6314_zpstf1wno2j.jpg


IMG_5924_zps1wnjaxef.jpg


IMG_6307_zpsnu6deuxi.jpg


IMG_6302_zpsemcnvmzc.jpg


IMG_6328_zpssuungggh.jpg


IMG_6329_zps2cyk6ijc.jpg

 Martin - 

Sir I cannot tell you how great it's been watching you build this immense kit, and how much I have learned from you. Such crazy decal detail. You sir have sit a very high bar for all of us. Aaron, if your looking in...here's a build for the magazine!!

Hunter 


  • Member since
    December 2010
  • From: Salem, Oregon
Posted by 1943Mike on Friday, March 18, 2016 2:19 PM

Simply outrageously gorgeous!!

This will be my "Bible" for building my 1/48 Pro Modeler Ju 88A-4.

Thanks for the super WIP - an inspirational tutorial to be sure.

Mike

Mike

"Le temps est un grand maître, mais malheureusement, il tue tous ses élèves."

Hector Berlioz

  • Member since
    March 2015
  • From: Streetsboro, Ohio
Posted by Toshi on Friday, March 18, 2016 2:13 PM

That is one of the most fantastic builds here on FSM forum.

Toshi

On The Bench: Revell 1/48 B-25 Mitchell


Married to the most caring, loving, understanding, and beautiful wife in the world.  Mrs. Toshi


  • Member since
    April 2015
  • From: New Hampshire, USA
Posted by UKguyInUSA on Friday, March 18, 2016 1:45 PM

Hello Chaps,

It's been a long haul build- 8 weeks in total, but that is because my wife and I are actively involved with contractors working on our new home that we will be moving to in mid-April....sorting out kitchen design, wood flooring, carpeting, tiles for kitchen and bathrooms, shower designs, paint colors for every room, new faucets for all sinks, choosing granite countertops and sinks for kitchen and bathrooms, new light fixtures and door handles etc etc....I hope this is the last time we have to move now, moving is a stressful and tiring event!


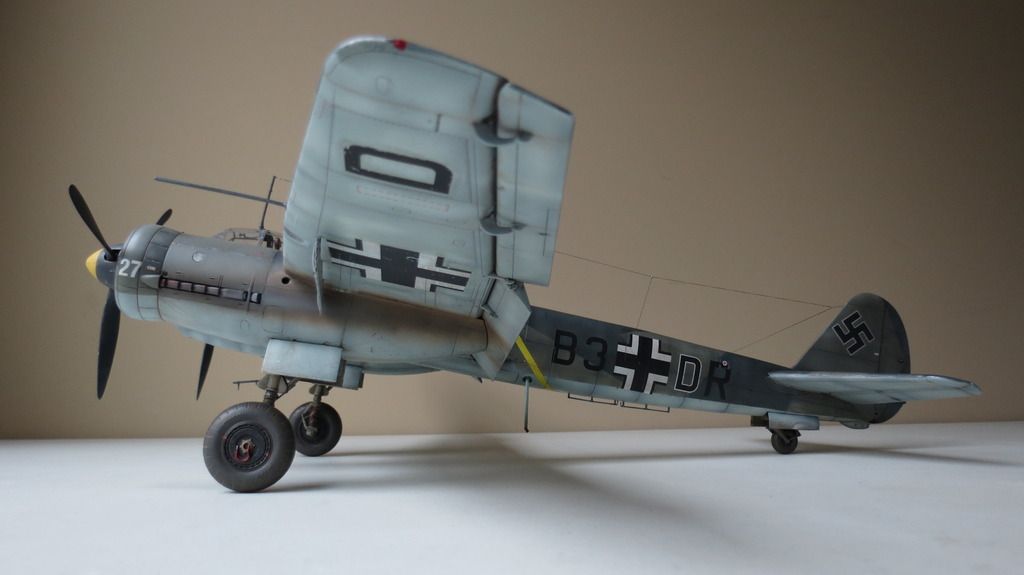
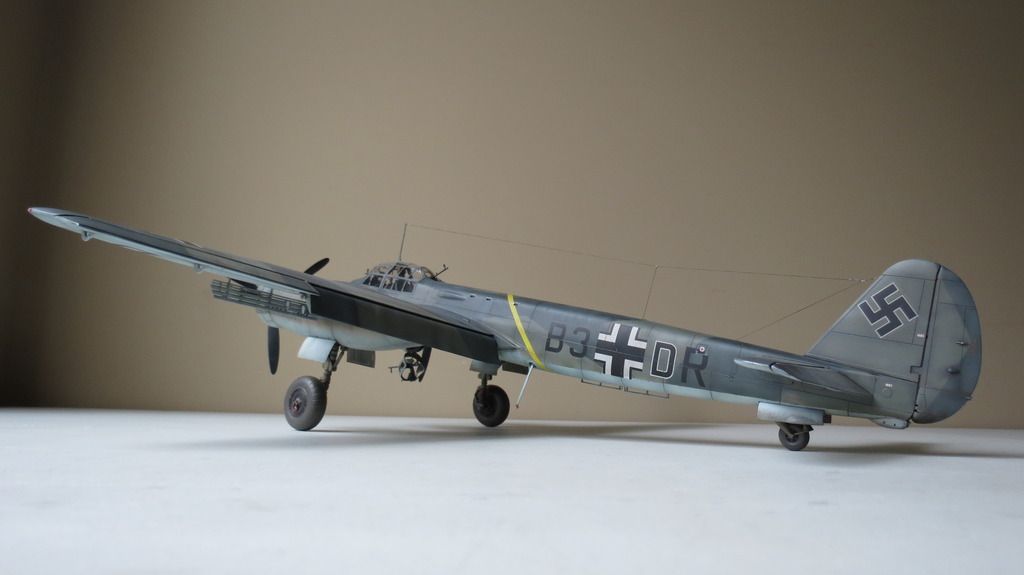
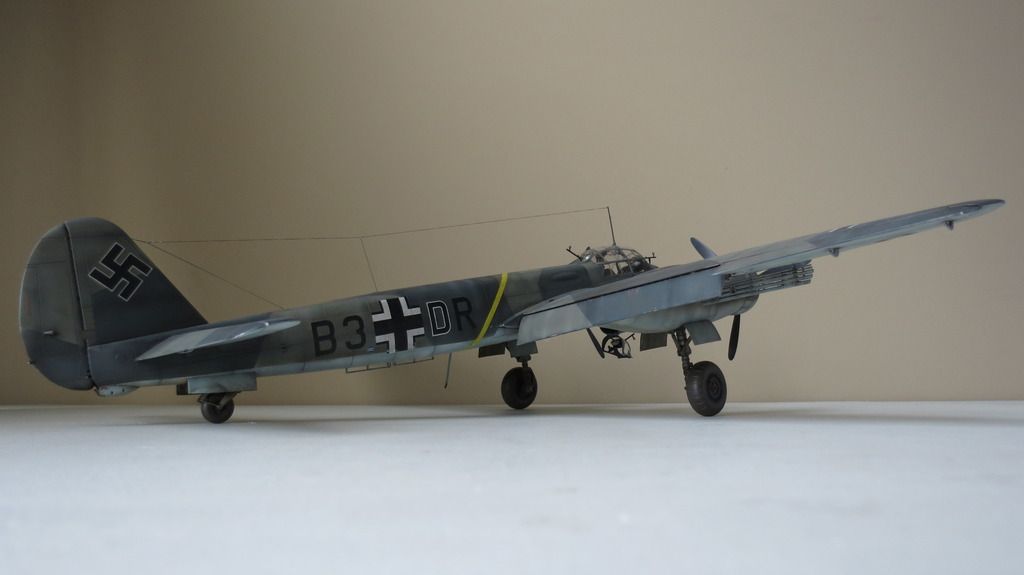
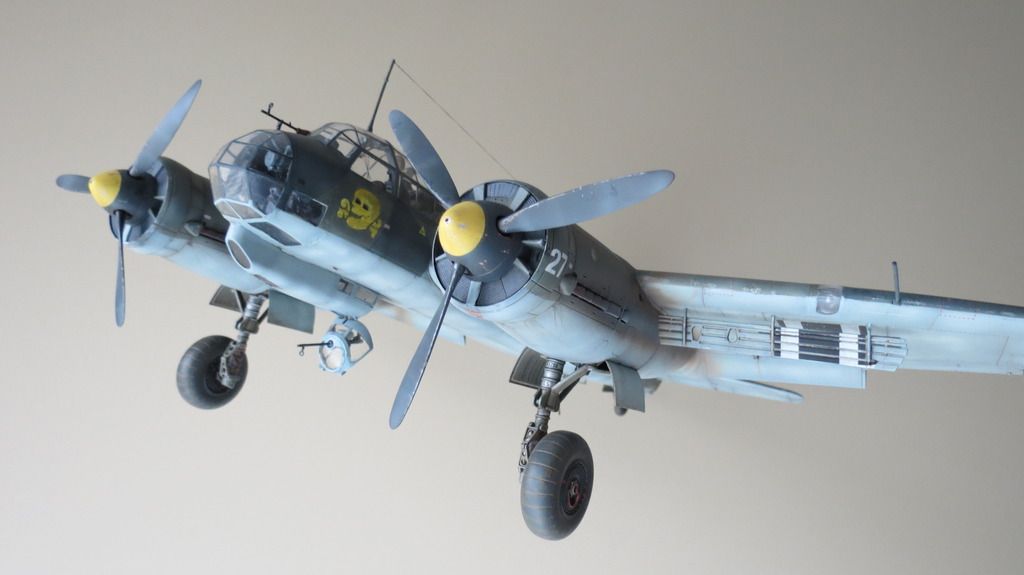
Anyway, enough of the waffle and lets get on with sharing photos of my completed build, which is built straight from the box, no after market additions, only using 1.010" fine black EZ-Line for the antenna cables. I hope you like....


IMG_5241_zpsp4glttnw.jpg


IMG_5420_zpsgcwwbr0o.jpg


IMG_5421_zpsviyhojs2.jpg


IMG_5511_zpsgakdkjv4.jpg


IMG_6287_zps8qhkqksu.jpg


IMG_6292_zps7pyvpyra.jpg


IMG_6293_zpssuxk0s4m.jpg


IMG_6298_zpsdifsskjo.jpg


IMG_6303_zpsjnlzdxnw.jpg


IMG_6320_zpsbqlp7tzy.jpg


IMG_6326_zpsx4sdpzxh.jpg


IMG_6327_zpsvjpckymx.jpg


IMG_5973_zpslasgqis8.jpg


IMG_6025_zps1pyudhs5.jpg


IMG_6247_zpsjye2rnpq.jpg


IMG_6251_zpsfh32mlcr.jpg


IMG_6297_zpscg6jvfre.jpg


IMG_6294_zpsekcijlab.jpg


IMG_6280_zpsem3clptj.jpg


IMG_6299_zpskj8eqwq5.jpg


IMG_6304_zpsyuvt56m0.jpg


IMG_5969_zpsw6ltchqj.jpg


IMG_5967_zps4bjigwxd.jpg


IMG_6288_zpsp00gvcjq.jpg


IMG_6324_zpsqiq40hhw.jpg


IMG_6322_zpsjakswaao.jpg


IMG_6319_zpsq2r8wsjl.jpg


IMG_6314_zpstf1wno2j.jpg


IMG_5924_zps1wnjaxef.jpg


IMG_6307_zpsnu6deuxi.jpg


IMG_6302_zpsemcnvmzc.jpg


IMG_6328_zpssuungggh.jpg


IMG_6329_zps2cyk6ijc.jpg


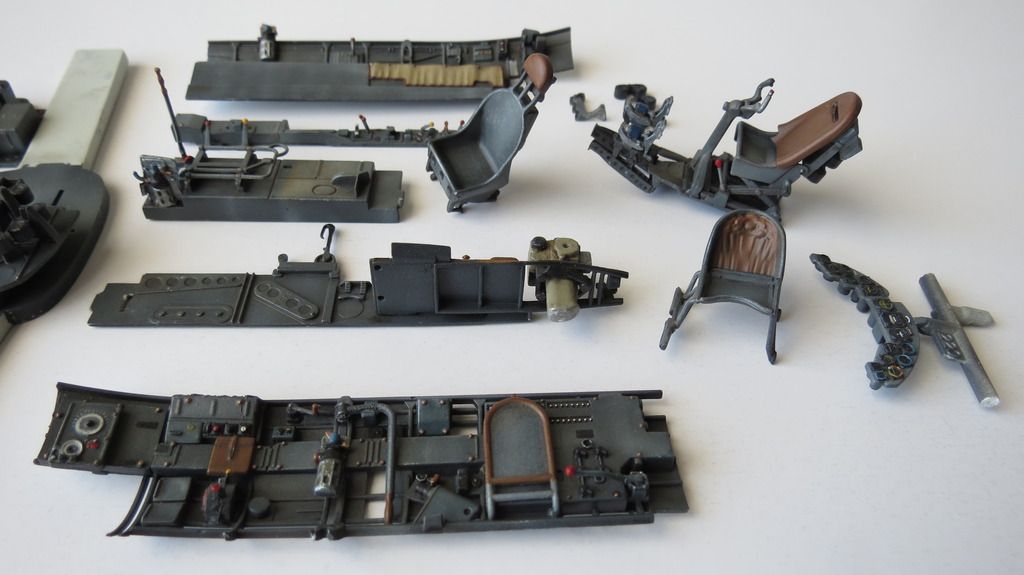
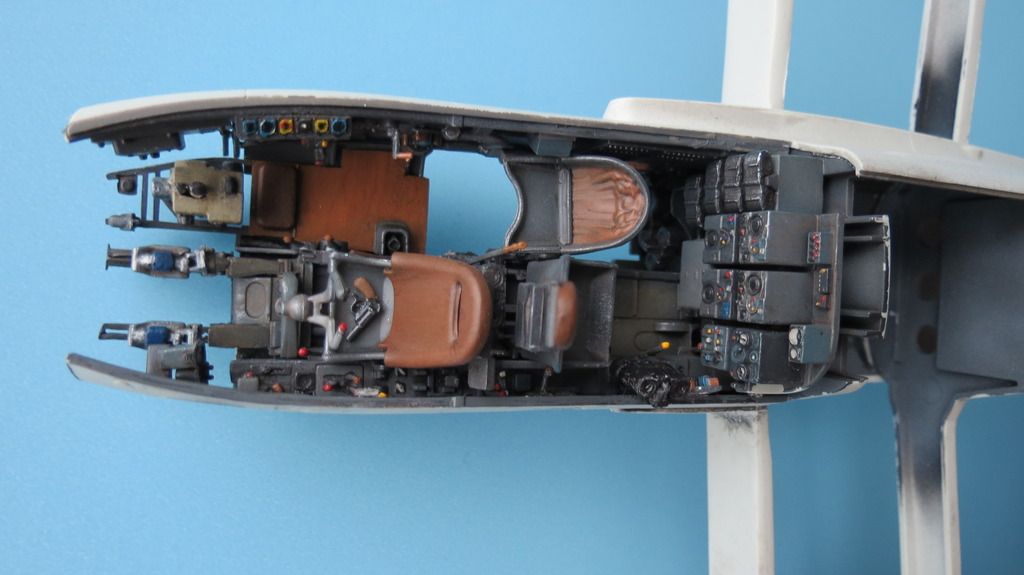
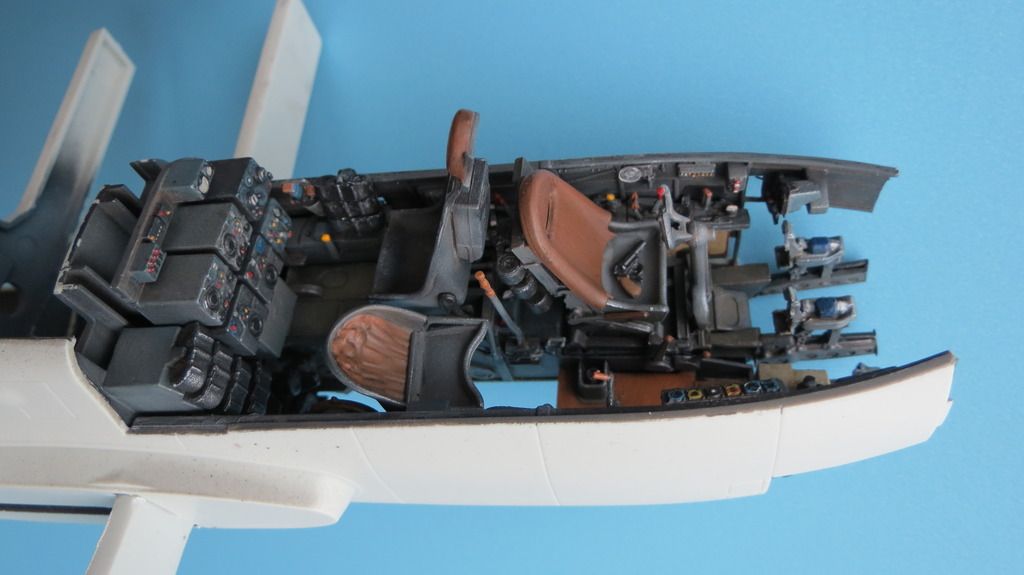
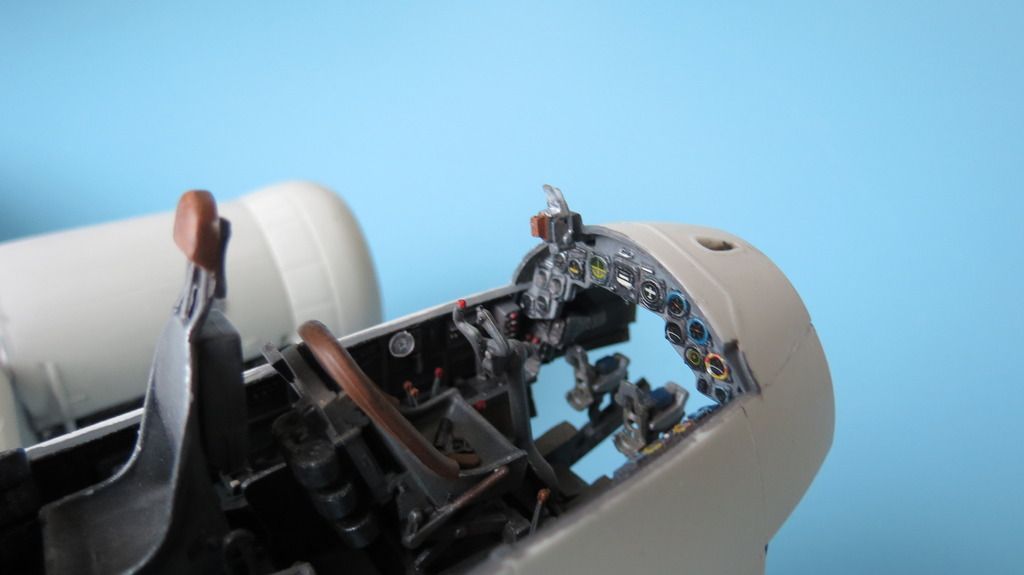
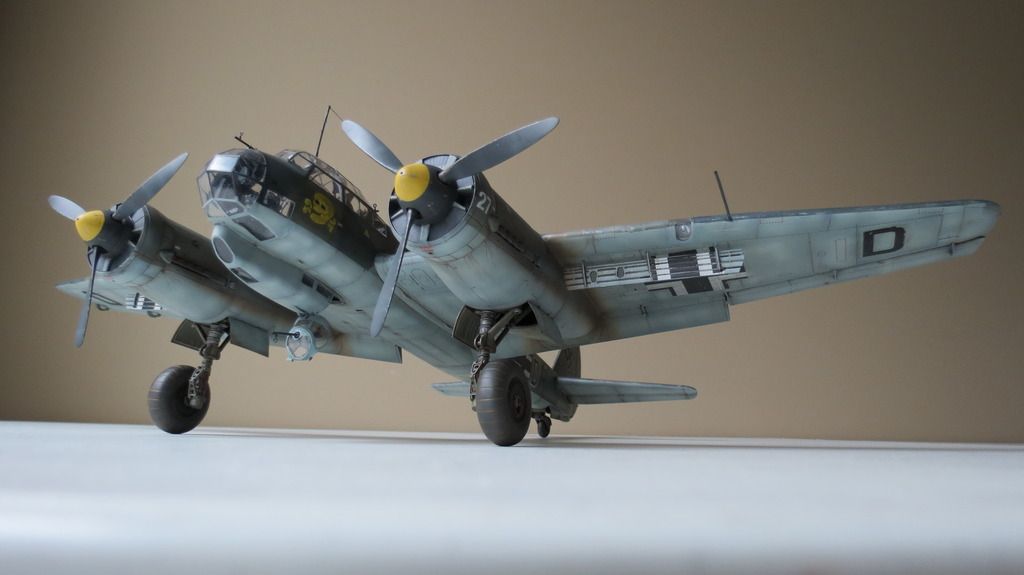
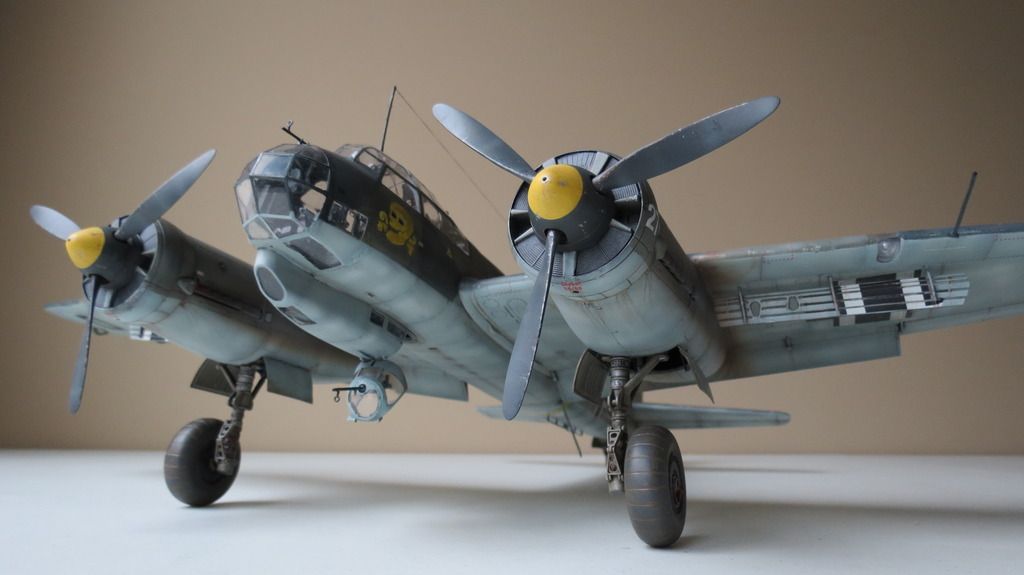
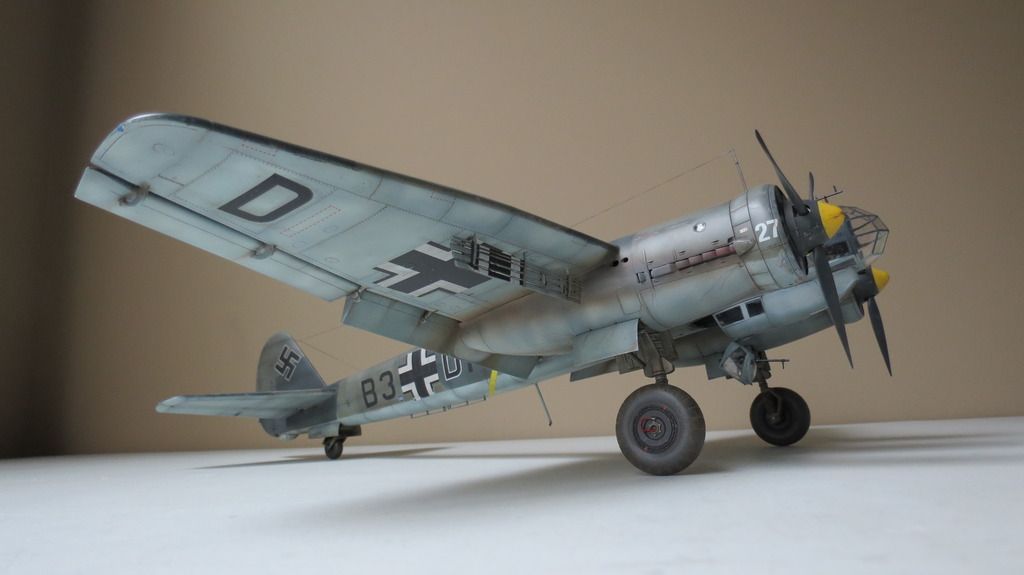
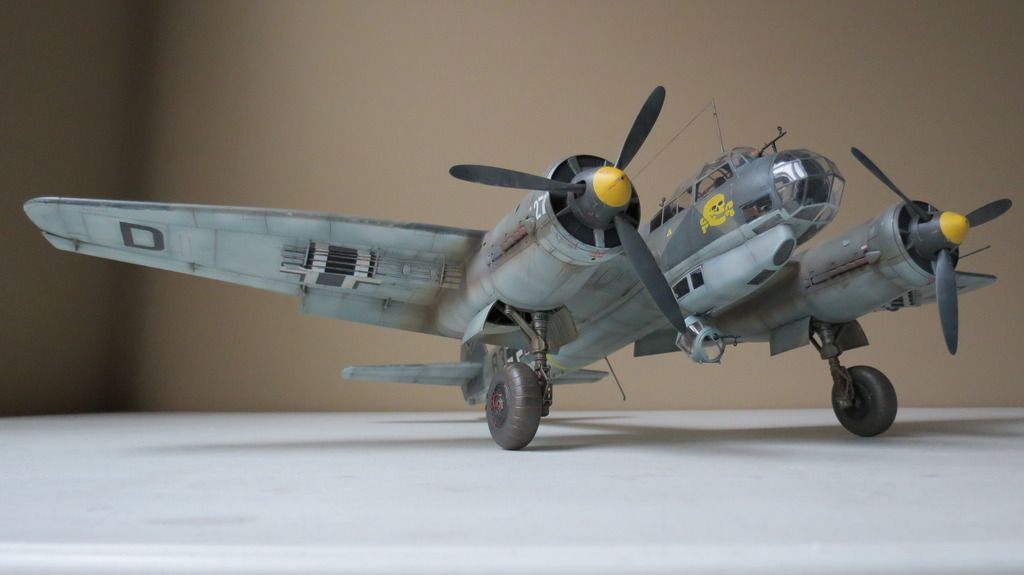
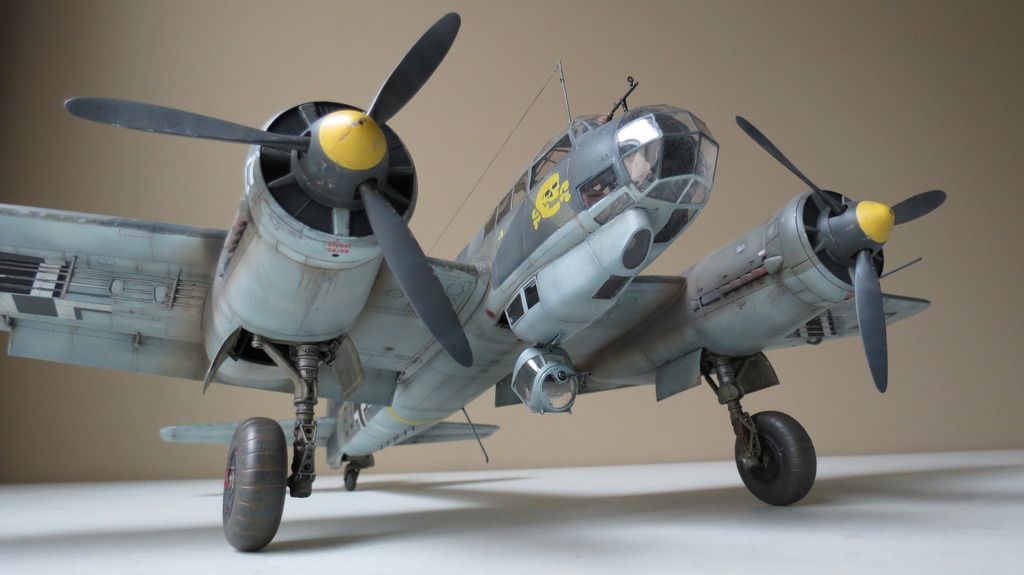
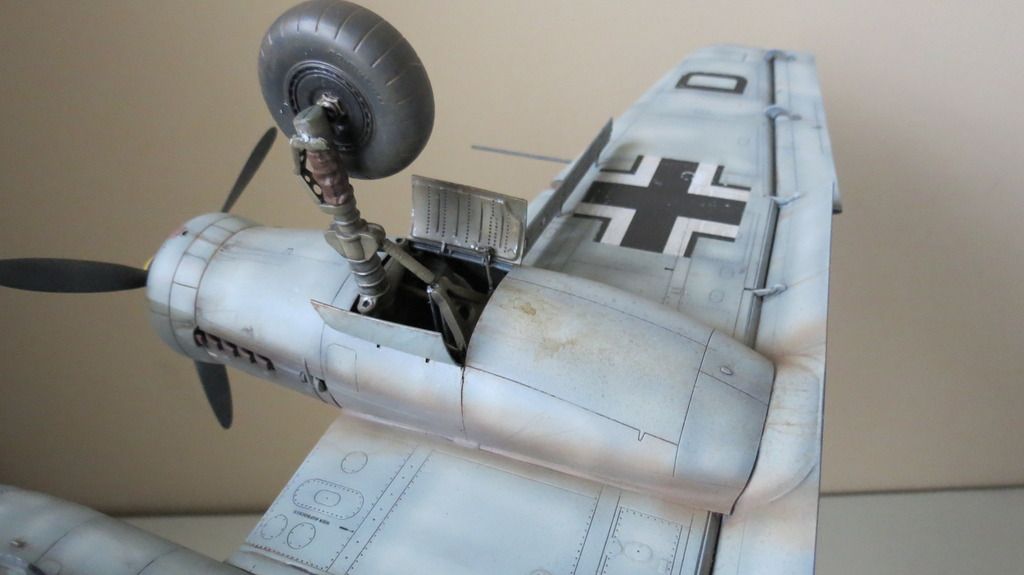
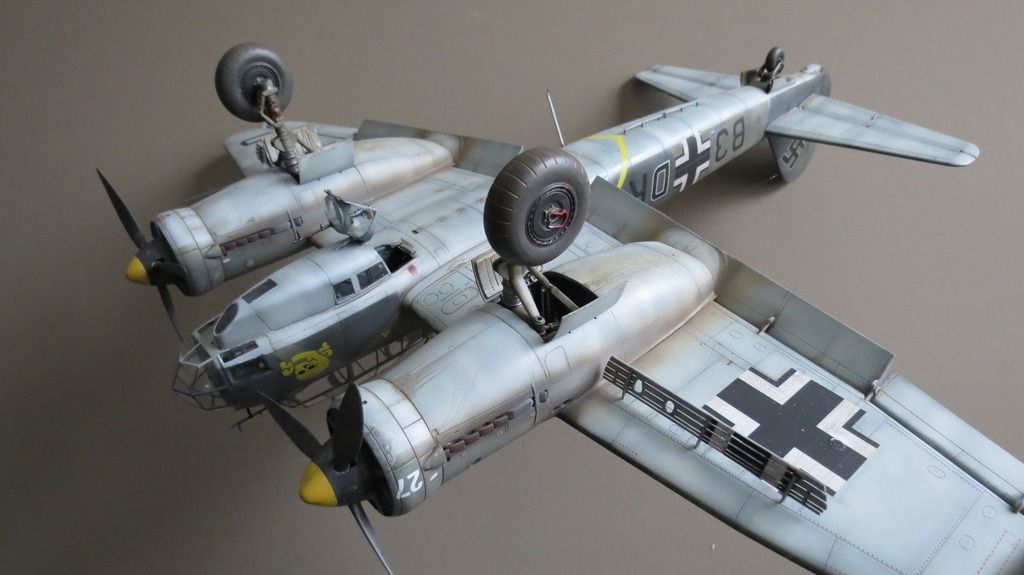
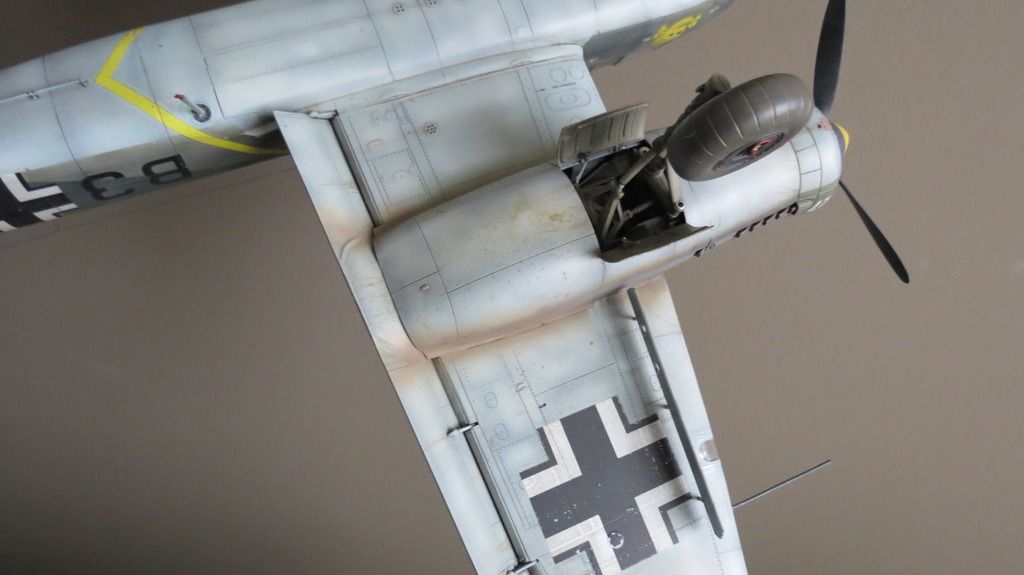
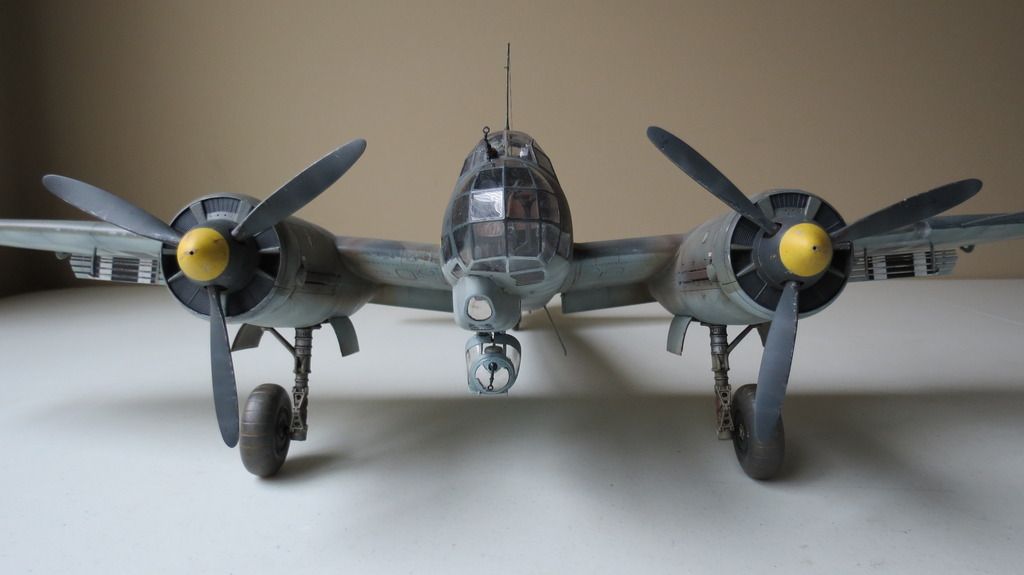
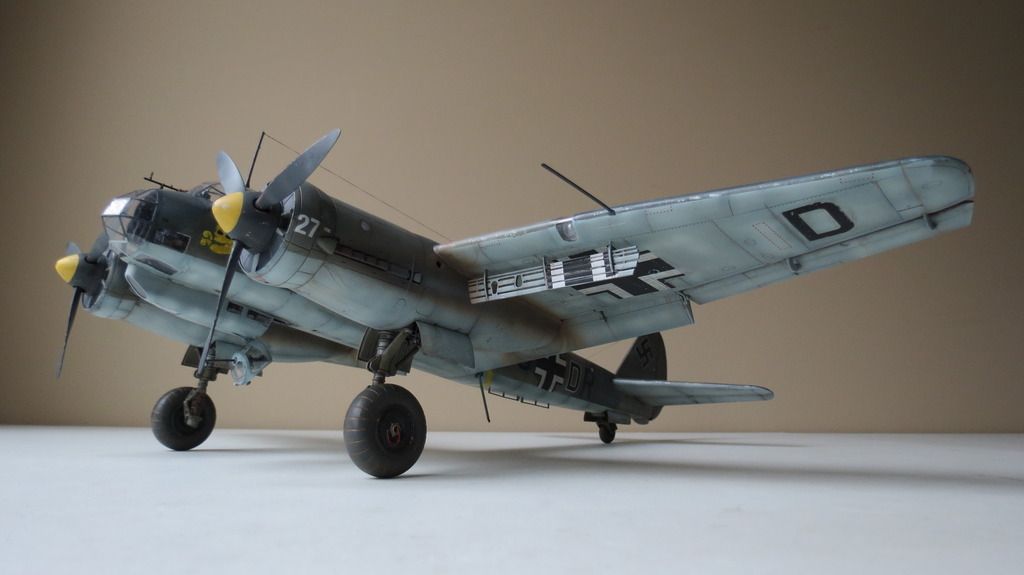
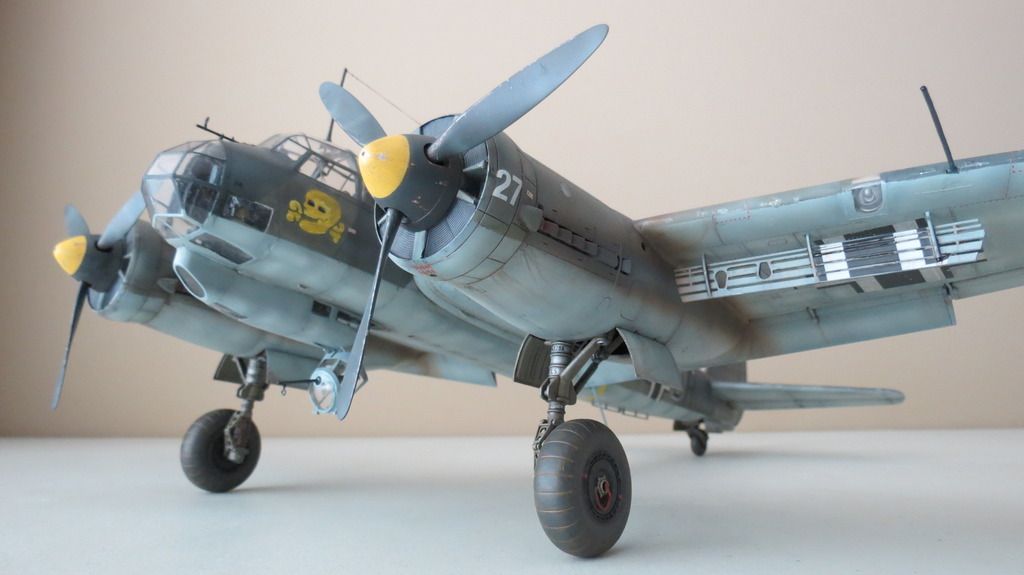
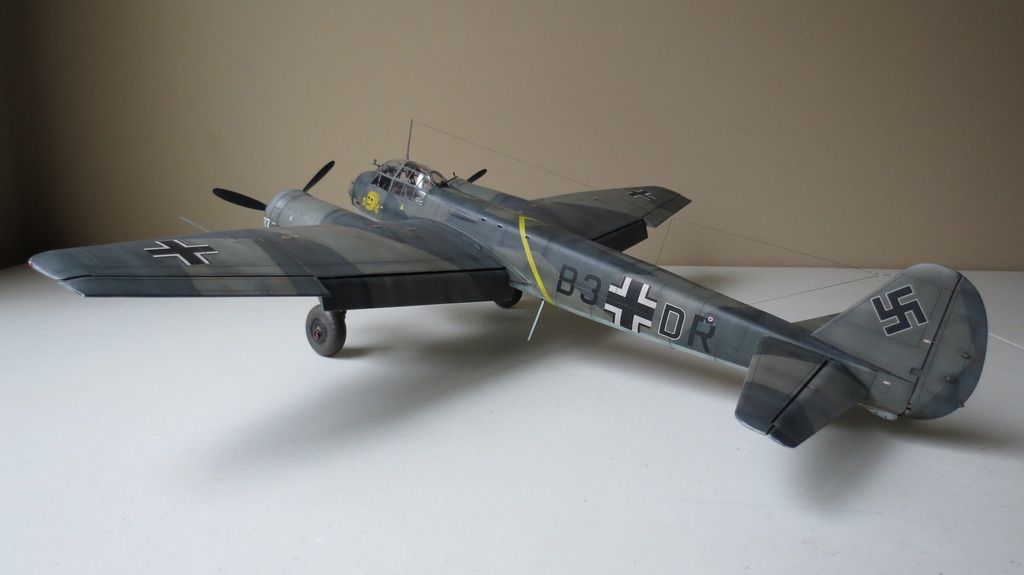
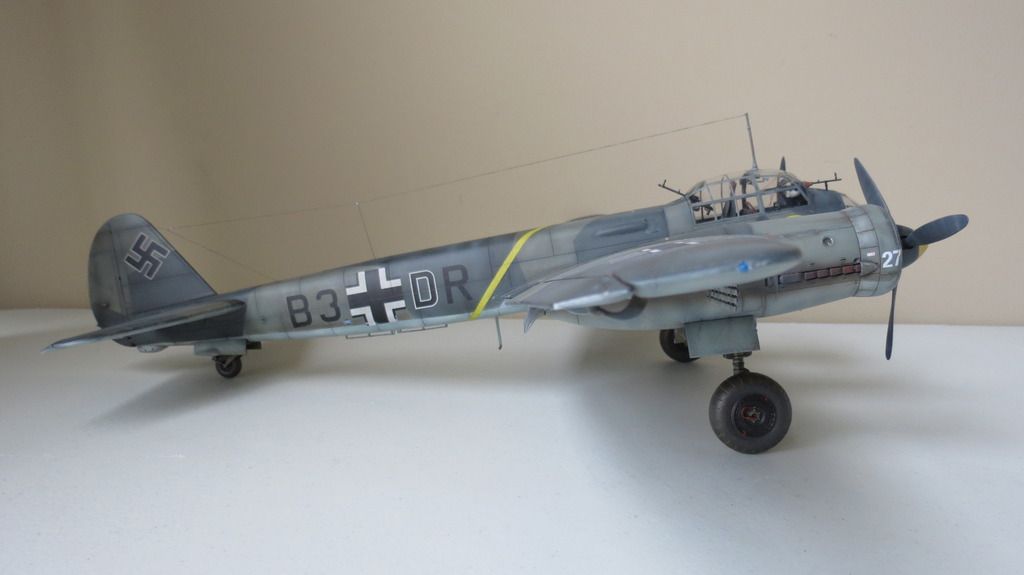
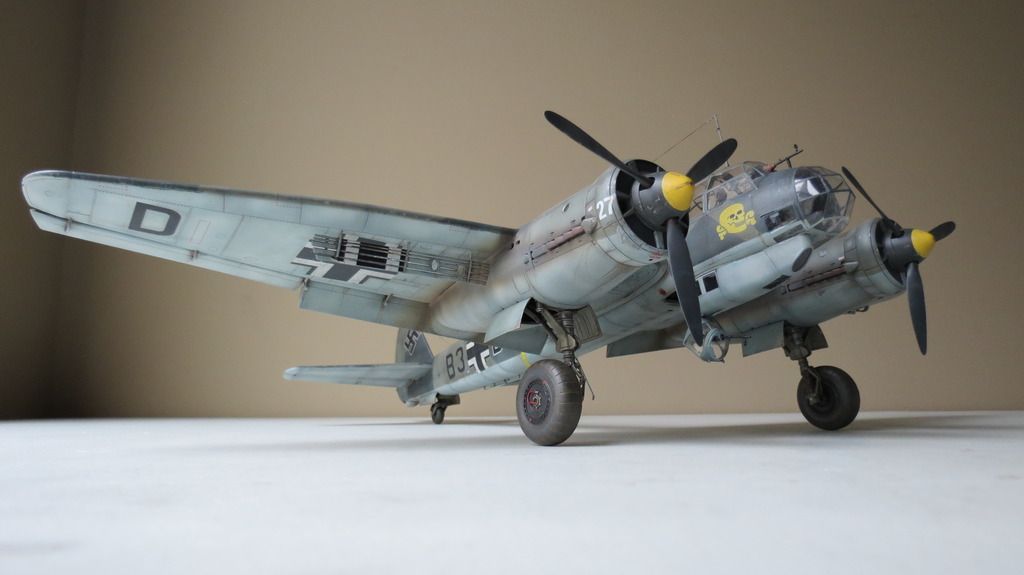
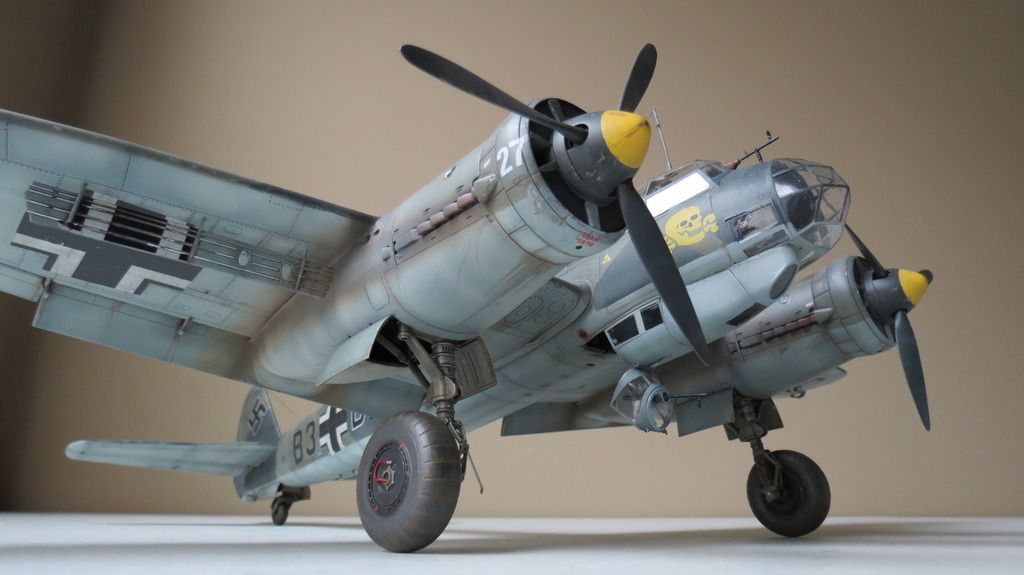
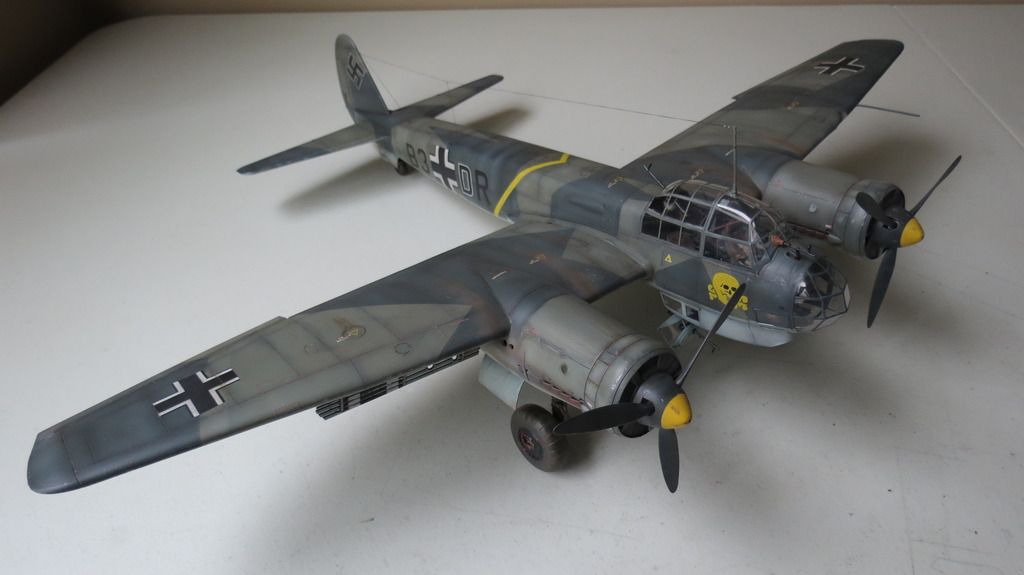
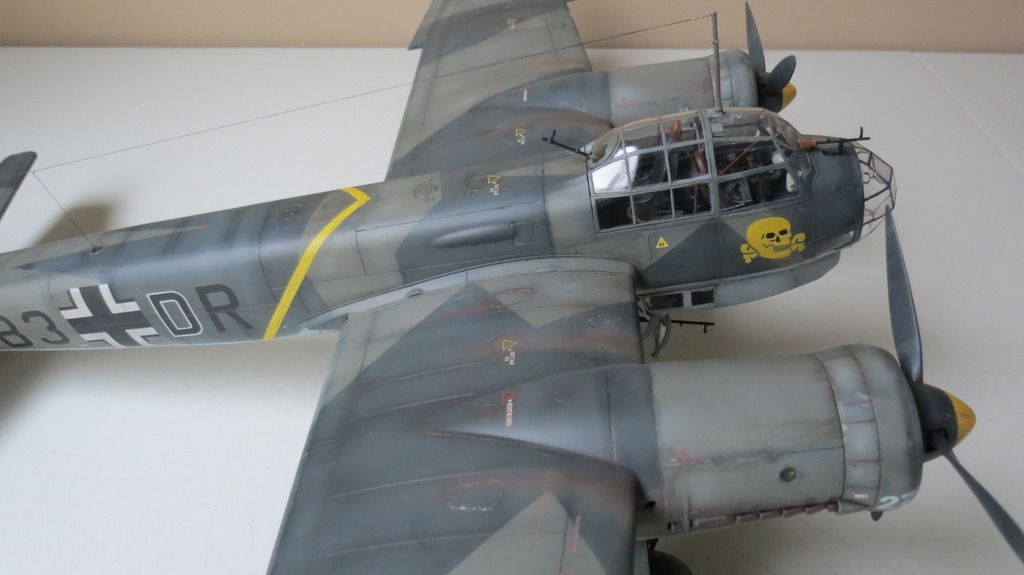
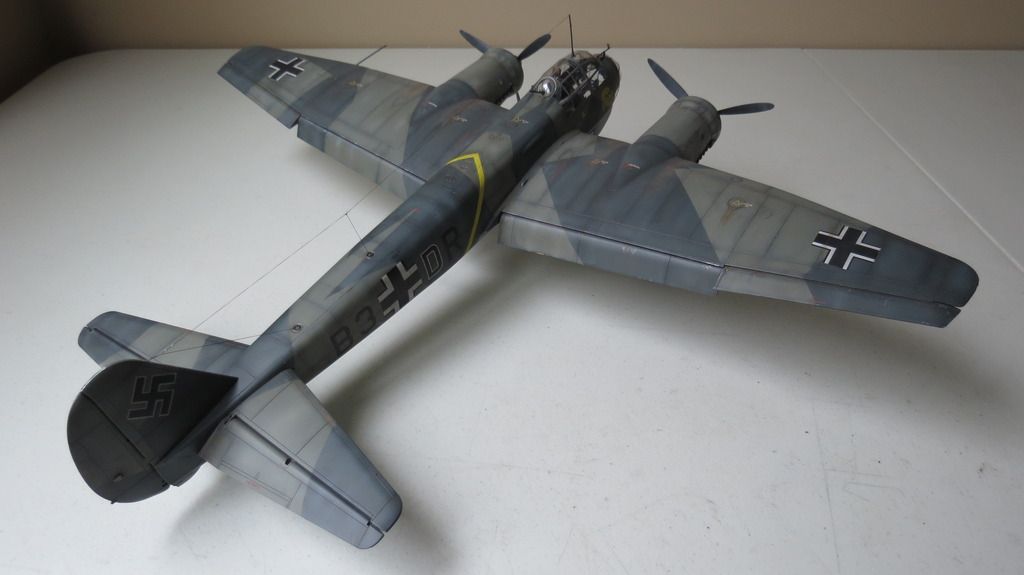
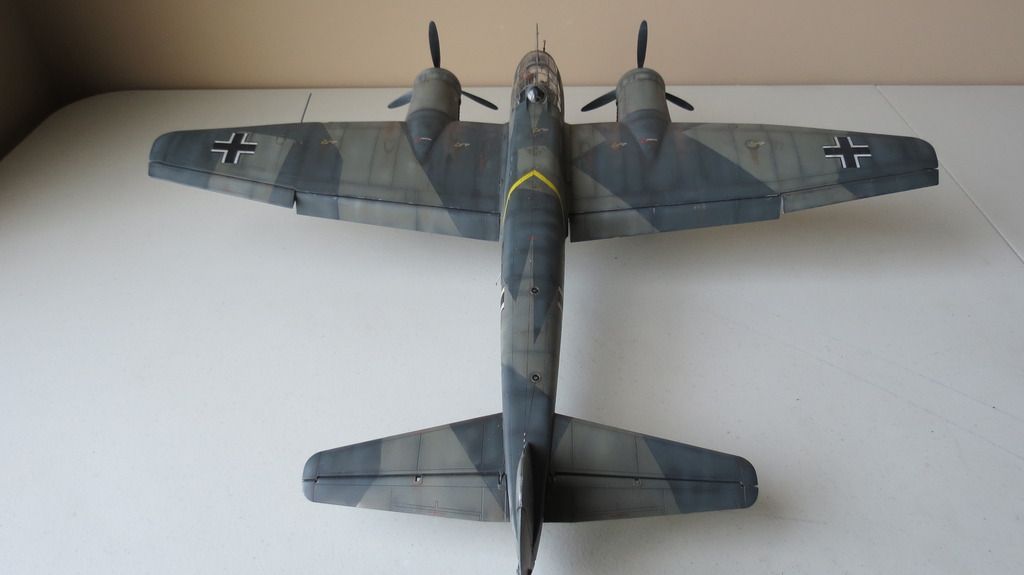
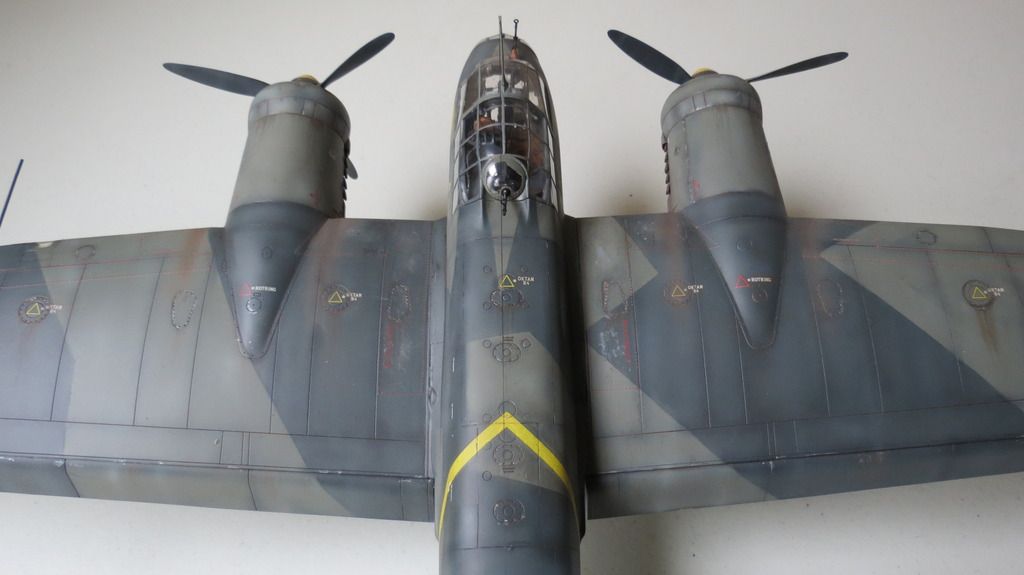
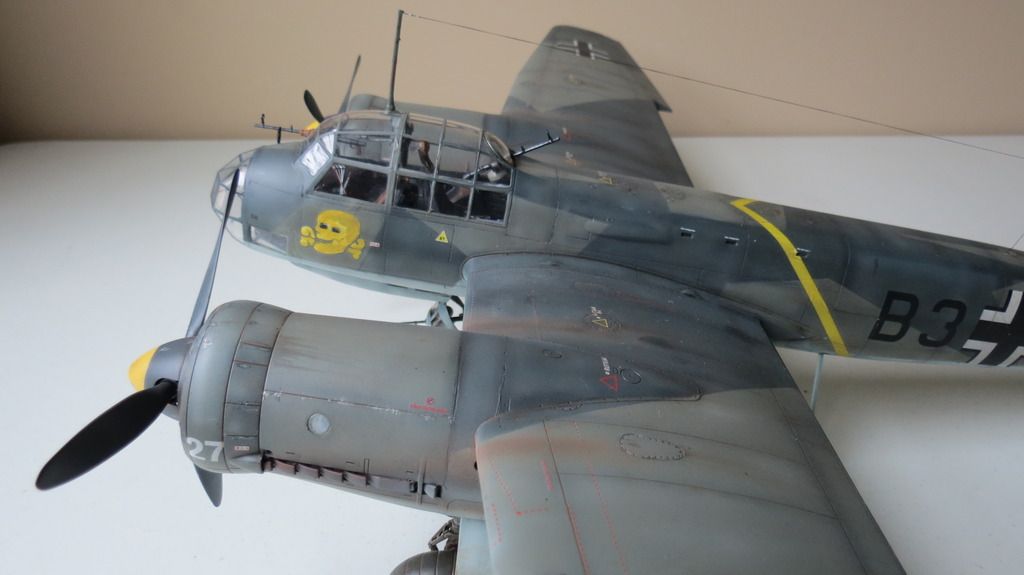
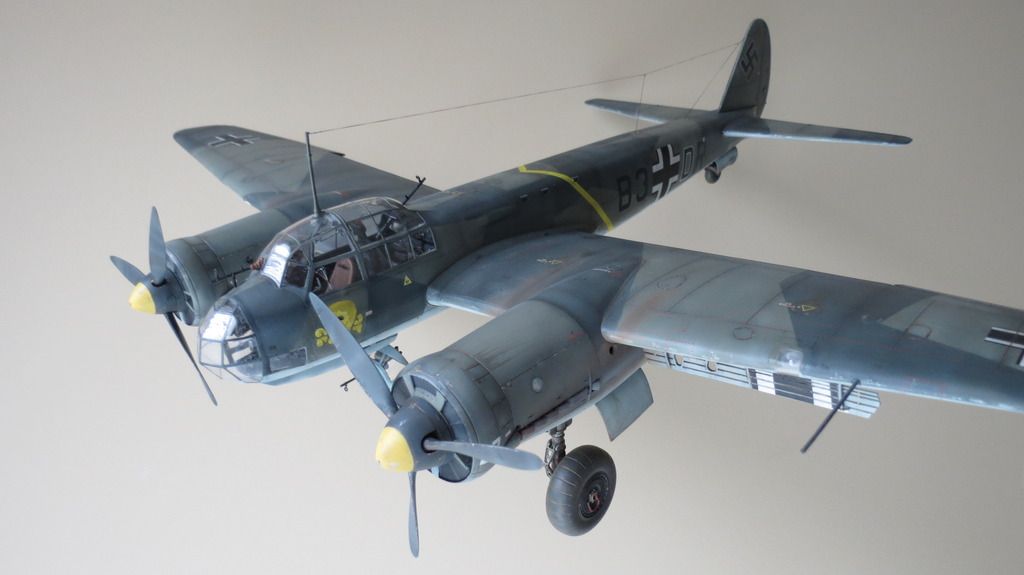
Regarding what I think of this kit: It's a great kit that goes together well, has some nice features such as a highly detailed cockpit, pose-able ailerons, flaps, elevators, rudder and air-brakes, recessed panel lines and other surface detail. The parts were all molded very well, with minimal flash and/or parting line miss-match that required clean up before painting.


It offers two sets of markings, I chose to do this version that was active in the "Battle of Britain", and the decals are excellent- they go down very well on a gloss clear coat with no silvering, and once the finishing matt clear coat was applied, they look painted on.


I did come across two issues during the build:


1) When fitting the engine nacelles to the undersides of the wings, I had a considerable gap between the mating areas of the front and rear nacelles. This is discussed in my "Final Reveal" video and can be seen in my "Build Updates" throughout this thread.

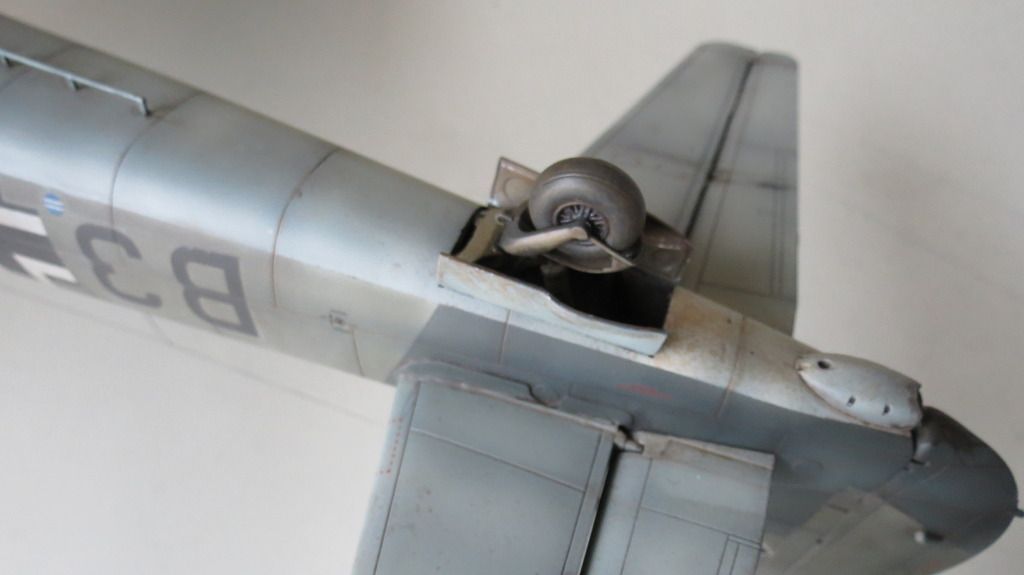
2) When fitting the wheels onto their axles, both axles sheared off very easily and remained inside the wheel mating holes. I drilled these out of the wheels and drilled corresponding holes into the wheel struts and fitted steel pins. I then took a black rubber Tamiya propeller bushing and cut it down the middle to create two thinner bushings. I slid these over the new steel axles and super glued them into place. These then provided some surface area for the wheel hubs to glue to. Again, I used CA glue to fit the wheels in place and it worked a treat, proving me with a very rigid and stronger undercarriage.


This kit would be superb if it came with two completely detailed Jumo 211B-1 engines, external bomb pylons and bombs and an open bomb bay with internal bomb racks and bombs!! That would make it super eye candy and a fabulous kit to work on.....I can dream!


In the meantime, if you'd like to watch my YouTube "Final Reveal" video, here is the link to that:


https://youtu.be/Un29hOf2diM


Thanks in advance for taking a look at this "Final Reveal", my video and for any comments left, they are greatly appreciated!

And, thank you to everyone who has followed this build through to the end and have left kind and encouraging comments!! YesYes


Until the start of my next build which won't be until we have moved and settled into our new home- probably the end of April, happy modeling and have fun! 


Cheers

Martin


  • Member since
    April 2015
  • From: New Hampshire, USA
Posted by UKguyInUSA on Friday, March 18, 2016 1:37 PM

Greatmaker

Holy cow that's simply an amazing build. I have always done the lighter color first and then done the darker color over it, but i see how doing it your way brings out the color differences so much better and you preserve your pre-shading. Looks like alot more work but the result spreaks for itself.  I just bought a circle cutter so I'm anxious to see how that works for masking prop spinners.  Plus I just bought some EZ line so now I know to use it.....too bad I bought green instead of black so I'll have to do some coloring. I'll have to try the Badger primer. I've tried the model master acrylic primer and have had horrible luck with it Thanks for sharing!


  Thanks for your kind compliment, Greatmaker, much appreciated!

If you paint the way you presently do, you could always paint straight onto the primer and then post-shade on top of your camouflage colors using a darker tone of the colors that is thinned with about 80-90% thinners and airbrush around the panels using your finest needle on your airbrush.

I don't have a circle cutter, but it is on my list of items to get. I want to start cutting out my own masks for airbrushing roundels onto aircraft instead of using the decals, so that they look more realistic.

I had always used Model Masters primer and never had any issue with it the two years that I have been modeling. I was just trying out the Badger Stynylrez, because I'd heard so many people raving about it. Plus...you get 4 times the amount for the money spent!

Cheers  Smile

Martin

  • Member since
    April 2015
  • From: New Hampshire, USA
Posted by UKguyInUSA on Friday, March 18, 2016 1:30 PM

lawdog114
Outstanding.
 

Thanks, Joe, greatly appreciated!


Cheers Smile

Martin

  • Member since
    April 2015
  • From: New Hampshire, USA
Posted by UKguyInUSA on Friday, March 18, 2016 1:29 PM

Toshi

I like how you did the wash in stages.  Fantastic job, I learned so much from your builds.

Toshi


Hello Toshi,

Thanks for following this build and your kind comments, much appreciated!


Cheers Smile

Martin

  • Member since
    January 2016
  • From: A Galaxy Far, Far Away
Posted by Hunter on Friday, March 18, 2016 12:46 PM

Martin - 

WOW!! HOLY WOW!! What an amazing build and such awesome depth and detail in your paint job. I have really enjoyed watching this build and learned a lot at the same time. Outstanding build and thank you for sharing it with all of us. 

Hunter 


  • Member since
    April 2015
  • From: New Hampshire, USA
Posted by UKguyInUSA on Friday, March 18, 2016 12:36 PM

patrick206

Martin -  A really remarkable job you made of it, all round quality build. Among the finest of details, quite a nice piece of work, perfect fit and finish. 

Thanks for the WIP text and photos. Great to have you here at FSM.

Patrick


Thanks Patrick, greatly appreciated and you're welcome for the in-depth posts, I hope they serve well for beginner modelers and those that are thinking about buying and building this kit, or those that have it in their stash.

The build is now complete and my "Final Reveal" post will be following shortly!

Have a great weekend!

Cheers Smile

Martin

  • Member since
    April 2015
  • From: New Hampshire, USA
Posted by UKguyInUSA on Friday, March 18, 2016 12:33 PM

silentbob33
Great work! I always enjoy your posts and learn quite a lot as well.


Hello Bob, thanks for your kind comment, much appreciated! I'm glad to hear that you can take some things from my post and use them in your builds, it's a great compliment and also makes my efforts for creating these in depth build threads.

Have a great weekend!

Cheers Smile

Martin

  • Member since
    April 2015
  • From: New Hampshire, USA
Posted by UKguyInUSA on Friday, March 18, 2016 11:15 AM

crown r n7

Awesome !!! Beer


Thanks Crown, greatly appreciated! Smile

Cheers,

Martin

  • Member since
    April 2015
  • From: New Hampshire, USA
Posted by UKguyInUSA on Friday, March 18, 2016 11:13 AM

lawdog114
Outstanding work Martin. I'm curious on your choice of cement to attach the clear parts. Perhaps you said what you used and I just missed it. Looks like you're in the home stretch bud.
 

  Thanks Joe, much appreciated! I always cement my canopies by taking a cocktail stick and dip the pointed tip into a drop of CA glue and rub it along the edge to be glued. When doing this, it is important to have the edge facing down, otherwise gravity can make the glue flow onto areas you don't want it to flow. I'll also carefully apply some to the mating surfaces. I let it take affect for 5-10 seconds then press the canopy into place and hold until the fast acting CA glue has set solid, usually around 30 seconds to a minute maximum.


Hope this helps?

Cheers,

Martin

  • Member since
    April 2013
  • From: Eleva, Wisconsin
Posted by Greatmaker on Thursday, March 17, 2016 12:03 PM

Holy cow that's simply an amazing build. I have always done the lighter color first and then done the darker color over it, but i see how doing it your way brings out the color differences so much better and you preserve your pre-shading. Looks like alot more work but the result spreaks for itself.  I just bought a circle cutter so I'm anxious to see how that works for masking prop spinners.  Plus I just bought some EZ line so now I know to use it.....too bad I bought green instead of black so I'll have to do some coloring. I'll have to try the Badger primer. I've tried the model master acrylic primer and have had horrible luck with it Thanks for sharing!


  • Member since
    February 2012
  • From: Olmsted Township, Ohio
Posted by lawdog114 on Thursday, March 17, 2016 12:31 AM
Outstanding.

 "Can you fly this plane and land it?...Surely you can't be serious....I am serious, and don't call me Shirley"


  • Member since
    March 2015
  • From: Streetsboro, Ohio
Posted by Toshi on Wednesday, March 16, 2016 5:50 PM

I like how you did the wash in stages.  Fantastic job, I learned so much from your builds.

Toshi

On The Bench: Revell 1/48 B-25 Mitchell


Married to the most caring, loving, understanding, and beautiful wife in the world.  Mrs. Toshi


  • Member since
    March 2013
Posted by patrick206 on Wednesday, March 16, 2016 4:35 PM

Martin -  A really remarkable job you made of it, all round quality build. Among the finest of details, quite a nice piece of work, perfect fit and finish. 

Thanks for the WIP text and photos. Great to have you here at FSM.

Patrick

  • Member since
    February 2014
  • From: Michigan
Posted by silentbob33 on Tuesday, March 15, 2016 6:01 PM
Great work! I always enjoy your posts and learn quite a lot as well.

On my bench: Academy 1/35 UH-60L Black Hawk

JOIN OUR COMMUNITY!

Our community is FREE to join. To participate you must either login or register for an account.

SEARCH FORUMS
FREE NEWSLETTER
By signing up you may also receive reader surveys and occasional special offers. We do not sell, rent or trade our email lists. View our Privacy Policy.