SEARCH FINESCALE.COM

Enter keywords or a search phrase below:

Revell 1/32 Spitfire Mk2 completed

5127 views
32 replies
1 rating 2 rating 3 rating 4 rating 5 rating
  • Member since
    March 2008
  • From: West Palm Beach, Florida
Posted by mic53mlb on Sunday, March 26, 2017 12:40 PM

Very nice job !! Well done !! 


  • Member since
    April 2010
Posted by Theuns on Thursday, March 23, 2017 11:24 PM

Cool, thanx for the info. I actually looked at loads of pic of spitts with open doors and interestingly allot oif them did not even have the bar. You can clearly see the clips that hold it on though....


Theuns

  • Member since
    September 2005
  • From: North Pole, Alaska
Posted by richs26 on Thursday, March 23, 2017 10:42 AM

Excellent work on this one, Theuns.  This is the new Revell of Germany kit from 2014, not the old Revell Mk I and Seafire IB kit from the 70's.  There is one minor error with yours, though.  The rescue crowbar is supposed to be natural steel,not painted red as that was done on post-war Spitfires.  Just like fire extinguishers on US WWII aircraft were brass and bronze, not red which came about post-war.  

WIP:  Monogram 1/72 B-26 (Snaptite) as 73rd BS B-26, 40-1408, torpedo bomber attempt on Ryujo

Monogram 1/72 B-26 (Snaptite) as 22nd BG B-26, 7-Mile Drome, New Guinea

Minicraft 1/72 B-24D as LB-30, AL-613, "Tough Boy", 28th Composite Group

  • Member since
    April 2010
Posted by Theuns on Thursday, March 23, 2017 3:43 AM

Actually acourding to Revell this is supose to be the new tool kit....

I am not all that sure of it


Theuns

  • Member since
    February 2012
  • From: Olmsted Township, Ohio
Posted by lawdog114 on Thursday, March 23, 2017 2:35 AM
Nice work on that ole' kit. She turned out great.

 "Can you fly this plane and land it?...Surely you can't be serious....I am serious, and don't call me Shirley"


  • Member since
    April 2010
Posted by Theuns on Wednesday, March 22, 2017 11:29 PM

Hi Chris, no I dont alter the paint with white, I just start spraying a colour very lightly and build it up more in some areas than in others to let the primer colour show through a little so that it looks "patchy" faded.


BTW, the colours are a tad darker than in the pix, the bottom is not grey like depicted but actually Sky "S".....the light was very bright when I took the pix with my ancient camera LOL


Theuns

  • Member since
    December 2002
Posted by Bossman on Wednesday, March 22, 2017 9:49 PM

Impressive Theuns !

Nice job on the fading/lightening.  Was it a matter of just mixing with white ?  Or did you use some other method ?

Chris

  • Member since
    April 2010
Posted by Theuns on Wednesday, March 22, 2017 9:46 AM

Yup . that prop is now 0 hours SMOH ;-)


Theuns

  • Member since
    November 2003
  • From: Naples, FL
Posted by tempestjohnny on Wednesday, March 22, 2017 9:36 AM
Great looking Spitfire. If I may give one nit pic. The prop is too shiny for the airframe. Unless of course it's a new prop


  • Member since
    April 2010
Posted by Theuns on Wednesday, March 22, 2017 9:26 AM

I finally completed this model.It was a real fight in some cases but overall the thing looks like a Mk2 of the 1940's RAF era.

I went for a highly faded look to the paint, the weathering is mostly chipping and exhaust/gun soot stains.


I still need to paint the pilot figure


Theuns

  • Member since
    April 2010
Posted by Theuns on Sunday, March 12, 2017 1:09 AM

Paint and weathering turned out OK, I still need to put some oil on the bottom.

The stencling carrier film silvered like mad, even with loads of microsol. I had to carefully put tamiya  thin cement on those areas to desolve the film.


Theuns

  • Member since
    April 2010
Posted by Theuns on Sunday, March 5, 2017 8:15 AM

Brown for the top was my own mix of humbrol 29 I lihtened a bit, the green was humbrol 168 IIRC the interior is Humrol 78 and the bottom is humbrol 90.


I now need to complete the dirtying up then final clearcoat.


Theuns

  • Member since
    April 2003
  • From: USA
Posted by keavdog on Sunday, March 5, 2017 2:13 AM
Nice looking build! I just got the tamiya Mk I. Tamiya calls out mixes for the interior and camouflage. What colors/manufacturers did you use for these ?

Thanks,

John

  • Member since
    April 2010
Posted by Theuns on Sunday, March 5, 2017 12:33 AM

Chris, no my fuse halves were OK but the wingfit to fuse was not good.

I have the decals on, they form down well, the one bottom wing roundal cracked a bit when I was forming it, I will have to toutch up the blue.


Theuns

  • Member since
    December 2002
Posted by Bossman on Monday, February 27, 2017 5:13 PM

Hey Theuns - very nice airbrush work and pit detailing.

I've noticed what you said about the Humbrol RAF dark green.  I've seen several videos of models that were built using the paints in Airfix beginner kits - that are supplied with paint.  They always seemed to be a lighter, more bluish color than the British one's I've built using MM Acrylics version of RAF dk green.   I guess I couldn't say which is right - but I just like the darker, greener shade.

Did You have any problems with warping of the fuselage ?  I built this kit about 6 or 7 years ago and the fuselage had a notable helical twist to it.  I wasn't able to fix it - but as long as you didn't look at it face to face - it was hard to notice.

Chris

  • Member since
    March 2003
  • From: Rain USA, Vancouver WA
Posted by tigerman on Sunday, February 26, 2017 1:09 PM

Really looking nice so far. Love the work on the office.

   http://i7.photobucket.com/albums/y269/wing_nut_5o/PANZERJAGERGB.jpg

 Eric 

  • Member since
    March 2015
  • From: Streetsboro, Ohio
Posted by Toshi on Sunday, February 26, 2017 7:41 AM

The camoflauge looks excellent.  A great job overall!!!

Toshi

On The Bench: Revell 1/48 B-25 Mitchell


Married to the most caring, loving, understanding, and beautiful wife in the world.  Mrs. Toshi


  • Member since
    April 2010
Posted by Theuns on Saturday, February 25, 2017 11:55 PM

I rather used humbrol 163 dark green instead of the normal humbrol 30 wich is way to "blue"

I sprayed the green and brown very thin and uneven to simulate the blotchy way it would fade, I am rather pleased with the results sofar.


Theuns

  • Member since
    April 2010
Posted by Theuns on Saturday, February 25, 2017 10:25 AM

Faded dark earth on, just enough shading showing through.

Theuns

  • Member since
    February 2012
  • From: Olmsted Township, Ohio
Posted by lawdog114 on Sunday, February 19, 2017 2:05 AM
Lookng sweet!.

 "Can you fly this plane and land it?...Surely you can't be serious....I am serious, and don't call me Shirley"


  • Member since
    April 2010
Posted by Theuns on Sunday, February 19, 2017 1:17 AM
My hand was a tad unsteaddy with the preshading, must be getting old #-o 
Image
Sky tipe S on the inderside, just enough shading showing through to give some feel.

Image

Theuns


  • Member since
    April 2010
Posted by Theuns on Sunday, February 12, 2017 10:39 PM

I completed the sanding of the bottom of the wing fit, rescribed and riveted it, only paint will show if I was successfull....

The canopy fit for the rear section was awfull, it does not line  up atall ad is to narrow, the sliding part should hide it when slid back.

The windshield is a little better but fit is not 100%. Glueing on the armoured glass infront of the windshield is tricky as te tamiya thin cement can wick inbetween the two layers , this time I got away with it though.


Theuns

  • Member since
    April 2010
Posted by Theuns on Thursday, January 5, 2017 11:13 AM

Here is the basic airframe together. loads of filling and sanding needed :-(

The right hand wingroot fit was baaaad


Theuns

  • Member since
    April 2010
Posted by Theuns on Sunday, December 25, 2016 10:30 PM

Thanx for the links,  am just to in a hurry to roder new stuff, I need this model to be done by the end of Jan/17.

I must also say that the pix show the slightest imperfection and "to me ageing eyes atleast" the model looks less bad LOL.

Interesting fact is that deu to the "lock up" of the ailerons over 400 MPH, in Nov 1940 Spermarine made a test sample of metal covered ailerons that showed the problem to be solved. 

Then Fighter Command ordered a crash program to have frontline Mk1 and 2's fitted with the new ailerons, so I recon by mid to late 1941 the Mk2 I am building would have had metal ones , that is my story and I am sticking to it ;-)


But I do agree that the kit should have been made better from the start, and it is not all that cheap either. If you were to add all the corrections ,one could most lilkely have bought the 1/32 Tamiya kit :-(


Theuns

  • Member since
    November 2004
Posted by snapdragonxxx on Sunday, December 25, 2016 3:19 PM

It would add expense to the project but Eduards Brassin cockpit replacement corrects many issues with the revell cockpit and HGW seatbelts are just the correct finishing touch.

You might like to try Yahu's IP panel for this kit:

https://www.scalemates.com/kits/662720-yahu-models-yma3201-spitfire-mk-ii

Eduard also have their usual sets for this which includes amothgst other items a IP and there are some resin sets out there to correct the intakes under the wing.

Barracuda have a correction set for the ailerons (fabric not metal for the IIa) and oil coolers as the kit ones are for the Vb.

Barracuda number #R32175

http://barracudacals.com/proddetail.php?prod=BR32175


It's the little things that you change that takes this kit up to what it should have been!


  • Member since
    April 2010
Posted by Theuns on Sunday, December 25, 2016 9:47 AM

Latest on the cockpit.

I added thin copper wire to look like the copper tubing they used in the hydrolic system. You can see them going into and from the controller valves. There are also the elecrtical lines running to the fire controll botton on the spade handle top of the collomb.


Theuns

  • Member since
    April 2010
Posted by Theuns on Saturday, December 24, 2016 8:42 AM
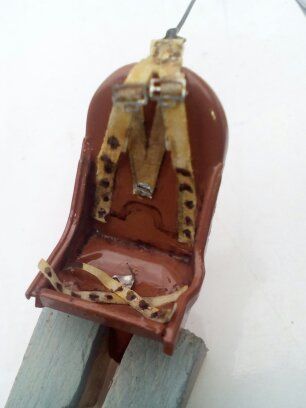
Here is my attempt at making the Spit's unique "Sutton seat Harnass"
I used masking tape strips, 2 buckles left over from my mustprang and stained it with watercolours to give some feel to it.
The black dots on the harnass is to simulate the 1/2" diameter holes in the straps where the kingpin with splitpin lock would join the 4 straps.
The sutton harnass was interesting in the sence that it had 2 sets of shoulder straps , one attatched to the rear bulkheads with a cable, I used fish trace cable for this and te other was bolted to the seat backrest.
The first stoped the pilot going to far forward in a prang yet allowed him some movement to lean forward and the second kept his butt firmly in the seat.
Image
The only hassle with photos this up close , it shows the slightest imperfection tha you can not see with eyes allone :wink: 

Theuns
  • Member since
    March 2015
  • From: Streetsboro, Ohio
Posted by Toshi on Saturday, December 24, 2016 8:31 AM

Nice weathering!

Toshi

On The Bench: Revell 1/48 B-25 Mitchell


Married to the most caring, loving, understanding, and beautiful wife in the world.  Mrs. Toshi


  • Member since
    April 2010
Posted by Theuns on Saturday, December 24, 2016 5:55 AM

Most of the parts painted and weatherd, assembly next

Theuns

JOIN OUR COMMUNITY!

Our community is FREE to join. To participate you must either login or register for an account.

SEARCH FORUMS
FREE NEWSLETTER
By signing up you may also receive reader surveys and occasional special offers. We do not sell, rent or trade our email lists. View our Privacy Policy.