SEARCH FINESCALE.COM

Enter keywords or a search phrase below:

Trumpeter 1:32 F-105G Wild Weasel Build Thread

15547 views
91 replies
1 rating 2 rating 3 rating 4 rating 5 rating
  • Member since
    August 2013
  • From: Michigan
Posted by Straycat1911 on Thursday, August 1, 2019 4:42 PM

Do you have a direct link to those makeup brushes? 

  • Member since
    March 2012
  • From: Louisville, KY
Posted by Builder 2010 on Saturday, June 15, 2019 2:53 PM

Thanks John!

Next plastic project is ill-defined at this time. Could be a plane, could be a vehicle. I don't know.

  • Member since
    December 2002
  • From: Northern California
Posted by jeaton01 on Friday, June 14, 2019 5:37 PM

Congrats, Builder, it's been an interesting ride and a fine model.

John

To see build logs for my models:  http://goldeneramodel.com/mymodels/mymodels.html


  • Member since
    March 2012
  • From: Louisville, KY
Posted by Builder 2010 on Friday, June 14, 2019 3:55 PM

I added a styrene shim to fill the space and CA'd the front Canopy back into place. Problem solved... model done.

  • Member since
    March 2012
  • From: Louisville, KY
Posted by Builder 2010 on Thursday, June 13, 2019 5:38 PM

Before I talk about today's "fun", I took some more beauty shots of the starboard side.


I did glue on two parts that were still on the sprue... the wing tip running lights.

Then the fun began. I you recall, I said I didn't want to mess with those little gear levers because the model was at a point where messing around could end badly. But, my AMS kicked in and after I did the end-of-project workbench cleaning I decided to give it a try making a scratch-built lever that would work. 

I bent some 1/32" brass wire and then bent it to conform the a good one that had fallen off. I then added layers of Bondic to build up the profile and with lots of filing, I made a reasonable shape. After a coat Tamiya "real metal", I was ready to install it.

After fussing with it a while, I realized it was about 10% to big and didn't fit right so I decided it really wasn't worth the effort. I glued the plastic one back and decided to leave the missing lever... missing.

Then when I went to turn the model rightside up from the holding jig, I bumped the front canopy and heard a "crack". It was now very wobbly side to side. I added some thick CA to reattach the lug to the back of the cockpit and use accelerator to set it. When I tried it to see if it was now secure, the damn lug broke off and I now had a canopy in my hand.

My worse fears did come true. I knew that the model was at a point when messing with it could turn about badly. I hate when I'm right!

So I quickly made a brass replacement and it's now sitting down in the basement curing with J-B Weld.

Notice: I carefully masked the whole deal EXCEPT the area where I had to file off the old lug's remains and didn't want to do any further damage. With my luck, the tape's going to pull paint off, or at least pull of the yellow gasket tape. We'll see tomorrow. Tomorrow, I'm re-gluing it back on the model and never touching it again!

I checked this morning and the new lug is strong and will work better than the plastic lug it replaced. The masking DID protect the canopy from all the filing and gluing. No harm no foul. Today, I'll remount it and tomorrow the epoxy will be cured.

  • Member since
    March 2012
  • From: Louisville, KY
Posted by Builder 2010 on Wednesday, June 12, 2019 7:07 PM

This is my 2nd post of the day since I did yesterday's this morning. The model for all intents and purposes is finished!

I'd rate this job a B+. There's a lot I could have done better, and some of it is just old Trumpeter engineering. After building the Tamiya Corsair, this was definitely a step backwards. I finished up the day with put all the remaining stuff including the air brake petals. According to the Squadron book, when landing, only the side petals were opened. The top would foul the parachute release and the bottom could impact the ground. Before gluing them on I did a quick dusting of Highlight White powder. According to references, the J75 would put a white coating on the exhaust stack.

I added the angle of attack sensor and painted it after it was on the plane. I put on the refueling probe and the gun door. After putting them in place I did some touch up painting. I touched up the windshield joint, but didn't attempt filling it. I'll just let it be. I did the job in my head and found too many ways to screw up what already was done.

The last thing I did was add some shims to the canopy hinges and the put them in with J-B Weld epoxy. Tomorrow, it will be hardened and done. I'm still toying with those auxiliary gear door levers and scratch-building the missing ones. Or not.

I put up some new backdrop paper and it really makes for some snazzy pics!

Note: When I took the pics the canopies were just hanging there. I actually glued them in tonight after we got back from dinner.

Next up: I'm building a scratch-built, laser cut, engine house for my railroad. It's 40" long and 15" wide covering three tracks. It is destined to be an article in Railroad Model Craftsman Magazine when I build and write about it. Also, my Victorian Townhouse model article is scheduled to start in the November issue of the same magazine.

I designed the whole thing in SketchUp and then drew laser-cutting drawings in CorelDraw. Nice thing about SU is you can do things like this fairly easily. All of the structure has been cut and is in my possesison. I'll make a master of the vent stacks and the resin cast them. The length was too great for my laser cutter's machine so the long parts are in halves and will have to be spliced.

I'm sratch-building an non-working gantry crane for the building. I just got some of the hoist mechanism 3D printed by Shapeways. It will cut out a lot of nitpicky time.

If anyone is interested in the building of the gantry, which will be mostly styrene, let me know and I'll post it in the FSM Forum. I'm not sure under which category it should go.

My next plastic kit choice is not finalized yet. I thought I was going to receive (as my commission on the Thud) a Tamiya 1:32 DeHavalind Mosquito, but there's a new Trumpeter 1/32 HEMTT Airport Fire Truck that's not out yet and it looks very intriguing. And then there's that 3D printer... I'd really like to try that out, and possibly instead of a model. Decisions, decisions...

As you've probably noticed a pattern; plastic kit, railroad project, plastic kit, railroad project, and so on. So thanks for watching and stay tuned.

  • Member since
    March 2012
  • From: Louisville, KY
Posted by Builder 2010 on Wednesday, June 12, 2019 11:21 AM

Details, details...

It's time to put all the little bits on. I wanted to install the upper red marker light. It, like the other plastic clear parts, had a lot of excess that needed trimming in order to fit inside  the raised rim. When I went to fit it, the darn thing fell inside the fuselage through the open hole at the bottom! Why in the world would they mold it with an open bottom? It will never come out since it's worse than getting a coin out of the slot in a piggy bank. So I went to plan B. Plan B was a bit of overkill.

I cut an over piece of the same shiny PE sprue and filed it to shape. Then, in the process of fitting it into the bezel, it too fell into the model through that %*((^@ hole!

Plan C was to make the oval out of thin card stock. Easier to shape and didn't matter if it too fell in the hole. After gluing in the oval, I used the chrome pen to make it nice and shiny and then with three layers of Bondic, made a very nice light lens. This I painted with clear red. Should have gone this route right from the beginning. So all the lights on the plane to this point are Bondic replacements.

I then built a custom nose pitot tube. The kit tube, besides being quite fragile, was out of scale, out of round and looked awful. From the get go I planned on making a metal replacement.

I used a piece of hard steel wire for the smallest diameter, a piece of 1/16" brass tubing for the large diameter and a piece of .8mm Albion aluminum tubing for the mid-diameter. I soldered the inner steel to the brass tube since the tube was a little bit oversized. I then used CA to hold the aluminum piece in place and then more thick CA to form the transition cones between the diameters. Forgive the shaky focus.

I had polished the steel before construction and then painted it semi-gloss black. I took the time to then add the 1/32" yellow tape stripe around the nose cone and the front was done.

The new pitot looks good and is very, very strong. The plane could be used as weapon if someone was so malevelently inclined.

I glued the windshield on with the Testor's Canopy Glue and it worked well, but there is a ledge that is not to my liking since, (as I've noted before) the Eduard cockpit raising widen the fuselage enough to make the canopy no longer fit the fuselage perfectly. I'm thinking how or if I'm going to do anything about this.

So here's the plane just before the other canopies are final fitted, the fuel probe and gun door put on, and the few little tiny Angle of Attach sensors are added to the fuze sides. There's a couple of spots where I need to touch up the matte finish. And the model will be done.

  • Member since
    March 2012
  • From: Louisville, KY
Posted by Builder 2010 on Monday, June 10, 2019 6:26 PM

Happy Monday!

We are at the beginning of the end! I'm doing all those things that were left until now so they wouldn't get wrecked. Even with all those precautions, I still knocked off a few things that needed re-attachment.

I started by making the slot in the rear cockpit bulkhead to receive the newly added hinge bracket. I measured the brass tab's width and marked that with a dividers. I then drilled these three holes which were then opened to a slot using the #11 blade. I'm surprised that there wasn't a slot in this part already. This was a kit part.

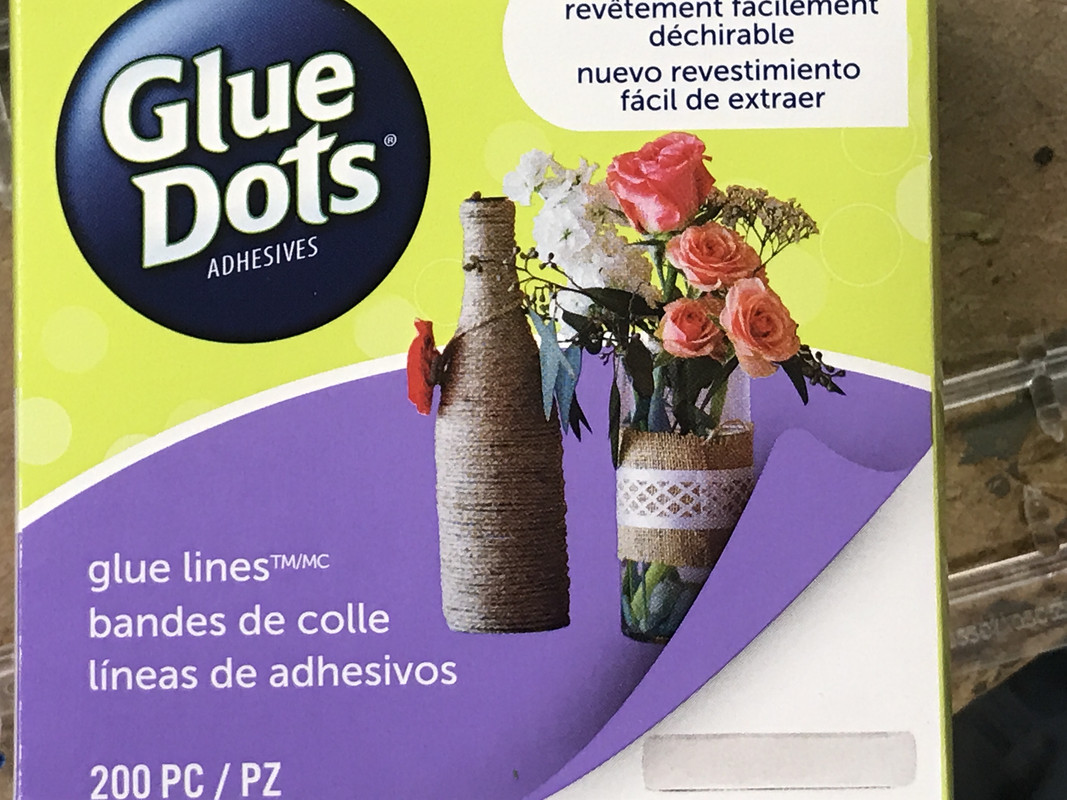
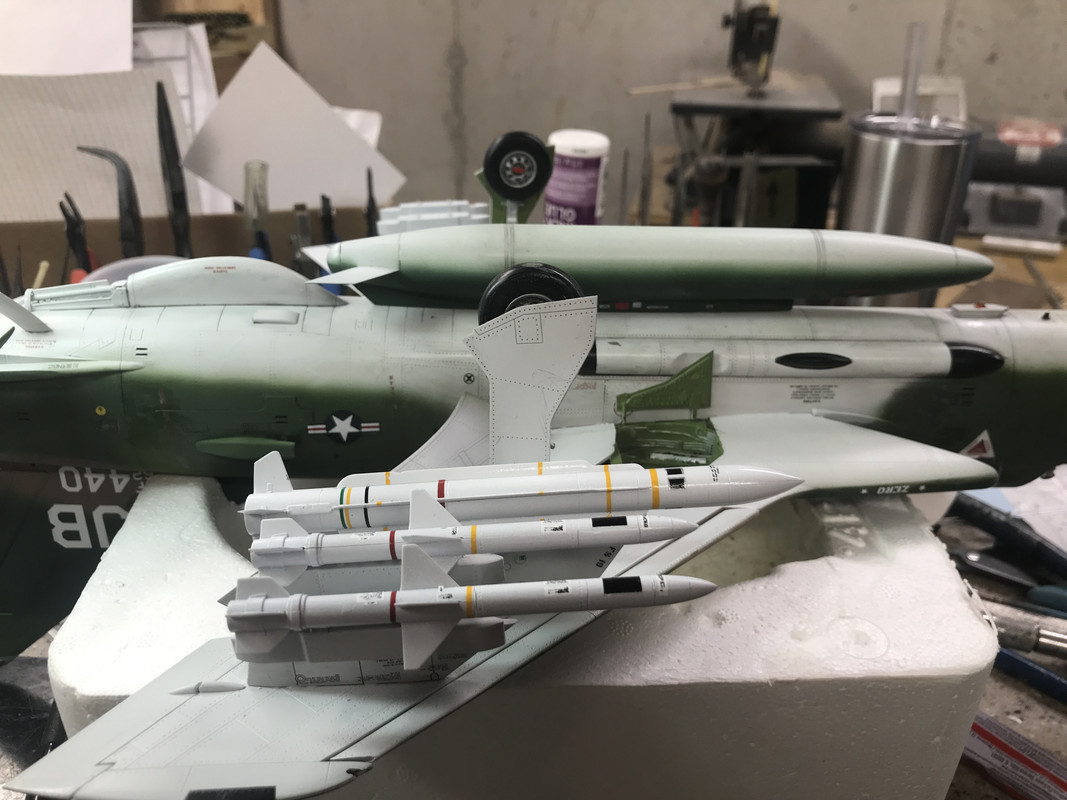
I then flipped the beast over, put it in the bead foam support and mounted the gear doors and the missiles. For the inner gear door and the main door I used "Glue Dots" which are very sticky bits of contact adhesive. They're very tenacious and hold well, plus they're a bit flexible and won't break loose like CA which is brittle. Henkel Loctite makes a flexible CA which has rubber in it, but it's not available on the retail market and it's black which doesn't work well for a lot of modeling situations. You buy the Dots at Michaels. If you get it, be careful. There are both permanent and removable versions now. I suppose the removable ones could be used for holding masks.

For the inner doors I used the dot form of the adhesive, and I recently bought some linear strips and used them on the main doors. I just put the adhesive strip on the flat side of the strut and stuck the door on. Once you've placed it, you pretty much have to live with it since it holds like crazy.

I used Testor's Tube Cement to hold on the missiles after scraping some of the paint off. Then I knocked some off when I put the model on the bench and the missiles hit some paint bottles. This was my fault! The work bench was a mess!

I also glued the big center tank in place. I did not rebuild those missing auxilary levers that would close the small third gear doors. They're really hard to see and even harder to scratch build. I'll see what kind of mood I'm in tomorrow.

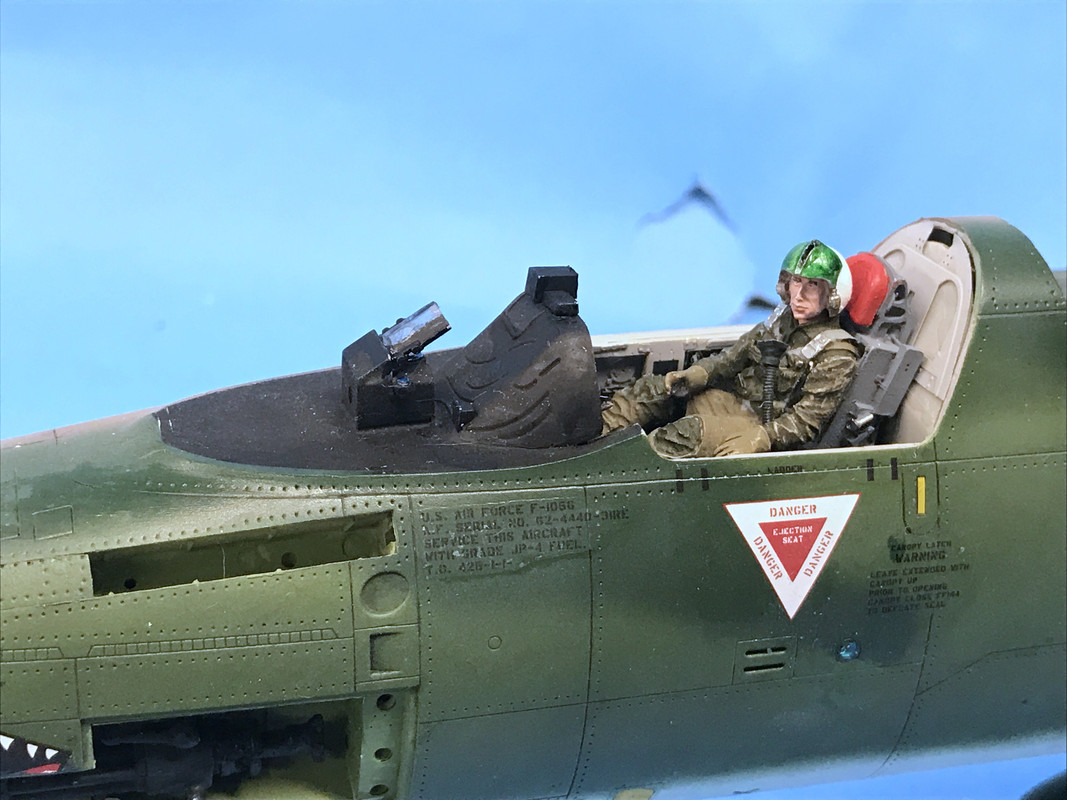
I went to insert the belly marker light which I pre-painted on the sprue, but the darn thing didn't fit into the opening and it was getting all screwed up (paint coming off, etc.). At least I was using my new Testor's Canopy Cement. I decided to go the Bondic route by filling the opening with three layers, each UV cured, and the final having the same shape as the original lens. I painted it Tamiya Clear Red. Bondic is a life saver.

I then flipped the model over and got back to work on the topside punch list. I built the HUD with Canopy Cement, added a couple more PE instruments on the instrument panel cowl, did some touch up painting and got it ready to receive the windshield.

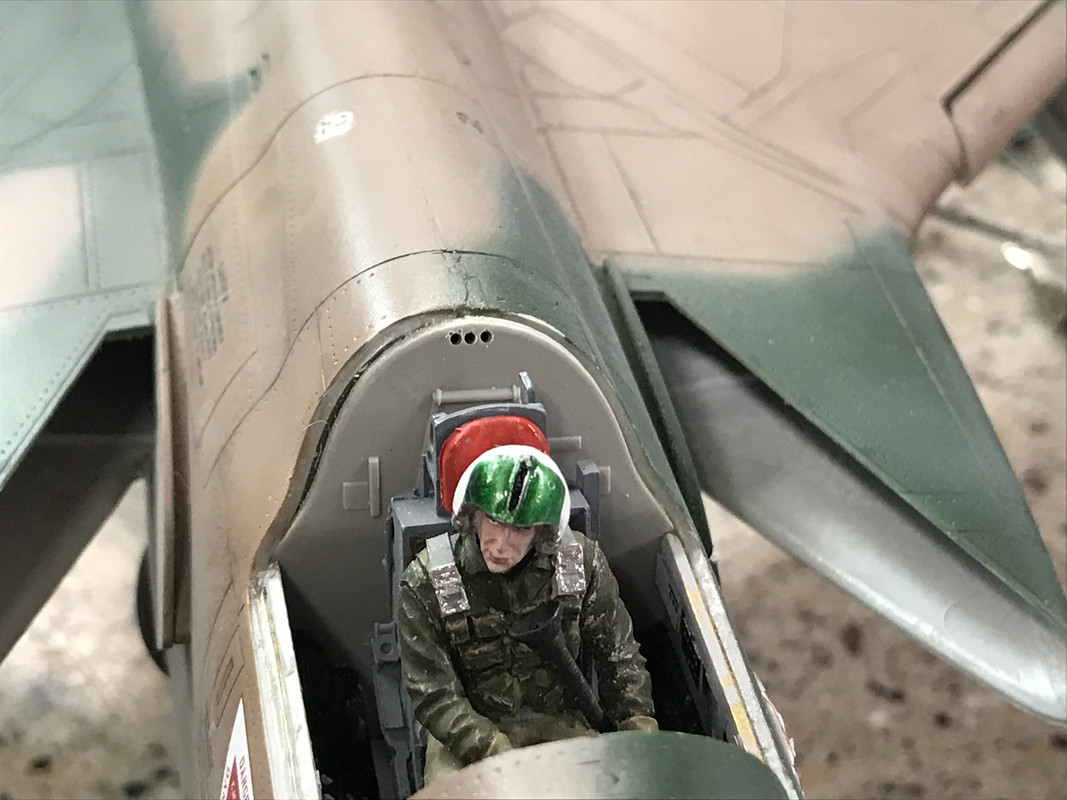
It was time to finish up the canopies. Based on Marty Schwendau, the Plastics Dept. Manager at Scale Reproductions suggestion, I bought some 1/32 "Pin Stripe Tape" used for model car building. With this I made some very believable gasketing for those Thud canopies. In the pics, none of these are in their final, glued positions.

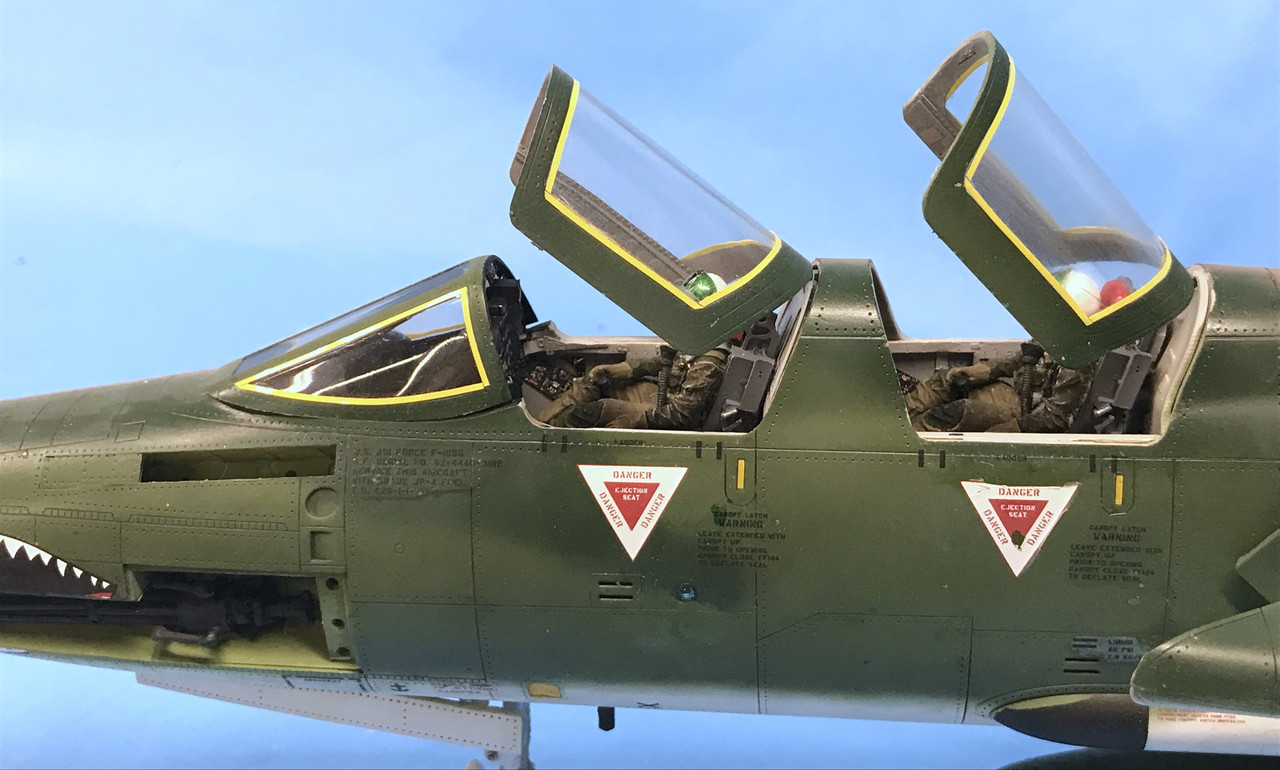
In the process of putting the stripping on the windshield, I broke off all the added pieces hanging from the bottom of the windshield frame. At the end of the session, I was in the process of remaking some of these including the rearview mirrors which weren't looking so hot. I'm making new ones out of very high polished PE fret left over from one of my grandson's projects.

I also attempted to add some wiring details in the gun bay. I broke two carbide drills in the process and was getting very annoyed, so I gave up on it.

I also attempted to put the blue identification lights in their holes in the sides. like the bottom lens, these did not fit nicely. Again, I went the Bondic route. I started by painting the holes silver, filled them, and then painted them clear blue.

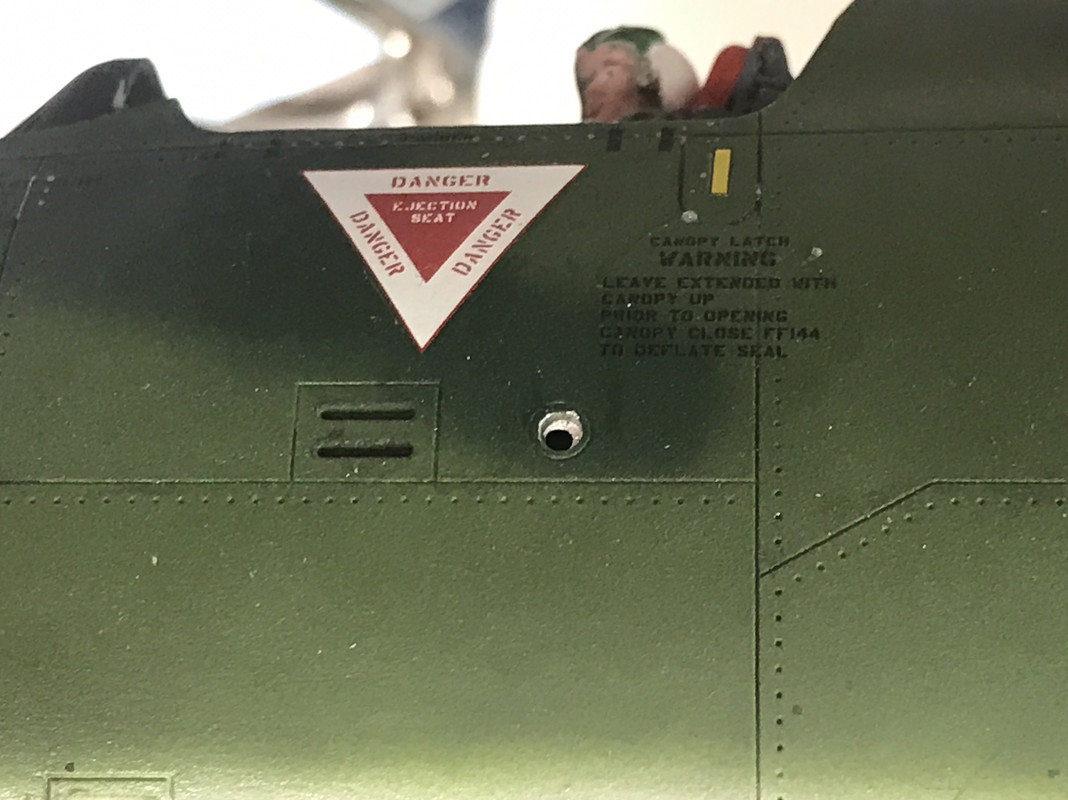
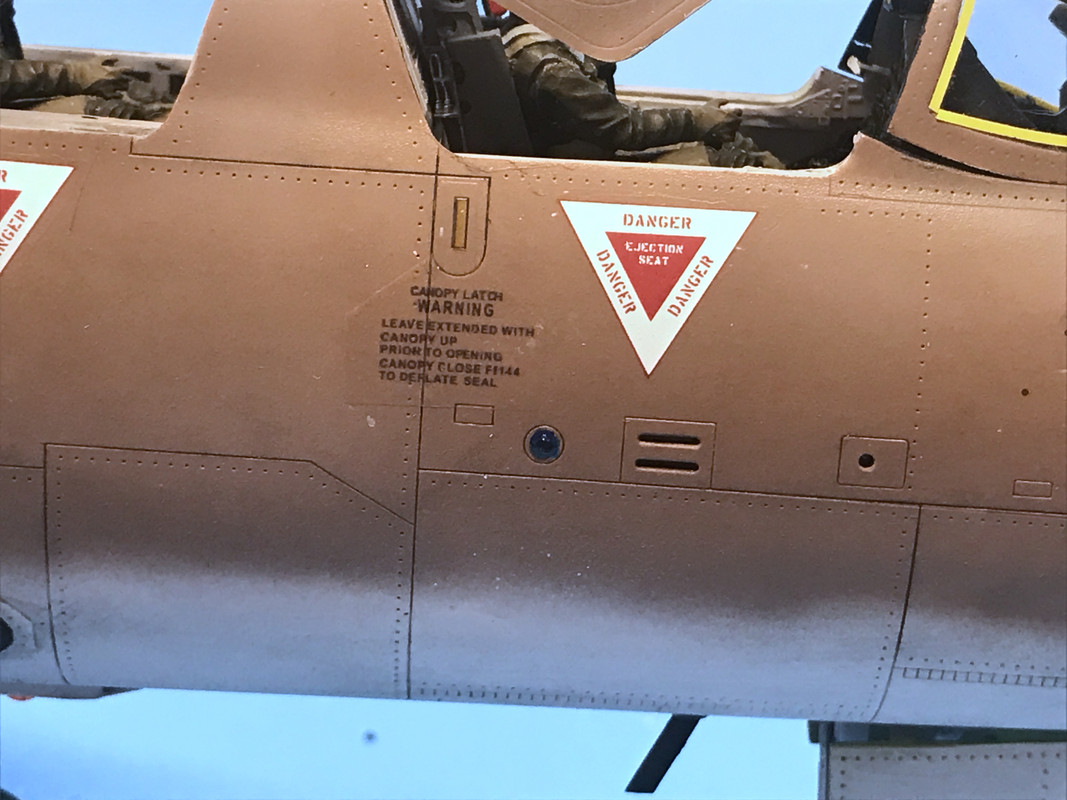
I had resisted getting Bondic thinking it was a bit of a gimmick, but I rely on it for all kinds of interesting modeling uses. 

On another topic, I've been getting some things 3D printed at outside sources. These jobs have generally cost me about $40 each for some very small stuff that I didn't want to or have the skills to create myself. But the Filament Additive Machines (FAM) generally only get down to about 100 microns (a 1/10 of a millimeter) which at 1:32 and 1:48 scales show up badly. You need to have them printed on an optical resin machine. These traditionally are very expensive, starting at about $3k and then going up... way up. Then I read about units that use UV LEDs instead of lasers and are being sold on Amazon for under $400, and they produce 10 micron layers. These work very well for model work. 

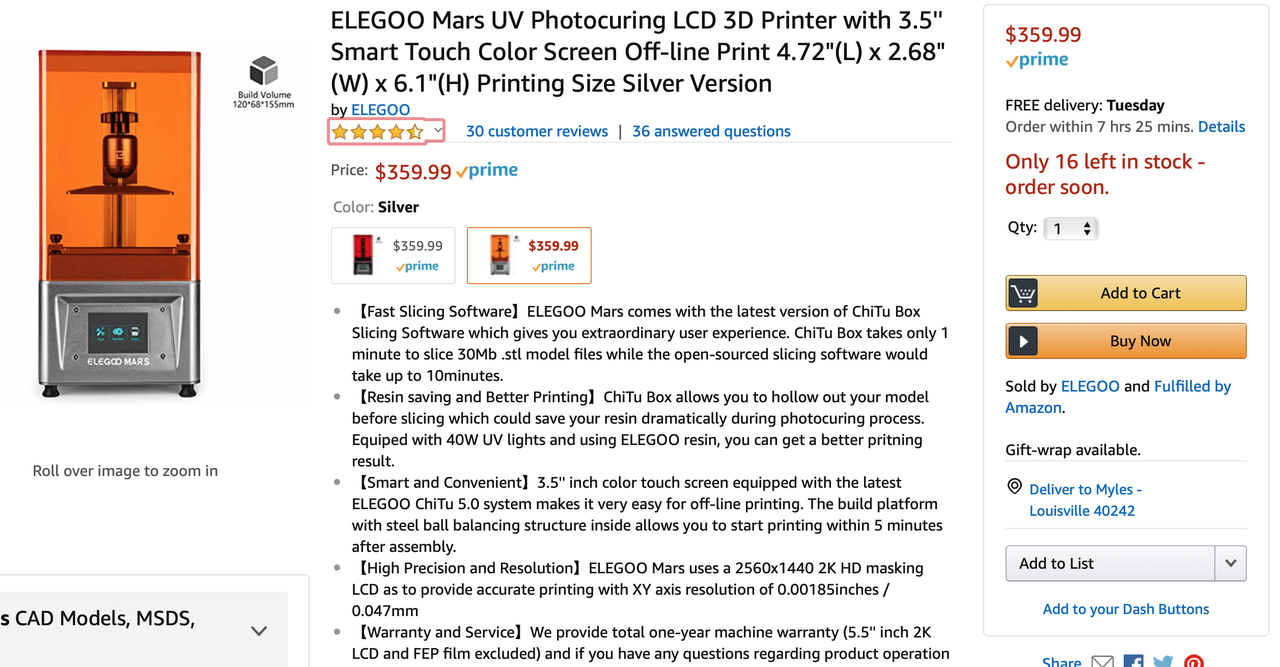
The unit above is Chinese, but most of the lower price 3D are. It uses a resin that's water soluble until cured and the models produced generally need more exposure to UV to become really solid. Amazon sells another UV that can be used to harden the models. 

At this price point, if I do 10 parts, I pay for it. Furthermore, even though the resin is pricy ($40 - $80 per bottle) after downloading their slicing software, I ran the part that I just had done by Shapeways, and it ended up usng $0.72 worth of resin. Resin that isn't directly cured by the UV scan can be returned to the bottle and re-used.

I'm seriously considering this for a my father's day/Birthday present to me. My son, last night, said "For $360 what's the risk?" Exactly!

  • Member since
    March 2012
  • From: Louisville, KY
Posted by Builder 2010 on Saturday, June 8, 2019 4:24 PM

This was yesterday's post, but it didn't stick... I'm re-posting it today.


Busy day and kind of weird. Got you note about the white undercoat just now, and it's a bit too late and yes… the yellow did wash out a bit. Next time...


Put the new "Ejection Warning" decals in place. My sizing was dead on. I had measured the little square space at .147 and use that number to set some guidelines in CorelDraw. I imported the photo and sized it so the same rectangle in the image coincided with the guidelines. I was then able to draw the entire decal design over the picture with assurance that it would be sized correctly.


540898


I used decal softener to remove the destroyed Stars and Bars from the rear fuze.


540899


I then trimmed the new decal as best as I could so it would have any white edges since the decal is actually all white. Maybe I should have matched the tan color and used that as a background around the stars and bars so any white would have been missing. But that horse has left the barn.


540900


Regardless, it's better than the destroyed one it's replacing.


With these decals in place it was time to spray that Tamiya Flat Clear. I bought it by the bottle, thinned it a bit with Iso and then airbrushed it on. And then this happened in many places, with this being the worst case. YIKES!


540901


It was some kind of water mark reacting with the flat spray. In most places I was able to retouch the airbrushed colors without causing any other problems. In this case I had to mask the decals since they were way too close to the action. I used some Press-n-Seal food wrap to make a quick mask that wouldn't be too tacky and pull off the decals.


I then, using the detail airbrush, which is gravity feed, started with the tan, then light green and finally the dark green. Thankfully it worked. When the marks appeared I almost freaked, not being sure it retouching it would make it worse. Since I was using flat paint, I didn't even think about re-shooting the flat clear. I didn't want any more surprises. Some of the decals silver which really pissed me off. Even with the gloss top coat, there was too much texture for these old decals.


540902


With painting done, I got to work finishing up the cockpit and canopies. The canopy I repaired needed repainting. It actually needed all three colors. I've figured a way to clean the gravity brush pretty fast. It's hard to tell that it was missing a chunk.


540903


The canopies recieve some PE embellishments on their bottom edges. I lost track of which canopy went where and was mistaken in thinking that they were the same. They are... almost. The rear canopy is a bit wider than the front since the fuze is still expanding to its full diameter from the pointy nose. So I ended up putting the front's PE on the rear and vice versa. Why is this important? The two PEs are different heights so there is bare brass sticking up in the viewable area of the clear glass. I can approach it two ways: 1) remove them and put them in the right places, or 2) using the yellow trim tape and it will cover most of the exposure.


I'm choosing option two. Prying them loose might work, but it can also bend the heck out of them and ruin them. And I am planning on using the yellow trim tape so option 2 will work.


The rear view mirrors are in place, the clear areas came out nicely, and all in all, the canopies work.


540904


No canopies are glued in this image. There are few more instrument boxes that go onto the instrument panel cowl. With them and touching up some paint, the cockpit will be complete.


I've flat sprayed the gear doors and they'll go on next. I didn't flat the missiles. They're generally new and leaving them shiny won't look too back. Unless you all have an opinion about it. I'm going to use some "Glue Dots" strips which is a kind of contact cement to hold the main gear doors on the structs. It's somewhat flexible and will be forgiving if it's bumped. I'm going to have to scratch-build two of those auxiliary gear struts for the side that got whacked, and I wil make the pitot tube for the nose out of telescoping brass and aluminum tubing. The ILS reflector looks like it gets painted yellow and a #440 decal goes onto it. With the gluing on of the missiles, the model should be done.

  • Member since
    March 2012
  • From: Louisville, KY
Posted by Builder 2010 on Thursday, June 6, 2019 5:10 PM

Yes and yes!

This is yesterday's report. Today, my wife and I took our grandson to a movie. Saw "Rocketman". Makes you wonder why anyone would want to be a rock star. Their lives get so screwed up...

The first thing I did was fix that canopy. I used Bondic successfully to completely fill the broken out portion, used plastic polishing materials of ever-finer grits to clean up the little bit of CA damage, and then fabricated and J-B Welded the missing bracket so the canopy can be posed open.

It's very strong and will survive installation.

I then got back to applying the starboard side decals. All went splendidly, until when I was grasping the fuselage to lift it and place a decal that was near the fore bottom, and the "stars and bars" on the fuze side transfered itself to my thumb. Then in my attempt to peel it off and put it back, it started to fracture. This is the result.

I may be able to clean it up a bit more with some strategic touch-up painting, but it won't be pristine. Why do decals have more affinity for flesh than models?

The shark decal on this side was having trouble getting around the compound curves of the nose. I had to slice the decal in two places so it settled in. That was after copious amounts of MicroSol. There's still a spot that has a wrinkle on the edge that I'll have to slice I'm afraid.

I was surprised that the "emergency release" decals were missing for the starboard side under the cockpit. The "Ejection Seat" triangles were included. I may just highlight the yellow lever in the at engraved portion to match the other side, but won't be able to duplicate the text. I may be able to make my own... now that I think about it. I just took some closeups of that graphic and will make my own. Once again, writing this journal gets me thinking.

This was the closeup that I took to get the text. I actually created new text over the decal text since it wasn't very precise. I don't like how that triangle decal is not settled in on top.

Here's what the decal's supposed to look like after I print it.

Now I'm going to go upstairs and print it.

And now that I think about it. I have one more stars and bars for the wing bottom that's intact. I may be able to scan that and reproduce a couple of good ones on white decal film. I'm going to give that a try too.

The making of the Stars and Bars worked well too. I scanned the decal, and then re-drew it over the image since I wanted a very clean edge without any pixelation. The results of both activities were good. The "ejection warning" could be printed on clear film since there was no white on it. The "stars and bars" required printing on white decal inkjet paper.

Here's the decals after I sprayed them with Testor's decal film spray. Inkjet ink is water soluble so you must seal it before soaking in water.

Tomorrow I'll remove that wrecked decal and put on a brand new one.

  • Member since
    June 2004
  • From: 29° 58' N 95° 21' W
Posted by seasick on Wednesday, June 5, 2019 9:00 PM

All the annoying little fixes add to the satisfaction when you are finished.

Chasing the ultimate build.

  • Member since
    August 2013
Posted by Jay Jay on Wednesday, June 5, 2019 8:12 AM
Sorry about all your irritating little troubles on this Thud but I can relate. That's how my modeling is going these days as well. I usually spend way more time fixing chit than the actual build. So when this happens I tend to walk away for a while and come back to it with a fresh attitude, but now each model is taking 3 times more work and time and that is getting old.


 I'm finally retired. Now time I got, money I don't.

  • Member since
    March 2012
  • From: Louisville, KY
Posted by Builder 2010 on Tuesday, June 4, 2019 6:22 PM

Thanks! The J-B Weld did cure and is holding the gear. I still have to deal with those auxiliary levers that pull the secondary door closed. One is missing and the other is half missing. I will have to scratch-build them if I want them to be seen.

I finished the touchup painting on the tail tip and it's passable. I left it natural metal although I think you're right that the bottom color might be more appropriate.

I decided it was time to decal this thing so I could put the flat coat on it. The decals are old and already showed that they would crack, so I started to coat the decal sheet with the Microscale Decal Film, but then rememnbered that I bought some Testor rattle can product that was supposed to do the same thing. So I sprayed the sheet, let it dry and then attempted to put on the most challenging decal in the model; the shark mouth on the gun (port) side of the plane. This decal had part of it missing where it passes over the gun shield and the eye is also attached to the same decal. I put it on and it fell apart. The Testor product didn't work! It took a ton of fiddling to get all the pieces back together. Decaling is fun until it isn't.

What made it more complicated was having to temporarily hold the gun compartment door in place since the decal goes over it too, and then cutting the decal on the door seams so the door could be posed open.

I used copious amounts of Microsol to get the decal to conform. I then proceeded to completely decal the entire port side. I ended then so it would all have a chance to dry overnight so I could handle the plane tomorrow and do the starboard side.

When the shark was dry enough I did the cutting and touched up the cracks with gloss white. It is passable. Here's the nose.

Another problem seems to be how to fasten the gun door to the plane? The curvature prevents it from contacting the entire length posing weakness. I'm thinking of using some thin strips of packing tape to hold it and make it movable.

Here's the midship's decals.

And the aft end. I'm having some trouble with the big "J B" decal peeling at the back edge. I've been working with the elevons removed to make it easier to put the plane in my lap when I was working on the side decals. They just slide in and out with the brass tubing.

One of the canopies is lacking a mechanism for holding it in the open position, while the other has an angular plastic tab. I may have inadvertantly cut it off when separating it from the sprue, but I'm not sure. I decided to tackly this by making a brass assembly.

It took a piece of small brass channel and ground off the flange on about 1/8" that would mate with the underside of the canopy's rear. I then bent this part to the angle I wanted to hold the canopy in the open position and then drilled two 0.021" holes and soldered some phosphor bronze wire into the holes to serves as anchoring pins. 

I then drilled the canopy to accept these pins and put the two together. I thought about using epoxy, but my ADD kicked in and I wanted to do it faster. So I used some thin CA. The CA attacked the plastic and the entire rear part broke away leaving a missing chunk. To make matters worse, the brass part with the plastic attached hit the floor and went into the ether.

The missing chunk is an easy fix. I'll use Bondic. I also got a CA smear on the clear inner surface which I'll have to polish out. I will then come up with plan B (or is it C). I hate when I attempt to solve a problem and it ends up being worse.

  • Member since
    March 2010
  • From: MN
Posted by Nathan T on Monday, June 3, 2019 7:37 PM

Nice paint work of the small parts! I think the tail top was painted light gray? That’s what I went with but natural metal could be right too? I hate how Trumpeter gives you such little area to attach the gear to. Hope your fix turns out. 


  • Member since
    March 2012
  • From: Louisville, KY
Posted by Builder 2010 on Monday, June 3, 2019 5:47 PM

Thanks! Today was a mixed bag of successes and not-so-successes. I masked all the little stuff that needed painting on top of the base colors: being the wing tip sensors, recon camera housing (which I missed when I did the nose cone) and the upper part of the tail which I'm assuming from the color chart, some kind of metallic finish although it may be white.

After using the narrow Tamiya tape to define the space I went back and protected the entire space from overspray. It takes about 30 seconds to air brush these little bits, but takes almost a half hour between the masking and the cleaning of the airbrush.

The camera housing and wing tip sensors came out very nice.

But the tail painting was a totally different thing. I first thought I would paint the whole thing metailic then go back and mask the background and paint the sensor the base color which matches the camo at that point. Then I decided to use Microscale liquid mask and shoot the area with Tamiya Real Metal Silver from the rattle can. Seemed like the most efficient approach. But I was spraying lacquer over acrylic which ain't so good, and I had a terrible time getting the liquid mask off. What I ended up with was a mess! The tweezers kept damaging the silver, and the mask removal was stubborn. I also took off most of the green paint from the sensor.

I went back and brush painted the silver, retouched the green, and will have to go back and do more tomorrow after it all dries ready well. I was rushing and was working with paints that were soft and therefore, not cooperative.

I cleaned off the excess panel accent on the tail and it came out nicely. You can see the remaining touch-up areas on the upper tail. It will end up okay, but I wasn't happy about how I'm getting there.

I got back to decaling starting with the myriad of little stencils that are on the pylons and adapters. They were a pain since I was working upside down and in between other stuff. In retrospect, I probably should have decaled the pylons before gluing them in place.

Many of these stencils were attached on the same decal so the spacing was set, but the connecting strands between them were very narrow leading to some of the stencils flipping upside down, or twisting and it was very finicky to get them back to straight. As I said, if I was doing it again, I would decal these parts before attaching them to the wing and even go as far as dullcoat them. 

And though all of the handling, one of the metal main landing gear struts decided to come loose. I tried using medium CA, and added accelerator to the strut and put the CA in the hole. After installing, the CA cured quickly, but the gear wasn't holding. Now I had a hole filled with cured CA that needed to be extracted before I could re-insert the strut and try again. This time I mixed up J-B Weld again and it's now curing overnight.

  • Member since
    March 2010
  • From: MN
Posted by Nathan T on Friday, May 31, 2019 8:25 AM

awesome work. Camouflage looks right on. Lots of detail to add on a F-105, I built the 1 48 version and remember all the extra detail painting and stuff to add on at the end. 


  • Member since
    March 2012
  • From: Louisville, KY
Posted by Builder 2010 on Thursday, May 30, 2019 8:05 PM

Did some errands and then got to work. Bought some nice new backdrop paper (actually bulletin board paper from Michael's) and other stuff. Finished decaling all the missiles and the centerline tank, and went back and cleaned up the panel line work a bit more, and lined the vertical stab which I didn't do yesterday.

All the missiles are ready to put onto the aircraft. I used MicroSol and MicroSet. I never know which one does what so I end up using both.

I then did the same for the centerline tank. Thankfully, all those tags were actually just one decal.

Lastly, I went back and did the rudder. As you can see, I'm finally figuring out how to do it without adding too much material making it harder to remove. I also found that the longer it dries, the better the clean up is since the material actually in the grooves tends to stay there a bit longer. I also reduced the amount of solvent on the Q-tips to the barest minimum. The lines on the tank were put down yesterday, but I cleaned them up today and most of the material in the grooves stayed put.

You really want to put the tiniest amount of accent into the groove that you can just to get it flow. You watch the flow and don't add any more until it actually stops so you're not adding too much excess. The upper part of the tail on this particular plane appears to be bare metal, and there are antenna on the tail and wing tips that need to be masked and painted black.

  • Member since
    March 2012
  • From: Louisville, KY
Posted by Builder 2010 on Wednesday, May 29, 2019 5:21 PM

Thanks for the feedback. I kept experimenting and found that I was putting on too much wash in the first place making removal even harder. I too am using a Q-tip with the solvent mostly removed. I also found that after removing the bulk, not to go back with a clean Q-tip too quickly since it keeps pulling wash out of the lines. I did however do every panel. Now that you mention it, it probably only should be panels that are regularly opened.

I also found that I was being too impatient. I found that after touching the engraved line, I would wait and watch how far the liquid moved along the line before adding the next amount. This wasy I was able to limit the amount of accent I was putting on. Again, it was directly affected by the depth and narrowness of the line. The deeper and narrower the more effective was the capillary action pulling the accent alone.

Here's was the upper wing showing the application before removing the excess.

I also did the panel lines on the pylons, but I did not apply it to the wing bottoms. Enough is enough... 

So here's the entire plane with its panels done.

I'm letting this dry more thoroughly. And while I was waiting I started decaling the missiles. The decals are produced by Microscale and are very thin and started to come apart so I carefully coated them with Microsol's Liquid Decal Film.

I started with the Standard Harm missile. While the missile has a bunch of decals, the pylons and launch rail have many more.

Tomorrow, I'll continue with the missiles and then get back to more work on the aircraft.

  • Member since
    January 2015
Posted by TheMongoose on Wednesday, May 29, 2019 12:09 PM

I've had that same problem with the panel line wash. I've had success 2 differnet ways with it. When all the lines are shallow I would wait longer to remove it as it just wasn't dry enough. In your case with different depths I would roll the cuetip on a paper towel and remove the excess spirits so it's just damp. Uses more cuetips but hey, they're cheap :-)

I'd also add that imho not every panel ilne should have wash in it anyway. When using a wash I think this is probably closer to reality than having every line and rivet stand out. 

Love how this is coming along. Keep up the detailed posts!

In the pattern: Scale Shipyard's 1/48 Balao Class Sub! leaning out the list...NOT! Ha, added to it again - Viper MkVii, 1/32 THUD & F-15J plus a weekend madness build!

  • Member since
    March 2012
  • From: Louisville, KY
Posted by Builder 2010 on Tuesday, May 28, 2019 10:09 PM

Thanks for all the nice thoughts!

Busy day, that is after I fixed a bone-headed mistake on installing A SECOND CEILING FAN. On Sunday, I replaced one of two ceiling fans in our sun room. Other than being somewhat of a pain working overhead, didn't have any problems. When we compared it to  the other 20 year-old fan, we quickly decided to replace it also, so I went back to Lowes and bought another. I put that in yesterday. Last night I'm staring at the thing and something seemed wrong. It was! I had put 3 out of 5 blades on their brackets upside down with the ribbed shiny side facing downwards and the night fake wood grained side facing up. To remove the blades you have to remove the light housing and then reach the blade screws working through a hole in the light switch housing, and it's a pain. But it's right now. My wife says it was my ADD showing its ugly head.

Then I got downstairs and did some serious work on the Thud.

First up was masking the nose cone and painting semi-gloss black. I'm going to back mask it when I over-coat it with flat spray. I want the nose cone to have some sheen. I used the Tamiya narrow flexible masking for curves. There is a yellow stripe separating the black from the camo. I have tape for that too.

I pulled all the masking from the plane including the paper towel wadding in the wheel wells. I needed to touch up the interior green with a brush. I took the gun compartment cover off the Vulcan and after carefully removing all the Blue Tack and then touching up the Nato Black paint. 

I needed a way to hold the plane upside down and not in my lap. I tried that and it was way to precarious. I have lots of big styrofoam blocks left over from scenery building on the railroad. I cut out some notches that let the fuze and the tail sit down and ended up with a very good way of working on all the bottom stuff that was coming.

I then masked and painted the black portions of the Targeting Pods on the lower fuselage flanks. Again, I made use of the Tamiya flexible curve tape to wrap around the curves. It did some almost completely except the football-shaped antenna end in the middle of the pods. In normal use this pod is a cylindrical affair that usually underslung on a plane. In the case of the F-105G, they split the cylinder in half and permenantly mounted each half to the planes undersides.

I used some liquid mask on the football's ends just to seal that tight little curve.

I then fully enclosed the area with wide Tamiya tape and then fully dressed the "surgical area" with newspaper so no black overspray went anywhere I didn't want it. A lot of work for a very little bit of paint.

The end result was pleasing with a couple of tiny spots that needed some touch up with bottom color.

It was time to overcoat the flat-painted areas with some gloss to both protect the paint from the Tamiya panel accent AND provides the decal surface. I used Tamiya gloss clear from the bottle thinned a bit and airbrushed. It's not the glossiest, and maybe I should have used lacquer, but that train has now left the station.

Then I decided to get really frisky. I wanted to try and use Tamiya Panel Accent Color and bring out the panels and fasteners on the bottom (and the rest of the plane).

I again watched some videos on using this product since I'm not quite sure when to remove the excess. Apparently, you should wait until it dries, then go back and with a very lightly moistened Q-tip with some low-odor mineral spirits. After that you clean the residue with a clean Q-tip.

On the first side I added the accent to the panel lines AND all the fasteners, but it created a lot of product to remove. On the other side, I just added it to the seam lines. I think that may be better. In either case, there is some residue left behind that adds some character to the bottom. It's no longer prisitine.

This was the side with the fastener coloring.

Here's is the entire bottom done. I went back and cleaned up the dirty area behind the front landing gear after I took this picture. These planes were rode hard and put away wet so a little grunge probably is okay.

I brought the panel painting up around the plane and it's looking decent.

I find the success is simply based on the depth of the engraving done by Trumpeter. The vertical seams are engraved more sharply than the horizontal ones. When I do the wipe down, the horizontal lines tend to lose the accent.

I went downstairs tonight to take these last pictures. This last one I tried on the canopies just for fun and found that my painting of the aft canopy needs a repaint due to having light green where dark green should to. Easy fix.

Tomorrow I will continue on this path and finish up the panel line work. I then have to get serious about finishing the cockpits and canopies with the PE that needs to be added. I'll then start decaling of which there are a lot. Finally it will be dull coat time.

  • Member since
    April 2003
  • From: USA
Posted by keavdog on Saturday, May 25, 2019 6:20 PM

That is a big bird!  Sure looks great.  The cammo looks fantastic and congrats on the ships!  Well deserved.

Thanks,

John

  • Member since
    January 2015
Posted by TheMongoose on Saturday, May 25, 2019 6:08 PM

Looking like a THID! i expeyour patron is going to love it. Does he have a thought on where it will be displayed?

In the pattern: Scale Shipyard's 1/48 Balao Class Sub! leaning out the list...NOT! Ha, added to it again - Viper MkVii, 1/32 THUD & F-15J plus a weekend madness build!

  • Member since
    March 2012
  • From: Louisville, KY
Posted by Builder 2010 on Friday, May 24, 2019 3:58 PM

After rechecking the Federal Standard color charts, this color is the one that is listed. I am going with it.

Did all the body painting today, and all by hand. I went back and cleaned up the damarcation lines using the fine line brush set to 15 pounds as was suggested by a reader on the other forum upon which I post all this. I then went back and forth several times further refining the lines, and then fixing the light bottom which had been receiving some minor over-spray during all this. I'm okay with the results. Again, since this model is for someone else and not me, I felt more comfortable not trying any techiniques about which I am not familiar, specifically "pre-shading panel lines." I leave that experimentation for a kit which I'm going to keep.

I also painted the colors onto the canopies and the refueling probe door that will be open on the model. I still have to mask the nose and paint it black, but I'm waiting until Monday when everything is really nice and dry before touching anything. I happy that I was able to do all the painting freehand. It saved a lot of handling.

For the light green I took Tamiya standard flat green and added a bit of white to it. I was comparing it to a FS color sample on my phone. I know this isn't precise, but it gave me the contrast difference I was looking for against the Dark Green.

After it's all dry, I'm going to overcoat it with some gloss or another. I may use Pledge or go with Tamiya clear. On the Corsair I used Testors "Wet Look Gloss" which worked really nice. I may go that route too. I'm a little squeamish with rattle cans since you really can't control them like the airbrush.

  • Member since
    March 2012
  • From: Louisville, KY
Posted by Builder 2010 on Thursday, May 23, 2019 7:35 PM

Short session... Started the color painting. Decided to try using the "rolled up masking tape" method of making a soft edged mask. I decided to use the centerline tank as my test subject. It didn't work well with the overspray being significantly different where the tape rolls were and not. So I had to do a hand re-shoot. As it turned out, I liked the way the hand spray worked better. The results are passable and give a very soft edge.

Using a pencil, I marked out the tan, light green and dark green areas of the SEA Camo scheme as shown on the instructions color sheet. My patron has chosent the shark mouth plane, but the camo doesn't change. I just found out today that the Wild Weasel has that afterburner vent intake at the base of the vertical stab was plugged with a aluminum plate. It's not too late to make that conversion. I also know that the tail is too short for the G model, but I didn't want to spring for the resin replacement.

I started painting with the "tan" and hand sprayed the "T" marked areas. I thought I lightened the light brown enough, but the end results are just plain wrong. It looks more like a NATO tank color scheme, not a late 1960s Vietnam Era aircraft. I will reshoot this bit. Since none of the other colors are NOT there it shouldn't be too difficult.

Tomorrow should he a longer session so we'll see how I do. I don't have much experience doing camo schemes since the last two planes I did were late WW2 Naval planes. I'm seriously thinking about not using any masks and doing it all freehand. Any opinions? The hobby shop has a new product that specifically designed to do free-form camo masking. It was $15.00 so I was reluctant to get it, but now I'm no so sure...

  • Member since
    March 2012
  • From: Louisville, KY
Posted by Builder 2010 on Wednesday, May 22, 2019 5:21 PM

Thanks! I didn't really start being able to scratch-build until my mid-60s. Now... based on the major projects I've done for my railroad, it doesn't phase me.

Finally today was the first painting day. I mixed up a very light, light gray using gloss Tamiya White and just a taste of Nato Black plus some Iso Alcohol and a few drops of retarder. I put the first coat on the gear doors after affixing them with some masking tape loops, and was going to paint the nose gear doors when I saw that a) I hadn't painted their insides with interior green and b) there were huge ejection pin marks that I really couldn't ignore since these WILL BE SEEN. So I stopped painting and filled the divots. Some were proud of the surface and needed to be chiseled off and others were indentations requiring filling. Early Trumpeter is nortorious for this.

I then stuck them to some tape along with the others and painted them all.

I paint their interior green parts after all the white work is done.

I drilled the missiles on their mating surfaces to accept some green florists wire. The wire is 0.046" and the drill was 0.0455 so it was a very nice push fit. I then attached all the wires to the rotary painting stand in prep for their painting which would be straight gloss white. I won't need to fill these holes since they're hidden by the mounting racks.

I didn't paint them until all the off-white bottom paint was done.

I started painting the model's bottom. It took several passes to get a nice coverage. Using gloss white as a base means I don't have to gloss it before decaling. That saves a step and reduces another chance for error. That dark spot at the foreground wing root is a reflection. The paint went on flawlessly. I'm letting dry thoroughly overnight so it's going to be easy to handle.

I also painted the bottom of the centerline tank since it's bottom color, not pure white.

The instructions show this tank as all white, but I've seen pictures that show it a two-tone affair with the dark green camo color on the top half with a soft edge.

I then painted the missiles their pure white. This is also gloss so it will faciliate decaling. There are lots of decals on the missiles and the their supports. Having glued on the pylons will not make decaling easier.

The last things I did was mask the canopies and put on their respective base coats.

I completely masked the inner surface and then masked the glazing on the outside.

I painted the base coat for the canopies the interior gray color I've been using. There's a bunch of Eduard PE that goes into these parts after the paint is complete. This was Tamiya Light Gray Primer.

I painted the windscreen a black base coat to work with the rest of the black forward cockpit area. This is semi-gloss black, but it doesn't matter since it's going to be glossy looking at it from the inside.

Tomorrow, I'll start working on the camo scheme. I've sent a note to my patron asking which version does he want, Bam Bam or the one with the shark mouth. I don't need him to decide right now since it's a decal question and I've got a lot of painting and masking to do.

  • Member since
    January 2015
Posted by TheMongoose on Wednesday, May 22, 2019 2:36 PM

That addapter looksthe part! Nice job scratching one up.

In the pattern: Scale Shipyard's 1/48 Balao Class Sub! leaning out the list...NOT! Ha, added to it again - Viper MkVii, 1/32 THUD & F-15J plus a weekend madness build!

  • Member since
    March 2012
  • From: Louisville, KY
Posted by Builder 2010 on Tuesday, May 21, 2019 6:10 PM

Accidentally closed this window before posting and lost the whole deal. So I do it again.

Short session today and I was fully ready to start painting. Then I noticed on the instructions that when you're using a dual Shrike option on the outer pylon you need to use an adapter, but when using the single missile, the missile attaches directly to the pylon. I didn't notice this diffierence until today, but had thrown away two of the four adapters I would need. I tossed them in the trash can yesterday thinking they weren't needed.

So I spent more that 45 minutes searching through disgusting crap with tons of floor sweeping, emptying one trash bag into another and carefully sifting through the refuse. I found one! I did this bag transfer activity four times, but couldn't find the second one. So why did that have to disappear instead of all the other little bits and pieces of junk?

So I scratch-built one. I should have done this right away. It turns out that the kit part is just about the thickness of four laminated pieces of 0.040" styrene. I measured the original with the caliper and transferred the width to the Duplicutter and made four pieces. The two pieces comprising the middle needed to be notched for the female slots that engage with the lugs on the pylon. So I measured and cut them with the micro-razor saw and the chip out the piece with a very small chisel. The two ends are reduced by the amount on the original.

The sides have a thicker piece which I cut out of some 0.015" ABS, and then I traced the end tapers and knocked off most of the stock with the 1" belt sander, and then hand sanded the final finish.

I added the simulated fasteners with a dividers and then cut the corners off some 0.040" stock and use them to form the male nubs that connect to the missile.

I glued all the adapters onto the plane so the would dry hard before I had to handle it for painting and since they all get painted bottom color.

When painted it will be hard to tell which is the real one and which is "Memorex" (I showing my age). Tomorrow I will get back to painting, but first I need to make a way to hold all the missiles. That won't take long.

  • Member since
    March 2012
  • From: Louisville, KY
Posted by Builder 2010 on Monday, May 20, 2019 6:14 PM

Short session, but here's what got done.

All of the fuselage masking is complete waiting for paint. According to my hobby shop experts, Vietnam Era fighters had soft-edge masking... more complications..., but this masking was just the first step to protect previously completed areas being, gun bay, exhaust, struts and wheel wells and cockpit. I used wet paper towels for the big areas supported by Tamiya tapes of varying widths. To hold the gun bay door on I used Blue Tack lumps and just mashed it together until it seated properly. The "stainless steel" muzzle panel was also masked. Any leakage will be hand painted later.

I masked the exhaust by sliding individual pieces of wide Tamiya tape under the rear sheet metal. At first I tried to door it cicularly, but that proved impossible, so I went to a radial plan. I shoved wet toweling in to the big open space in the middle. I also put paper towels into the wing portion of the jet air intakes. I painted those surfaces white and from what I've seen on real planes, intake trunks are often white.

I used paper towels on all the wheel wells also, but I first made paper sleeves to wrap around the struts themselves. Again, any leakage will be hand brushed. I also masked the fuel probe so it's outer panel can be painted body color. I will have to put it on the plane at one point to line up the camo breaks.

I then realized that it would be prudent to glue on the hard points on the wings since these will be bottom color and it will hide any glue errors. I tried them all on and found that I had glued the support rails for the Standard HARM missiles backwards. I ripped them off and replaced any sway braces destroyed in the process. Luckily, since there were so many gravity bombs included in the kit (4 frets) that there was a second set of support rails and many more correct sway braces. I was able to make the fix and then glue the hardpoints onto the plane.

In the above I haven't yet glued on the rails since they were drying. I'll do that tomorrow.

So here she is all ready for the paint shop. I gave the entire plane a wipe down with an iso alcohol soaked piece of paper towels. From now on all handling will be done wearing nitrile gloves only.

To paint the missiles I'm going to drill a small hole in the area near the mounting holes and use wires glued in to hold them still. First paint step will be to just spray the entire bottom and outter wheel door surfaces bottom white (a very light gray). I was thinking about shooting some Tamiya white primer first, but it's rattle can I don't have as much control over it as I do with my airbrush.

  • Member since
    March 2012
  • From: Louisville, KY
Posted by Builder 2010 on Sunday, May 19, 2019 5:25 PM

Yesterday's IPMS/Military Modelers Club of Louisville show was loads of fun. The Missouri got a gold medal and the Essex got silver in the Ships 1:400 and larger category, and Missouri won best ship. There weren't many entries so my competition was pretty light, but the comments and interest were wonderful! It was their largest show in the club's 43 history with over 350 entries. 

Then today (Sunday), my wife went to a play with our daughter so I had a couple of hours in the shop. The Thud is getting into the final stages with masking and painting just around the corner.

I got the dive breaks finished starting with a coat of Tamiya flat clear and followed by a Tamiya Panel Line Accent wash to give some definition to the rivets.

They're ready to go one the model after all the body painting is done.

I then finished all the ordinance and glued the adapter for the large Standard HARM missile. All the nibs are removed and the surfaces sanded using one of those Bow sanders with some fine grit abrasive. I had to fill just one spot. They're ready for painting and decaling.

I was unsure about when to attach all the sensors and antenna to the body. They're delicate, stick out and will probably get whacked, but I really didn't want to have to glue anything to the plane after all the painting, so I atteched them all.

There are five in the fore area.

And a vent, large blade antenna and a vent tube. The vent tube was just a piece of plastic and there was no hole in which to glue it, so I made a real brass one instead with micro-tubing. The filed the sloped outlet after CA'ing it into the fuselage.

Tomorrow's Monday so that means more shop work. This plane could be done in a bit over a week.

JOIN OUR COMMUNITY!

Our community is FREE to join. To participate you must either login or register for an account.

SEARCH FORUMS
FREE NEWSLETTER
By signing up you may also receive reader surveys and occasional special offers. We do not sell, rent or trade our email lists. View our Privacy Policy.