SEARCH FINESCALE.COM

Enter keywords or a search phrase below:

Steel Cats (Sept. 2012-Aug. 2013)

321914 views
3330 replies
1 rating 2 rating 3 rating 4 rating 5 rating
  • Member since
    July 2004
  • From: Sonora Desert
Posted by stikpusher on Wednesday, August 21, 2013 11:57 AM

Mike/TB, excellent work on both the zimm and the camo job... truly excellent.


F is for FIRE, That burns down the whole town!

U is for URANIUM... BOMBS!

N is for NO SURVIVORS...

       - Plankton

LSM


  • Member since
    April 2013
Posted by SchattenSpartan on Wednesday, August 21, 2013 5:12 PM

Wanna see some more pics?

I managed to complete construction on the upper hull (except for 3 handles I'll make out of wire and the big engine grills) Here's a pic of how it looks right now:

A cllose-up of the engine deck (a lot of small hooks and stuff there - I almost lost one of them...):

The PE grills were a royal pain to put in place. They were bent and wrinkled in several spots when I got the kit (another reason I got it that cheap) and I had to  get them back to their normal shape first. It took me about 2 hours to straighten them and glue them in place. I also added that beaten-up look they had on the real vehicles:

I did all the remaining modifications to the upper hull by removeng the mounting plates for the plastic fenders. I also added the headlight:

There are small gaps between the upper hull and the protruding parts of the lower hull sides I need to fill when joining the hull halves...

I also glued the rear plate to the lower hull. I still need to add all the weld seams back there (5 in total), but that has to wait untill the upper hull is in place:

The exhausts are assembled and I'll sand the joints when they are completely dry:

Smae with the gun barrel:

Those of you who didn't build this kit already might ask themselves "What is he doing with the plastic barrel, when the kit has a metal one in the box already?". The problem with that metal barrel is that the muzzle brake is not included separately. I have to assemble the plastic barrel and cut the muzzle brake off and add it to the metal one...

Here's the pic that inspired me to paint my King Tiger with winter camo (I'll use 113 as my vehicle number as well):

It's on the back of my reference book for the Tiger and all its variants (all the prototypes, Tiger, Tiger P, Ferdinand/Elefant, Tiger 2, Jagdtiger and the Vk 4502s.)

The book is in German only, but I can recommend it even if you don't speak German. There are lots of great wartime pics and plans in it and it includes a lot of different vehicles with a surprisingly good amount of information/pics for each vehicle. I picked mine up for 20€ so it's not very expensive either:

 Cheers, Clemens


  • Member since
    July 2004
  • From: Sonora Desert
Posted by stikpusher on Wednesday, August 21, 2013 6:17 PM

You are making very rapid progress there Clemens! What is next?


F is for FIRE, That burns down the whole town!

U is for URANIUM... BOMBS!

N is for NO SURVIVORS...

       - Plankton

LSM


  • Member since
    April 2013
Posted by SchattenSpartan on Wednesday, August 21, 2013 6:57 PM

What is next? Hmm, let me think about that for a sec...

  • clean up the seam on the muzzle brake and attach it to the gun barrel
  • add big engine grills (I have no clue on how to bend those things...)
  • glue the mounting brackets for the fenders in place
  • add a cable for the headlight
  • sand those damn roadwheels (all 18 pairs of them!)
  • sand down the seams on the exhausts
  • add all the towing hooks (6 pieces)
  • glue the hull halves together
  • add weld seams to the rear plate
  • fill some minor gaps (there's only 2 of them so far and they are really small)

Most tasks on that list shouldn't take more than 10 minutes (except the roadwheels and the engine grills), so I hope I can get everything but the fenders assembled tomorrow and paint it all up this Friday (just the Dunkelgelb and the basic camo)

Any tips on those engine grills? The new Dragon kits have them pre-bent but not this one, and they are wrinkled a bit to make things worse...

If I manage to get everything on the list done tomorrow, ther's just the following left to do on Friday before I can start painting:

  • cut tools from the sprues
  • bend PE fenders (should be an easy task once I get the hang of it - I won't use 4 out of 10 fenders anyway, so I have some pieces to practice with)
  • asssemble the towing cables (those pesky steel wire ones - no idea on how to bend them properly)

I'll assemble the tracks when I am painting/weathering the model prior to applying all the mud... They are those "Magic" tracks which are not magic at all - 3 ejector pin marks to sand off on the flat track links (easy one) and 2 on the ones with the giuding teeth (that's going to be a pain...). I'd get me some friul tracks, but my LHS has none of them left for the KT and ordering them would take way too long...

  • Member since
    March 2003
  • From: Rain USA, Vancouver WA
Posted by tigerman on Thursday, August 22, 2013 1:36 AM

Mike, that's brilliant work on the camo.

   http://i7.photobucket.com/albums/y269/wing_nut_5o/PANZERJAGERGB.jpg

 Eric 

  • Member since
    April 2005
Posted by Thunderbolt379 on Thursday, August 22, 2013 2:59 AM

Thanks Eric! Am home from work and contemplating making a start on the wash detailing...

Clemens -- I bent the AM grills for mine but can't remember how... Rolled around a small-diameter tube, maybe? I remember it wasn't difficult, but one settled down more accurately than the other.

Mike/TB379

http://worldinminiature.blogspot.com/

  • Member since
    November 2003
  • From: Nashville, TN area
Posted by bobbaily on Thursday, August 22, 2013 6:32 AM

Eric-love the camo scheme.

Clemens-you are making great progress-looking forward to more pics.

Bob


  • Member since
    November 2009
  • From: SW Virginia
Posted by Gamera on Thursday, August 22, 2013 8:49 AM

Clemons: You're making great progress. I wouldn't worry too much about the engine grilles - as you said the crew walked around on top of them during maintenance so they'd tend to be a little dinged and ripped up.

And those tracks are Magic compared to the old ones that you had to cut every single link off the sprue and clean it up. And these are single piece- last Sherman Easy Eight treads (I think the T80 series track- US Korean War issue in any case) I built consisted of THREE parts per every track link to clean up and fit- AAARRRRRRRRGGGGGGGG!!!!!!!!!!

"I dream in fire but work in clay." -Arthur Machen


  • Member since
    April 2013
Posted by SchattenSpartan on Thursday, August 22, 2013 10:49 AM

Thanks a lot!

Cliff: That sounds horrible! I still prefer the friuls, but like I said, I don't have the time to wait for them... I absolutely dislike Dragon's PE frets BTW. They look great, but the material is very flimsy and once you bend it, you can't really bend it back to its original shape (Eduard's PE metal is much better).

  • Member since
    April 2005
  • From: Australia
Posted by taxtp on Thursday, August 22, 2013 4:30 PM

This has been one of the most informative group builds that I've seen. It's definitely helped me along. It's been some time since I posted here but I decided I should pick up my 1/48 Tiger I again and complete it before the deadline. It's the Tamiya Tiger I early, and I wanted to finish it in Panzer Grey. It's got the Voyager P/E set, and a turned metal gun barrel and MG.

Here it is with color modulation using Tamiya acrylics, and a filter using AK Intereactive Blue Brown for Panzer Grey, heavily thinned.

At this point, the tracks are flat black, dry brushed with an 80:20 mix of Tamiya metallic grey and flat black, and washd with a 'rust' ix of Humbrol 62 Leather mixed with 113 Rust.

Cheers

Tony

I'm just taking it one GB at a time.

  • Member since
    April 2005
  • From: Australia
Posted by taxtp on Thursday, August 22, 2013 4:48 PM

Trouble is, once I started, I got so enthusiastic that I couldn't stop to post my photos, so here's the rest of it. I gave it anothe filter using Burnt Sienna and Titanium White oil paint thinned with enamel thinner. A small amount of dry brushing to the edges, some chips, scratches down the sides, some specific weathering on various grills and the like, the pioneer tools, some chains, slightly rusted and then a good application of AK Interactive European Earth to the wheels, tracks, underside and lower hull sides. I'm not really an armor modeler, but I'm OK with the result. I hope you enjoy it. I only wish I had better lighting, I  think some of the subtleties are lost in the photos.

Cheers

Tony

I'm just taking it one GB at a time.

  • Member since
    April 2013
Posted by SchattenSpartan on Thursday, August 22, 2013 6:20 PM

Your Tiger looks absolutely gorgeous, Tony!

  • Member since
    April 2013
Posted by SchattenSpartan on Thursday, August 22, 2013 6:33 PM

Only a text update today:

I didn't make as much progress as I hoped. The reason for that are the engine grills. The PE parts were almost impossible to glue in place. They had the wrong shape and were too big. It took me 4 hours (and 6 attempts) to get them glued onto the plastic parts and another hour to fill any gaps with superglue and sand it all smooth. I think it looks kinda ok-ish now, but I won't know for sure untill I paint them up. I'll just leave them off if they don't look good... They were only held in place by 4 tiny screws anyway, so I think some tank crews removed them once they were too damaged... Any information on that?

The only other task I accomplished is attaching the muzzle brake. I also sanded roughly half the amount of roadwheels.

I'll assemble the hull and add the weld seams tomorrow morning. The wire handles/ headlight cable shouldn't take more than 10 minutes to attach to the model, so I WILL be able to paint her up tomorrow (even if I have to work all night long!)

  • Member since
    March 2003
  • From: Rain USA, Vancouver WA
Posted by tigerman on Friday, August 23, 2013 12:06 AM

Great work on the Tiger Tony. Any chance you can get some outdoor photos? The flash is washing out the detail.

   http://i7.photobucket.com/albums/y269/wing_nut_5o/PANZERJAGERGB.jpg

 Eric 

  • Member since
    April 2005
  • From: Australia
Posted by taxtp on Friday, August 23, 2013 1:10 AM

Sure Tigerman, I'll do that in a day or two when the weather clears.

Cheers

Tony

I'm just taking it one GB at a time.

  • Member since
    November 2003
  • From: Nashville, TN area
Posted by bobbaily on Friday, August 23, 2013 6:03 AM

Impressive work Tony-I started on the same kit a few years back and ended up putting it back in the box-would have never known it was 1/48 if you hadn't said-great job on the weathering too....well done.

Bob


  • Member since
    April 2005
Posted by Thunderbolt379 on Friday, August 23, 2013 8:50 AM

Tony, that is one good lookin' Tiger!

Progress on the Royal Kitty -- I've done two rounds of oil wash weathering, fine stuff, for closeups, nothing you can see from two feet back, at least not with my eyesight! Have done some drybrushing too, but acrylics are my least favourite medium for that job and my enamels are packed away as I was using them so little in the last year. I don't have a decent set of oils to mix the drybrushing shades in, so I'm going to have to compromise a bit on that aspect, at least at this point. Over the weekend I want to assemble the running gear, which means wash and drybrush the tracks, wash and graphite-dust the wheels, then get everything mounted. Also, I would like to get the external fittings painted, and possibly apply the decals. There's plenty in that lot to keep me busy -- more photos soon.

Mike/TB379

http://worldinminiature.blogspot.com/

  • Member since
    November 2009
  • From: SW Virginia
Posted by Gamera on Friday, August 23, 2013 11:23 AM

Sharp work Tony, cool to see a grey Tiger for a nice change!

Clemons & Mike: Looking forward to your photos guys!

"I dream in fire but work in clay." -Arthur Machen


  • Member since
    April 2013
Posted by SchattenSpartan on Friday, August 23, 2013 2:30 PM

Did someone say "photos"?

Well, here are some for you!

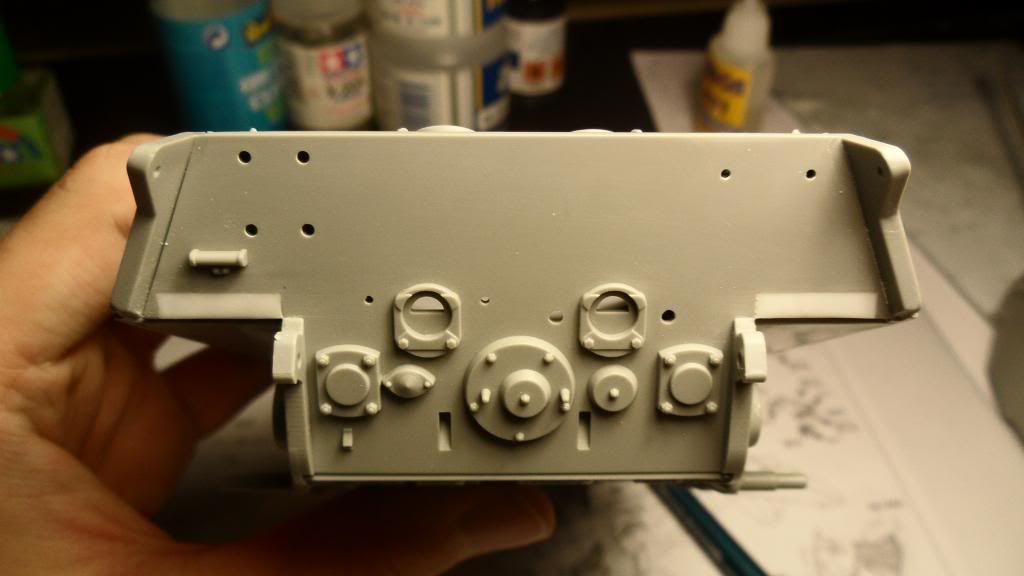
I'm still not completely done with the construction work, but she is almost ready for some paint! I am just waiting for the glue on the streched sprue (glued to the rear plate for creating weld seams) to set, while I'm writing this post.

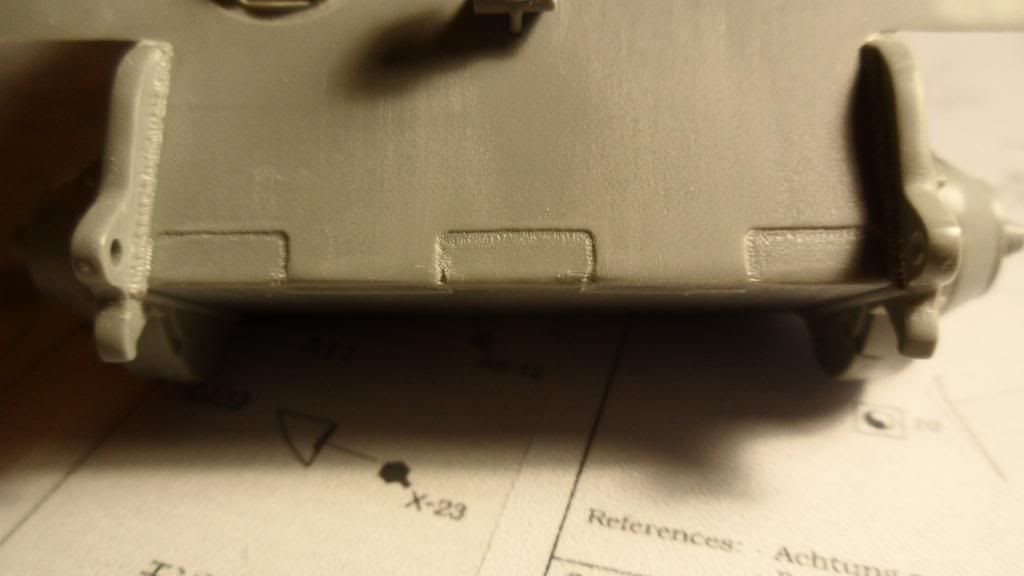
I had to modify the rear plate as well for the Eduard fenders (fill in the recesses for the plastic fenders and sand off the raised details around them):

First thing I did was to glue some strips of plastic in the recesses I had to fill:

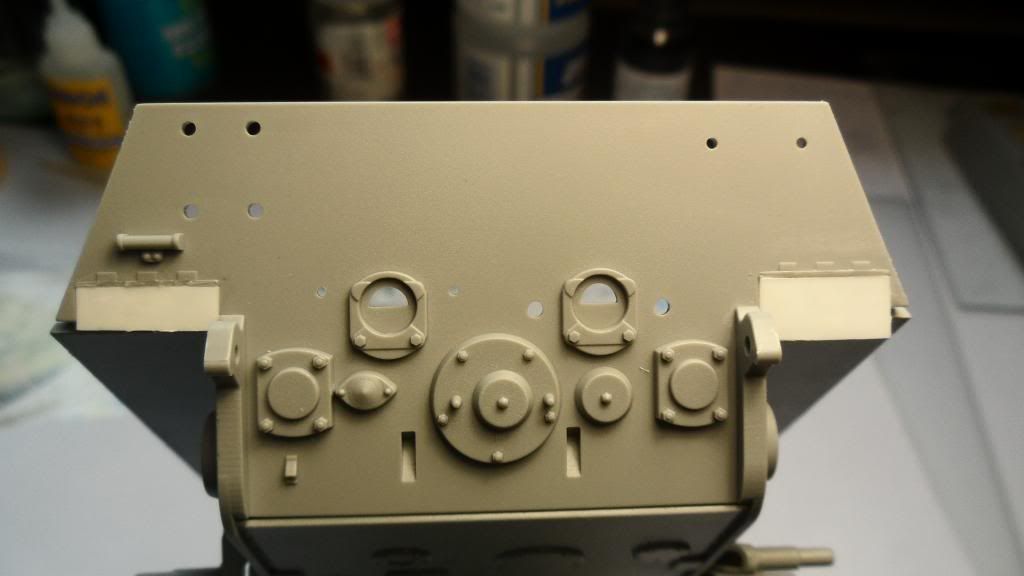
Then I cut them to shape using a new scalpel blade and sanded everything smooth:

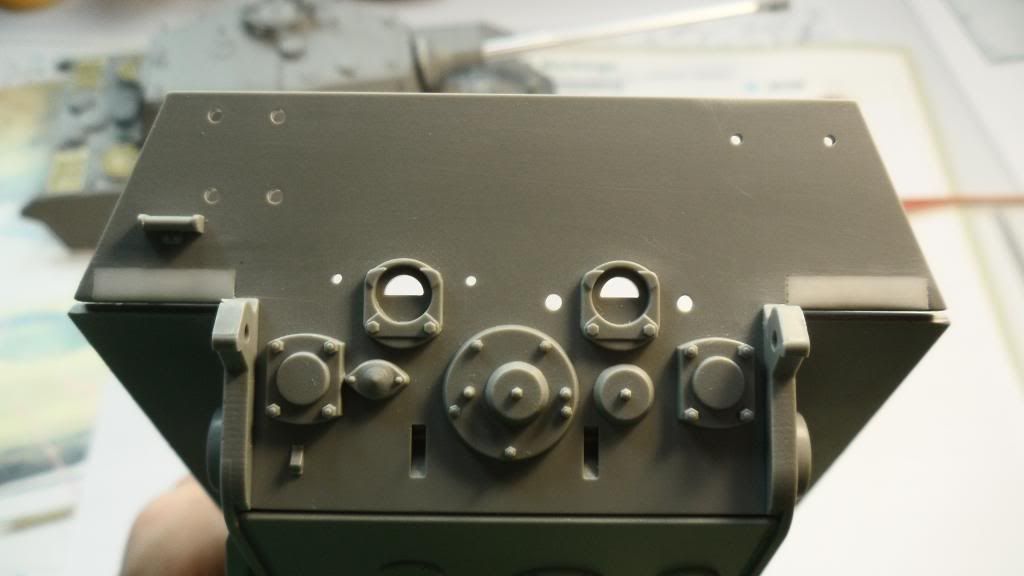
It's not perfect, but the area will be covered up by the rear fenders anyway. It would look a lot better if I spent more time on it, but time is the thing I'm lacking the most ATM... (There you have it! The ultimate definition of time! Wink)

the hull is glued together now:

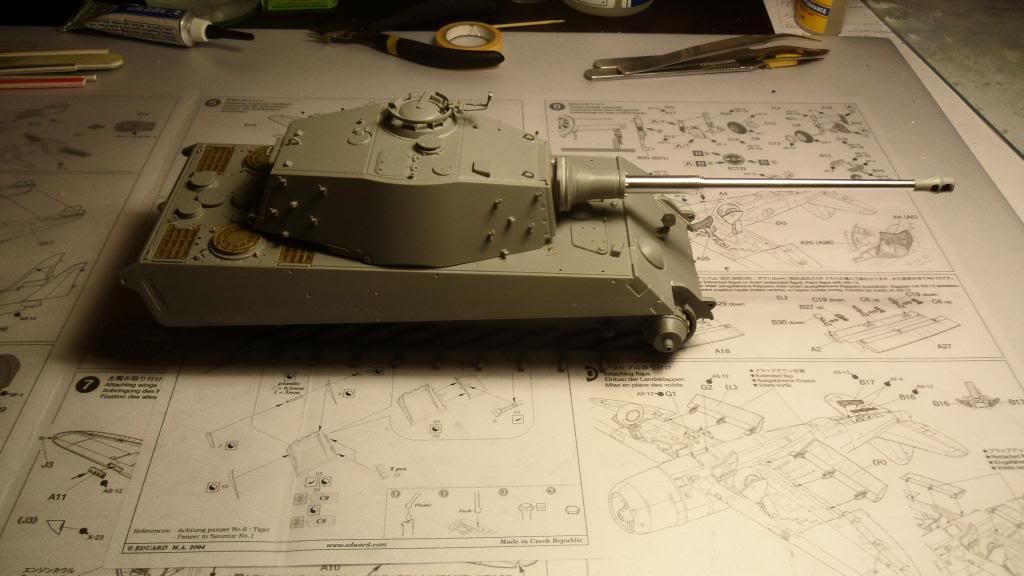
There is a small step on the left side of the hull, but I'll try to sand that away.

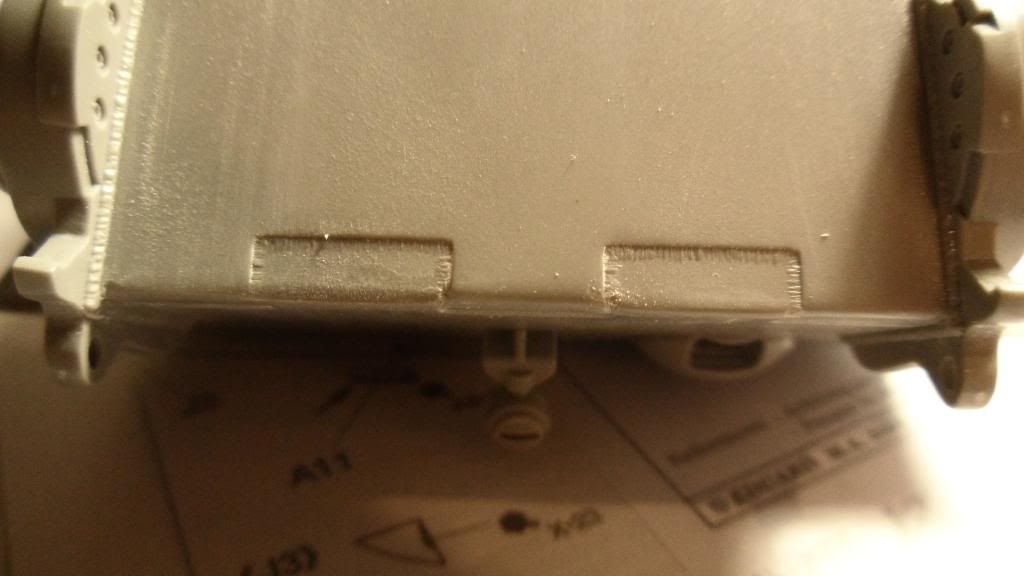
Rear plate/upper hull joint:

The small gaps on the sides are going to be covered by the weld seams...

Here's the front end of the tank:

I noticed that the edge on the front was way too rounded after looking at the pics and fixed that already (it is still a bit rounded, but looks much better now)

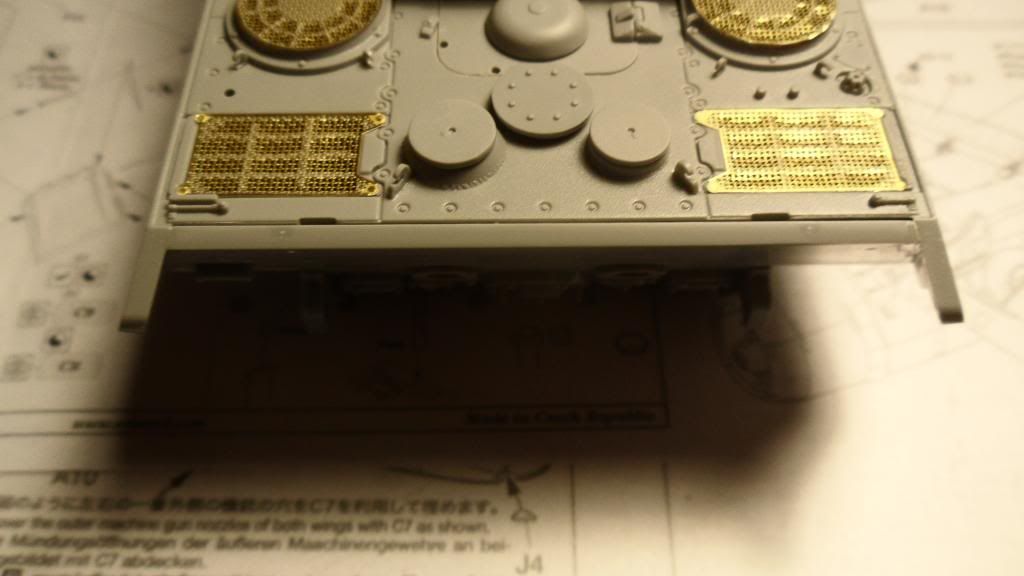
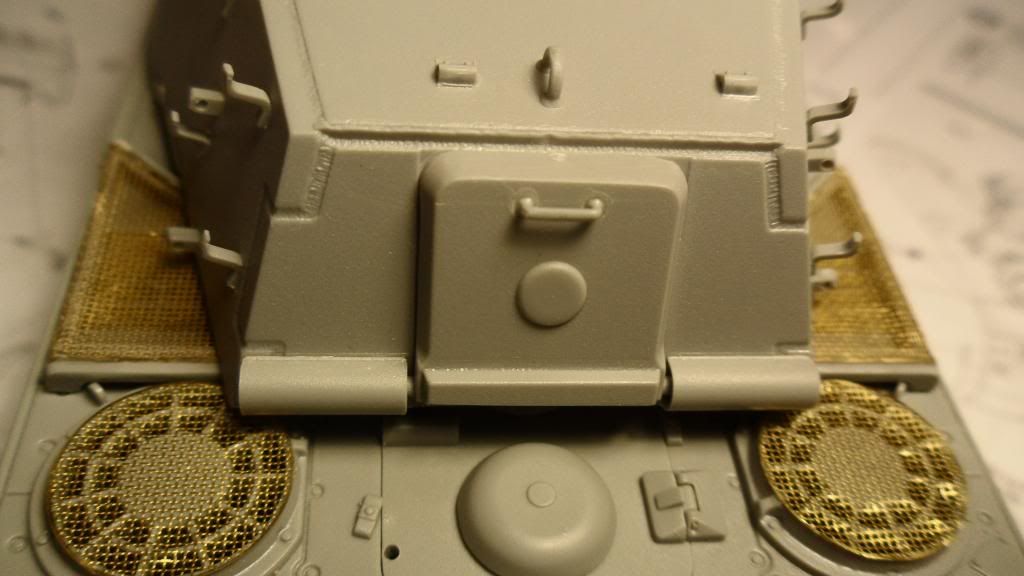
And some pics of the engine grills. I don't know how they look when they are painted, but I hope they turn out good enough to mount them on the vehicle (I really like the look of them on the real thing!):

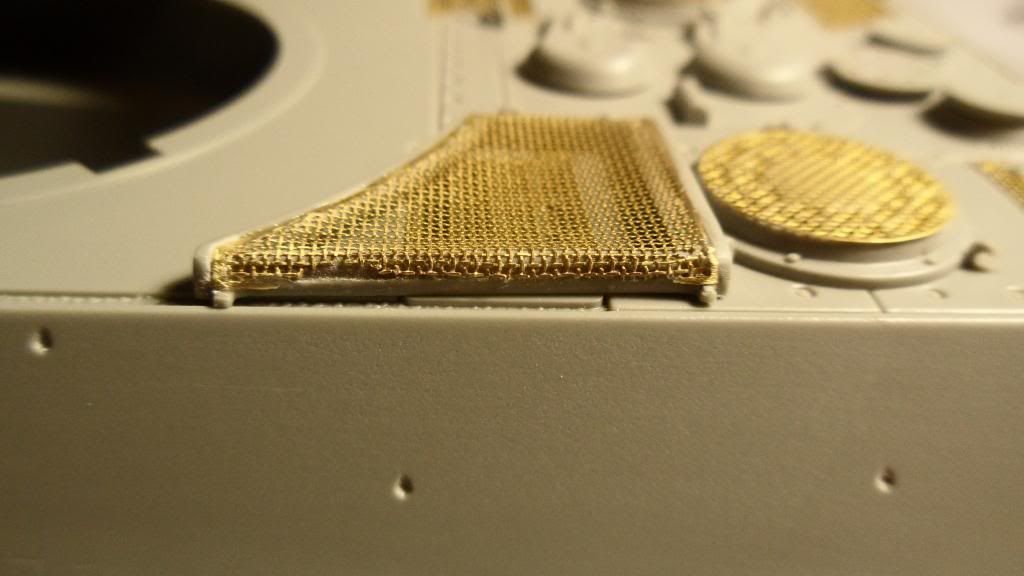
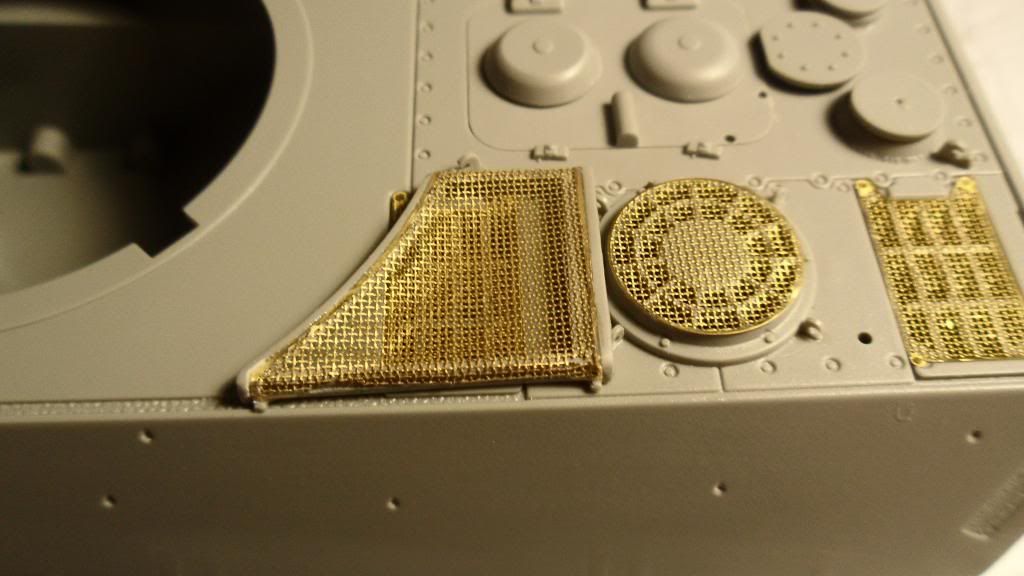
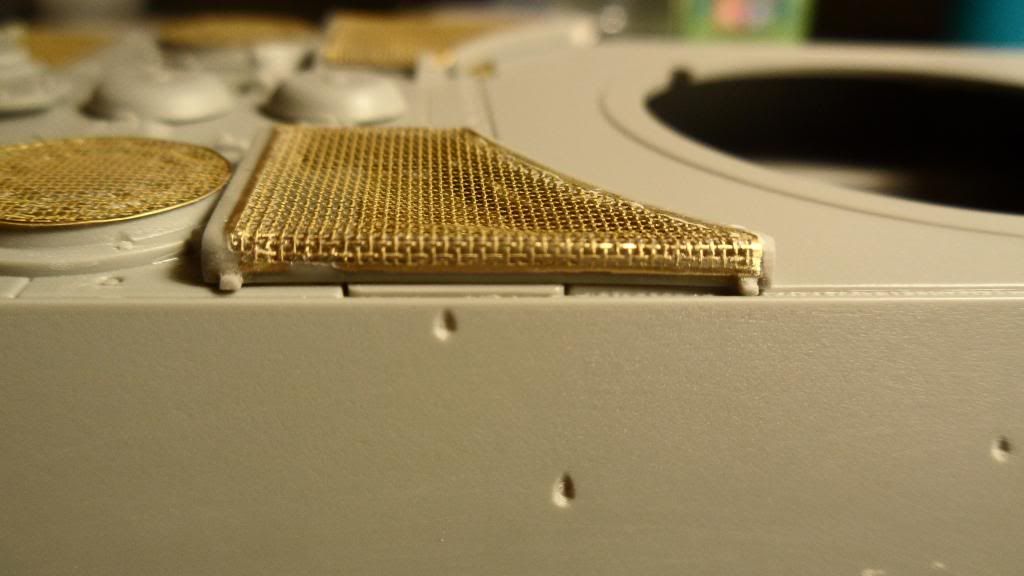
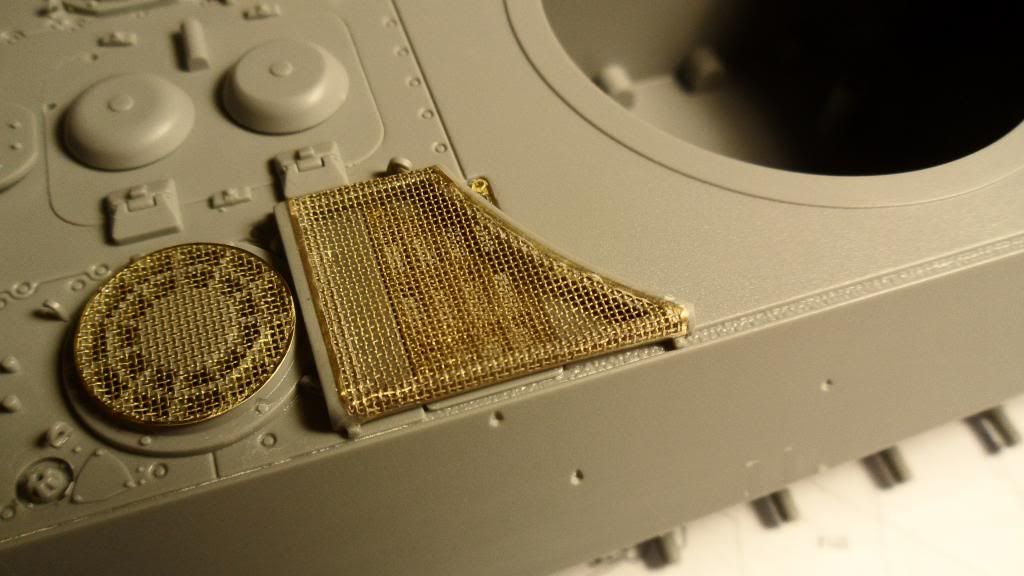
This is all you can see with the turret in place, so the only point where the grills have to look decent is the outer edge (the most problematic spot in the whole assembly Bang Head):

  Next time I'll build one of Dragon's Henschel King Tigers, I'll look for one of the kits with pre-bent engine grills (like the ones in the Porsche KT) or get me some Eduard/Aber replacements....

More pics later tonight (hopefully with some paint on...)

  • Member since
    May 2011
  • From: Illinois
Posted by armor86 on Friday, August 23, 2013 3:32 PM

Tony - I pick up some AK Intereactive Blue Brown for Panzer Grey earlier this year but have not tried it yet. Used the AK DAK filter and wash and seem to do the trick! Armor86

Panzer III project from last year using pigments from ModelMakerZ ... for blue/brown German Grey. 


Dan

  • Member since
    July 2013
  • From: Talent, OR
Posted by bitbite on Friday, August 23, 2013 3:33 PM

Looks great so far, Schatten. Can't wait to see it painted. Beer

"Resist the urge to greedily fondle the parts . . ." - Sheperd Paine "Modeling Tanks and Military Vehicles" Page 5

  • Member since
    April 2013
Posted by SchattenSpartan on Friday, August 23, 2013 4:17 PM

Hey there buddy! Are you in here as well?

Tony: May I ask what paint you used for the gray? I have to remember that AK filter!

  • Member since
    July 2013
  • From: Talent, OR
Posted by bitbite on Friday, August 23, 2013 5:28 PM

Schatten - "Hey there buddy! Are you in here as well?"

Hopefully this was addressed to me . . . if so, unfortunately I am not.  Just saw it today and there's no way I'd be able to finish anything for it in time.  Lots of great builds here though.  Just lurking, learning, and enjoying.  Toast

"Resist the urge to greedily fondle the parts . . ." - Sheperd Paine "Modeling Tanks and Military Vehicles" Page 5

  • Member since
    April 2013
Posted by SchattenSpartan on Friday, August 23, 2013 5:38 PM

Yep, it was adressed to you! I have a hard time completeng my kitten in time... I won't be able to paint her up today. I'm still struggling with the weld seams. The stretched sprue I used to make them was too thick, so it takes forever to get one weld seam finished. I'm at number 3 now (1 more to go...)

  • Member since
    April 2013
Posted by SchattenSpartan on Friday, August 23, 2013 6:02 PM

No more pictures today, guys. I screwed up two of the weld-seams (it looks horrible). I'll go to my LHS tomorrow to pick up some white paint for the winter camo and ask the guys there for help...

  • Member since
    April 2013
Posted by SchattenSpartan on Friday, August 23, 2013 6:17 PM


This is how the "weld seams" look like:

1)

2)

Is it possible to fix that mess? Any tips? I need help!!!! Crying

  • Member since
    April 2005
Posted by Thunderbolt379 on Friday, August 23, 2013 7:11 PM

SS -- that's quite a reaction you got, I'm guessing the solvent was too hot for the plastic. Okay, assuming it's fully cured, I'd remove the mess by laying a square profile rat-tail file into the angle and filing it back. It may not be perfect but it'll get you close enough for it to not be noticeable. Then I would recreate the welds using a different method, either a 'cooler" solvent, or by laying in a thin strip of plastic and texturing it with the heated tip of a knife blade...

M/TB379

http://worldinminiature.blogspot.com/

  • Member since
    April 2013
Posted by SchattenSpartan on Friday, August 23, 2013 7:23 PM

The solvent is very hot indeed. It is actually extremely hot -Tamiya Extra thin Cement. Lots of it. I used this technique on Tamiya's IS-2 -with good results. The other 2 weld seams turned out quite good as well...

  • Member since
    April 2005
Posted by Thunderbolt379 on Saturday, August 24, 2013 8:51 AM

Progress for today -- I've been working on the running gear. The wheels got the oil pinwash treatment, and the rims were treated with pencil graphite. I used a tissue and really scrubbed the graphite into the paint, and the result is pretty amazing to the naked eye -- we'll see how visible it is in photographs, hopefully tomorrow. I also discovered I had camo'd the wrong side of the outer rank of roadwheels, so had to fire up the AB to zap on some RB and DY, then wash detail them. I need to drybrush silver enamel, and see if I can rustle up a little orange for fresh rust here and there, but by that point she should be about ready to mount the running gear. Then external fittings and decals...

M/TB379

http://worldinminiature.blogspot.com/

  • Member since
    April 2013
Posted by SchattenSpartan on Saturday, August 24, 2013 12:59 PM

I think I fixed the weld-seams. They are far from being perfect, but don't look that bad either. I'll post some pics later tonight...

JOIN OUR COMMUNITY!

Our community is FREE to join. To participate you must either login or register for an account.

SEARCH FORUMS
FREE NEWSLETTER
By signing up you may also receive reader surveys and occasional special offers. We do not sell, rent or trade our email lists. View our Privacy Policy.