SEARCH FINESCALE.COM

Enter keywords or a search phrase below:

Steel Cats (Sept. 2012-Aug. 2013)

321914 views
3330 replies
1 rating 2 rating 3 rating 4 rating 5 rating
  • Member since
    April 2013
Posted by SchattenSpartan on Friday, August 30, 2013 2:21 PM

stikpusher

SchattenSpartan

How about a round 3? I have plenty of cats in my stash...

me too... my old Panthers were purged during my last move early this year and do think we should open this up to modern kitties as well... Leopard, Gepard, Luchs...

Yep, including all the kittens would be cool! I have a Leopard (German recon paper-tank, not the modern one) in my stash, but I didn't have a reason to build it so far...

Malone, Bitbite: Thanks a lot guys! I neverr thought I could pull that off without any problems, but it looks like it worked just fine!

  • Member since
    April 2006
  • From: ON, Canada
Posted by jgeratic on Friday, August 30, 2013 3:23 PM

EB - from your description and from what can be seen, I can tell you put a major amount of effort in the weathering process.  Definitely one dirty cat you have there, great job!  I really like the look of the gun barrel from the top view.

I'm not sure what happened to the camou streaking on the lower ends, they appear to have become grey?  As for dust, I find a good starting point is a heavy dead matt finish.

I've also Rinaldi's first volume of work, and he mention's giving the hull a darker tone to emulate the weight of the vehicle.  Maybe instead of darkening the colour with black or some other neutral shade, take a page from the study of the colour wheel and complementary colours.  For instance, the complementary (or opposite) colour of green is red.  Utilizing red to darken green will give a more vibrant look overall.

--------------------------------------------------------

Shatten - white wash is looking right on.  You did not use any hairspray, or other such dedicated product, in between the gloss coat and white paint?

regards,

Jack

  • Member since
    April 2013
Posted by SchattenSpartan on Friday, August 30, 2013 3:37 PM

Thank you very much, Jack! I didn't use anything between the clear coat and the white paint.

  • Member since
    February 2010
  • From: Berkeley CA/St. Paul MN
Posted by EBergerud on Friday, August 30, 2013 3:48 PM

One of the few things I do understand about Rinaldi's book is color balancing. I make a lot of paints from primes and have six different color wheels and a Munsell volume. The problem with his idea in my view is pretty simple - you get a better looking kit, but not one that is necessarily true to reality. A real object might indeed be dull and lacking in visual interest. Recall that Rinaldi talks about tank "art" not tank "reproduction." Another Armor-Meister who is good with heavy weather is Karl Logan who has done several pieces for Finescale. He once talked about this and urged modelers to "evoke" an image with a model. I'm pretty sure the model he built that accompanied this was a Tiger II that was weathered to death: and it certainly evoked a very tired tank, a very tired crew and a desperate situation. But frankly I think a real tank in WWII would have rarely looked as rusted, dented, chipped, muded etc etc as pictured by Rinaldi or Wilder.  (I'm rather keen on Mig Jimenez's kits.)  For one thing "wastage" was so high in all armies that I doubt many vehicles were very old and those that were would have been rebuilt. As noted in my text, I am sure a combat AFV would have been really dirty and covered with dust and maybe mud. But the Spanish School gents make marvelous models and create arguably a kind of "art." (I'm satisfied with a blinking hard craft.) But I think they evoke more than reproduce. Every now and then I see someone square the circle. Some gent from Texas won the overall prize at a recent national AMPS convention with a German flak vehicle and it was jaw dropping - and I think very realistic. Maybe it takes talent. If so, there's a limit to what I'll ever do.

Eric


A model boat is much cheaper than a real one and won't sink with you in it.

  • Member since
    July 2004
  • From: Sonora Desert
Posted by stikpusher on Friday, August 30, 2013 4:28 PM

Eric I am with you on that. I spent about 6 years in Mech Infantry units (4 active, 2 in Guard, plus another 15 years in units with wheeled softskins, often alongside AFVs) in varying climates/conditions. I like to base my AFV weathering on stuff I saw firsthand here or there and yes, it does get pretty dulled down. Real operational AFVs rarely have all that artistic contrast stuff that draws the eye and in combat situations draw fire. Modern AFVs have a much longer lifespan than WWII stuff. It was not common at all for a vehicle to see a year or more of combat service then. Most were destroyed or replaced/rotated back for rebuild due to obscelesence. Yes they did get beat up in service, life was rough on them. But the current popular trends are leaning much more towards the overdone, rather than underdone.


F is for FIRE, That burns down the whole town!

U is for URANIUM... BOMBS!

N is for NO SURVIVORS...

       - Plankton

LSM


  • Member since
    February 2010
  • From: Berkeley CA/St. Paul MN
Posted by EBergerud on Friday, August 30, 2013 6:17 PM

Certainly glad for the testimony. I don't think modelers should feel bound by any formula. There were tens of thousands AFVs and millions of soft skinned vehicles in WWII and I'd guess that some of them looked quite the fright. And if you want (as I understand Karl Logan's point) to evoke a mood, a little artistic license should be perfectly fine. Folk that make dios could really go to town with rust, dents, smoke and anything else in portraying a knocked out vehicle. Auto modelers have a separate genre for reproducing rusted junkers - and the guys good at it have real skill.  (I remember seeing a photo of a Sheridan in Vietnam that had literally melted down - wonder how you'd handle that. Who'd want to?) And if you want to follow last generation's armor guru Tony Greenland you could certainly argue that you model the vehicle and not the mud it fought in. Those liking a really clean build could also be doing the equivalent of a "commission day" model that ship fans often do. Every tank in the war was deployed "factory fresh" at least once.  (It's very odd, but few ship modelers use heavy weather. Now salt water does attack paint and during WWII some paint jobs were intentionally kept thin above the waterline to keep flammable materials to a minimum. I employ a lot of rust, streaking and fading on ships and many modelers don't like it. They may be right about the model, but they're wrong about the history. The Missouri in Tokyo Bay was a mess - some of the North Atlantic Corvettes looked ready to sink.) But the mass conscription, mass production war fought in WWII would have been bad news for basic housekeeping. I'd certainly argue that dirt, fluids, streaking and dust would be true to the representation of most vehicles used in the field.

Eric


A model boat is much cheaper than a real one and won't sink with you in it.

  • Member since
    March 2003
  • From: El Dorado Hills, CA
Posted by IBuild148 on Friday, August 30, 2013 9:20 PM

Eric - I would appreciate some extended time.

I have both MK tracks assembled. Sunday and Monday and I want to paint them and then late Monday / Tuesday put them on.

Then some light weathering.

Thanks

IBuildOne48

Teach modeling to youth!

Scalefinishes.com

http://i712.photobucket.com/albums/ww122/randysmodels/NMF%20Group%20build%20II/Group%20Badge/NMFIIGBbadgesmall.jpg


  • Member since
    March 2003
  • From: El Dorado Hills, CA
Posted by IBuild148 on Friday, August 30, 2013 9:24 PM

Well done Eric! Yes Like the history lesson too.

IBuildOne48

Teach modeling to youth!

Scalefinishes.com

http://i712.photobucket.com/albums/ww122/randysmodels/NMF%20Group%20build%20II/Group%20Badge/NMFIIGBbadgesmall.jpg


  • Member since
    July 2012
Posted by Hasenpfeffer on Friday, August 30, 2013 9:27 PM

Well fellas, I'm calling it done. I was a little heavy handed for my taste on the dust layer (especially on the turret). Live and learn. I will post more photos tomorrow, but I just wanted to get this up.

1:35 Italeri Panther Ausf. A

Extras: Cavalier Zimmerit, multiple parts from the bin (mostly donated from my 1st Steel Cats build spares), Bronco AM tracks, and a little scratch.

Eric, you can use this photo for the front page completed build pic.

 I just want to thank everyone for the great work and camaraderie. Eric you put together one heck of a GB and I'm glad I was able to take part. It was a ton of fun and, like I said, the people here are second to none. Over 200 pages and 3000 comments. Wow! Yes 

  • Member since
    July 2013
  • From: Talent, OR
Posted by bitbite on Friday, August 30, 2013 9:31 PM

That looks sweet!  

There are so many good builds in this thread!  Big Smile

"Resist the urge to greedily fondle the parts . . ." - Sheperd Paine "Modeling Tanks and Military Vehicles" Page 5

  • Member since
    April 2005
Posted by Thunderbolt379 on Friday, August 30, 2013 9:43 PM

Hassen -- fantastic! Sweet build, tied together by the finishing techniques into a convincing whole!

On my KT front, I just resprayed the tracks into something a little lighter and dustier, hopefully they won't fight me so much now. Also sprayed a test panel to try out the Tamiya new clear flat, which will be needed to overcoat the decals, or more accurately the gloss base for them. The test should tell me whether I need to spray whole areas or even the entire turret, or just spot over the decals themselves.

Am intending to have her done today, let's see what the Fates have in mind!

M/TB379

http://worldinminiature.blogspot.com/

  • Member since
    April 2005
  • From: Australia
Posted by taxtp on Friday, August 30, 2013 10:04 PM

I like it Dave, I like it a lot.

The B&W photo looks just right.

Cheers

Tony

I'm just taking it one GB at a time.

  • Member since
    April 2005
  • From: Australia
Posted by taxtp on Friday, August 30, 2013 10:06 PM

I like how it's all coming together at the end of this GB for a lot of us. In my opinion, having multiple people building and completing together makes these GBs much more enjoyable.

Cheers

Tony

I'm just taking it one GB at a time.

  • Member since
    March 2003
  • From: Rain USA, Vancouver WA
Posted by tigerman on Saturday, August 31, 2013 1:37 AM

Dave, brilliant work bud. I really like that B/W shot.

   http://i7.photobucket.com/albums/y269/wing_nut_5o/PANZERJAGERGB.jpg

 Eric 

  • Member since
    April 2005
  • From: Piscataway, NJ!
Posted by wing_nut on Saturday, August 31, 2013 6:49 AM

2 day? Never was THAT fastWink  But certainly not now.  I am averaging 10 days between post that show discernible progress these daysSad

Thanks for posting the color wheel Jack.  I just saved that.   I know that black and white are not the best for darkening and lightening color and this should help.  I am not trying to be a smart a$$ but... if reg darkens green, what darkens red?  same 2 colors just a different mix?

While I am not color blind by any means, I do sometimes have problems with color.  Hard to explain.  It has to be, "OMG that needs some blue in it."  before I know it needs blue.  When it gets down to the subtle differences I am lost.  

Marc  

  • Member since
    April 2005
  • From: Piscataway, NJ!
Posted by wing_nut on Saturday, August 31, 2013 6:51 AM

And oh yeah... 2 pages of posts since mine yesterday... with 2 days to go?  That's butt kickin' GB participation.

Marc  

  • Member since
    March 2003
  • From: Western North Carolina
Posted by Tojo72 on Saturday, August 31, 2013 7:29 AM

Great Panther Dave,this was certainly a fantastic sustained campaign for sure,great work everyone

  • Member since
    November 2003
  • From: Nashville, TN area
Posted by bobbaily on Saturday, August 31, 2013 8:24 AM

Dave-that is an impressive Panther-outstanding build, camo, zimm, weathering-attention to detail is great.

Job well done!

My Panther is about 98% done-I need to add....err...make the cables, attach & paint a few parts that were 'overlooked' the first time and maybe add some additional weathering.  Don't think I'll make the 8/31 deadline (the wife is talking about going to a movie and we have some other commitments this pm) but it's all good.

Will try to post some current status pics later today.

Bob


  • Member since
    July 2012
Posted by Hasenpfeffer on Saturday, August 31, 2013 8:40 AM

Thanks for all the comments guys! Cool It has really been fun here. Like I said, I'll post some more pics later on this afternoon. I'm noticing that the track wasn't lying down on the road wheels for these pics - left side is kinda floating... geez.

Eric, this one is the 1:35 Italeri Panther ASurprise CH Black Knight was the 1st one. (Heck, I scavenged lot of parts, but I didn't think that many! LOL!) Wink

  • Member since
    April 2005
Posted by Thunderbolt379 on Saturday, August 31, 2013 9:35 AM

She's close, gents! We're ticking over to September 1st here in Aus in 12 minutes, but a little overrun would be welcome. I've not known many models fight me at the finish, but this one has, in some unexpected ways. I resprayed the tracks this morning in a lighter, dustier mix, which went down over the darker shade subtly but did the job, then did a standard suite of wash and drybrushing, plus worked ground graphite into the track to match the wheel contact zone, applied with a q-tip. There are those who say the tracks cannot be mounted on this kit with the fenders fitted -- well, they're wrong, but in fairness, it's not easy! I rolled the juncture points up under the skirts.

I've fitted the bow MG, finished and fitted the jack block, done the final round of touchup painting, bare metal drybrushing and graphite work, done the pigment work (black on the exhausts and mixed black and Europe dust for a dark dirt effect on the skirts and under the bow and stern.

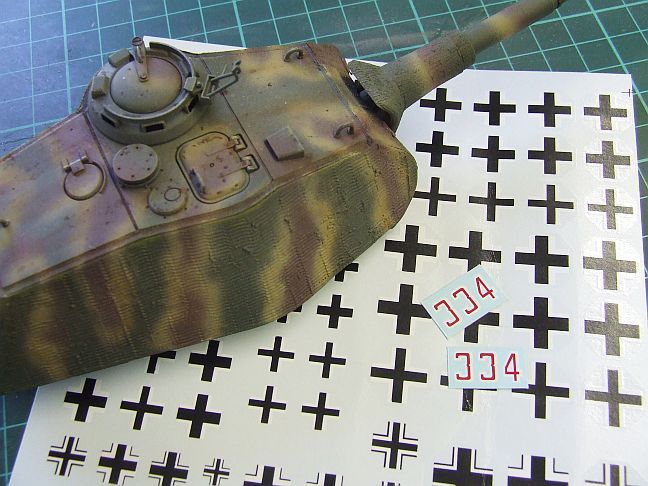
I also tackled the decals, using the kit serials and the Microscale crosses I found. The serials went on more or less okay over a spot of Future, and after three or four application of Microsol they're snugged into the zim fairly well. But the crosses... I've only applied one so far as I'd have to say they are the least cooperative decals from this firm I have ever worked with. Serious silvering and minimal lay-down... Though after letting it dry out completely and then reapplying sol it's looking better. I have been planning how to stencil paint the crosses instead, but I'll delay that decision until I can take a better look at the result so far.

Having used Future to prep the surface, a flat coat is also required, so I did a test shot with the new Tamiya XF-86. I sprayed a piece of plastic with the track umber I mixed, then brushed some Future over half of it, and finally sprayed XF-86, thus:

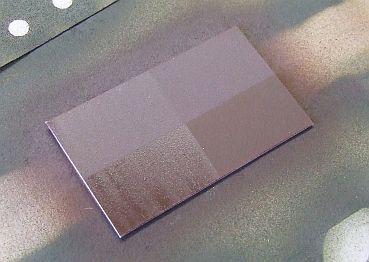
Bottom right is the raw paint, bottom left is the Future, the top strip is the XF-86, straddling both with a clear "tidemark." It knocks the shine down completely but clearly lightens the ground, so it must be used carefully, especially over dark colours. I'm very happy with the paint and finishing effects as they stand and don't want to modify them if I can help it.

Here's a look at the decals:

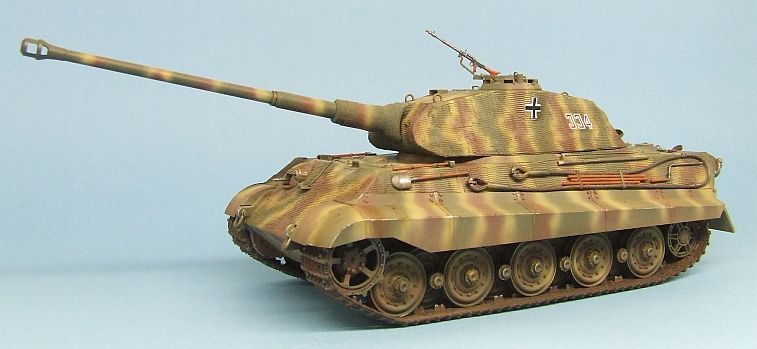
And finally, here she is as of midnight:

What remains to be done? Make a call on the crosses, whether to go with the decals or stencil them, and the final touch of flat to blend them in; attach the main gun and AA MG permanently; cut, paint and fit the radio antenna -- though I'm having trouble finding my .015" wire and might have to hit the hobby shop for more...

Cheers, Mike/TB379

http://worldinminiature.blogspot.com/

  • Member since
    November 2003
  • From: Nashville, TN area
Posted by bobbaily on Saturday, August 31, 2013 10:14 AM

Very nice Mike...great build....love the camo scheme & weathering....well done.

Bob


  • Member since
    April 2013
Posted by SchattenSpartan on Saturday, August 31, 2013 11:19 AM

Dave: Really amazing work! I thought the B&W pic showed a real Panther when I first saw it!

Mike: Very nice weathering and great camo work!

I won't be able to get my kitty done today. Sorry guys.

I'm still working on the streaking (working really slow here). I could just glue the roadwheels and tools in place, slap some mud on and get the tracks on, but I want to take my time with the weathering to get some decent results.... One of the guys working at my LHS took some really nice pics of my Tiger (before I started work on the streaking) and he promised me to send them to me today or tomorrow, so stay tuned for some more pics! I'll post some more up-to-dat pics as soon as I finish work on the streaking effects.

I promise to get her done untill Thursday. If I'm not allowed to claim the badge, I'm OK with it. I participate in GBs for the fun of building with great people like you guys and not for the badges (although the badges for this one look sweet!)

  • Member since
    March 2003
  • From: Rain USA, Vancouver WA
Posted by tigerman on Saturday, August 31, 2013 12:51 PM

Mike that looks sweet. I wish I had now gone heavier on the weathering, it looks a bit underdone in the pictures.

Don't sweat the finish guys, I'll give you a bit longer to finish and then I'll post the builds in the armor forum.

Dave, sorry, I'll fix that.

   http://i7.photobucket.com/albums/y269/wing_nut_5o/PANZERJAGERGB.jpg

 Eric 

  • Member since
    March 2003
  • From: El Dorado Hills, CA
Posted by IBuild148 on Saturday, August 31, 2013 2:17 PM

MEGAPROPS Mike on your Tiger. Looks fantastic!

IBuildOne48

Teach modeling to youth!

Scalefinishes.com

http://i712.photobucket.com/albums/ww122/randysmodels/NMF%20Group%20build%20II/Group%20Badge/NMFIIGBbadgesmall.jpg


  • Member since
    March 2003
  • From: El Dorado Hills, CA
Posted by IBuild148 on Saturday, August 31, 2013 2:21 PM

Thanks Eric! I just finished painting the tracks Black and waiting for them to dry. Then I will put a coat of gray and the steel. Then weather.

IBuildOne48

Teach modeling to youth!

Scalefinishes.com

http://i712.photobucket.com/albums/ww122/randysmodels/NMF%20Group%20build%20II/Group%20Badge/NMFIIGBbadgesmall.jpg


  • Member since
    April 2013
Posted by SchattenSpartan on Saturday, August 31, 2013 3:25 PM

It looks like I won't get the pics today, so here's just a teaser for you. I took those at my LHS a while back (before I started all the work on the weathering). I used my phone, so the quality is so-so, but I think you get the idea:

 Please note that the model was lacking all weathering effects when I took those pics. It looks a bit dirtier and beaten-up by now...

Cheers, Clemens


  • Member since
    July 2013
  • From: Talent, OR
Posted by bitbite on Saturday, August 31, 2013 3:28 PM

Yes, I get the idea that it looks cool as hell.  Balloons

"Resist the urge to greedily fondle the parts . . ." - Sheperd Paine "Modeling Tanks and Military Vehicles" Page 5

  • Member since
    April 2013
Posted by SchattenSpartan on Saturday, August 31, 2013 3:34 PM

Thanks, buddy! What do you guys think about some rust in the recesses on the hull top BTW?

  • Member since
    November 2003
  • From: Nashville, TN area
Posted by bobbaily on Saturday, August 31, 2013 3:41 PM

Clemens-looks great...very nice washed out white wash effect...can't wait to see more pics!

Bob


  • Member since
    April 2006
  • From: ON, Canada
Posted by jgeratic on Saturday, August 31, 2013 5:12 PM

Dave - fabulous job on the panther, the dusting  on the turret looks fine to me - it's just waiting for the next rainfall.  Noticed too you had darkened the screens over the engine deck (or is no dust was applied over them?).   I was thinking of trying something similar, but wasnt sure if it was correct.   You seem to have pulled it off nicely.   The b/w photo also looks cool.  I detect a slight grain, is it some special effect from the software?

Mike - super job on the KT camou striping, looks just like in the period photos, only better since we can see it in colour.    For the antenna, you can always stretch some sprue over a candle flame.  Look forward to the final results.

Schattan -  very fine execution on the white wash.  The neat thing is, in some areas it looks like wind blown snow.  If you are going to add rust to the hull top I'd keep it to a brown shade as opposed to bright orange - looks too cold of a setting to have rained recently.  Unless you are going for the artistic look, then no boundaries on that. 

Marc  - you are welcome for the colour wheel.   Yes, to darken red, you can use it's opposite which is green.     A bit more explanation, history, and  a neat vision exercise to try out  can be found at this youtube link:

This is just one way of darkening a colour while still keeping it vibrant and avoiding the dull grey look.  You can also use the complimentary split, which are the colours on either side of the direct opposite.  

If you want to get very precise and technical, you can input the base colour you are working on here:

http://scalemodeldb.com/paint

... and with the resultant number, input here to get an exact compliment shade.

websitetips.com/.../sitepro

regards,

Jack

JOIN OUR COMMUNITY!

Our community is FREE to join. To participate you must either login or register for an account.

SEARCH FORUMS
FREE NEWSLETTER
By signing up you may also receive reader surveys and occasional special offers. We do not sell, rent or trade our email lists. View our Privacy Policy.