SEARCH FINESCALE.COM

Enter keywords or a search phrase below:

My First Time Group Build

36110 views
323 replies
1 rating 2 rating 3 rating 4 rating 5 rating
  • Member since
    April 2013
Posted by macman on Wednesday, May 22, 2013 6:28 PM
  • Member since
    December 2002
  • From: Bury St Edmunds, Suffolk, England
Posted by Bish on Sunday, June 2, 2013 2:26 AM

Nice work macman.

Come on guys, we got two months left of this build. Lets not let it fade with a whimper but make it go out with a bang. We only have 3 completed builds so far. Lets get that built list filled out.

I am a Norfolk man and i glory in being so


On the bench: Airfix 1/72nd Harrier GR.3/Fujimi 1/72nd Ju 87D-3

  • Member since
    September 2009
  • From: Guam
Posted by sub revolution on Tuesday, June 4, 2013 6:48 AM

Sorry Bish, the whole work thing didn't pan out. Now I'm in the middle of moving, but I will hopefully be mailing my model stuff so I get it as soon as possible when I get there.

NEW SIG

  • Member since
    April 2013
Posted by SchattenSpartan on Tuesday, June 4, 2013 7:10 AM

I hear you, mate!

I can't remember my first model sadly, because I built it with my dad when I was really young (6 years at most), but I can tell you the first model I built after really starting with the hobby. It is Tamiya's 1/48 Thunderbolt "Bubbletop". I still have the model sfanding on one of my PC speakers next to my bench. It was my first model I can remember, so I hope that one is qualified for this GB.

Cheers, Clemens

  • Member since
    December 2002
  • From: Bury St Edmunds, Suffolk, England
Posted by Bish on Tuesday, June 11, 2013 3:32 AM

No problem Sub, thanks for checking in.

Clemens, sorry for not getting back. Ye, that would be ok. The GB does end on the 1st of August. Think you can squeeze that in.

I am a Norfolk man and i glory in being so


On the bench: Airfix 1/72nd Harrier GR.3/Fujimi 1/72nd Ju 87D-3

  • Member since
    April 2013
Posted by SchattenSpartan on Tuesday, June 11, 2013 8:49 AM

Thanks! Are metal gun barrels ok for this GB? I used them on my first attempt at this kit as well... (same with a set of PE-belts)

  • Member since
    March 2012
  • From: Corpus Christi, Tx
Posted by mustang1989 on Tuesday, June 11, 2013 8:59 AM

That'll be ok. I used PE seat belt buckles and a ring gunsight on the machine gun I built. I tried not to get too carried away because this build is about "using what we had available" when we were younger. Jeez! It doesn't seem like 30+ years ago!!!


 Forum | Modelers Social Club Forum (proboards.com) 

  • Member since
    December 2002
  • From: Bury St Edmunds, Suffolk, England
Posted by Bish on Monday, June 17, 2013 1:43 AM

I'll second that, don't see why not, especially as you used them first time roiund.

I am a Norfolk man and i glory in being so


On the bench: Airfix 1/72nd Harrier GR.3/Fujimi 1/72nd Ju 87D-3

  • Member since
    April 2013
Posted by SchattenSpartan on Wednesday, July 3, 2013 5:50 PM

The whole cockpit tub is now sprayed in some darkened down Tamiya XF-26. I'll do the detail work tomorrow and post some pics for ya.

This project will be slowed down a wee bit though, as I'm building Tamiya's other offering of the P-47D at the same time (The Razorback) as a German-captured machine with a yellow underside! I just love me some Double-D jugs! (pun intended)

Stay tuned, guys!

Cheers, Clemens

  • Member since
    October 2005
  • From: New Port Richey
Posted by deattilio on Wednesday, July 3, 2013 6:17 PM

I’m still in the game, progressing slowly – very slowly but nearing the finish line.  I got the fuselage and control surfaces painted, and being only the second time using Alclad was very pleased – my first being merely 20 or so minutes earlier on a 1/72 F9F Panther.  The pictures don’t do full justice but that should change once finished and I take more care photographing the model.  Alclad is freaking awesome, well worth the extra effort in prepping for the results achieved.  Next will be the wings in a less stunning acryl aluminum. 

A lot of effort for a 30+ year old Snap Tite kit I must say.


Tags: 1/72 , aircraft


WIP:
Trying to get my hobby stuff sorted - just moved and still unpacking.


"Gator, Green Catskill....Charlie On Time"


  • Member since
    April 2013
Posted by SchattenSpartan on Wednesday, July 3, 2013 6:34 PM

Looking really nice! Good job on that Alclad finish!

You can see my first attempt on Alclad paints in the side-by-side comparison of my 2 "Kokomo" Jugs when my entry is finished (the old one and the one I am currently building). That Thunderbolt was my first model kit I can remember building, my first aircraft model and also my first attempt at Alclad, so don't expext too much (LOL!). This Thunderbolt will be my 2nd attempt, but I've learned a lot from Kokomo Nr.1: Never use a flat primer, test with some paint if all the seams are really sanded smooth, polish your primer untill it is all shiny,...

I think this will look a lot NMF-ish tan the first Thunderbolt (and it  is a great opportunity to practice some NMF painting for the 1/32 B-25, B-17, P-47 and P-51 I plan on building next)

Cheers, Clemens

  • Member since
    December 2002
  • From: Bury St Edmunds, Suffolk, England
Posted by Bish on Thursday, July 4, 2013 1:29 PM

deattilo, that's looking good.

Clemens, hope we get to see some pics soon.

I am a Norfolk man and i glory in being so


On the bench: Airfix 1/72nd Harrier GR.3/Fujimi 1/72nd Ju 87D-3

  • Member since
    April 2013
Posted by SchattenSpartan on Thursday, July 4, 2013 6:48 PM

You do get some pics, mate. Here you go:

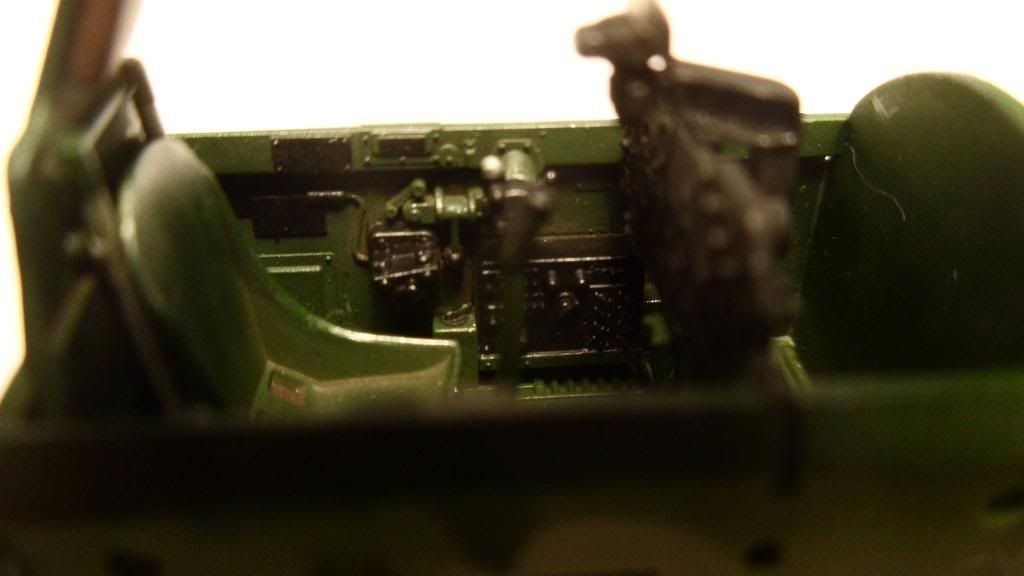
I painted the The whole tub in Tamiya XF-26 mixed with some Gunze "Flat Black" to darken it down. Then The details are painted in various Vallejo Air colors.

I used two colors for drybrushing: XF-26 mixed with XF-4 for all green areas and XF-16 (Flat Aluminium) for all black areas and those areas that would show a lot of wear.

As a last stap I applied an oil-wash consisting of a 50/50 mix of black and burnt umber.

Here are the pics:

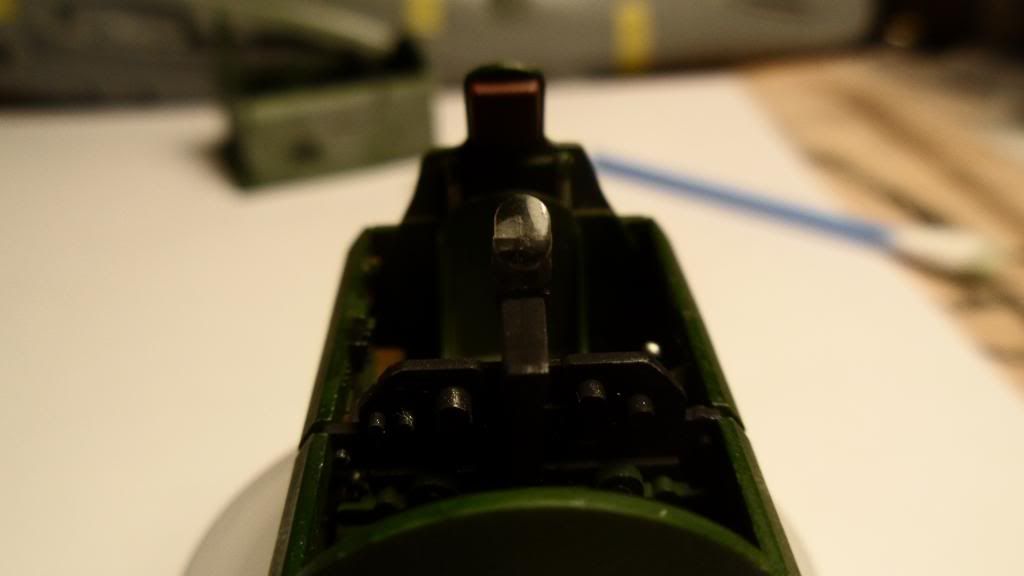
I had to remove a nasty mold line going right over the whole gun-sight:

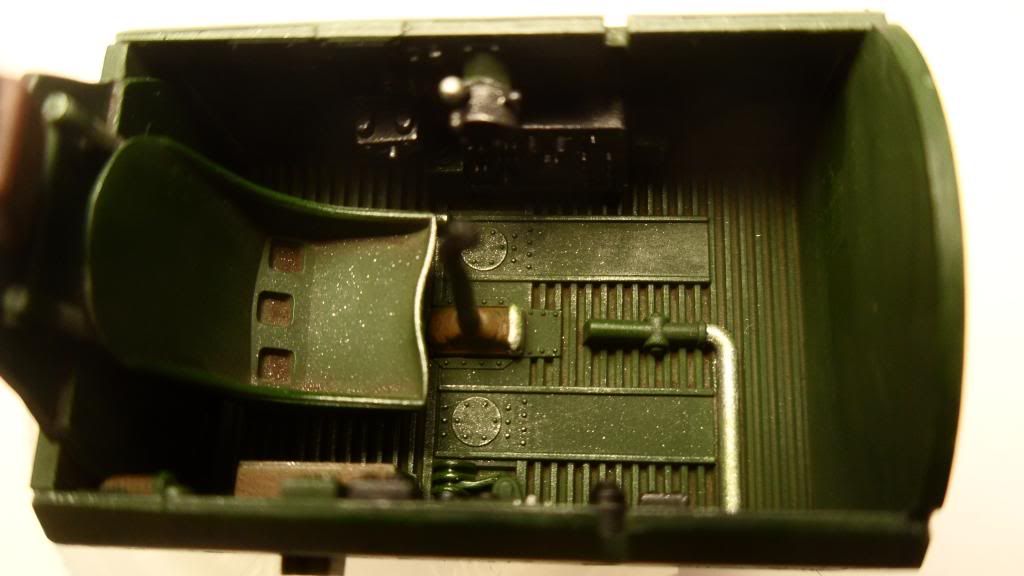
The Whole IP-assembly is removeable, because I have to add some wiring to it:

 I still have to add the IP decal (the gunsight is just stuck on for the photo, so that I can remove it for applying the decal):

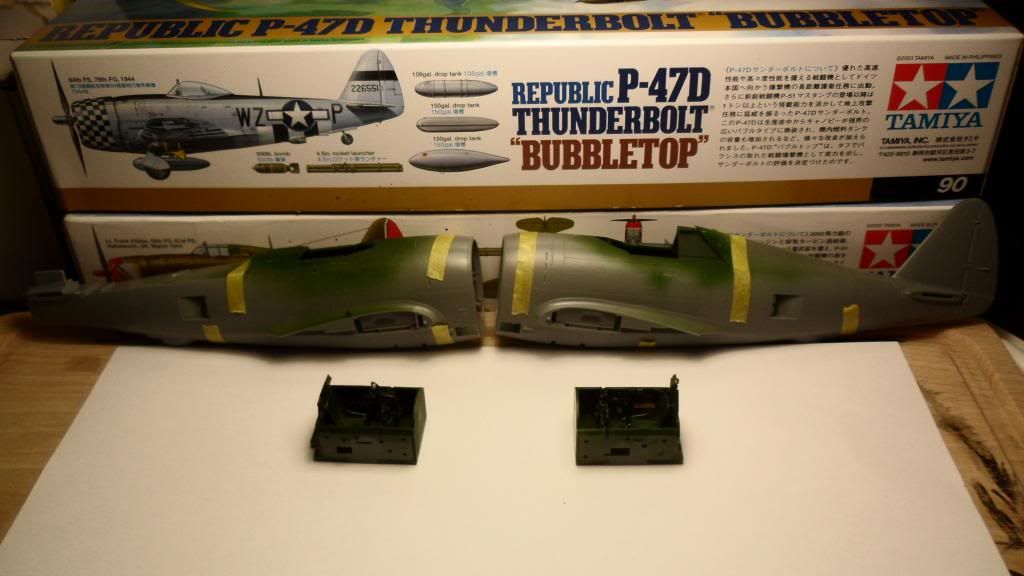
A side-by-side comparison with the cockpit tub of the 2nd Thunderbolt I'm building right now (Razorback). Note the missing gun-sight (I snapped it off when I applied the IP decal, but it is an easy fix). The IP is glued in place on the Razorback tub, as there is no wiring necessary with that one (it is not visible unlike on the Bubbletop):

 There are 2 more kits on my bench atm (1/35 King Tiger to my right and 1/48 Fw190 to my left), so I had to sacrifice some of my working-area for the Thunderbolt kits:

Please note that the green is much darker in person. My camera just screws up all the colors when the lighting is so bad... The 1st pic is probably the most accurate regarding the color (it's even a little bit darker IRL)

I hope you like it. This Pit took me about 6-7 hours to paint up and weather (not counting in the time the wash needed to dry) I really love building those Tamiya Thunderbolts! The are the best kits I've ever seen (together with their 1/32 Mustang).

Cheers, Clemens

  • Member since
    December 2002
  • From: Bury St Edmunds, Suffolk, England
Posted by Bish on Sunday, July 7, 2013 2:35 AM

I need to keep up more, missed your post here. Or is it the wealth of Jugs you keep puttying in front of us.Wink

That's great work on the pit. I think that green mix you have is pretty spot on. It certainly looks the same as the xtracolour one I use.

Nice work.

I am a Norfolk man and i glory in being so


On the bench: Airfix 1/72nd Harrier GR.3/Fujimi 1/72nd Ju 87D-3

  • Member since
    April 2013
Posted by SchattenSpartan on Sunday, July 7, 2013 7:02 AM

Thanks Bish! It's actually only 2 Jugs, but I am posting them nearly everyhere... Oh, there is also the big one I still have to star on. I want to take my time with that build though (lots of PE and Resin).

Cheers, Clemens

  • Member since
    April 2005
  • From: Australia
Posted by taxtp on Sunday, July 7, 2013 10:10 PM

Yeah nice work on the Jugs Clemens. I've started work on my 1/72 Frog P-47D. IT will be a far far cry from your ones, I'm afraid. Very basic, raised details, chunky, but I guess OK for the seventies.

I'm going to build it as the maker intended, but to my current standard.

Cheers

Tony

I'm just taking it one GB at a time.

  • Member since
    April 2013
Posted by SchattenSpartan on Monday, July 8, 2013 1:07 PM

Thank you very much, Tony! I am looking forwards to some pics of your Jug!

  • Member since
    April 2005
  • From: Australia
Posted by taxtp on Friday, July 12, 2013 9:39 AM

OK, I've got going on the jug. First off, some history. I built the Frog P-47D in 1976, at the age of 9. It's one of the things I remember very clearly. Built it in a couple of hours. Painted with Humbrol. The colours required were dark green, ocean grey and slate grey. We ended up only buying #2 gloss emerald green and slate grey, so thats what it got. I didn't understand that gloss enamel takes longer to dry, and couldn't wait, so the decals went on whilst the paint was wet.

I had it for maybe 10 years but I don't know what eventually happened to it.

Anyway, I've started on it. It's chunky, the panel lines are raised and not too fine, and there are lots of surface imperfections on the plastic. I've decided to make it as the maker intended, without modification or extra detail, but hopefully with a decent paint job.

Started on the cockpit, I used MM Euro green as the experts claim it's OK for P-47 cockpits. There's some dry brushing and other weathering, but it doesn't look to orealistic. Inaccurate sseat, noy joy  stick or harnesses, leave it alone Tony.

The engine. Single row of a twin row engine, but OK ish. It's  a shame the firewall doesn't fit the fuselage at all. Don't touch it Tony.

Interior. No sidewall detail but who cares :) (Now that's the spirit)

Basic construction done. LOTS of cleanup coming. I would normally rescribe the raised detail, but will try to retain it.

I'm just taking it one GB at a time.

  • Member since
    April 2013
Posted by SchattenSpartan on Friday, July 12, 2013 12:47 PM

Looking nice, Tony!

  • Member since
    April 2005
  • From: Australia
Posted by taxtp on Saturday, July 13, 2013 2:57 AM

I've done the cleanup, and brush - primed the seams, which are surprisingly OK. I intend to prime it with RAF Ocean Grey (Humbrol 106) as this is one of the upper surface camo colors anyway.

However, I'll park it for a day or three, asI've also got a hawker typhoon on the go, and the uppersurface colors are the same, Ocean Grey/Dark Green, so I might as well economise on the airbrush cleaning and do them both at once.

BTW, I rarely use enamels these days, although there are still a lot in the cupboard. But since this is a 'retro' build, and I painted the original (and all the kits of my childhood) using Humbrol enamels, I'll use them exclusively for this build.

Cheers

Tony

I'm just taking it one GB at a time.

  • Member since
    October 2005
  • From: New Port Richey
Posted by deattilio on Saturday, July 13, 2013 8:07 AM

We got some good looking T-Bolt tonnage taking shape.  I plan on getting a little more work done on my Mustang with some pics to accompany those T-Bolts.


WIP:
Trying to get my hobby stuff sorted - just moved and still unpacking.


"Gator, Green Catskill....Charlie On Time"


  • Member since
    December 2002
  • From: Bury St Edmunds, Suffolk, England
Posted by Bish on Sunday, July 14, 2013 8:18 AM

Nice work there Tony, that's looking good.

Defiantly need a Stang added to the collection here.

Quick heads up guys. There's 2 and a half weeks left of the GB. So lets get these builds wrapped up. I know its been extended once, and personally I am not a fan of continually extending GB's. Best to let them end and something else take its place. So if all you guys are happy, we will just let those who have started finish there builds.

We only have 3 completed builds, so lets get some more added to the front page.

I am a Norfolk man and i glory in being so


On the bench: Airfix 1/72nd Harrier GR.3/Fujimi 1/72nd Ju 87D-3

  • Member since
    April 2005
  • From: Australia
Posted by taxtp on Sunday, July 14, 2013 8:59 AM

I've had a change of plans. In the interest of getting this thing done, I've got the first colour shot. This is what an Ocean Grey P-47 looks like. I think this old Frog clunker lacks realism, but I'll finish it nonetheless.

Cheers

Tony

I'm just taking it one GB at a time.

  • Member since
    December 2002
  • From: Bury St Edmunds, Suffolk, England
Posted by Bish on Sunday, July 14, 2013 9:00 AM

Looks good Tony.

I am a Norfolk man and i glory in being so


On the bench: Airfix 1/72nd Harrier GR.3/Fujimi 1/72nd Ju 87D-3

  • Member since
    October 2005
  • From: New Port Richey
Posted by deattilio on Sunday, July 14, 2013 11:11 AM

I got the wings painted.  The first coat of straight Testors Acryl Aluminum looked too metallic so added a bit of gray to give it that different look between the wings and fuselage.  I will try to get a coat of gloss on this week so I can get the rudder painted white.  It is finally looking like progress is occurring.


WIP:
Trying to get my hobby stuff sorted - just moved and still unpacking.


"Gator, Green Catskill....Charlie On Time"


  • Member since
    December 2002
  • From: Bury St Edmunds, Suffolk, England
Posted by Bish on Sunday, July 14, 2013 11:38 AM

That's looking good. Nice work on the NMF.

I am a Norfolk man and i glory in being so


On the bench: Airfix 1/72nd Harrier GR.3/Fujimi 1/72nd Ju 87D-3

  • Member since
    April 2005
  • From: Australia
Posted by taxtp on Tuesday, July 16, 2013 6:21 PM

VERY nice work on the Mustang. The finish looks terrific.

I progressed the T-Bolt a little, still masked up after application of the theatre stripes.

Cheers

Tony

I'm just taking it one GB at a time.

  • Member since
    April 2013
Posted by SchattenSpartan on Wednesday, July 17, 2013 5:44 AM

Looking good, Tony!

  • Member since
    December 2002
  • From: Bury St Edmunds, Suffolk, England
Posted by Bish on Wednesday, July 17, 2013 1:52 PM

Tony, I assume there is an airplane under there some where. That's lots of masking. Is that tin foil you have used on the wings.

I am a Norfolk man and i glory in being so


On the bench: Airfix 1/72nd Harrier GR.3/Fujimi 1/72nd Ju 87D-3

  • Member since
    October 2005
  • From: New Port Richey
Posted by deattilio on Sunday, July 21, 2013 12:18 PM

Progress continues:

The flat white, along with the OD anti-glare is applied.  Now I will allow this to cure for several days before I apply the final airbrushed color – red.  I still have to clean up the prop and hub before I can apply the red, the several days should give me plenty time.  Once the red is on all that remains is brushed on colors and decals, which should go quickly.


WIP:
Trying to get my hobby stuff sorted - just moved and still unpacking.


"Gator, Green Catskill....Charlie On Time"


JOIN OUR COMMUNITY!

Our community is FREE to join. To participate you must either login or register for an account.

SEARCH FORUMS
FREE NEWSLETTER
By signing up you may also receive reader surveys and occasional special offers. We do not sell, rent or trade our email lists. View our Privacy Policy.