SEARCH FINESCALE.COM

Enter keywords or a search phrase below:

Achtraden! 8x8 Group Build '09-'10

45314 views
373 replies
1 rating 2 rating 3 rating 4 rating 5 rating
  • Member since
    May 2009
  • From: Hobart, Tasmania
Posted by Konigwolf13 on Saturday, November 7, 2009 8:11 AM

But we do have daylight savings, hell the damn state government keeps thinking about making it year long daylight savings.


As for progress on the build....

Got a base coat done on the cabin today, need to full some ejector pin marks before I can do any more. pics soon.


Andrew

  • Member since
    August 2009
  • From: Cary, North Carolina
Posted by M1Carbine on Saturday, November 7, 2009 11:50 PM

So is the Logo posted earlier goint to be the official Logo for this GB??????


WooooooooooooooooooHoooooooooooooooooooooo

yes I know Im a little excited but thats why my Dr gives me meds.


Bob

  • Member since
    April 2005
Posted by Thunderbolt379 on Monday, November 9, 2009 6:10 AM

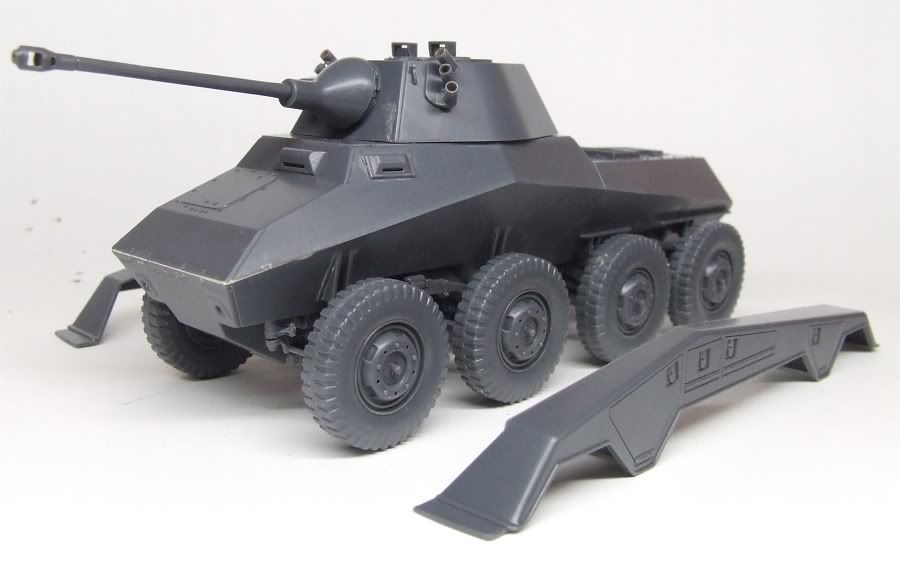
Nate -- made some more progress, we seem to be at about the same point. My next job is to mount the fenders/stowage lockers and get the hull fittings into place. There are a few bits to rub down, I might as well make rubbing down a single job when the build-up reaches the last point before the delicate parts need to be painted seperately.

Photobucket" border="0" />

The wheels are simply push-fitted. I was thinking about using the hot knife trick to ripple in the weld seams -- not sure if I should. It just makes sense to buy a Dragon 234 with all the work done! Note the lower port front of the turret where some liquid glue seeped around, that's part of the rubbing down.

Photobucket" border="0" />

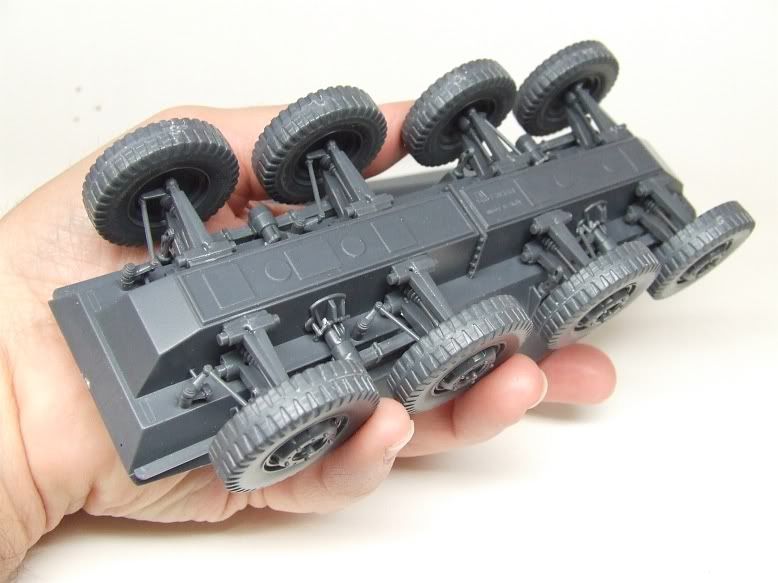
This one shows how relatively undetailed the Italeri molds are in comparison to the Dragons. I got all the steering rods installed last night, it's detailed enough for cursory inspection but the Dragon looks like it'll drive away on the bench. Imagine a 1:16th scale 234 by Trumpeter, with working steering and suspension (and a $300 price tag...)

KW13 -- The way DS is reported over here it only ever seems to be about bringing the westerly states into line with the east for business purposes -- the east coast keeps wanting us to leave our clocks permanently forward two hours... Which is never going to happen! But that's politics, the real world is styrene!

M1 -- I keep meaning to do something special with a selection of badges, one with a 234, one with a BTR and one with an LAV-25, therefore something apppropriate to the different streams within the theme. It'll be a week before I can get these designs up and running -- end of the academic year, I'm grading papers and helping look after an exam in two days. Then I'll be slightly free-er, just in time for the hot weather when paint dries too fast in the AB...

Right, I'd better get on and fit the fenders.

Cheers, Mike/TB379

http://worldinminiature.blogspot.com/

  • Member since
    August 2003
  • From: Connecticut, USA
Posted by Nachtflieger on Monday, November 9, 2009 3:32 PM

Mike.......looking REAL good!Smile [:)] We ARE at just about the same point. Today I added the fenders, and built the turret and gun assembly. I was surprised at how beefy it looks with the fenders, and turret in place. It's actually a good sized vehicle compared with some of my other armour kits.

I have been building at my job, so I didn't take pics of my latest assembly. I'll finish up the turret tomorrow, and bring it home to shoot some pics.

Oh yeah, as for adding weld beads; in one of the pics of my Puma, if you look at the join between the two lower hulls in the front, you'll see I added a weld bead there. Actually, there was a gap, and I had to fill it with Squadron green putty. While it was still wet, I just textured it with my exacto knife. This is a very simple method which I think gives good results.

Nate


  • Member since
    August 2009
  • From: Cary, North Carolina
Posted by M1Carbine on Tuesday, November 10, 2009 1:07 AM

Got some more shots of progress.  Its been slow because this model is......lets say......not up to par.

had to scratch build the mud flaps for the front

got the major components primed

tomorrow Ill start with the final details and some painting.

enjoy

Bob

  • Member since
    April 2009
  • From: Carmel, IN
Posted by deafpanzer on Tuesday, November 10, 2009 11:18 AM

Oh man!  You guys are on ROLL!  I can't wait to start my kit soon...

I'd like to ask you guys what you use as for primer because last time I used Tamiya light gray primer and I was not too impressed.  My figures end up with alot of air bubbles afterward...


Andy

  • Member since
    August 2009
  • From: Cary, North Carolina
Posted by M1Carbine on Tuesday, November 10, 2009 1:24 PM

Def, I first used Rustoleum auto primer, but I found that the paint gets real thick towards the end of the can, plus its about $4 a can.  I then went to WallMart and picked up thier brand of grey primer and have used it ever since.  It lays on like silk and sprays real even and I love the fact that its .98 a can. 

Bob

  • Member since
    August 2003
  • From: Connecticut, USA
Posted by Nachtflieger on Tuesday, November 10, 2009 3:13 PM

Nice work Bob!Thumbs Up [tup] That is really coming out nice......I especially like the primered shots.Big Smile [:D]

 Andy: I only use primer if I have aftermarket goodies like PE, or an aluminum barrel. Even then, I don't always prime.........I usually shoot paint directly on the plastic. When I do primer, I use Tamiya's white or grey primer.

Nate


  • Member since
    April 2005
Posted by Thunderbolt379 on Tuesday, November 10, 2009 5:19 PM

Nate -- I noticed the green putty and wondered about that -- a Dragon kit needing filler? Big Smile [:D] Well, I guess their engineers are just about as mortal as Tamiya's, which is just this side of divinity... Great looking build and yes, this beast does look very beefy when it's all together. I have the fenders on mine now, plus the exhausts, tiedown lugs, tool box and front bumper bar and she's starting to really look the business. Pictures soon -- not many more parts to go and it'll be time to set her aside until I can get her into dunkelgelb.

Bob -- That Luchs looks a bit of a handful, an unusual subject for sure. Sorry she's a bit below par but it looks like you're rising to the challenge. I'll watch with great interest as I have a number of RG armor kits, including their Panzerhaubitzer 2000, and I'm interested in the sort of engineering quirks that RG may build in. Good work so far, she looks great in primer!

Andy -- Speaking of primer, the only primer as such I've used to date has been Humbrol #1 enamel, which has a marvelous application and can be sanded glass-smooth with fine paper and lubricant. In other cases I've used straight Tamiya acrylic as an undercoat on vinyl, choosing a color which will be complimentary (or at least not antagonistic) with the main colors to come.

KW13 -- a thousand appologies, I don't think I got around to thanking you for making up the trial badge! If folks like your design they are more than welcome to use it On that theme, good news, I've landed a good suite of images and will be making up a further selection of badges shortly on German, American and Russian themes -- gentlemen, take your pick! (Or if anyone has another design they'd prefer, by all means submit it for the consideration of the builders!)

Cheers, Mike/TB379

http://worldinminiature.blogspot.com/

  • Member since
    August 2009
  • From: Cary, North Carolina
Posted by M1Carbine on Tuesday, November 10, 2009 5:57 PM

Thank you gents.  I got the base coat on and camo on, and shot it with lusterless flat. I see a few little quirks in the paint but I think it will even out with the oil wash I plan on doint later this evening.

Ill have some more shots later.


Bob

  • Member since
    July 2009
Posted by Axel Smith on Tuesday, November 10, 2009 6:15 PM

Nice looking build you got there Bob!


I guess I should be getting 'round to uploading pics of my build...  I've been scratching an interior, but I know its not accurate. I just wanted to add something to the interior to make it so it didn't look like an empty... So yeah. Its not accurate by anymeans (i think) ... Hope I won't upset any rivet counters out there... Smile,Wink, & Grin [swg]

- Alex

'Verily, this vichyssoise of verbiage veers most verbose, so let me simply add that it's my very good honor to meet you and you may call me V...'

  • Member since
    August 2009
  • From: Cary, North Carolina
Posted by M1Carbine on Tuesday, November 10, 2009 7:06 PM

Thanks Axel, I should have some more shots later this evening.  Playing with all the fiddly bits (tools) and such.

AS far as upsetting rivet counters...I say....rivets schmivits...build away my friend and just enjoy it buddy.


Bob

  • Member since
    August 2009
  • From: Cary, North Carolina
Posted by M1Carbine on Tuesday, November 10, 2009 10:35 PM

Well I had to go over the nato black camo again, I just ddnt like the way it looked.  Here are some shots.

More to come


Bob

  • Member since
    April 2005
Posted by Thunderbolt379 on Wednesday, November 11, 2009 12:14 AM

Excellent decision, Bob -- respraying the black component of the camo creates a much more solid feel which is very realistic. Finishing is always our own choice of techniques to get the effect we're looking for and I think the ability to either experiment or change direction is a valuable skill!

Can't wait to see wheels under her,

Cheers, Mike/TB379

http://worldinminiature.blogspot.com/

  • Member since
    August 2009
  • From: Cary, North Carolina
Posted by M1Carbine on Wednesday, November 11, 2009 1:38 AM

Thanks Mike.  Im working on those vynal buggers now.  I have found that they really hate paint......LOL.  One of the vynal wheels is badly formed so I have o try and hide it the best I can.  Ill have some more shots later.


Bob

  • Member since
    August 2003
  • From: Connecticut, USA
Posted by Nachtflieger on Wednesday, November 11, 2009 2:06 AM

Really looking good Bob!Thumbs Up [tup] Nice camo. I agree with Mike........looking forward to seeing it with wheels.

Nate


  • Member since
    April 2009
  • From: Carmel, IN
Posted by deafpanzer on Wednesday, November 11, 2009 1:32 PM
Sign - Ditto [#ditto]  Great CAMO! Thumbs Up [tup]  Looks alot better already... you are almost there so please slow down! 

Andy

  • Member since
    August 2009
  • From: Cary, North Carolina
Posted by M1Carbine on Wednesday, November 11, 2009 1:38 PM

Thanks Nate and Andy.  Ill tr to slow down but I must say I am quite enthusiastic this being m first group build.


Bob

  • Member since
    May 2005
  • From: Dublin Rep Of Ireland
Posted by terry35 on Wednesday, November 11, 2009 6:19 PM

Hi mike, I'm not forgetting hope to start soon.

Thread seems to be comming along grand,

Terry.

  • Member since
    August 2009
  • From: Cary, North Carolina
Posted by M1Carbine on Wednesday, November 11, 2009 9:38 PM

Got a couple of more shots.  I finally get the decals on and hit it with some super acrylic flat.  Got some more fiddly bits on and she gets the dry brushing adn wash this evening.

Bob

  • Member since
    August 2009
  • From: Cary, North Carolina
Posted by M1Carbine on Thursday, November 12, 2009 1:48 AM

good evening all.  Well the wheels were a nightmare, one is so badly molded it will have to stay as is.  I had to butcher the inside of it just for it to have the hub sit properly.  I tried to hide the buldge on the tire but what the heck are you gonna do.....live with it.

Now time for a wash.


Bob

  • Member since
    May 2009
  • From: Hobart, Tasmania
Posted by Konigwolf13 on Thursday, November 12, 2009 2:32 AM

Looking good, Thumbs Up [tup]


 I hope to get some time on my ASLAV tonight, if not it will be after the weekend cause I got the weekend madness GB starting tomorrow


Andrew

  • Member since
    August 2009
  • From: Cary, North Carolina
Posted by M1Carbine on Thursday, November 12, 2009 3:03 AM

OK time for bed, so this is what I got so far

initial wash burnt umber

then I started laing on the mud

Good morning all, Im off to bed, more to follow.


Bob

  • Member since
    August 2009
  • From: Cary, North Carolina
Posted by M1Carbine on Thursday, November 12, 2009 11:54 AM

Is it morning yet???? Did I sleep???? what time is it?????

Got some more weathering done this morning, or last night, or an hour ago.........something like that.

still some more weathering to be done and fixing of fiddle bits here and there.  I should have more later.........................ZzzzzZzzzzzzzSleepy [|)]

Bob

  • Member since
    August 2003
  • From: Connecticut, USA
Posted by Nachtflieger on Friday, November 13, 2009 2:50 AM

Bob....You are flying with this kit!Smile [:)] Looking real good. I especially like the mud look; it looks like it forded a stream a while back, and the mud dried on the sides......very convincing.Thumbs Up [tup]

Nate


  • Member since
    August 2009
  • From: Cary, North Carolina
Posted by M1Carbine on Friday, November 13, 2009 11:40 AM

Thanks Nate.  That is exactl the look I was going for.  I had seen some pictures of one on a training mission that was just covered in mud.  I have to add a few more finishing touchess and shes will be done.


Bob

  • Member since
    October 2009
Posted by Rhino92 on Friday, November 13, 2009 8:09 PM

Hi All,

  It appears I left out some of the info on my chosen build for the group. I am doing the Sd. Kfz 234/1 1:35 scale by Italeri. My build is coming along nicely. I have some WIP pics to post. Coming, hopefully, this evening.

-Ryan

  • Member since
    October 2009
Posted by Rhino92 on Friday, November 13, 2009 8:10 PM

Bob,

    I must say that as good as this looks in the photos, in person it is phenominal. Great Work!!

-Ryan

  • Member since
    April 2005
Posted by Thunderbolt379 on Friday, November 13, 2009 8:50 PM

Hi gents, sorry I've not been around for the last day or two, I've had lots of RL stuff to get done.

Bob -- stunning work! It takes courage to splash mud all over a fresh paintjob and you've pulled it off realistically! She looks like she's just charged through a mud wallow this morning and the mud has had a chance to dry in the sun and wind. You'll clearly be first to the finish line, so I'd better get those badges up this weekend!

Ryan -- I'll adjust Page 1 with your details right away -- thanks! Excellent work on the interior, I have one at about the same stage, in the box for years as I've never been able to decide how to paint the interior and never yet found a PE set for the anti-grenade screens of the turret. Will you be using the kit-supplied nylon or going an AM route?

My own Testor/Italeri Puma is now structurally complete, there'll be a couple more pics sortly. I'm going back to my StuG for 1000 Roadwheels and she should soon be ready for undercoat, which means I can production line the two through the paintshop as far as base colour goes (their contrasting camo colours will be different).

Cheers, I'm looking forward to putting that Lynx onto Page 1 as the first completed build!

Mike/TB379

http://worldinminiature.blogspot.com/

  • Member since
    August 2009
  • From: Cary, North Carolina
Posted by M1Carbine on Friday, November 13, 2009 9:11 PM

Ryan- thanks bro I appreciate it.  Yours is coming along and looks SWEET!

Mike- I was up in the air about doing it but then said "clean armor........NOT!" so I dove in.  It took two days of carful applications of MIG pigments till I was finally happy with it.  m glad you like it, I was getting worried for a bit.  Just a few more fiddl bits and she should be a wrap.  Dang, Ill have to get another 8x8 to build.  So being out of work has one advantage............I can work on m models........................LMAO.

Antenna added

More later


Bob

JOIN OUR COMMUNITY!

Our community is FREE to join. To participate you must either login or register for an account.

SEARCH FORUMS
FREE NEWSLETTER
By signing up you may also receive reader surveys and occasional special offers. We do not sell, rent or trade our email lists. View our Privacy Policy.