SEARCH FINESCALE.COM

Enter keywords or a search phrase below:

Achtraden! 8x8 Group Build '09-'10

45314 views
373 replies
1 rating 2 rating 3 rating 4 rating 5 rating
  • Member since
    April 2005
Posted by Thunderbolt379 on Friday, November 13, 2009 9:24 PM

Hi Bob -- I bet it took courage! So that was MiGs mixed with, what, water or a binding agent? I've only used them dry so far for dust, I'm a way off working up the guts to apply mud yet, though I keep telling myself 'that next assault gun' will get dirtied up.

Did you use wire or stretched sprue for the antennas? They look good!

Yep, plenty of time and subjects -- nobody is building a 234/3 or /4 yet, there are Russian BTRs not yet in the lineup, an alternate version of the Centauro, always more variants of LAV-25 and Stryker...

Cheers, Mike/TB379

http://worldinminiature.blogspot.com/

  • Member since
    August 2009
  • From: Cary, North Carolina
Posted by M1Carbine on Friday, November 13, 2009 10:02 PM

Thanks Mike.

First thing I did was hit the outside edges with 502 oils Dark Mud. Then the first applicaton of MIG europe dust P028 was mixed with turpentine and applied liberally to the outside edges like the oils.  Once that dried, I used the pigment dry and featherd it up from the heav areas to the top sufaces. Once that was completed I sealed it with MIG pigment sealer and that was that.


Bob

  • Member since
    August 2009
  • From: Cary, North Carolina
Posted by M1Carbine on Friday, November 13, 2009 10:04 PM

Oops sorry Mike, the antennas were mad of wire, I cant think of the guage off hand but I can check.  I cut them to length heated up the ends with a lighter and jammed them in on top.  The hot metal, melted the plastic enough to get it in, then when the plastic cools it hardens them in place.


Bob

  • Member since
    July 2009
Posted by Axel Smith on Friday, November 13, 2009 10:37 PM

Okay, won't be able to get any progress on my BTR-80 done this weekend, I'm participating in the Weekend GB. Hopefully I'll have some pics posted soon.

Oh, and great work Bob!

- Alex

'Verily, this vichyssoise of verbiage veers most verbose, so let me simply add that it's my very good honor to meet you and you may call me V...'

  • Member since
    August 2003
  • From: Connecticut, USA
Posted by Nachtflieger on Saturday, November 14, 2009 1:56 AM

That's coming along nicely Ryan!Thumbs Up [tup] I like how you've painted the interior.Smile [:)]

Nate


  • Member since
    August 2009
  • From: Cary, North Carolina
Posted by M1Carbine on Saturday, November 14, 2009 3:03 AM

Ok so I am about 5 minutes from completing the LUCHS 2.  So being that this went so fast I have another I am going to throw into the ring.  Italeri 1/35 Puma Sd.Kfz 234/2.  There is only one slight problem.  The iassembly instructions are missing.  Can someone help me out here.............LOL.  Please let me know.  I posted the need for it in the armor section, hopefully someone comes through.


Bob

  • Member since
    April 2005
Posted by Thunderbolt379 on Saturday, November 14, 2009 4:30 AM

Hi Bob --

PM inbound!

Mike/TB379

http://worldinminiature.blogspot.com/

  • Member since
    October 2009
Posted by Rhino92 on Saturday, November 14, 2009 11:13 AM

Thanks Mike!

         I am going to attempt the kit nylon. Hope it turns out.

-Ryan

  • Member since
    August 2009
  • From: Cary, North Carolina
Posted by M1Carbine on Saturday, November 14, 2009 2:12 PM

Gentlemen, it is with great pleasure that I post the final photo of the LUCHS 2.

So with this being done so fast, Im waiting for Mike to give me the OK the jump in with another build.  Enjoy


Bob

  • Member since
    April 2009
  • From: Carmel, IN
Posted by deafpanzer on Sunday, November 15, 2009 12:56 AM

WOW!  This is GREAT especially with the weathering.  I don't think I have seen this vehicle before... is it still being used by modern Germans? 

If you want to hear my feedback, here it is... I only see one area that needs to be addressed... the area behind the wheels are too clean especially when the vehicle is muddy.  We should be seeing even more dirt or mud behind and around the wheels if you get my meaning.  


I am almost done painting up my German figures!  I can't wait to start building my 234/1 kit perhaps tomorrow or Monday!  What are you planning to build next?

Andy

  • Member since
    August 2009
  • From: Cary, North Carolina
Posted by M1Carbine on Sunday, November 15, 2009 4:30 AM

Deaf, I dont know if it is still in use.  Some of the photos on the web look fairly recent (within a few years) so it is a possibility.  Ill hit the areas needed, probably in the morning Im experimenting with a mud mix using micro balloons, I almost have the mix where I want it. 

I asked Mike if I could buld another for te GB adn he said OK so deep in the back of my stash I found a 234/2 so that will be the next one for this GB.


Bob

  • Member since
    April 2005
Posted by Thunderbolt379 on Sunday, November 15, 2009 5:01 AM

Hi all,

I didn't get to the badges today, many appologies, I'll try to get them up as soon as possible.

Yep, I agree -- a little mud behind the wheels would look very natural, Bob, I noticed that and was about to mention it but the comment came in before I could do so. It's an excellent model!

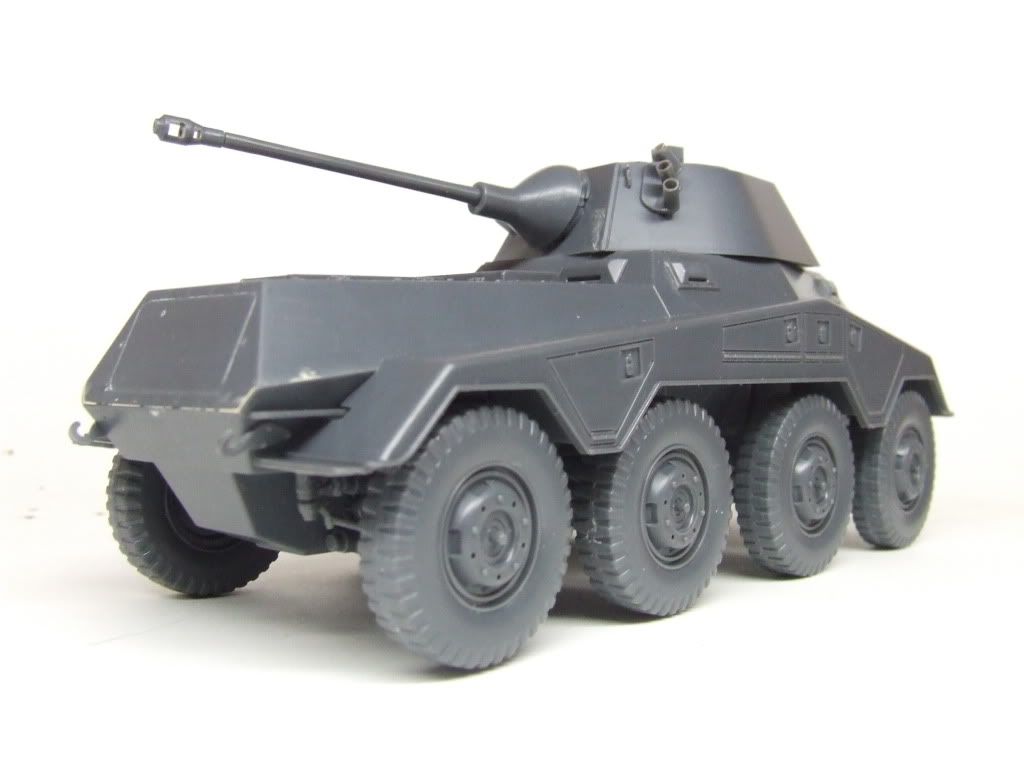
Here's my latest batch of work. The Puma with fenders on:

Photobucket" border="0" />

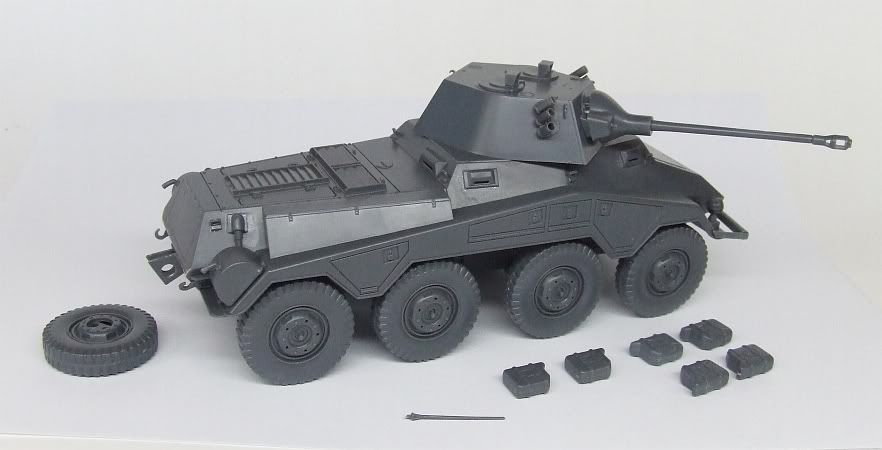
And with external dressing: exhausts, tool box, lift lugs, lights, front bumper, spare wheel rack:

Photobucket" border="0" />

That's pretty much it before painting, though I might mount the vehicle corner sighting poles too. I'm thinking of priming as the plastic is a pretty dark gray. Today I spent on my StuG IV and she's getting close to painting too, so they'll go through the spray stage together.

Cheers,

Mike/TB379

http://worldinminiature.blogspot.com/

  • Member since
    August 2003
  • From: Connecticut, USA
Posted by Nachtflieger on Sunday, November 15, 2009 8:31 AM

Bob: Excellent job on the Luchs!Thumbs Up [tup]Thumbs Up [tup] I really like how it turned out.Big Smile [:D] Congratulations on being the first to finish!


Mike: Your Puma is looking real good......looking forward to seing it painted up.Big Smile [:D]

Nate


  • Member since
    October 2009
Posted by Rhino92 on Sunday, November 15, 2009 12:05 PM

Looking good Mike! Cant wait to see some paint on it.

-Ryan

  • Member since
    August 2009
  • From: Cary, North Carolina
Posted by M1Carbine on Sunday, November 15, 2009 3:43 PM

Looking sweet!


Bob

  • Member since
    April 2009
  • From: Carmel, IN
Posted by deafpanzer on Sunday, November 15, 2009 5:39 PM

Mike,

Your Puma is looking great!  Which color/camo have you decided to paint? 

Andy

  • Member since
    April 2005
Posted by Thunderbolt379 on Sunday, November 15, 2009 5:55 PM

Hi Andy -- thank! I'm going with green mottle, turret number 415 which I believe belongs to an unidentified unit in France, '44.

Cheers, Mike/TB379

http://worldinminiature.blogspot.com/

  • Member since
    August 2009
  • From: Cary, North Carolina
Posted by M1Carbine on Sunday, November 15, 2009 7:00 PM

Ok mud lovers here it is.  I was subtle about it but still muddy.

Bob

  • Member since
    April 2005
Posted by Thunderbolt379 on Sunday, November 15, 2009 11:57 PM

Hi all,

Page 1, leader post, is updated: badges are now available! And the gallery of finished builds is now up to showcase our handiwork!

Cheers, Mike/TB379

http://worldinminiature.blogspot.com/

  • Member since
    August 2009
  • From: Cary, North Carolina
Posted by M1Carbine on Monday, November 16, 2009 12:52 AM

Wow, great looking badges Mike.  Im all..........................badged up. Got started on the 234/2 today, on side of the suspension is done.


Bob

  • Member since
    April 2005
Posted by Thunderbolt379 on Monday, November 16, 2009 12:56 AM

Hey, the badge looks proud! My sister made them from images I located, she's GOOD at digital image manipulation!

I still haven't got to the plans -- will try to later on, but it sounds like you're moving along okay!

M

http://worldinminiature.blogspot.com/

  • Member since
    August 2009
  • From: Cary, North Carolina
Posted by M1Carbine on Monday, November 16, 2009 1:19 AM

Mike, thank your sister for all her great work on the badges bro.  No worries on the plans.  I scanned the instructions from Ryans 234/1 which is basically the same.  The only thing I will need when you get a chance are the instructions for the turret assembly.  I should have some pics up tomorrow evening.


Bob

  • Member since
    March 2006
Posted by TD4438 on Monday, November 16, 2009 1:34 PM

Count me in on this one.I've been wanting to build this kit for over 20 years.Got started today after a few months off from the bench.


  • Member since
    February 2004
  • From: Weymouth, Dorset, UK
Posted by chris hall on Monday, November 16, 2009 1:49 PM

The Tamiya Sd.Kfz.232 8-Rad is a fine kit. I built the re-issued version (new detail bits, decals, small etched fret, turned aluminium gun barrel, couple of new figures) for a review in a UK-based military modelling magazine earlier this year. Be careful assembling the suspension. With a bit of forethought and organization, you can bulid in some flexibility, which helps a great deal in keeping all eight wheels on the ground at the same time.

Cheers,

Chris.

Cute and cuddly, boys, cute and cuddly!
  • Member since
    March 2006
Posted by TD4438 on Monday, November 16, 2009 4:21 PM

Thanks for the tips chris.This is an older kit,no PE or aluminum barrel.The suspension looked crazy at first.Just had to be patient.Here's my current progress.I might even get some paint on it today!


  • Member since
    August 2003
  • From: Connecticut, USA
Posted by Nachtflieger on Monday, November 16, 2009 4:21 PM

Nice looking badges Mike.Thumbs Up [tup] I just finished up my Brummbar for the 1000 wheels GB, so now I will focus completely on my Puma. I'm actaully almost done with the build portion.Smile [:)]

Hey TD.......nice start to the 232!Thumbs Up [tup] I built one this past summer, and it went together with no real issues.

Nate


  • Member since
    May 2009
  • From: Hobart, Tasmania
Posted by Konigwolf13 on Tuesday, November 17, 2009 4:29 AM

Mike, I have doubts about being able to complete this build in the time frame, the doller issue looks likely to impede on things, I would still like to try. On the other side I have another version of this kit that I had been planning to build OOB for a diorama, I would like to enter this one as my main build, its built as far as pictured below, basically partially complete fwd wheels.

Andrew

  • Member since
    April 2005
Posted by Thunderbolt379 on Tuesday, November 17, 2009 4:48 AM

Hi Andrew -- no worries, go with whatever you reckon is your best shot. I asked for no more than 10% complete and this one looks to be a lot less than that, so there's not even a bend of the rules! Same kit? Nothing to even change on Page 1!

Cheers, happy building,

Mike/TB379

http://worldinminiature.blogspot.com/

  • Member since
    May 2009
  • From: Hobart, Tasmania
Posted by Konigwolf13 on Tuesday, November 17, 2009 4:51 AM

Thanks Mike

Andrew

  • Member since
    March 2006
Posted by TD4438 on Tuesday, November 17, 2009 9:58 AM

Ready for paint.


JOIN OUR COMMUNITY!

Our community is FREE to join. To participate you must either login or register for an account.

SEARCH FORUMS
FREE NEWSLETTER
By signing up you may also receive reader surveys and occasional special offers. We do not sell, rent or trade our email lists. View our Privacy Policy.