SEARCH FINESCALE.COM

Enter keywords or a search phrase below:

IDF Group Build Mk. II 2010-2011

107452 views
398 replies
1 rating 2 rating 3 rating 4 rating 5 rating
  • Member since
    May 2012
Posted by Ninja-Viking on Thursday, May 24, 2012 12:15 PM

Helo H-34

It's good to see the IDF builds still rolling along .

My 1/72 M51 is stalled at the boggie assembly stage but the build is still on the bench .

I saw over at Tracks n Troops they had some 1/72 IDF equipment sets as well as a M113 Fitter and Command vehicle in resin . I placed an order and wanted to use paypal as my payment option but I'm yet to recieve a invoice to send the payment through . I don't want to make a nuisance and bug the guy about my order , especially if he's really busy doing ton's of orders  for other modellers . It's been about a week since I placed mine , so I'm not sure when it would be appropriate to contact Tracks n Troops about my order , perhaps I'll wait another week ?

Anyway , I'll try and make some progress on my M51 over the next couple of days .

John .

Are you making any progress on the IDF tanks?

Ken

  • Member since
    September 2006
  • From: Dripping Springs, TX, USA
Posted by RBaer on Tuesday, May 22, 2012 3:13 PM

Looks good, Mike.  Your builds are always well-executed and neat. Yes

I hope to have some pics up of the finished Magach soon.  It looked good on the contest table last Sat but no show. No worries there, the class was rather large, and had a lot of very nice builds.

Apprentice rivet counter.

  • Member since
    April 2005
Posted by Thunderbolt379 on Friday, May 18, 2012 8:52 AM

Thanks, Vance! Armour has become second nature, I guess, and in some ways they're easier than aircraft -- generally bigger and with less filling (none on this one at all...)

I was wondering the same thing -- White R34 had some stunning scratchbuild/conversions underway, but he's not been around for ages. I hope things are under control for him...!

Cheers, Mike/TB379

http://worldinminiature.blogspot.com/

  • Member since
    February 2003
  • From: Rothesay, NB Canada
Posted by VanceCrozier on Friday, May 18, 2012 8:44 AM

Mike, uhhh.. Bow Down

That is an impressive looking machine, glad I could follow along. One of these days I'm going to have to try my hand at some armour. (I do have one one the stash) That's some great work.

BTW, I just checked out the profile for the original poster "White_R34" - no sign of him since October last year??!! Anybody know anything??

On the bench: Airfix 1/72 Wildcat; Airfix 1/72 Vampire T11; Airfix 1/72 Fouga Magister

  • Member since
    April 2005
Posted by Thunderbolt379 on Friday, May 18, 2012 3:50 AM

Thanks, John, it was a pretty straightforward build, the only issues were really with things like the lack of fit on the right skirt, and some tiny parts with no positive location features. Other than that it was a very pleasant run through the standard suite of techniques.

I realise I've only done two armour builds which are more than single-colour schemes in the last two years, and they're both WWII German. The AS-90 coming up is a two-colour scheme, so that'll help rebalance things...

Cheers, Mike

http://worldinminiature.blogspot.com/

  • Member since
    September 2003
  • From: Australia
Posted by Helo H-34 on Thursday, May 17, 2012 10:49 PM

Awesome Merkava 1 build Mike Toast

Everything looks great but I understand your own minor issue's with some of the weathering and washes , although it doesn't show in the pic's .

You mentioned about the radio mast , which is something I had over looked on my 1/72 builds ; So I'll be adding some wire as well .

All round excellent build Sir .

John .

  • Member since
    April 2005
Posted by Thunderbolt379 on Thursday, May 17, 2012 7:47 PM

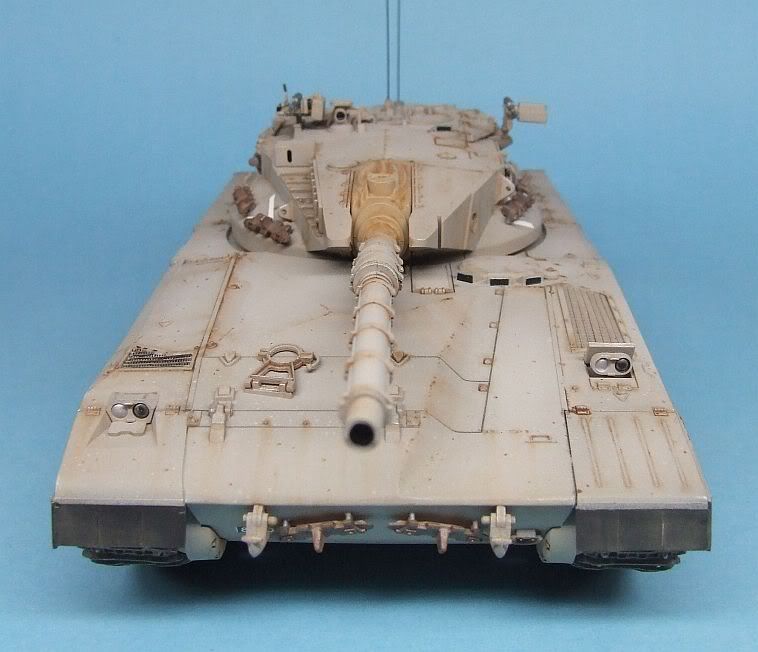
Gallery shots, as promised! This is Tamiya's Merkava 1, almost OOB, finished in Tamiya Acrylics, oil wash and MiG pigments, with radio masts of .015" sping steel wire. RBaer, many thanks for the tracks that made it all possible!

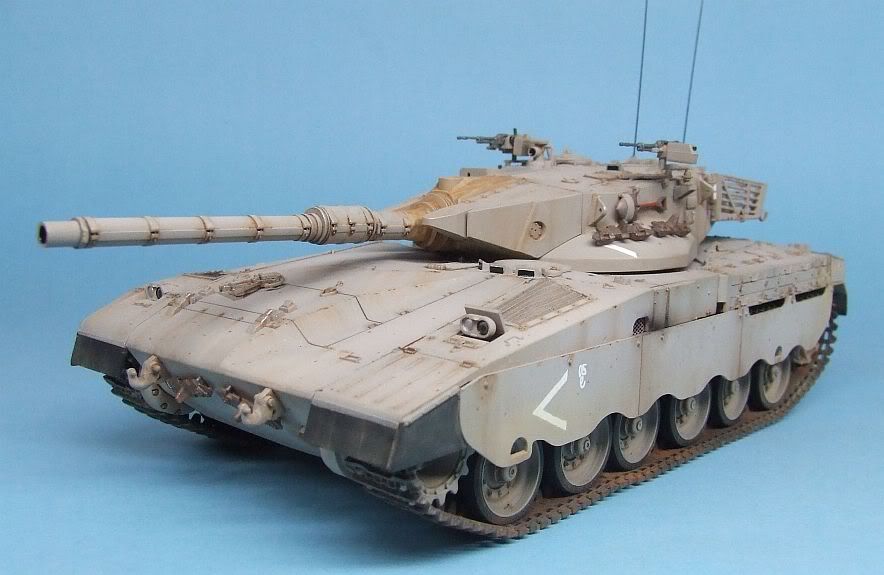
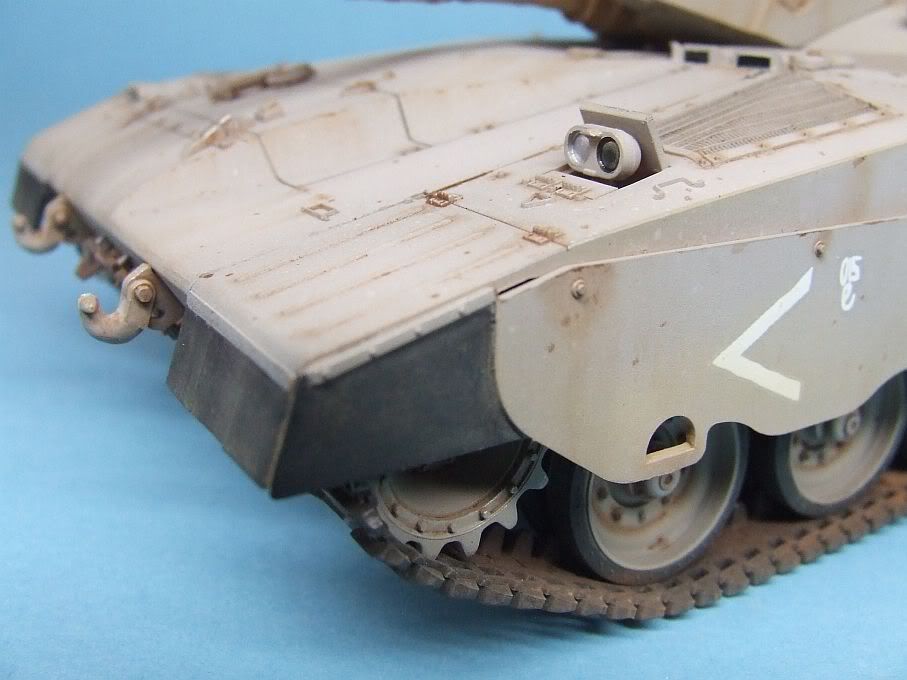
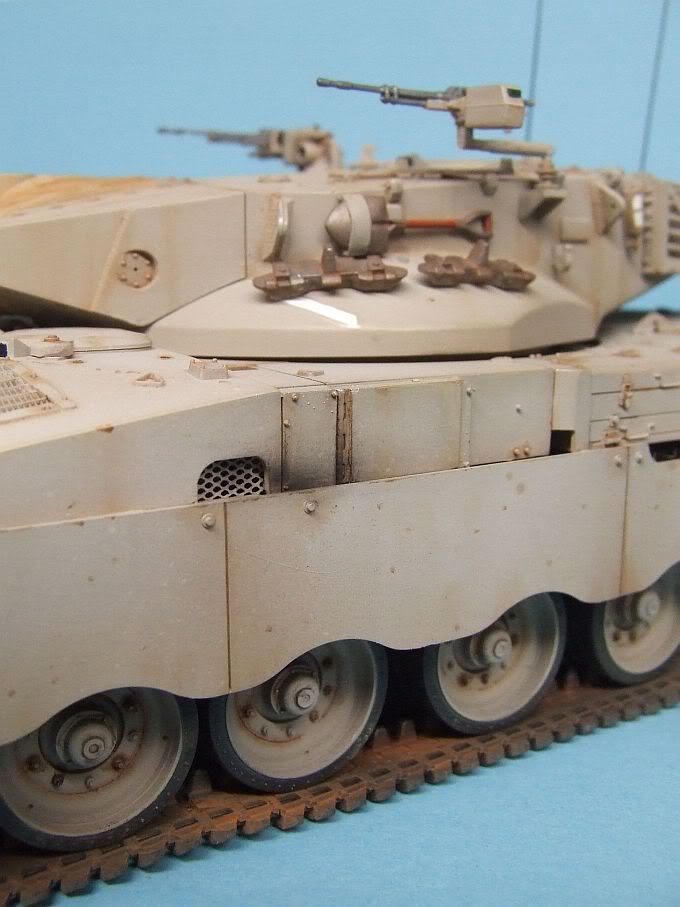
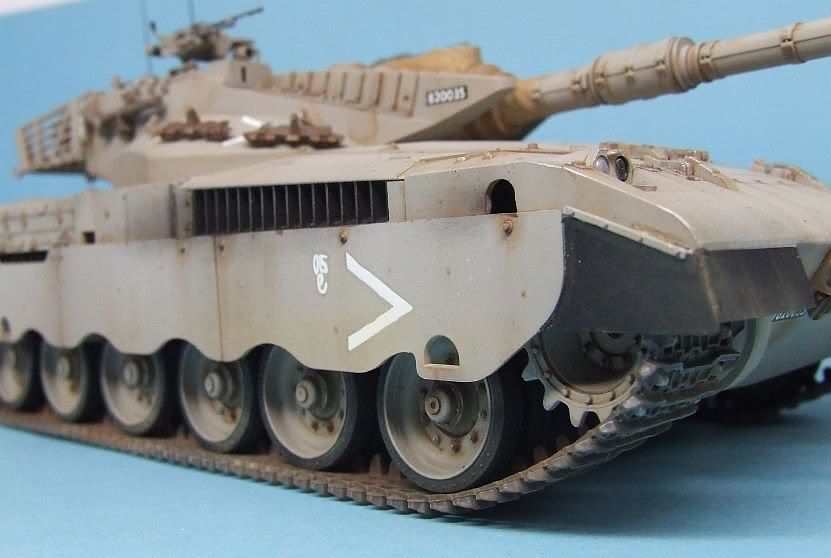
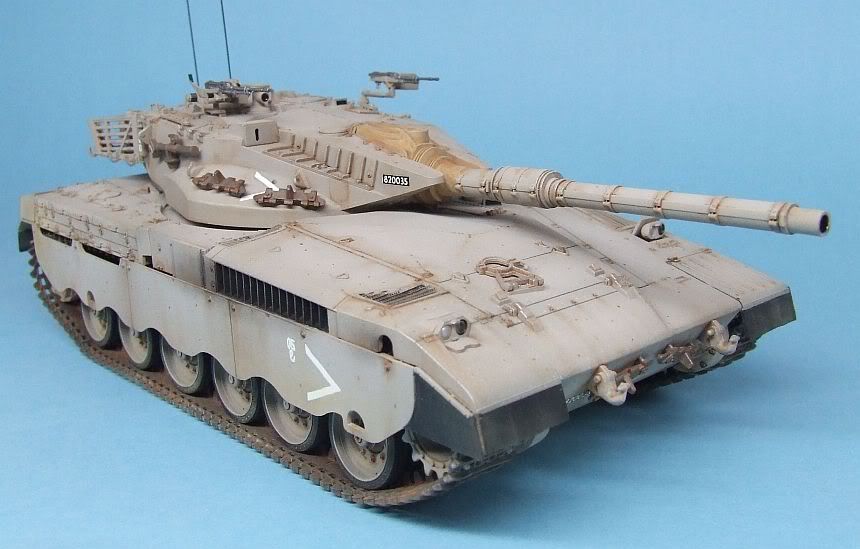
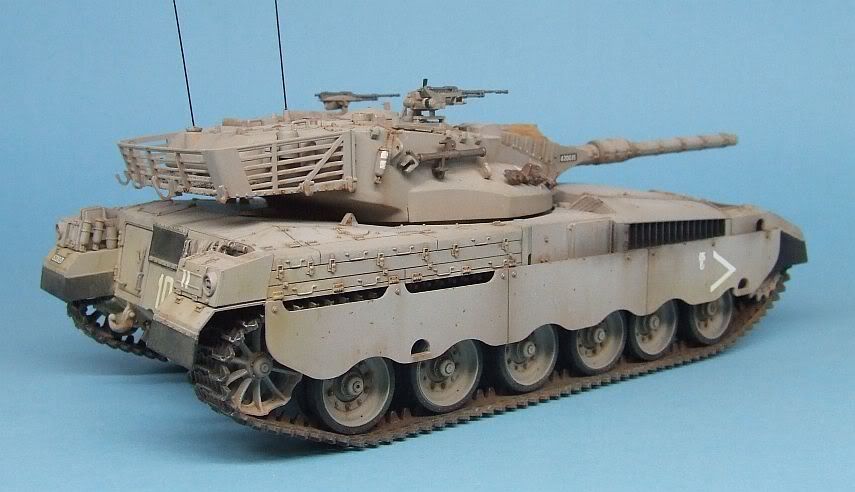
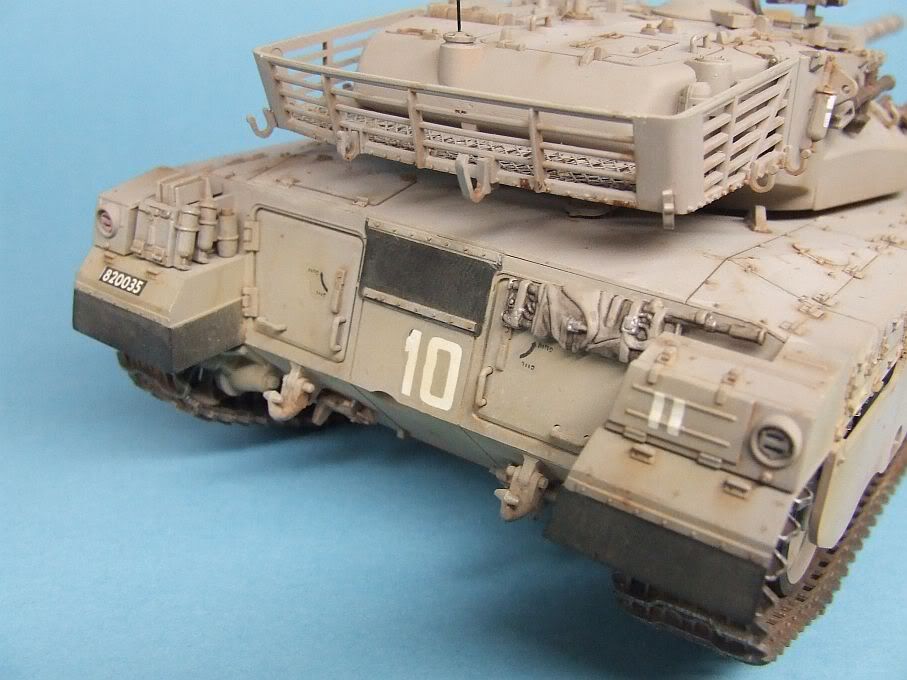
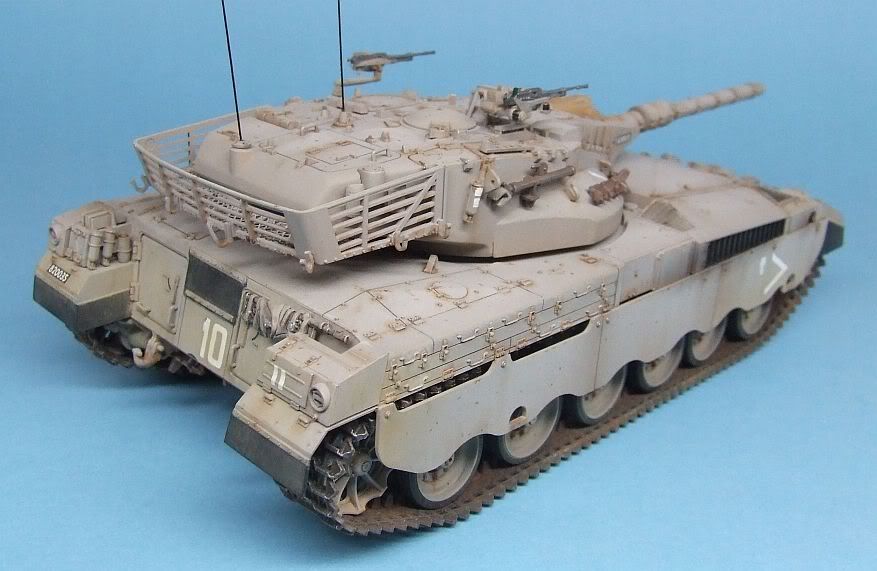
There are a few remaining points I could have addressed. My marking choice has a divisional sign of two white stripes around the barrel, but I have no confidence the supplied decals will conform well enough not to stand out like a sore thumb against the paint job. I would have painted them if I'd realised at the outset, now it would be a more lengthy process of masking, and I'll look at that some time in the future. I could have outlined the driving lights with a lick of black wash to define them better -- maybe, but does the real tank show such a detail? The tow cables are missing, they're a sub-project for later. And I notice the engine grills don't look too hot here -- the oil wash looks pretty good to the naked eye, but very severe and uneven in pictures, so I might try evening it out at some point.

Okay, my third IDF build is ready for the display shelf (if I had such a thing...), and I'll finish the Merk II when I bite the bullet and buy some Isradecals, I shudder at their expense but if I'm going to build other Merks, which I am, and which will all be derived from Academy kits, I'm going to need them as the Academy decals really are the worst in the business.

Cheers, thanks for looking, hope you've enjoyed the build as much as I have. Next for me, a slightly problematic Sea Harrier, a StuH 42 with all the trimmings, fold PE for an AS-90, get a T-72 into paint, and move two Spitfires along to the painting stage... Oh, and finish at least one Phantom before midyear!

Mike/TB379

http://worldinminiature.blogspot.com/

  • Member since
    February 2003
  • From: Rothesay, NB Canada
Posted by VanceCrozier on Thursday, May 17, 2012 2:48 PM

Looking forward to the finals Thunderbolt!

On the bench: Airfix 1/72 Wildcat; Airfix 1/72 Vampire T11; Airfix 1/72 Fouga Magister

  • Member since
    April 2005
Posted by Thunderbolt379 on Thursday, May 17, 2012 10:00 AM

Guys, I'm calling the Tamiya Merk 1 done at this time. There are some fiddling details left, but they're more than I have patience to get into at this time. I just did the gallery photos and will post them tomorrow -- it's half after midnight here and I'm bushed!

Chjeers, Mike/TB379

http://worldinminiature.blogspot.com/

  • Member since
    September 2006
  • From: Dripping Springs, TX, USA
Posted by RBaer on Wednesday, May 16, 2012 11:20 AM

Looking good, Mike.

VC, I have a T34/85 almost ready, and the Magach I'm currently working on. I may also bring a late KT, not sure.

Apprentice rivet counter.

  • Member since
    April 2005
Posted by Thunderbolt379 on Wednesday, May 16, 2012 8:30 AM

Very nearly home and hosed -- I did the general drybrushing of edges and mounted the running gear yesterday:


Then I painted the interior of the gun barrel and a few touchups, plus fitted the side skirts (the right hand skirt gave me hell, four goes to fit, exactly the same as the Academy kit -- ergo Academy reproduced Tamiya's error...) Today I did the bare metal drybrushing, picked up some missed wash weathering points, worked on the MGs and applied the decals. The sheet was old and pretty tough, and needed very long soak times, but the decals behaved fairly well thereafter:

I weathered the spare track links ready to mount tomorrow, and final jobs include last touch-ups, fabricate the antennas, apply pigments for dust, fit and weather the MGs and paint that stretcher (?) that's stowed on the rear hull. With that lot I think I can call this one done, pending only tow cables, whether a set of Eureka XXLs or experiments with braided copper wire from some other source, as the kit cables are no good, requiring heating and bending, a process I have no faith in at all, especially not to look realistic and fit into very delicate, tiny guide parts...

Hopefully I'll be posting gallery shots this time tomorrow.

Cheers, Mike/TB379

http://worldinminiature.blogspot.com/

  • Member since
    February 2003
  • From: Rothesay, NB Canada
Posted by VanceCrozier on Tuesday, May 15, 2012 1:30 PM

Wrapping up nicely Thunderbolt!

 RBaer.... I guess we'll just have to believe you... Wink Have fun at the show, what are you taking with you?

On the bench: Airfix 1/72 Wildcat; Airfix 1/72 Vampire T11; Airfix 1/72 Fouga Magister

  • Member since
    September 2006
  • From: Dripping Springs, TX, USA
Posted by RBaer on Tuesday, May 15, 2012 1:27 PM

Looks good from here. I like the way the wash defined all the different panels on the front hull.

I have a fair amount of progress but no pics. I'm trying to get ready for a show this Saturday and can model or take pics, so you can see (or not) what takes priority. Hope to have pics up next week of both the Magach and Merk.

Cheers!

Apprentice rivet counter.

  • Member since
    April 2005
Posted by Thunderbolt379 on Sunday, May 13, 2012 4:27 AM

Progress over the last two days, the wash process is close to complete, anything I spot from here on I'll pick up as I go. Some detail painting has been done and the MGs are underway. Here she is:

I'm hoping to mount the running gear tomorrow, and might possibly have a completion the day after...

Cheers, Mike/TB379

http://worldinminiature.blogspot.com/

  • Member since
    April 2005
Posted by Thunderbolt379 on Friday, May 11, 2012 8:34 AM

I managed to put in some time today. I got the tires neatened up, assembled the wheels, unmasked everything and identified all touchups needed. Here she is:

Tomorrow I'll get into the touchups and detail painting, and hopefully start the oil wash. I'm a bit disillusioned with masking over XF-1 black, it never leaves a clean finish. The black seems to be particularly delicate, marking or showing residues no matter how carefully the tack is reduced before tape is applied, and brush painted touchups are always visible, if only because the thicker application dries noticeably glossy... I must develop a better technique for this part of the process.

Cheers, M/TB379

PS: The flange detail I added shows up nicely under the paint and looks like it really belongs.

http://worldinminiature.blogspot.com/

  • Member since
    April 2005
Posted by Thunderbolt379 on Tuesday, May 8, 2012 5:53 PM

Thanks John and Vance -- I think the preshade vanished under the topcoat, if there's anything left it's probably going to be too subtle to show up in photos... Still trying to get the knack of this!

I may not have a chance to start the next phase until the weekend, real life is doing its thing, but it's good to have all the spraying done!

Cheers, Mike/TB379

http://worldinminiature.blogspot.com/

  • Member since
    February 2003
  • From: Rothesay, NB Canada
Posted by VanceCrozier on Tuesday, May 8, 2012 2:17 PM

Looking good Doc Thunderbolt! I've tried preshading a couple of times with little success, I'm either not making enough contrast on the pre-shade, or I'm using too much paint on the top coat. I probably should plan on doing the top coat in two sessions just to force myself to take a break & look at the progress partway through...

On the bench: Airfix 1/72 Wildcat; Airfix 1/72 Vampire T11; Airfix 1/72 Fouga Magister

  • Member since
    September 2003
  • From: Australia
Posted by Helo H-34 on Tuesday, May 8, 2012 8:09 AM

Hi Mike ;

I'm quite impressed with the extra effort you put in making those missing hinge flanges ;

Excellent work my friend Bow Down

I'm yet to try pre-shading on my builds but I think I'll give it a go next time .

Anyway your really moving along with the Merk 1 , I look forward to the next WIP pic's

John .

  • Member since
    April 2005
Posted by Thunderbolt379 on Tuesday, May 8, 2012 7:46 AM

I managed to complete spraying today, with an extra mixing of Sinai Grey for the MGs, double-coat the outer faces of the wheels, paint the drives and idlers, touch up as required, then apply the fade and shade coats too. At this time the Merk 1 is ready for detail painting and oil wash.

M/TB379

http://worldinminiature.blogspot.com/

  • Member since
    April 2005
Posted by Thunderbolt379 on Sunday, May 6, 2012 2:39 AM

Well, only a week late but I managed to get some done on the Tamiya Merk 1. Last weekend I used .010" card to add the missing flanges of the hinges on the storage lockers, here's the evidence:

No way was I going to add two bolt heads to each of the 16 flanges without a punch and dye set... Next came the masking and preshading, also last weekend:

My first preshaded tank, we'll see how much shows through. Today I finally mixed the Sinai Grey (XF-57:XF-20, 1:1) and laid on the basecoat:

The light is a bit harsh, the grey is not quite as luminous as that, and the preshade is pretty much burned out here.

There's a bit more to do in the next session, I forgot to paint the MGs, and the wheels need a bit of a touch up on a few outer faces (they were painted about a fortnight ago), then I can get to the shade and fade coats in the same job. From that point it should be downhill to the finish...

Cheers, Mike/TB379

http://worldinminiature.blogspot.com/

  • Member since
    September 2006
  • From: Dripping Springs, TX, USA
Posted by RBaer on Friday, May 4, 2012 4:28 PM

Good idea, but I went ahead and used decals on painted masking tape. I'm not totally happy with having to change the numbers, since up until now I was building a specific tank. Now it's "another tank in that same unit".  Although, if I can find some decal stripes or white decal paper.......

Apprentice rivet counter.

  • Member since
    February 2003
  • From: Rothesay, NB Canada
Posted by VanceCrozier on Tuesday, May 1, 2012 3:05 PM

RBaer

A bit more progress......

Dusting, detail painting done, working on the AFV Club tracks. My "3"s didn't work so well, probably have to re-do those. I couldn't find any suitable decals, so tried to hand-paint them and ended up with some pretty nasty brush strokes. Anyway, here it is:

http://i1236.photobucket.com/albums/ff451/rustybaer/SD530004-1.jpg

Trying to get ready for ScaleFest in May.Stick out tongue

Looks really good from here. Cool For the numbers - might you try a basecoat of white on styrene sheet, mask with some tape, then spray the black??

On the bench: Airfix 1/72 Wildcat; Airfix 1/72 Vampire T11; Airfix 1/72 Fouga Magister

  • Member since
    September 2006
  • From: Dripping Springs, TX, USA
Posted by RBaer on Tuesday, May 1, 2012 12:55 PM

Thanks guys. It's kind of fun when all the elements of the painting process start to work together.

I did re-do the number panels on the side, still working on the air ID panel and figs.

Apprentice rivet counter.

  • Member since
    April 2005
Posted by Thunderbolt379 on Sunday, April 29, 2012 7:43 PM

Echoing those words, she's a stunner! I MUST add one of these to my collection!

I had meant to get the main spraying on the Merk 1 done on Saturday but things ended up busy, and it'll be tomorrow before I can rip into it...

M/TB379

http://worldinminiature.blogspot.com/

  • Member since
    September 2003
  • From: Australia
Posted by Helo H-34 on Saturday, April 28, 2012 5:04 PM

WOW , really looking good now RBaer .

The weathering is just superb .

Great Stuff  Toast

John

  • Member since
    September 2006
  • From: Dripping Springs, TX, USA
Posted by RBaer on Saturday, April 28, 2012 12:57 PM

A bit more progress......

Dusting, detail painting done, working on the AFV Club tracks. My "3"s didn't work so well, probably have to re-do those. I couldn't find any suitable decals, so tried to hand-paint them and ended up with some pretty nasty brush strokes. Anyway, here it is:

Trying to get ready for ScaleFest in May.Stick out tongue

Apprentice rivet counter.

  • Member since
    September 2003
  • From: Australia
Posted by Helo H-34 on Tuesday, April 24, 2012 3:08 PM

Sounds like you guy's are making really great progress .

I've been busy on the home front of late and haven't been able to get much done .

Hopfully some updates sooner than later .

John

  • Member since
    September 2006
  • From: Dripping Springs, TX, USA
Posted by RBaer on Tuesday, April 24, 2012 11:54 AM

Looking forward to seeing the progress.......

Speaking of which, I'm close to wrapping up the Magach, no pics yet. I think for this one I may actually splurge and purchase some nice figs, instead of the Academy guys I usually use.

The Merk is coming along as well, will try to get current pics of both asap.

Apprentice rivet counter.

  • Member since
    April 2005
Posted by Thunderbolt379 on Tuesday, April 24, 2012 2:40 AM

Hi all, I managed to get back to the Merk 1 today, installing the return rollers and masking all axles. Oh, and a few days ago I did a Sinai Grey mixing and zapped the running gear. It'll need a touch more but I'm happy with the shade (a 1:1 mix of XF-20 Light Grey and XF-57 Buff, as recommended for a 1982 scheme on the IDF Modelling site). I'm very close to finished construction, there are only a few details left to fit before I'm into paint. There are some missing hinge flanges I can add from .005" sheet, a few details around the sights to go, then the batch of parts to be finished in metallic and weathered. Other rthan that, I'm onto the standard round of black mudflaps, base, shade and fade coats, spray the tracks, then bring it all together with the oil wash and dust process.

Cheers, Mike/TB379

http://worldinminiature.blogspot.com/

  • Member since
    September 2006
  • From: Dripping Springs, TX, USA
Posted by RBaer on Monday, April 16, 2012 3:43 PM

Thanks, Mike. The  regular wheels on the Merk are a mixture of Tamiya and Acad, and the front Acad. I don't recall much trouble with painting or installing the the "tires"  but it's been a while. I do remember that they don't  take paint well and have a sharp inner edge that's hard to fix.

Apprentice rivet counter.

JOIN OUR COMMUNITY!

Our community is FREE to join. To participate you must either login or register for an account.

SEARCH FORUMS
FREE NEWSLETTER
By signing up you may also receive reader surveys and occasional special offers. We do not sell, rent or trade our email lists. View our Privacy Policy.