SEARCH FINESCALE.COM

Enter keywords or a search phrase below:

60th Anniversary Korean War Group Build- extended for the duration

764425 views
3335 replies
1 rating 2 rating 3 rating 4 rating 5 rating
  • Member since
    November 2009
  • From: SW Virginia
Posted by Gamera on Tuesday, November 6, 2012 8:06 AM

SP: Great photos there! Sure looks peaceful, at least till the shooting starts.

Looked around the internet and only found one painting of Gus's F-86, I'm not totally sure it's correct, I'm going to have to do more checking. All I'm sure about is it was named Danny after his newborn son. Funny he flew over a hundred missions and never lost a fighter, the first 'ship' he lost was Liberty Bell 7.

Thanks for the tips on the books guys, will have to check those out!

"I dream in fire but work in clay." -Arthur Machen


  • Member since
    July 2004
  • From: Sonora Desert
Posted by stikpusher on Monday, November 5, 2012 4:25 PM

And of course ya gotta love web searches for bits of KW inspiration...

from Life magazine, this beautiful view (post cease fire in 1960) of an M46 from 1st Cav dug in overlooking the Imjin river

or this image of the bones of fallen Chinese soldiers and other battle debris taken in 1960 at some place called "Massacre Valley" in Korea

And from YouTube, this nice tribute video made with some additional opening captions and the title sequence of the Clint Eastwood film "Heartbreak Ridge". Great footage of various combat actions that works quite well to the music.

... and the real "Heartbreak Ridge" in 1960


F is for FIRE, That burns down the whole town!

U is for URANIUM... BOMBS!

N is for NO SURVIVORS...

       - Plankton

LSM


  • Member since
    July 2004
  • From: Sonora Desert
Posted by stikpusher on Monday, November 5, 2012 2:54 PM

Gamera, good luck on finding decals for Gus's bird. I would love just to see a profile at least. I am looking forward to seeing that M40. That is one imposing looking beast of a SP gun!

Draken, you are quite correct on "The Coldest Winter". What is great for me is that for 2010 Christmas, my second daughter gave me "The Hawk and the Dove", a dual biography of sorts on Nitze and Kenan, who are mentioned so prominently in the US political background chapters. Having read that book last year helped put a lot more perspective on this current read. I do gotta say that David Halberstam does not like MacArthur and conservatives in his book. After this one I may go back and re read John Toland's "In Mortal Combat". And maybe see if I can find "American Ceaser" somewhere secondhand...

John, I hope your information on the engine for the HO3S is put to good use for here.


F is for FIRE, That burns down the whole town!

U is for URANIUM... BOMBS!

N is for NO SURVIVORS...

       - Plankton

LSM


  • Member since
    December 2002
  • From: Northern California
Posted by jeaton01 on Sunday, November 4, 2012 8:34 PM

The HO3S/R-5 had a Pratt & Whitney R-985 engine.

John

To see build logs for my models:  http://goldeneramodel.com/mymodels/mymodels.html


  • Member since
    December 2010
  • From: Yangju, Gyeonggi-Do, Korea
Posted by the_draken on Sunday, November 4, 2012 4:42 PM

Probably me thaty mentioned "The Coldest Winter".  AWESOME book!  Even though it only covered the first ten months of the War.  The next book you should read after that is "The Final Crucible:  US Marines in Korea, Vol. 2:1953".  Lee Ballanger is the author.  TOTALLY awesome, describes the trench warfare north of Seoul and Uijeongbu.  Stay away from anything by Cummings, the guy is an apologist and really doesn't understand the war, IMHO.

I've been sorely distracted by family and health problems m'se'f, I've only gotten as far spray painting the Dragon armoured jeeps.  I _HAVE_, however, started assembly on my Academy F-89J Scorpion.  I'm trying to decide whether or not to scrap off the cockpit detail and use the Photo Etch.  Tempting to go both ways.

I'll post pics when I can...

________________________________________________________________________________

Andy Hill (the_draken) landrew.hill(at)live.com <*> ASE Master Auto Tech, Imaca certified.  >^.^<

PADI OWSI Certified, BA Poli Sci (NDSU), BS Secondary ED-Social Studies MSUM (Sigma *** Laude)

  • Member since
    November 2009
  • From: SW Virginia
Posted by Gamera on Sunday, November 4, 2012 4:32 PM

Wow, has it been that long? I did get some turned brass ammo rounds in for the M40. Soon as the replacement treads come in I'll have everything I need except time. Hopefully when I get my Tiger done.

Btw: picked up Squadron's 'Air War Over Korea' book and was reminded that US astronaut Gus Grissom had flown missions there, gee now I wonder if can find decals for his bird....

"I dream in fire but work in clay." -Arthur Machen


  • Member since
    July 2004
  • From: Sonora Desert
Posted by stikpusher on Sunday, November 4, 2012 4:14 PM

Wow, almost a month of no postings here. Self serving bump! I am reading "The Coldest Winter" that somebody in here mentioned awhile back. An excellent read giving the best deep background material on every conceivable aspect that I have yet read on the Korean War.


F is for FIRE, That burns down the whole town!

U is for URANIUM... BOMBS!

N is for NO SURVIVORS...

       - Plankton

LSM


  • Member since
    July 2004
  • From: Sonora Desert
Posted by stikpusher on Wednesday, October 10, 2012 8:21 PM

Those piston engined 'copters certainly were intricate in all their workings. I learned that on my H-13 build. If you can find out what sort of engine that one had you can do some gizmology with an aftermarket engine and make it look about right. Providing that you are unable to find any good references.

Well here are my UK AFV crewman all primed up with Gunze Mr Surfacer 1000 in today's airbrushing experiment.


F is for FIRE, That burns down the whole town!

U is for URANIUM... BOMBS!

N is for NO SURVIVORS...

       - Plankton

LSM


  • Member since
    November 2009
  • From: SW Virginia
Posted by Gamera on Tuesday, October 9, 2012 7:41 AM

Interesting John, just enough to get you intrigued but not enough to really scratch-build the engine.  

"I dream in fire but work in clay." -Arthur Machen


  • Member since
    September 2003
  • From: Australia
Posted by Helo H-34 on Tuesday, October 9, 2012 3:38 AM

Thank's Cliff ;

just for a few seconds here's something slightly different from the Duece trucks I'm currently working on ;

I stumbled across this photo in one of my old photo albums


I don't remember posting it before and the photo was taken with a pocket 35mm camera about ten years ago ; Back when I was a regular visiter to HMAS Albatross Naval Air Station Museum , 1.5 hours  south of Sydney .

I wish I had been able to get closer or had a better camera with zoom capability . The placement of the engine inside the frame is quite interesting on this Sikorsky S-51 .

I had a quick look on google images for other better pic's of the engine but I have not seen anything so far . Might make an interesting build if I can find better reference's

Back to the GMC CCKW 353's

John .

  • Member since
    November 2009
  • From: SW Virginia
Posted by Gamera on Monday, October 8, 2012 12:32 PM

She's coming along nicely John.

"I dream in fire but work in clay." -Arthur Machen


  • Member since
    September 2003
  • From: Australia
Posted by Helo H-34 on Monday, October 8, 2012 6:24 AM

Just a small update today .

Working on the Club Mobile with most of the pieces cut from the resin pour blocks , cleaned up and now are ready for airbrushing


The shelves and counter top are to be wood brown in colour , so I left those out to do seperatly ; With the sides of club moblie glued to the bottom section , evrything else I can paint olive drab .

I used the two small extension pieces to extend the length of the chassie and for extra strength I glued some plastic strip on the inside of the chassie frame overlapping the extension pieces

The extra strength was really only needed while I continued working on the chassie adding the rest of the rear suspension parts , I wanted to avoid any clumsy handling on my part and repeated glueing of the same thing over and over .

Hopfully some painting tomorrow .

John .


  • Member since
    November 2009
  • From: SW Virginia
Posted by Gamera on Saturday, October 6, 2012 6:22 PM

John: Nice work there on Lee Roy, the support dolly looks really good!

"I dream in fire but work in clay." -Arthur Machen


  • Member since
    July 2004
  • From: Sonora Desert
Posted by stikpusher on Saturday, October 6, 2012 1:02 PM

Oh Heavy Drops! I cant wait!


F is for FIRE, That burns down the whole town!

U is for URANIUM... BOMBS!

N is for NO SURVIVORS...

       - Plankton

LSM


  • Member since
    September 2003
  • From: Australia
Posted by Helo H-34 on Saturday, October 6, 2012 7:58 AM

I'm still messing around with the GMC CCKW 353 "soft-skin'' vehicles with four of them now on the bench

Two are now painted and I need to mask the wheel hubs to paint the tyres next .

The LeRoi 105 compressor seems to fit okay on the Airfix chassie ; I've nick-named my truck 'Lee-Roy'

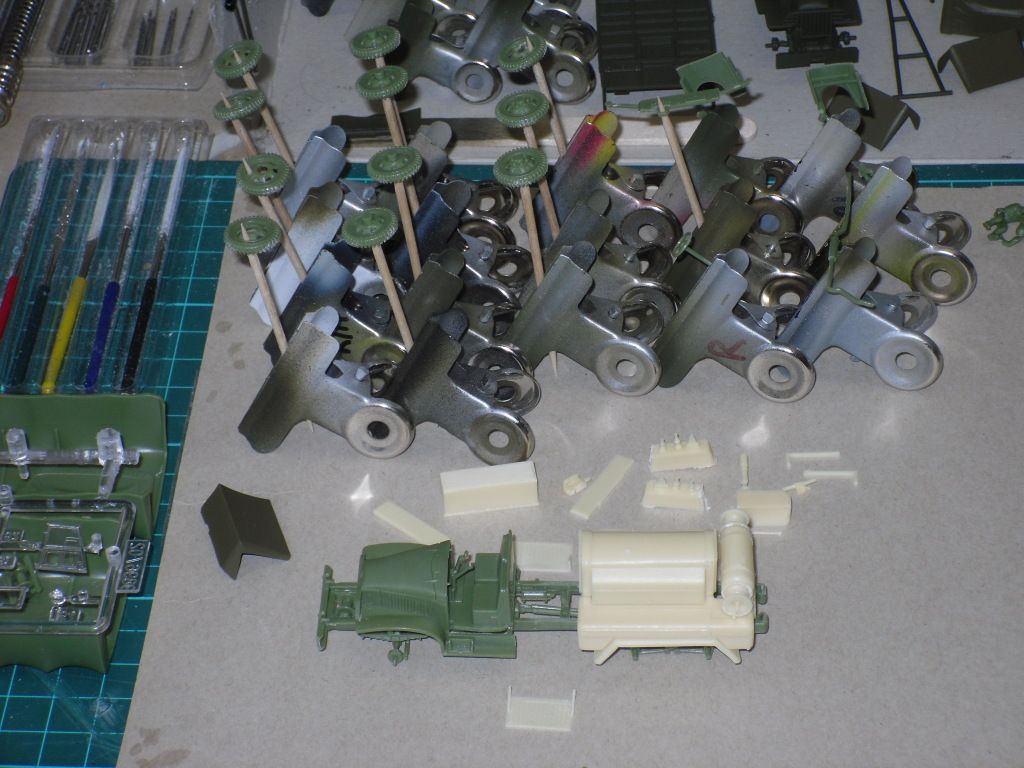
I did have to file down part of the rear chassie rails to accommodate the resin compressor . I think I already mention how part of the Airfix chassie is slightly deeper than the Academy Duece and a Half truck .

Anyway , like I said it seems to fit okay .

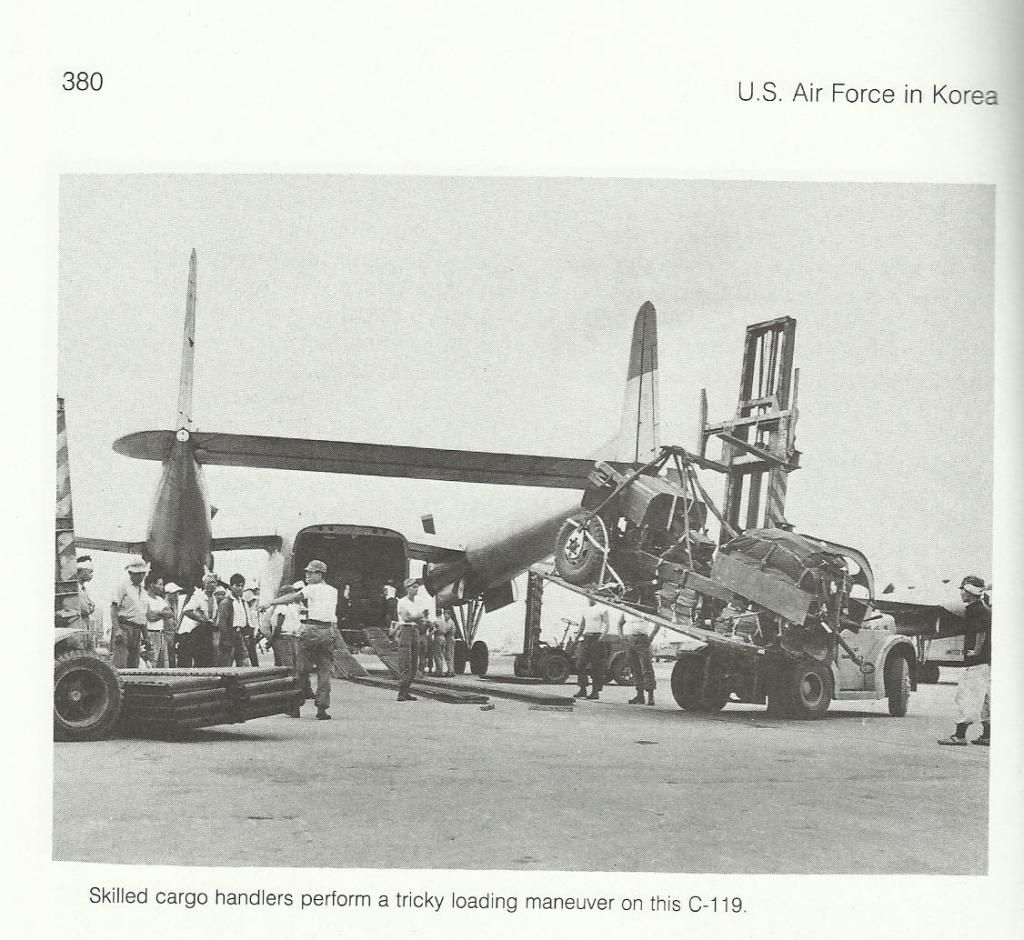
Squadrons GMC CCKW book has some great colour photo's and I really liked these series of pic's from the book

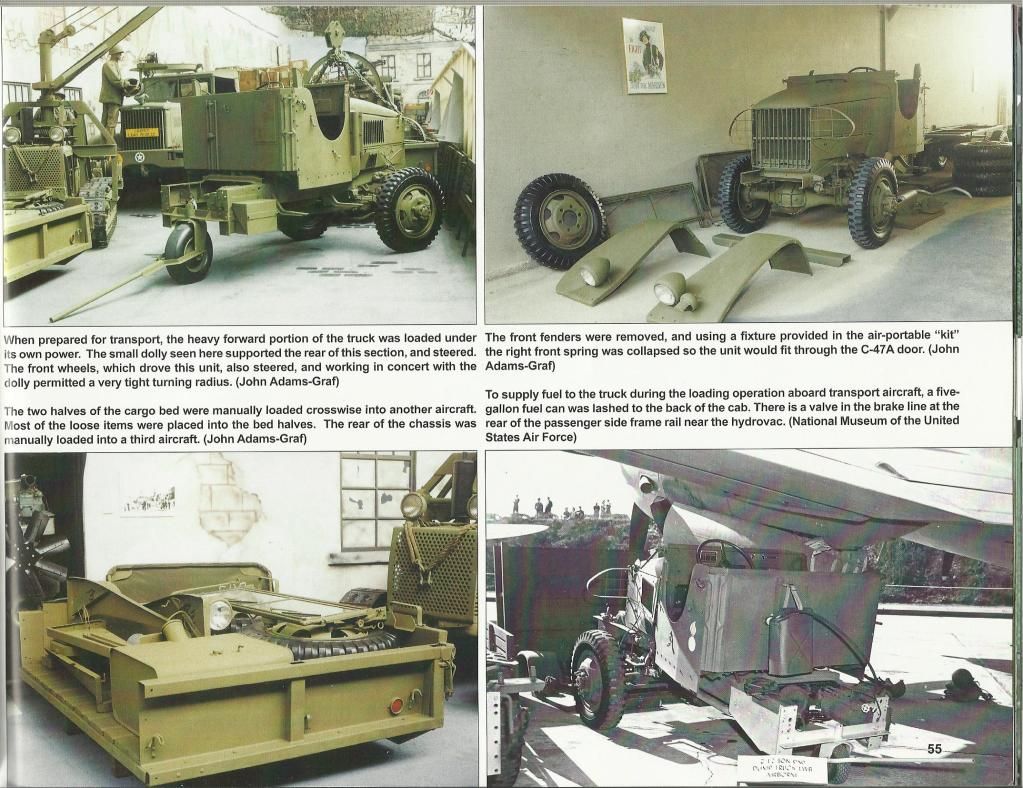
I have my stalled C-119 build sitting on top of the cupboard and I thought the series of trucks I'm building would go nicely positioned around the C-119 . So I decided to have a go at making something like the pic above with my 4th build ;

I found a wheel in the spares box , (A-4 Skyhawk nose wheel) and made a rear support dolly like in Squadrons book

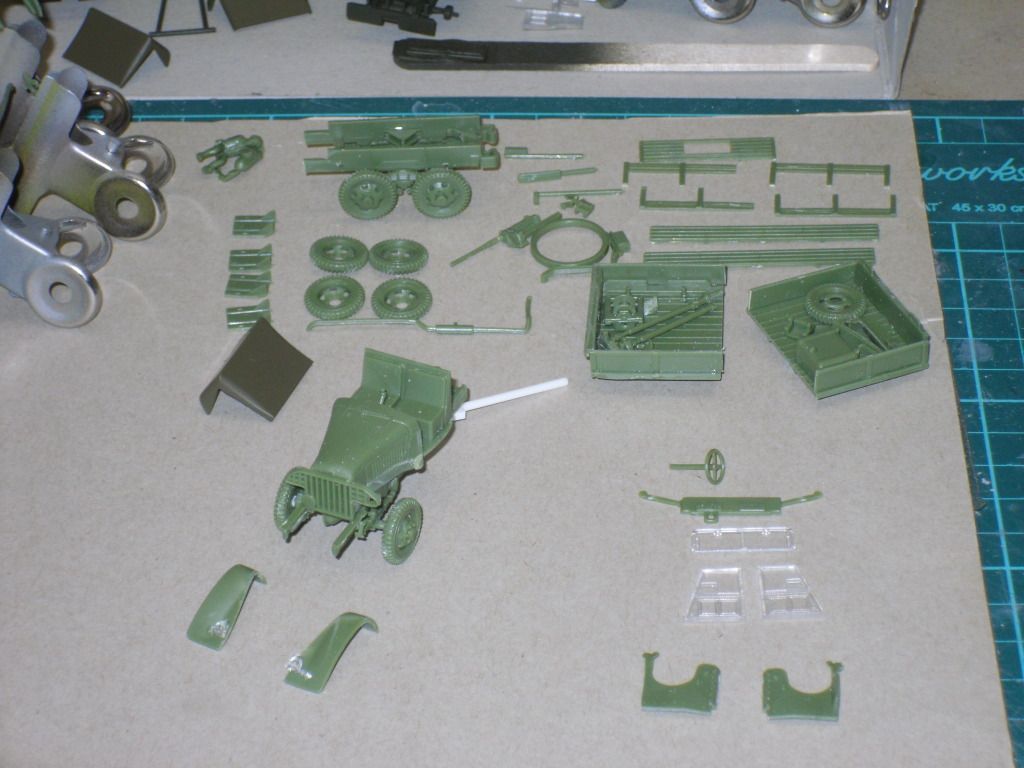
I had to carefully score from the underside of the front mud guards to remove them from the front section , the plastic is a little on the soft side of these Airfix/Heller GMC trucks , so it wasn't difficult to remove them .

As in Squadrons book I also cut the rear tray in half along with the side gates and I have those reference pic's you guy's posted for me a while back showing the types of pallets the USAF used in their cargo planes

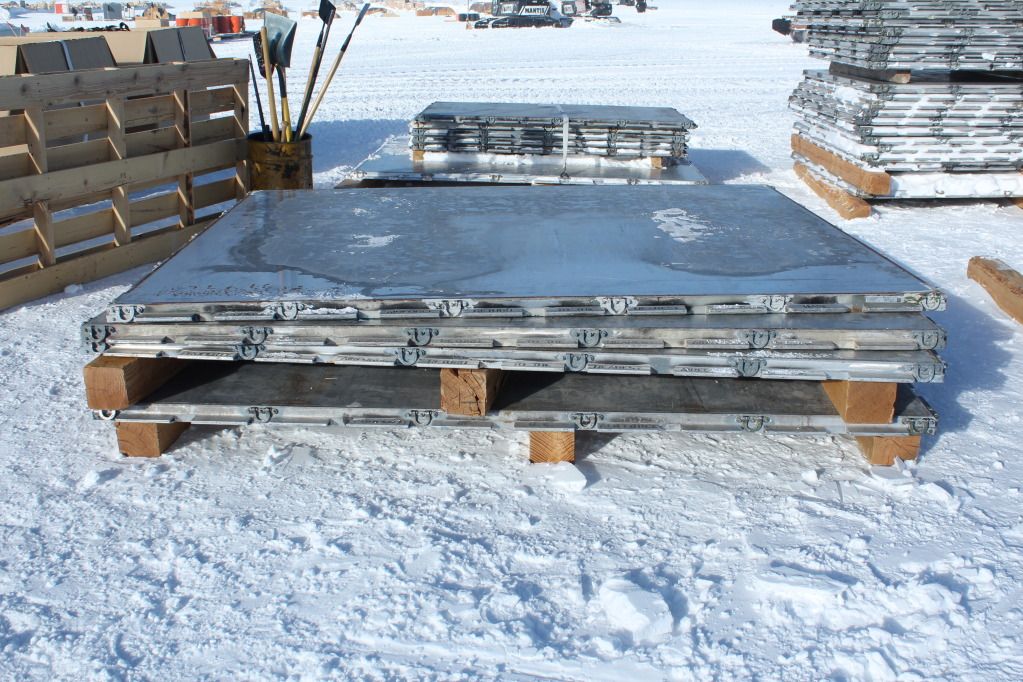
I'll cut some plastic sheet to what I think is the appropriate size and make some for the rear tray halves to sit on . I still haven't put together that nice little metal GHQ foklift and I want to include it in the dio with the C-119 and trucks

Builds 3 and 4 are ready for the spray booth and hopfully I can start on number 5 sometime tomorrow , the Club Mobile .....all this work is making me hungry !

John .


  • Member since
    September 2003
  • From: Australia
Posted by Helo H-34 on Thursday, October 4, 2012 3:18 PM

I agree , the crispness of those AFV figures is extremely good . Most 1/72-76 scale figures have some much flash on them , it's a lot of work cleaning them up . You always have to fold over a piece of corse sandpaper and get betwwen their legs ...Indifferent ......Flash and seams everywhere . Your figures Stik look ready to paint .

Andy excellent work on the drone . I bought the Italeri kit about 18 months ago when it first hit the LHS shelves and you won't believe what I paid for mine

I thought for the price I was getting something with all the 'bells and whistle's' but there really isn't all that much to the kit

               $32.70     OUCH !

Anyway here's a close up of the Compressor Truck resin parts

It took about 1.5 hours to carefully remove the pieces from the pour blocks

Most of it can be assembled seperatly and I'll start on the Duece (No.3) Chassie next .

John .

  • Member since
    July 2004
  • From: Sonora Desert
Posted by stikpusher on Thursday, October 4, 2012 1:29 PM

Gamera, the detail is fabulous on these figures. Just maybe half a notch below some comparable resin figures of the same sort from Ultracast in "crispness" of the detail. And yes, Commonwealth figures are way under represented by most companies. I need the MiniArt and MasterBox sets of British AFV crew figures as well.


F is for FIRE, That burns down the whole town!

U is for URANIUM... BOMBS!

N is for NO SURVIVORS...

       - Plankton

LSM


  • Member since
    November 2009
  • From: SW Virginia
Posted by Gamera on Thursday, October 4, 2012 9:37 AM

John: Nice looking conversion there too, yeah you could build a whole fleet out of the different conversions there.

Andy: Nice looking drone, as much as I hate painting canopies I should pick one myself.

SP: Really nice, I've become a big fan of Bronco, nice to see non-German subjects and the detail is very well done.

"I dream in fire but work in clay." -Arthur Machen


  • Member since
    July 2004
  • From: Sonora Desert
Posted by stikpusher on Wednesday, October 3, 2012 8:30 PM

Helo, nice work on those Deuces! More softskins! Yes Those things that keep an army fighting are always under represented at best on these forums.

Draken, pretty cool looking UAV.  I still am not sure what to make of those things in the real world. 

Well I decided to do a slight turn here to get me a crew figure for my Centurion that I finished last winter. This Bronco figure set looked perfect since the uniforms these figures have on were also worn in Korea.

So I built up the three non driver guys in the "pixie" (insulated cold weather) suits

Next week  on my days off I am planning on priming these guys with Mr Surfacer and then I can start working on painting them up.


F is for FIRE, That burns down the whole town!

U is for URANIUM... BOMBS!

N is for NO SURVIVORS...

       - Plankton

LSM


  • Member since
    December 2010
  • From: Yangju, Gyeonggi-Do, Korea
Posted by the_draken on Wednesday, October 3, 2012 9:50 AM

So, I finally took pictures of what I've done so far at home:

When I bought the kit it was brand new to the AM line.  A year later they re-issued it with Hellfires.  At $20/per I was NOT going to buy another.  So I made my own pylons and added Hellfires to it scavenging them from an Italeri UH-60 Desert Hawk.  I was only going to include feul tanks on that one anyway.

So, next up is the Armored jeep and the Cold weather jeep.  Built at the same time as the ND ANG F-89J.  Both have Photoetch, the Jeep has the armor and the Scorpion has the cockpit detail.

________________________________________________________________________________

Andy Hill (the_draken) landrew.hill(at)live.com <*> ASE Master Auto Tech, Imaca certified.  >^.^<

PADI OWSI Certified, BA Poli Sci (NDSU), BS Secondary ED-Social Studies MSUM (Sigma *** Laude)

  • Member since
    September 2003
  • From: Australia
Posted by Helo H-34 on Wednesday, October 3, 2012 2:32 AM

Andy , that Diamond T19 wrecker sound awesome ...Cool

These little Airfix GMC CCKW 353 trucks seem to be good therapy for me as things are a bit stressfull on the homefront . So I started a second one ;

Everythings identical to the first build

And everything is ready for the spraybooth with the first build in the background resting after a few coats of olive green

I'll add the canvas cover on this second build and  I suddenly remembered that I have the CMK Clubmobile and Compressor truck resin conversion sets . CMK's instructions suggest the Academy Duece and a half kit but I was thinking if the Airfix kit could also be used ?

The Club Mobile instuctions show two small chassie extension pieces to add to the rear of the Academy kit but I could easierly make some extension pieces to suit the Airfix chassie as it's a slightly deeper chassie frame ;

The rest of the resin conversion looks quite straight forward

The Compressor Truck looks to be a lot easier again

Although the instructions don't mention it , I suppose I would need to leave the fuel tank off that fits to the side of the chassie frame

This next pic from Squadrons GMC CCKW 353 Walk Around book shows the Compressor Truck without the large fuel tank on the right hand side

The Airfix Duece only takes a couple of hours to put together and probably the same time for the resin conversions , so I may as well just continue on while I'm in the groove . Nice quick , no hassle builds seem to suit me at the moment .

John .

  • Member since
    December 2010
  • From: Yangju, Gyeonggi-Do, Korea
Posted by the_draken on Tuesday, October 2, 2012 8:19 PM

I need to get me one of those conversions!  I've got the Wespe resin kit of the Diamnd T-19 Wrecker.  In other news, I've gotten my first package from Korea, but it's sitting at the post office.  I still need to do the decals on my predator.  I went to Ohio for the memorial service, and I spent today with the dentist and doctor.  Tomorrow, two cavities to be filled, ugh.  I'm going to be working on two kits at the same time coming up:  The Academy F-89J for the ND ANG series, and I've got the Dragon set of two "Armored 4X4 Truck" Jeeps.  I'm going to make one armored with the .30 cal and the other is going to be unarmored with a resin cold weather kit that I got from elsewhere.  Found it on eBay but can't remember who makes it.  I'll be adding the wire cutting bar to both Jeeps.

Other than that, not much going on in Minnesota...

________________________________________________________________________________

Andy Hill (the_draken) landrew.hill(at)live.com <*> ASE Master Auto Tech, Imaca certified.  >^.^<

PADI OWSI Certified, BA Poli Sci (NDSU), BS Secondary ED-Social Studies MSUM (Sigma *** Laude)

  • Member since
    November 2009
  • From: SW Virginia
Posted by Gamera on Tuesday, October 2, 2012 11:29 AM

John: That is a nice conversion set- I've seen some that looked pretty half-Censoreded but that's a well done set. The forward brace, I'm assuming it's travel lock for the front boom, looks like you've got it in the right place from the instructions. 

"I dream in fire but work in clay." -Arthur Machen


  • Member since
    July 2004
  • From: Sonora Desert
Posted by stikpusher on Tuesday, October 2, 2012 10:29 AM

Those conversion parts are very nicely detailed


F is for FIRE, That burns down the whole town!

U is for URANIUM... BOMBS!

N is for NO SURVIVORS...

       - Plankton

LSM


  • Member since
    September 2003
  • From: Australia
Posted by Helo H-34 on Tuesday, October 2, 2012 1:51 AM

Some progress on the Duece Wrecker .

There's lots of suspension pieces , drive shafts and axle parts to make everything look quite accurate for 1/72/76 scale

I started with the front axle and suspension and work my way towards the rear of the chassie

Tracks abd Troops supply a new whinch to replace the kit one , so after glueing the front suspension and axle into position I fitted together the resin whinch and glued it between the front chassie rails and also glued the sides to the rear tray as well as some assembly of the front cab and bonnet

There's also a drive shaft that fits from the whinch back to the transmission

Just after taking that last pic , I noticed Tracks and Troops suppliy a resin front bumper bar , so I removed the kit one and glued the resin one on in it's place .

Next was the hoist assembly

Everything fitted quite well together , except for my clumsy handling and one of the thin rear support brace piece kept coming unglued

There's some nicely detailed resin tool boxes supplied

And they fit in place quite well .

One thing that has me perplexed is a resin cross member piece that appears to fit just in front of the grill -'I think' ?

I'm not 100% sure as to where it's suppose to fit

I'm leaving the front cab doors off to paint seperatly and I think I can do some of preliminary airbrushing of olive drab/green next


  • Member since
    November 2009
  • From: SW Virginia
Posted by Gamera on Monday, October 1, 2012 7:56 PM

The Sandlot? Thanks- I'll check it out!

And thanks to the links to the diorama pamplets, I've only seen these recently when someone else posted the links here. I did pick up Paine's building dioramas and modeling armoured vehicles books though -back in the late '80s too. Both are worn almost the point of falling apart they've been thumbed though so much. The man was (and is) not just a modeler but an artist.

"I dream in fire but work in clay." -Arthur Machen


  • Member since
    July 2004
  • From: Sonora Desert
Posted by stikpusher on Monday, October 1, 2012 7:34 PM

Have you ever seen The Sandlot Gamera? Good fun family film that will have you laughing your butt off...  no Korean waitresses there though Crying

the old Monogram AFV kits have to be taken in the context of their era. Most were in 1/32, which died out pretty much for Armor kits a few years later. But some of the later ones were quite decent, compared to kits of the same vintage from Tamiya, I  think forced them to step up their game. And those diorama inserts each kit had... very inspirational to the young modelers of that time.

Here are a  link to that stuff...

http://www.sheperdpaine.com/gallery/armor/index.htm

http://www.sheperdpaine.com/monogram/index.htm

look at this diorama insert that came with your $5 Monogram Ostwind kit, read those books he has for reference and at 10 years old I was all ready to run out and join the airborne... Wink

http://www.sheperdpaine.com/monogram/Ostwind_sheet.pdf


F is for FIRE, That burns down the whole town!

U is for URANIUM... BOMBS!

N is for NO SURVIVORS...

       - Plankton

LSM


  • Member since
    November 2009
  • From: SW Virginia
Posted by Gamera on Monday, October 1, 2012 6:50 PM

Forever SP?!?! Wink

Ok, I've been building Monogram aircraft all the way back to the early '80s but I didn't pick up a tank kit till around '87 or so. It was an Italeri kit and started with those and Tamiya. I'm ashamed to admit I've never built a Monogram AFV kit ever. Embarrassed

BTW: It's funny but that cute Korean-American waitress was responsible for my first trying kim-chee to impress her........ Propeller

"I dream in fire but work in clay." -Arthur Machen


  • Member since
    July 2004
  • From: Sonora Desert
Posted by stikpusher on Monday, October 1, 2012 3:12 PM

Helo, the Pershing looks good to me YesThe steel oops can easily be fixed with a bit more weatheringWhistling That Deuce conversion looks pretty sweet! Stick out tongue I am looking forward tothat. I love how you are all over theplace on vehilcles- AFVs and support softskins of every type!Toast

Gamera, those Monogram figures have been around for-ever (forever.... forever... forever... ). If you look at the old Shep Paine dioramas for the Monogram US kits like the Deuce, M48, M29, Jeep, etc. those were what he used. I think with a little dressing up they just might do the trick for what I need. Heck a lot them would work real good for Korean War figures too. I love that Modelling the US Army in WWII site. I have been using it for quite awhile! andyes some figures there would work for either war with little or no modification.


F is for FIRE, That burns down the whole town!

U is for URANIUM... BOMBS!

N is for NO SURVIVORS...

       - Plankton

LSM


  • Member since
    November 2009
  • From: SW Virginia
Posted by Gamera on Monday, October 1, 2012 8:42 AM

John: The M26 looks good! And looking forward to the GMC truck (would the Aussie term be lorry?). Built  the Academy version a few years back to go with a B-24, I should hunt up the photos.

SP: I'm certain the Monogram figures should work, didn't know about them. Replacing the helmets and rifles etc with Tamiya parts that are slightly larger should give a good impression that these guys are a little shorter.

Seems there are more over-size than under-size figures out there though. I've found the US Army Models (assuming you haven't already seen it of course) site to have some really nice reviews on figures - WW2 of course but some should work for Korea.

"I dream in fire but work in clay." -Arthur Machen


JOIN OUR COMMUNITY!

Our community is FREE to join. To participate you must either login or register for an account.

SEARCH FORUMS
FREE NEWSLETTER
By signing up you may also receive reader surveys and occasional special offers. We do not sell, rent or trade our email lists. View our Privacy Policy.