SEARCH FINESCALE.COM

Enter keywords or a search phrase below:

The Official F-4 Phantom II Group Build 2011

617769 views
2992 replies
1 rating 2 rating 3 rating 4 rating 5 rating
  • Member since
    August 2009
  • From: Toledo Area OH
Posted by Sparrowhyperion on Friday, January 14, 2011 9:05 AM

What shipping prices?


f-4phantom

Check out the shipping price!    Buyer Beware.

Dean

In the Hangar: 1/48 Hobby Boss F/A-18D RAAF Hornet,

On the Tarmac:  F4U-1D RNZAF Corsair 1/48 Scale.

  • Member since
    August 2009
  • From: Toledo Area OH
Posted by Sparrowhyperion on Friday, January 14, 2011 9:07 AM

Thunder, where did you get those instrument decals?  I might want to pick up a set.


Thunderbolt379

A little progress to report on the Fujimi RF-4E. Last night I applied trhe Fujimi instrument decals with the Microscale system, and this morning used the edge of a blade to trim the overhang -- they're always larger than the surfaces they go onto... Today I sprayed the seat frames flat back, then brush painted the cushions, this may be the first time I ever got acrylics to go on cleanly from a brush. Then the faceshield handgrips in yellow and black, and harness from Tamiya tape painted Deck Tan and cut in fine strips... Convincing MB-7s they're not, but they'll do, as I can't be bothered tussling with True Details seats on this one.

http://i301.photobucket.com/albums/nn48/MikeTheModeller/Fujimi%20RF-4E/DSCF0827a.jpg

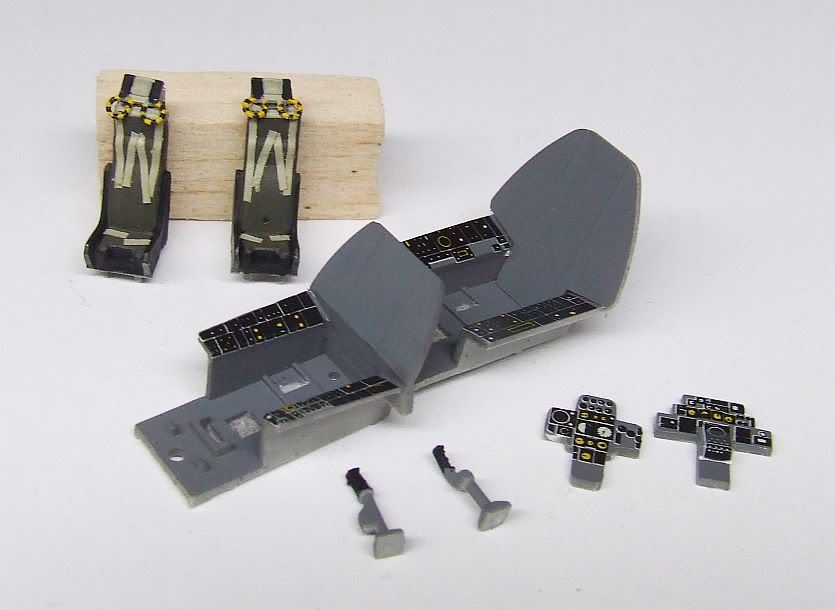
A bit spartan, but in this scale I'm not going to go overboard, the eyestrain has given me a nice headache already. The only extra detail I might add is some spots of brass paint to suggest buckles. The canopies will be closed so this detail should suffice.

I also sprayed the interior of the nose black to provide darkness behind the camera bays, also a dark end to the intake tunnels; tomorrow a little gray on the cockpit walls (yes, I forgot when I had the AB loaded, I was so busy spraying the separate tub...) and I can proceed with assembly. White in the intakes, gunmetal exhausts, white landing gear components... Then she should build up quite quickly.

Cheers, Mike/TB379

In the Hangar: 1/48 Hobby Boss F/A-18D RAAF Hornet,

On the Tarmac:  F4U-1D RNZAF Corsair 1/48 Scale.

  • Member since
    October 2003
  • From: Mpls., Mn.
Posted by f-4phantom on Friday, January 14, 2011 9:14 AM

The shipping prices on the decal sheet on E-bay from the conversation above.

Dean

  • Member since
    November 2009
  • From: The NYC.
Posted by Ish47guy on Friday, January 14, 2011 1:51 PM

$8, but its being shipped from overseas.

Taken directly from ebay posting:

All items ships WORLDWIDE! Fast Shipping.
All items will be sent by Registered AirMail package with tracking number, marked as gift.
Quick delivery! Europe - approx 12 days, USA - approx 15-20 days. (If there are no big delays on post offices.)
The item(s) will arrive to you in 6-30 days, depending on postal delays and your location.
All items are not insured. If you want to insure it, only contact me!
If you haven't received your package during 3 weeks, please, email me and we will track your package and will try to find its location.


Buyer beware indeed.

  • Member since
    December 2003
  • From: Indiana
Posted by hkshooter on Friday, January 14, 2011 2:02 PM
  • Member since
    March 2005
  • From: near Nashville, TN
Posted by TarnShip on Friday, January 14, 2011 3:31 PM

so, the obvious question is Did the GIB punch out because of the takeoff?,,,,,or some other later maneuver?


dang, that's cool, working tubojet models


Rex

almost gone

  • Member since
    April 2005
Posted by Thunderbolt379 on Friday, January 14, 2011 4:45 PM

Sparrow -- those are the kit decals from Fujimi #K-8 1:72 RF-4B/E. They don't look too bad!

HK -- fabulous video! She really looks like a Phantom in the air. All she's missing is some droptanks and ordnance, and maybe some springing in the landing gear. Beautiful flight too, nice landing! And those turbines sound good too...

Cheers, M/TB379

http://worldinminiature.blogspot.com/

  • Member since
    December 2010
  • From: New Zealand
Posted by Rough as guts on Friday, January 14, 2011 4:48 PM

Awesome and the landing.......Bow Down


www.kiwimodeller.com

  • Member since
    December 2003
  • From: Indiana
Posted by hkshooter on Friday, January 14, 2011 6:19 PM

The landing was sweet but I wasn't to sure they'd get to land after I saw that take off.

  • Member since
    April 2005
Posted by Thunderbolt379 on Friday, January 14, 2011 6:29 PM

I noticed the wobbly pitch at takeoff -- it's understandable, she's a heavy bird and her C of G will be critical. Maximum dynamic stress on an aircraft is usually encountered at takeoff (if I'm understanding correctly, I'm strictly an amateur) because the vehicle is at it's highest flight weight (fuel reserves barely touched) while maximum power is applied to move said fuel, thus the greatest strain is applied to the airframe at that moment. It looked like the pilot was compensating for a delicate C of G on takeoff, and she would become more finely responsive as her weight went down, possibly correcting C of G at the same time. She certainly looked under more positive control on landing.

Armchair aviators of the world unite... Whistling

M/TB379

http://worldinminiature.blogspot.com/

  • Member since
    November 2010
  • From: Lafayette, Indiana
Posted by Son Of Medicine Man on Friday, January 14, 2011 7:12 PM

Hi Everyone,

Good job on the cockpit Mike, looking good!  And thanks for the additional info on the sheen levels.  It makes me wonder if the sheen was from trying to make the surface as smooth as possible to lessen drag.

I wish to thank Matt for the scan of his kit instructions with the color codes.  That will be a big help.

And thank you Berny for the camouflage layout.  By the way, I have decided to load my F-4E for a typical run on the Ho Chi Minh trails.  I did catch a photo of an F-4E loaded with Bullpup missiles and bombs.  I did read that the Bullpups were phased out in 1970.  But since my aircraft is April 1970, would there have still been Bullpups being used?  If so I would like to load mine with some.  Just let me know what you think.

I had double disappointment for me today.  First, there was no kit waiting for me after work on the front step.  Second, received the Osprey Mig Killers 72-73 with the picture of the Phantom I wanted to build and it turned out to be a small fuzzy black and white of it in the shop for repairs.

Surely tomorrow the kit will arrive!

Ken


  • Member since
    September 2008
  • From: Minneapolis MN
Posted by BigSmitty on Friday, January 14, 2011 8:34 PM

Ken,

Glad to help with the scans.  I feel your pain.  First I was going to start on the1/72 F-4E with the IAF markings today.  Looked at the box, 2008 Hasegawa F-4E.  Open the box... 1985 mold/decals.  So a rebox.  Interior is non existent, ejector marks roughly the size of a DIME on the intake ramps, etc.  Bah.  I shelve it, get out the old P1 1/48 Hasegawa F-4J kit.  Decals look a little rough.  I cut a spare off the sheet, dip it in water, and...

It disintegrated.  Just not my night.  I ordered up a pair of resin Eduard "Brassin" ejection seats with the color PE for the seats for it, and will try some Future on another spare decal on the sheet to see if that will hold it together.  Don't need decals for a while so hopefully either the Future or the Testors decal spray can save the decals.

Matt - IPMS #46275

"Build what ya love and love what ya build..."

Build Logs, Rants and Humor


  • Member since
    August 2009
  • From: Toledo Area OH
Posted by Sparrowhyperion on Friday, January 14, 2011 8:42 PM

You might have a better time with the Micro Scale Decal Film liquid.  The spray can be a bit spotty sometimes, and future sometimes adds more thickness than you want which can sometimes give it a raised texture.  Just a suggestion.

Rich

BigSmitty

Ken,

Glad to help with the scans.  I feel your pain.  First I was going to start on the1/72 F-4E with the IAF markings today.  Looked at the box, 2008 Hasegawa F-4E.  Open the box... 1985 mold/decals.  So a rebox.  Interior is non existent, ejector marks roughly the size of a DIME on the intake ramps, etc.  Bah.  I shelve it, get out the old P1 1/48 Hasegawa F-4J kit.  Decals look a little rough.  I cut a spare off the sheet, dip it in water, and...

It disintegrated.  Just not my night.  I ordered up a pair of resin Eduard "Brassin" ejection seats with the color PE for the seats for it, and will try some Future on another spare decal on the sheet to see if that will hold it together.  Don't need decals for a while so hopefully either the Future or the Testors decal spray can save the decals.

In the Hangar: 1/48 Hobby Boss F/A-18D RAAF Hornet,

On the Tarmac:  F4U-1D RNZAF Corsair 1/48 Scale.

  • Member since
    April 2005
Posted by Thunderbolt379 on Friday, January 14, 2011 8:50 PM

Ken -- always a pleasure to share info and thoughts!

Smitty -- OUCH. I have the old P1 in my stash, and a fair few of those editions, I think AM decals might be the way to go if they're looking a bit rough when I finally get the chance to move up to 1:48th...

Sprayed the burner cans on the F-4F earlier, now about to do the inside cockpit walls and intakes... I might be hanging this thing together later!

Cheers, Mike/TB379

http://worldinminiature.blogspot.com/

  • Member since
    April 2005
Posted by Thunderbolt379 on Friday, January 14, 2011 8:53 PM

Echoing Rich -- Microscale Liquid Decal Film is amazing stuff. I've only ever applied it with a wide, soft square-ended brush, and the stuff self-levels to the point that it literally vanishes. It also dries in a blink. For custom decals or saving denatured ones it would always be my first choice.

Cheers, M/TB379

http://worldinminiature.blogspot.com/

  • Member since
    September 2008
  • From: Minneapolis MN
Posted by BigSmitty on Friday, January 14, 2011 9:00 PM

Thanks for the tip on the MicroScale stuff.  I'll take a look for it tomorrow.  Really want to save the decals for the VF-84 "Skull & Crossbones" markings.

Matt - IPMS #46275

"Build what ya love and love what ya build..."

Build Logs, Rants and Humor


  • Member since
    April 2005
Posted by Thunderbolt379 on Friday, January 14, 2011 9:17 PM

Good luck with them, Smitty!

Ken -- I've been studying the Kaufbeuren F-4F photos again, and while the lighting conditions make it difficult to judge colours in shadow areas, I would swear the intake interiors on 37+14 are the same shade of gray as the topside camo, as deep inside as you can see. Any thoughts on this???

Cheers, Mike/TB379

http://worldinminiature.blogspot.com/

  • Member since
    July 2003
  • From: waynesboro va, via Ireland
Posted by sidure on Saturday, January 15, 2011 1:11 AM

Great conversations going on in here, I have picked up a lot of info from all the input. Great video of the R/C F-4 HK, thanks for posting it.

I have a question of colours also. I used to know it off the top of my head but for the life of me I cant remember the correct FS colour for the cockpit. My Tamiya kit only says light gray so if anyone has the instructions with the FS number I would be gratefull

Steve

  • Member since
    April 2005
Posted by Thunderbolt379 on Saturday, January 15, 2011 1:21 AM

Hi Steve, good to see you here! The shade you're looking for is FS 36231 Dark Gull Gray.

Cheers, Mike/TB379

http://worldinminiature.blogspot.com/

  • Member since
    November 2010
  • From: Lafayette, Indiana
Posted by Son Of Medicine Man on Saturday, January 15, 2011 9:20 AM

Thunderbolt379

Good luck with them, Smitty!

Ken -- I've been studying the Kaufbeuren F-4F photos again, and while the lighting conditions make it difficult to judge colours in shadow areas, I would swear the intake interiors on 37+14 are the same shade of gray as the topside camo, as deep inside as you can see. Any thoughts on this???

Cheers, Mike/TB379

Hi Mike,

Check out the photos on this web page.  Scroll down about 3/4 of the page and you will see a pretty decent shot looking down one of the intakes.  I can't say how it became this color, but it is definitely grey.  I would say paint because the inside at the top is a lot lighter.

http://forums.airshows.co.uk/viewtopic.php?f=9&t=21448 

Ken

  • Member since
    August 2009
  • From: Toledo Area OH
Posted by Sparrowhyperion on Saturday, January 15, 2011 9:55 AM

It looks Gray to me, maybe light to medium aircraft gray.  BTW, AWESOME! images.  I am now thinking of maybe doing another F4 in German markings IF I still have time after the RAF Bird. lol

LoL


Son Of Medicine Man


 Thunderbolt379:


Good luck with them, Smitty!

Ken -- I've been studying the Kaufbeuren F-4F photos again, and while the lighting conditions make it difficult to judge colours in shadow areas, I would swear the intake interiors on 37+14 are the same shade of gray as the topside camo, as deep inside as you can see. Any thoughts on this???

Cheers, Mike/TB379


Hi Mike,

Check out the photos on this web page.  Scroll down about 3/4 of the page and you will see a pretty decent shot looking down one of the intakes.  I can't say how it became this color, but it is definitely grey.  I would say paint because the inside at the top is a lot lighter.

http://forums.airshows.co.uk/viewtopic.php?f=9&t=21448 

Ken

In the Hangar: 1/48 Hobby Boss F/A-18D RAAF Hornet,

On the Tarmac:  F4U-1D RNZAF Corsair 1/48 Scale.

  • Member since
    November 2010
  • From: Lafayette, Indiana
Posted by Son Of Medicine Man on Saturday, January 15, 2011 10:28 AM

Another thought is that maybe it is painted grey to help mask the dirt to make it look nicer.  If you look at early A-1 Skyraider pictures, you will see that nasty looking black streaks coming from the engine exhaust.  In later photographs you will see some A-1s painted black masking the streaks.  I have also read where some other aircraft were painted to mask oil streaks.

Ken

  • Member since
    February 2010
  • From: Ontario, Canada
Posted by Bockscar on Saturday, January 15, 2011 11:03 AM

The glacier has budged a little:

The white plastic is so thin more light comes through it than the instruction sheet. Reminds me of that thin vac styrene in gift sets.

I had to cut three spars for the inside of the fuselage to just reinforce the plastic. One spar is cut slightly wider because this Revell kit didn't take into account the Whitman Area-Rule slight bulge around the engine nacelles. Tamiya 1/32 did a great job of that.

This is an old kit (1985) so wing parts 12&13-lowerwings and forward fuselage- as well as parts 16&19 -upper wings- are so warped they need chip dip. When dry fit, the kit supplied engine intake spar and the internal intake manifolds of the fuselage do not even get close to touching the bottom of the wing. i'm using sheet styrene and Squadron putty in thin layers to try and make viable wings.

I can't shave off the internal pylon nubs as suggested in step 6, the plastic too thin.

Did I forget to mention I've cut a big spar to separate the pilot from the WSO, is that going to look hokey rather than the WSO's instrument panel only?

  • Member since
    February 2003
  • From: Panama City, Florida, Hurricane Alley
Posted by berny13 on Saturday, January 15, 2011 11:45 AM

Son Of Medicine Man

By the way, I have decided to load my F-4E for a typical run on the Ho Chi Minh trails.  I did catch a photo of an F-4E loaded with Bullpup missiles and bombs.  I did read that the Bullpups were phased out in 1970.  But since my aircraft is April 1970, would there have still been Bullpups being used?  If so I would like to load mine with some.  Just let me know what you think.

Ken


The Bullpups were used for targets such as bridges and tunnels.  For general missions on the Ho Chi Minh trail, they were not very effective.  The Bullpup was only carried for a very short time, the GBU-8, and GBU-10 being the weapon of choice for bridges and tunnels.   The AGM-12 used the same guidance system as the GBU-8 HOBO and the HOBO was more effective and carried more explosive. 

I never saw an AGM-12 loaded on the F-4, but I am sure they were used.  If you want to load some type of smart bomb I would suggest two GBU-10's, a Pave Spike pod on the left forward missile well, ECM pod (AN/ALQ-87) on the right forward missile well, two AIM-7's on the two aft wells, a centerline drop tank, and two 370 wing tanks.   

As an alternate load two GBU-8's in place of the GBU-10's, that way you wouldn't need the Pave Spike pod.

The GBU's were used for "High Priority" targets and not used for convoys, such as trucks or barges.  The weapon would cost more than the target they were going after and conventional weapons would be more cost effective.  Why drop one GBU and destroy one truck when you can unload a rack full of MK-20's and destroy several.  A full load of conventional weapons would cost less than one "Smart Bomb" and do more damage on a convoy.

That is just my 2 cents and only a suggestion.

Berny

 Phormer Phantom Phixer

On the bench

TF-102A Delta Dagger, 32nd FIS, 54-1370, 1/48 scale. Monogram Pro Modeler with C&H conversion.  

Revell F-4E Phantom II 33rd TFW, 58th TFS, 69-260, 1/32 scale. 

Tamiya F-4D Phantom II, 13th TFS, 66-8711, 1/32 scale.  F-4 Phantom Group Build. 


  • Member since
    February 2010
  • From: Ontario, Canada
Posted by Bockscar on Saturday, January 15, 2011 12:19 PM

mississippivol

Bockscar-Thanks for the heads up. This li'l bird is starting to be a poster child for plastic surgery!

Rex- Lookin' back at the box, it doesn't have the ARN-101 on the spine, but it does have the two bumps on the 'chute door. I used to know what those were about.

Glenn

Yeah Glenn:

It's called "Rhino-Plasty"

Unless otherwise posted, check out:

http://www.8tfw.com/pages/index3.htm

PHANTOM F4 PARKING ONLY

  • Member since
    February 2003
  • From: Panama City, Florida, Hurricane Alley
Posted by berny13 on Saturday, January 15, 2011 12:25 PM

Son Of Medicine Man

 Thunderbolt379:

Good luck with them, Smitty!

Ken -- I've been studying the Kaufbeuren F-4F photos again, and while the lighting conditions make it difficult to judge colours in shadow areas, I would swear the intake interiors on 37+14 are the same shade of gray as the topside camo, as deep inside as you can see. Any thoughts on this???

Cheers, Mike/TB379


Hi Mike,

Check out the photos on this web page.  Scroll down about 3/4 of the page and you will see a pretty decent shot looking down one of the intakes.  I can't say how it became this color, but it is definitely grey.  I would say paint because the inside at the top is a lot lighter.

http://forums.airshows.co.uk/viewtopic.php?f=9&t=21448 

Ken

Because of the lighting, it would be hard to say what the color is.  I do know that all of the F-4's I saw, the intakes were painted with an epoxy based gloss white.  It is possible that some aircraft were repainted with a different color.  Without a detailed shot down the intake under good lighting conditions, it would be almost impossible to tell.

Berny

 Phormer Phantom Phixer

On the bench

TF-102A Delta Dagger, 32nd FIS, 54-1370, 1/48 scale. Monogram Pro Modeler with C&H conversion.  

Revell F-4E Phantom II 33rd TFW, 58th TFS, 69-260, 1/32 scale. 

Tamiya F-4D Phantom II, 13th TFS, 66-8711, 1/32 scale.  F-4 Phantom Group Build. 


  • Member since
    November 2010
  • From: Lafayette, Indiana
Posted by Son Of Medicine Man on Saturday, January 15, 2011 1:29 PM

Hi Berny,

I sent you a PM with a picture out of the Osprey MiG Killers 1972-73 book.  I did not want to violate any copyrighted material here.  I agree with you that the Bullpups would not have been used for a typical raid on the Ho Chi Minh trails, so I recant that choice for a target but still want to load the Bullpups.  I can't escape the "coolness" of how they look!

Ken

  • Member since
    November 2010
  • From: Lafayette, Indiana
Posted by Son Of Medicine Man on Saturday, January 15, 2011 1:34 PM

I am bummed.  The mail just got delivered but no kit.  And since there will be no delivery on Monday, I will have to wait and hope for Tuesday.  Sad face! :(

Ken

  • Member since
    July 2003
  • From: waynesboro va, via Ireland
Posted by sidure on Saturday, January 15, 2011 4:07 PM

Thanks very much for the colour callout Mike. Yep work has started on the big Tamiya 1/32 J and I picked up resin seats and Eduard PE for the seats and cockpit. This thing is going to be a beast. The seats will be a kit all by themselves. I am working on the intakes and engines right now and when I have something to show I will post pics

Steve

  • Member since
    April 2005
Posted by Thunderbolt379 on Saturday, January 15, 2011 5:11 PM

Ken and Berny -- thanks for the info (and especially the link to those extra photos from Kaufbeuren, they're tremendous!). I think I'm going to have to go with my gut based on the best angles here. There are a couple that suggest gray inside the intakes because there is simply no luminous tone to suggest white in the shadow... One well-lit shot clearly shows the top camo gray wrapping inside, though how deep is another question. I think on this one it's gonna be gray intakes, unless any other info somes along before I get to the AB!

Steve -- ah, of course, if you're building a -J you want the Navy/Marines callouts, which would be:

  • FS 16440 Light Gull Gray
  • FS 17875 Insignia White

Check your period and unit, FS 36440 Flat Gull Gray was also common, sometimes paired with gloss white undersides. In Vietnam The Air War it's clear that the shipboard schemes were often flatter than the Air Force ones, though they too picked up that distinct sheen, whether deliberately or as a result of operating conditions. It's almost irrisistable, though, to finish a Phantom in gloss, she just looks so kewl!

Cheers, Mike/TB379

http://worldinminiature.blogspot.com/

JOIN OUR COMMUNITY!

Our community is FREE to join. To participate you must either login or register for an account.

SEARCH FORUMS
FREE NEWSLETTER
By signing up you may also receive reader surveys and occasional special offers. We do not sell, rent or trade our email lists. View our Privacy Policy.