SEARCH FINESCALE.COM

Enter keywords or a search phrase below:

The Official F-4 Phantom II Group Build 2011

617586 views
2992 replies
1 rating 2 rating 3 rating 4 rating 5 rating
  • Member since
    November 2010
  • From: Lafayette, Indiana
Posted by Son Of Medicine Man on Wednesday, February 29, 2012 9:36 PM

Hi Sam,

Very nice of you to offer your help here.  A lot of modelers including myself really appreciate getting help and advice from experts like you.  Many of us really strive to be as authentic as possible when recreating a piece of history.  Many thanks in advance for your offer and be sure we will take you up on it!  By the way, I just viewed your videos on youtube.  Very cool videos!

Ken

  • Member since
    February 2010
  • From: Ontario, Canada
Posted by Bockscar on Wednesday, February 29, 2012 8:39 PM

Sam:

Welcome to the Forums, and to this build.

Great to hear another F-4 is going to be restored!

I'm sure we have a few questions about F-4's coming up in the future.

Again,

Welcome aboard!

  • Member since
    February 2012
Posted by SammyWoody on Wednesday, February 29, 2012 8:32 PM

Guys, just wanted to comment on 66-8711.  First, are you aware I have this plane on video on youtube?  If not, go to youtube.com, enter my name as "samwlassiter" under "Search", and you will see 5 Udorn videos I made and posted.  The following video: "Vietnam Conflict - Udorn RTAFB Part II" has a screen shot of the dice and "7 COME 11" wording on the acft nose.  1 min and 50 sec into the video.  I was the crew chief on "727" for several months and was at Udorn Aug 72-Aug 73.  Also, in case you don't know,  "711" is being restored and will be on a pedestal with other acft at Hill AFB, Ogden, Utah.  (see below).  If I can help in any way, e-mail me at slassiter@sc.rr.com or call me at 843-708-0795.  Good day gents.......Sam Lassiter.


F-4D Phantom II
Hill AFB, Ogden, Utah 

McDonnell Douglas F-4D "Phantom II" 
S/N 66-8711 

Crew:   Two 
Engines:   Two General Electric J79-GE-15 turbojets; 16,900 lbs thrust each in afterburner 
Wingspan:   38 ‘  4 7/8 “
Length:   62 ‘ 10 “ 
Height:   16 ‘ 6 “ 
Weight:   Max:  58,000 LBS; Empty:  28,276 LBS
Speed:   Cruise:  587 MPH; Max: 1,459 MPH 
Range:   Ferry:  1,375 Miles; Combat:  538 Miles 
Service Ceiling:   59,400 FT 
Armament:   4 AIM-7 Sparrow AAMs, 4 AIM-9 Sidewinders, up to 16,000 LBS ordnance 
Cost:   $2,200,000  (approximate) 

This F-4D-32-MC, S/N 66-8711, "City of Kaysville," was manufactured by McDonnell Douglas Aircraft Corporation in St Louis, Missouri, and accepted by the USAF on September 18, 1967.  It was first assigned to the 33rd Tactical Fighter Wing, Tactical Air Command, at Eglin AFB, Florida, but in October 1967 it was transferred to the 432nd Tactical Reconnaissance Wing, Pacific Air Forces, at Udorn RTAFB, Thailand.  While there it had deployments to Clark AB in the Philippines.  In August 1974 the aircraft went to the 48th Tactical Fighter Wing, US Air Forces Europe, at RAF Lakenheath, in England.  In January 1975 it was transferred to the 52nd Tactical Fighter Wing (USAFE) at Spangdahlem AB, Germany.  While there it was deployed to Zweibrucken AB.  In November 1981 this aircraft went to the 401st Tactical Fighter Wing (USAFE) at Getafe AB, Spain.  The following January it moved to the 457th Tactical Fighter Squadron of the US Air Force Reserve at Carswell AFB in Fort Worth, Texas.  Finally, in August 1988 it made its final move to the Ogden Air Logistics Center at Hill AFB, Utah.  There it spent the rest of its flying career in flight test support operations.  It was ultimately retired to the Aircraft Battle Damage Repair training area of the 649th Combat Logistics Support Squadron at Hill, where it was used to train personnel in field repair of aircraft.  It was moved to Hill Aerospace Museum in December 2004.  The aircraft will undergo complete restoration in the coming months for future exhibit as part of a four-ship formation on pedestals in our Memorial Park. 

Printed:  March 2011

  • Member since
    February 2010
  • From: Ontario, Canada
Posted by Bockscar on Thursday, February 9, 2012 10:37 PM

Page 200?

LOL....Wink

Hey guys, I didn't know the Brits messed with the fuselage, I figurred just the engines and avionics......musta' missed a few posts......prawley had a mini-tea service to......lol.....Whistling

Yah, that's a good lookin' gal.....Mike....'ya mind if I cut in pal......Big Smile

  • Member since
    April 2005
Posted by Thunderbolt379 on Wednesday, February 8, 2012 7:47 PM

Thanks, RAG -- yep, it is a striking finish, and it makes me want to pull out the 48s from Has and build a '77 Jubillee bird. Larger scakle will mean relatively great smoothness in the finish, and I could investigate the colour matching to a greater extent, make sure I clean the decal residue properly and all that. So many Phantoms to build, and life is so short!!!

Yep, Page 200! The way we took off a yeaer ago it looked like 400 was in store, but we only got about 20% completions. Here's hoping Rhinos III gathers pace!

Cheers, Mike/TB379

http://worldinminiature.blogspot.com/

  • Member since
    December 2010
  • From: New Zealand
Posted by Rough as guts on Wednesday, February 8, 2012 7:29 PM

Beautiful bird Mike. I like the sharp contrast of that dark grey and white on the Royal Navy birds. The effort gone into that paint job was sure worth it.

I see what you mean about the fuselage shape as well  - she has got the sexy curves, just a bit different from her American cousin

 And wow - page 200 ! Propeller Awesome Cool

www.kiwimodeller.com

  • Member since
    April 2005
Posted by Thunderbolt379 on Wednesday, February 8, 2012 6:46 PM

(Bowing) Thanks, Bocks! -- photography can conceal the odd sin, it's true, but it was one of the more intense aircraft buildsI've done, for sure! I can't wait to get into another, and I'm leaning toward the Luft RF-4E in Norm '72, while building the Has. RF-4B...

Cheers, Mike/TB379

http://worldinminiature.blogspot.com/

  • Member since
    February 2010
  • From: Ontario, Canada
Posted by Bockscar on Wednesday, February 8, 2012 6:41 PM

Well Mike;

0 defects from where I'm sitting.....that looks fab!Wow

Weathering underside and the titanium tail and stab parts are fantastic.

Well done mate!YesToast

  • Member since
    June 2009
Posted by jimbot58 on Saturday, February 4, 2012 12:15 PM

Mike, I think it looks great! You sound a bit like me as I am already seeing all the things I don't like about my "F" that I moved over to the new Rhino build. Silvering in a few decals, panel line issues, paint, etc. I tend to be a perfectionist, but my skills and techniques are far from perfect!

It's been quite a year with all that happened both in members personal lives and the loss of a comrade along the way. I hope the ongoing build of 2012 will go smoother for all of us!

Jim

*******

On my workbench now:


Fujimi F-4K Phantom "Yellow Bird" and Zvezda Su-27SM Flanker


  • Member since
    April 2005
Posted by Thunderbolt379 on Wednesday, February 1, 2012 5:23 PM

Hi guys, I'm calling my Fujimi F-4K finished, and am presenting the evidence here. Okay, the final stencils did not get done on the tail surfaces, but as they're virtually invisible against the grey, no great loss. Last night I unmasked the canopy, mounted the tail surfaces, and reattached the burner cans and small gear doors which managed to fall off one last time. MiG pigments create burning on the natural metal areas. I have never known any parts fight me on the paintjob like the tails of this Phantom, the base silver was sprayed three times in acrylic, enamel, with different thinners and so on, sanded back each time, washed, rescribed -- and they're not what I had hoped for. But this job is officially off the bench now!

On with the evidence:

It's not as good as I would have liked -- the whole business with the decals silvering and then the residues creating dead spots under the clearcoat was a negative learning experience, and the landing gear, while strong enough, does not line up straight by any means. Still, she looks okay from any angle other than head-on, and I tried some new techniques, such as the tonal variation on the underside.

Well, this post brings Rhinos II officially to a close, a month late but, hey, if the tails had fought me less it would have been done way back.

Thanks to all who took part and made this GB such a resounding success, and I hope you'll come on over to Rhinos III and either cut sprue or cheer on the builders there.

It's been a great year in the hobby -- here's to many more just like it! Toast

Cheers all,

Mike/Thunderbolt379

The Official F-4 Phantom II Group Build 2011, signing off.

http://worldinminiature.blogspot.com/

  • Member since
    April 2005
Posted by Thunderbolt379 on Sunday, January 29, 2012 11:46 PM

Hi guys,

It's great to see so many of you over at Rhinomania III -- twenty participants so far!

After a hiatus of a couple of weeks during which I completed an M51 Isherman for IDF II, I can anounce I am back on that blasted Fujimi F-4K. The metallic paints have been defying me, whether enamel or acylic, and irrespective of which brand of thinners I use. A while ago I seemed to lose the ability to spray metallics, and have so far painted these stabilators three times. the result is far from perfect but I'm offficially fed up and pressing on to completion. I've done a basic silver in enamel, and the dark panel in aluminum acrylic, and tomorrow will get the grey upper and white lower surfaces done, then some stencil data, clear coats, mount the stabs and landing gear and unmask the canopy -- and this GB will truly have reached its last gasp!

Cheers, Mike/TB379

http://worldinminiature.blogspot.com/

  • Member since
    April 2005
Posted by Thunderbolt379 on Friday, January 13, 2012 12:01 AM

No problem RAG -- sorry about the dead bird, and I'm sure you'll find another Phantom wooing you before long!

Cheers, M/TB379

http://worldinminiature.blogspot.com/

  • Member since
    December 2010
  • From: New Zealand
Posted by Rough as guts on Thursday, January 12, 2012 11:46 PM

Hi Guys, some great inspirational work out there!!

Unfortunately my "S" has crashed and burnt Black Eye 

I started back on her this afternoon and things went rapidly from bad to worse. Sadly I don't have the time or patience to repair her. The fuselage  will be retired as my hanger queen and will be my first piece I practice on when I get my first airbrush later in the year.

Mike, could you please adjust my entry for Rhino III as tentative - until I find a new kit.

Thank you gentlemen, I've enjoyed the experience and learnt a lot for when I do actually finish a Phantom - Rough As Guts signing out Smile


www.kiwimodeller.com

  • Member since
    July 2011
  • From: Land of Oz
Posted by MilitaryAircraft101 on Thursday, January 12, 2012 4:41 PM

Cheers! Some credit for the backstory goes to a bloke over at whatifmodelers named GTX who wrote this war in as part of his Alternate Australian History...

  • Member since
    April 2005
Posted by Thunderbolt379 on Thursday, January 12, 2012 4:35 PM

MA101 -- amazing piece of work all round, 'what-ifs' can be terrific and a real change of pace! Kudos on completion and compiling such a detailed "history of the conflict!"

Will update p1 right away!

Cheers, Mike (who has only those wretched tailplanes to go on the -K...)

http://worldinminiature.blogspot.com/

  • Member since
    July 2011
  • From: Land of Oz
Posted by MilitaryAircraft101 on Thursday, January 12, 2012 2:21 PM

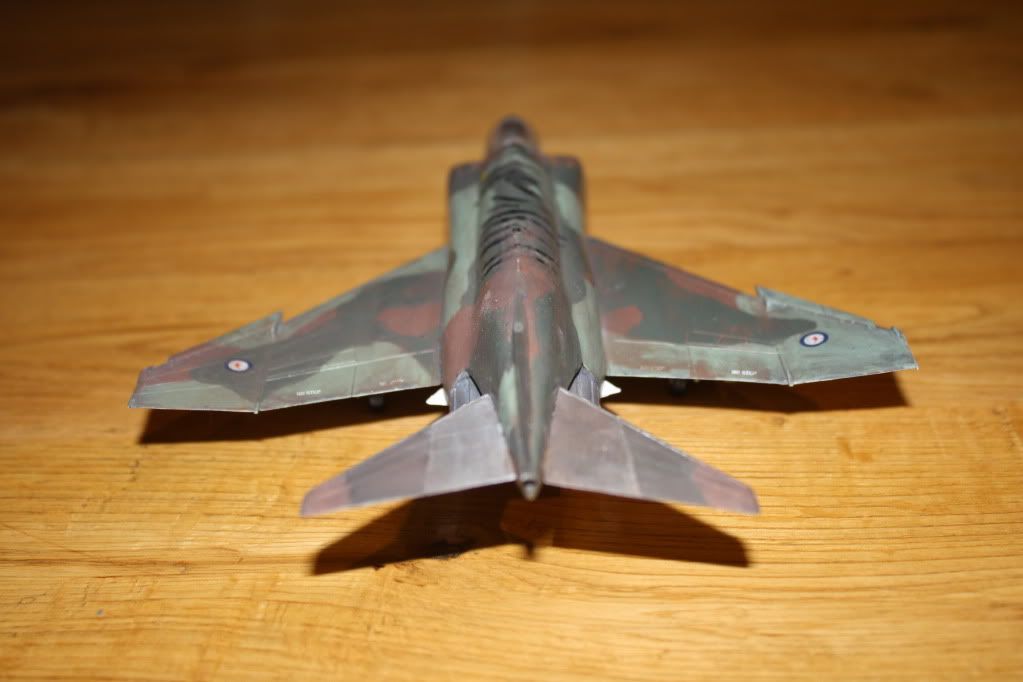
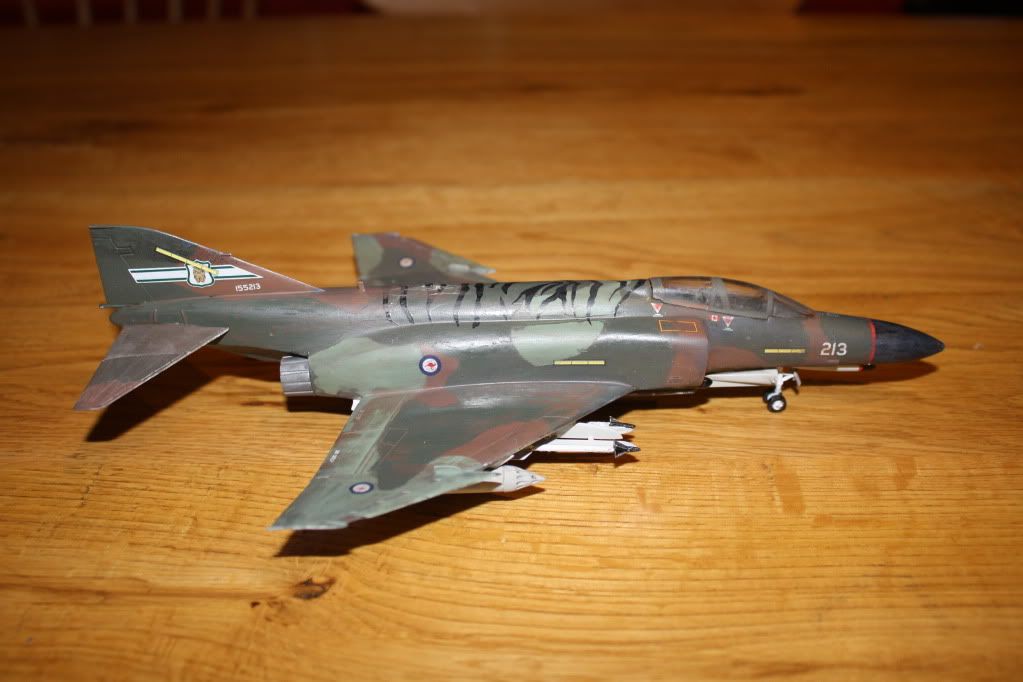
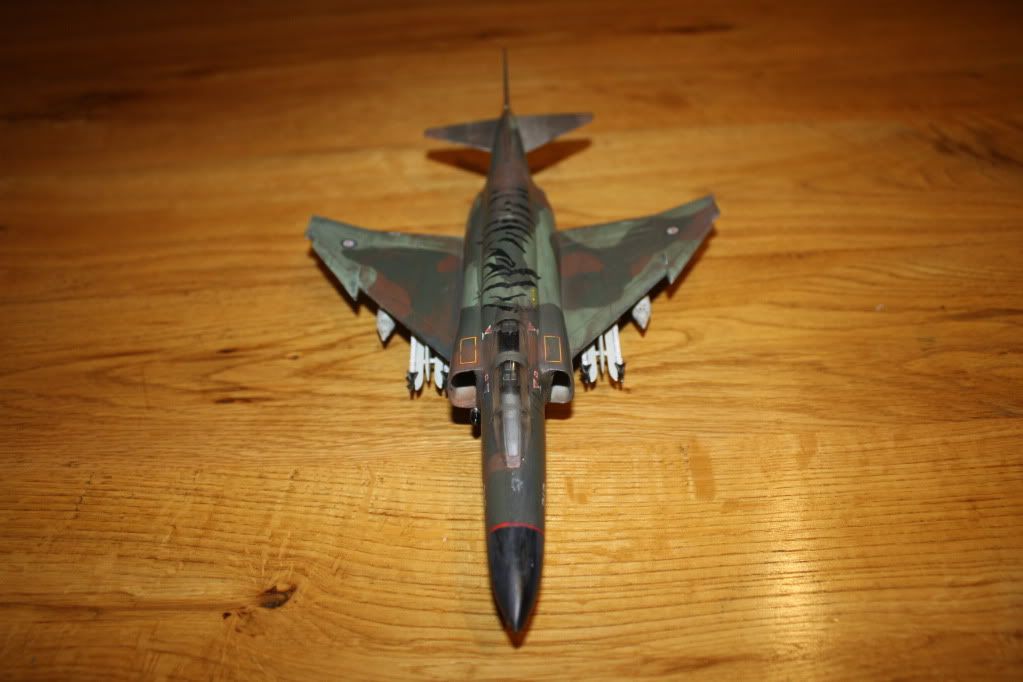
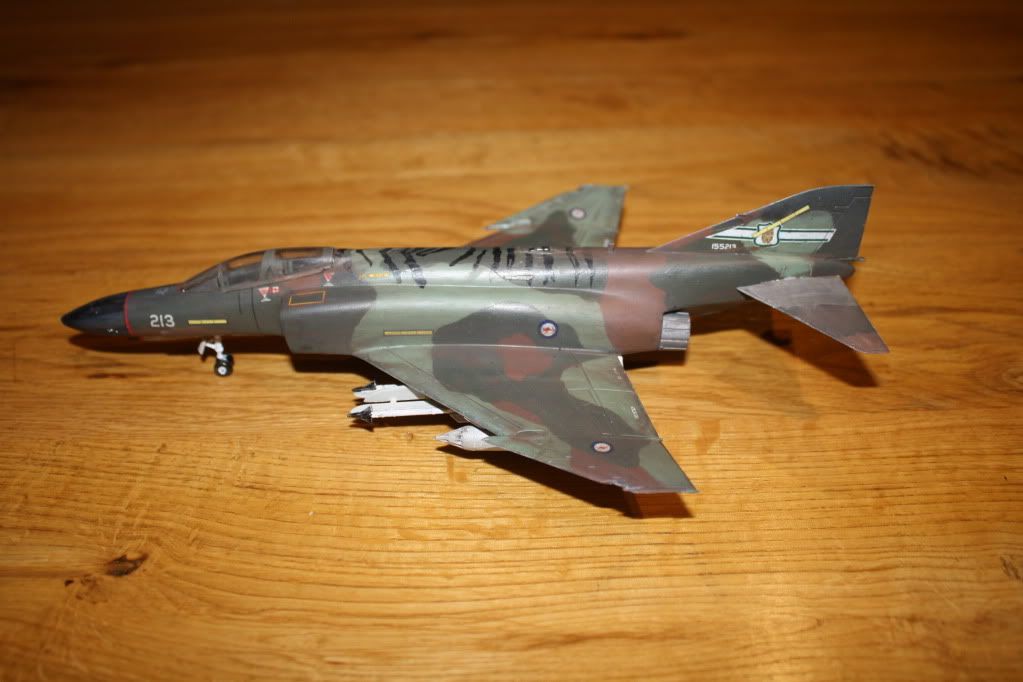
Guys, I hope you'll be forgiving here, as my camera was out of action for three months, in which time I started-and finished, my F-4AU conversion from the Hasegawa F-4E (1/72). This model depicts F-4AU "213" in Port Moresby during the East Timor war of 1975-76. Here is a short description of the war, for all of you who aren't sufficiently versed in Australian military history. It also includes a detailed description of the dogfight, which is pulled from a military report written after the fight.

After the Indonesian invasion of East Timor in December 1975, the Australian government, under increasing external stress, decided to intervene, starting with airpower, then moving on with paratroops and securing ground incrementally. Quickly after the declaration of war by Australia, a Soviet backed ceasefire was signed between Indonesia and Australia. In these initial strikes, F-4AU fighters (Modified F-4E and F-4C fighters) from 77 Squadron RAAF carried out a number of counter attacks on Indonesian positions at Dili. This F-4AU (213) on it's 3rd mission into occupied territory, had the first RAAF aircrew lost in the war, piloted by Jonothan Stanbridg, the WSO, Arthur Steele, was hit by MiG-21 fire, and bled out on the return flight, which resulted in the Phantom being nicknamed "666", much to the distaste of the crew of C-5 "Shuttlin' Sheila", ID number 666. The replacement, a Canadian, Danny Michaels, known as "Canuck" in the Australian camps. This F-4AU carried ECM rigs, and a special, top secret laser guided pathfinding technology, which simoultaneosly mapped the terrain, and marked out landing sites for the home command radar operators, who subsequently passed on this information to the C-130s, C-5s and Sea Kings which the troops would land out of.

On the final day of fighting, 213 scored her first air to air kill, after her and her sister aircraft "Royal Flush" were engaged in a brutal dogfight with two MiG-23s and four MiG-21s. Royal Flush took lead in the chase, and 213 stayed back and waited to take missile shots. The MiG-21s, with a primary mission of protecting the MiG-23s, began a "wagon wheel" maneuver, where they circled eachother, trying to lure the Phantoms into a deadly ring of MiGs. Royal Flush, fancying her chances, made a "boom and zoom" missile shot, though the gs sustained from trying to avoid the MiG ring meant that the sidewinders didn't get a proper lock, though one did detonate and damage the aileron controls of one MiG, who sharply turned towards base, with hydraulic fluids running out of the wings. 213 took her chance and came in right behind the temporarily undefended MiG, left by his counterpart, and fired a sidewinder salvo of two, one sped past, but the other detonated and tore the tail off the MiG. During this time, the -23s had bugged out back to base, and now it was a two on two fight, the Phantoms fancying their chances against the MiGs.

Royal Flush turned towards Darwin, appearing to bug out, but after diving to the deck, she made an Immelman turn and fired her two Aim-7 Sparrow missiles, 213 watched in awe as the radar guided missiles hit home and destroyed a second MiG. The last MiG reamaining now had two Phantoms on her tail, with a total of two sparrows and four sidewinders remaining, against the MiG's cannons. Royal Flush headed towards home, the crew elated about their MiG kills, not paying attention to the MiG-21 that had shot out of the sky behind them. 213 followed on full afterburner behind the MiG, who began to turn violently, though Royal Flush continued to fly home. The MiG broke again, now both him and 213 closing on Royal Flush. Royal Flush still not realising, was a sitting duck, and the MiG evaded 213, diving into the clouds, and resurfacing behind Royal Flush, 30 mm cannon shells tearing through Royal Flush, her wings ripping off and tumbling towards the sea.

The MiG had run out of ammunition after the fight with Royal Flush, 213 not knowing that earlier the MiG had shot down two F-111Bs and one Mirage III+ on that mission, and including his A-7 killl, Royal Flush just made this MiG "328" the first Indonesian jet ace. 213 pulled out right beside the MiG and the pilot and WSO exchanged glances, the MiG sending a sneaky salute and breaking away for Dili. Rattled, 213 headed home, feeling rather down after the loss of Royal Flush (later a confirmation for the first MiG who was leaking hydraulic fuel as a kill took the crew's total to 3) even after their own MiG kill, when they arrived, their flightsuits were drenched with sweat and the control column was slimy with sweat. The rattled crew were shaking and couldn't even undo their own seat straps.

The crew of Royal Flush had ejected north of Darwin, btu had both drowned in the cords of their parachutes. At this news, Stanbridge broke down. Royal Flush's WSO had been his brother, Tom "Hawk" Stanbridge... For now, the war was over, but 27 RAAF aircrew had been killed in only weeks, the highest ratio since WW2. The crews of F-4AU "Royal Flush" and "213" both received Conspicuous Gallantry Medals, which were at the time second highest gallantry medal, behind the Victoria Cross. In 1991, after its outstanding gallantry in the face of the enemy during both the East Timor war and the Falklands War, 77 Squadron RAAF was awarded the Meritorious Unit Citation from the Australian government for it's role in the two wars.

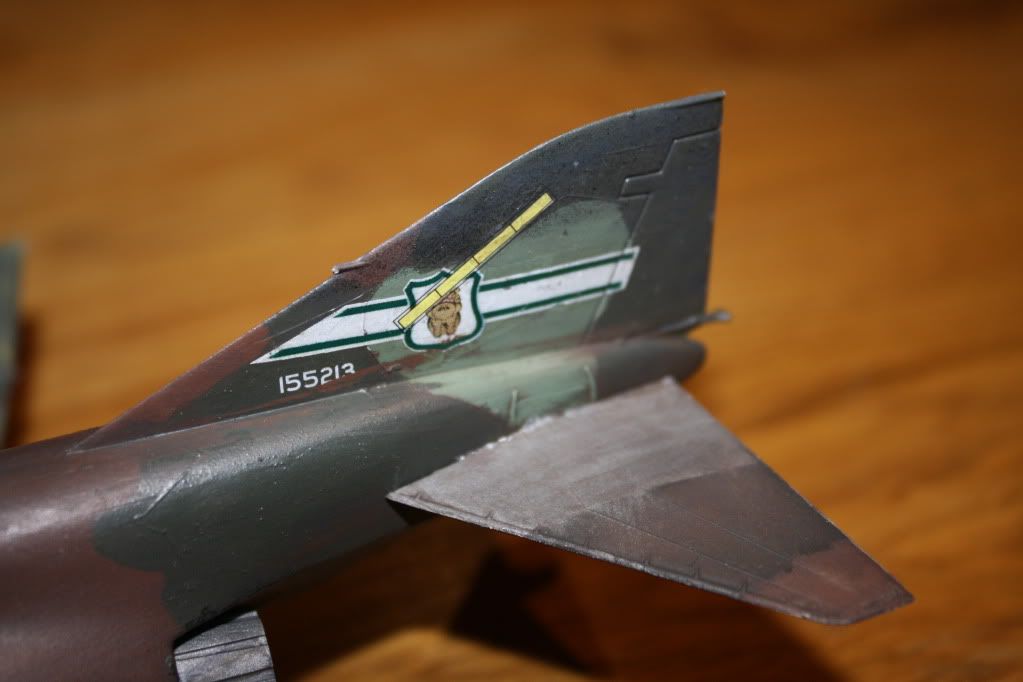
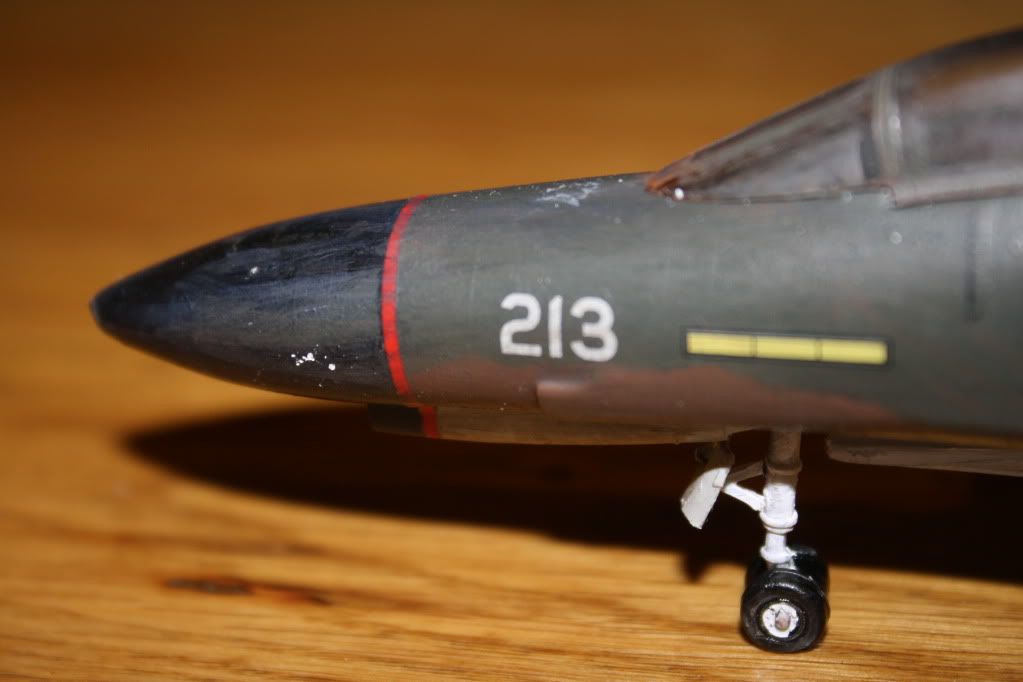
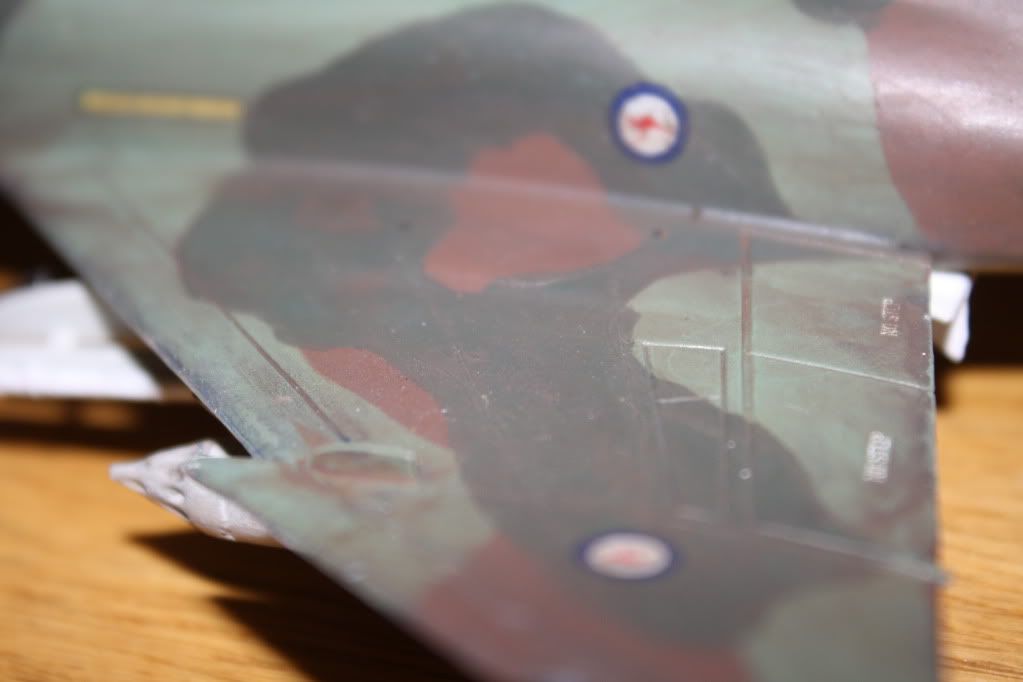
The Pics of J. Stanbridge and D. Michaels' F-4AU before the mission. After field exercises a week prior to the intervetnion, the F-4AUs had their camouflage quickly modified to a dark green on red brown and light grey green, rather than dark brown on red brown and light grey green. The aircraft also suffered extremely harsh conditions after becoming stationed in Port Moresby, and suffered high amounts of weathering, from the humid summer climate and the muddy terrain of the East Timorese jungle.


Cheers all! Enjoy

  • Member since
    June 2009
Posted by jimbot58 on Wednesday, January 11, 2012 3:07 AM

TB379/Bockscar I really haven't tried to achieve an 'automotive' look gloss finish, and that is why I have never tackled any auto models though several exist in my stash. My only goal is to get a smooth enough surface for my decals to set on and not silver. I know auto modelers use fine abrasives in successive finer grits to get their effects. When I lightly sand with my 2000 grit paper, I'm just taking off the 'peaks' of the surface coat, where I always seem to get that gritty uneven "crinkly" surface. The toothpaste has a fine abrasive in it, that gives a glossy surface after I sand. I have to be super careful around edges and surface details not to sand through the paint to the bare plastic. More than once I have had to repaint areas where this happened. I have several older completed kits in my collection that have silvered decals before i started following this method.

I tried doing a NASCAR/Dale Earnhardt model, but lost interest when I ended up with an 'orange peel' surface.

As far as those decals go, I tend to work on a bunch of those little ones ("NO STEP", "DO NOT PUSH", etc) until I work up to doing a big one. They always make me nervous because anything can go wrong with one. I never seem to do more than a few at a time anyway.

Jim

*******

On my workbench now:


Fujimi F-4K Phantom "Yellow Bird" and Zvezda Su-27SM Flanker


  • Member since
    February 2010
  • From: Ontario, Canada
Posted by Bockscar on Tuesday, January 10, 2012 7:34 PM

Jimbot58;

You raise a good issue, there are decals, and then there are those itty-bitty micro-all-over-the-place decals.

Do you go big first, or the small ones cause of the time?

I liked that polident smile idea, if it works on teeth, it's gotta work on lacquer.Super Angry

  • Member since
    February 2010
  • From: Ontario, Canada
Posted by Bockscar on Tuesday, January 10, 2012 7:29 PM

Auto factory smooth, at 1/48 or-so-scale?

ahem!

Well, apparently ostrich feathers, with the right amount of static applied,

are super efficient at removing any residual dust from an about-to-be-painted auto's surface.

I always use anti-stat cloths before painting. But I fear they put in hand-softening lotion as well...lol

Who needs a flea-hair under a decal?


  • Member since
    April 2005
Posted by Thunderbolt379 on Tuesday, January 10, 2012 5:09 AM

Jimbot -- thanks! I'm in an eternal quest for the techniques to produce a smooth surface -- smooth by the standards auto modellers acheive. I haven't come even close yet, one reason I have never tried painting a car mode, though a junker covered with rust might be possible! I shall remember your tips and give them a try.

I got 16 more decals on around nose and tail, painted the pitot tube on the tail, and have painted and assembled the landing gear:

It's amazing how when you blow it up to this size you see all the imperfections which are invisible on the real object!

The main job remaining is the horizontal tails, which I resanded today, and will take a third crack at the metallic areas, then paint and clear the top and bottom surfaces... Then  there's another half dozen decals! Install the tails and landing gear, unmask the canopy and she's finally done!

M/TB379

http://worldinminiature.blogspot.com/

  • Member since
    June 2009
Posted by jimbot58 on Sunday, January 8, 2012 3:14 AM

TB/Mike: You are getting an incredible amount of progress done in a short time on that bird! I'm lucky if I do 4 decals in one sitting! My record on the "F" is 14 last Saturday, and with well over 100 decals going on this kit, no wonder I take so long! The K is looking very good!

I also have trouble with clear gloss finishes and after trying other finishes, I find myself using nothing but Testors Glosscote Lacquer. I know others have good success with Future, but I can't get the hang of it. However, I still get that crinkled, pebbled surface. What I do to avoid silvered decals is I use a bit of 2000 grit automotive sandpaper, and carefully wet sand (lightly) over the surface and use a special cloth (old cut-up cotton T-shirt) and special polishing compound (Colgate toothpaste-anti cavity protection formula) I get a very smooth surface! I assume this is what you are talking about with your crinkle paint and hope this helps?????

*******

On my workbench now:


Fujimi F-4K Phantom "Yellow Bird" and Zvezda Su-27SM Flanker


  • Member since
    April 2005
Posted by Thunderbolt379 on Sunday, January 8, 2012 1:55 AM

Spuggies and Rattlers installed, touchups done and re-cleared, burner cans installed, intakes unmasked... SIXTEEN more decals to go, on areas recently exposed. Wing tanks and gear bay doors to install later...

M/TB379

http://worldinminiature.blogspot.com/

  • Member since
    February 2010
  • From: Ontario, Canada
Posted by Bockscar on Saturday, January 7, 2012 10:53 PM

Indeed, forsooth,

tis not the silk which blindeth the eye,

to conjurs cerebral,

butt the bump, immediate!

-Good man!Toast

  • Member since
    April 2005
Posted by Thunderbolt379 on Saturday, January 7, 2012 10:42 PM

Forsooth, and in truth, 'tis less the foresaid 'kini's than that which they doth so inadequately contain that doth blind the eye and command the heart... Or so Shakespeare would doubtless have said if they had then in 1600...! They had them in ancient Rome, as it happens!

M/TB379

http://worldinminiature.blogspot.com/

  • Member since
    February 2010
  • From: Ontario, Canada
Posted by Bockscar on Saturday, January 7, 2012 10:33 PM

the truth forthwith.....dampness does a film detract.......

test lightly, don't want any of those 'kini's to snap off unexpectedly,

shisshh, could blind a guy Mike!Black Eye

  • Member since
    April 2005
Posted by Thunderbolt379 on Saturday, January 7, 2012 10:21 PM

Well, to be fair, there is a pool just outside the workshop... And a freaking great storm that went through last night. But I only wish there were string 'kini's to distract my jaded eye!

I'll source some ultra fine steel wool and give it a test.

I'm thinking maybe something WWII Japanese -- green and grey, nothing complicated...

M/TB379 (Sparrows attched...)

http://worldinminiature.blogspot.com/

  • Member since
    February 2010
  • From: Ontario, Canada
Posted by Bockscar on Saturday, January 7, 2012 10:11 PM

Krikey!

I'm lookin' for the quicky myself!

Mike, supposedly, and i can attest that it is accurate, steel wool shaves rather than scratches - a million little planes, rather than a million little shovels.

A super-fine steel wool, if it disappoints dispatching floccules, makes a great fire starter on a damp day camping....lol....

It almost sounds as though you are also suffering humidity issues........

Mike, stop painting your projects beside that huge pool mate!

-those string 'kini's got your eye off the task pal?Whistling

  • Member since
    April 2005
Posted by Thunderbolt379 on Saturday, January 7, 2012 9:29 PM

HAHAHAHA -- thanks Bocks! I've not heard the steel wool trick before, I must try it. between the decals and the paint and masking not sticking quite right I got a bit fed up with this one -- chasing things not going right ends up going in circles. Right now I'm mounting the Sparrows and touching up round the intakes, which will need more clear, plus starting to get the rattlers and tanks ready for mounting. Exhasts can go on in the same round too.

What I need is a nice, quick build, a single colour subject, or two at most, so I can see decals and clearcoats work properly again...

Cheers, M/TB379

Tags: ahahah

http://worldinminiature.blogspot.com/

  • Member since
    February 2010
  • From: Ontario, Canada
Posted by Bockscar on Saturday, January 7, 2012 8:53 PM

Micro-wombats......deposited the crinkleys while you was a restin'!

Actually, that's still lookin' good.

mask the decals, and hit the wombat doos with super-fine steel wool.....from steel sheep.....not sand paper it digs in, but steel wool cuts to the surface.

any how, I still think thats a nice build.

use the dirt to your advantage, Berny always said........lol......


JOIN OUR COMMUNITY!

Our community is FREE to join. To participate you must either login or register for an account.

SEARCH FORUMS
FREE NEWSLETTER
By signing up you may also receive reader surveys and occasional special offers. We do not sell, rent or trade our email lists. View our Privacy Policy.