SEARCH FINESCALE.COM

Enter keywords or a search phrase below:

The group build to end all group builds - THE GREAT WAR

155887 views
1091 replies
1 rating 2 rating 3 rating 4 rating 5 rating
  • Member since
    July 2006
  • From: San Francisco Bay Area
Posted by bufflehead on Sunday, January 15, 2012 12:25 AM

Rob, thanks for the kind words and I'm glad the Plastruct tip helped! 

Assembly done (finally) and primered.

Don't have any MM Russian Earth Brown and I typically don't use enamels so I tried mixing up a similar color using Tamiya acrylics:  50% Khaki, 40% Olive Drab and 10% Olive Green.  Although the mix looked like the right tone in the bottle, it seems a bit dark to me once sprayed on the model.  I think I'll lighten the mix quite a bit and hit the upper panels with to brighten them up!

I'm experimenting with the tracks and trying a method that Mike Rinaldi has been using, altered a bit to suite my paint supply.  First I sprayed Humbrol Metal Cote Gunmetal onto a section of the tracks (bottom section in case I mess up!).  I used Metal Cote because when it dries the Metal Cote can be buffed or burnished to a metallic sheen.  After a couple of hours I sprayed a light coat of Tamiya acrylic Flat Brown, followed by a coat of Flat Earth.  I let this dry about 15 minutes and then I used a small flat brush moisted with Windex to gently remove the acrylic paint from the high spots and flat areas around the bolts.  My goal was to slowly remove the upper acrylic paint to expose the underlying enamel Metal Cote.  However, using the brush was VERY slow, so I switched to a Windex moistened cotton bud and gently dabbed at the areas I wanted to remove the acrylic paint.  For some reason this worked much better.  I let this dry and then used a very stiff bristle brush to burnish the exposed Metal Cote.

I'm not too sure about the results.  I had hoped for more of the flat brown to show through, but all I can see is flat earth and dark metal.  I'll try applying a couple of brown filters to make it look more like tarnished, used steel.  Opinions fellas?


Ernest

Last Armor Build - 1/35 Dragon M-26A1, 1/35 Emhar Mk.IV Female


Last Aircraft Builds - Hobby Boss 1/72 F4F Wildcat & FW-190A8


  • Member since
    December 2010
  • From: Memphis TN
Posted by Heavens Eagle on Sunday, January 15, 2012 12:56 AM

Wow bufflehead!  The tracks really look good in the photo!  You might try a slightly moistened paper towel around your finger with the Windex.  As to the coloring on the tracks it does look good.  Only have one suggestion, that is if this is a tank that is "in action" the high points of the tracks would be fresh steel color from wear.  Other than that it really is looking good!

  • Member since
    October 2009
Posted by PANZERWAFFE on Sunday, January 15, 2012 10:12 AM

Ernest think if you want a more brown tint would go with a wash like you have said.  That way you would not lose the metal color you have.  I think they look really great as is and I like that metal color a lot.  I would only brighten up the high points.  The color you mixed for the hull is really nice!  It really shows the detail on the build.  Very outstanding work on it.  I am really liken it Yes

Rob

  • Member since
    February 2006
  • From: Smithers, BC, Canada
Posted by ruddratt on Sunday, January 15, 2012 3:42 PM

Ditto what the others have said. Man, those tracks are flippin' amazing!  I'm going to remember that technique when I get back to working on my Dragon 1/72 Sherman.

Mike

 "We have our own ammunition. It's filled with paint. When we fire it, it makes pretty pictures....scares the hell outta people."


  • Member since
    February 2006
  • From: Smithers, BC, Canada
Posted by ruddratt on Sunday, January 15, 2012 4:05 PM

OK fellas. Got an update as promised. Even though it's not an official entry to this GB, I can't think of a better place to show it. Been working on a shelf sitter started quite a while back, Eduard's 1/48 Fokker E.V. Neat little kit.

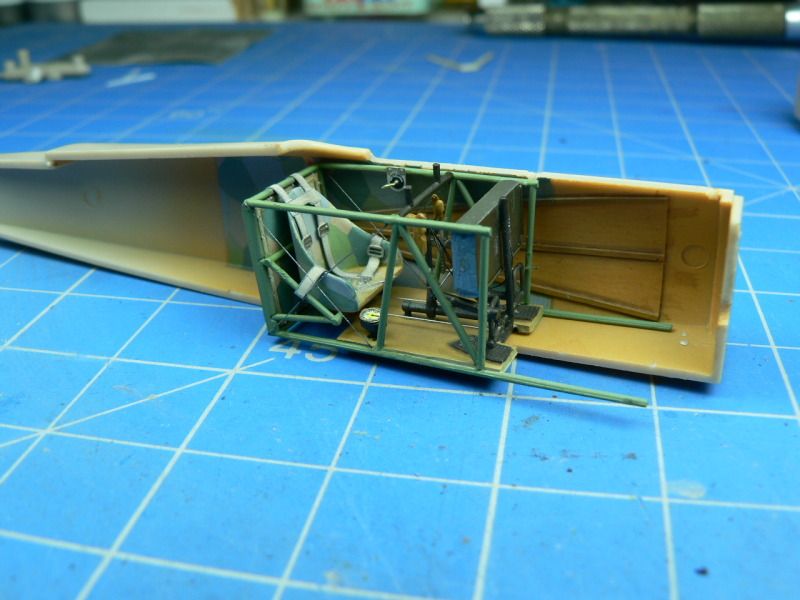
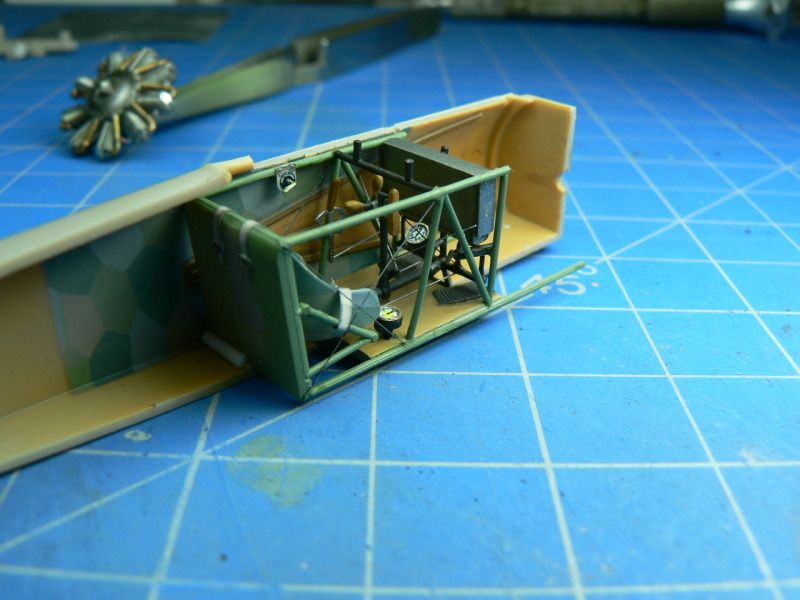
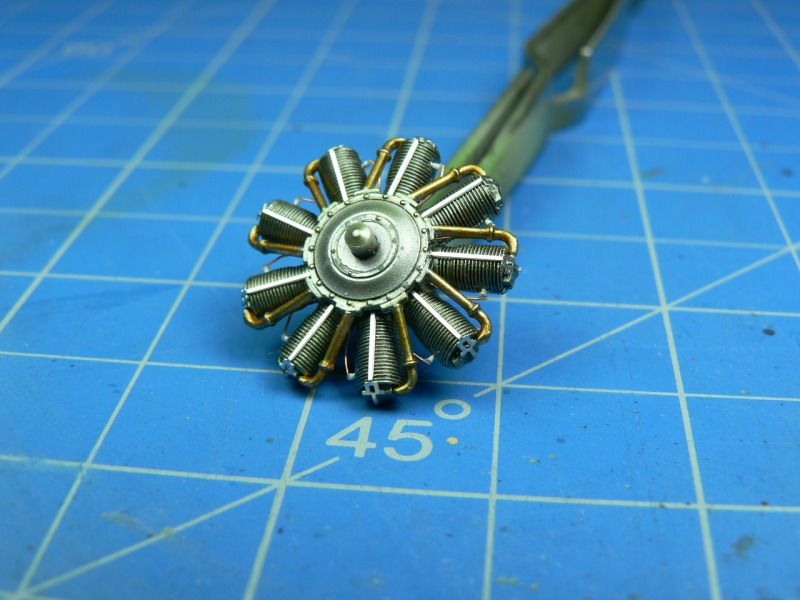
This was as far as I had gotten before I boxed her up, basically the 'pit and the engine, buttoned 'er up and built the guns....

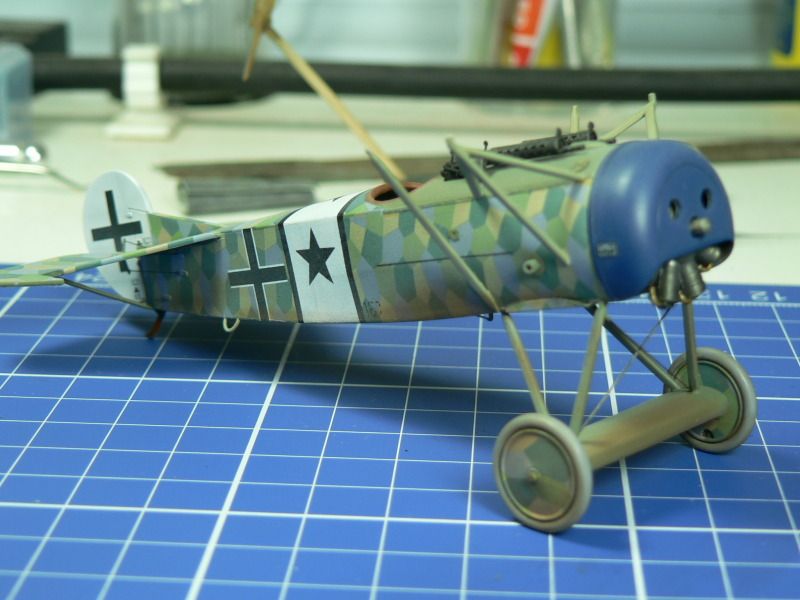
Got all the fiddly bits attached (sorry about the fuzziness of some of the pics), got 'er weathered up, and attached most of the rigging...

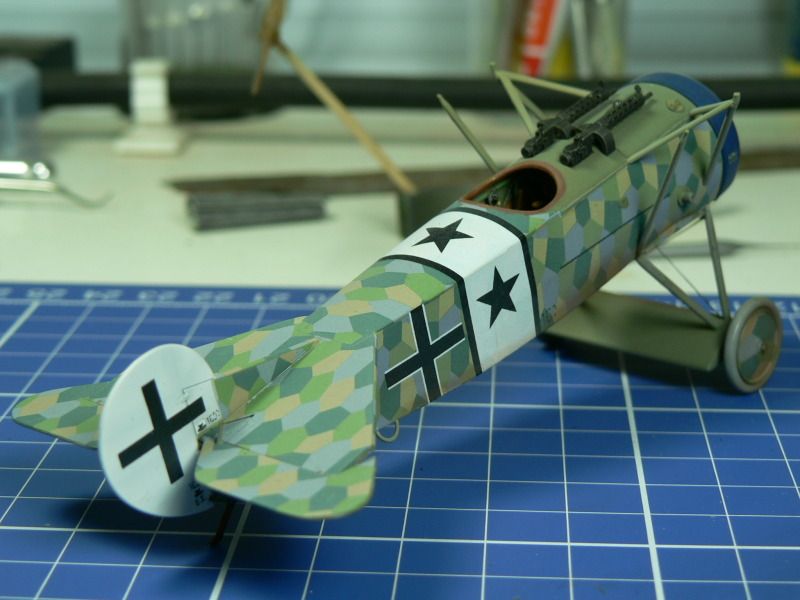
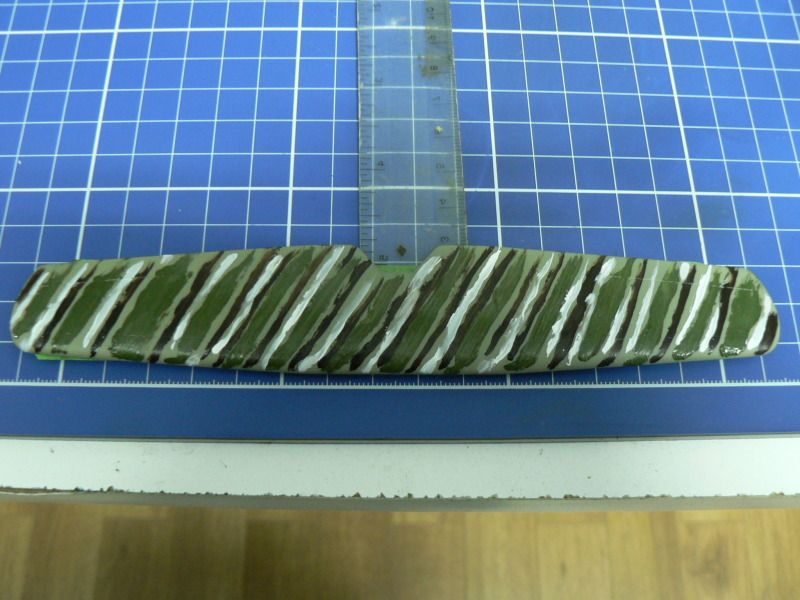
....and this was going to make or break the build, that being the upper wing. Saw a technique online about replicating the streaked camo seen on a lot of Fokkers and wanted to have a go at it. The wing was given a base coat of MM RLM02 and shined up with Future. The camo called for three oil colors. Two were easy - titanium white and burnt umber. The third, olive drab, I had to mix, and did so with a combination of mostly yellow ochre with a little chromate green and lamp black added to it. Some japan drier was added to all three colors to improve their flow and speed up the drying time. They are then brushed on in streaks, randomly alternating the 3 colors, like so....doesn't look like much at this point, but it gets better, trust me.

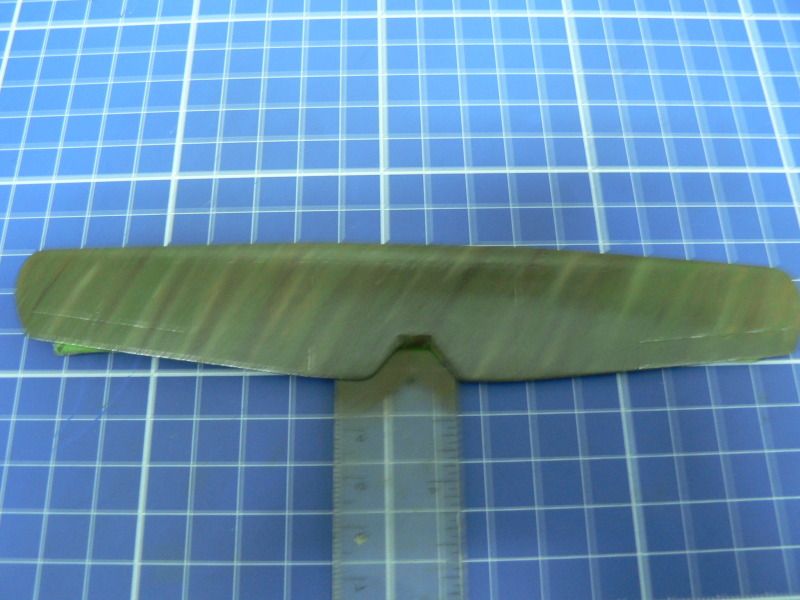
Using a wide flat brush, I started blending the colors in the same direction as the streaks, constanly wiping the brush to remove the excess, until it looked like this.....

I have to say I'm really happy with how they came out, and can't wait to try it again on my Fokker Dr.1's.

Mike

 "We have our own ammunition. It's filled with paint. When we fire it, it makes pretty pictures....scares the hell outta people."


  • Member since
    July 2006
  • From: San Francisco Bay Area
Posted by bufflehead on Sunday, January 15, 2012 5:01 PM

Mike, that is one cool technique you used on the upper wing!  I really like the effect of the blended oil paints, sort of like a "tiger stripe" camo pattern.  The interior and engine work are outstanding!  Great work on the Fokker!!

Ernest

Last Armor Build - 1/35 Dragon M-26A1, 1/35 Emhar Mk.IV Female


Last Aircraft Builds - Hobby Boss 1/72 F4F Wildcat & FW-190A8


  • Member since
    July 2006
  • From: San Francisco Bay Area
Posted by bufflehead on Sunday, January 15, 2012 7:34 PM

OK, I added a brown filter using MIG Productions Brown Wash, then followed a few hours later with a filter using Sin Industries Tan for Tritonal Camo.  Dry brushed a touch silver Rub N Buff on the high spots.  I had to adjust the lighting so you can see the effects of the filters so the silver highlight don't show very well, but they're there!  I think I like it.....

Applied tonal highlights to the upper surfaces and then pre-shaded (post-shaded?) panel lines and edges with flat black.....

Then blended it all together with a mix of the base color and the highlight color.....I want it a bit lighter to offset the weathering to come.

I'll let it dry overnight and add the red & white stripes tomorrow, add decals and then start the weathering process.....hopefully it will be done by the end of the week.

Ernest

Last Armor Build - 1/35 Dragon M-26A1, 1/35 Emhar Mk.IV Female


Last Aircraft Builds - Hobby Boss 1/72 F4F Wildcat & FW-190A8


  • Member since
    February 2006
  • From: Smithers, BC, Canada
Posted by ruddratt on Monday, January 16, 2012 9:16 AM

Looks real good Ernest! I've yet to get the hang of using filters, but you seem to have the technique down to a science. The worn metal on the tracks looks awesome too, and the shading on the tank body really takes it to another level. It's been a joy watching this one come together! Yes

Mike

 "We have our own ammunition. It's filled with paint. When we fire it, it makes pretty pictures....scares the hell outta people."


  • Member since
    October 2009
Posted by PANZERWAFFE on Monday, January 16, 2012 7:48 PM

RUDDRATT - Don't know much about these early aircraft but I do like looking at them especially when their so well doneYes  Great looking cockpit and radial engine.  The top wing is outstanding.  Trying to think what I can use that technique on for armor?  Like you results so much I may just have to have a faded striped tankSurprise  But really, it looks great.

Probably not much of a question for all of you flyboys but how do you get that pattern on the fuselage?  Thats one of the things I like best about these early aircraft, their color and markings. 

ERNEST - I love it!!Yes  Thats all that needs to be said, your build says the rest Yes  More please

Rob

  • Member since
    December 2002
  • From: NYC, USA
Posted by waikong on Monday, January 16, 2012 7:52 PM

Mike, that streaking technique looks good. I had to do the same camo for my Fokker and the streaking really gave me some headaches. At the end, it was ok, not completely happy with what I did.

Ernest, the tank is coming along REALLY nice!

My website: http://waihobbies.wkhc.net


  • Member since
    February 2006
  • From: Smithers, BC, Canada
Posted by ruddratt on Monday, January 16, 2012 8:32 PM

Glad you like 'er so far, fellas. It was a bit of trial & error - I had considered acrylics and gave 'em a shot in spite of my wife's warnings about them drying too fast. She was spot on, and I had to strip the wing down to plastic and start all over again. The only change I'll probably make is to add just a touch of violet oil paint to my OD mix to 'brown' it a little more.

Rob, I'm going to have to figure a way to do that pattern on the fuselage (figuring it may just involve scaling the wing technique down a bit). Got the same kit Waikong built for this GB (which he did an outstanding job on), only in the dual combo package, and all schemes have streaking on the fuselage (to different degrees). Good thing about the oils is if I fudge it, it can be wiped off easily and I can have another go at it.

Mike

 "We have our own ammunition. It's filled with paint. When we fire it, it makes pretty pictures....scares the hell outta people."


  • Member since
    April 2005
  • From: Piscataway, NJ!
Posted by wing_nut on Tuesday, January 17, 2012 1:12 PM

Ernest, the tracks looked pretty darn goos the 1st crack at it but they are even better now.  Very nice.  Since it is not complete yet I have to alter something another forum member may say... I love your Whippet and want to date with the hope the relationship will grow. Wink

Mike cool technique.  Not be all that familiar with the WWI stuff I have not seen that camo before but it looks real sharp.

Marc  

  • Member since
    February 2006
  • From: Smithers, BC, Canada
Posted by ruddratt on Tuesday, January 17, 2012 8:23 PM

Marc, that was a fairly common pattern on Fokker aircraft. Seen it used a lot on the D.VII's, and on the DR.1's, you'd be hard pressed to find one without it..........speaking of which, my DR.1 Dual Combo arrived today. Man, what a kit!! Six incredible color schemes and enough parts to build two complete aircraft. I cannot wait to get started on this!

...but alas, it will have to wait until the E.V and the Hanriot HD.1 are finished (but when one considers the new time line of this GB, looks like I've got time Wink ).

Mike

 "We have our own ammunition. It's filled with paint. When we fire it, it makes pretty pictures....scares the hell outta people."


  • Member since
    July 2006
  • From: San Francisco Bay Area
Posted by bufflehead on Tuesday, January 17, 2012 10:40 PM

Rob, Mike, waikong, and Marc, thanks for taking the time to comment on the Whippet.  I'm enjoying the build quite a bit because; 1) its very different from all the WWII tanks I've built so far, and 2) despite all the work I've put into it, its actually moving along much quicker than normal for me!! Stick out tongue

I was able to paint the red & white stripes by carefully masking with Tamiya tape and then AB'ing Tamiya Flat Red and Flat White. I need to touch up a couple of areas, but overall it came out quite nice for the first attempt!

BTW, does anyone know the reason for the stripes?  Combat ID?  Battalion, division, regiment ID?

I'm having some trepidation with the kit supplied decals.  They look opaque and a little on the thick side.  I really want to use the "Firefly" markings as its the most colorful choice.  I have no other decals or transfers that might work and I can't find any aftermarket sets for the Whippet.  Looks like I'm stuck using them so I spent the evening testing a couple out on the kits fuel tank lower plate that I didn't use.  After spraying on the base color and coating with Future, I used Micro-Set for both, but on one decal I used Micro-Sol and on the other I used Walther's Solvaset.  The Solvaset proved too strong for as they wrinkled the decal terribly and never flattened out completely (formed quite nicely over rivets though!)  The decal with Micro-Sol however came out much better and after protecting with another coat of Future and spraying on a flat coat it turned out OK, but the thickness of the decals is visible in the photo:

For some reason I couldn't get it to stand out in the photos I took, but If you look closely you can see a slightly darker rectangle around the decal.  I'll have to trim the carrier film very close to the markings to reduce that effect.


Ernest

Last Armor Build - 1/35 Dragon M-26A1, 1/35 Emhar Mk.IV Female


Last Aircraft Builds - Hobby Boss 1/72 F4F Wildcat & FW-190A8


  • Member since
    February 2006
  • From: Smithers, BC, Canada
Posted by ruddratt on Tuesday, January 17, 2012 11:28 PM

Ernest, that masking job looks darn good for a first attempt, and really adds a nice burst of color and contrast that is not often seen on AFVs, although I'm not too sure what their purpose actually was (hopefully someone with more know-how on the subject has the answer). Took a close look at the decal on the fuel cover, and really had to look hard to see the film. Had you not mentioned it, it would have slipped right past me. Perhaps a mist coat using a lighter shade of the main color would tone it down, as well as weather the markings themselves? Just a thought.

Rob, I totally misunderstood your question on the fuselage pattern. Sorry buddy. You were referring to the lozenge camo and not the streaking. The lozenge is all done with decals that are included with the kit. The Eduard decals are among the nicest I've ever worked with, and the sections are each outlined precisely for the builder depending on their location on the model (rudder, lower fuselage, etc.), so little trimming is needed.

Mike

 "We have our own ammunition. It's filled with paint. When we fire it, it makes pretty pictures....scares the hell outta people."


  • Member since
    April 2006
  • From: ON, Canada
Posted by jgeratic on Wednesday, January 18, 2012 12:49 AM

Ruddratt - Fokker streaks looks really good.  I remember reading theories on the Aerodrome forum about how the look was achieved and what colours where used on the real deal - all from a b/w photo that had a number of paint buckets on the floor, sizing up the width of the brush, etc.

When I return to my 1/72 DR.I I plan to do the streaking on a computer paint program and print out on clear decals.

Ernest - Whippet is really eye catching now.  Regarding your question about the stripes - these were known as a recognition flash used by armoured units to quickly discern friend from foe.  They were still seen in use early in WW2 and sometimes the colours were inverted, such as the Canadian Churchills during the Dieppe raid.

Here is photo of a Valentine in the desert sporting them:

regards,

Jack


  • Member since
    April 2005
  • From: Piscataway, NJ!
Posted by wing_nut on Wednesday, January 18, 2012 7:22 AM

bufflehead

BTW, does anyone know the reason for the stripes?  Combat ID?  Battalion, division, regiment ID?

It doesn't mean "AIM HERE"?Whistling

Marc  

  • Member since
    October 2009
Posted by PANZERWAFFE on Wednesday, January 18, 2012 7:06 PM

ERNEST - The recognition flash looks great!  Your decals don't look bad at all and as Mike has said, you may be able to cover any areas your not happy with.  They defiantly look better then the decals for my MK IV.  Was not pleased with them, found them also to be to thick, so did not use them.  Instead had printed out numbers in the style and size wanted, taped to the work mat, laid wax paper over the top and taped the edges, then put Tamiya tape over the numbers on top of the wax paper and then used a #11 blade to cut out the numbers using the numbers that could be seen through as a template.  After all of that, carefully lifted the tape which is now a stencil and placed on the model and sprayed some paint.

MIKE - Thanks for both explanations but Yes was referring to the lozenge.  Really like how that stuff looksYes

Rob

  • Member since
    February 2006
  • From: Smithers, BC, Canada
Posted by ruddratt on Wednesday, January 18, 2012 7:48 PM

Rob, yep, they do look pretty cool, don't they. Can be a bit labor intensive depending on how much of the aircraft's surface is covered with 'em, both inside and out (yep, you can find 'em INSIDE the 'pit as well).

Jack, sounds like an interesting technique. I've seen factory printed decals to replicate the streaked camo, but I'm eagerly anticipating to see what you come up with. Should be awesome! Be sure to post pics. Yes

Mike

 "We have our own ammunition. It's filled with paint. When we fire it, it makes pretty pictures....scares the hell outta people."


  • Member since
    July 2006
  • From: San Francisco Bay Area
Posted by bufflehead on Thursday, January 19, 2012 9:24 PM

Jack, thanks for the info!  I never heard the term "recognition flash" until now. That's a great photo you posted.... I find it fascinating that they were still used almost unchanged decades later! 

Rob, thanks for the stencil tip!  I was going to give it a try; even spent a couple of hours on the computer trying to find matching fonts and when I tried to print them I found out I have NO ink in my printer!! Super Angry  I don't want to lose time just to get ink, so I'll just go with the decals and live with any issues they present.  I'll file your technique away in case I want to give it another go (with ink! Whistling)

Ernest

Last Armor Build - 1/35 Dragon M-26A1, 1/35 Emhar Mk.IV Female


Last Aircraft Builds - Hobby Boss 1/72 F4F Wildcat & FW-190A8


  • Member since
    February 2006
  • From: Smithers, BC, Canada
Posted by ruddratt on Friday, January 20, 2012 8:50 PM

OK fellas, I'm calling this Fokker E.V. done. A neat little kit with excellent detail and decals, and no real fit issues to speak of. Marc, if you want to add it to page one, even though it was not an official entry here, I wouldn't mind. Wink   Next it's on to the 1/48 Hanriot HD.1.

Enjoy the pics !

Mike

 "We have our own ammunition. It's filled with paint. When we fire it, it makes pretty pictures....scares the hell outta people."


  • Member since
    April 2006
  • From: ON, Canada
Posted by jgeratic on Saturday, January 21, 2012 12:39 PM

Mike, grats on the completion, looks very clean.  Difficult to see the camou streak, were the photos taken in harsh lighting or a flash used?

regards,

Jack

  • Member since
    July 2006
  • From: San Francisco Bay Area
Posted by bufflehead on Saturday, January 21, 2012 7:11 PM

Mike, very nice Fokker you've completed!  I didn't expect it to be done so soon, its a pleasant surprise!!  Is there s special name for a biplane with only an upper wing?? Hmm

Ernest

Last Armor Build - 1/35 Dragon M-26A1, 1/35 Emhar Mk.IV Female


Last Aircraft Builds - Hobby Boss 1/72 F4F Wildcat & FW-190A8


  • Member since
    February 2006
  • From: Smithers, BC, Canada
Posted by ruddratt on Sunday, January 22, 2012 12:32 PM

Thanks fellas !

Jack, I did not use a flash, but I'm thinking I probably should have. Experimented with a few different camera settings, but I'm still not totally happy with the pics. Believe me, it looks a lot better in person. Thinking I may shoot a few more today and see what happens.

Ernest, as this was a shelf sitter near completion, there was not a whole lot left to do, and that it is what is referred to as a parasol wing and had minimal rigging, that kind of sped up the completion process. The Hanriot will be rigged to the max, and from what I've read in kit reviews about the kit markings, I may be painting some of my own, so it will be taking much longer to finish that guy.

Mike

 "We have our own ammunition. It's filled with paint. When we fire it, it makes pretty pictures....scares the hell outta people."


  • Member since
    April 2005
  • From: Piscataway, NJ!
Posted by wing_nut on Sunday, January 22, 2012 4:44 PM

Mike, simply beautiful.  I would have respnded sooner but I was busy taking this picture...

The good news was I missed the snow here in NJ.  Bad news was I had to put down my cigar and Margarita to take the shotWhistling   How's that ear BTW?


Marc  

  • Member since
    February 2006
  • From: Smithers, BC, Canada
Posted by ruddratt on Sunday, January 22, 2012 5:48 PM

The ear's good, Marc. Still feels a little weird at times, but I guess exposure to temps of -45C can do that. Lesson learned, though. Wink

...and speaking of temps, where the heck are you right now. Those people in that pic are WAY underdressed for winter! Stick out tongue

Mike

 "We have our own ammunition. It's filled with paint. When we fire it, it makes pretty pictures....scares the hell outta people."


  • Member since
    April 2005
  • From: Piscataway, NJ!
Posted by wing_nut on Sunday, January 22, 2012 7:49 PM

I am back home nowSad  That was Friday night in Clearwater Fl.

Marc  

  • Member since
    July 2006
  • From: San Francisco Bay Area
Posted by bufflehead on Monday, January 23, 2012 12:48 AM

Mike - parasol wing...never heard that before!  I learned something new today!  Thanks!

Marc - what the??  Cigars and margaritas in warm climes while we're hard a work chopping plastic and breathing enamel fumes?Surprise  hehe!!  JK!! Hope you had a great time in Florida!

Weekend update fellas:  Not much done.  Had to work Saturday and then watched "Red Tails" today followed by the 49ers/Giants game.  Strangely, I'm NOT a 49ers fan, but I enjoyed the game nonetheless.  It was a close one!

Got the decals on:

Whooo Nelly those decals were a pain!  At first things went pretty smoothly.  I trimmed away some of the excess carrier film for the decals on the right side and had no problems.  On the left side, things didn't go so smoothly.  I tried to trim the film even closer and for some reason all the decals started to curl really badly once the paper backing was removed.  I ripped off the "/" on the B/6 decal and promptly lost it somewhere, but was able to make a new one from the remaining kit decals.  The "IX" curled so badly I couldn't get it to lay flat.  I almost gave up from shear frustration (and a little Super Angry), but calmed down and used very warm water to "reconstitute" them and then I was able to finish them off.  WHEW.....Black EyeBang Head.  Not only are they thick, but they're also qutie a bit oversized.  In the end I guess they look OK. 

And completed the tracks (for now)

After some serious thought and studying the pics from the previous track experiment, I decided that the test tracks were way too dark for a vehicle that spent most of its time on dirt, mud and sod.  I don't believe there were that many paved roads in the French countryside in 1917-1918.  The tracks just looked too new and clean in my previous attempt, so I tossed that method out the window and tried a different one.

  1. Painted them a dark chocolate brown with Tamiya acrylics.
  2. Stippled black paint (Vallejo) on them using a piece of packing foam
  3. Stippled Tamiya Flat Earth on them
  4. Mixed a slurry of MIG Pigments Dark Mud and Russian Earth (80/20) with water and applied using a medium brush.
  5. Dabbed away the excess pigments using a moisted soft cloth around my fingertip
  6. Drybrushed Vallejo Black/Brown on all the highpoints
  7. Drybrushed Humbrol Metal Cote Polished Steel (not Gunmetal) on the highpoints (let dry overnight)
  8. Buffed the Metal Cote with a soft cloth

Sorry, didn't take any pics for steps 5-8.  The finished product.:

I'll add some final weathering after they're installed.


Ernest

Last Armor Build - 1/35 Dragon M-26A1, 1/35 Emhar Mk.IV Female


Last Aircraft Builds - Hobby Boss 1/72 F4F Wildcat & FW-190A8


  • Member since
    April 2005
  • From: Piscataway, NJ!
Posted by wing_nut on Monday, January 23, 2012 6:29 AM

WOW Ernest... just WOW.

Marc  

  • Member since
    August 2007
  • From: back country of SO-CAL, at the birth place of Naval Aviation
Posted by DUSTER on Monday, January 23, 2012 11:02 AM

Steve

Building the perfect model---just not quite yet  Confused

JOIN OUR COMMUNITY!

Our community is FREE to join. To participate you must either login or register for an account.

SEARCH FORUMS
FREE NEWSLETTER
By signing up you may also receive reader surveys and occasional special offers. We do not sell, rent or trade our email lists. View our Privacy Policy.