SEARCH FINESCALE.COM

Enter keywords or a search phrase below:

Big Beautiful Jugs - OFFICIAL P-47 GROUP BUILD

200182 views
1248 replies
1 rating 2 rating 3 rating 4 rating 5 rating
  • Member since
    June 2010
  • From: Austin, TX
Posted by DoogsATX on Thursday, December 29, 2011 2:21 AM

Sorry to hear it, Joe - mixing paint is always a joy, isn't it?

Finally got to play with some Jugs tonight...just some initial test-fits and prepping the cockpit parts for primer, but so far so good.

The Revellogram Razorback's wing and elevator fits are miles better than its sister bubbletop kit...

For the sake of comparison...

On the Bench: 1/32 Trumpeter P-47 | 1/32 Hasegawa Bf 109G | 1/144 Eduard MiG-21MF x2

On Deck:  1/350 HMS Dreadnought

Blog/Completed Builds: doogsmodels.com


  • Member since
    August 2009
  • From: MOAB, UTAH
Posted by JOE RIX on Thursday, December 29, 2011 7:51 AM

No worries there Doogs. This in fact is the first time I have actually attempted to mix a custom paint so I find it rather challenging. You'd think I would do more of this as I work in an Ace Hardware store and mix paint often as part of my job. Go figure.

By the way Doogs how's your new work area working out?

"Not only do I not know what's going on, I wouldn't know what to do about it if I did". George Carlin

  • Member since
    November 2009
  • From: SW Virginia
Posted by Gamera on Thursday, December 29, 2011 10:26 AM

Well, I painted my cockpit with Tamiya dark green and then post-shaded by spraying the high points with Testor's medium green (sorry don't remember the numbers to either). Maybe not perfect but I think it's a good ballpark estimate.

Edit with photo.

I used some of the parts to Eduard's ZOOM set for the Academy P-47N. Not everything fit but it does add more interest to the cockpit.

"I dream in fire but work in clay." -Arthur Machen


  • Member since
    February 2011
  • From: Monterey Bay,CA-Fort Bragg, NC
Posted by randypandy831 on Friday, December 30, 2011 12:40 AM

only if id known. almost done with hasegawa's P-47.

Hnmmmm....just maybe. school starts next week. 

tamiya 1/48 P-47D $25 + shipping

tamiya 1/48 mosquito $20+ shipping

hobby boss 1/48 F-105G. wings and fuselage cut from sprue. $40+ shipping. 

  • Member since
    December 2010
  • From: Colorado Springs
Posted by Geof on Friday, December 30, 2011 12:55 AM

Do we have an official tag yet for this GB?

Photobucket

On the Bench: Tamiya's 1/48 A-10a Thunderbolt 

In the Hangar:  Hmmm???


  • Member since
    August 2009
  • From: MOAB, UTAH
Posted by JOE RIX on Friday, December 30, 2011 7:12 AM

Absolutely stunning job on your cockpit Gamera.

"Not only do I not know what's going on, I wouldn't know what to do about it if I did". George Carlin

  • Member since
    July 2010
Posted by jbrady on Friday, December 30, 2011 9:44 AM

The decals are on and it's shiney. The Squadron decals went on like a dream. They are, however, a pain to move around. Get them close to where you want them and then lots of water to move them just a little bit. One application of MicroSol and they melted right into the surface. I used the kit decals for the stencils and they just plain suck. Three shots of vinegar and four coats of clear and they still stand proud of the surface... what you gonna do, they are what they are.


  • Member since
    January 2003
  • From: Hancock, Me USA
Posted by p38jl on Friday, December 30, 2011 10:10 AM

ooh... Likey the yellow surround.. ! Nice..

[Photobucket]

  • Member since
    July 2010
Posted by jbrady on Friday, December 30, 2011 10:14 AM

p38jl

ooh... Likey the yellow surround.. ! Nice..

Yeah I like that also... the 4th, 78th, and one or other group used that from October 42 to July 43 when they went to a Cocarde with a red surround.


  • Member since
    June 2010
  • From: Austin, TX
Posted by DoogsATX on Friday, December 30, 2011 10:21 AM

Joe - the new work area is heavenly. New chair, tons of work room...with the new compressor/regulator I've been able to relocate the compressor where it's pretty out of the way. Even retained one of my old folding tables for "parts layout", though I assume it'll come in extra handy when it comes time to tackle the North Carolina!

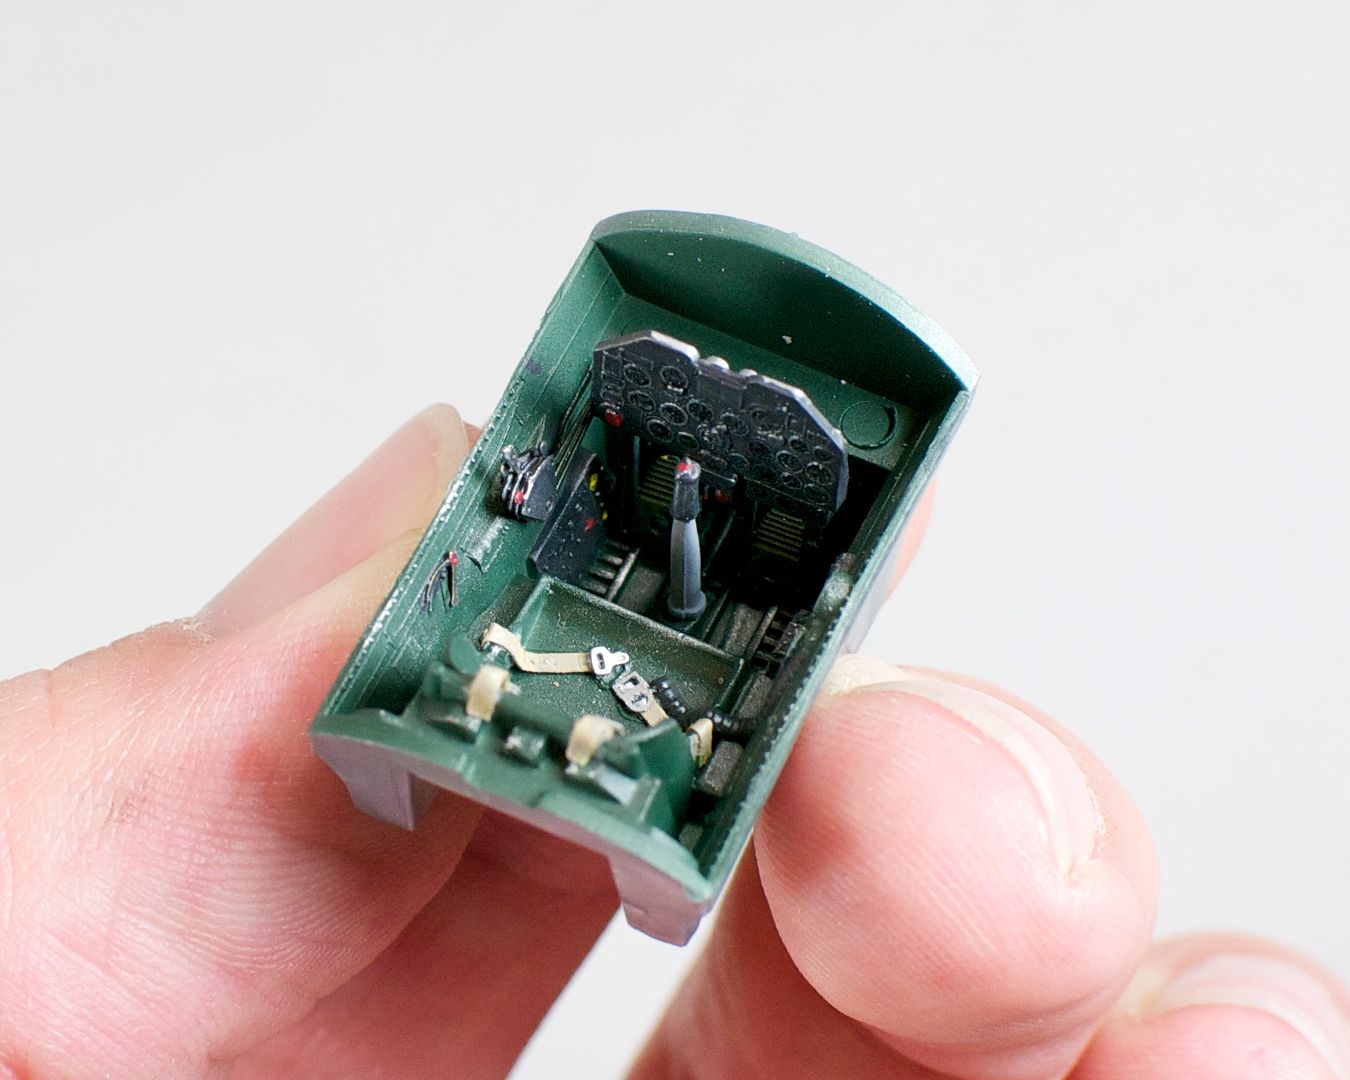
Gamera - nice job on the pit! Amazing how much more detail the N kit has than the Revellogram Razorback. This is the one from my Monogram that went bad last year, but the Razor's pit is exactly the same (minus that nifty PE throttle quadrant)

Randy - DO IT! Love the -M!

Geof - nope, but feel free to grab any of them that have been tossed up. I'm not one much for the badges, so I've kinda slacked there...

jbrady - sorry to here that! I had very mixed results with my last Tamiya Jug. Some decals (the gun numbers) went on perfectly, other stencils sucked. This time I'll be using some dry transfer stencils. 

Made some small progress last night. Lots of getting parts ready for priming, mainly. 

Here's the two kits' P&W R-2800 engines. I think it's a nice summation of the difference between them. The Revellogram does a very good job (especially for its age) in overall shape, but the finer details? Not quite.

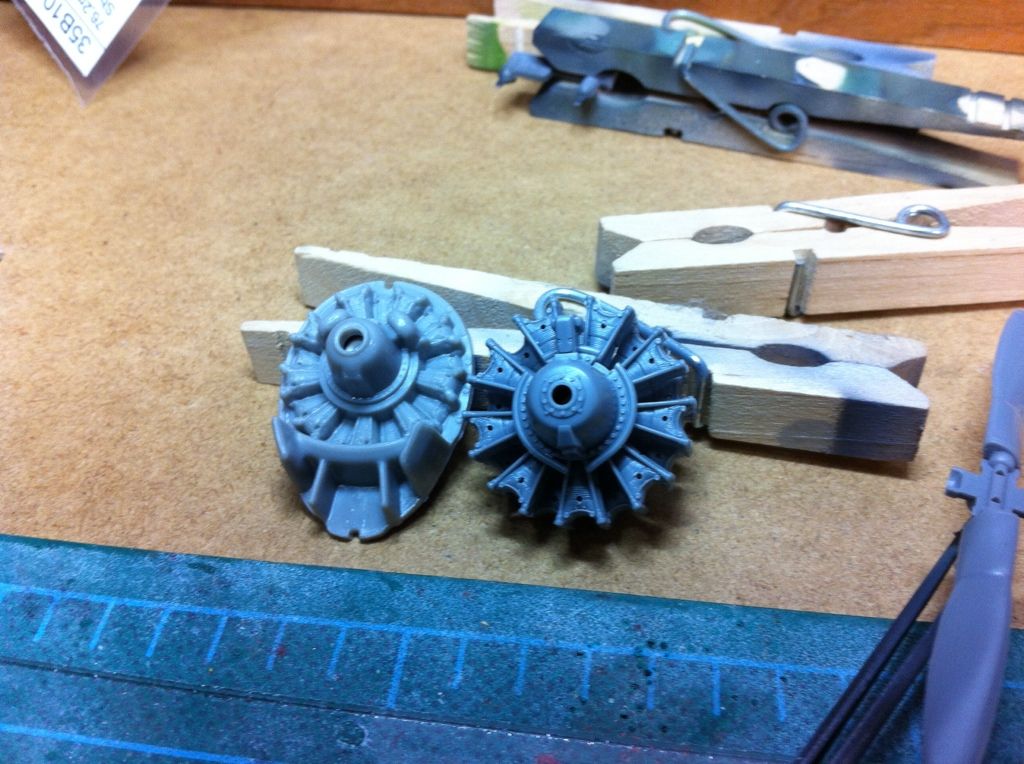
Holes have already been drilled in the Tamiya engine for wiring. The cylinders have hollow backs, so I'll be able to pass wire through the magnetos and just snip.

Also got a start on replacing the Revellogram's dreadful blast tubes. Need to drill the holes out to size and add backing inside the wing for proper backspacing, but so far so good.

On the Bench: 1/32 Trumpeter P-47 | 1/32 Hasegawa Bf 109G | 1/144 Eduard MiG-21MF x2

On Deck:  1/350 HMS Dreadnought

Blog/Completed Builds: doogsmodels.com


  • Member since
    January 2003
  • From: Hancock, Me USA
Posted by p38jl on Friday, December 30, 2011 10:53 AM

You guys are shaming me in to getting out my XP-47H sooner than I planned... hummmm....Huh?

[Photobucket]

  • Member since
    July 2010
Posted by jbrady on Friday, December 30, 2011 2:51 PM

Got some work done.

Gonna try a technique I saw in one of Fermis' builds. Dry brush a lightened version of the base coat... maybe that will help with the kit decals. More later.


  • Member since
    November 2009
  • From: SW Virginia
Posted by Gamera on Friday, December 30, 2011 6:19 PM

Joe & Doogs: Thanks guys, love those Eduard ZOOM PE sets, everything is pre-painted, you just shave off the details on the kit part and glue the PE piece over it. They come with some small parts for the various knobs and levers I don't always use but hey for five bucks I like the detail and it beats trying to paint the instruments myself.

Doogs: That cockpit for your Razorback D looks good to me, I too love those throttles. And yeah Monogram/Revell has come a long way, not that I'm knocking the older kits at all. The Promodeler N is very nicely detailed though fit is iffy- some parts fit great and others are pretty sloppy.

JBrady & Randypandy- Gee, you guys are already almost done. Very nice work!


"I dream in fire but work in clay." -Arthur Machen


  • Member since
    February 2011
  • From: Monterey Bay,CA-Fort Bragg, NC
Posted by randypandy831 on Friday, December 30, 2011 10:49 PM

ehh..screw it. throw me in. hase 1/48 razorback with 56th FG markings. love to build my tam bubble top but need to find a dorsal fin conversion to make it a 47d-30. anyone know who makes a conversion? i searched with nothing.

tamiya 1/48 P-47D $25 + shipping

tamiya 1/48 mosquito $20+ shipping

hobby boss 1/48 F-105G. wings and fuselage cut from sprue. $40+ shipping. 

  • Member since
    October 2010
  • From: Australia Brisbane
Posted by peterjb on Sunday, January 1, 2012 7:00 AM

I would like to join with academys 1/48 p-47 bubbletop thanks. 

  • Member since
    September 2009
  • From: Spring Branch, TX
Posted by satch_ip on Sunday, January 1, 2012 8:32 AM

Randy, I think you are out of luck.  I've searched and searched and no -30 conversions.  I did manage to find two Hasegawa -30 kits.  They can be had.


  • Member since
    June 2010
  • From: Austin, TX
Posted by DoogsATX on Sunday, January 1, 2012 9:52 AM

randypandy831

ehh..screw it. throw me in. hase 1/48 razorback with 56th FG markings. love to build my tam bubble top but need to find a dorsal fin conversion to make it a 47d-30. anyone know who makes a conversion? i searched with nothing.

Got ya added! 

Regarding the D-30, one option would be to build it from Tamiya's P-47M (or, if you're building one of the few M's without the tail fillet, borrow the rear upper fuselage parts for the D). 

I thought all Hasegawa bubbletops included the tail fillet as a drop-on piece? I know it's the case with their 1/32 kits. 

On the Bench: 1/32 Trumpeter P-47 | 1/32 Hasegawa Bf 109G | 1/144 Eduard MiG-21MF x2

On Deck:  1/350 HMS Dreadnought

Blog/Completed Builds: doogsmodels.com


  • Member since
    February 2011
  • From: Monterey Bay,CA-Fort Bragg, NC
Posted by randypandy831 on Sunday, January 1, 2012 11:46 AM

thanks! quick boost makes a 30 conversion but for a 72nd. BOO! and yeah, all hasegawa bubble top kits include the dorsal fin. i might just give tamiya a holler and ask for the dorsal fin off the M kit. 

tamiya 1/48 P-47D $25 + shipping

tamiya 1/48 mosquito $20+ shipping

hobby boss 1/48 F-105G. wings and fuselage cut from sprue. $40+ shipping. 

  • Member since
    November 2008
  • From: Crawfordsville, Indiana
Posted by Wabashwheels on Sunday, January 1, 2012 12:19 PM

Doogs, I'm still with you guys.  I've done a couple Razorbacks in the past year,  I've got some work left on a plane in the Japanese GB, and then I''l be doing a Jug with a bubble top. I'll let you know. For now I'm just trolling this thread.  Rick


  • Member since
    June 2010
  • From: Austin, TX
Posted by DoogsATX on Monday, January 2, 2012 2:37 AM

Wabashwheels

Doogs, I'm still with you guys.  I've done a couple Razorbacks in the past year,  I've got some work left on a plane in the Japanese GB, and then I''l be doing a Jug with a bubble top. I'll let you know. For now I'm just trolling this thread.  Rick

Excellent - no worries! 

On the Bench: 1/32 Trumpeter P-47 | 1/32 Hasegawa Bf 109G | 1/144 Eduard MiG-21MF x2

On Deck:  1/350 HMS Dreadnought

Blog/Completed Builds: doogsmodels.com


  • Member since
    June 2010
  • From: Austin, TX
Posted by DoogsATX on Monday, January 2, 2012 2:41 AM

Wish I had pics to put up, but I don't feel I'm there quite yet. Seems like there's a lot of pre-work that needs to go into these Jugs!

As of tonight, I've got a bunch of pieces primed. Gear doors, etc painted in yellow chromate. The cockpits have been done in Euro Dark Green standing in for DDG. Harnesses painted onto the seats, prop tips yellow, prop cap for "Magic Carpet". Weird thing is...when I did "Hairless Joe" last year, I had to use Deep Yellow as MM's Insignia Yellow was far too light. This time around, IY was the ticket. Guess maybe the 56th's extensive use of RAF paint extended even to yellow for squadron colors and tail numbers...

Hopefully pics tomorrow...

On the Bench: 1/32 Trumpeter P-47 | 1/32 Hasegawa Bf 109G | 1/144 Eduard MiG-21MF x2

On Deck:  1/350 HMS Dreadnought

Blog/Completed Builds: doogsmodels.com


  • Member since
    August 2009
  • From: MOAB, UTAH
Posted by JOE RIX on Monday, January 2, 2012 12:45 PM

 Well, my attempts at mixing a DDG have met with some degree of success. In doing so I took a unique approach and utilized a resource I had available. As I stated before I work in an Ace Hardware store and thus mix house paint. So, I perused our color sample chips and picked out a couple of samples that I thought might get me in the ballpark of the DDG I had color photos of. We have a paint scanner which we can use to scan a color and produce a formula for yet, the photos do not provide a consistent patch with which to scan. Anyway, I found a color that was quite close and then called up the formula to see what colors to use and in what proportions. The color formula for the swatch I picked came out with the following: Approx. 40% Green, 30% Black and 30% Brown. My next challenge was to find paints in my stash that were close to the colorants in our mixing machine. These are what I came up with in Tamiya Acylics: XF-11 IJN Green, XF-1 Flat Black and X-9 Brown. Keeping in mind that these colors are added to a can of white base so I knew my initial mix was going to come out dark and would require adding white to lifgten it up. Indeed this was the case once I had whipped up the initial batch. I also had to keep adding more IJN Green to get me even closer. I was close yet not quite there as I needed something else and that ended up being a shot of X-4 Blue to give me that slight Blue-Green tint I saw in the photo. In the end I'm really not sure what the exact ratios are but it came out as close as I could using the photos. Thusly, I sprayed the cockpit yesterday and I am pleased with the results. I'll get some pics ASAP. Bottom line was that it was fun and interesting.

 So, just a hint that if you have a color sample you would like to match, say out of a reference book or what, try taking it down to your local hardware store or paint shop and have them scan it for a formula. 

                                                                Joe

"Not only do I not know what's going on, I wouldn't know what to do about it if I did". George Carlin

  • Member since
    August 2009
  • From: MOAB, UTAH
Posted by JOE RIX on Wednesday, January 4, 2012 8:08 AM

Here's some pics of my efforts. They are certainly not the best but it will give you a general idea of what I came up with. Again, the color may be a bit dark but once I weather it a bit I believe it'll look quite nice.

100_0619.jpg

100_0623.jpg

100_0622.jpg

"Not only do I not know what's going on, I wouldn't know what to do about it if I did". George Carlin

  • Member since
    December 2004
  • From: Houston, Texas
Posted by panzerpilot on Wednesday, January 4, 2012 9:19 AM

randypandy831

thanks! quick boost makes a 30 conversion but for a 72nd. BOO! and yeah, all hasegawa bubble top kits include the dorsal fin. i might just give tamiya a holler and ask for the dorsal fin off the M kit. 

Hey. I've got the Tamiya P-47M kit. The sprue you need is "L".

It's got a serial # on it: 61096 and A905819. Parts 12, 13, 14, 18 &19. Hopefully Tamiya will send them to you. There are actually 3 different dorsal fin styles on the sprue (12, 14, 18). Good luck!

-Tom

  • Member since
    June 2010
  • From: Austin, TX
Posted by DoogsATX on Wednesday, January 4, 2012 9:31 AM

Lookin' good, Joe! 

My cockpits are coming together...everything painted DDG, various panels picked out with Vallejo Black Grey, harnesses painted, drybrushing mostly done. The IP decal went on the Tamiya IP last night...not as clean as the bubbletop but it'll certainly do. The bit of silvering beneath the gauges themselves actually works to an advantage I think, giving them some contrast to the surrounding panel.

Still have to dull the IPs, gloss the gauges, and apply some washes and maybe some pigments (Magic Carpet was operating from Y-29 in January '45 - very primitive conditions with snow and mud on the ground, have to imagine some of that got tracked in!). 

Elsewhere, the R-2800s are coming along and the props are about ready for their stencil data. I've been working with Hamilton Standard props so often that I was kind of surprised the C.E. blades don't sport logos.

On the Bench: 1/32 Trumpeter P-47 | 1/32 Hasegawa Bf 109G | 1/144 Eduard MiG-21MF x2

On Deck:  1/350 HMS Dreadnought

Blog/Completed Builds: doogsmodels.com


  • Member since
    November 2009
  • From: SW Virginia
Posted by Gamera on Wednesday, January 4, 2012 9:53 AM

I like what I see Joe!

Nice to see everyone making progress. My N is together, I had to use a ton of putty, it's going to be a bear to get it all sanded down and buffed out for the NM.

"I dream in fire but work in clay." -Arthur Machen


  • Member since
    February 2003
  • From: Between LA and OC, SoCal
Posted by oortiz10 on Wednesday, January 4, 2012 5:11 PM

Hey Jug fans,

With the holidays came some time off, so I was able to get in some bench time.  It came in small bunches, but I was still able to make some progress.  Unfortunately, family commitments came too so I wasn't able to take a lot of in progress pix.  Regardless, let me show you where I'm at.

My last posts showed the completed cowl and engine.  My faux pas was to shoot MM Dull Coat straight onto the Alclad without "sealing" it first.  The result was a nice weathered look, but it made the decal's carrier film super obvious.  Since then, I was able to get the fuselage painted, the decals laid on, and most of the fiddly bits attached.

Here's where it's at:  


Before attaching the nose end to the fuse, I redid the vents behind the cowling.  I'm really pleased with the way they came out.  They're made from soda can aluminum, and the exhaust pipe is shaped styrene rod.


Here are some close-ups:

In the last pic, you can see the changes I made to the belly tank attachment.  No, it's not 100% accurate, but it looks 100 times better than the kit's molded attachment points.


Anyway, this thing's going together faster than I thought.  Since this kit was a "bonus find," I'm not super-worried about a perfect build.  I'm using it more as a test bed for some of the painting and building techniques I plan on using on later NMF planes.

Thanks for looking!  Comments and criticisms welcome.  Feel free to drop you two cents in the bucket on your way out. 

Cheers!

-O


-It's Omar, but they call me "O".

  • Member since
    December 2004
  • From: Houston, Texas
Posted by panzerpilot on Wednesday, January 4, 2012 5:39 PM

Hey O, That looks really sharp. What did you pre-shade the Alclad with?

-Tom

  • Member since
    December 2002
  • From: Northern California
Posted by jeaton01 on Wednesday, January 4, 2012 7:46 PM

Nice, O.  That pipe technically is a wastegate, its a little shorter and there is a butterfly valve in there.  It opens when the turbo is producing the boost pressure the pilot has selected, controlled automatically.

John

To see build logs for my models:  http://goldeneramodel.com/mymodels/mymodels.html


  • Member since
    February 2003
  • From: Between LA and OC, SoCal
Posted by oortiz10 on Wednesday, January 4, 2012 7:59 PM

panzerpilot,

Alclad White Aluminum was sprayed over Alclad white microfiller primer.  White Aluminum was sprayed over the entire airframe.  Once that was dried, I used a couple of different techniques to get the look I was after.  One thing I did was pre-shade the panels with Testors Gloss Black in the little square bottle.  Once that was dried, I toned it down with White Aluminum again.  One the fuselage, I post-shaded some panels with different shades of White Aluminum, darkened with different amounts of Alclad Steel.  In some spots, I sprayed very thin coats of straight Steel.  Again, it was all trial and error.  Like I said, this is a "practice" kit.

John,

Good info on that "pipe."  Great thing about these boards is how much info you can gain from those in the know.


Cheers!

-O

-It's Omar, but they call me "O".

JOIN OUR COMMUNITY!

Our community is FREE to join. To participate you must either login or register for an account.

SEARCH FORUMS
FREE NEWSLETTER
By signing up you may also receive reader surveys and occasional special offers. We do not sell, rent or trade our email lists. View our Privacy Policy.