SEARCH FINESCALE.COM

Enter keywords or a search phrase below:

Big Beautiful Jugs - OFFICIAL P-47 GROUP BUILD

200222 views
1248 replies
1 rating 2 rating 3 rating 4 rating 5 rating
  • Member since
    August 2009
  • From: Borlando Fla home of the rat
Posted by TREYZX10R on Tuesday, January 1, 2013 7:10 PM

Geof thanks!

G-J Great looking Bug Jug!


G-J
  • Member since
    July 2012
Posted by G-J on Tuesday, January 1, 2013 2:37 PM

I put a lot of work in yesterday and this morning to finish this up and want to call this done.  I still have to wash it, then add the flat coat.  And I'd like to make a base for it, but that will be a while.  But, I wanted to get this up so that Doogs can close it off.

Thanks Doogs for letting me in this one.  This was my first model after about a 30-year hiatus.

I learned so much, a lot from this thread alone.

There's a ton of warts on this, fortunately, I'm not the best of photographers.  But I'm trying to improve that as well.

The Jug is 100% OOB, I really didn't know about aftermarket parts until I got into it.  And, it is 100% hand brushed.  At some point I'll get an airbrush.

I learned that directions are a good starting point, but they seem to be more of a suggestion. I learned that acrylic paints become unstable (and lose a lot) when the house temperature drops to about 45.  (Thanks Sandy.)  Decaling used to be my worst skill, but this site has taught me to be a much better decaler - even though one decal did get sacrificed in the building of this plane.  I've learned that masking canopies is very, very tedious when I'm cutting tiny strips of masking tape.

Here are some final pictures.

On the bench:  Tamyia Mosquito Mk. VI for the '44 group build.  Yes, still.

On deck: 

  • Member since
    April 2005
  • From: Australia
Posted by taxtp on Monday, December 31, 2012 8:43 PM

Hi Doogs,

I haven't got very far with mine. Happy to go ahead and complete, or defer it if you want to finish this GB off.

Cheers

Tony

I'm just taking it one GB at a time.

  • Member since
    November 2009
  • From: SW Virginia
Posted by Gamera on Monday, December 31, 2012 11:10 AM

ACK! For some reason I was thinking this GB started back in the summer, it's already been over a year!

The Promodeler P-47N (which I have renamed 'Jinx') is almost done and the decals are on the Tamiya P-47D.

Doogs: may I go ahead and post photos even though I'm over the deadline? I won't be taking a badge since I'm so way over here.

"I dream in fire but work in clay." -Arthur Machen


  • Member since
    December 2010
  • From: Colorado Springs
Posted by Geof on Sunday, December 30, 2012 11:45 PM

Boys, you have been getting after it! Been off the radar for a bit with the holidays!

Trey! Nice save and great looking jug! I need to build me a picture box setup. Very nice!

SF! Also great save on those dry rub decals! Turned out great! Very well done.

B-17... Looks great so far. Can't wait to see it finished!

Great work from everyone else too. Winding up to be a great year!

Photobucket

On the Bench: Tamiya's 1/48 A-10a Thunderbolt 

In the Hangar:  Hmmm???


  • Member since
    August 2009
  • From: Borlando Fla home of the rat
Posted by TREYZX10R on Sunday, December 30, 2012 8:31 PM

B-17pilot thanks!

Stoutfella WOW! Well worth the wait Sir! I think you're being over critical of your work,as we all do. The flaws are nothing that jumps out and the great results everywhere else more than make up for any minor blems. A fitting tribute build for sure and a fine looking Gabby Jug,very nicely done Sir!

  • Member since
    November 2009
  • From: SW Virginia
Posted by Gamera on Sunday, December 30, 2012 5:13 PM

G-J: She looks pretty good to me in the photo from what I can see, good luck!

SF: Wow, great work! The first white stripe on the fuselage does look a little crooked but otherwise they all look good to me. Personally I think she looks fantastic, you should be proud of her. And the Gabby figure looks great too!

"I dream in fire but work in clay." -Arthur Machen


  • Member since
    September 2009
  • From: Frisco, TX
Posted by B17Pilot on Sunday, December 30, 2012 4:23 PM

Stoutfella and Trey: Great looking Jugs!

As for me, I got the landing gear on to help protect the decals later. I improved the kit supplied actuators for the rear doors with plastic rods

And here she is up on her gear:

Oh and speaking of decals, here they are:

Well as you can see I didn't use the kit supplied decals. I did use the serial number, since I used bits of a Aeromaster decal sheet to mark it as a P-47 with the 9th AF. The instructions did help in providing placement for the stencil markings. Overcoat and a little weathering and she'll be done, perhaps on New's Day, minus the weapon plyons and fuel tank, which I forgot to paint with the aircraft Huh?


  • Member since
    January 2012
  • From: East Peoria, IL
Posted by stoutfella on Sunday, December 30, 2012 3:57 PM

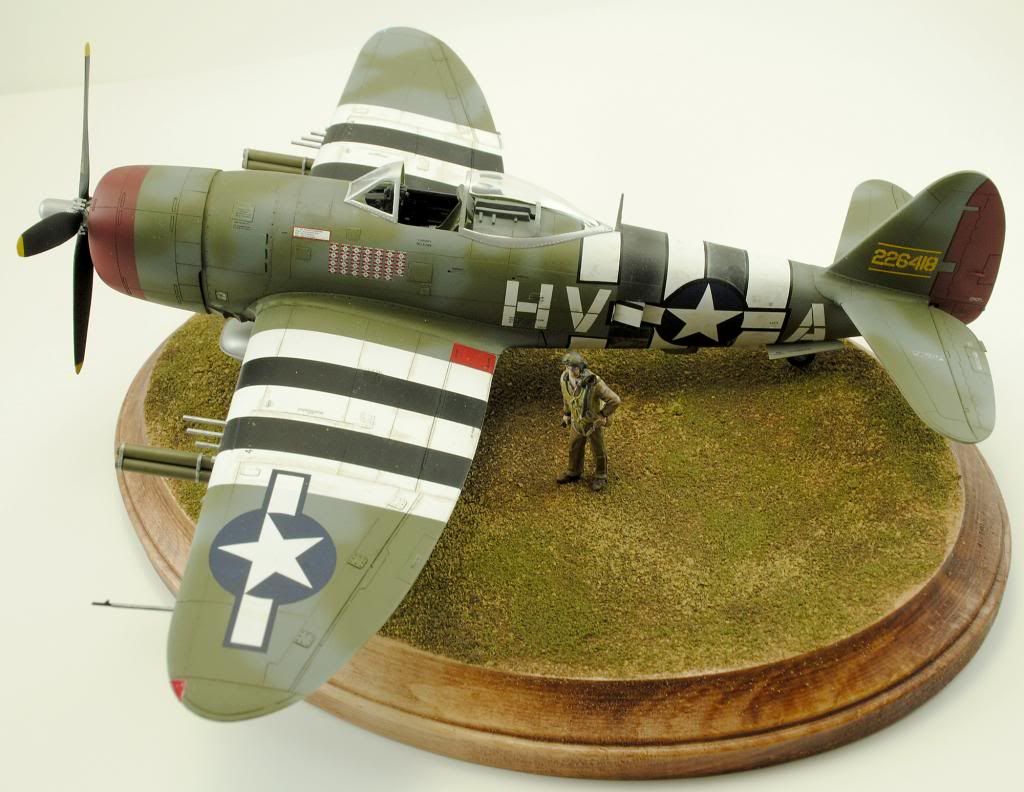
Trey: Sorry to make you wait, but here are some finished pics. As I mentioned in earlier posts, I built this in honor of my late mom, who worked at the Republic factory in Evansville, Ind., during the war. Gabby was her favorite pilot and I dimly recall her saying back in my younger modeling days that I should build his plane. So here ya' go, Mom, albeit a tad late.

I had a few issues with the kit, as previously described, enough to make me leery of future Academy kits. I've committed to building my Revellogram P-38 next, but after that I'm definitely looking forward to getting back to my Tamiya stash.

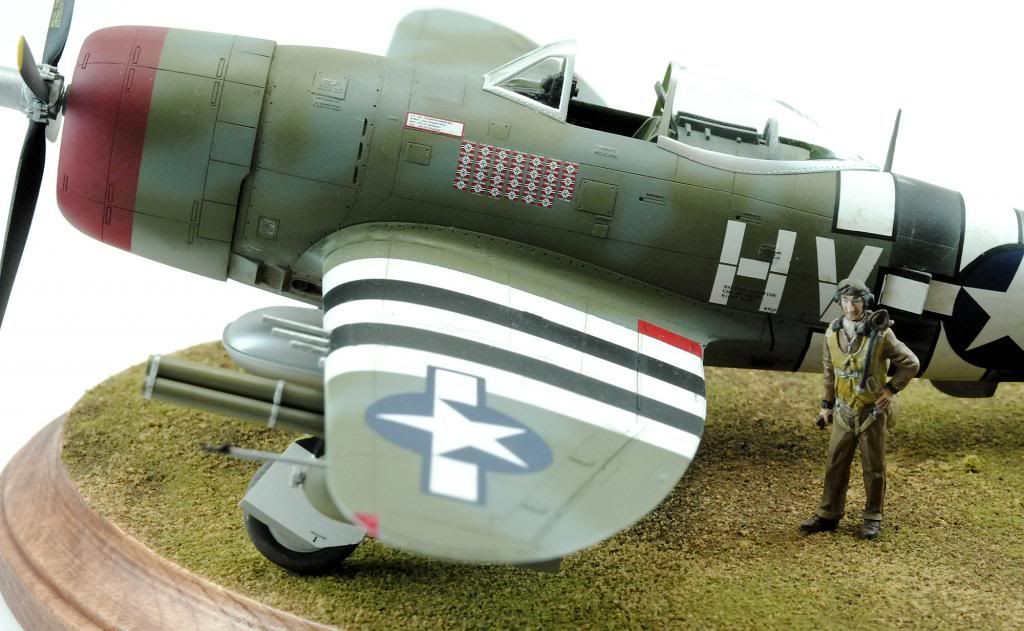
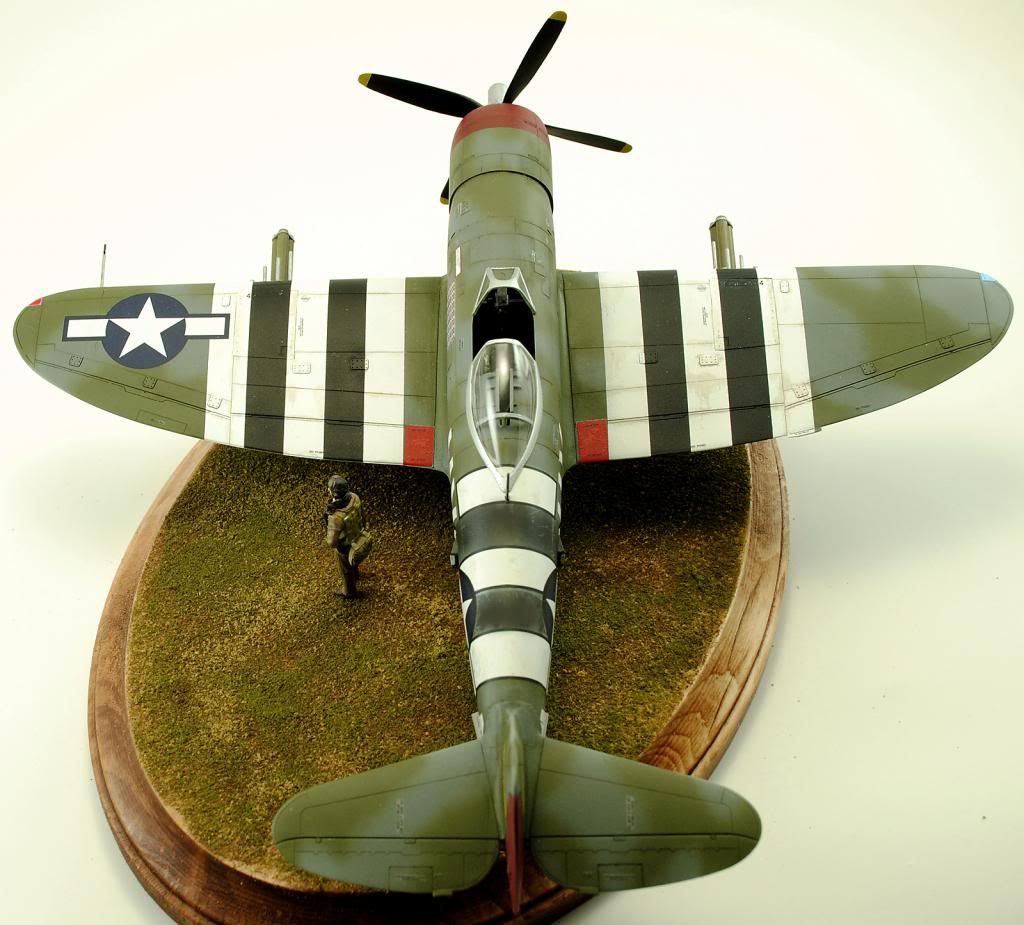
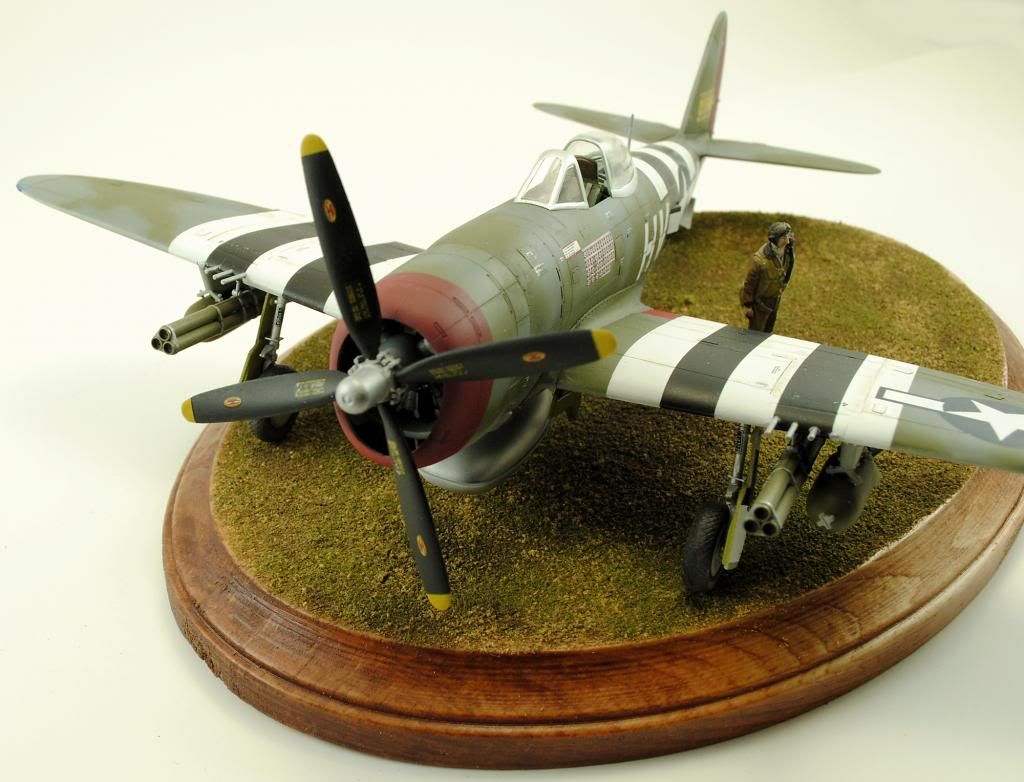
And this was absolutely, positively my last attempt at invasion stripe decals. I painted the ones on the wings, but used the decals for the fuselage stripes. I think they mostly look OK, but there are plenty of flaws. In fact, I think that pretty much sums up this build. Looks mostly OK, but lots and lots of flaws on close inspection, including some decal silvering that, I'm sure, stems from a less than perfect surface after multiple wrestling matches with the airbrush. When I was done, I actually laid down a couple of fairly thick coats of rattle-can Dullcoat rather than airbrushing, in an attempt to smooth out the final surface, which worked pretty darn well but couldn't hide the shortcomings in my decal work.

So there ya go, my final build of 2012. Happy New Year to all!

Cheers,

Stoutfella

On the bench: 1/48 Tamiya Bristol Beaufighter

On deck: 1/48 Tamiya P51-B

G-J
  • Member since
    July 2012
Posted by G-J on Saturday, December 29, 2012 12:04 PM

Here's a shot of my Jug, almost done.  So far, only one decal has been sacrificed; I'm a little upset about it, but this is the first model back after a 30 year hiatus.

When I'm done I'll post lessons learned - there have been many.

On the bench:  Tamyia Mosquito Mk. VI for the '44 group build.  Yes, still.

On deck: 

  • Member since
    August 2009
  • From: Borlando Fla home of the rat
Posted by TREYZX10R on Friday, December 28, 2012 9:49 PM

Stoutfella thanks! I'm eagerly awaiting the finished Gabby, pics do'nt make us wait til suday!!

  • Member since
    January 2012
  • From: East Peoria, IL
Posted by stoutfella on Friday, December 28, 2012 9:31 PM

Trey, that's a great recovery. Looks terrific. Congrats!

I'm pretty much done with my Gabreski Jug and will have pics to prove it tomorrow or Sunday.

Cheers,

Stoutfella

On the bench: 1/48 Tamiya Bristol Beaufighter

On deck: 1/48 Tamiya P51-B

  • Member since
    August 2009
  • From: Borlando Fla home of the rat
Posted by TREYZX10R on Friday, December 28, 2012 8:55 PM

Cliff,Joe thank you both

and a big thanks to Bigfoot01 who took the time to point out that the gear angle needed a tweak!

the fix,looks a lot better thanks John

  • Member since
    August 2009
  • From: MOAB, UTAH
Posted by JOE RIX on Friday, December 28, 2012 8:41 PM

Absolutely Outstanding Jug Trey. You should truely be proud of the work you've done there.

"Not only do I not know what's going on, I wouldn't know what to do about it if I did". George Carlin

  • Member since
    November 2009
  • From: SW Virginia
Posted by Gamera on Friday, December 28, 2012 7:14 PM

She looks fantastic Trey!

Kudos sir!!!

"I dream in fire but work in clay." -Arthur Machen


  • Member since
    August 2009
  • From: Borlando Fla home of the rat
Posted by TREYZX10R on Friday, December 28, 2012 5:28 PM

I'm calling it done

Added some gunsight details

I used watercolor mixed with Formula'560' canopy glue for the id lights after drilling them slightly


also used the same canopy glue for the clear position lights

I used aluminum tubing for the exhaust and punched out disc for the pressure valve that goes in the outlet

cheers Trey

  • Member since
    August 2009
  • From: Borlando Fla home of the rat
Posted by TREYZX10R on Wednesday, December 26, 2012 10:39 PM

SF the Gabby 47 is looking really sharp,love the way you did the cammo,soft edge on the green looks outstanding

Cliff that was strait up testors flat aluminum not metalizer,the clear I put down over it to protect did'nt bond for some reason!

Well I have made a partial recovery to were I wanted to be. I shot tamiya ts-30 first followed by Model Master aluminum plate metalizer. Then I buffed everything out by hand and shot automotive 2part urethane clear thinned about 30% over the whole thing. I'm not going to attempt to mask and spray the invasion stripes,just too worried everything will pull up again! I tried using the kit supplied ones but ruined them putting them on,totally my fault. So 'elsie ' will have to live without her belly stripes,oh well.

Decals are Aero Master and are working great

Monster Prop is ready to hang

  • Member since
    November 2009
  • From: SW Virginia
Posted by Gamera on Tuesday, December 25, 2012 8:32 AM

B-17: She's coming together great there! Nice work!

Trey: OUCH! That's one of the main reasons I stopped using Testor's Metalizer, great stuff, looks more like aluminum to me than Alclad or anything else- but it peels up at the slightest provocation, I swear even a dirty look. Best of luck with the Tamiya, looks like you've got a perfect undercoat there with the black.

SF: Ohhh, yes! The only thing better than a Gabby P-47 is two Gabby P-47s! Great work there on the fighter and Mister Gabreski.

BTW: Gabby wants a pair of eyeballs for Christmas!!!

Merry Christmas folks!

"I dream in fire but work in clay." -Arthur Machen


  • Member since
    January 2012
  • From: East Peoria, IL
Posted by stoutfella on Monday, December 24, 2012 9:07 AM

Good work, guys. B17, that's a beaut. You're headed for the finish line. Trey: Looks like a save. Hang in there.

I had hoped to finish my Gabreski jug by Christmas in honor of my mom, but I'm not quite gonna make it with everything else going on today and tomorrow. As you can see, it's all fiddly bits (including some eyeballs for Mr. Gabreski Wink ) and I probably only need a couple of hours to make it whole, but it's just not gonna happen unless I can find those couple of hours tonight. I will make the end-of-year deadline, though, which I wasn't sure I'd make when I started. Anyway, I'll post wrap-up pics when I'm done.

MERRY CHRISTMAS TO ALL!!!!

Cheers,

Stoutfella

On the bench: 1/48 Tamiya Bristol Beaufighter

On deck: 1/48 Tamiya P51-B

  • Member since
    August 2009
  • From: Borlando Fla home of the rat
Posted by TREYZX10R on Sunday, December 23, 2012 6:40 PM

Thanks Cliff it kinda was ,for a while that is

B17 pilot thanks ,your panel varition looks great! Mine not so much!

Had an EPIC fail on the NMF. Masked up some panels to spray some different shades of aluminum and the clear pulled away from the base. So I grabbed some really strong tape and started using it to 'pull' the remainder of the clear away.


then wet sanded everything with 1000 grit,loosing a little detail but its better than binning it at this point.

Then sprayed it semi gloss black to check for flaws . I'm going to try Tamiya ts-30 silver leaf as I've had good results in the past with it.

If that does'nt work I'm returning it to kit form. Gee I'm so glad I got back into this hobby to relax.

  • Member since
    September 2009
  • From: Frisco, TX
Posted by B17Pilot on Sunday, December 23, 2012 4:42 PM

Good job Trey!

Well my painting is done! Had a couple of problem areas in the tail as well so that set me back a bit. With the nice weather I got all the painting done! Decal time!


Some panels are diferent shades, but I went with a light variation so they might not show up in the pictures.


  • Member since
    November 2009
  • From: SW Virginia
Posted by Gamera on Sunday, December 23, 2012 7:58 AM

Nice!!! Super shiny! The paint looks flawless!  

"I dream in fire but work in clay." -Arthur Machen


  • Member since
    August 2009
  • From: Borlando Fla home of the rat
Posted by TREYZX10R on Saturday, December 22, 2012 8:56 PM

Cliff,Rick thanks very much for the kind words.

Doogs well all the coin I saved not buying resin goodies for this build I just spent on a Tamiya Razorback to get the aforementioned blast tubes,thanks buddy. Really just kidding it was a great suggestion ,that Tamiya kit is the shiznit! Well worth the coin spent.

I'm going with Testors aluminum for the base of the NMF. First shot some Testors clear over the canopy to help seal down the mask and avoid 'creep'. Followed by a shot of the green interior color. Then the aluminum went on. I had to stop and fix some blems inspite of all the extra care I still missed a few spots. I then shot some Testors clear over the aluminum ,hopefully this will keep me from damaging the finish as I add some various tints to access panels and the anti glare areas.

The props almost ready to hang

Panel color modulation followed by Invasion stripes and anti glare next,cheers Trey

  • Member since
    November 2008
  • From: Crawfordsville, Indiana
Posted by Wabashwheels on Saturday, December 22, 2012 9:33 AM

Trey, That's a good old kit to start with, but you have done some great looking work to bring the level of detail way up.  Keep up the good work.  Rick.


  • Member since
    November 2009
  • From: SW Virginia
Posted by Gamera on Saturday, December 22, 2012 7:47 AM

Hey nice work there Trey! All ready for the NM now.

"I dream in fire but work in clay." -Arthur Machen


  • Member since
    August 2009
  • From: Borlando Fla home of the rat
Posted by TREYZX10R on Friday, December 21, 2012 4:57 PM

The wings next,opened the spent shell ports ,landing lights and ID light holes

Cleaned up the engine and firewall,opened the intakes and removed areas around the cylinder heads

Joined the wings and set the dehedral,its close but not exact

filled the minor gaps with green squadron putty

smoothed out the filler and painted a guide coat of thinned grey to highlight imperfections

I just had to touch up a few panel lines at the seams avoiding a major rescribe job.

Thinned MM enamel applied to get a uniform base before the NMF

canopy added

NMF is next,cheers Trey

  • Member since
    August 2009
  • From: Borlando Fla home of the rat
Posted by TREYZX10R on Thursday, December 20, 2012 12:54 AM

Disregard the pic request B-17 in the stash gave up a turbo(more to come on that build later) and using the donated part I finished up the aft turbo vents.


 I also used some sheet styrene painted black to block light from passing thru the opened vents and installed the office.


Glued the fuse halves together


started working on the gun sight

after it sets up it will be time to decide what to do about the raised panel lines,not really wanting to rescribe this thing. Geuss it depends on how much detail I loose sanding the seams

  • Member since
    August 2009
  • From: Borlando Fla home of the rat
Posted by TREYZX10R on Wednesday, December 19, 2012 9:18 AM

I'm still cleaning up the fuse and opening up tiny vents

Does anyone have a good detail picture of this area?Been searching for hours and coming up dry. Would be greatly appreciated

cheers Trey

  • Member since
    August 2009
  • From: Borlando Fla home of the rat
Posted by TREYZX10R on Tuesday, December 18, 2012 9:32 PM

Monogram kit Geoff,sorry forgot to mention that earlier

Office is a wrap,not a very accurate molding I might add. A lot of missing and misplaced components .Still trying to avoid resin replacements with this build so in it goes.

  • Member since
    August 2009
  • From: Borlando Fla home of the rat
Posted by TREYZX10R on Tuesday, December 18, 2012 12:18 PM

Geof thanks p/m sent about the seat;)

Tony appreciate the kind words!

JOIN OUR COMMUNITY!

Our community is FREE to join. To participate you must either login or register for an account.

SEARCH FORUMS
FREE NEWSLETTER
By signing up you may also receive reader surveys and occasional special offers. We do not sell, rent or trade our email lists. View our Privacy Policy.