SEARCH FINESCALE.COM

Enter keywords or a search phrase below:

Vietnam Air War GB - Extended!

137529 views
1018 replies
1 rating 2 rating 3 rating 4 rating 5 rating
  • Member since
    November 2010
  • From: Lafayette, Indiana
Posted by Son Of Medicine Man on Sunday, November 25, 2012 7:03 PM

Hi Everyone,

I hope everyone had a good Thanksgiving!  I have been busy with a lot of other things instead of modeling but have finally got back to the bench.  I had the cockpit pretty much done except for the final assembly so that is what I am working on now.

In this first picture is the rear cockpit's front panel with the resin mold stub still attached:

 And here is the cockpit where it is to be installed:


Here is the panel with the resin mold stub removed:


And here is the panel from behind:


It took some filing to get it to fit flush.  Here it is epoxied in place:


Tomorrow when the epoxy is completely set, I will file the sides flush with the cockpit sides, then epoxy the rear scope in place.

Ken

  • Member since
    November 2010
  • From: Lafayette, Indiana
Posted by Son Of Medicine Man on Thursday, November 15, 2012 6:02 AM

professordeath

Ewwww....good luck with that. I know you will get it worked out for sure, but it is going to be some work. Let me ask you...have you used epoxy to fill before? My understanding is that it is really hard to sand and smooth. Never tried it myself, but I know the stuff is pretty hard. Just a thought.

I keep hearing about Gator Grip.....I need to try some for sure. I actually like the gel CA by Loctite. It works pretty good for photo etch and small stuff, but I've had no luck with any CA for landing gear, weapons and such...the slightest knock and they shear off.

Hi Jimmy D.,

That is a good point about using epoxy for fill.  This is going to be a tight spot to work in so it would probably be better to use putty.

Ken

  • Member since
    November 2010
  • From: Lafayette, Indiana
Posted by Son Of Medicine Man on Wednesday, November 14, 2012 8:42 PM

Hi Everyone,

Well the epoxy held and very well.  I did some filing and several fitting tests and no problems!  Here is a picture before I did the final filing.  You can see the panel rail is uneven against the fuselage:

 And here it is after I straightened it up:

 Well after all that work, I cut out the photo-etch panel rail (which came from the same Verlinden kit) and laid it on top and got a surprise.  It does not exactly match.  It is close, but not close enough:


Which means I have to do some more custom work to make this look right.  And I am going to make this look right.  What I think my plan of attack will be is to glue (epoxy of course!) the avionics panel in place first.  Then cut the fuselage just enough for the photo-etch piece to lay flat on top.  Then with the photo-etch piece out of the way, fill in the areas that need built back up with epoxy and square it off with a file.

Ken

  • Member since
    November 2010
  • From: Lafayette, Indiana
Posted by Son Of Medicine Man on Wednesday, November 14, 2012 6:02 AM

professordeath

It is looking good, Ken. The weather here in Southeast Texas is starting to do the opposite. Its getting cool so I am looking forward to some yearly yard overhauls to prepare for my holiday light explosion. I also need to clean out my garage which is something you will die doing in the Houston summers.

I'm beginning to hate superglue for anything but gap filling. I now use epoxy for my gear parts and weapons since they usually end up popping off with CA.

loving this build!

Thank you Jimmy D.!  I totally agree with you about using CA.  It is pretty worthless.  Another builder told me about another product that works pretty good on photo-etch that I have started using.  It is called "Gator's Grip".

Enjoy your cooler weather down there in Texas!  By the way, I was born in while my Dad was stationed at Amarillo Air Force Base.  We lived there for a few years then we were stationed at Randolph Air Force Base for a few years after that.  I wish I still lived there in Texas.  I hate the cold!

Ken

  • Member since
    November 2010
  • From: Lafayette, Indiana
Posted by Son Of Medicine Man on Tuesday, November 13, 2012 9:40 PM

Hi Everyone,

Here are the pictures that I promised last night.  In this picture you can see the difference in height from the original wheel well and the new Aires resin piece.  You can see the part of the left original wheel well in the left side of the picture.  That is the air brakes directly behind the wheel wells.

 Here is a closer look at the Aires piece before I started work on it:

 Here is what it looke like after I ground it down as small as I could:

 Another view:

 And here is a picture of the other piece:


I mixed up some epoxy and glued the avionics bay back together.  Hopefully it will hold together so I can get started on the fuselage tomorrow.

Ken

  • Member since
    November 2010
  • From: Lafayette, Indiana
Posted by Son Of Medicine Man on Monday, November 12, 2012 9:38 PM

Hi Everyone,

You may have noticed that I have not posted any progress on my build for a few days.  The weather was really nice here so I took advantage of it and got some work done outside.  Today the weather returned back to cold so I am back at the workbench.

I took pictures but it is late and I do not want to spend the time to post them tonight.  I will post them tomorrow.  The first thing I worked on was the main wheel bays.  The Aires resin pieces are a lot taller than the molded in parts they are replacing, at least as they come out of the box.  First I filed down the top until I could start to see light through the part.  Then I filed the corners down at 45 degree angles so that when the top wing is laid over them it gives as much clearance as possible.  It is going to take some work to make it all fit.

The next thing I worked on was the avionics bay.  I started to put it into the hole that I had previously cut out and the super glue let go.  I will never use super glue again on resin.  It is worthless.  I will only use epoxy.  Unfortunately the only epoxy I had on hand was some super long setup time stuff.  So off to the store I went.  That pretty well finished off my evening.

Ken

  • Member since
    November 2010
  • From: Lafayette, Indiana
Posted by Son Of Medicine Man on Monday, November 12, 2012 9:38 PM

Nice work Mike!!  Very good detail paint work on the cockpit!!  Yes  Yes 

Ken

  • Member since
    September 2010
  • From: California
Posted by mikeymize on Monday, November 12, 2012 12:14 AM

Photo update MiG-17 Cockpit and power plant. Landing gear and fuselage next.

"Time you enjoy wasting is not wasted time".


  • Member since
    November 2010
  • From: Lafayette, Indiana
Posted by Son Of Medicine Man on Sunday, November 11, 2012 8:11 AM

I salute to all that served in our country's military and give thanks on this day, Veteran's Day.  Toast 

Ken

  • Member since
    November 2010
  • From: Lafayette, Indiana
Posted by Son Of Medicine Man on Thursday, November 8, 2012 5:48 PM

stikpusher

"Gentleman, we can rebuild him. Make him better than he was before..."

This is looking like it is gonna be an impressive piece of work once it is finished.

Thank you Stik.  I think I am about done with the "removing" of plastic except for any final fitting adjustments.  So now I can move to the "assembly" stage where I can finally see this thing come together!  Smile

Ken

  • Member since
    July 2004
  • From: Sonora Desert
Posted by stikpusher on Thursday, November 8, 2012 3:14 PM

"Gentleman, we can rebuild him. Make him better than he was before..."

This is looking like it is gonna be an impressive piece of work once it is finished.


F is for FIRE, That burns down the whole town!

U is for URANIUM... BOMBS!

N is for NO SURVIVORS...

       - Plankton

LSM


  • Member since
    November 2010
  • From: Lafayette, Indiana
Posted by Son Of Medicine Man on Wednesday, November 7, 2012 8:57 PM

Hi Everyone,

Are you ready for another episode from Ken's Chop Shop?  As promised, tonight we are doing the other main wheel bay.  Here is a shot of the original wheel bay along with the Aires resin update piece:

 Here is the view from the other side:

 Once again I started off with cutting the majority of the plastic out with the Dremel using the cutting bit:

 Here is the view from the other side:

 And once again from this point I used a flat file and a lot of test fitting to remove the remaining plastic until I got the piece to fit:

 And here is the view from the other side:

 Here is the what the hole looked like when I was finished:

 And once again the view from the other side:


That is all for tonight's episode!  Stay tuned for more from Ken's Chop Shop!

Ken

  • Member since
    December 2002
  • From: Coldwater, Mich
Posted by MKelley on Tuesday, November 6, 2012 10:34 PM

Son Of Medicine Man

professordeath

Keep it up. You've got more patience than me, Ken.

Kelley, I really like the 105. One of my favorite planes. How is the kit, are there any major fit issues?

Thanks Jimmy D.!

Ken

No issues if you take your time. Next time I will paint the intakes before I put the wings on. It will be a bear to get to them now.

  • Member since
    November 2010
  • From: Lafayette, Indiana
Posted by Son Of Medicine Man on Tuesday, November 6, 2012 10:15 PM

professordeath

Keep it up. You've got more patience than me, Ken.

Kelley, I really like the 105. One of my favorite planes. How is the kit, are there any major fit issues?

Thanks Jimmy D.!

Ken

  • Member since
    November 2010
  • From: Lafayette, Indiana
Posted by Son Of Medicine Man on Tuesday, November 6, 2012 9:27 PM

Greetings everyone!

Welcome to another episode of Ken's Chop Shop!  In tonight's episode we are going to chop off one of the main wheel bays on the wing to replace it with an Aires resin piece.  Sounds like fun doesn't it!  Let's get started!

Here is the original wing with the Aires replacements:

 Here is what the backside looks like:

 Now I know what you are thinking, "Ken, how are you going to cut that irregular shape out and still keep the surrounding plastic intact?"  Good question.  First we are going to cut out the biggest chunk of plastic with a Dremel using a cutting bit.  Then we are going to spend about 3 hours using both a flat file and a half round file finishing the hole, constantly taking fitting calculations, and looking at pictures for reference.  Here is the result:

 Here is with the Aires piece in place (not glued of course):

And so ends another episode of Ken's Chop Shop!  Come back tomorrow when we start on the other side!

Ken


  • Member since
    November 2010
  • From: Lafayette, Indiana
Posted by Son Of Medicine Man on Tuesday, November 6, 2012 9:20 PM

MKelley

 have not posted anything lately for the build. I have not been lazy though. I have been working on Mongram's F-105. It will have markings for the Arkansas Traveler flown by Col. Paul P. Douglas out of Korat RTAB, Thailand in 1968. The Colonel has his kill markings from WW II displayed.

i266.photobucket.com/.../020-2.jpg

i266.photobucket.com/.../019-1.jpg

i266.photobucket.com/.../024.jpg

i266.photobucket.com/.../023-2.jpg

i266.photobucket.com/.../022-1.jpg

i266.photobucket.com/.../374.jpg

i266.photobucket.com/.../375.jpg

I should be able to get the decals in thenext couple of days. In addition I have been working on a B-57G with aftermarket goodies, that will most likely take couple of weeks to get completed. I will get some photos posted sometime soon. 


OK I messed up and posted twice anyone tell how to delete one of them and I will that quickly.

Nice job!  Yes  Yes 

Ken

  • Member since
    December 2002
  • From: Coldwater, Mich
Posted by MKelley on Tuesday, November 6, 2012 6:41 PM

 have not posted anything lately for the build. I have not been lazy though. I have been working on Mongram's F-105. It will have markings for the Arkansas Traveler flown by Col. Paul P. Douglas out of Korat RTAB, Thailand in 1968. The Colonel has his kill markings from WW II displayed.

i266.photobucket.com/.../020-2.jpg

i266.photobucket.com/.../019-1.jpg

i266.photobucket.com/.../024.jpg

i266.photobucket.com/.../023-2.jpg

i266.photobucket.com/.../022-1.jpg

i266.photobucket.com/.../374.jpg

i266.photobucket.com/.../375.jpg

I should be able to get the decals in thenext couple of days. In addition I have been working on a B-57G with aftermarket goodies, that will most likely take couple of weeks to get completed. I will get some photos posted sometime soon. 


OK I messed up and posted twice anyone tell how to delete one of them and I will that quickly.

  • Member since
    December 2002
  • From: Coldwater, Mich
Posted by MKelley on Tuesday, November 6, 2012 6:38 PM

I have not posted anything lately for the build. I have not been lazy though. I have been working on Mongram's F-105. It will have markings for the Arkansas Traveler flown by Col. Paul P. Douglas out of Korat RTAB, Thailand in 1968. The Colonel has his kill markings from WW II displayed.

i266.photobucket.com/.../020-2.jpg

i266.photobucket.com/.../019-1.jpg

i266.photobucket.com/.../024.jpg

i266.photobucket.com/.../023-2.jpg

i266.photobucket.com/.../022-1.jpg

i266.photobucket.com/.../374.jpg

i266.photobucket.com/.../375.jpg

I should be able to get the decals in thenext couple of days. In addition I have been working on a B-57G with aftermarket goodies, that will most likely take couple of weeks to get completed. I will get some photos posted sometime soon.

  • Member since
    November 2010
  • From: Lafayette, Indiana
Posted by Son Of Medicine Man on Sunday, November 4, 2012 6:52 PM

Hi Everyone,

Welcome to Ken's Chop Shop!  Today was another busy day.  Today's mission; prepare the avionics bay to be installed:

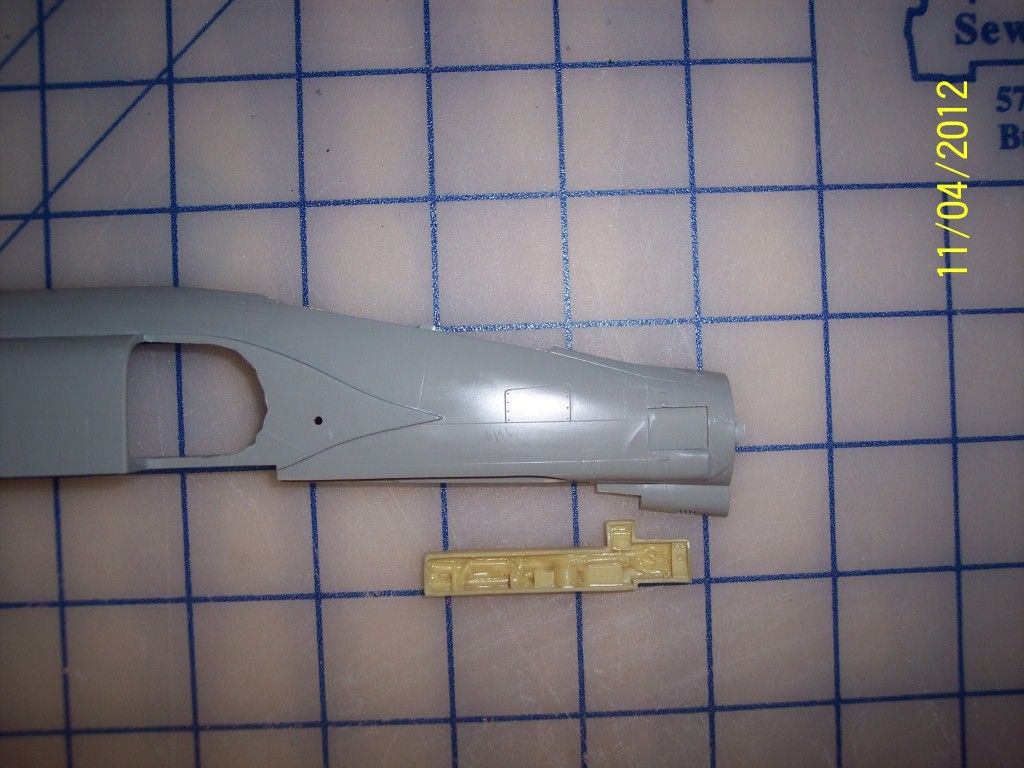
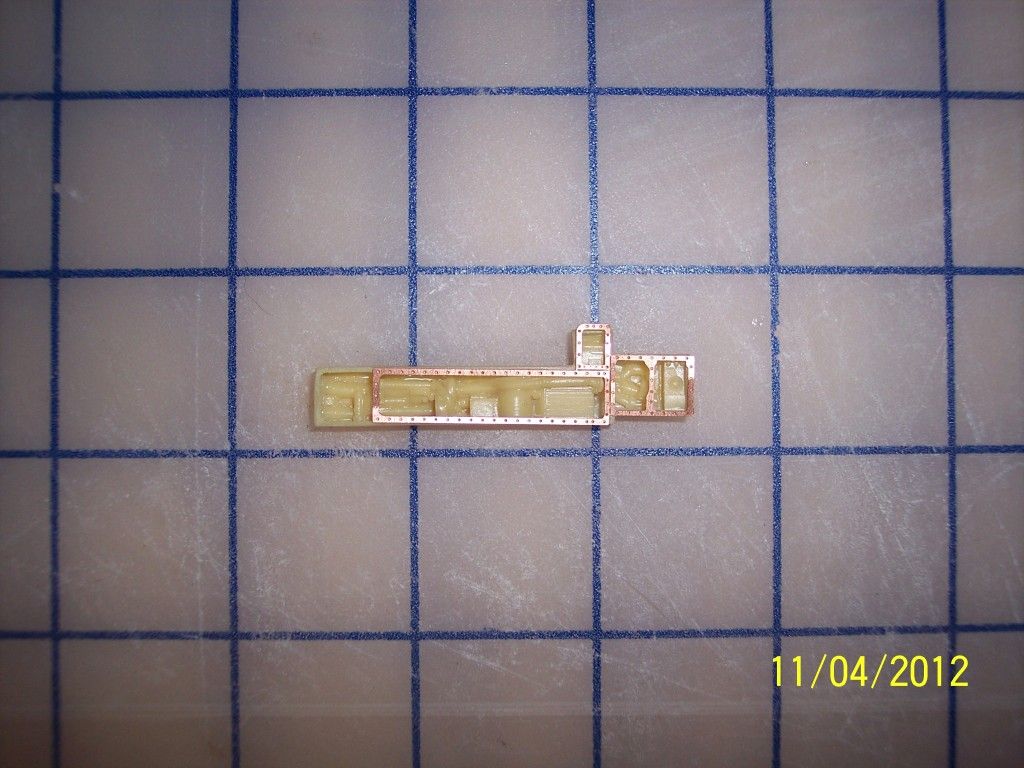
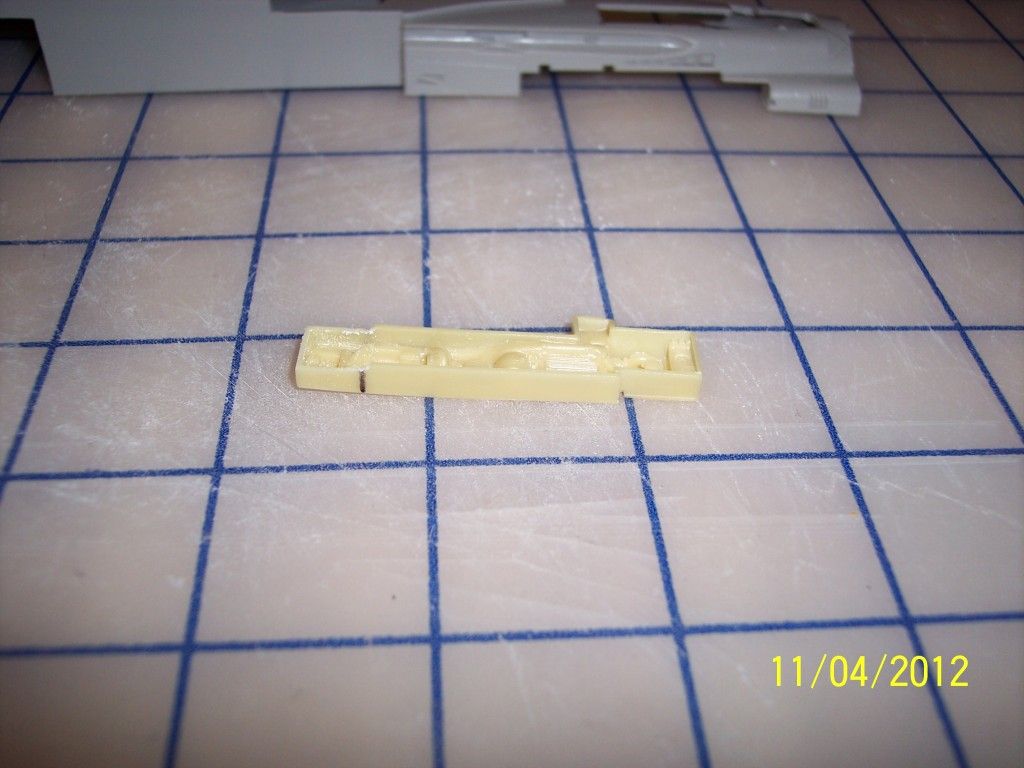
 The first thing to note is that the photo etch of the panel frames is smaller than the resin piece:

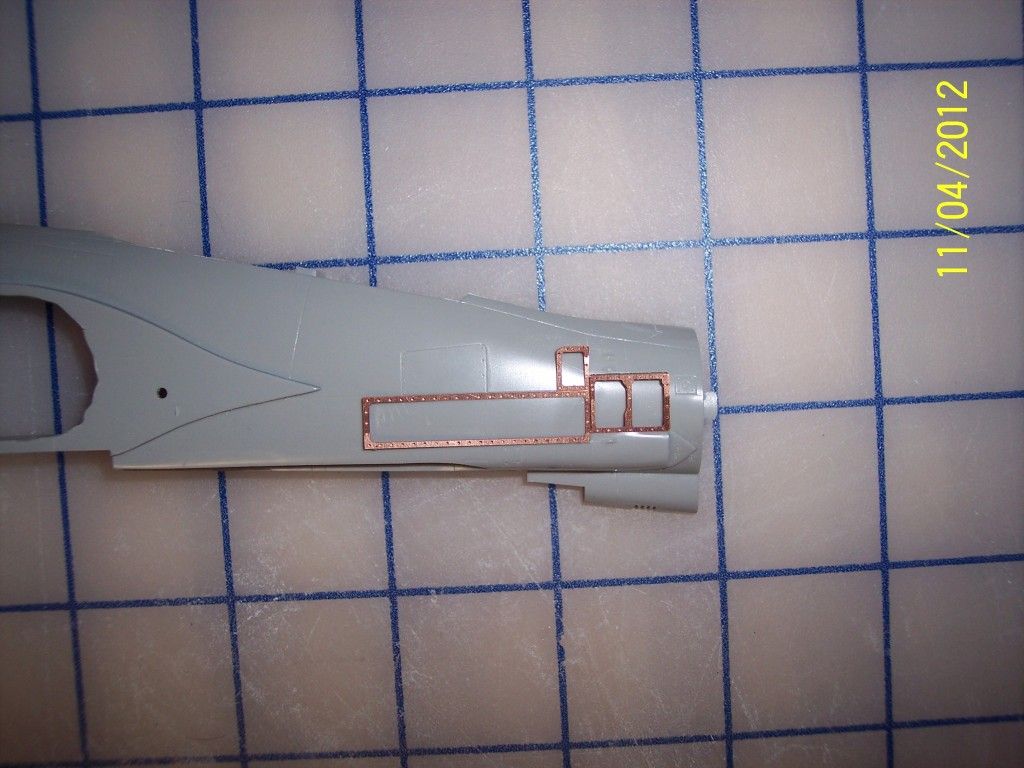
  So the area to be cut out of the fuselage will need to match the photo etch, not the resin piece.  Here is a picture showing the placement for the photo etch on the fuselage:

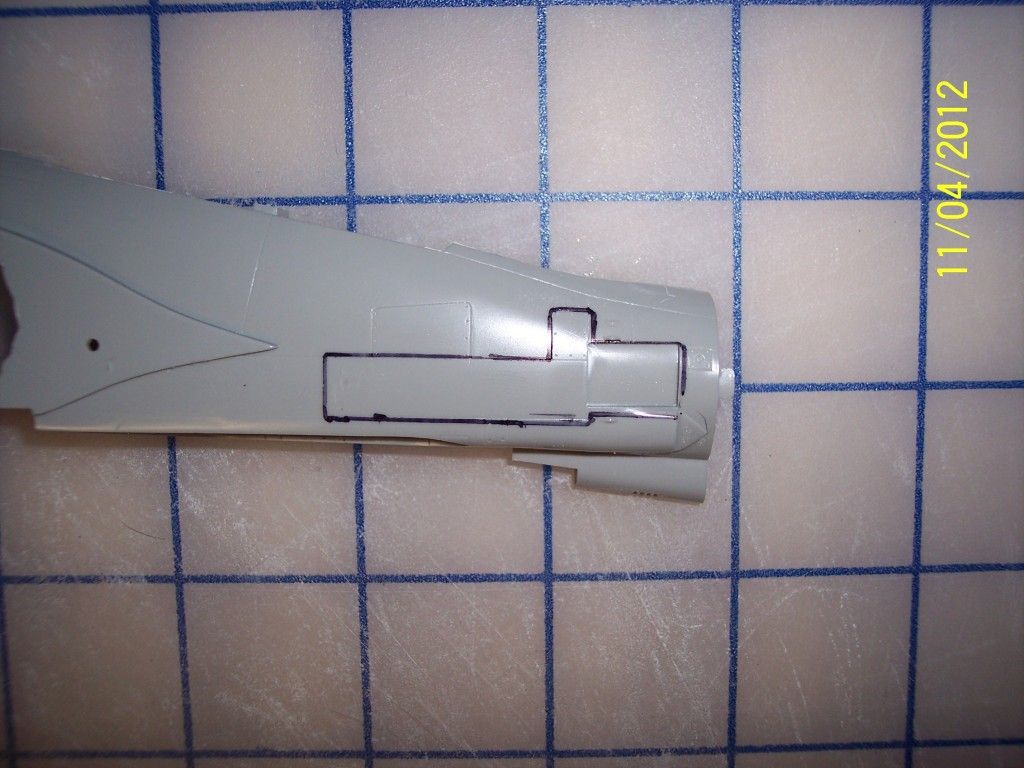
  I used the photo etch as a template to trace out a line for the hole I needed to cut out of the fuselage:

 Next I used my Dremel with a cutting bit and carefully cut out the hole staying well within the lines:

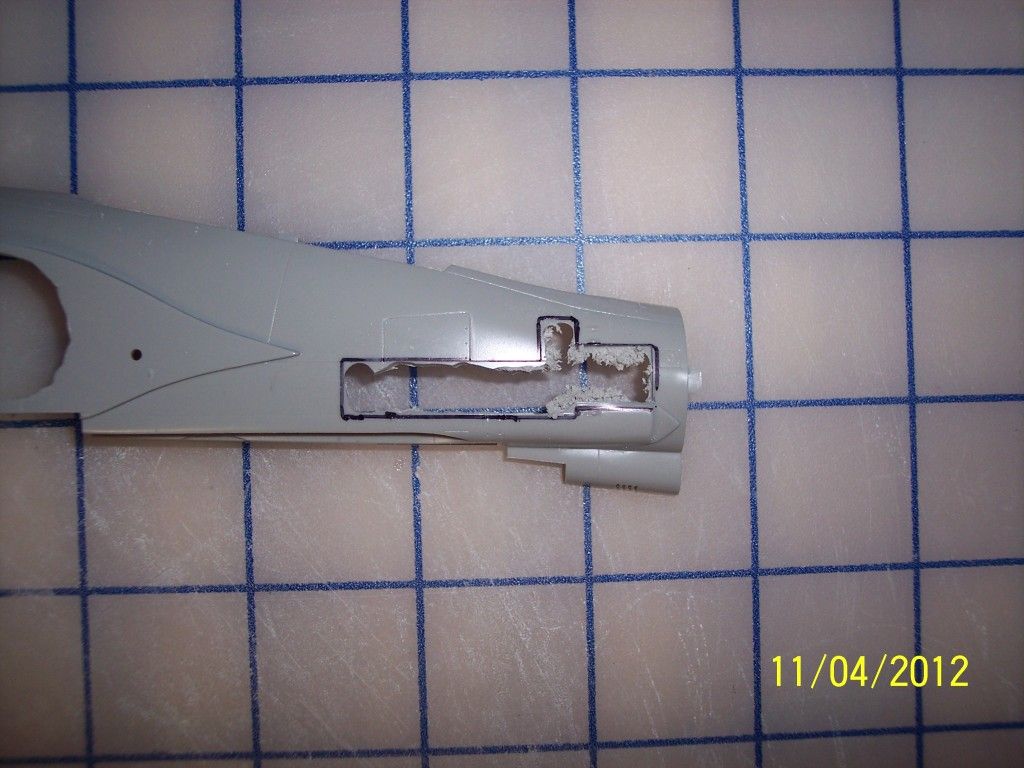
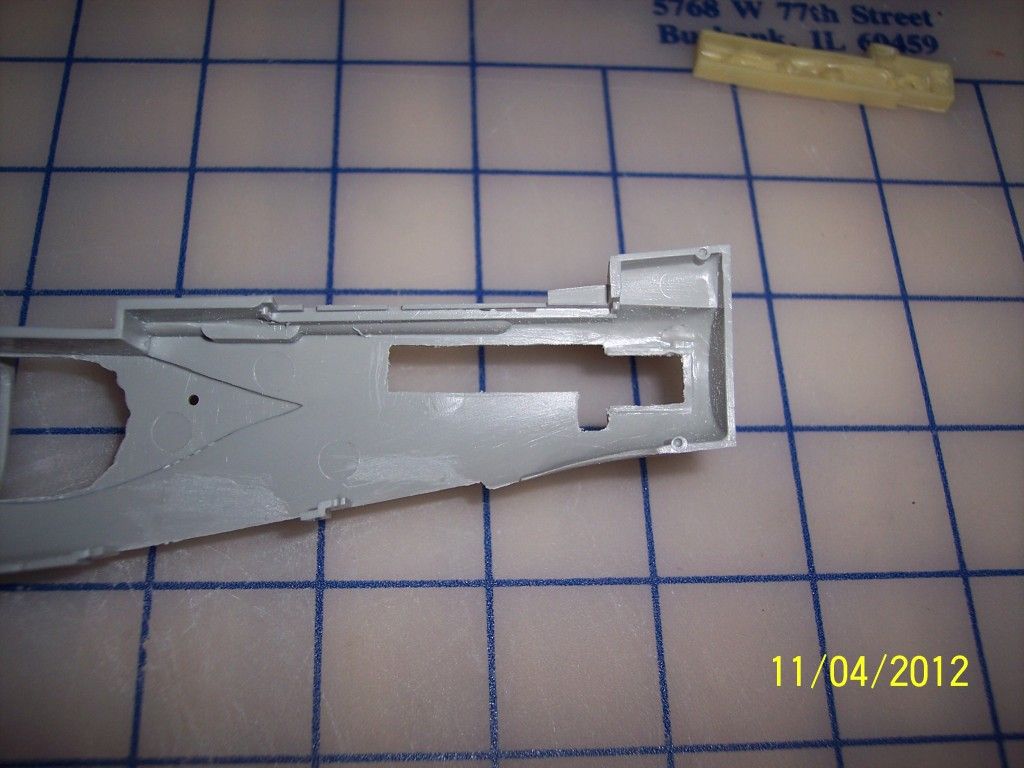
 Then I finished the hole with a flat file.  The next thing I had to take care of was on the inside of the fuselage toward the nose was a raised area that I had to remove with the same flat file:

 Here is a picture with the resin avionics bay inserted into place.  Take note of the upper right corner.  Because of the shape of the fuselage, that corner of the avionics bay sticks up above the fuselage.  More about this in a second.


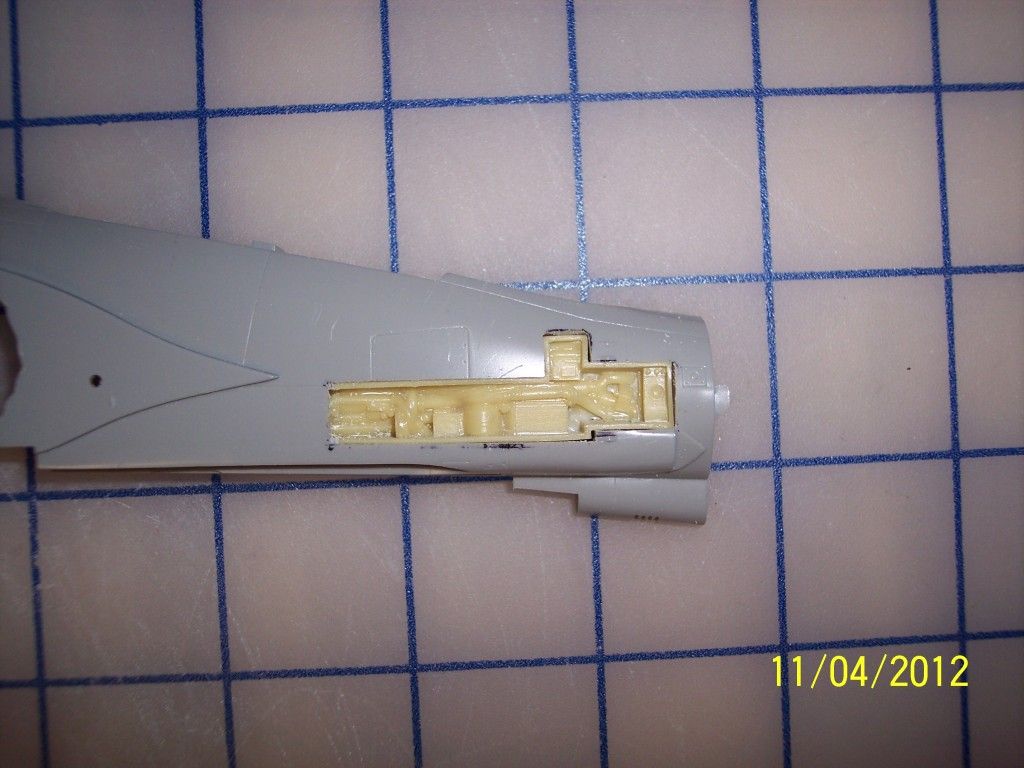
Here is a picture of it from behind:

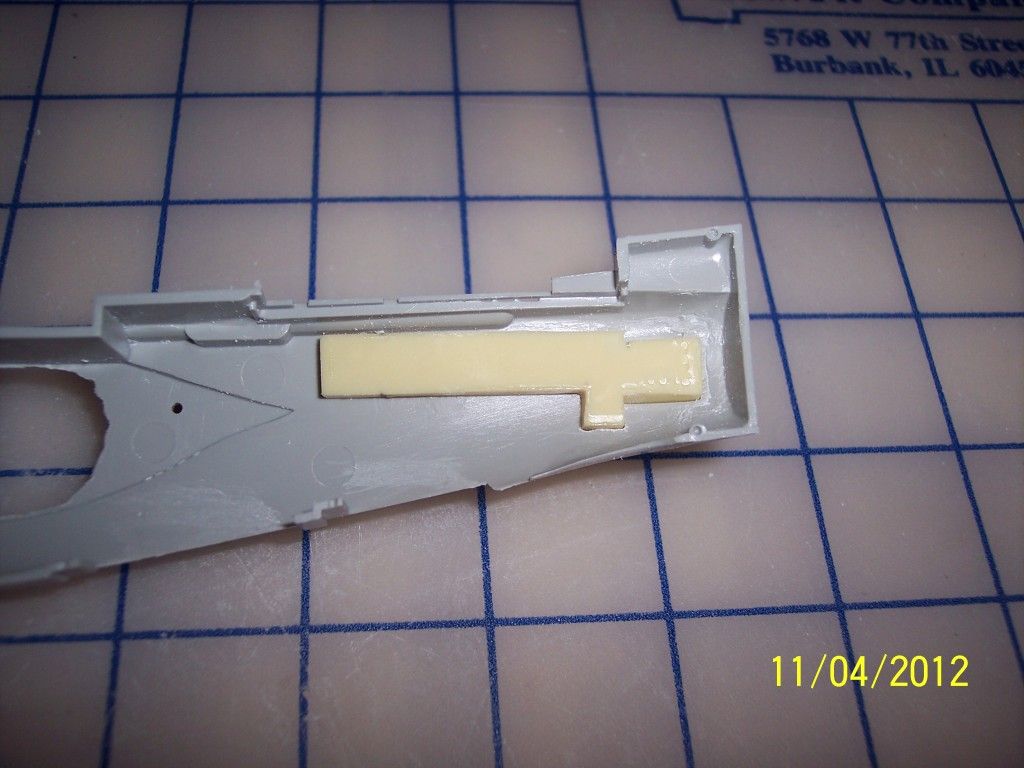
 In this next picture you can see where I modified the resin piece where it was "under" the panel so that it would fit flush.  This way when I place the photo etch piece on top, the thickness of the fuselage is not holding the resin piece too deep making it out of scale for the depth:

 Okay, now back to that corner that is sticking out too far.  I came up with the idea that I could run hot water over the resin piece to soften it up and thereby be able to bend that corner down so it wasn't sticking up too high.  Here is the result:

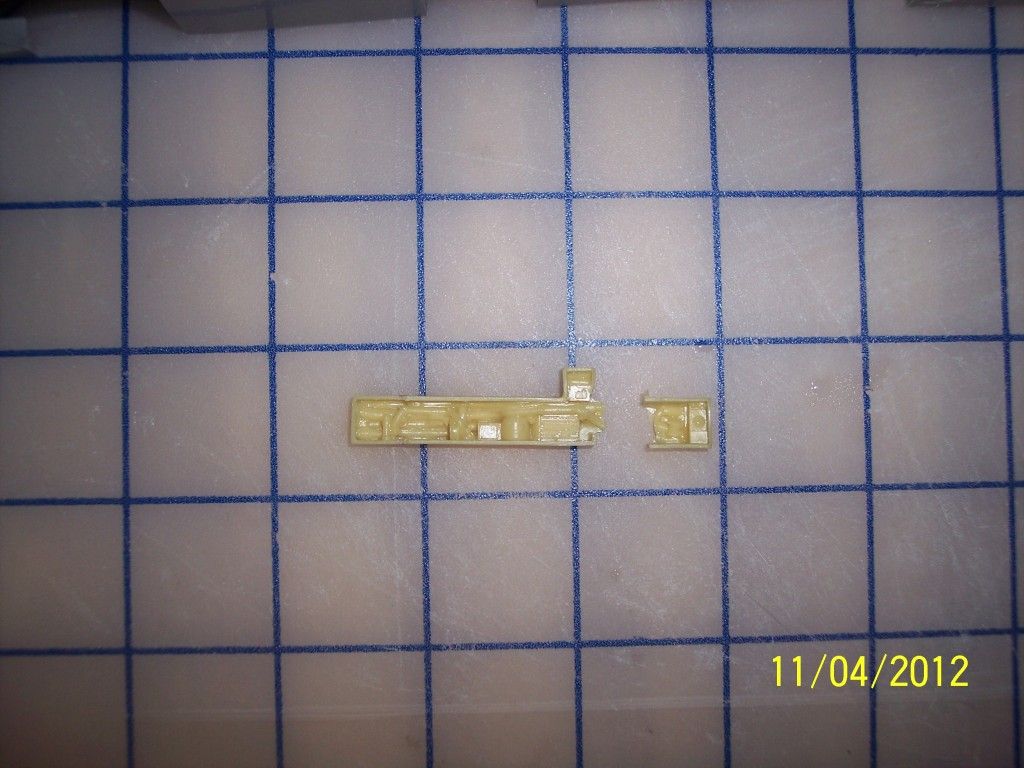
I had a feeling that it was a bad idea, but live and learn.  So instead I filed down that corner then super glued the two halves back together.  Fortunately the way that it broke you will never be able to see it after it is glued back together.  So now I will have to wait for the glue to dry before I proceed.

Ken

  • Member since
    November 2010
  • From: Lafayette, Indiana
Posted by Son Of Medicine Man on Sunday, November 4, 2012 3:07 PM

mikeymize

 Hi everyone, after a few bumps in the road I finally finished the Skyraider. Not the original I started with nor the same camo scheme but oh well..... Anyhow, it was still quite fun and I actually learned more about the VNAF and its' pilots during the build which is always a good thing. I've always enjoyed the research/prep part of a project. The other thing that was cool was I started using an airbrush again, albeit a cheap one but gained some more knowledge of paint mixology as well as technique or in my case, lack thereofEmbarrassed

  So far I've enjoyed everyone's builds and am very impressed by the efforts put forth. 

Nice job Mike M.!  Yes  Yes 

I have to agree with you on enjoying the research part of any of the modeling projects.  It is my favorite part!  Smile 

Ken

  • Member since
    September 2010
  • From: California
Posted by mikeymize on Sunday, November 4, 2012 2:34 PM

 Hi everyone, after a few bumps in the road I finally finished the Skyraider. Not the original I started with nor the same camo scheme but oh well..... Anyhow, it was still quite fun and I actually learned more about the VNAF and its' pilots during the build which is always a good thing. I've always enjoyed the research/prep part of a project. The other thing that was cool was I started using an airbrush again, albeit a cheap one but gained some more knowledge of paint mixology as well as technique or in my case, lack thereofEmbarrassed

  So far I've enjoyed everyone's builds and am very impressed by the efforts put forth. 

"Time you enjoy wasting is not wasted time".


  • Member since
    November 2010
  • From: Lafayette, Indiana
Posted by Son Of Medicine Man on Saturday, November 3, 2012 10:07 PM

Hi Everyone,

Today was a busy day.  First I washed the Aires wheel bay set with the vinegar and water solution.  Next I cut off the resin base stub from the front wheel well:

Here is the Verlinden open avionics panel:

 It also had excess resin that needed to be removed:

Here it is with the excess removed:

 The Aires cockpit includes the side panels that are molded into the sides of the fuselage as shown in the next two pictures:

 And here is the fuselage halves with the molded instruments filed off:


Ken

  • Member since
    November 2010
  • From: Lafayette, Indiana
Posted by Son Of Medicine Man on Saturday, November 3, 2012 10:55 AM

Hi Everyone,

I opened up the Aires wheel well set for my F-4E and once again I am blown away by the level of detail!  Take a look:


Next it is off to the vinegar water bath to wash off the resin mold release agents that may be left on the parts.  Then I will cut off the resin mold bases and start fitting them into the kit parts.

Ken

  • Member since
    April 2011
  • From: Dayton, OH
Posted by tcepilot on Thursday, November 1, 2012 11:31 PM
I will be back to the GB soon guys. Been a little busy. :D

-tcepilot


 just make a gif here


  • Member since
    November 2010
  • From: Lafayette, Indiana
Posted by Son Of Medicine Man on Thursday, November 1, 2012 9:25 PM

professordeath

Love it, but I'm biased. Keep at it!

Thanks Jimmy D.!

  • Member since
    November 2010
  • From: Lafayette, Indiana
Posted by Son Of Medicine Man on Thursday, November 1, 2012 9:15 PM

Hi Everyone,

Chop chop!!  Cut cut!!  And presto!  Another wing is done!  I had to tape the fuselage together along with the wings so I could get an idea of how it is shaping up.  Here it is so far:

Ken 

  • Member since
    November 2010
  • From: Lafayette, Indiana
Posted by Son Of Medicine Man on Tuesday, October 30, 2012 8:42 PM

Hi Everyone,

Its like all I am doing is chopping on this kit!  At this rate I don't think there is going to be much left when I am done!  Tonight I worked on the right wing flap and aileron.  Here is a picture of the top wing section with the flap and aileron held on with tape so it is not align perfectly:

 Here is a picture of the bottom wing section before I chopped on it:

 Here is the same section chopped:

  And here is the bottom with the flap and aileron in place with tape to get an idea of how it is going to look:

I still need to clean up the cuts with some sanding but I think the resin pieces are going to look pretty cool!

Ken

  • Member since
    November 2010
  • From: Lafayette, Indiana
Posted by Son Of Medicine Man on Monday, October 29, 2012 8:54 PM

Hi Everyone,

Today was a busy day for me so I did not have very much time to spend at the workbench.  But I did get a little bit done.

The resin flaps and ailerons by Wolfpack are nice but like most resin aftermarket sets the directions are a bit limited.  I spent some time getting the pieces oriented as to what went where.  Here is a picture of the pieces with the top of the right wing:

The next thing to do was to cut off the resin mold stubs from the pieces.  Here is a shot with the pieces laid out next to where they are going to be:

You will notice that they do not follow the shape of the lines engraved into the wing by Hasegawa.  Also where the hinges are supposed to be the new pieces go a little farther "north" on the wing.  This is going to take some extra care when lining them up and cutting them out.

This is all I got done tonight, it has been a long day.

Ken 

  • Member since
    November 2010
  • From: Lafayette, Indiana
Posted by Son Of Medicine Man on Sunday, October 28, 2012 9:46 PM

professordeath

You really are going all out in this bad boy that's for sure. All the extras you're shoving in there is really going to make the build fun to watch and interesting on your part. Look forward to seeing this one completed.

Hi Jimmy D.,

Yes, it should actually fly when it is finished! Big Smile 

Ken

  • Member since
    November 2010
  • From: Lafayette, Indiana
Posted by Son Of Medicine Man on Sunday, October 28, 2012 8:31 PM

Hi Everyone,

Today I did a lot of research so not a lot of work on the F-4E.  Since Dom was kind enough to point out that I should install aftermarket wheel wells that has put me at a point of limbo.  The cockpit sits on top of the front wheel well so I will need it in hand to get a better idea of what to do next.  But I have been researching and found it is going to take a bit of "shoe horning" to make it all fit.  Another thing that I plan on installing that I have not mentioned yet is the Verlinden F-4E Phantom Super Detail Set which includes the open avionics panel.  This requires cutting into the fuselage area where the cockpit is located.  It is going to be a tight fit.

Another thing that I am planning to install is the aftermarket flaps and ailerons.  Since this cutting has to be precise, I am taking my time on planning this very thoroughly before I proceed.

Ken

JOIN OUR COMMUNITY!

Our community is FREE to join. To participate you must either login or register for an account.

SEARCH FORUMS
FREE NEWSLETTER
By signing up you may also receive reader surveys and occasional special offers. We do not sell, rent or trade our email lists. View our Privacy Policy.