SEARCH FINESCALE.COM

Enter keywords or a search phrase below:

The 2013 Automotive Group Build

66732 views
584 replies
1 rating 2 rating 3 rating 4 rating 5 rating
  • Member since
    April 2005
  • From: Australia
Posted by taxtp on Monday, January 28, 2013 11:47 PM

Hi ewheeler,

I'll look forward to your pictures. Are you really sure you won't do the flowers ? :)

They should all be interesting builds, should be fun.

I've added you to the build roster. We're up to 14 already.

Cheers

Tony

I'm just taking it one GB at a time.

  • Member since
    April 2005
  • From: Australia
Posted by taxtp on Tuesday, January 29, 2013 5:16 PM

Monogram 1/32 1966 Mustang GT-350

Since I've got multiple builds in progress, I've decided I will identify which one I'm working on in each update, with a heading.

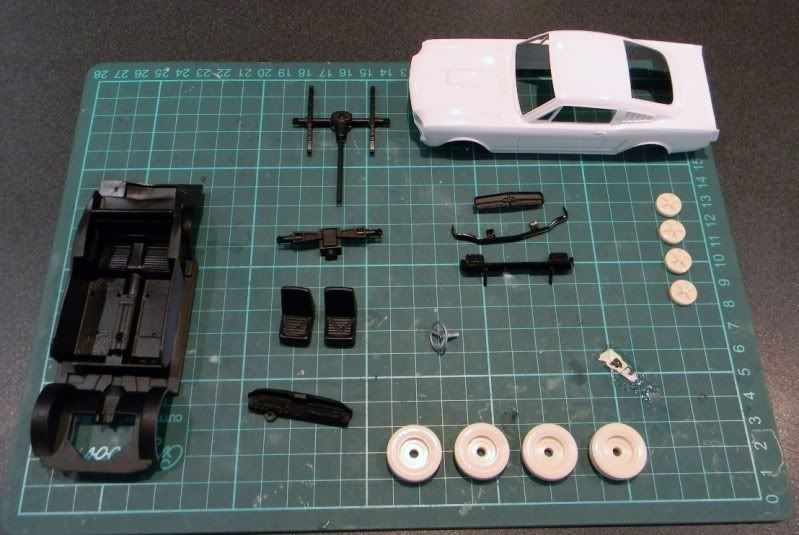
I did some of the hack work on this one last night, removing parts from the sprue, clearing flash and filling ejection pin marks. I also removed the kit chrome using a weak solution of caustic soda.

I then set about spraying and some basic assembly. So the interior pieces and the axles got semi gloss black, some of the chrome bits have been primed with gloss black, in preparation for a subsequent coat of Alcad II Chrome. I still have more cleanup to do on the hub caps, so I didn't prime them. The tyres are two piece (right and left)  solid plastic, but I'll have to remove the seam line before proceeding.

At some point, I'm gonna have to bite the bullet and mask up so that I can paint the blue stripes on this thing, but wasn't in the right mood for it last night.

The reason I'm building this simple little kit is because it's a reprise of the first car kit I ever built, back in the late1970's. There are four car models from early on that I don't still have, otherwise my collection is complete. I've decided to gradually build these up to complete the collection. The others are all Airfix 1/32 kits, the 1933 Alfa Romeo, the Bugatti 35B and the 1912 Model T Ford. I guess I have some hard work to do !

Anyway, here's the solitary progress photo for today.

Cheers

Tony

I'm just taking it one GB at a time.

  • Member since
    August 2009
  • From: Borlando Fla home of the rat
Posted by TREYZX10R on Tuesday, January 29, 2013 8:08 PM

Tony the 'Stang is off to a full gallop,looking great!

I got started on the Merc ,first up cleaning the frame up and replacing the coil springs

I used some copper wire coiled around some sprue for the front coils

I used ca to glue them in the retainer cups and trimmed them to the right height

This nasty bit of frame support is the same molding as the Woody I did last year and its a bear to get in place and keep the holes lined up while the glue sets. I learned from doing the Woody to start glueing from the rear and let each section set before going to the next. I rushed this on the Woody and wound up spending a lot of time filling and cleaning up the misalignment,totally my fault.

This time around the patience has paid off and no filler will be needed just a little fine filing and sanding. Started working on the mill and going to keep it basic out of box except the exhaust manifolds,and some detailing such as plug wires and a few fluid lines.

Before I can finish the Mill the chrome needed to be stripped off . I use straight bleach and it really works fast,the stuff literally dissapears before your eyes.

now just pour the bleach back into the bottle and sneak it back in the laundry room and the Missus never missed it!


  • Member since
    May 2005
Posted by pyrman64 on Tuesday, January 29, 2013 8:48 PM

TREYZX10R
now just pour the bleach back into the bottle and sneak it back in the laundry room and the Missus never missed it!

I really would advised against pouring it back for your missus to reuse on her delicate unmentionables....did you notice the residue after you deplated the chrome? Ick! Do you want to wear that?!

Greg H

"There is many a boy here today who looks on war as all glory, but, boys, it is all hell." Gen. Wm T. Sherman (11 April 1880, Columbus, Ohio)

  • Member since
    April 2005
  • From: Australia
Posted by taxtp on Tuesday, January 29, 2013 9:05 PM

I guess it's ok if you use the bathroom cleaning bleach rather than the unmentionable washing bleach !

A bit of glitter in the bowl never hurt anyone :)

My caustic soda is really drain cleaner, so I guess it fulfils it's real purpose after I've finished with it.

Great update Trey, I din't expect you to start so soon. I particularly like the springs, I'll use that when the time comes.

I've never seen photos of in progress chrome removal before.

The ride height on my Mustang is a bit of an issue too, it sits way too high, even on the box art. I'll have a look tonight as to how I fix it, before we get too far down the line.

I often use your 'patience' method for gluing problematic aircraft fuselage halves together, start at one end, align it, let it set, then proceed section by section.

Cheers

Tony

I'm just taking it one GB at a time.

  • Member since
    March 2011
Posted by ewheeler454 on Tuesday, January 29, 2013 10:10 PM

Hi all,

Here is a beginning stage on my Nova.


66 Nova_001 by ewheeler454, on Flickr

And here is the decals I simply refuse to use as it is a simple fact that if I did I think even my wife would laugh at me hehehehehehe.


66 Nova_002 by ewheeler454, on Flickr

taxtp,

The mustang is looking good. Have you tried the Touch-N-Flow plastic welder? It works great putting body parts and engines together. It actually welds the plastic together.

  • Member since
    April 2005
  • From: Australia
Posted by taxtp on Tuesday, January 29, 2013 11:04 PM

Hi Ewheeler,

I'm not going to be guilty of encouraging you to use those decals. Yuck ! I don't think they'd even go on a VW Kombi. Did they have something like that on the side of the Mystery Machine ?

Are you going to use the chrome on your Pro-street Nova, or strip it ? t least you're under way, and have made some good progress.

I don't have access to Flickr from here, I'll check that out later when I'm at home.

I usually use Tamiya Extra Thin Plastic Cement, which also works by capillary action. The difference is that its applied with a brush, but it doesn't mar the surface of the plastic, except for the weld obviously.

Cheers

Tony

I'm just taking it one GB at a time.

  • Member since
    October 2010
  • From: Hoodsport, WA
Posted by Dogfish_7 on Wednesday, January 30, 2013 6:09 AM

I'd like to enter as well. Propeller

Galaxie '46 Aerosedan Salt Flats Racer

Galaxie '48 Sedan Delivery Hearst Hauler

AMT/ JF Resin '49 Merc Pro Street

Revell Shelby GT 500TM


Bruce

  • Member since
    May 2005
Posted by pyrman64 on Wednesday, January 30, 2013 7:27 AM

ewheeler454
And here is the decals I simply refuse to use as it is a simple fact that if I did I think even my wife would laugh at me hehehehehehe.

How do you know she isn't laughing at you already?! Huh? Zip it! Wink

Greg H

"There is many a boy here today who looks on war as all glory, but, boys, it is all hell." Gen. Wm T. Sherman (11 April 1880, Columbus, Ohio)

  • Member since
    October 2010
  • From: Hoodsport, WA
Posted by Dogfish_7 on Wednesday, January 30, 2013 8:05 AM

Never though about the Wife having chrome in her braConfused

Bruce

  • Member since
    October 2010
  • From: Hoodsport, WA
Posted by Dogfish_7 on Wednesday, January 30, 2013 8:11 AM

Just started the 48 Hearse Hauler yesterday. Cut the chassis, floor pan and interior for stretching. Will fabricate new spans for them.

Also started filling the sinks left on the frame.

Bruce

  • Member since
    March 2011
Posted by ewheeler454 on Wednesday, January 30, 2013 5:27 PM

pyrman64,

Right now she's kinda mad because I'm buying car kits. My brother-in-law works for Academy so every time I go for a visit he loads me up. I have quite a few tanks, planes and ships so she doesn't understand why I don't finish those first hehehehehe.

  • Member since
    March 2011
Posted by ewheeler454 on Wednesday, January 30, 2013 5:46 PM

Tony,

I will be stripping the chrome so I can clean the flash. I have already stripped the rims and the intake. I'm not using the tires and rims that came with it. They like 17" rims with super thin tires. I found some rims and tires on ebay to fill the tubs properly hehehehe. With the touch-n-flow it has a long needle and the solvent evaporates with no mess hehehehe.

  • Member since
    March 2011
Posted by ewheeler454 on Wednesday, January 30, 2013 5:49 PM

Dogfish,

I'm looking forward to seeing your sedan finished. That's a lot of detail in the chasis. :)

  • Member since
    October 2010
  • From: Hoodsport, WA
Posted by Dogfish_7 on Wednesday, January 30, 2013 5:54 PM

Thanks. Managed to fit the pans and frame today, as well as sand the body, scribe doors, etc.\

Bruce

  • Member since
    October 2010
  • From: Hoodsport, WA
Posted by Dogfish_7 on Wednesday, January 30, 2013 6:11 PM

Enough for today.

Bruce

  • Member since
    April 2005
  • From: Australia
Posted by taxtp on Wednesday, January 30, 2013 6:43 PM

Ewheeler - you've talked me into it, I'm going to order some touch-n-flow, but I suspect it will take some time to get here due to it's volatile nature.

Dogfish - I've added you to the build roster, thanks so much for joining. I am really interested in the way you extend these parts, I've never seen it done first hand. Please keep up the photos and descriptions. One question - what material did you use to extend the chassis rails ? Is it a part cut from another chassis ? It looks to have the same shape as the kit chassis rails. I can't believe how much you've achieved in such a short time, that would have taken me weeks.

Cheers

Tony

I'm just taking it one GB at a time.

  • Member since
    April 2005
  • From: Australia
Posted by taxtp on Wednesday, January 30, 2013 6:48 PM

Monogram 1/32 1966 Mustang GT-350

Well, here's my update for last night, as it turned out, only had a little time at the bench.

I've cleaned up and primed the the hub caps and steering wheel with gloss black. I've also sprayed the underside of the chassis and body black. The seam lines running around the tyres has been cleaned up and filled with CA where necessary. I find the lack of tread on these tyres disturbing, however the intention I had with this kit was only ever to build it. When I do a detailed model of this car, it will be in 1/24 or 1/25.

Cheers

Tony


I'm just taking it one GB at a time.

  • Member since
    November 2003
  • From: State of Mississippi. State motto: Virtute et armis (By valor and arms)
Posted by mississippivol on Wednesday, January 30, 2013 9:02 PM

Here's what I have so far. Body is painted, and the chassis is mocked up. The only modification so far is substituting some coiled wire for the front springs. I still have to detail the wheels and give the chassis a drybrush and a dusting.

Glenn

  • Member since
    November 2003
  • From: State of Mississippi. State motto: Virtute et armis (By valor and arms)
Posted by mississippivol on Wednesday, January 30, 2013 9:04 PM

I forgot to add that I'll need to straighten up the windshield framing, as it became warped. The wheel flares on the rear fenders fit really well...I'm just hoping the paint will polish out.

Glenn

  • Member since
    April 2005
  • From: Australia
Posted by taxtp on Wednesday, January 30, 2013 9:26 PM

That's looking pretty neat Glenn. Your statement " I'm just hoping the paint will polish out' is a sentiment I share with every car model that I build. I'm still to find a gloss coat that I am 100% happy with, but I keep experimenting.

I finally solved the 'pebbling' problem I had when spraying Future, and I've tried that on my Alfa, out of necessity, as the decal manufacturer warned against solvent based clear coats, but I haven't tried to polish it out yet.

I sometimes use Tamiya spray bomb gloss clear, but it's really aggressive, and can make decals bubble and disrupt other paints underneath,so it has to be used with extreme care.

I've tried a few others, they all seem to have their ways. I guess I'd be really happy if the Future thing works out, as it's cheap, doesn't yellow and is pretty forgiving.

Cheers

Tony

I'm just taking it one GB at a time.

  • Member since
    August 2009
  • From: Borlando Fla home of the rat
Posted by TREYZX10R on Wednesday, January 30, 2013 9:46 PM

Dogfish7 killer scratching going on!

Glenn looking sweet!

Tony totally agree about the rattle can tamiya clear it will do a lift job if sprayed even a little heavy handed

I've gotten the brake lines run and the rear axle assembly in place

then some semi gloss black


  • Member since
    April 2005
  • From: Australia
Posted by taxtp on Wednesday, January 30, 2013 10:50 PM

Good progress Trey. Is the S-G Black from a Tamiya rattle can as well ? I find it very easy to use.

Cheers

Tony

I'm just taking it one GB at a time.

  • Member since
    May 2005
Posted by pyrman64 on Thursday, January 31, 2013 7:22 AM

Trey: Looks good, so far.

Greg H

"There is many a boy here today who looks on war as all glory, but, boys, it is all hell." Gen. Wm T. Sherman (11 April 1880, Columbus, Ohio)

  • Member since
    October 2010
  • From: Hoodsport, WA
Posted by Dogfish_7 on Thursday, January 31, 2013 7:41 AM

As requested, used Evergreen Styrene sheet, square tube, 90 Deg angle and rod. Picked the best places to cut the interior floor and body pan.

Laid the sectioned pans in the stretch body; measured the span ( 1.17 mm). Cut the sheet first and glued the sections back together.

Laid the square stock in place, measured,cut and glue with Pro Weld.

Cut a narrow strip thw width of the fram and glued it to the frame rail. Then laid round rod, where the bracing is.

Cut 90 deg. angle for the floor edge and glued. Will also make short pan reinforcement lines on the underside to blend the extension.

That's pretty much it. Just add details to taste:)

Bruce

  • Member since
    January 2013
Posted by xradio on Thursday, January 31, 2013 8:54 AM

I would like to join the group build. Monogram 1/24 64 Mustang Indy Pace Car. Thanks!

  • Member since
    October 2009
  • From: Oil City, PA
Posted by greentracker98 on Thursday, January 31, 2013 11:38 AM

I don't want step on anyone's toes, But I think I have a group badge. This shows everything but race cars and construction vehicles, so I think it would make a great badge. What do you all think?

A.K.A. Ken                Making Modeling Great Again

  • Member since
    October 2010
  • From: Hoodsport, WA
Posted by Dogfish_7 on Thursday, January 31, 2013 1:02 PM

A bit large.

Bruce

  • Member since
    April 2005
  • From: Australia
Posted by taxtp on Thursday, January 31, 2013 3:44 PM

xradio - thanks for joining, it's great to have another 'stang on the GB. I have this kit in my stash, so I'll be paying attention to yours. You're on the build roster.

Dogfish - many thanks for the detailed update. Well explained and thanks for the learning opportunity.

Greentracker - if you've stepped on any toes, they're not mine. Thanks for working on the badge, and nice job. I'd be happy to include it as one of a small number of options. I've taken the liberty of downsizing it a bit. I think it's a bit hard to read the title in the smaller size. Would it be possible to emphasise the text a little more? Maybe we could delete the dates and increase the font on the title ?

I'll post my update a bit later on.

Cheers

Tony

I'm just taking it one GB at a time.

  • Member since
    April 2005
  • From: Australia
Posted by taxtp on Thursday, January 31, 2013 6:51 PM

Monogram 1/32 1966 Mustang GT-350

Chrome has been sprayed on the various bits, using Tamiya aerosol TS-83. I've started masking the stripes on the body, I'm a bit nervous about getting good alignment.

Cheers

Tony

I'm just taking it one GB at a time.

JOIN OUR COMMUNITY!

Our community is FREE to join. To participate you must either login or register for an account.

SEARCH FORUMS
FREE NEWSLETTER
By signing up you may also receive reader surveys and occasional special offers. We do not sell, rent or trade our email lists. View our Privacy Policy.