SEARCH FINESCALE.COM

Enter keywords or a search phrase below:

1/72 O' Mania!!!

66034 views
598 replies
1 rating 2 rating 3 rating 4 rating 5 rating
  • Member since
    December 2002
  • From: Bury St Edmunds, Suffolk, England
Posted by Bish on Wednesday, August 7, 2013 1:06 PM

That's looking good there Check. I know what you mean about propeller tips.

I am a Norfolk man and i glory in being so


On the bench: Airfix 1/72nd Harrier GR.3/Fujimi 1/72nd Ju 87D-3

  • Member since
    September 2003
  • From: AandF in the Badger State
Posted by checkmateking02 on Wednesday, August 7, 2013 1:31 PM

Thanks, Bish.  Before I looked at the decal sheet closely, I had painted the tips the standard yellow--which isn't too much work.  

I haven't used decals for prop tips before, and was concerned they would wrap well around the sides, but these worked fine--with some prompting from MicroSol.  


  • Member since
    December 2002
  • From: Bury St Edmunds, Suffolk, England
Posted by Bish on Wednesday, August 7, 2013 1:58 PM

No, I haven't. The Hase B-24 comes with them. I did use them the first time, I am in two minds with this build.

I am a Norfolk man and i glory in being so


On the bench: Airfix 1/72nd Harrier GR.3/Fujimi 1/72nd Ju 87D-3

  • Member since
    September 2003
  • From: AandF in the Badger State
Posted by checkmateking02 on Wednesday, August 7, 2013 2:09 PM

I still had to touch up both the yellow and the red in a couple of spots, and didn't quite have the right yellow to match.

If it weren't for the three colours, it's probably just as simple (almost) to use paint for monotone yellow tips.


  • Member since
    April 2013
Posted by SchattenSpartan on Wednesday, August 7, 2013 2:32 PM

Really nice work, Checkmate!

  • Member since
    September 2003
  • From: AandF in the Badger State
Posted by checkmateking02 on Wednesday, August 7, 2013 4:58 PM

Thanks, Clemens.  Currently finishing it up with some rigging.


  • Member since
    July 2013
Posted by Herodotus2go on Wednesday, August 7, 2013 5:58 PM

Checkmateking,

Looking really good.  Hope the final assembly goes easy.

  • Member since
    September 2003
  • From: AandF in the Badger State
Posted by checkmateking02 on Wednesday, August 7, 2013 6:24 PM

So far, so good, H2G.


  • Member since
    July 2013
Posted by Herodotus2go on Wednesday, August 7, 2013 9:12 PM

I've decided to paint the P-40E underside FS36622 with Model Master 1933 Camouflage Gray.

I found this analysis of early P-40 colors by Rato Marczak at http://www.ratomodeling.com/articles/AVG_cammo/ to be very useful.  Again, I had not realized how much of a can of worms the underside color of lend lease aircraft was.  So, I was very happy of find this on clearance at my local Hobby Lobby Store and be able to move on with construction.

I've been able to finish masking the canopy pieces.

I'm very pleased to get this done.  It has been the step that has caused a number of my builds not to get completed.  But its' now behind me on this.

Hope to get some more done soon.  Checkmate's progress is great inspiration.

See ya'll back here soon - H2G

  • Member since
    September 2003
  • From: AandF in the Badger State
Posted by checkmateking02 on Wednesday, August 7, 2013 10:20 PM

Be careful, H2G.  MM's Camouflage Gray is very, very light--almost white.  I have it in bottle form; same FS number 36622, and sometimes use it for a "dirty" white.  It's what I sprayed on the end of the Devastator torpedo.

I'm not sure that any undersurface color used on a P-40 was that white-ish.

Merely a "heads-up!"  Whisper

As for the Devastator, I managed to get one photo, before the camera battery got too weak to operate the flash, so I'm re-charging it and waiting impatiently.  Hmm


  • Member since
    July 2013
Posted by Herodotus2go on Thursday, August 8, 2013 5:15 AM

Checkmate, Sorry but  I'm LOL over the camera thing. Isn't technology great?

Thanks for the heads-up, I'll test it and see.

  • Member since
    September 2003
  • From: AandF in the Badger State
Posted by checkmateking02 on Thursday, August 8, 2013 7:35 AM

Yes

Good to go, H2G!!  Just wanted to let you know it might not be the color you anticipated.

And now that the battery has recharged, due to that "great" technology of the re-charger, I can post photos again!


  • Member since
    September 2003
  • From: AandF in the Badger State
Posted by checkmateking02 on Thursday, August 8, 2013 7:54 AM

A couple of things to note about the Airfix Devastator, then I'll let the pictures speak for themselves.

Either due to my construction, or the kit engineering, the dihedral on the wings doesn't match too well.  Not being obvious till I set it on its landing gear, I didn't do anything about it.  But then, I'm not sure I would have known what to do about it if I'd discovered it earlier.

During the "unmasking" after painting, I managed to break the instrument panel loose.  Since the fuselage was closed up, I couldn't get it back in--although I did manage to shake it out, so it isn't rattling around inside.  Use more superglue next time!

It's not obvious anyway, though, since the "clear" canopy is pretty opaque, not uncommon in older Airfix kits..

I had some problems getting the decals to snuggle over the wing corrugations, even with MicroSol.  I ruined two decals on the upper port wing alone.  Third time was the charm.

The aircraft represents T1, flown from USS Lexington (CV-2) by Lt. Cmdr. James Best, CO of VT-2  during the Battle of the Coral Sea.  If I remember rightly from Blue Skies and Blood, the Lex's torpedo group did not find the Japanese task force at all during the battle, and all torpedo damaged was caused by the Yorktown's VT.

First, then, a couple of shots of the undersides. 

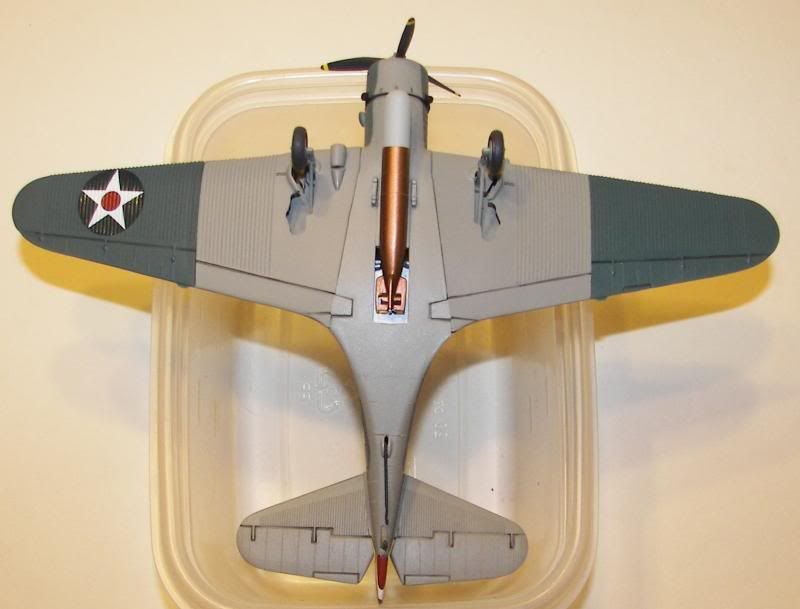
I added some stretched sprue to represent the wires passing across the torpedo slung under the fuselage.  They aren't too visible in these shots, but show up better in later views.

I used a thin black acrylic wash in the recesses of the control surfaces--otherwise I didn't do any weathering, something I don't excel at, anyway.


  • Member since
    September 2003
  • From: AandF in the Badger State
Posted by checkmateking02 on Thursday, August 8, 2013 7:58 AM

Now a kind of walk-around, beginning port aft.


  • Member since
    September 2003
  • From: AandF in the Badger State
Posted by checkmateking02 on Thursday, August 8, 2013 8:02 AM

And the starboard side.


  • Member since
    September 2003
  • From: AandF in the Badger State
Posted by checkmateking02 on Thursday, August 8, 2013 8:05 AM

It's been a great GB to participate in.  Thanks for looking at the photos.  I'll continue to be interested in keeping up with everyone's progress.  There's always something new to learn.

Thanks to tcepilot for sponsoring the GB.  Balloons I appreciate the opportunity to participate.


  • Member since
    April 2013
Posted by SchattenSpartan on Thursday, August 8, 2013 10:59 AM

That's one gorgeous looking model, Checkmate! Congratulations to such a nice end result!

  • Member since
    December 2002
  • From: Bury St Edmunds, Suffolk, England
Posted by Bish on Thursday, August 8, 2013 11:12 AM

That's a sweet looking build check. You have certainly more than  brought the best out of it.

I am a Norfolk man and i glory in being so


On the bench: Airfix 1/72nd Harrier GR.3/Fujimi 1/72nd Ju 87D-3

  • Member since
    November 2010
  • From: Florida-West Central
Posted by Eagle90 on Thursday, August 8, 2013 11:50 AM

Checkmate.  Wow!  What a great build!  She is beautiful!  Your canopy work is great!  

Eagle90


  • Member since
    September 2003
  • From: AandF in the Badger State
Posted by checkmateking02 on Thursday, August 8, 2013 1:40 PM

Thank you, Clemens, Bish & Eagle.

Even some of the old kits build up pretty.

The canopy work was just tedious, but not too hard with thin enough masking tape strips and a sharp knife.

I appreciate y'all's comments very much.


  • Member since
    July 2013
Posted by Herodotus2go on Thursday, August 8, 2013 6:13 PM

Checkmate,

A really great looking Devastator!  You showed that a good looking model can come out of an older kit.  Had an awesome time following your progress.  Hope to see you soon in another GB - H2G

  • Member since
    April 2010
Posted by Theuns on Friday, August 9, 2013 1:48 AM

Vell done on that Devistator !

Theuns

  • Member since
    September 2003
  • From: AandF in the Badger State
Posted by checkmateking02 on Friday, August 9, 2013 8:21 AM

Thanks, H2G and Theuns.  All those wing corrugations were the trickiest part.  The rest of it went together pretty well, for an old kit.


  • Member since
    July 2013
Posted by Herodotus2go on Thursday, August 15, 2013 9:07 PM

Not a lot of progress this past week.  Had some automobile and home maintenance issues that intruded on model building plans.

I tested the Model Masters 1933 (FS 36622) Camouflage Gray.  I'm going to go with it.  

Got a small seam on upper wing filled

and got gear doors glued on and holes for drop tank/bomb that I'm not going to use filled (more spares box swag! yeah!)

Hope to make much more progress this weekend.

  • Member since
    September 2003
  • From: AandF in the Badger State
Posted by checkmateking02 on Friday, August 16, 2013 12:19 AM

Looks good, H2G.  I wonder if MM changed the Camouflage Gray.  My bottle dates to the '90's and a no-longer-with-us model of the Defiant from "Deep Space Nine."  

Anyway, your results look great!


  • Member since
    November 2010
  • From: Florida-West Central
Posted by Eagle90 on Friday, August 16, 2013 6:35 AM

Looks great H2G!  The colors are nice too!

Eagle90


  • Member since
    April 2013
Posted by SchattenSpartan on Friday, August 16, 2013 7:57 AM

Nice work H2G!

  • Member since
    July 2013
Posted by Herodotus2go on Tuesday, August 20, 2013 8:38 PM

Apologies for being such a slow-poke.

Got the underside sprayed with Camouflage Gray

Painted and installed the reflector gun sight

and got the canopy painted interior green and installed.

working on masking for painting the topside Dark Earth & Dark Green.

  • Member since
    September 2003
  • From: AandF in the Badger State
Posted by checkmateking02 on Wednesday, August 21, 2013 1:07 AM

Very sharp!  Nice work!


  • Member since
    April 2010
Posted by Theuns on Wednesday, August 28, 2013 7:02 AM

Guys I am calling thos 1/72 Airfix Canberra completed.....warts and all!

I didn't really enjoy this build, but just wnated it done. Even with as much lead as I could fit in the front it is still a tail sitter, they even supply a tailstand for it.

PRU blu from Humbrol, the paint was then "streaked" with powdered pastels to look weathered and faded by harsh African sun. Even with good gloss coat I still got some silvering of some decals.

South African Air Force Canberra Mk 12b mid 80's

Only addons are the "towl rail" and blade antennas on the tail.

Theuns

JOIN OUR COMMUNITY!

Our community is FREE to join. To participate you must either login or register for an account.

SEARCH FORUMS
FREE NEWSLETTER
By signing up you may also receive reader surveys and occasional special offers. We do not sell, rent or trade our email lists. View our Privacy Policy.