SEARCH FINESCALE.COM

Enter keywords or a search phrase below:

100th Anniversary of WWI GB

75519 views
879 replies
1 rating 2 rating 3 rating 4 rating 5 rating
  • Member since
    December 2002
  • From: Bury St Edmunds, Suffolk, England
Posted by Bish on Tuesday, July 22, 2014 10:22 AM

Chuck, do you do the whole rigging with one piece of thread, or individual thread for each strand. If the latter, how do you secure the other end.

I am a Norfolk man and i glory in being so


On the bench: Airfix 1/72nd Harrier GR.3/Fujimi 1/72nd Ju 87D-3

  • Member since
    October 2011
  • From: Lake Villa, Illinois
Posted by Chuck Davis on Tuesday, July 22, 2014 10:33 AM

Hi Bish - I use individual segments for each line, cut comfortably oversize.  On one end I put a knot - usually two to three ties to get a big enough "bunch" of line to act as a "bumper".  I then pull the line thru the hole I drilled thru the wing (usually passing thru the lower wing from the underside) until my "bumper" gets caught.  A drop of CA at the knot secures the line on that end.  I then pass the line thru the next hole (usually in the upper wing), pull it thru the wing.  I then hold tension on it and hit it with a drop of CA, usually on the top of the wing.  That completes both ends of one wire.  Then you repeat for the next wire, and so on...and then you drink coffee!  AFTER doing the wiring...

The next day I'll come back and carefully slice off the exposed wire nubs, sand if necessary, and do touch up painting.  One thing I learned the hard way - do any decals that are on or near the rigging holes AFTER the wiring is done and sanded smooth.  Ask me how I know this...

Chuck Davis

  • Member since
    December 2002
  • From: Bury St Edmunds, Suffolk, England
Posted by Bish on Tuesday, July 22, 2014 10:46 AM

I was thinking a drop of CA but wasn't sure if it was that obvious. The Eduard kit I am building has one piece wings, and I was thinking something like that would be the best way. In fact, I can't imagine there is any other way to do it.

Sounds like you learnt the lesson the hard way with the decals.

I am a Norfolk man and i glory in being so


On the bench: Airfix 1/72nd Harrier GR.3/Fujimi 1/72nd Ju 87D-3

  • Member since
    October 2011
  • From: Lake Villa, Illinois
Posted by Chuck Davis on Tuesday, July 22, 2014 10:50 AM

Yes, indeed.  I think it might even have been the stars on the top of this Jenny.

As for other methods, I guess there's always stretched sprue but I'm too ham-fisted to able to get consistent line thicknesses.  I'm sold on the fishing line method.

What Eduard kit are you working on?

Chuck Davis

  • Member since
    December 2002
  • From: Bury St Edmunds, Suffolk, England
Posted by Bish on Tuesday, July 22, 2014 12:18 PM

I am not all that keen on stretched sprue. I used to use it for antennas. But I find it sags after a while and getting the right thickness is not always easy. I prefer either fishing line or E-Z line. I may well use the latter for my build here.

This is the kit I have.

I am a Norfolk man and i glory in being so


On the bench: Airfix 1/72nd Harrier GR.3/Fujimi 1/72nd Ju 87D-3

  • Member since
    October 2011
  • From: Lake Villa, Illinois
Posted by Chuck Davis on Tuesday, July 22, 2014 12:27 PM

Cool - that's basically the same kit I'm doing for this Group Build, just a different boxing.  How do you get your E-Z Line thin enough to look good in 1/72?  I've used it on and off for bits of rigging in 1/32 and it certainly lives up to it's name.

Chuck Davis

  • Member since
    December 2002
  • From: Bury St Edmunds, Suffolk, England
Posted by Bish on Tuesday, July 22, 2014 12:36 PM

I just pull it tight until I think its thin enough. I used it on the 0/400 I built last year and I use it on most of my aircraft antenna's. For antenna's, I drill a hole through the mast and a hole in the tail. I pass it through the mast and then use CA to secure it to the tail. Once dry I pull it as tight as I dare and then glue it in place, I just have to hold it tight for a minute or so until the glue is set and then trim it. I will basically do the same for the rigging.

I am a Norfolk man and i glory in being so


On the bench: Airfix 1/72nd Harrier GR.3/Fujimi 1/72nd Ju 87D-3

  • Member since
    September 2011
  • From: Milaca, Minnesota
Posted by falconmod on Tuesday, July 22, 2014 8:27 PM

Bish

I am not all that keen on stretched sprue. I used to use it for antennas. But I find it sags after a while and getting the right thickness is not always easy. I prefer either fishing line or E-Z line. I may well use the latter for my build here.

This is the kit I have.

Wait just a minute!!!  that's the kit I have! Super Angry  Lol

John

On the Bench: 1/72 Ki-67, 1/48 T-38

1/144 AC-130, 1/72 AV-8A Harrier

  • Member since
    April 2006
  • From: ON, Canada
Posted by jgeratic on Tuesday, July 22, 2014 10:33 PM

EZ line is what I use as well.  I drill the holes before painting, and before the wings are attached to the fuselage.  In the last 1/72 bipe build (pictured below), I also tried a similar product from Uschi.  Just below the main wing between the inner struts is some of their fine rigging (0.02mm).  They also carry standard (0,03mm) and superfine (0.01mm).   I find their product is actually round in profile compared to EZ line.

My method is to drill location holes, but not completely through the plastic/resin parts.  They are merely a pocket to hold a drop of superglue,and that should dry relatively even with the surrounding surface.  

The rigging wire is cut one segment at a time, and it's length is shorter than what is required, by a few millimeters.  Once one end is firmly set,  the other is stretched into position with tweezers, holding it there for  a minute or so while the glue sets.  

As long as you are careful in not dropping glue where it's not required, there is no clean up afterwards.

regards,

Jack

  • Member since
    June 2010
  • From: Rochester, New York USA
Posted by rocker286 on Wednesday, July 23, 2014 10:28 PM

Wow folks, thanks for all the helpful suggestions! Rigging up a Nieuport doesn't seem so daunting now! Rudratt, you are correct! I am going to build Eddie's 28'. When I picked up the kit I was really hoping it would have his markings, and what do ya know? They're the only option to use!

4badges

  • Member since
    December 2002
  • From: Bury St Edmunds, Suffolk, England
Posted by Bish on Thursday, July 24, 2014 5:31 AM

falconmod

Bish

I am not all that keen on stretched sprue. I used to use it for antennas. But I find it sags after a while and getting the right thickness is not always easy. I prefer either fishing line or E-Z line. I may well use the latter for my build here.

This is the kit I have.

Wait just a minute!!!  that's the kit I have! Super Angry  Lol

John

John, ye, I think we spoke about that earlier in the thread. Either that, or there is 3 of us doing it. But its so long ago, I forget now. Will have to go back and check.

I am a Norfolk man and i glory in being so


On the bench: Airfix 1/72nd Harrier GR.3/Fujimi 1/72nd Ju 87D-3

  • Member since
    December 2002
  • From: Bury St Edmunds, Suffolk, England
Posted by Bish on Thursday, July 24, 2014 5:36 AM

John, ye we did, way back on page 6 at the end of Jan. Boy this thread has been going a long time.

cs.finescale.com/.../157905.aspx

And with Chuck, it is now 3 of us doing it. Should be fun.

I am a Norfolk man and i glory in being so


On the bench: Airfix 1/72nd Harrier GR.3/Fujimi 1/72nd Ju 87D-3

  • Member since
    September 2011
  • From: Milaca, Minnesota
Posted by falconmod on Thursday, July 24, 2014 6:25 AM

Your right it should be fun for three of us to be building the same kit at the same time.  Hopefully we can help each other avoid any pitfalls.  Or we can just race to the finish line and see who's is better..just kidding  lol  Surprise

I must bet nuts doing this in 1/72 scale,  as the only other WW1 plane I've done was in the last WWI build and that was 1/48.  Bang Head

John

On the Bench: 1/72 Ki-67, 1/48 T-38

1/144 AC-130, 1/72 AV-8A Harrier

  • Member since
    December 2002
  • From: Bury St Edmunds, Suffolk, England
Posted by Bish on Thursday, July 24, 2014 6:54 AM

That's ok, we can all be nuts together. I probably won't be starting mine until into next year, so I may well be picking up some tips from you guys.Wink

I am a Norfolk man and i glory in being so


On the bench: Airfix 1/72nd Harrier GR.3/Fujimi 1/72nd Ju 87D-3

  • Member since
    September 2011
  • From: Milaca, Minnesota
Posted by falconmod on Thursday, July 24, 2014 7:46 AM

I was ready to start mine  July first,  had it on the work bench ready to go and post the opening box and sprue tree pictures then I realized it was Aug first. Sad  what a let down.  So I've really been waiting for the 1st this time.

John

On the Bench: 1/72 Ki-67, 1/48 T-38

1/144 AC-130, 1/72 AV-8A Harrier

  • Member since
    December 2002
  • From: Bury St Edmunds, Suffolk, England
Posted by Bish on Thursday, July 24, 2014 8:19 AM

I still have 3 armour builds for GB's that end this year and then a few that end early next year to complete before I can started on mine. With any luck, I am looking at the first half of next year, fingers crossed.

I am a Norfolk man and i glory in being so


On the bench: Airfix 1/72nd Harrier GR.3/Fujimi 1/72nd Ju 87D-3

  • Member since
    October 2011
  • From: Lake Villa, Illinois
Posted by Chuck Davis on Friday, July 25, 2014 12:08 PM

Okay, Jack - you've convinced me.  I've been wondering about the new stuff from Uschi.  Seeing your bipe (a Willow is it?), I'm wanting to give it a try.  I've got some on order, and I'll try it out on my Albie - thanks!

Chuck Davis

  • Member since
    November 2008
  • From: Central Florida
Posted by plasticjunkie on Friday, July 25, 2014 3:00 PM

Snake

Please correct my entry to the old 1/48 Monogram Fokker DVII. I had forgotten that I have 3 or 4 of them that I bought from Squadron in the early 80's for under a buck each. I also have the Tom's Models pe set to add missing details.

 GIFMaker.org_jy_Ayj_O


Too many models to build, not enough time in a lifetime!!

  • Member since
    February 2006
  • From: Smithers, BC, Canada
Posted by ruddratt on Sunday, July 27, 2014 10:32 PM

OK fellas, we're just about there now, only a matter of hours!  In light of the absence of our host (Dave, aka GreySnake) ,  I'll do my best to fill in and keep things up to date until he returns.

Have at 'em guys - I know it's the 28th somewhere!  Yes

Mike

 "We have our own ammunition. It's filled with paint. When we fire it, it makes pretty pictures....scares the hell outta people."


  • Member since
    September 2011
  • From: Milaca, Minnesota
Posted by falconmod on Monday, July 28, 2014 7:44 AM

Why was I thinking it started Aug 1st!     I'm ready but I won't be able to get to the bench until Wednesday.

John

On the Bench: 1/72 Ki-67, 1/48 T-38

1/144 AC-130, 1/72 AV-8A Harrier

  • Member since
    December 2002
  • From: Bury St Edmunds, Suffolk, England
Posted by Bish on Monday, July 28, 2014 7:54 AM

O, now that sneaked up out of no where. I won't be starting mine for a while, but I will defiantly be watching.

I am a Norfolk man and i glory in being so


On the bench: Airfix 1/72nd Harrier GR.3/Fujimi 1/72nd Ju 87D-3

  • Member since
    February 2007
  • From: Bronze Squadron - Battlestar Cerberus
Posted by Lodni Kranazon on Monday, July 28, 2014 2:44 PM

So we are posting everything here in this thread? Just checking. I already have a parts photo up of two out of three of planned builds. A 1/240 U.S.S. Fairfax from the old Revell HMS Campbelton kit and a Polish air service SPAD XIII from the 1/28 Revelll kit.  Do I need to put up another? 

[Admiring Starbuck's space fighter] Cassiopeia: It's a perfect machine! Born to dance amongst the stars! Starbuck: Yeah, it's bumping into them that has me worried.

  • Member since
    July 2010
  • From: Tempe AZ
Posted by docidle on Monday, July 28, 2014 8:20 PM

Well,

I guess I will start.  Here is the Trumpeter 1/350 scale HMS Dreadnought 1907 that I am building.  I plan on building her to look as she did at the beginning of the Great War.  

This is my first Group Build so I am not sure what to post, so I will show a few of the overall shots of the kit and where I got to today.  

Enjoy,

Steve

Here is all the sprues

Here are the AfterMarket goodies I plan on using.

As with the vast majority of ship builds, I am starting with the hull.  I drilled out all 112 scuttles (port holes), glued in the bulkheads and finally glued the hull halves together.  I added some Evergreen sheet to strengthen and align the seam along the middle bottom portion.


  • Member since
    February 2005
  • From: Proctor. MN
Posted by 65ss on Monday, July 28, 2014 8:43 PM

I have a few hours on a Vette I'm working on for another GB, but I'm itching to get started on my Renault FT-17!

Dale

  • Member since
    February 2006
  • From: Smithers, BC, Canada
Posted by ruddratt on Monday, July 28, 2014 8:57 PM

Wiccan - what you've got posted is fine, and this is indeed the place.  No need to post the other build until you feel like it.

Steve - awesome that you picked this as your first GB!  Yes  Love all the AM you're putting into that guy.  Gonna be fun watching it all come together.

Dale -  looking forward to seeing your build as well!  I think it's fantastic that we've got so many different modeling genres entered here.  This is going to give a lot of us some real good looks at subjects we don't normally build.  Thanks guys!

Work and family will delay my start (which bites),  but only for a few days (not so bad).

Mike

 "We have our own ammunition. It's filled with paint. When we fire it, it makes pretty pictures....scares the hell outta people."


  • Member since
    September 2013
  • From: San Antonio, Texas
Posted by Marcus McBean on Monday, July 28, 2014 10:06 PM

Started my build tonight.  ICM "SMS KONIG" 1350 scale.  Drilled out the portholes, cleaned up the hull and added a coat of primer.  I ordered way to much P.E., I have enough to build a sister ship. Here are a few starter pictures.

Some of the P.E.

Not sure at this time if I will use the wood deck. I found it to thick on my Dreadnought project and ended up painting the deck.  The panks on the KONIG deck are continous run and the lenght of the deck.

  • Member since
    October 2013
Posted by Big Blue on Monday, July 28, 2014 11:22 PM

The long wait is over!

My contribution to this group build will be a 1/32 scale Fokker E.III Eindecker from Wingnut Wings.

At the moment I am planning on building E.III 105/15, flown by Ernst Udet:

After all these months of waiting, I sat down tonight to kick off my build and realized I was missing the primary interior paint color... so clever.  Hopefully my LHS will have what I need in stock, and I can pick some up tomorrow.

Just to be able to say I made some progress on day 1, I did lay the base colors for the interior wood work.  I will drag oils over them to create the grain effect tomorrow.  

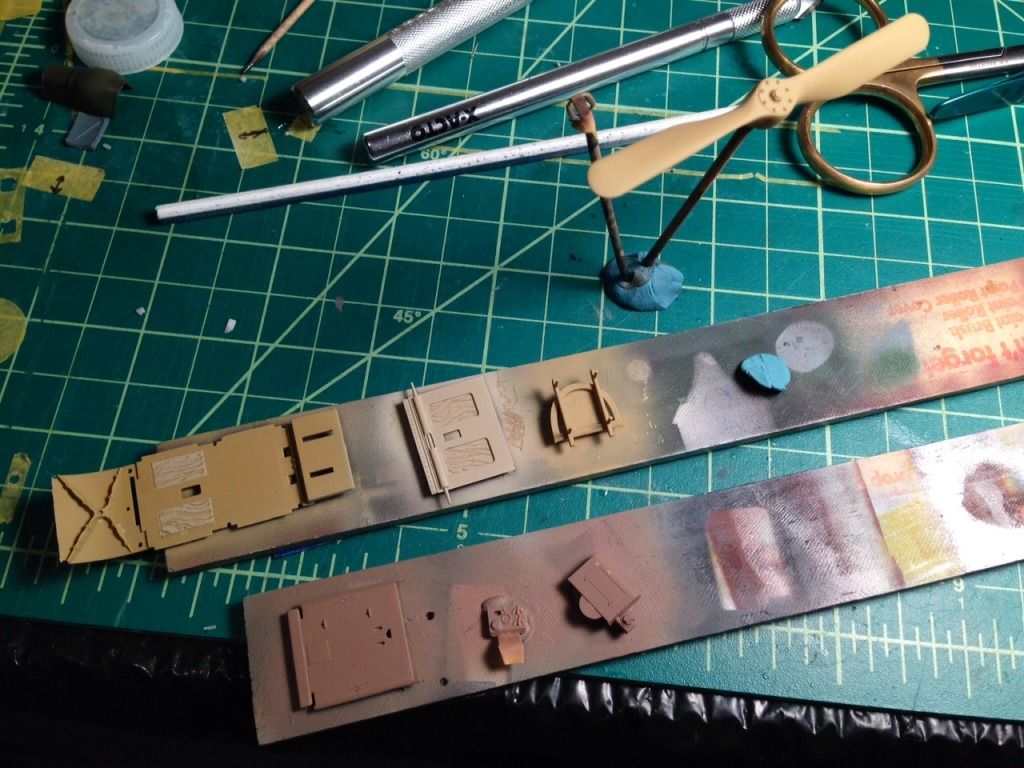
I experimented with using color pencils to add some more distinct grain to the plywood pieces covering the access doors in the floor (and their exteriors).  I plan on giving them a light oil treatment as well to blend them in a bit more, but may wind up eliminating the pencil work.

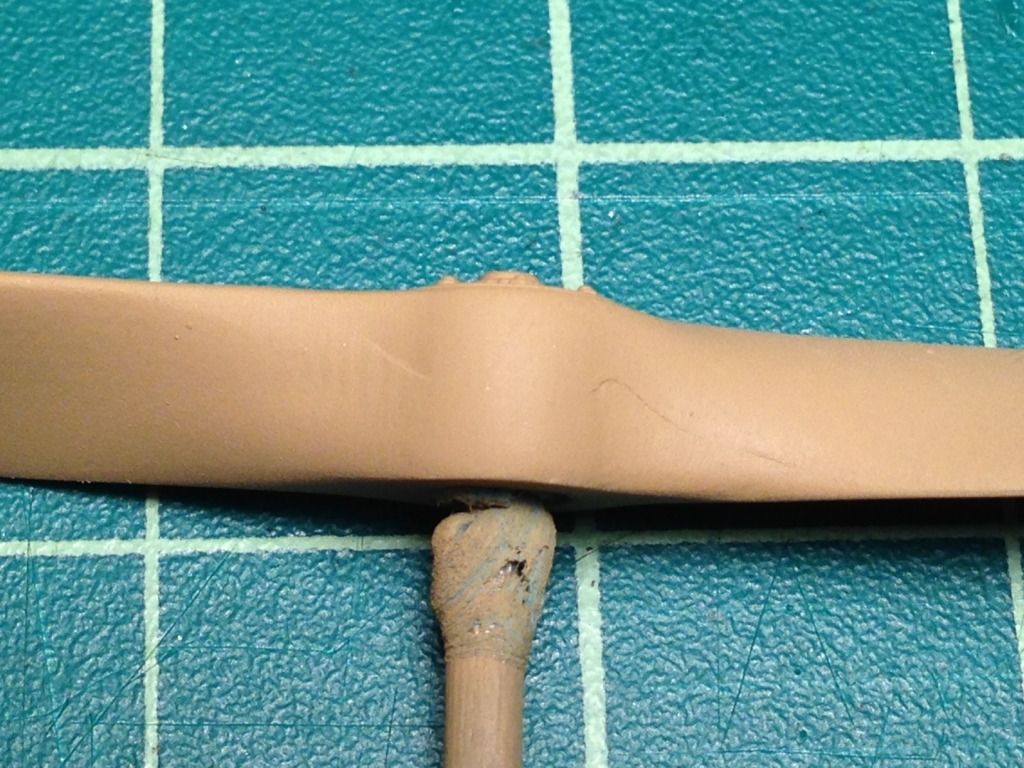
The Garuda propeller needs to have a laminated (light/dark) effect that I have not fully planned out just yet.  I don't think I can mask those compound curves to get appropriately parallel lines, and I certainly don't trust myself to do it by hand.  I seen examples done with colored pencils that look great, but again, I need to figure out some type of jig to maintain quality control.  Suggestions welcome!

Oh, and it turns out the prop has some production marks that need a bit of filling.  Given the manufacturer, I half wonder if they are part the prop!

Hopefully I'll have more to show soon.  

p.s.  I love seeing the people's work so far... two ships!  I can't wait to watch those come together; I have no experience there whatsoever!

  • Member since
    October 2004
  • From: Northern Virginia
Posted by ygmodeler4 on Monday, July 28, 2014 11:44 PM

Oh man! this snuck up on me too....I was chomping at the bit to get started and then had a few other bb's start so my builds will have to wait as well...like others I shall be watching closely though. I am excited about those ships too!

-Josiah

  • Member since
    October 2011
  • From: Lake Villa, Illinois
Posted by Chuck Davis on Tuesday, July 29, 2014 7:05 AM

WOW!  Those ships have some serious photoetch.  They will be cool to watch coming together - can't wait

Chuck Davis

  • Member since
    December 2002
  • From: Bury St Edmunds, Suffolk, England
Posted by Bish on Tuesday, July 29, 2014 7:33 AM

Nice to see some ships mixed in on a GB.

Steve, welcome to the world of group builds. It can be tricky as to when to do a pic update. To often and you end up showing every part being added and not enough and you go from a box to the completed model in two quick steps. Just post updates when ever you get to a stage where you think its worthwhile. If there is anything along the way that you think others might want to see, such as a problem you have over come, or one you can't over come, you can do an early update if you need feedback or slot it into your regular update if you want to make others aware of it. But you will soon get the hang of it.

Blue, ever since I did the FSM WW! areo GB last year and saw the great build mike and the others did with WnW kits, I have been seriously considering one of their kits, and this one has been at the top of the list.

Its German and has a single wing, which means its closer to what I am used to doing. So I will be watching that build.

Mike, is that the same kit you did, or was it the other version.

I am a Norfolk man and i glory in being so


On the bench: Airfix 1/72nd Harrier GR.3/Fujimi 1/72nd Ju 87D-3

JOIN OUR COMMUNITY!

Our community is FREE to join. To participate you must either login or register for an account.

SEARCH FORUMS
FREE NEWSLETTER
By signing up you may also receive reader surveys and occasional special offers. We do not sell, rent or trade our email lists. View our Privacy Policy.