SEARCH FINESCALE.COM

Enter keywords or a search phrase below:

100th Anniversary of WWI GB

75528 views
879 replies
1 rating 2 rating 3 rating 4 rating 5 rating
  • Member since
    April 2006
  • From: Denver, Colorado
Posted by waynec on Wednesday, August 13, 2014 9:57 PM

that is one sweet engine. i am starting to do that with truck engines if i have a nice model to work fron

Никто не Забыт    (No one is Forgotten)
Ничто не Забыто  (Nothing is Forgotten)


  • Member since
    April 2006
  • From: Denver, Colorado
Posted by waynec on Thursday, August 14, 2014 6:03 PM

had to CYA the track on. weathered it with TAMIYA dark rust followed by black powders. it wouldn't be that rusty but it looks better. i did NOT spray it with mud or dirt. to be realistic the whole thing would be mud. the camo blended much better with the oil washes. it's just sitting on the base so i know there are gaps under the track. if i mount it permanently i will add some LIQUIDTEX, paint it, and press the tank in.

money shot

Никто не Забыт    (No one is Forgotten)
Ничто не Забыто  (Nothing is Forgotten)


  • Member since
    February 2005
  • From: Proctor. MN
Posted by 65ss on Thursday, August 14, 2014 7:30 PM

Man is it fun watching all these different builds!

John the interior parts look good, I really like the engine!

Doug that engine looks great!

Steve I built my first ship model last year, and would like to do another so I'll be watch yours closely, By the way it looks good so far!

WAYNEC the washes turned out great, they're just enough! I really like the color of the tracks!

Dale

  • Member since
    September 2013
  • From: San Antonio, Texas
Posted by Marcus McBean on Thursday, August 14, 2014 7:45 PM

Looking really nice, really really like the paint job.

  • Member since
    October 2011
  • From: Lake Villa, Illinois
Posted by Chuck Davis on Thursday, August 14, 2014 8:57 PM

Great updates everyone!  I'm especially watching the armor and the ships...much to learn!

Chuck Davis

  • Member since
    July 2010
  • From: Tempe AZ
Posted by docidle on Thursday, August 14, 2014 11:39 PM

John,

Love your Albatross so far, I can hardly wait to see the fuselage together.

Doug,

Great work so far. Is that I release Spad or an older kit?

Wayne,

Your MK 1 is really cool although I can never figure out how anyone can build in that small a scale?!

Dale,

I'm glad you're watching my Dreadnought build, thank you and if you want to a more detailed post, I am posting the build over in the Ships forum.

Steve


  • Member since
    December 2002
  • From: Bury St Edmunds, Suffolk, England
Posted by Bish on Friday, August 15, 2014 1:52 AM

Nice work wayne, nice muddy looking base as well.

I am a Norfolk man and i glory in being so


On the bench: Airfix 1/72nd Harrier GR.3/Fujimi 1/72nd Ju 87D-3

  • Member since
    October 2008
  • From: Georgia
Posted by Rigidrider on Friday, August 15, 2014 6:59 PM

Steve... just picked up the SPAD about 2 or 3 mo ago at LHS. I was going to do a balsa SPAD but just cant seem to get the hang of applying the tissue correctly, Maybe later...

Doug

When Life Hands You A Bucket Of Lemons...

Make Lemonade!

Then Sell It Back At $2 Bucks A Glass...

  • Member since
    January 2013
Posted by jibber on Saturday, August 16, 2014 12:43 PM

Wayne what a very cool build, I love how the paints and the washes worked together to make those rivets just pop. WWI had some interesting vehicles, I can't wait to get started on this one.  

  • Member since
    June 2010
  • From: Rochester, New York USA
Posted by rocker286 on Saturday, August 16, 2014 5:21 PM
I've really been enjoying all the photos you folks have been sharing! I just finished up an He 115 model this afternoon, and I'm all set to start on my Nieuport tomorrow!! DSCF1489

4badges

  • Member since
    October 2008
  • From: Georgia
Posted by Rigidrider on Sunday, August 17, 2014 6:45 AM

Morning all... Got some more done last night.

I want the seat to look more wooden, so I'm going to laminate it with thil pieces of balsa. 

The engine craddle and forward section cockpit frame. This for the most part wont be seen, so just painting a wood tone when it needs.

Put a couple of plastistrip pieces inside the fuselage and some metal foil inside the engine compartment to try to simulate the aluminium nose pieces and covers, also dirtied it up a bit with Tamiys acryl smoke and soot.

Cockpit nearing finishing, I cut some  "Gauge Housings" from an old chromed sprue and will add gauge faces from a decal set. most of the cockpit trim and inserts had to be made as they are not provided with kit.

And lastly the fuse halves are together, Thats all for now, hoping to be able to do more later today,

Thanks, Doug 

When Life Hands You A Bucket Of Lemons...

Make Lemonade!

Then Sell It Back At $2 Bucks A Glass...

  • Member since
    September 2013
  • From: San Antonio, Texas
Posted by Marcus McBean on Sunday, August 17, 2014 9:53 PM

Just a quick update on what I have gotten done since the last post. 

Added the torpedo doors (4) on the hull plus the door on the bow.  Glue the deck in place, there were a few gaps at the stern on both port and starboard side.  A little Tamiya green putty and white glue took care of them. 

The hull is 95% painted.  Had a little grey paint dust settle on the hull bottom when I picked up the model while spraying the upper hull for a better view and the suction from the spray booth pulled the over spray onto the hull.

Been spending a lot of time cleaning up flash, mold lines, and such.  For the great reviews I read and heard about ICM products this the most cleaning of parts I have ever done so far.

Anyway here are a few pictures of the hull and deck.  Will start on the deck and lower superstructure this week.

This is my first time using Model Master Enamels.  I must say I like them very well, no problems using with the airbrush.  The airbrush seem to work better after cleaning it with enamel thinner after the first use. 

Marcus

  • Member since
    February 2005
  • From: Proctor. MN
Posted by 65ss on Monday, August 18, 2014 6:31 PM

doug the Neiuport looks good!

Marcus the hull looks good. I use MM Enamel paints almost exclusively, they really seem to lay down smooth for me. The separation line between the colors look nice and straight. When I did my ship it took a few tries before I was happy with my masking.

Dale

  • Member since
    September 2013
  • From: San Antonio, Texas
Posted by Marcus McBean on Monday, August 18, 2014 7:27 PM

Dale,

Thanks for the feedback.  It took me a few tries also.

  • Member since
    June 2010
  • From: Rochester, New York USA
Posted by rocker286 on Tuesday, August 19, 2014 5:33 PM
I figured I'd try my luck at using artist's oils to simulate wood grain on the prop blades and interior of my Nieuport. I read Chuck Davis' article in the current issue of FSM about this technique only two days ago, so the information was fresh in my mind. I know the photo isn't the best quality (It's really hard to zoom in on a plane this small!) but I'm pleased with the results! Now I just have to wait and let it dry for a few days...Tom Petty was right- waiting IS the hardest part! DSCF1495

4badges

  • Member since
    December 2002
  • From: Bury St Edmunds, Suffolk, England
Posted by Bish on Tuesday, August 19, 2014 5:37 PM

Nice work there Marcus.

I mainly use enamels and find the airbrush cleans a lot easier than after using acrylics.

I am a Norfolk man and i glory in being so


On the bench: Airfix 1/72nd Harrier GR.3/Fujimi 1/72nd Ju 87D-3

  • Member since
    October 2013
Posted by Big Blue on Tuesday, August 19, 2014 7:25 PM

Well, two nearly straight weeks of amazing weather and a concurrent family vacation have been wonderful, but have really slowed my progress on my Eindecker.  I do have a small update to share, but first want to congratulate the other participants on some great looking work.  I have been enjoying your updates in lieu of actual modeling myself.

Steve, the Dreadnought is coming along nicely, and I'm certain will be very impressive once finished.

David, I am looking forward to seeing your St. Chamond build.  I don't envy the work you have ahead on the tracks!

Wayne, your tank came together quite nicely.  Looks like your new airbrush is working out well!

Marcus, the hull looks fantastic, and the extra detail you are adding to your build will surely pay off.

Doug, great work so far on the Spad; the engine is a nice little model unto itself.

Rocker, great start with the woodwork.  I am always impressed with you folks who can pull off the 1:72 scale biplanes since I can barely find my way around in 1:32!

Sorry if I missed anyone... if I did, it isn't a reflection on your work, but rather about how I have done a poor job keeping up with the GB thread.

Ok, here is the small update I promised:

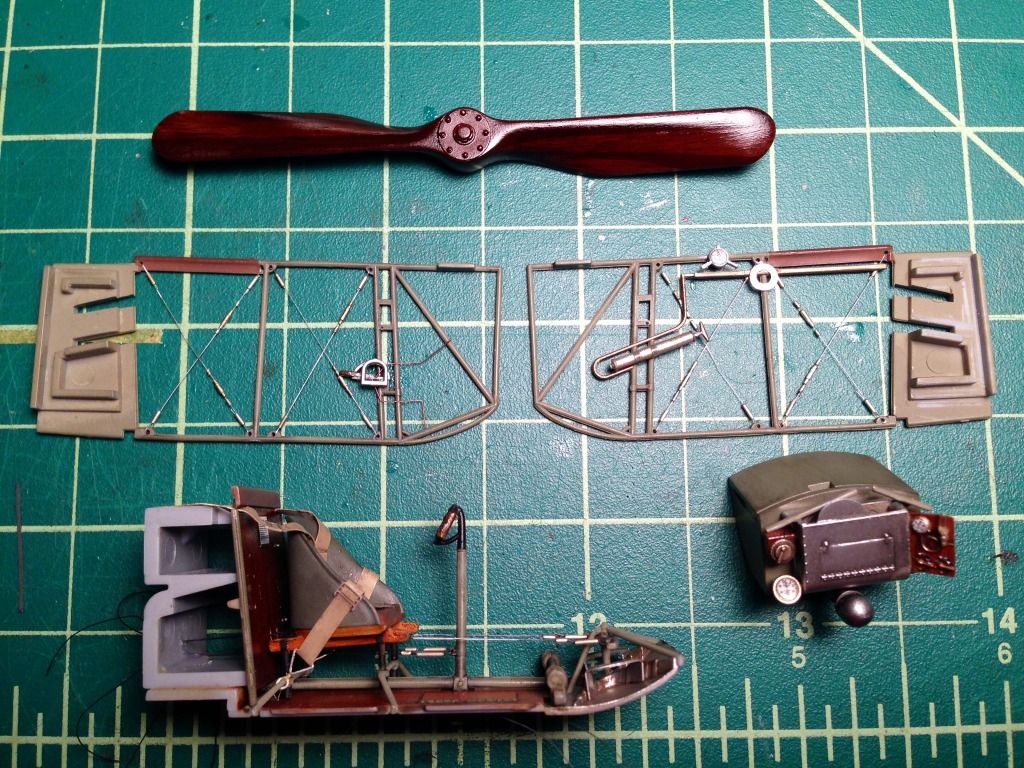
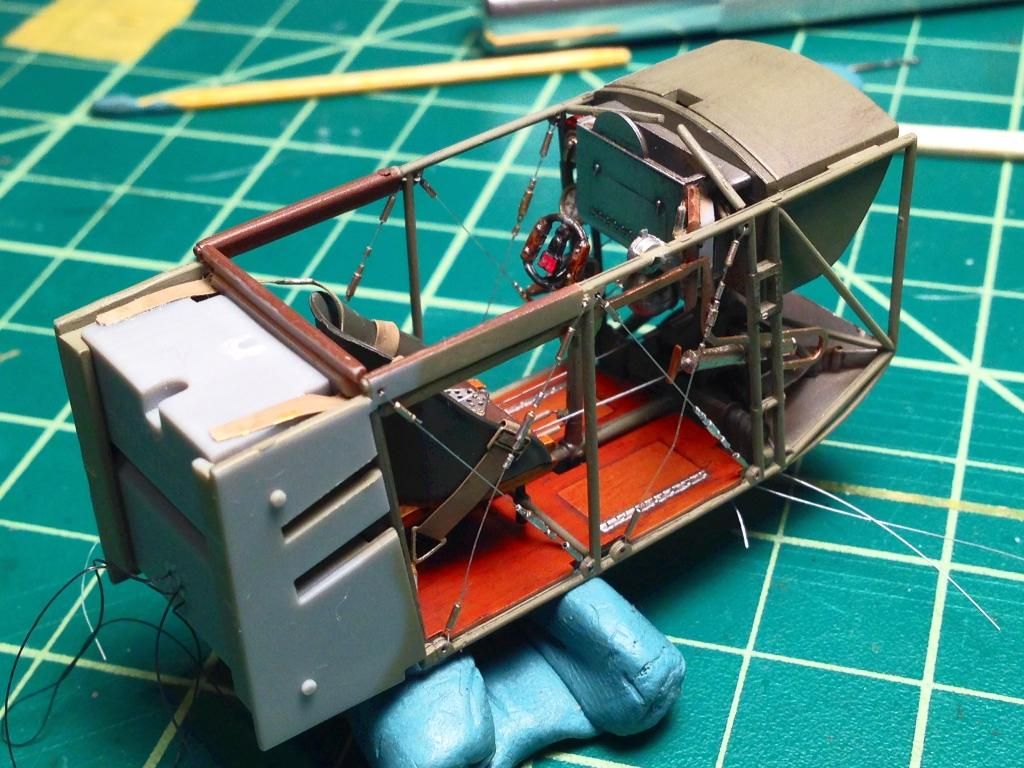
As you can see, I have nearly finished the work on the cockpit, with a just a little bit of rigging to do across the front of the framing once it is put together (the cockpit is just press-fit for the pictures), and perhaps some additional detailing of the control stick.  I can see in the last picture that I need to touch up the paint on the back of the pilot's seat (I may be ready to try out those HGW fabric belts as I am getting sick of wrestling with photo-etch and delicate paint.)

The side bracing wires are monofilament and silver Sharpie, and the turnbuckles are from pieces of slide fit aluminum tubing that I cut, assembled, and colored with a gold Sharpie.  I will need to tighten one or two of them up with a blown out match once I actually assemble the interior as those thin framing tubes have a bit of flex in them.  

The control rigging is EZ Line (silver Sharpie again) and nickel silver tube.  I also rigged what I assume will be the wing-warping control lines from the control rod under the seat (you can see the mono sticking out from underneath the assembled cockpit).  I think that they will just run to a pair of turnbuckles where the longer wing rigging will take over, but I wanted them to be long enough for me to work comfortably when the time comes.  I have also drilled the attachment point at the bottom of the control stick for future rigging.

Finally, I gave the propeller a few coats of clear once the oils had a chance to dry (yellow/orange mix, followed by a brown I mixed from clear yellow, red & blue).

That's all for now.  Thanks for taking the time to read this, and keep up the good work all.

Blue

  • Member since
    September 2013
  • From: San Antonio, Texas
Posted by Marcus McBean on Tuesday, August 19, 2014 9:53 PM

Blue,

That cockpit looks fantastic, great detail and colors.

Marcus

  • Member since
    December 2002
  • From: Bury St Edmunds, Suffolk, England
Posted by Bish on Wednesday, August 20, 2014 4:07 AM

That's a sweet looking cockpit there Blue. Some amazing detail in this, wish I could get wood to look like you have on the prop.

I am a Norfolk man and i glory in being so


On the bench: Airfix 1/72nd Harrier GR.3/Fujimi 1/72nd Ju 87D-3

  • Member since
    October 2008
  • From: Georgia
Posted by Rigidrider on Wednesday, August 20, 2014 4:51 AM

Blue... That cockpit is amazing!

Doug

When Life Hands You A Bucket Of Lemons...

Make Lemonade!

Then Sell It Back At $2 Bucks A Glass...

  • Member since
    July 2013
Posted by DURR on Wednesday, August 20, 2014 5:17 AM

the engines look like the size of a wwii fighter fuselage on that staaken  wow

  • Member since
    October 2011
  • From: Lake Villa, Illinois
Posted by Chuck Davis on Wednesday, August 20, 2014 7:53 AM

Beautiful cockpit, Blue!

Chuck Davis

  • Member since
    January 2014
  • From: Toronto
Posted by Rob S. on Thursday, August 21, 2014 6:56 AM

Goodday All...first off, the level of work happening on this GB is absolutely stellar and I hope I can keep up with the outstanding quality!! I have done 4 GBs since I signed on for this GB way back in its early inception and I'm happy to now be focused on my Roland. Just finished step one after a week (long dry time for artists oils Embarrassed) The first step of this WnW Roland gets the ground work done for the front of the cockpit.

Footboards - Valejo wood with artists oil burnt umber. MG magazine:

add in the front wall:

Spent belt box, fuel tank and all parts prior parts assembled...thus ends Step 1!

______________________________________________________________________________


On the Bench: Nothing on the go ATM

  • Member since
    March 2013
Posted by Ssasho0 on Thursday, August 21, 2014 8:47 AM

Hi Rob,

good start on the Roland, but you hould think about the control wires right now, before gluing everything :) They are quite visible in the end, for everyone that wants to take a look at the cockpit and really add to the build.

best regards,

Sasho

  • Member since
    January 2014
  • From: Toronto
Posted by Rob S. on Thursday, August 21, 2014 9:38 AM

Thanks Sasho, I`ll look ahead in the book!! Cheers for that!

______________________________________________________________________________


On the Bench: Nothing on the go ATM

  • Member since
    October 2013
Posted by Big Blue on Thursday, August 21, 2014 3:48 PM

Marcus, Bish, Doug & Chuck: Thanks for the kind comments.

Rob: Great start on the Roland; your wood & metal work look great!  What did you use for the aluminum?

I hope to have some more updates soon.

Blue

  • Member since
    January 2014
  • From: Toronto
Posted by Rob S. on Thursday, August 21, 2014 4:49 PM

Hey Big Blue...thanks..alum is Vallejo Air aluminum with an acrylic blk wash, then finished off with an enamel aluminum drybrush on raised details.

______________________________________________________________________________


On the Bench: Nothing on the go ATM

  • Member since
    December 2002
  • From: Bury St Edmunds, Suffolk, England
Posted by Bish on Friday, August 22, 2014 4:38 AM

Rob, that's awesome. Love the effect of the wood and metal. Great work.

I am a Norfolk man and i glory in being so


On the bench: Airfix 1/72nd Harrier GR.3/Fujimi 1/72nd Ju 87D-3

  • Member since
    January 2014
  • From: Toronto
Posted by Rob S. on Friday, August 22, 2014 5:36 AM

Thanks Bish, gonna get back on this project on the weekend...more progress to follow.

______________________________________________________________________________


On the Bench: Nothing on the go ATM

  • Member since
    October 2013
Posted by Big Blue on Friday, August 22, 2014 9:35 AM

Small update:

One of the distinctive features of the Fokker Eindecker is the turned aluminum cowling seen in the picture below:

The prevailing theory seems to be that the builders "turned" a disc of soft pure aluminum into the stronger duralumin sheet metal for anti-corrosive benefits.  Looked cool too.  

I have been playing around with a couple of techniques to replicate this finish, and made a pass at it using the  combination of paints (Tamiya Flat Aluminum & Tamiya Chrome Silver) recommended by Wingnut Wings.

I sprayed the Flat Aluminum base, and then brush painted the Chrome Silver swirls.  The challenges are two-fold: first, despite heavy use of Mr. Color Leveling Thinner, I had a hard time keeping the Tamiya paint from thickening up while brush painting, resulting in heavier swirls than I wanted.  Second, the difference in the two paints is primarily in the amount of light they reflect, so it can be tricky to see what you are doing unless the light is at an oblique angle to separate the two colors.

Overall, I like the effect, but am leaning towards stripping it down and taking another stab at it, either with the same paints (but a greater attention to keeping my swirls thin), or with a different, still-to-be-discovered-by-me technique (I have one or two that I hope to try on some scrap plastic today).

I figured since this was a group build, I'd show the process rather than jus the results.

Elsewhere, I have also started working on the Taurus resin engine:

All I can say is "wow".  The level of detail on this tiny motor is pretty amazing.  Until I actually received the kit, my brain couldn't appreciate how small these parts are:

In case the match doesn't provide perspective, my cutting mat is a 1/2 inch grid.

I managed to separate the most delicate looking bits, the valve rocker arms (two of which can be seen on the emery board next to the crankcase) from their resin blocks without breakage, which was a relief.  I nearly lost one to the carpet monster, but swearing, praying and crawling around on my elbows and knees with a magnifying glass saved me.  I still have the propeller shaft, cylinder heads, tappets, bushings, spark plugs and push rods to go.  Plus ignition wires and valve springs.  I'm looking forward to working on this.  Very cool.

Blue

JOIN OUR COMMUNITY!

Our community is FREE to join. To participate you must either login or register for an account.

SEARCH FORUMS
FREE NEWSLETTER
By signing up you may also receive reader surveys and occasional special offers. We do not sell, rent or trade our email lists. View our Privacy Policy.