SEARCH FINESCALE.COM

Enter keywords or a search phrase below:

P-40 GB 2014

55331 views
508 replies
1 rating 2 rating 3 rating 4 rating 5 rating
  • Member since
    January 2011
  • From: Commonwealth of Virginia
Posted by Tal Afar Dave on Saturday, April 26, 2014 8:56 PM

Hey Joe,

Sorry the skeletal wing project didn't work out.  Your guns and ammo boxes look pretty convincing....What are the handles on top of the boxes for? (Not familiar with the internal workings on the P-40 wing.  Did you scratch the guns or are they AM?

Thanks,

TAD

2022 New Year's Resolution:  Enter 1 group build and COMPLETE a build this year!!  Why Photobucket did you rob me of my one Group Build Badge???  Must be part of the strong anti-Monogram cartel!!!

 ]

  • Member since
    June 2013
Posted by bvallot on Saturday, April 26, 2014 10:17 PM

mississippivol

Bv, are you adding the machine guns in the cockpit as well? I didn't see them sticking out by the instrument panel.

Oh yeah! That's coming next. =]  I had to get the IP set into place first.  The two .50s will go right where they're supposed to only that the extended barrel on the left side will be made to come apart so that I can take off the cowl piece to reveal the engine.  Or at least that's the plan currently.  I'm using some Albion slide tubes to do the trick.  I wanna say I learned about them on the NMF GB ??  So that long barrel will slide in and out of what will be the end of the regular .50 cal gun barrel.  I won't bother opening up the ammo bay doors for that since I'm running out of time on this.  =P  Plus, I am still new to all this super-detailing.  It doesn't seem overwhelming until you're waist deep in it and not getting anywhere. 

Joe:  Don't be bummed about the ribbing around the wing.  I'm sure the route you're taking now will work out better anyhow.  To be honest, I hadn't even researched that deep into what the damn ammo boxes looked like yet.  I've been so busy researching every other aspect of the plane that I am going to show that I never even bothered to look.  =]  So with that said...your's look great!!  =D  I doubt I would have come to learn about it any sooner. Yes

On the bench:  

Tamiya F4U-1  Kenneth Walsh


  • Member since
    September 2011
Posted by fightnjoe on Sunday, April 27, 2014 7:34 AM

thanks for the kind words.

the guns are scratched out.  

joe

Veterans,

Thank You For Your Sacrifices,

Never To Be Forgotten

Where you can find me:

Workbench on FaceBook  Google Plus  YouTube

  • Member since
    December 2013
  • From: Greenville, TX.
Posted by Raymond G on Tuesday, April 29, 2014 12:15 PM

Hey guys.  Everyone's models are looking great.  Kinda feel out of my league ;-)  My surgery went well, and I'm hoping that maybe next week I can spend a little time on my Warhawk.  It's killing me not being able to work on it...

Bvallot:  I'm glad I saw your last post.  I wondered how the armor plated back to the cockpit was going to fit... I have no idea why I didn't think about putting it in the back!  

See you guys in a week or two, Raymond

On the Bench:

U.S.S. Arizona (Revell)

P-51D Tribute (Revell)

57 Chevy Bel Air


  • Member since
    June 2013
Posted by bvallot on Tuesday, April 29, 2014 1:10 PM

No worries Ray! That's why we're all here.  ;]  Glad to hear you're on the mend. 

Here's my latest...it ain't much as I'm double dipping at the moment with my P-38. heheheee

So here's what I have scratched out so far with the .50 cal set up and the bulkhead behind the motor mounts.

On account of the time left for this build, I decided not to engineer another bulkhead where the .50 barrels rest.  Instead, I just fashioned a shelf that also reinforces the fuselage.  It's basically just an L bracket.

 image by brittvallot, on FlickrNext, I've built up the coolant expansion tank with the straps to hold it down and some other goodies...primed it for paint.

 image by brittvallot, on Flickr

 image by brittvallot, on Flickr

So far...everything seems to still be right on the money.  No ill-fitting parts yet.  I had to be careful with that strut for the .50s.  It was a tight fit and I didn't want it to spread the fuselage to the point where my engine mount would be loose.

Critiques and comments are always welcome.  =]

On the bench:  

Tamiya F4U-1  Kenneth Walsh


  • Member since
    September 2011
Posted by fightnjoe on Tuesday, April 29, 2014 11:18 PM

well another update with a few extra pictures.


work focused on the brownings for the starboard wing. i also repopped the ammo box. all in all the brownings are over 30 pieces each. they both have the cables for the remote triggers.

the brownings painted and installed.

Image
Image
Image

the ammo box

Image
Image

this more closely resembles the pictues i have found.

now the overall. mind you the wing is taped for effect.

Image
Image

with that i may try to piece together a small resemblance of the rounds. will have to see about that. 

overall i am pretty happy with this. the gun body is glued in. the barrel is removable so i can fit the wing and do any filling and sanding without causing issues. 


now please, comments, critiques, and criticism are encouraged. 


joe

Veterans,

Thank You For Your Sacrifices,

Never To Be Forgotten

Where you can find me:

Workbench on FaceBook  Google Plus  YouTube

  • Member since
    December 2013
  • From: Greenville, TX.
Posted by Raymond G on Wednesday, April 30, 2014 8:17 PM

Man, looks great Joe!  The detail you guys are going to blow my mind.  Raymond

On the Bench:

U.S.S. Arizona (Revell)

P-51D Tribute (Revell)

57 Chevy Bel Air


  • Member since
    October 2008
  • From: Georgia
Posted by Rigidrider on Thursday, May 1, 2014 11:22 AM

Nice detail Joe... very realistic! Love the ammo box... well, I'm going to be starting mine soon... not as detailed as what your doing but I'll do my best, ha!

Doug

When Life Hands You A Bucket Of Lemons...

Make Lemonade!

Then Sell It Back At $2 Bucks A Glass...

  • Member since
    September 2011
Posted by fightnjoe on Thursday, May 1, 2014 12:17 PM

many thanks.  you are both very kind.

joe

Veterans,

Thank You For Your Sacrifices,

Never To Be Forgotten

Where you can find me:

Workbench on FaceBook  Google Plus  YouTube

  • Member since
    April 2010
Posted by Theuns on Friday, May 2, 2014 11:16 AM

Just stunning!

Theuns

  • Member since
    June 2013
Posted by bvallot on Thursday, May 8, 2014 12:10 AM

Last quick update here for a little while.  Honest! ;)

Started looking more at the wheel bay just so I don't have any surprises later on when I'm ready to get the wings together.  I realize the wheels will cover mostly everything, but since I'm going the distance already I figured I'd do a little something for all visible areas.  Didn't want to over do it and find issues with the fit so i settled for this:

 image by brittvallot, on Flickr

 image by brittvallot, on Flickr

 image by brittvallot, on Flickr

 image by brittvallot, on Flickr

Still going to fix up the landing gear here.  This is a stopping point for now.  Anybody else out there who's tackled the Warhawk have any input...hit me.  

On the bench:  

Tamiya F4U-1  Kenneth Walsh


  • Member since
    October 2008
  • From: Georgia
Posted by Rigidrider on Thursday, May 8, 2014 11:17 AM

Very nice detailing... those little extras are what really brings one to life!

Doug

When Life Hands You A Bucket Of Lemons...

Make Lemonade!

Then Sell It Back At $2 Bucks A Glass...

  • Member since
    March 2008
  • From: West Palm Beach, Florida
Posted by mic53mlb on Thursday, May 8, 2014 5:37 PM

fightnjoe, I hope you are making pull away panels to show off your work, excellent !!! Everyone, very good work !!! I wish I had the time right now to join in (I bought a Hase 1/48 P-40E plus Eduard and PE accessories), maybe next year's GB. You guys are Inspiring !!! Keep up the good work.

  • Member since
    March 2008
  • From: West Palm Beach, Florida
Posted by mic53mlb on Thursday, May 8, 2014 5:41 PM

Tal Afar Dave, those are handles for the .50 Cal ammo boxes for the guns in the wings. When ground/support crew loaded the guns they had to heft those things up onto the wing, I'm pretty sure they were quite heavy i.e. handles. Hope this helps, enjoy.

  • Member since
    June 2013
Posted by bvallot on Thursday, May 8, 2014 9:02 PM

Yeah, I forgot to mention it earlier, but those handles are a nice touch. =]

On the bench:  

Tamiya F4U-1  Kenneth Walsh


  • Member since
    September 2011
Posted by fightnjoe on Saturday, May 10, 2014 12:44 PM

you are all very kind.

ok folks i am here again. more boredom.

spent quite a bit of time playing with the landing gear and the flaps. alot of trimming, sanding, trimming, scrapping, starting over...........in other words the same as all my work sessions. 

first up are the flaps. these turned out ok for me. when painted they actually should look very good. i hope.

Image
Image

and then fit into the slot.

Image

and now i need help. been playing with the landing gear. this is another "the kit part looks ok but can i do it better". i still have a few bits to add, mostly bolt heads and such. but overall they are done. mind you they are multiple pieces. the long leg is all glued and mostly ready. the lower "wheel" attachment is loose with the inner tube loose yet. i want your blunt opinion on them.

first up is both together. the kit part on the right. please remember when glued they will be much straighter.

Image

now my versions and then fit into the wing.

Image
Image

like i said i want blunt opinions on this. nothing is set in stone and i could go either way. 


all comments, critiques, and criticism are encouraged.


joe

Veterans,

Thank You For Your Sacrifices,

Never To Be Forgotten

Where you can find me:

Workbench on FaceBook  Google Plus  YouTube

  • Member since
    April 2010
Posted by Theuns on Sunday, May 11, 2014 1:37 AM

Hey Folks, please tell me if I have missed anyone's completed pix on the front page so I can update asap.

I have been running mad lately with tight deadlines on project completion and have not been online as much as I would have liked :-(

Theuns

  • Member since
    March 2013
Posted by MikeyBugs95 on Sunday, May 11, 2014 2:16 AM

Hey. I'd enlist in this with a Mauve P-40M but I'd have no time as I am planning to acquire some AM details for it over the summer. Is there another P-40 GB planned after this is over?

 In progress:

CAD:

1/35 SINCGARS ICOM/ASIP; 1/35 Flat screen TVs; 1/35 tactical light that I shall reveal later Devil

Models:

1/35 DML M4A1 DV; AFV Club M18 Hellcat; DML StuG IV; DML Armored Jeep w/ .50 cal; Panda Cougar 4x4 MRAP; Academy M3A1 Stuart; 1/700 Midship Models USS Miami; 1/700 Skywave Rudderow Destroyer Escort

  • Member since
    April 2010
Posted by Theuns on Sunday, May 11, 2014 4:20 AM

As long there is enough interest I am sure another P-40 GB could be hosted by someone :-)

Theuns

  • Member since
    September 2011
Posted by fightnjoe on Wednesday, May 14, 2014 10:53 PM

ok all today was a big day for me and this project. it is the turning point. 

before that though some different little stuff needed some work.

the landing gear. those blasted scissors.

Image

those look better. not 100% but much better.

paint on the flap interiors.

Image

then i needed to add some detail to the cowl flaps.

Image
Image


now for the milestone. the wings are glued on. this is a major step for me and this project. once the filling and sanding are done it will be just little bits and pieces left other than the .5 cal guns in the nose. 

but for now, the milestone.

Image

now this was not without a minor inconvenience.

Image

pretty large gap right there. in part because of all the sanding and stuff i did in the starboard wing, but fear not, i have already applied a homemade liquid styrene goop into this to try to get it to go away. 


i have also made a list of the items left to do and to install. only about a dozen things and some need to be after paint. the biggest thing will be the .5 cal guns and the blast tubes.


all comments, critiques, and criticism are encouraged. 


joe

Veterans,

Thank You For Your Sacrifices,

Never To Be Forgotten

Where you can find me:

Workbench on FaceBook  Google Plus  YouTube

  • Member since
    October 2008
  • From: Georgia
Posted by Rigidrider on Saturday, May 17, 2014 1:40 PM

Joe... WOW,  Great detail! Shes coming along great!...

When Life Hands You A Bucket Of Lemons...

Make Lemonade!

Then Sell It Back At $2 Bucks A Glass...

  • Member since
    October 2008
  • From: Georgia
Posted by Rigidrider on Saturday, May 17, 2014 2:03 PM

Well, I had time to slow down for a bit and its time to begin posting my build...

This will be an aircraft of the 10th AirForce, 80th Fighter Gp, 89th Squadron. This aircraft was one of the later Flying Tiger birds turned over to the Army Air Corps, and used in The Burma Theater to escort supplies over "The Hump" along with harassing the Japanese convoys and sea shippments into the area in late 43 into 1944, and in all ... to the end of the war. 

It will be a Revell Smithsonian series P40E I found at a swap meet a few years ago. 1/32nd scale.

Whom ever had owned it previously for some reason had taken the time to remove all the parts from the sprue...go figuer.

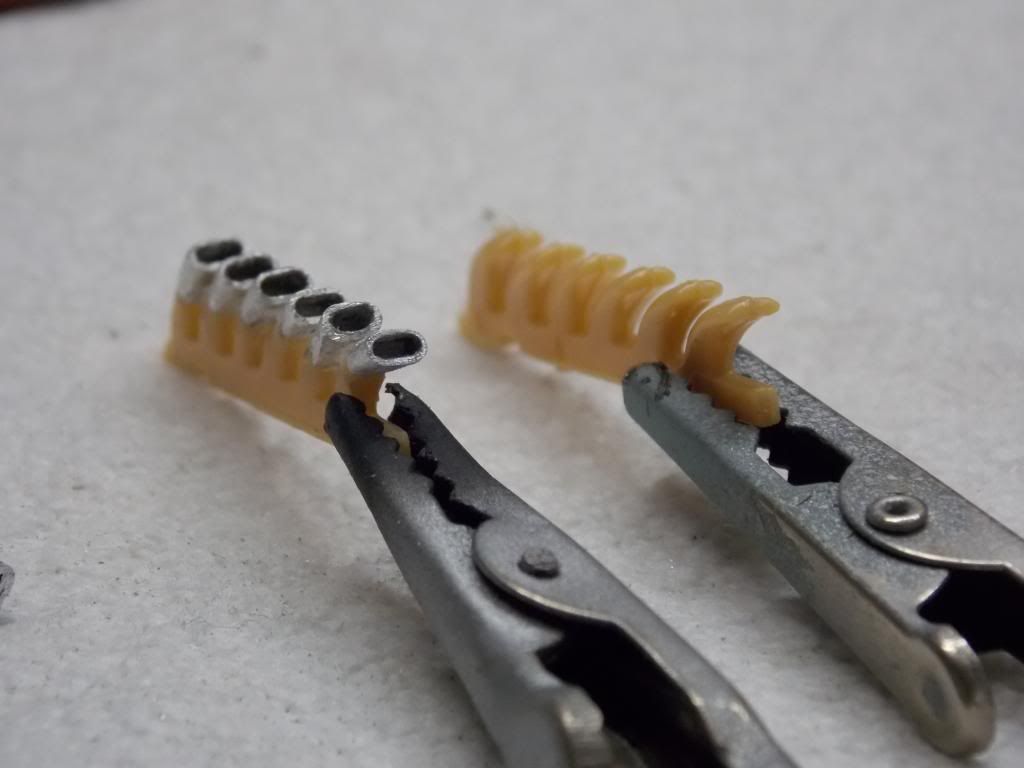
The exhause looked pretty crappy, and I had no desire to drill out so I tried something I had been wanting to do for awhile, I took some aluminum tubing 1.5mm dia. and fashioned some new tips, then filed down the original and fit them to the nubs. Though not picky picky perfect, I think they look loads better then the original.

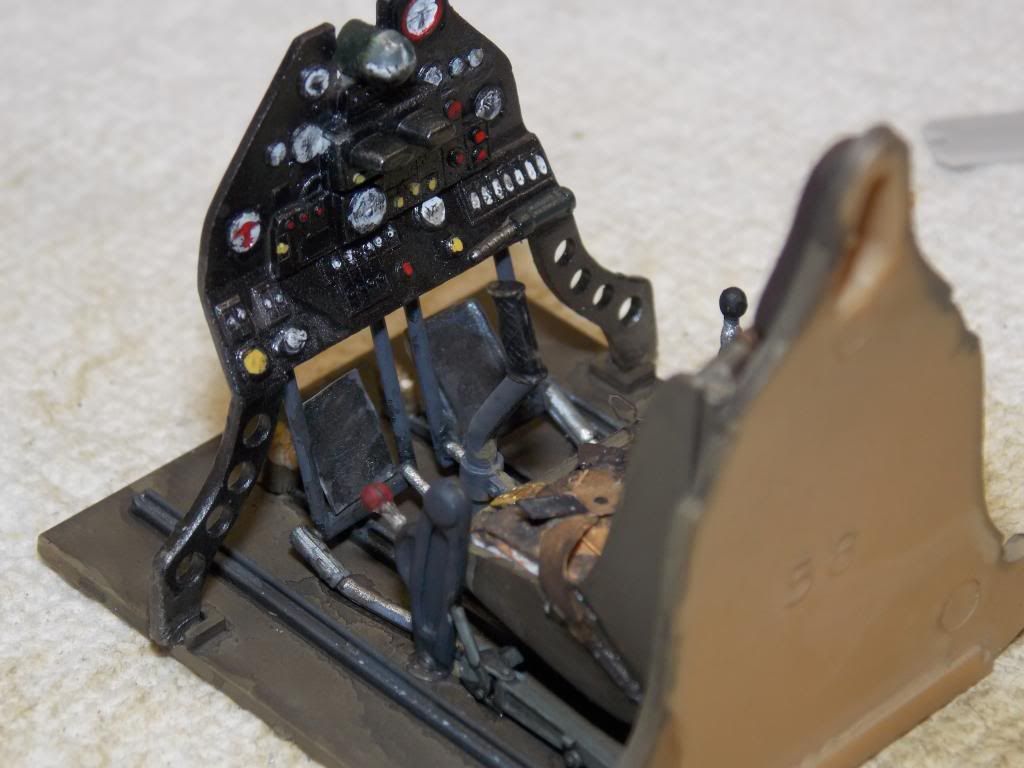
Jumping ahead abit the cockpit is nearing finish...

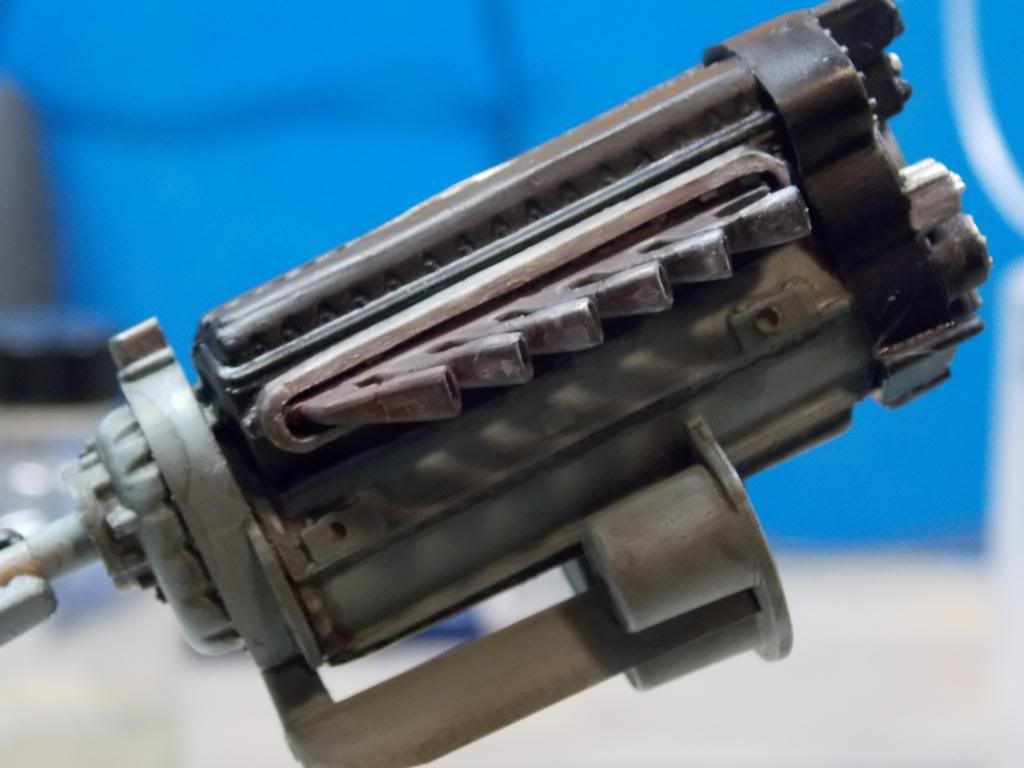
Getting ready to mate the engine to the pit assy.

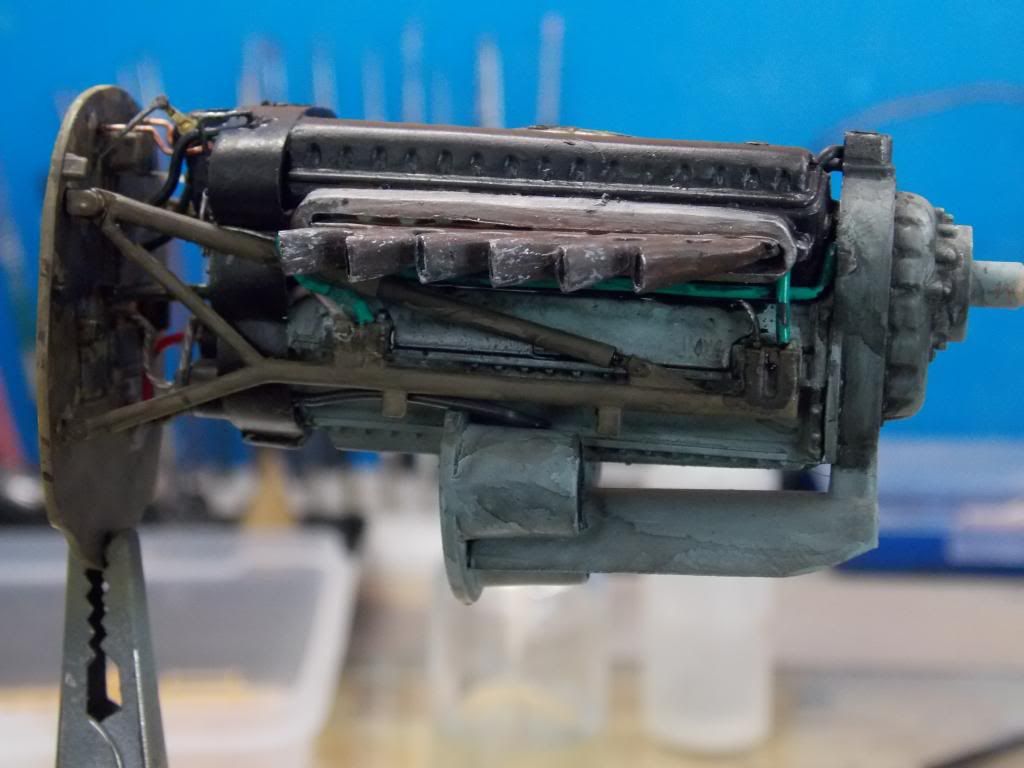
And a little of the fuse walls ...

Well thats about all for now... More in the near future!

Thanks

Doug (RR) 

When Life Hands You A Bucket Of Lemons...

Make Lemonade!

Then Sell It Back At $2 Bucks A Glass...

  • Member since
    June 2013
Posted by bvallot on Saturday, May 17, 2014 2:10 PM

Doug that looks like a great start! =]  I'm really happy to see all the linkage for the carburetor intake.  It looks great.  

On the bench:  

Tamiya F4U-1  Kenneth Walsh


  • Member since
    November 2003
  • From: State of Mississippi. State motto: Virtute et armis (By valor and arms)
Posted by mississippivol on Saturday, May 17, 2014 7:55 PM

Joe and Doug, great work so far!

  • Member since
    December 2003
  • From: Charleston, SC
Posted by sanderson_91 on Saturday, May 17, 2014 9:09 PM

Great work Joe and Doug!  

Steve


  • Member since
    October 2008
  • From: Georgia
Posted by Rigidrider on Sunday, May 18, 2014 6:34 AM

Thanks guys... This is a bit out of my "comfort zone" being most aircraft I do are Luftwaffe types, But the P40 was always my absolute favorite WWII Birdie! I'm also enjoying the amazing work going on here. I like watching other builders progress and ideas come to life.

Doug

When Life Hands You A Bucket Of Lemons...

Make Lemonade!

Then Sell It Back At $2 Bucks A Glass...

  • Member since
    October 2008
  • From: Georgia
Posted by Rigidrider on Sunday, May 18, 2014 5:56 PM

Little bit more done today...

Got the pit and the engine installed in the frame. I had a heck of a time getting all in and properly positioned, I had to insert a pair of spreaders/strengtheners behind the pit, it had some tension on it and I didnt want to see seams cracking after paint is applied.

everything finally in place and secured... I hope...

I know the gap is really there in all pictures I've seen but it still bugs me.

engine fit was ok...

and the bulk of the tail completed...

All for now,,,

Thanks, Doug 


When Life Hands You A Bucket Of Lemons...

Make Lemonade!

Then Sell It Back At $2 Bucks A Glass...

  • Member since
    April 2010
Posted by Theuns on Monday, May 19, 2014 11:33 AM

Very nice!

Theuns

  • Member since
    December 2003
  • From: Charleston, SC
Posted by sanderson_91 on Tuesday, May 20, 2014 5:00 PM

Hey Doug,

What's your technique for your exhausts?  Very realistic looking!

Steve


  • Member since
    October 2008
  • From: Georgia
Posted by Rigidrider on Tuesday, May 20, 2014 5:39 PM

  Thank you Steve... Being the pieces sent with kit looked so crappy, What I did  (been wanting to try for awhile) was to take some thin wall 3mm tubing (I used aluminum but I'm sure copper would work as well) cut to length, you just gotta play that one by ear, squeezed down to shape, (oval) then filed down the kit exhaust to leave a nub to mount to, kind of like a dentist does when fitting a crown, then CAed to the nubs. After that its just a matter of trimming and dressing to uniformity and look. I've seen a number of different shapes and tips used on this series of engine and this one was not too hard to shape.

  Thanks again... Hope that helps!

Doug

When Life Hands You A Bucket Of Lemons...

Make Lemonade!

Then Sell It Back At $2 Bucks A Glass...

JOIN OUR COMMUNITY!

Our community is FREE to join. To participate you must either login or register for an account.

SEARCH FORUMS
FREE NEWSLETTER
By signing up you may also receive reader surveys and occasional special offers. We do not sell, rent or trade our email lists. View our Privacy Policy.