SEARCH FINESCALE.COM

Enter keywords or a search phrase below:

Armour in the West GB (Defence of the Reich)

44499 views
658 replies
1 rating 2 rating 3 rating 4 rating 5 rating
  • Member since
    December 2002
  • From: Bury St Edmunds, Suffolk, England
Posted by Bish on Sunday, January 25, 2015 4:09 PM

Nice to see you started eagle, you should be able to do this blindfolded and without instructions by now. Wink

I am a Norfolk man and i glory in being so


On the bench: Airfix 1/72nd Harrier GR.3/Fujimi 1/72nd Ju 87D-3

  • Member since
    November 2009
  • From: SW Virginia
Posted by Gamera on Sunday, January 25, 2015 6:29 PM

Yeah Eagle, as Bish said you shouldn't even need the instructions by now!

"I dream in fire but work in clay." -Arthur Machen


  • Member since
    November 2010
  • From: Florida-West Central
Posted by Eagle90 on Sunday, January 25, 2015 8:11 PM

Gamera

Yeah Eagle, as Bish said you shouldn't even need the instructions by now!

LOL!  You know, funny you guys mention that.  I opened the Testors box, and started doing all the undercarriage stuff and didn't realize I never opened the instructions until I had done almost to step 3!  Too funny!

Eagle90


  • Member since
    November 2010
  • From: Florida-West Central
Posted by Eagle90 on Thursday, January 29, 2015 7:33 PM

A few more progress pics.  Decided I'm going to go with straight Dark Yellow with this one.  Considering the production dates and number produced.  I'm thinking DY would have been the most common scheme.  Thanks for looking!

Eagle90


  • Member since
    December 2002
  • From: Bury St Edmunds, Suffolk, England
Posted by Bish on Friday, January 30, 2015 12:48 AM

That's looking good Eagle.

I am a Norfolk man and i glory in being so


On the bench: Airfix 1/72nd Harrier GR.3/Fujimi 1/72nd Ju 87D-3

  • Member since
    November 2009
  • From: SW Virginia
Posted by Gamera on Friday, January 30, 2015 8:32 AM

Good start Eagle!

"I dream in fire but work in clay." -Arthur Machen


  • Member since
    November 2010
  • From: Florida-West Central
Posted by Eagle90 on Friday, January 30, 2015 11:43 AM

Bish

That's looking good Eagle.

Thank you sir!  And thank you for the help!

Eagle90


  • Member since
    November 2010
  • From: Florida-West Central
Posted by Eagle90 on Friday, January 30, 2015 11:45 AM

Gamera

Good start Eagle!

Thank you sir!  I'm excited about doing some interior detailing with this one!  The /1 and /2 didn't have any opportunity for the interior stuff, but this one being open!  I have plans for a couple of MP40's laying around, maybe a helmet!  This is cool!  I'm digging armor stuff!  Whistling

Eagle90


  • Member since
    February 2006
  • From: Cincinnati Ohio
Posted by DantheMan85 on Friday, January 30, 2015 8:04 PM

Excellent work everyone, got back to work on my Stug III.  One problem I ran into was these six tabs sticking up from the lower hull, I keep trying to fit the upper half and it just was not working.  Then taking a second look at step one, the lower hull does not have the tabs, and there is no note to remove them.  So I removed them and the fit is much better.

This Stug kit is complex in some assembly steps, but the end resualt will be a highly detailed kit.

On my Work Bench: Tamiya Ford GT 1/24

Up Coming: ?


  • Member since
    December 2002
  • From: Bury St Edmunds, Suffolk, England
Posted by Bish on Saturday, January 31, 2015 12:59 AM

That's looks nice Dan, glad to see it back.

I am a Norfolk man and i glory in being so


On the bench: Airfix 1/72nd Harrier GR.3/Fujimi 1/72nd Ju 87D-3

  • Member since
    February 2006
  • From: Cincinnati Ohio
Posted by DantheMan85 on Saturday, January 31, 2015 8:14 AM

Thanks Bish.

I'll also being using with my Stug III the magic tracks from the cyber hobby kit Pz.Beob.Wg.III Ausf.H #9136.  To replace the DS tracks. 

On my Work Bench: Tamiya Ford GT 1/24

Up Coming: ?


  • Member since
    December 2002
  • From: Bury St Edmunds, Suffolk, England
Posted by Bish on Saturday, January 31, 2015 8:27 AM

Are you not keen on those DS tracks. I would rather have Magic or Fruils, but have used the DS a couple of times and they are rather nice. Though on both occasions it was on panthers so I didn't have to worry about track sag between the top rollers.

I am a Norfolk man and i glory in being so


On the bench: Airfix 1/72nd Harrier GR.3/Fujimi 1/72nd Ju 87D-3

  • Member since
    November 2009
  • From: SW Virginia
Posted by Gamera on Saturday, January 31, 2015 6:07 PM

Looks very good Dan, sometimes chopping off the alignment pins and tabs oddly enough is the only way to get things to fit.

"I dream in fire but work in clay." -Arthur Machen


  • Member since
    April 2006
  • From: ON, Canada
Posted by jgeratic on Sunday, February 1, 2015 12:43 PM

With just a little over three months to go, I best start cracking on this one.

I think I only linked a box top cover for the Jadgpanzer IV, so here is a shot with the extras and a trio of reference books.

Also have Atak zimmerit set shown below, minus the right hull section already attached. 

 16233093100_93571bab3e_b.jpg


Atak also provides some resin pieces cast with zimmerit surfaces, and give you a choice for the front glacis.  You can choose to do numerous individual parts, or just use the all in one front hull structure, which I've already done as seen in the second photo.  A lot less work I think, just some pinholes to fill and maybe some filler on the sides.  Going the other route would require removal of the pistol ports (the pointy discs on either side of the main gun) and that is some pretty thick plastic, but suppose a dremel tool would make quick work of it.


16394525476_c9b55a5e5a_b.jpg


Some hull details on the right side.  To attach the zim, a couple pieces of tape acts as hinge for proper placement.  Acrylic Future was brushed on both surfaces and then mated together.  After about an hour or so, superglue was spread around the outer edges for more permanent setting.


16234271499_b0cc2eb7a4_b.jpg

 regards,

Jack

  • Member since
    December 2002
  • From: Bury St Edmunds, Suffolk, England
Posted by Bish on Sunday, February 1, 2015 1:34 PM

I know what you mean jack. I have just started an F-111 and the Jagdpanther will be next, going to be pushed to meet the deadline.

Nice start there, I am not seen those Zimm sets used before.

I am a Norfolk man and i glory in being so


On the bench: Airfix 1/72nd Harrier GR.3/Fujimi 1/72nd Ju 87D-3

  • Member since
    February 2006
  • From: Cincinnati Ohio
Posted by DantheMan85 on Monday, February 2, 2015 1:25 PM

Bish: Yeah I've used them on a Tiger, worked great.  But I plan to use them on my
practice tank, Cyberhobby Pz.Beob.Wg.III Ausf.H #9136.  Using it as a practice
surface for weathering and with the DS tracks.  Going to try gluing a fine
wire on the underside facing the hull, and hopefully that will be enough for the
track sag.

Gamera: Thanks.  Wounder why the instructions doesn't say anything about those
alignment tabs?

Been doing some dry test fitting of the upper and lower hull's, ran into some gap's and problems.  There's a nice gap were the lower and upper meet in the front.

And where the crew compartment and back engine deck meet, but this is small gap and should not be a problem to fill

When I glued on the idler wheel's the mount's didn't go on straight, so I modified them a little so the idler wheel will line up with the return wheels.

And ran into another problem, the gun barrel does not extend far enough into the mount(left) when you slip it through the gun cover (center)

Other than that, this is a pretty good kit.

On my Work Bench: Tamiya Ford GT 1/24

Up Coming: ?


  • Member since
    November 2010
  • From: Florida-West Central
Posted by Eagle90 on Wednesday, February 4, 2015 6:10 AM

Man, there are some great looking builds here!  Awesome work everyone!

A couple of more progress pics.  I'm at the painting stage now, just need to find the time to do it!  Also, you expert armor guys will find this funny, but I noticed as I was building the /3 that the driver had the worst seat in the house!  Good night!  Right under that big ol gun!  O.k., you can laugh at my novice observations!  Big Smile

Eagle90


  • Member since
    November 2009
  • From: SW Virginia
Posted by Gamera on Wednesday, February 4, 2015 7:42 AM

Dan & Eagle: Very nice progress guys!

Eagle: Yeah I'd figure the driver would end up with some hearing loss problems!

"I dream in fire but work in clay." -Arthur Machen


  • Member since
    November 2010
  • From: Florida-West Central
Posted by Eagle90 on Wednesday, February 4, 2015 7:59 AM

Gamera

Dan & Eagle: Very nice progress guys!

Eagle: Yeah I'd figure the driver would end up with some hearing loss problems!

Thank you sir!

LOL!  Funny scene...Soldier pulls the short straw...

"you get to drive again."

"WHAT?"

"you are driving again."

"What!  I drove the last 10 times!"

"then you are good at it.

"WHAT?"

Big Smile

Eagle90


  • Member since
    April 2006
  • From: ON, Canada
Posted by jgeratic on Wednesday, February 4, 2015 10:42 AM

Hey guys, the Stug and wheeled AFV are both looking quite good.

-----------------------------

I'm still in the process of finishing up details on the lower hull of the Jagdpanzer, but have found some mistakes on the assembly instructions (left and right parts numbers are mixed up) for Tristar's Pz IV wheel set.  If you have that in your stash or plan to purchase in the future, might be interested in these corrections:

There could be more, but the above is all I've found so far.

regards,

Jack

  • Member since
    December 2002
  • From: Bury St Edmunds, Suffolk, England
Posted by Bish on Wednesday, February 4, 2015 12:39 PM

Nice work there guys. Those builds are both looking really nice.


And as a former AFV driver who use to have a gun firing above my head, all I can say is


WHAT

Thanks for sharing that info jack, well spotted.

I am a Norfolk man and i glory in being so


On the bench: Airfix 1/72nd Harrier GR.3/Fujimi 1/72nd Ju 87D-3

  • Member since
    April 2006
  • From: ON, Canada
Posted by jgeratic on Monday, February 9, 2015 2:39 PM

Rear hull zimmerit is in three pieces, so that was attached directly with superglue.   Also scratch built a towing pin, which also required drilling a location hole .

 Those of you familiar with the panzer IV chassis will notice the road wheels look odd here.   Still need to add the rubber portions, but these will be kept separate for painting purposes. These, along with the drive sprockets and idler wheels will be left unattached for the same purpose.

16299112959_a08f095d79_b.jpg

 I had intended to use Dragon's road wheels, but they sort of float on  the Tristar axles.  The rubber on both appear to be the same width, but from the face on view, Tristar's looks to have less rubber - perhaps explained away as road wear?  Again, they appear virtually the same height/size, but the location of recessed detail on the outer rims is located differently between the two.  This just adds to the illusion, and makes it appear Dragon has a lot more rubber height than actual.

16297669178_3bce414e3c_b.jpg

 regards,

Jack

  • Member since
    December 2002
  • From: Bury St Edmunds, Suffolk, England
Posted by Bish on Monday, February 9, 2015 2:59 PM

Looking really nice Jack. I do think those Tristar wheels look better than the Dragon.

I am a Norfolk man and i glory in being so


On the bench: Airfix 1/72nd Harrier GR.3/Fujimi 1/72nd Ju 87D-3

  • Member since
    April 2006
  • From: ON, Canada
Posted by jgeratic on Monday, February 16, 2015 12:32 PM

Thank you, Bish.

Upper hull structure is now attached, as well as the main gun - mantlet is slipped on for dry fit only at this point.  Both forward detail parts  and zimmerit sections all glued on. 

15928766324_84993ffe48_b.jpg

 A number of lengthy gaps where the zimmerit sections come together, so that will eventually be looked at.  Have tried some Tamiya 2 part epoxy putty just below the left drive sprocket.  The corner section in front of this will also need to be covered in zimm - the Attak resin set did not provide for this.

15931156783_030869f437_b.jpg

 regards,

Jack

  • Member since
    November 2009
  • From: SW Virginia
Posted by Gamera on Monday, February 16, 2015 1:27 PM

As usual fantastic work Jack! And you are a better man than me, I'd knock off about 2/3rds or more of that PE while painting her.

"I dream in fire but work in clay." -Arthur Machen


  • Member since
    December 2002
  • From: Bury St Edmunds, Suffolk, England
Posted by Bish on Monday, February 16, 2015 1:32 PM

She is coming on nicely jack, just as expected. Thanks for pointing those out, I would never have spotted that wire for sure. I have started using fine wire for those lights, adds a nice touch.

I am currently on course to start the Jagdpanther at the end of the month. can't wait to start on that.

I am a Norfolk man and i glory in being so


On the bench: Airfix 1/72nd Harrier GR.3/Fujimi 1/72nd Ju 87D-3

  • Member since
    April 2006
  • From: ON, Canada
Posted by jgeratic on Monday, February 16, 2015 11:25 PM

Thanks Guys.

Yes, know all about PE getting knocked off.  Over the last few armour builds I've learned to include equipment and other such details glued together right on the vehicle, even though it would be easier to paint items separate first.

regards,

Jack

  • Member since
    April 2006
  • From: ON, Canada
Posted by jgeratic on Monday, February 23, 2015 1:12 PM

The past week was spent on the rear deck details.  Some things to point out done differently from instructions:

 - shovel - Aber PE provides a brass replacement , but I just used the original plastic and thinned the heel section a bit.  For the two nails detail,  some thin rod sprue placed into pre-drilled holes.  Another application of liquid cement over top to flatten out.  Also couldn't find the strap on the PE fret, so just made one from plastic sheet.

 - jack - again, Aber has you practically rebuild this, but I decided it was not worth the hassle as there isn't much difference in detail from the kit part.  I just cleaned off the molded on mounting frames and fashioned some  cut wire for the two handles (better seen in 2nd photo).

 - wrench(s) - PE too thin for rebuild, so relied on the kit part, the usual clean up of molded on brackets followed with adding PE ones.


16440308999_75bd11638b_o.jpg


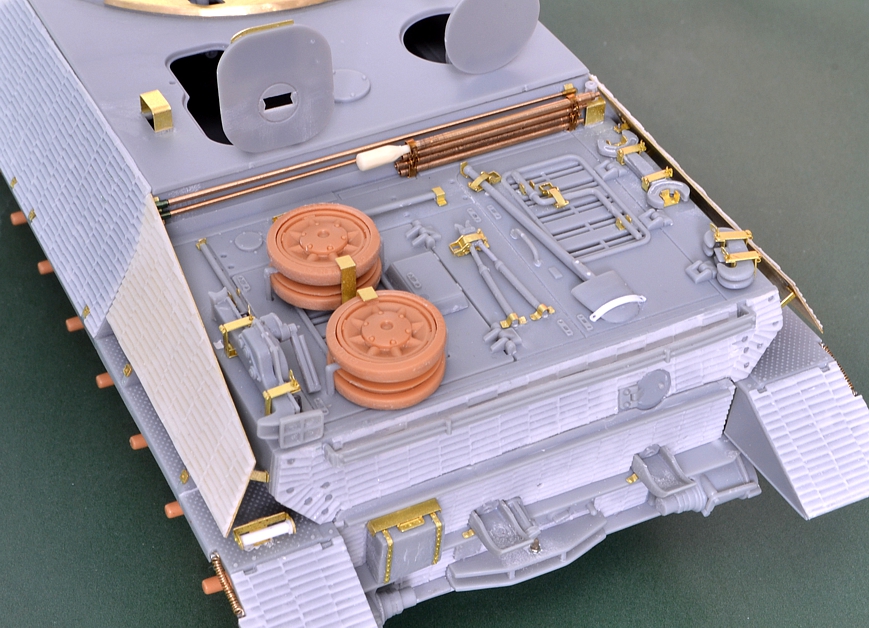
There should be a clamp on the axe, but this tool is loose for now.  If time permits, it will be in the hands of one of the crew members for a planned dio (no, not Jason visits Panzer Lehr on Friday the the 13th ;)

 Other loose items for now for painting purposes are the spare road wheels, gun cleaning rods, and the spaced armour sheets on the rear.


16626100025_df71a0ea73_b.jpg


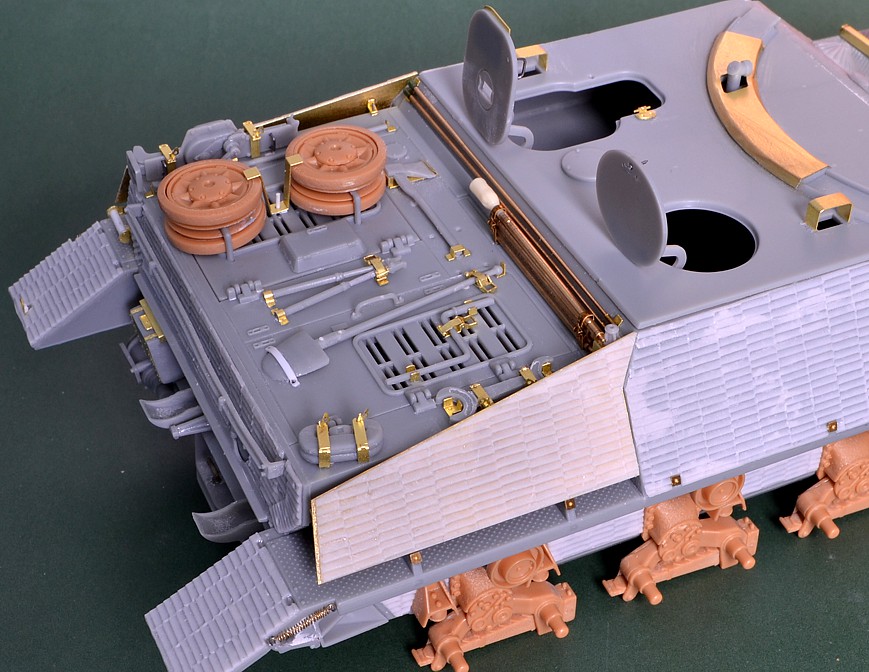
Got  a decent start on the hull roof, it too is loose for now.  Still have a few pieces to go, including a trio of periscopes.  Instructions have you create your own springs for hatch detail, so I did the same with the rear fenders.  Really simple, just some brass wire wrapped around an appropriate diameter drill bit.


16625000071_c01b2f85fb_b.jpg


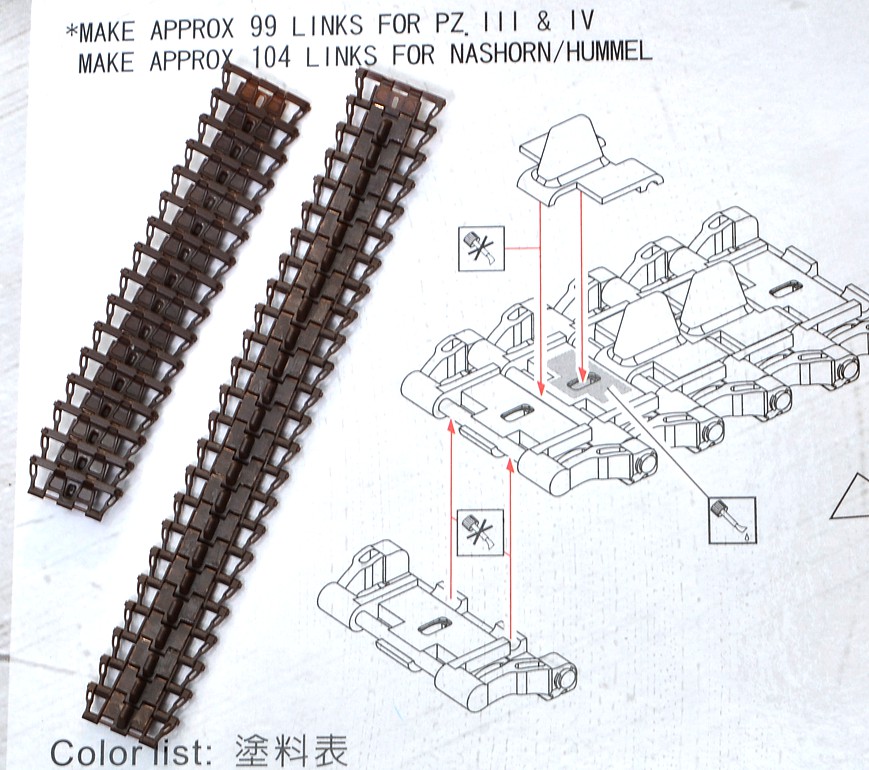
Mid week saw the arrival of workable track links from AFV Club.  Have a few put together to see how they look.  I really like the colour they are molded in, could almost pass for brown grey metal.  Should be a lot quicker than the Stuart tracks done last year - 5 pieces per link compared to only two here.


16626098345_49543d8ee1_b.jpg

 regards,

Jack

  • Member since
    December 2002
  • From: Bury St Edmunds, Suffolk, England
Posted by Bish on Monday, February 23, 2015 1:43 PM

jack, that's looking really nice, some great detail on that.

How you finding those tracks. I am normally partial to Fruils but am going to get a set of AFV Club tracks for my latest 251 kit, but I have not used them before.

I am a Norfolk man and i glory in being so


On the bench: Airfix 1/72nd Harrier GR.3/Fujimi 1/72nd Ju 87D-3

  • Member since
    April 2006
  • From: ON, Canada
Posted by jgeratic on Tuesday, February 24, 2015 12:30 AM

Thanks Bish.

Regarding AFV brand tracks, the only other ones I have used were the 1/48 scale tracks for my Tunisian Tiger.  I thought both those and the ones presented above are great.  That being said, have you looked at Perth reviews for the 251?   Looks to need some TLC with all those sink marks -

http://www.perthmilitarymodelling.com/reviews/vehicles/afvclub/afv35070.htm

regards,

Jack

JOIN OUR COMMUNITY!

Our community is FREE to join. To participate you must either login or register for an account.

SEARCH FORUMS
FREE NEWSLETTER
By signing up you may also receive reader surveys and occasional special offers. We do not sell, rent or trade our email lists. View our Privacy Policy.