SEARCH FINESCALE.COM

Enter keywords or a search phrase below:

Armour in the West GB (Defence of the Reich)

44499 views
658 replies
1 rating 2 rating 3 rating 4 rating 5 rating
  • Member since
    December 2002
  • From: Bury St Edmunds, Suffolk, England
Posted by Bish on Sunday, March 22, 2015 8:21 AM

I have used the Dragon 251 tacks, they were fiddly. The DS tracks are ok, used 2 of those, but I do prefer individual links, especially Fruils. But I am now glad I didn't replace my magic tracks with the metal ones.

Don't worry, i have been building and studying German armour for years and it still confuses the hell out of me.  Now Allied armour, that is a complete mystery to me.

I am a Norfolk man and i glory in being so


On the bench: Airfix 1/72nd Harrier GR.3/Fujimi 1/72nd Ju 87D-3

  • Member since
    April 2006
  • From: ON, Canada
Posted by jgeratic on Sunday, March 22, 2015 1:17 PM

Cliff - that is quite a bit of dedicated work on the interior, even though none of the access doors will be opened up?

Bish - looking very good after the initial hiccup with the zimm.  Not sure if you noticed my post on your wip thread?  It looks this particular zimmerit is only the first layer, and was roughened up with a trowl.   The final layer, with a proper pattern, would be applied the following day, but apparently many vehicles could not wait and left the factory with just the initial coat.

----------------------------------

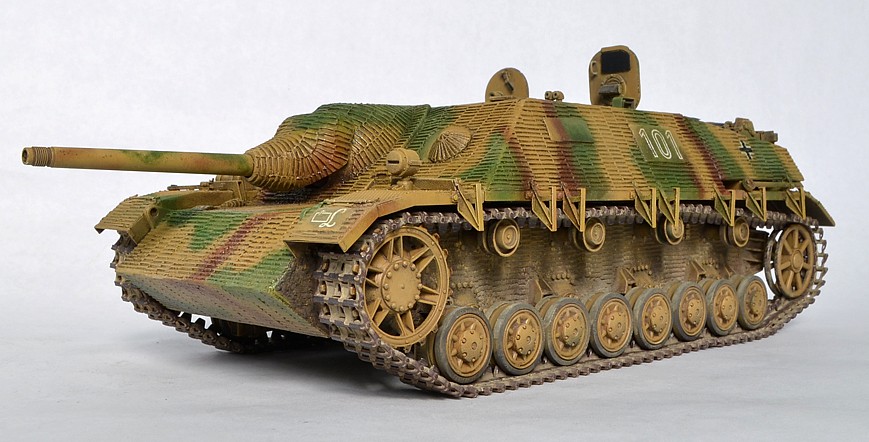
Thank you everyone for the comments.  Yes, those are loading stencils on the rear of the vehicle.  I think the one on the right is accurate as I copied it from an  AFT decals set.  The left side is just made up to include some measurements of the vehicle.

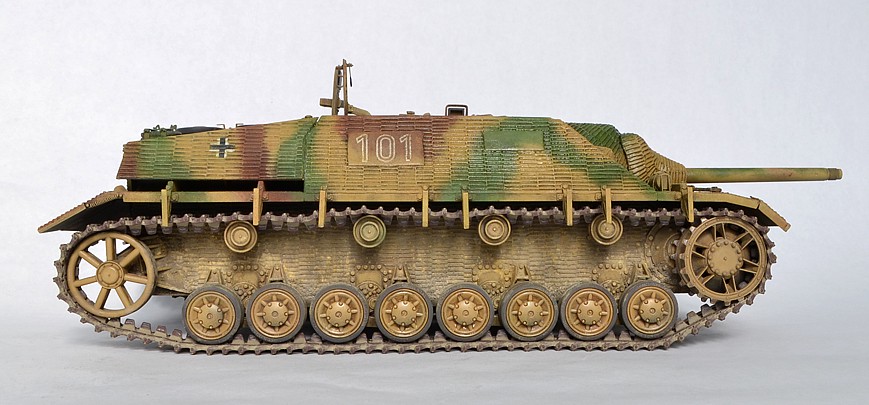
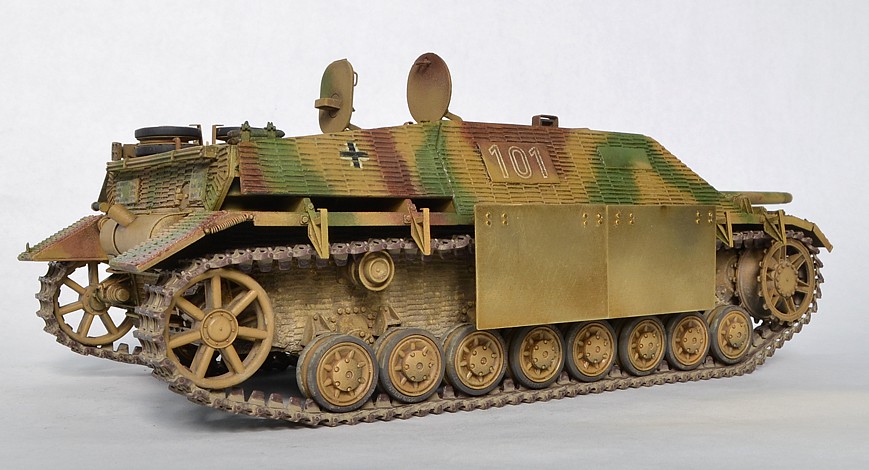
Tracks and running gear are now attached.  During the process, did have to pop off the outer half of the return rollers.   This was to facilitate the guide teeth fitting in there.  In fact, even the spacing in between the double road wheels made for a tight fit. 

16708535440_fcca7ae89f_b.jpg

 References called for 99 links per side, but I found the sag a bit on the extreme, so removed one link on each set.

16708310418_766dc8d622_b.jpg

16688603577_d76ed753cc_b.jpg

 Also considering hanging a couple sections of the skirt armour on one side.  Photo of the unpainted brass pieces below - what do you guys think?

16708311728_efdf82b2dd_b.jpg

 regards,

Jack

  • Member since
    December 2002
  • From: Bury St Edmunds, Suffolk, England
Posted by Bish on Sunday, March 22, 2015 2:20 PM

Thanks jack. No, I must have missed that one. Now that's interesting, I didn't know they were applied in 2 layers, but makes sense. I assume the second layer was to have been the more common one. It does explain why this pattern does not have the rough surface of the more common ones.

Lovely work there, those stencils are a nice touch, and I like the idea of just the couple of skirts.

I am a Norfolk man and i glory in being so


On the bench: Airfix 1/72nd Harrier GR.3/Fujimi 1/72nd Ju 87D-3

  • Member since
    November 2009
  • From: SW Virginia
Posted by Gamera on Sunday, March 22, 2015 2:57 PM

Hey Jack, she's coming along great there- I love dusty look you've got on the wheels and running gear, I always seem to overdo it.

And I am leaving the center access hatch on my Panther open, it just seems the engine kit is designed to leave the entire engine deck off. With the center hatch open you can see inside just not all that much.

"I dream in fire but work in clay." -Arthur Machen


  • Member since
    February 2006
  • From: Cincinnati Ohio
Posted by DantheMan85 on Wednesday, March 25, 2015 5:34 PM

Thanks Bish,
Nice work on your Zimmerit, I have not masterd it yet but some day I will have to.  
Those stamps seem to make it easy for that pattern.  I made one of the Dragon Jagdpanther's, went together pretty good.  A few gap's here and there.  The PE looks nice, the magic track are great I really like them.

Eagle90: Nice weathering on your 234, the darker color in those panel and groves really make them stand out.  I like your family photo.  Been practicing with artist oil's for my weathering.

Thanks Gamera: I have the same Tamiya engine set, have a Tiger to go with it.  On the area's where you'll glue the engine parts to the hull, I would use a hobby knife and carefully remove the paint down to bare plastic.  To get a good bonding surface, or use fine sand paper.

Jgeratic: Yeah those tow cables are stiff, but I was able to bend them into the shape I want.  Your Jagdpanzer Is coming along great.  I've never done a camouflage pattern yet, but I'll be practicing that on my scrap Panzer III.

This morning I put the last piece on my Stug III,  the cover and mount for the machine gun has gone missing and the gunner's sight dropped down into the fight compartment when I was gluing it on.  I'm thinking about scratch building a mound and cover for the machine gun, looked through my pairs and no luck with a gunner sight.  This evening I plan on priming it with Model Master white primer,  and I'll be starting my Hezter here shortly.  Road wheels and drive and idler are dry fitted on for the pictures.


On my Work Bench: Tamiya Ford GT 1/24

Up Coming: ?


  • Member since
    November 2009
  • From: SW Virginia
Posted by Gamera on Thursday, March 26, 2015 7:59 AM

Hey Dan, she looks perfect, time to slosh some paint on her!

And thanks, the area under the engine deck was already bare plastic so hopefully I won't have any problems. I doped a pile of epoxy on the seams as well, it should hold- I hope.

"I dream in fire but work in clay." -Arthur Machen


  • Member since
    December 2002
  • From: Bury St Edmunds, Suffolk, England
Posted by Bish on Thursday, March 26, 2015 12:26 PM

Thanks Dan. I would not rush tpo get those stamps though. The one for this pattern doesn't really work, I ended up scribing the pattern with a scalpel blade. The one for the pattern worn by Stug's though might well work, but I have yet to try it.

The StuG is looking good. be good to see some paint on it. What pattern are you going for.

I am a Norfolk man and i glory in being so


On the bench: Airfix 1/72nd Harrier GR.3/Fujimi 1/72nd Ju 87D-3

  • Member since
    February 2006
  • From: Cincinnati Ohio
Posted by DantheMan85 on Thursday, March 26, 2015 8:24 PM

Thanks Gamera & Bish.

If I were to get another Stug III that use these molds, I would assembly the main parts first to make filling and sanding easier.  And so I could put in that gun breach.  Think I'll start out with Tamiya's Dark Yellow for the base color, then lighten it up with either Desert Yellow and Buff.  Might even use some of Model Master's lighter dark yellow shades.  Don't think I'll apply zimmerit.  Last evening I airbrush on Model Master Acrl Primer White. 

On a side note even If I start on my Hezter, don't think I could finish it before the deadline.

On my Work Bench: Tamiya Ford GT 1/24

Up Coming: ?


  • Member since
    November 2009
  • From: SW Virginia
Posted by Gamera on Friday, March 27, 2015 8:40 AM

You could just leave her there for a winter whitewash scheme! Stick out tongue

Seriously, she's coming along great, am looking forward to seeing her all painted up.

"I dream in fire but work in clay." -Arthur Machen


  • Member since
    April 2006
  • From: ON, Canada
Posted by jgeratic on Friday, March 27, 2015 2:50 PM

Thanks guys Beer

Dan - the Stug looks great in the primer phase, looking forward to the next update.

------------------------------------------

The two sections of skirt armour are now painted and weathered.  Judging by the PE construction, these shields were neither bolted nor welded in place, so would explain why they never hung around to show battle damage.  Only photo example I could find of damage for these skirts on the Pz IV chasis had a direct hit, which was so large it  also knocked out the tank.


For the vehicle, all that is left to add are two antenna, and creating some glass effect for the periscopes.  Should start on the figures soon.  Now that I have them laid out, I've noticed only the heads and arms are different.  The axe (grey plastic) is from the Jagdpanzer kit, and will be held by one of the crew instead of the large vehicle tool.


 regards,

Jack

  • Member since
    December 2002
  • From: Bury St Edmunds, Suffolk, England
Posted by Bish on Friday, March 27, 2015 2:58 PM

Looks good there jack, very good. Those side skirts were indeed not fixed in place but hung so that if one got caught up it would simply come off rather than fowl the vehicle. So indeed damaged skirts would be unlikely.

I am a Norfolk man and i glory in being so


On the bench: Airfix 1/72nd Harrier GR.3/Fujimi 1/72nd Ju 87D-3

  • Member since
    February 2006
  • From: Cincinnati Ohio
Posted by DantheMan85 on Sunday, March 29, 2015 8:26 AM

Thanks Gamera,

Thanks Jgeratic: Nice work on your Armour skirts, and nice figure set.  Have not really built a tank with skirts yet.

Last Friday I airbrushed on Tamiya Dark Yellow XF-60, in the spots where I didn't get full coverage I'll be going over those with a lighter color.  Last evening I went back over those area's with Tamiya Desert Yellow.

But here's some photo's with Dark Yellow.

On my Work Bench: Tamiya Ford GT 1/24

Up Coming: ?


  • Member since
    December 2002
  • From: Bury St Edmunds, Suffolk, England
Posted by Bish on Sunday, March 29, 2015 10:47 AM

Nice to see the yellow on Dan, looks good.

I am a Norfolk man and i glory in being so


On the bench: Airfix 1/72nd Harrier GR.3/Fujimi 1/72nd Ju 87D-3

  • Member since
    November 2009
  • From: SW Virginia
Posted by Gamera on Monday, March 30, 2015 8:02 AM

Yeah Dan, she looks really good!

"I dream in fire but work in clay." -Arthur Machen


  • Member since
    April 2006
  • From: ON, Canada
Posted by jgeratic on Monday, March 30, 2015 4:25 PM

Dan - I like the look of that dark yellow - I wonder if Tamiya has changed their mix these past few decades, as my bottle is way darker and greener.

------------------------------------

Thank you guys on the Jagdpanzer comments, much appreciated.

Prep work on the figures is done.  Green stuff putty was used to fill in seams, and while it was still workable, a wet fingertip was used to smooth into the areas.  This helps to cut down time spent during the sanding stage - in fact, took maybe a dozen swipes of sand paper and the figs were ready for paint.  

I did swap out one of the heads for a Hornet product so one will be wearing an M-43 cap.  Also added PE shoulder boards from Model Alliance, and a PE wrist watch band can be seen on the bare headed figure.

Primer/base coat is Tamiya's German Grey.  For the uniform colour proper, I mixed directly in the airbrush cup (all Vallejo) German Fieldgrey, Light Green Blue, and Transparent Green.  For thinning, some water and acrylic retarder.  This was sprayed from up top, like a light source.

Next up is further highlights and shading with a fine paint brush.

regards,

Jack

  • Member since
    November 2009
  • From: SW Virginia
Posted by Gamera on Monday, March 30, 2015 5:40 PM

Looks good Jack, looking forward to seeing some paint slapped on 'em.

"I dream in fire but work in clay." -Arthur Machen


  • Member since
    December 2002
  • From: Bury St Edmunds, Suffolk, England
Posted by Bish on Tuesday, March 31, 2015 1:03 AM

Nice work on the figures jack, where did that PE watch come from.

I am a Norfolk man and i glory in being so


On the bench: Airfix 1/72nd Harrier GR.3/Fujimi 1/72nd Ju 87D-3

  • Member since
    December 2002
  • From: Bury St Edmunds, Suffolk, England
Posted by Bish on Tuesday, March 31, 2015 3:31 PM

Got some more progress on the Jagdpanther. With the gun in the right position I was able to get the roof on. I also got the rest of the clamps fitted. I got a set of fire extinguishers from Royal Model rather than try and modify the kit one. For the tube that holds the barrel cleaning rods and spare antenna's, I had to make a guess of the mount. At first I thought it might have been the same as that on the later vehicles, but closer inspection of a couple of photo's showed what looked like an improvised bracket. I also have a problem to solve with the rear. The support brackets for the exhaust don't fit with the towing clevice in place. I can only guess that the mechanics altered the support braces, so I will have to do that.

So with all that done, I can now move on to the primer and painting.

I also got the tracks and wheels primed and painted black, using Tamiya NATO black.


In the past, I have done the road wheels by spraying the metal and then hand brushing the tires. But finally I have got a circle template to mask the wheels, so I am trying that method instead.

Of course, that's not all of them, but you get the point.

And here is the first of the trees. I am using floral wire coated in flexi bark. I still have some more branches to add but wanted to see what the flexi bark was like.


For the second tree, I intend to have a thicker trunk and am going to try tile grout for the bark.

That's all for now.


I am a Norfolk man and i glory in being so


On the bench: Airfix 1/72nd Harrier GR.3/Fujimi 1/72nd Ju 87D-3

  • Member since
    April 2006
  • From: ON, Canada
Posted by jgeratic on Tuesday, March 31, 2015 11:53 PM

Bish - the zimmerit looks bang on now.  Have to say after sorting that out, you've really picked up the pace on the build.  Interesting trees, never seen wire twisted like that, but the shapes look quite convincing in an organic sort of way.

Bish

Nice work on the figures jack, where did that PE watch come from.

Thanks Cliff and Bish .... wrist watch is from Alliance Model Works LW35064.  
regards,
Jack

  • Member since
    February 2014
  • From: Michigan
Posted by silentbob33 on Wednesday, April 1, 2015 9:00 AM

There's a lot of fantastic work going on here!  I'm in awe of what I'm seeing.  Unfortunately, I don't think I'll be able to start my King Tiger in time so I'm going to have to drop out.  My daughter was born three months ago and we have a four year old boy as well.  While I'm having a blast getting some good "daddy" time in, I have to cut back in other areas.  Keep up the good work!

On my bench: Academy 1/35 UH-60L Black Hawk

  • Member since
    December 2002
  • From: Bury St Edmunds, Suffolk, England
Posted by Bish on Wednesday, April 1, 2015 11:33 AM

Thanks jack. ye, the zimm did slow me down a bit. I read about doing trees like this years ago. Of course it is my first attempt, so I might tweak things with future builds depending on how these turn out.

Now that set looks nice. will have to see if I can find a UK source, the only one listed in White Ensign.

Bod, sorry to see you leave, but I understand and thanks for letting me now.

I am a Norfolk man and i glory in being so


On the bench: Airfix 1/72nd Harrier GR.3/Fujimi 1/72nd Ju 87D-3

  • Member since
    November 2009
  • From: SW Virginia
Posted by Gamera on Wednesday, April 1, 2015 2:19 PM

Bish: She looks really really good! And cool work on the tree, I've seen that technique before and keep meaning to try it but never seem to get around to it.

Jack: Those are pretty awesome- esp the medals since they're really metal. The eyeglasses are pretty cool too!

Bob: Hate to see you drop out but I agree that family stuff is more important than modeling. Seems it took me forever to grow up but my nephews seems like yesterday they were in diapers and they're almost to high school by now.

BTW: Almost certainly I won't finish in time either- I'm going to keep hacking away at the Ersatz M10 but I can't imagine being done in a month though.

"I dream in fire but work in clay." -Arthur Machen


  • Member since
    February 2014
  • From: Michigan
Posted by silentbob33 on Wednesday, April 1, 2015 2:33 PM

Thanks for the kind words guys.  I'm going to keep building, just at a much slower pace and will only commit to future GBs if I'm sure I'll be able to finish.

On my bench: Academy 1/35 UH-60L Black Hawk

  • Member since
    December 2002
  • From: Bury St Edmunds, Suffolk, England
Posted by Bish on Wednesday, April 1, 2015 2:40 PM

Thanks gamera. Its something I have been putting off for ages. But I can't keep building dio's without adding some trees. I think I might be a bit pushed to meet the deadline myself, but I am hoping. Of course, as always, on going builds are more than welcome to keep being posted here after the end date.

Bob, that's a god idea. Even without the distractions you have I have vowed to do that. In fact, after my current commitment's, I only plan on being committed to 2GB's at most, the one I am building for and the next one after that. But I plan on getting away from GB';s altogether for a build or 2, build something of my own choosing and without a deadline.

I am a Norfolk man and i glory in being so


On the bench: Airfix 1/72nd Harrier GR.3/Fujimi 1/72nd Ju 87D-3

  • Member since
    November 2009
  • From: SW Virginia
Posted by Gamera on Friday, April 3, 2015 10:03 AM

Thanks Bish, I intend to finish the thing, just not sure when....

"I dream in fire but work in clay." -Arthur Machen


  • Member since
    February 2006
  • From: Cincinnati Ohio
Posted by DantheMan85 on Friday, April 3, 2015 5:42 PM

Thanks Gamera.

Thanks Bish: Great work and detail on your Jagdpanther.

Thanks Jgeratic, Yeah they might have.  I know the MM Dark Yellow 2095 has some green in it.
Excellent work on your figures.

Did some airbrushing with Tamiya Desert Yellow, on the lightly cover area's.  I'm not to crazy about the darker color, I might go back over those area's with a lighter dark yellow from Model Master.  Also airbrushed Tamiya Dark Yellow on the road wheels.  Was going to try Tamiya's Rubber Black XF-85 for the road wheel's, but my local hobby shop didn't have any.

On my Work Bench: Tamiya Ford GT 1/24

Up Coming: ?


  • Member since
    November 2009
  • From: SW Virginia
Posted by Gamera on Friday, April 3, 2015 10:02 PM

Dan she looks good to me, hit her with some pin washes and that detail will pop right out.

"I dream in fire but work in clay." -Arthur Machen


  • Member since
    February 2006
  • From: Cincinnati Ohio
Posted by DantheMan85 on Saturday, April 4, 2015 9:18 AM

Thank Gamera, yeah all that great detail will be coming out in weathering.

On my Work Bench: Tamiya Ford GT 1/24

Up Coming: ?


  • Member since
    December 2002
  • From: Bury St Edmunds, Suffolk, England
Posted by Bish on Saturday, April 4, 2015 2:14 PM

Looks good Dan. I have been using Tamiya NATO black for German wheels. German rubber was of poor quality and apparently was more grey that rubber used in other countries.

I am a Norfolk man and i glory in being so


On the bench: Airfix 1/72nd Harrier GR.3/Fujimi 1/72nd Ju 87D-3

  • Member since
    April 2006
  • From: ON, Canada
Posted by jgeratic on Sunday, April 5, 2015 5:10 PM

Both antenna now on.  Keep seeing things that need touch up (particularly in the blown up digital photos), so vehicle isn't quite finished.

Figures, insignia details now on, but opted to paint the lieutenant's shoulder boards since the brass already had good detail.  Again, close up shows I need to widen the aluminum braid section. 

regards,

Jack

JOIN OUR COMMUNITY!

Our community is FREE to join. To participate you must either login or register for an account.

SEARCH FORUMS
FREE NEWSLETTER
By signing up you may also receive reader surveys and occasional special offers. We do not sell, rent or trade our email lists. View our Privacy Policy.