SEARCH FINESCALE.COM

Enter keywords or a search phrase below:

50th Anniversary Vietnam War Group Build

78949 views
896 replies
1 rating 2 rating 3 rating 4 rating 5 rating
  • Member since
    January 2014
  • From: Toronto
Posted by Rob S. on Thursday, May 7, 2015 8:53 PM

VERY sexy Stik...Well done thus far...looking forward to the big finish!!

______________________________________________________________________________


On the Bench: Nothing on the go ATM

  • Member since
    July 2004
  • From: Sonora Desert
Posted by stikpusher on Thursday, May 7, 2015 9:11 PM

Thank you sir. If all goes well, in about 24 hours I will call this one done.


F is for FIRE, That burns down the whole town!

U is for URANIUM... BOMBS!

N is for NO SURVIVORS...

       - Plankton

LSM


  • Member since
    May 2009
  • From: Poland
Posted by Pawel on Friday, May 8, 2015 4:38 PM

Hello Stik,

that M113 looks very nice - and clean, I wonder how heavy are you going to weather it. I'm in process of dirtying up my Whale right now, too! Good luck with the finish, and have a nice day

Paweł

All comments and critique welcomed. Thanks for your honest opinions!

www.vietnam.net.pl

  • Member since
    July 2004
  • From: Sonora Desert
Posted by stikpusher on Friday, May 8, 2015 6:14 PM

I will give it a moderate amount of weathering. But, alas, all has not gone well today. What was supposed to be a 90 minute errand for tires & alignment is now well over 3 hours and counting... So I am looking at later this evening or tomorrow morning... Who knows?


F is for FIRE, That burns down the whole town!

U is for URANIUM... BOMBS!

N is for NO SURVIVORS...

       - Plankton

LSM


  • Member since
    May 2009
  • From: Poland
Posted by Pawel on Saturday, May 9, 2015 11:46 AM

Hello Stik!

I for myself, try not to set deadlines for my modelling - most time I did, the projects got delayed, by a lot of time.

Looking forward to see your M113 weathered - my Whale currently looks like on the photos below:

I finished putting the decals on and started to weather the surface - it's also mostly done. I used dark gray paint (Humbrol 32) thinned with turpentine - put that on the surface detail, waited to dry a little and then I removed the excess with a Q-tip dampened with airbrush thinner. In places where the lines were too shallow I pencilled them in.. The airbrush thinner also washes pencil off, should it slip. The next thing to do would be to put a satin clear coat on top of that and then start the final assembly. Still waiting for the custom PE to correct the wheels.

Thanks for reading and I hope you liked the pictures - good luck with your builds and have a nice day

Paweł

All comments and critique welcomed. Thanks for your honest opinions!

www.vietnam.net.pl

  • Member since
    July 2004
  • From: Sonora Desert
Posted by stikpusher on Sunday, May 10, 2015 12:27 AM

Pawel, that Whale is looking better and better! I am very impressed by your work here on this!

Here is some detail shots of the final bits added before weathering... tie down straps, lenses, antenna...

and with initial weathering...

I still want to add a bit more before I call it done...


F is for FIRE, That burns down the whole town!

U is for URANIUM... BOMBS!

N is for NO SURVIVORS...

       - Plankton

LSM


  • Member since
    July 2004
  • From: Sonora Desert
Posted by stikpusher on Sunday, May 10, 2015 3:22 PM

Today I started my favorite part of the weathering- MUD!!! I am doing that in two stages. a more gainy lighter color mud to represent the more grainy gloppy mud of the roads and trails... it is still drying here so a bit darker than it should look once dry

and of course the stuff tracked in by the troops carried when they would re mount the track

My final step will be to add a layer of fresh wet darker, siltier ride paddy mud to represent as they would have looked during and immediately after the Battle at Ap Bac. That will come in a few days due to work...


F is for FIRE, That burns down the whole town!

U is for URANIUM... BOMBS!

N is for NO SURVIVORS...

       - Plankton

LSM


  • Member since
    February 2014
  • From: Michigan
Posted by silentbob33 on Sunday, May 10, 2015 4:12 PM

Very cool Stik!

On my bench: Academy 1/35 UH-60L Black Hawk

  • Member since
    December 2002
  • From: Bury St Edmunds, Suffolk, England
Posted by Bish on Sunday, May 10, 2015 4:30 PM

Loving that Stik, very nice mud application.

I am a Norfolk man and i glory in being so


On the bench: Airfix 1/72nd Harrier GR.3/Fujimi 1/72nd Ju 87D-3

  • Member since
    May 2009
  • From: Poland
Posted by Pawel on Sunday, May 10, 2015 5:40 PM

Yeah, that mud is really good! If I may suggest something, I'd put more "old dirt" on the ramp - now it looks like the grunts tramped on a freshly washed ramp. Otherwise I just admire it Big Smile. Good luck with your build and have a nice day

Paweł

All comments and critique welcomed. Thanks for your honest opinions!

www.vietnam.net.pl

  • Member since
    January 2014
  • From: Toronto
Posted by Rob S. on Monday, May 11, 2015 6:12 AM

Fantastic Stik...can you reveal what you used for the mud compound?

Pawel...that Whale is looking gorgeous..I gotta admit I don't know that aircraft, so, I am doing some Wiki reading on it now..Yes

______________________________________________________________________________


On the Bench: Nothing on the go ATM

  • Member since
    July 2004
  • From: Sonora Desert
Posted by stikpusher on Monday, May 11, 2015 4:05 PM

Well I start with finely sifted dirt out of my yard, then I mixed up some burnt sienna and raw sienna MM Acrlylic for color and thinned that out, then I added Future to the mix to lock it place once it dries. I add more dirt to give it a grainier look. Less dirt gives a more smooth silty type of mud. In this case I actually mixed the paint color first, and thinned it, then added the Future before I put any dirt in there.


F is for FIRE, That burns down the whole town!

U is for URANIUM... BOMBS!

N is for NO SURVIVORS...

       - Plankton

LSM


  • Member since
    November 2003
  • From: Nashville, TN area
Posted by bobbaily on Monday, May 11, 2015 6:42 PM

Pawel-very nice build-weathering looks great-looking forward to seeing the finished product

Stik-the attention to detail is fantastic and the mud/dust combination is outstanding-great job!

Bob


  • Member since
    January 2014
  • From: Toronto
Posted by Rob S. on Monday, May 11, 2015 7:56 PM

Thanks for that Stik..your technique is solid!! Well done!!

______________________________________________________________________________


On the Bench: Nothing on the go ATM

  • Member since
    July 2004
  • From: Sonora Desert
Posted by stikpusher on Tuesday, May 12, 2015 2:59 PM

Thanks for the kind words guys! I am glad that you like it.

Well the mud was freshly applied and still drying when I took the photos that I posted on Sunday. Here is how it came out after drying to the lighter shade that I wanted and mixed up.

as you can see it is much lighter and toned down that when still damp...

Today I added the darker "wet rice paddy mud"

I think that I am going to need to go back tomorrow and do some touch up with the Burnt Umber paint to get the proper look that I want. Plus I still need to add some fuel & oil spillage... 

One more session at the bench...


F is for FIRE, That burns down the whole town!

U is for URANIUM... BOMBS!

N is for NO SURVIVORS...

       - Plankton

LSM


  • Member since
    July 2004
  • From: Sonora Desert
Posted by stikpusher on Wednesday, May 13, 2015 1:14 PM

As I suspected yesterday, once dry, the "wet mud" came out a little lighter than I wanted... too much thinner and not enough paint I guess...

so today I went and mixed up a new mix of Future, thinner and Burnt Umber acrylic to get a nice "wet mud" look and got that applied where I wanted. Then a mix of a wash of Grimy Black for fuel and oil spills on the appropriate spots and finally some soot in the exhaust. I am calling this one done...

I will get a proper all angle and detail shots batch of photos up tomorrow on my day off.


F is for FIRE, That burns down the whole town!

U is for URANIUM... BOMBS!

N is for NO SURVIVORS...

       - Plankton

LSM


  • Member since
    May 2009
  • From: Poland
Posted by Pawel on Wednesday, May 13, 2015 4:30 PM

Hello everybody!

Stik - that M113 looks very good! I like the tie-downs a lot. The mud looks good, too. Did you ever try to paint wet stains on the vehicle using future? That worked for me very good.

Rob S. - thanks a lot for your kind words! Didn't the whale have a long and interesting career?

Bob - thank you very much! I'd like to finish that baby, too - but I still need some time on it, plus some trick to correct the wheels.

Good luck with your builds and have a nice day

Paweł

All comments and critique welcomed. Thanks for your honest opinions!

www.vietnam.net.pl

  • Member since
    July 2004
  • From: Sonora Desert
Posted by stikpusher on Wednesday, May 13, 2015 9:12 PM

Thanks Pawel. No I have not yet tried using Future for wet stains on a vehicle... yet... I had thought about it though, and if I do come up with a scenario to do one like that, I will. I can imagine that the effect would be just right. All I can say is that the stuff is very handy to use in this hobby.


F is for FIRE, That burns down the whole town!

U is for URANIUM... BOMBS!

N is for NO SURVIVORS...

       - Plankton

LSM


  • Member since
    July 2004
  • From: Sonora Desert
Posted by stikpusher on Thursday, May 14, 2015 6:05 PM

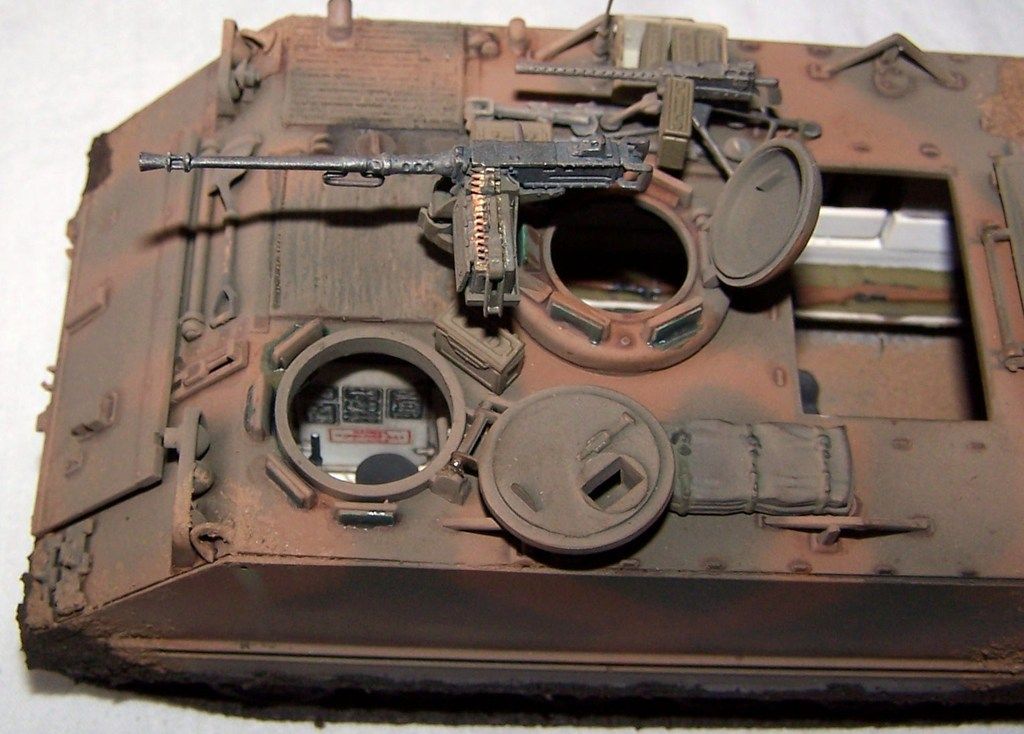
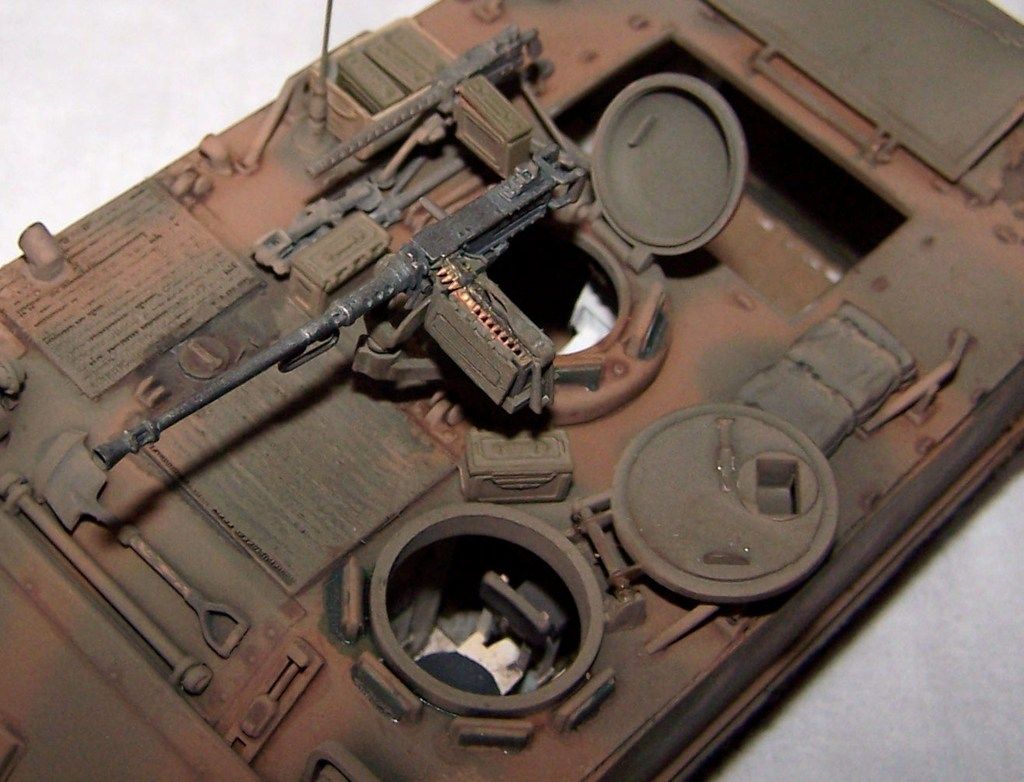
As I said yesterday, a better walkaround of my completed 113 today

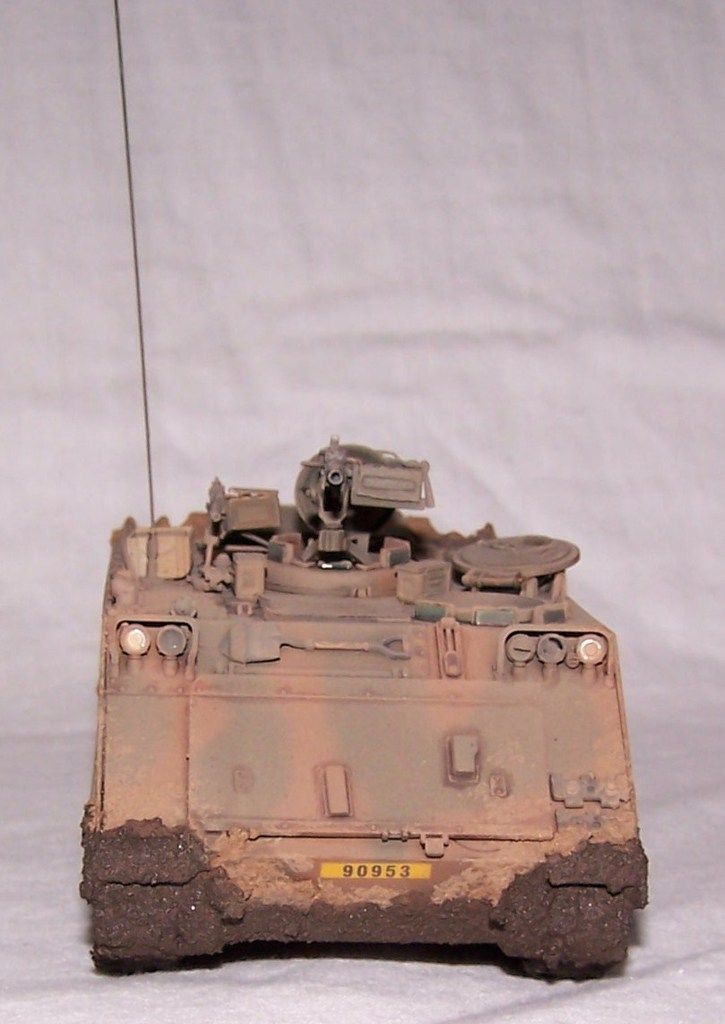
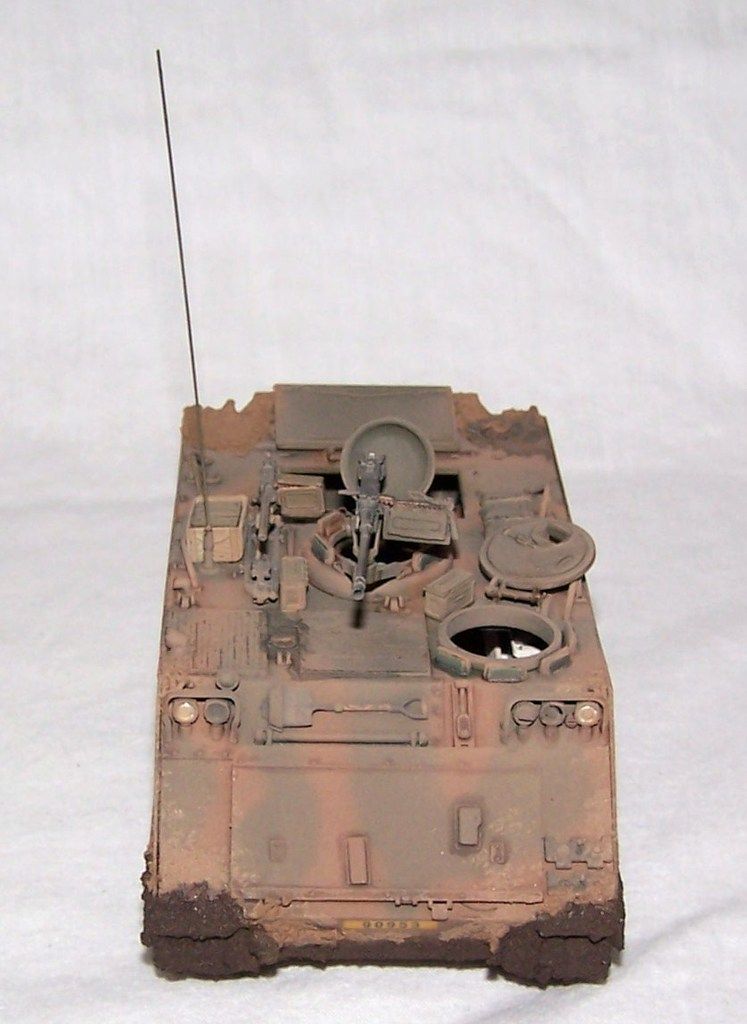
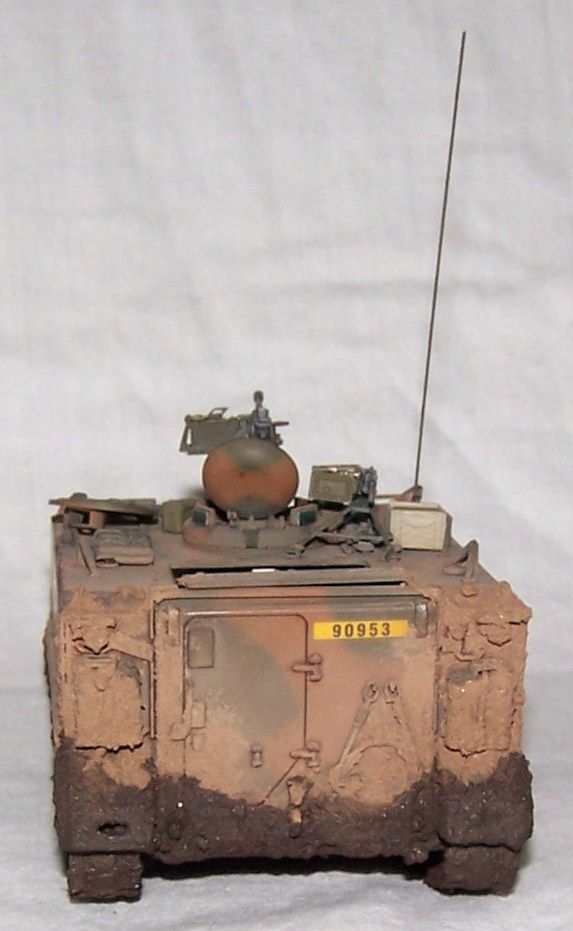
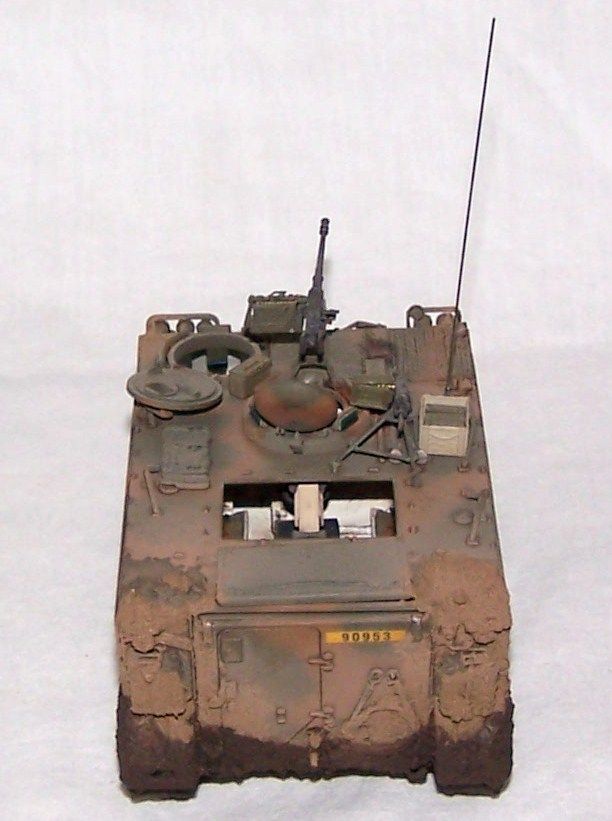
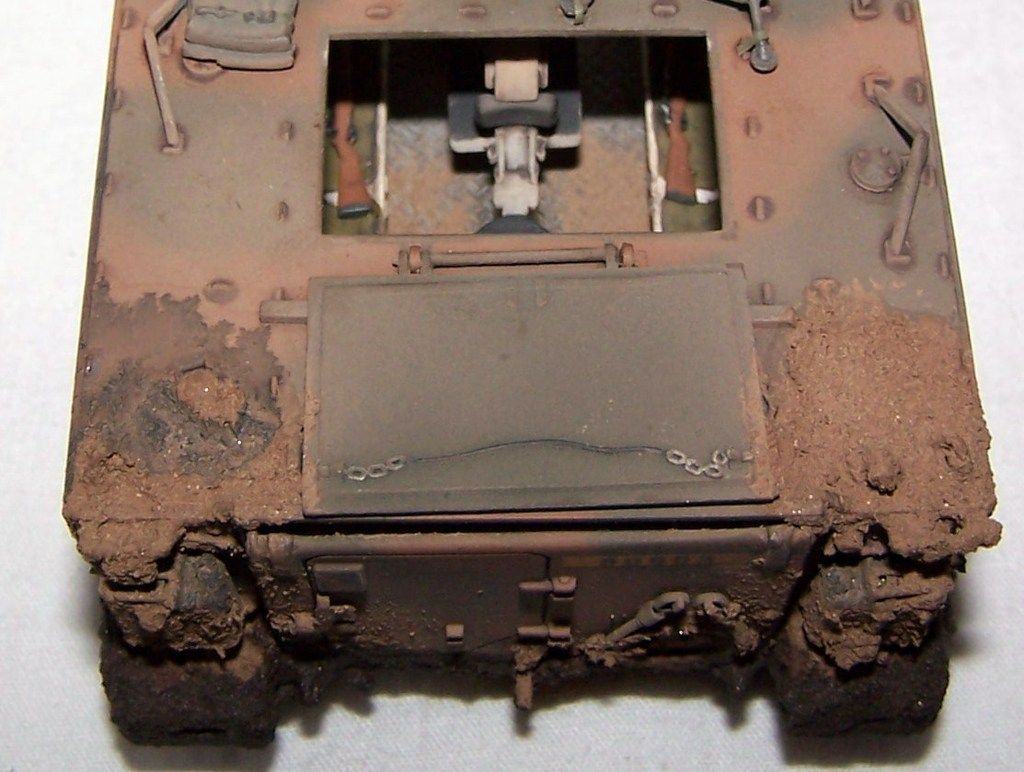
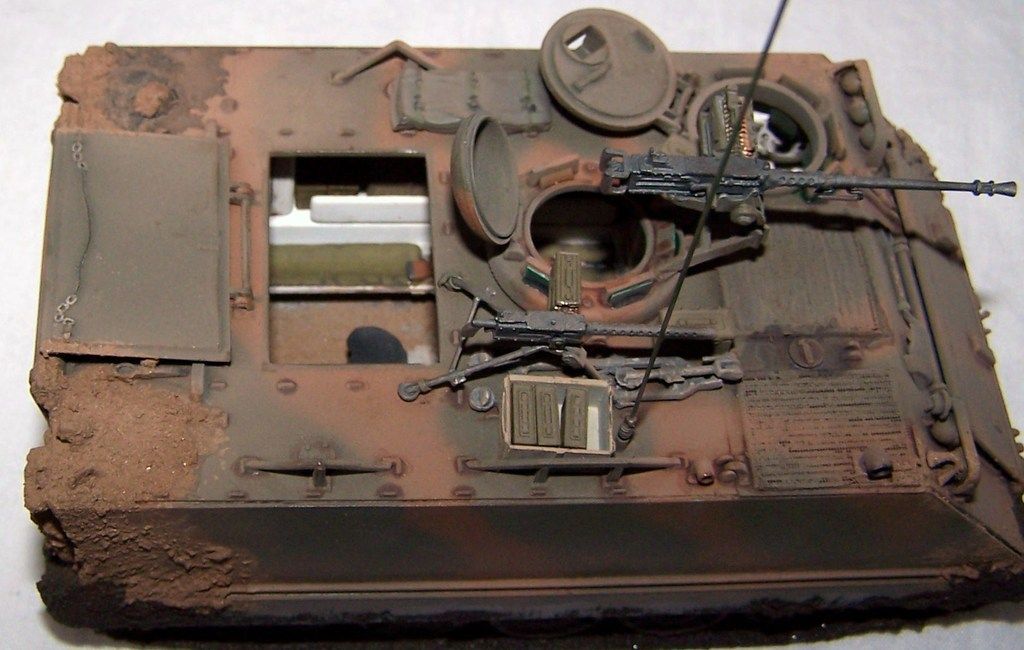
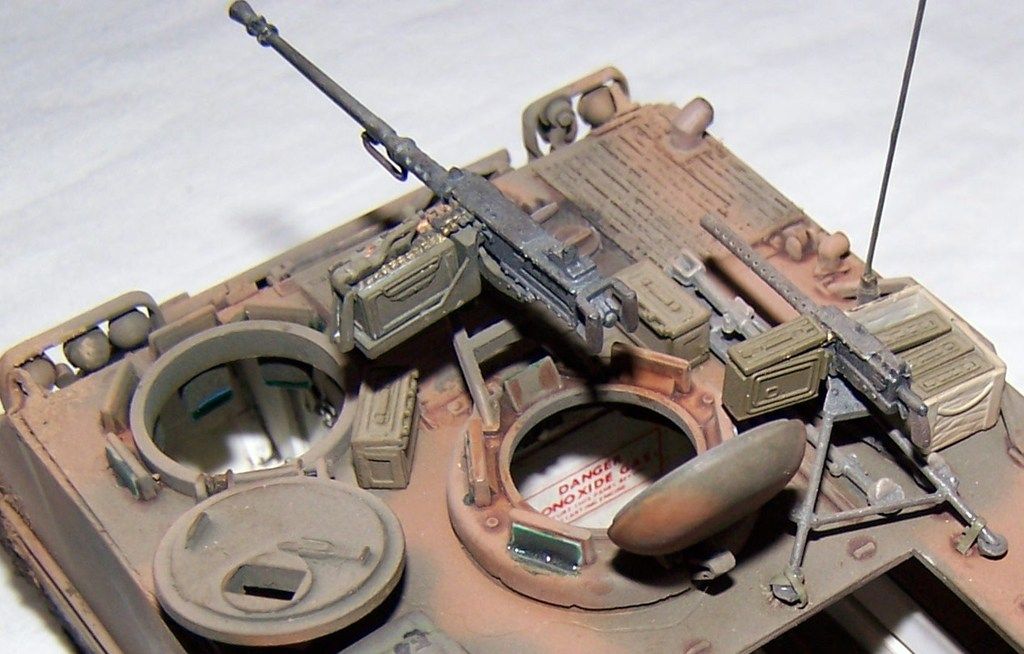
OK, here we go... My completed ARVN M113, 4th Squadron, 2nd Armored Cavalry, Ap Bac Vietnam,  January 2, 1963

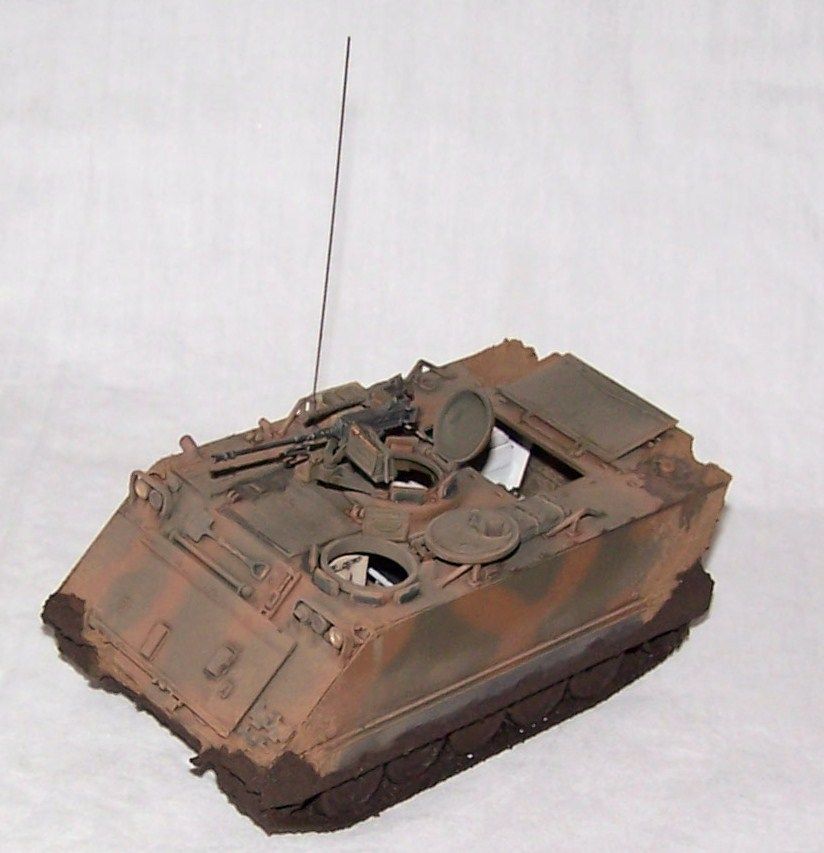
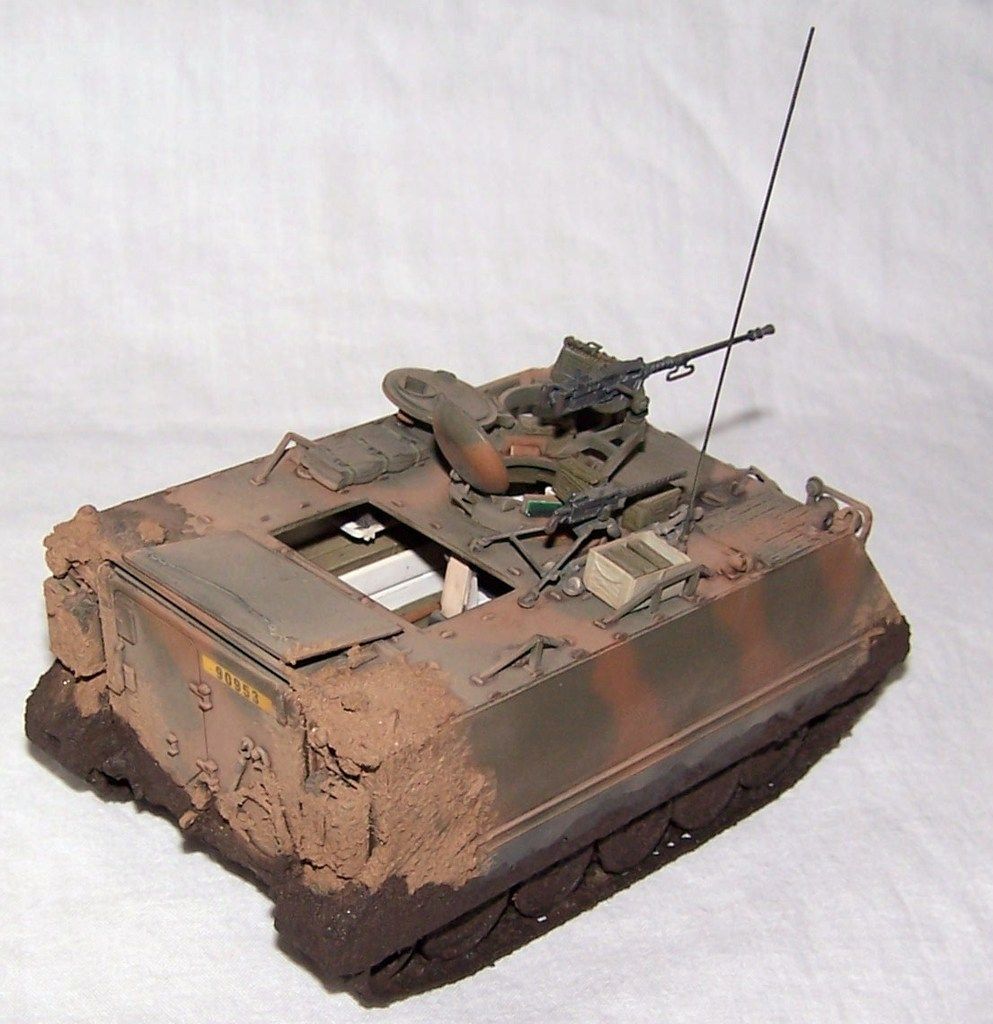
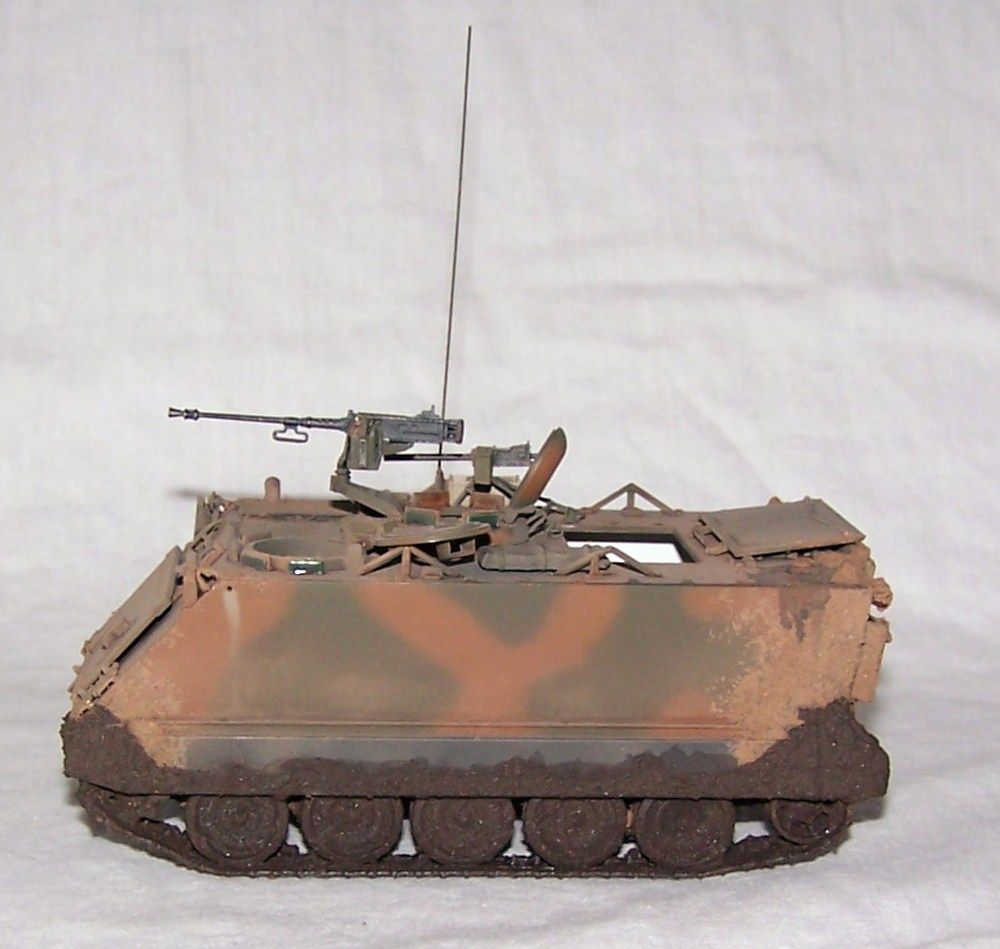
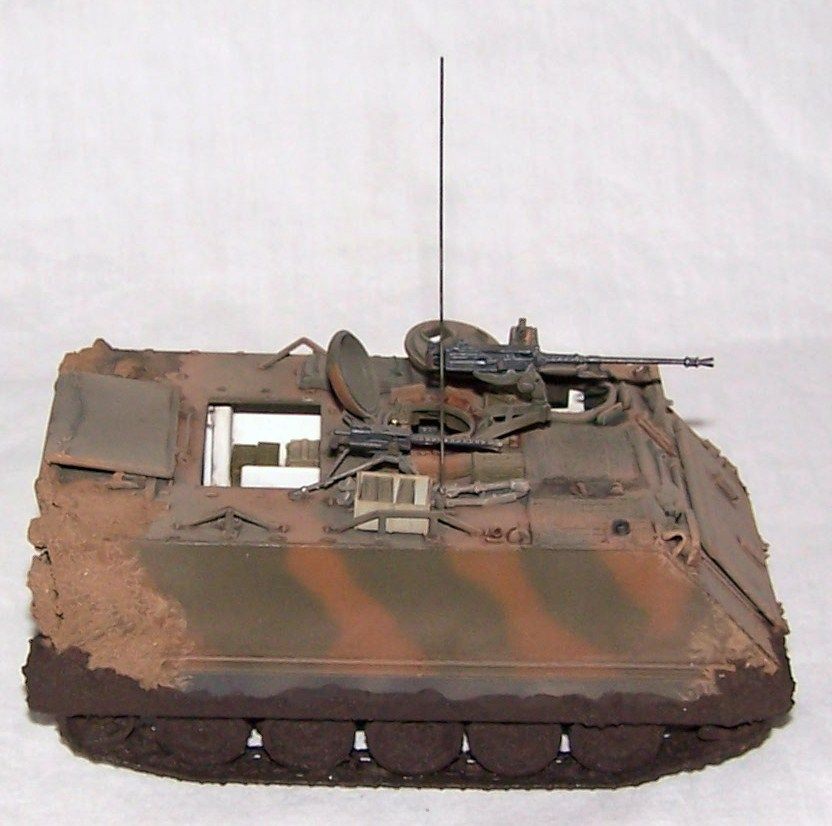
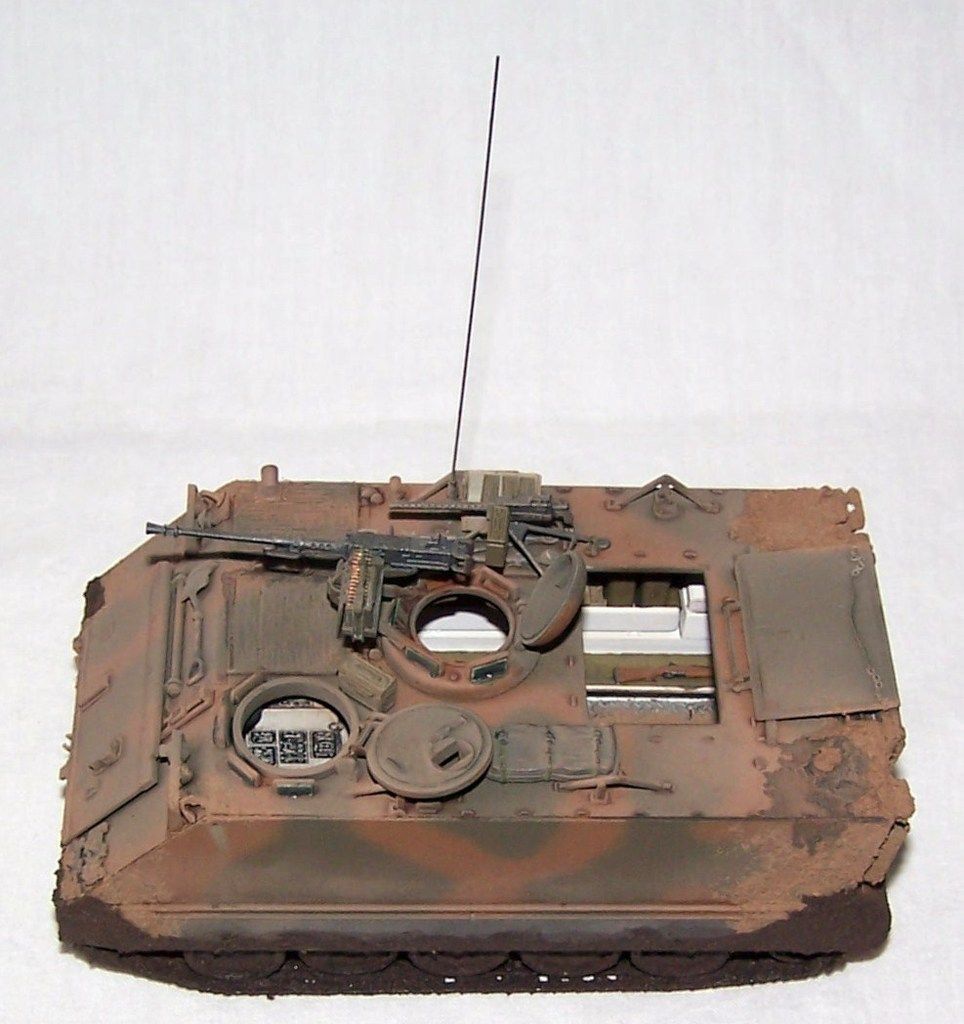
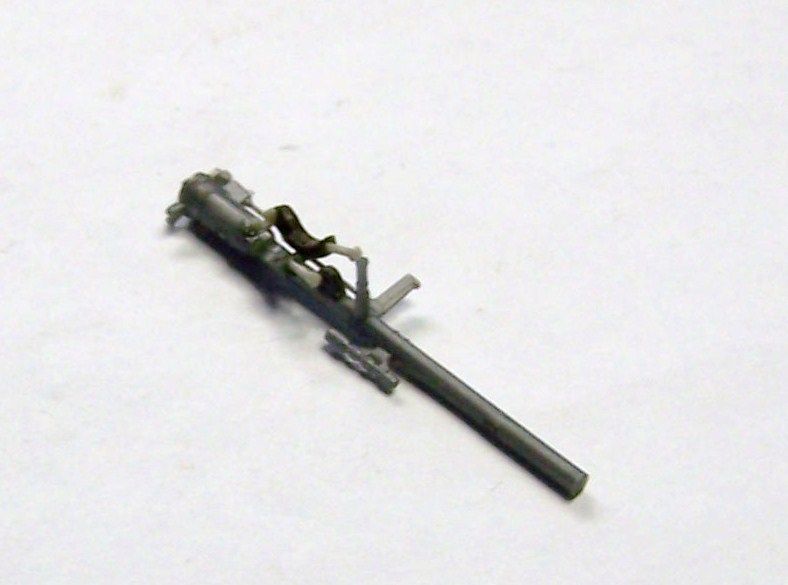
Thanks for looking, and thanks to FSM for hosting this Group Build.But... I must confess that there will be one last addition in a day or so. I was doing some final research for this build the other day and I came across the tidbit of info that the ARVN Armored Cavalry in 1962 re equipped from rocket launchers (bazookas) to M18 57mm Recoilless Rifles. I dug thru my stash and sure enough I had one left from a Tamiya US Weapons Set. BUT, it is on the same tripod mount as a M1919 .30 cal. So I had to modify it for shoulder fire as carried by the ARVN tracks. I also found a bag in my spares bin that looks close enough for the shoulder bag used by gunners and loaders to carry the rounds.

so here is the Rifle and Bag so far

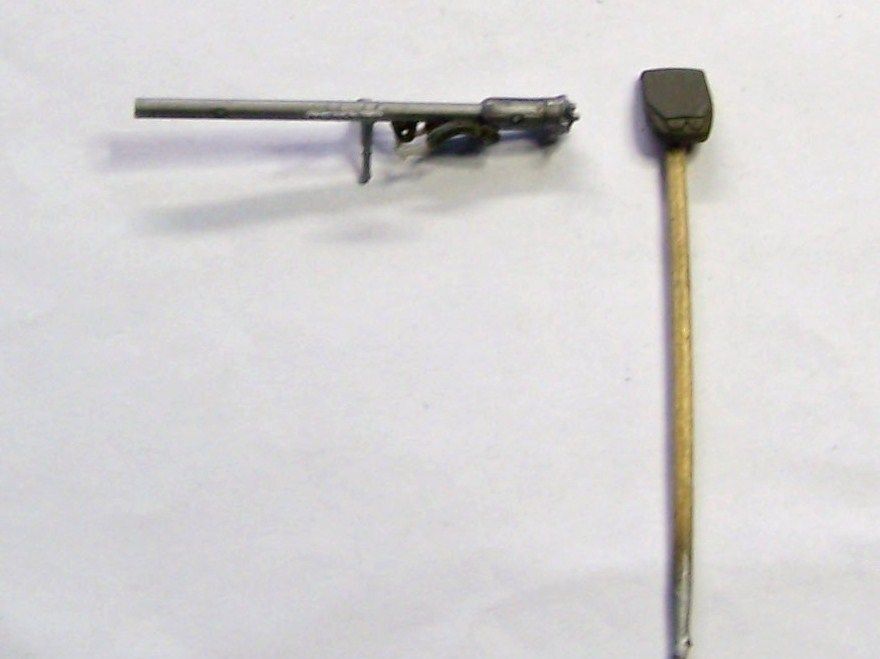
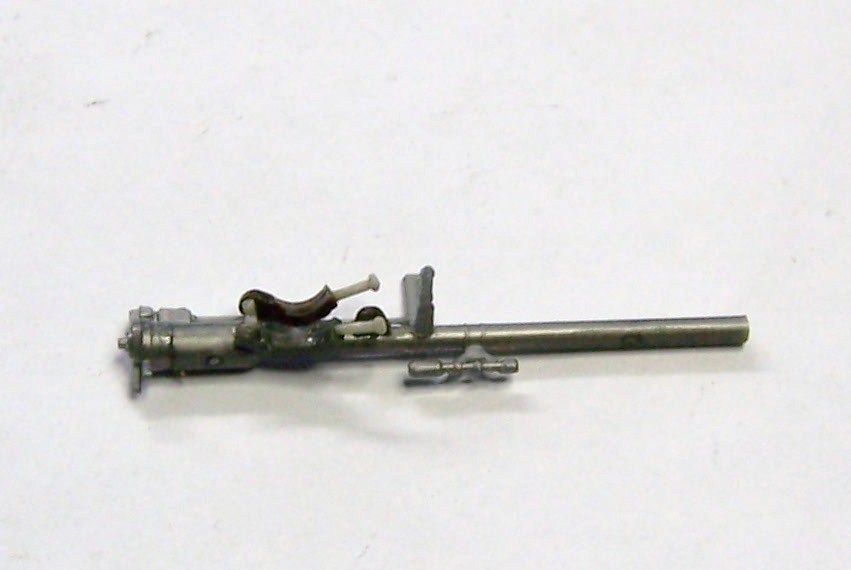
and a couple of close ups of the mods I did to make the folding bipod/shoulder rest

so I will get it painted up and added to the top deck in the next day or two... with some photos of course...


F is for FIRE, That burns down the whole town!

U is for URANIUM... BOMBS!

N is for NO SURVIVORS...

       - Plankton

LSM


  • Member since
    February 2014
  • From: Michigan
Posted by silentbob33 on Thursday, May 14, 2015 7:07 PM

Very very cool Stik! I love the weathering, it looks like it just drove in after a rainstorm.

On my bench: Academy 1/35 UH-60L Black Hawk

  • Member since
    January 2014
  • From: Toronto
Posted by Rob S. on Thursday, May 14, 2015 7:26 PM

wicked Stik! Congrats...she turned out fantastic YesCoolYes

______________________________________________________________________________


On the Bench: Nothing on the go ATM

  • Member since
    July 2004
  • From: Sonora Desert
Posted by stikpusher on Friday, May 15, 2015 12:02 AM

SB & Rob, thank you guys. I am happy to hear that you like this build.


F is for FIRE, That burns down the whole town!

U is for URANIUM... BOMBS!

N is for NO SURVIVORS...

       - Plankton

LSM


  • Member since
    October 2004
  • From: Northern Virginia
Posted by ygmodeler4 on Friday, May 15, 2015 9:14 AM

YesYes on this one Stik!

-Josiah

  • Member since
    May 2009
  • From: Poland
Posted by Pawel on Sunday, May 17, 2015 10:44 AM

Hello!

Stik - like I wrote, that M113 is lookin' good! I also like that recoilless rifle a lot!

I also did some work on my Whale - I managed to spray a semi-matt coat on the whole model. That helped to finally blend the decals with their surroundings. With that final coat on, I could at last unmask the cockpit. I'm glad I haven't found any nasty surprises under there, although the close up photos show all the minor finish problems that cannot be seen from the distance:

I also put the flaps and slats on. Especially the flaps weren't that easy to put on. Also note the static charge dissipators on the wing tips - I made them out of thin plastic fishing line, so as to keep them from breaking off:

At the same time I also installed the arresting hook:

You could say - just a few more details and it's done - but such things usually take me a lot of time, so let's see how it goes. I hope you liked it - thanks for reading and have a nice day

Paweł

All comments and critique welcomed. Thanks for your honest opinions!

www.vietnam.net.pl

  • Member since
    July 2004
  • From: Sonora Desert
Posted by stikpusher on Sunday, May 17, 2015 1:17 PM

That is looking very sharp Pawel! I really like the fishing line static dissipators. An excelling added detail.


F is for FIRE, That burns down the whole town!

U is for URANIUM... BOMBS!

N is for NO SURVIVORS...

       - Plankton

LSM


  • Member since
    May 2009
  • From: Poland
Posted by Pawel on Monday, May 18, 2015 2:07 PM

Thanks a lot, Stik!

All comments and critique welcomed. Thanks for your honest opinions!

www.vietnam.net.pl

  • Member since
    November 2003
  • From: Nashville, TN area
Posted by bobbaily on Monday, May 18, 2015 6:28 PM

Pawel-very nice build indeed!

Bob


  • Member since
    October 2010
  • From: Australia Brisbane
Posted by peterjb on Tuesday, May 19, 2015 8:11 AM

Weathering looks good on the m113 nice work.

  • Member since
    October 2010
  • From: Australia Brisbane
Posted by peterjb on Tuesday, May 19, 2015 8:22 AM

Looking good Pawel will be using fishing line too good idea.

  • Member since
    December 2002
  • From: Bury St Edmunds, Suffolk, England
Posted by Bish on Wednesday, May 20, 2015 12:47 PM

Sorry I haven't been keeping up guys.

Great job on the 113 Stik, really nice weathering and nice work on the mud. I tried future on the 251 I built at end of last year but didn't have much luck with it. It may need several applications to get good results though.

Pawel, that's looking really god, I do like the white undersides, some great results there.

I am a Norfolk man and i glory in being so


On the bench: Airfix 1/72nd Harrier GR.3/Fujimi 1/72nd Ju 87D-3

JOIN OUR COMMUNITY!

Our community is FREE to join. To participate you must either login or register for an account.

SEARCH FORUMS
FREE NEWSLETTER
By signing up you may also receive reader surveys and occasional special offers. We do not sell, rent or trade our email lists. View our Privacy Policy.