SEARCH FINESCALE.COM

Enter keywords or a search phrase below:

2014 SCI FI HARD SCIENCE GROUP BUILD

43444 views
544 replies
1 rating 2 rating 3 rating 4 rating 5 rating
  • Member since
    March 2014
Posted by Señormodeler on Monday, March 2, 2015 10:52 AM

Definitely, yes. I'm laying on filters now. Then some discoloration. Then more discoloration to specific panels. Then streaking and rust. Then I'll paint the grey and yellow panels. Then black pigments.

That's my basic plan.

  • Member since
    August 2010
  • From: Weiden, Germany
Posted by Beckyhead on Monday, March 2, 2015 10:50 AM

MF is loking great. Do you plan on adding oil or greae streaks, especially by those six grill thingees?

 photo group_build_zps4810f6a0.png

  • Member since
    March 2014
Posted by Señormodeler on Monday, March 2, 2015 12:00 AM

This week I found some time to work on the Falcon and to begin my favorite part of the process... weathering. I started applying the first filter over the base color... Abteilung German Ochre. The base coat needed to be warmed up a little and the german ochre does the job. 

But before applying the filter I went in with a gundam marker and put all the little hash marks that appear all over the ship. Here you can see the hash marks and also the filter. The left side of the image has the first layer of the filter and the right side doesn't.

I also did the bulk of the painting of the death star tiles. I gave each one a slight different shade of grey. I still may go back and add different tonalites as well as do some weathering on them.

And here's the falcon with a couple more layers of filtering with german ochre. Warming it up inch by inch.

Thanks for looking. Comments welcome.

  • Member since
    March 2014
Posted by Señormodeler on Monday, February 16, 2015 6:45 PM

Thanks Gamera!

  • Member since
    November 2009
  • From: SW Virginia
Posted by Gamera on Sunday, February 15, 2015 1:40 PM

She's coming along great SM, looking forward to how she looks all done up!

"I dream in fire but work in clay." -Arthur Machen


  • Member since
    April 2006
  • From: Denver, Colorado
Posted by waynec on Saturday, February 14, 2015 1:55 PM

oooooh, shiny!!

OOPS wrong universe. i plan to start my T2 HKT next Saturday at Wings Over The Rockies aero expo.

Никто не Забыт    (No one is Forgotten)
Ничто не Забыто  (Nothing is Forgotten)


  • Member since
    March 2014
Posted by Señormodeler on Saturday, February 14, 2015 9:16 AM

I applied the base coat to the falcon this week. Tried to keep the pre-shade effect very subtle.

Masked off all the red panels on the upper side. Sponged on some Humbrol masking liquid for the paint chips. Applied a custom mix of muted red tamiya paint.

I think the red panels came out a little too dark, so I'm going to give them a light sanding with fine grit sandpaper to beat them back a little. Then I'll sponge on a few nuetral gray paint chips.

Still have the bottom panels to do and then I'll attach the cockpit and start the weathering. 

Comments welcome. Thanks for looking!

  • Member since
    March 2014
Posted by Señormodeler on Sunday, February 1, 2015 9:10 AM

I finally got some primer on this guy. Used Tamiya fine light grey.

Then pre-shaded with german grey.

Added the PE grills.

Then started base coating it with a mixture of flat white, gloss white, with a pinch of nuetral grey and brown.

Thanks for looking.

  • Member since
    November 2009
  • From: SW Virginia
Posted by Gamera on Saturday, January 24, 2015 5:02 PM

Looks good Rob! I've thought about lighting my classic Galactica but so far haven't gotten around to trying it.

"I dream in fire but work in clay." -Arthur Machen


  • Member since
    January 2008
  • From: Limoges
Posted by Rob.H on Saturday, January 24, 2015 4:46 PM

More progress with the "Bucket".

I have been busy wiring up resistors and LEDs. I've forgone the investment in a commercial kit primarily because I think it should be simple enough to do myself. Also, because of all the money I've dropped on the aftermarket decals and PE sets, the kit is already far and away the most expensive I've ever put together.

At this point I am planning to install the following LEDs:

2 white in the nose for the mid-deck lights

2 white in each of the landing bays

3 red per side for where the fighter bays retract

1 blue in each of the four outboard engines

2 blue in the central hull engines

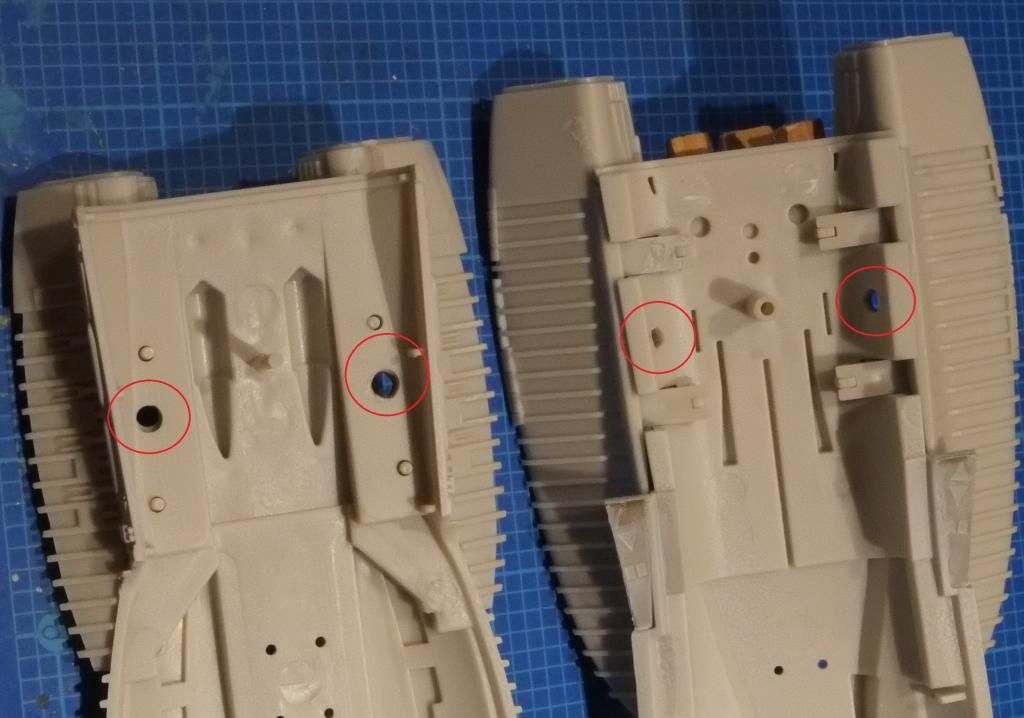
I've started to make modifications to the hull to accommodate running the wiring into the outboard engines. I've temporarily mounted half of each of the engine pods so that I could drill the holes for the wires to pass through.

 photo Engine Wiring Ducts_zpslabxxutf-1.jpg

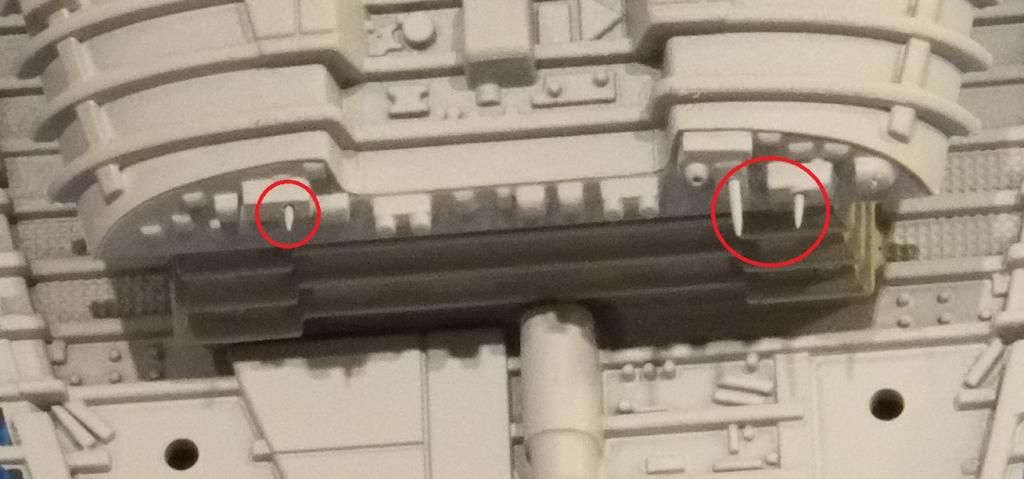
I've also finished assembling the nose, which in hind-sight I should have kept in subassemblies until finished painting and applying the armour decals. I'll certainly go that route with the rest of the kit. Based on a suggestion I saw on another thread, I added a few needles to represent some of the missing antennae on the "chin" of the nose.

 photo Added Antennae2_zpsqhzujvur.jpg

on the bench: Moebius Battlestar Galactica, Tamiya 1/35 M13/40

 photo PacificCarrierBuild2014small_zps595053a9.jpg

  • Member since
    November 2009
  • From: SW Virginia
Posted by Gamera on Wednesday, January 21, 2015 9:35 AM

Looks good, you're coming right along!

"I dream in fire but work in clay." -Arthur Machen


  • Member since
    March 2014
Posted by Señormodeler on Wednesday, January 21, 2015 9:04 AM

I ended up getting some isopropyl alcohol and q-tips and cleaning it that way. That seemed to work really well. The q-tips were dirty after I rubbed them on each section of the ship, so I think they pulled up a fair amount of deposits. Glad I did it.

Primed!

  • Member since
    November 2009
  • From: SW Virginia
Posted by Gamera on Wednesday, January 21, 2015 7:37 AM

Yeah as BH said a little detergent and warm water is all I use. Though after rinsing I let the model dry overnight. You might want to be a little more careful there about getting water on the electronics you added though.

"I dream in fire but work in clay." -Arthur Machen


  • Member since
    August 2010
  • From: Weiden, Germany
Posted by Beckyhead on Tuesday, January 20, 2015 6:38 PM

I would use simple dish detergent and warm water, and wipe down with Q-tips and a small sponge. Don't saturate the sponge, just wet enough to apply and have control.

 photo group_build_zps4810f6a0.png

  • Member since
    August 2010
  • From: Weiden, Germany
Posted by Beckyhead on Tuesday, January 20, 2015 6:37 PM

It couldn't hurt, considering the hard work you put into the lighting, i'm sure you'd want the best paint job possible. In addition, I always wear latex gloves when working to prevent any dirt, or oils from my hands that can mar the finish. Just do not bring out to the back yard and put a hose to it!

Keep up the awesome work!

 photo group_build_zps4810f6a0.png

  • Member since
    March 2014
Posted by Señormodeler on Wednesday, January 14, 2015 8:39 PM

Thanks, fellas. I'm prepping it for a coat of primer. Any suggestions on how/if I should clean it before I prime it. I washed all the parts at the start of the build, but I wonder if I should use some q-tips to go over everything. Any suggestions?

  • Member since
    November 2009
  • From: SW Virginia
Posted by Gamera on Wednesday, January 14, 2015 7:41 AM

That Falcon looks fantastic SM, looking forward to each update.

"I dream in fire but work in clay." -Arthur Machen


  • Member since
    January 2008
  • From: Limoges
Posted by Rob.H on Tuesday, January 13, 2015 7:38 PM

Mach71, you are right, its the part of the ship where the hanger pods pull in.  I am surprised Moebius left it so bare.

That's an impressive bit of electrical kit in the Falcon SenorModel.  I nope my BG wiring job will look half as tidy when I am done!

on the bench: Moebius Battlestar Galactica, Tamiya 1/35 M13/40

 photo PacificCarrierBuild2014small_zps595053a9.jpg

  • Member since
    March 2010
  • From: Boston
Posted by mach71 on Tuesday, January 13, 2015 12:12 PM

Wow, that MF is spectacular! The lighting really adds a lot to the kit.

Rob H, that PE looks great. What area of the ship is it? Where the hanger pods retract to?

Rob S, That is the R2/AMT re-release of the UFO mystery ship converted to the Lief Ericson.

The stated scale is 1/350 I think. The planet is 8 in across.

  • Member since
    March 2014
Posted by Señormodeler on Tuesday, January 13, 2015 9:23 AM

AMAZING WORK, BH!! That paint job is incredible. I hope my falcon looks that good.

Rob, very cool lighting work on the BG!

I've been so busy with my 10 week old kid that I haven't had time to do any updates, but I have a small update today.

Finally got all the lighting installed and glued down. She's ready to close up for good.

Checked for light leaks.

Then realized that I needed a 2.1mm plug connector between the gooseneck stand and the ship itself, or else I wouldn't be able to separate the ship from the base (which would be handy if I transport it). So I spliced in a connection and glued the female connecter inside the gun well.

Glued on the sidewalls, which pretty much means I'm glueing the model together for good. I hope those LEDs last a good long while and there are no short circuits!

Then realized that I'm missing a piece! E33. It goes here...

Looked high and low and it's nowhere to be found. So I decided to scratch it. Found some references and I'm currently working on that.

Time to mask some sections off and prime her up! Really looking forward to painting her.

Thanks for looking.

  • Member since
    December 2006
  • From: Phoenix, AZ
Posted by Fly-n-hi on Tuesday, January 13, 2015 8:50 AM

Beckyhead, the X-wing looks great!

Rob H, I'm looking forward to seeing more of the BG!

As for me...I've had to pack up my modeling stuff since we had company in town and what not but I'm still planning on finishing my X-wing on time.  It might be a while before I get my stuff back out.  Its kind of nice having a clean house again!

  • Member since
    August 2010
  • From: Weiden, Germany
Posted by Beckyhead on Monday, January 12, 2015 8:28 PM

That is a great concept, but I am looking for something a little more subtle....

 photo group_build_zps4810f6a0.png

  • Member since
    August 2010
  • From: Weiden, Germany
Posted by Beckyhead on Monday, January 12, 2015 8:26 PM

Thanks Rob...Micro Mask applied with a toothpick after masking for the yellow stripe, airbrushed the Insignia Yellow, the simply removed the dried masking fluid when complete.

 photo group_build_zps4810f6a0.png

  • Member since
    January 2008
  • From: Limoges
Posted by Rob.H on Monday, January 12, 2015 7:44 PM

Wow Beckyhead.  Your X-wing is simply stunning to look at.

How did you chip the yellow paint on the nose?

on the bench: Moebius Battlestar Galactica, Tamiya 1/35 M13/40

 photo PacificCarrierBuild2014small_zps595053a9.jpg

  • Member since
    January 2014
  • From: Toronto
Posted by Rob S. on Monday, January 12, 2015 7:02 PM

Wow, Mach, cool ship...what sorta scale or size is that? That hemisphere looks huge?

______________________________________________________________________________


On the Bench: Nothing on the go ATM

  • Member since
    November 2009
  • From: SW Virginia
Posted by Gamera on Monday, January 12, 2015 6:38 PM

Hey Rob very cool, I really like the PE for the interior of the fighter hangers.

BH: WOW, that's a fantastic job! I love the weathering!!!

Mach71: Very cool Leif Erikson! And love the planet base, great idea and it looks really good!

"I dream in fire but work in clay." -Arthur Machen


  • Member since
    March 2010
  • From: Boston
Posted by mach71 on Monday, January 12, 2015 11:29 AM

Beautiful X-wing!

I do have a stand suggestion. Go to a craft store and get a floral arrangement Styrofoam base in the shape of a hemisphere. Paint it like the deathstar, glue it to a wood plaque painted black. Run a post through it to hold your excellent X-wing!

Bob's your uncle.    

Edit:

Like this:

  • Member since
    February 2014
  • From: Michigan
Posted by silentbob33 on Monday, January 12, 2015 6:59 AM

Awesome X-Wing!  Love the weathering

On my bench: Academy 1/35 UH-60L Black Hawk

  • Member since
    January 2014
  • From: Toronto
Posted by Rob S. on Monday, January 12, 2015 5:07 AM

Gorgeous XWing Beckyhead!! What a beauty....VERY well done, congrats! YesYes

______________________________________________________________________________


On the Bench: Nothing on the go ATM

  • Member since
    August 2010
  • From: Weiden, Germany
Posted by Beckyhead on Sunday, January 11, 2015 10:38 PM

Thanks all for the compliments. This project is complete. However, I'm only using the kit stand as a temporary holding device until I can find a better idea for a base. Suggestions?

Anyway, I hope you like the finished product.

 photo 20150111_201815_zps71xtdaqs.jpg  photo 5ee164ca-f5b5-4e2c-9948-02c6e8ae59d9_zps453484e6.jpg X-Wing (Cockpit) photo 20150111_201647_zpsdlurjatq.jpg X-Wing Complete photo 20150111_201605_zpscea8dfwh.jpg

 photo group_build_zps4810f6a0.png

JOIN OUR COMMUNITY!

Our community is FREE to join. To participate you must either login or register for an account.

SEARCH FORUMS
FREE NEWSLETTER
By signing up you may also receive reader surveys and occasional special offers. We do not sell, rent or trade our email lists. View our Privacy Policy.