SEARCH FINESCALE.COM

Enter keywords or a search phrase below:

1945 GB

95428 views
1851 replies
1 rating 2 rating 3 rating 4 rating 5 rating
  • Member since
    April 2006
  • From: ON, Canada
Posted by jgeratic on Tuesday, December 15, 2015 11:21 PM

Thank you Check and Eric.

That is an excellent seascape with that destroyer.  I've a few of those in the stash, so there is chance for improvement.   Made mistakes too on this first try with a water base, so upward and onward as they say.

Actually, the bow crests on mine are made of cotton.  The clear cement was used to attach them, as well as fill in gaps between the hull and water.   I did find too much cement caused the cotton to yellow.   This happened at the rear, and I had to go back in with some white paint.

regards,

Jack

  • Member since
    September 2003
  • From: AandF in the Badger State
Posted by checkmateking02 on Tuesday, December 15, 2015 8:46 PM
That's a nice base, EB. Can you give us a run-through how you made it?


  • Member since
    February 2010
  • From: Berkeley CA/St. Paul MN
Posted by EBergerud on Tuesday, December 15, 2015 7:50 PM

Very nice low maintainence base - fits the neat boat just fine. Never thought of doing the bow wake with clear parts cement - Micro makes a good brand and I've got a whole bottle. If you've got the stuff, it works really nicely to get some gloss medium (liquitex, golden, lots of makers), pour out a nice circle of it on a piece of wax paper (alum foil might work) and let it dry overnight. Than you can strip it off. Cut it into the appropriate size slice and then bend it over a toothpick. Let it sit that way for a bit and it will hold the shape. I'll do the next one better but below is ball park.

Eric


A model boat is much cheaper than a real one and won't sink with you in it.

  • Member since
    September 2003
  • From: AandF in the Badger State
Posted by checkmateking02 on Tuesday, December 15, 2015 3:04 PM
Very successful water-effects, Jack. That is really a sharp and natural-looking display. Excellent!


  • Member since
    April 2006
  • From: ON, Canada
Posted by jgeratic on Tuesday, December 15, 2015 1:33 PM

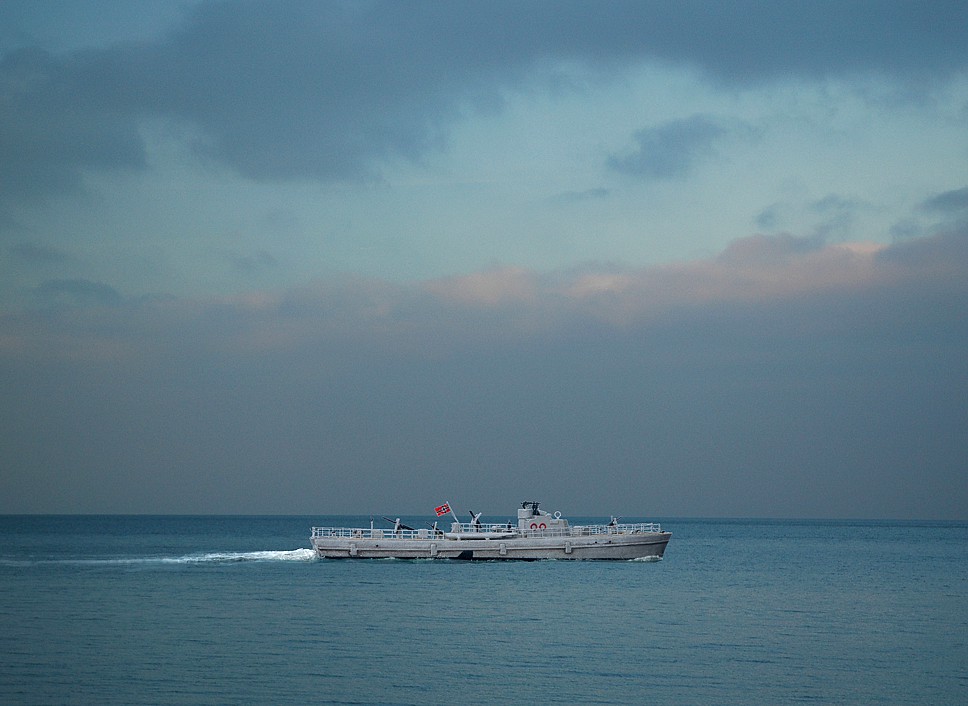
Weather still isn't cooperating for natural lighting, so took these photos before noon:
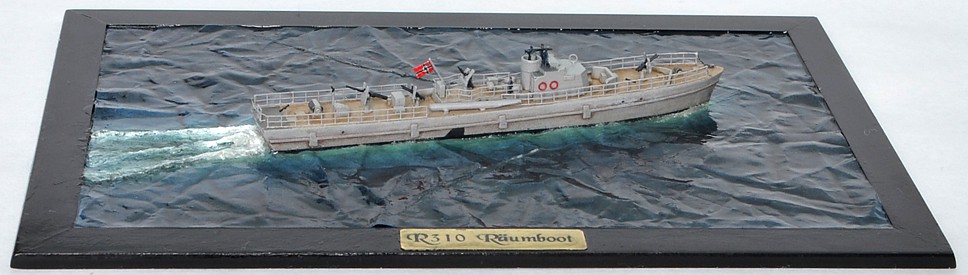
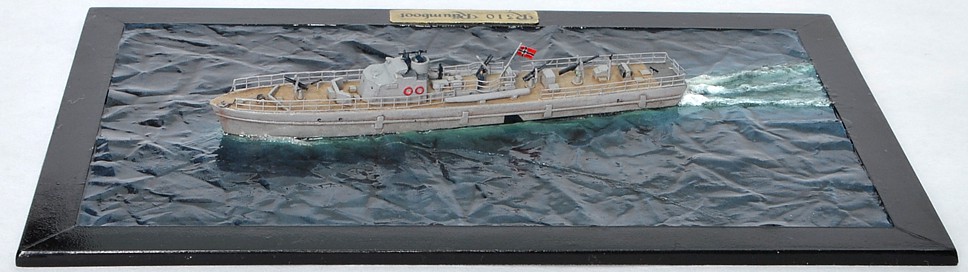
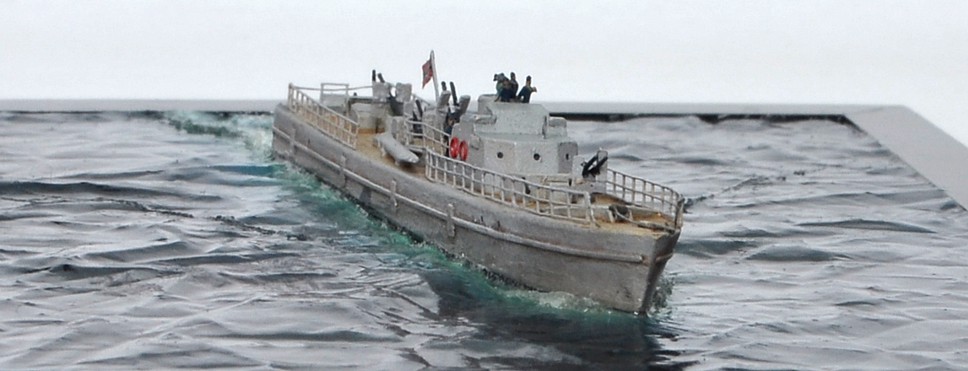
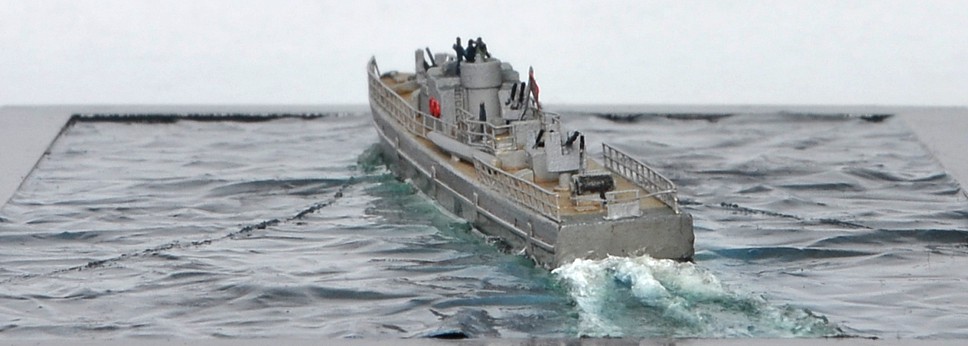
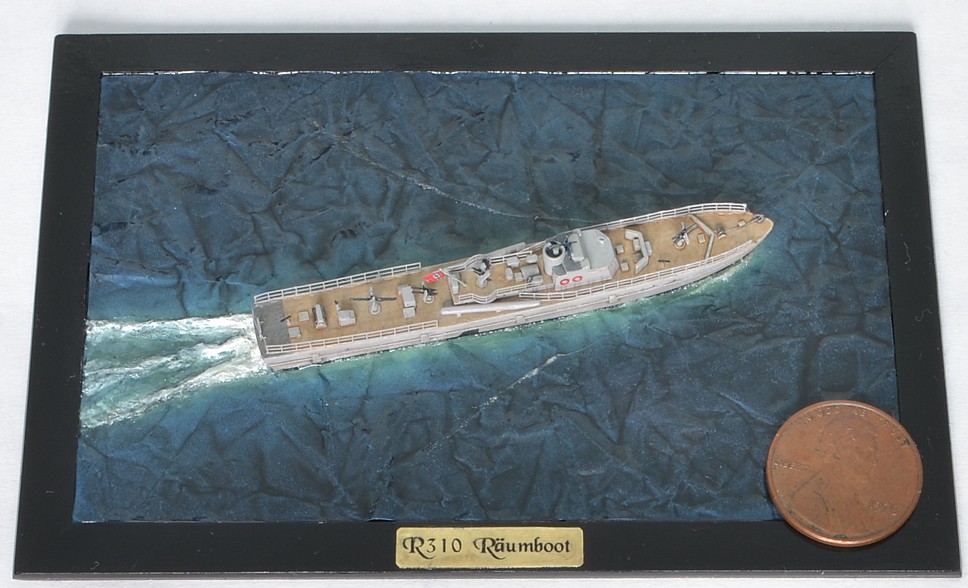
R310  r-boat
Bergen, Norway 1945


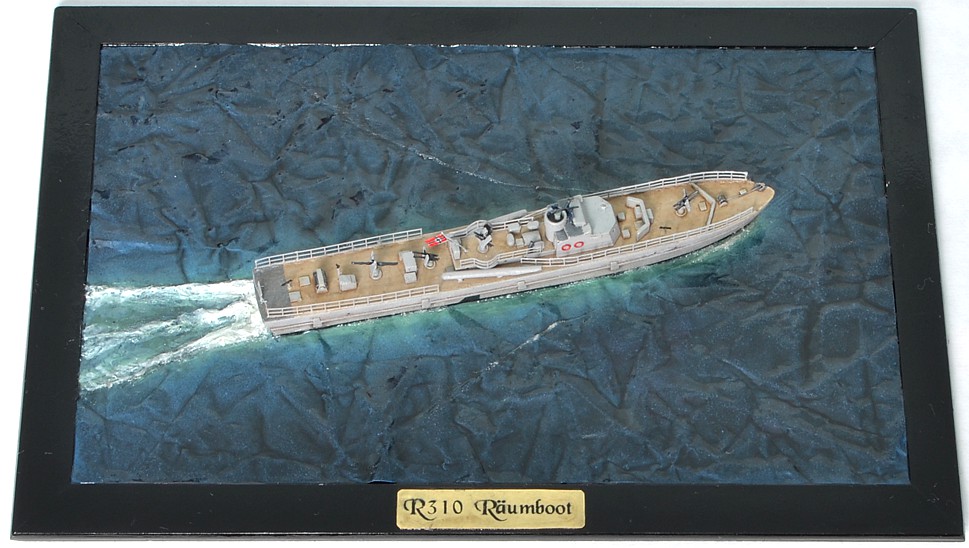
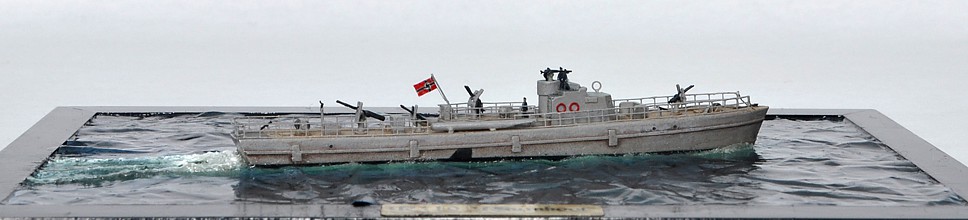
not to forget, the 'money shot'

A little history ...

R-boat, or Raumboot, was a class of light minesweepers designed to work in coastal and shallow waters.  They were also employed in mine laying,  escort, patrol and sea rescue.  By war's end,  424 boats had been built, with about 140 surviving.  These vessels were ordered in blocks, with some weight and size differences among them.

R310 was launched June 10th 1944, belonging to the R301 series.  They were unique in having two 21" torpedo tubes, were the heaviest at 160 tons, and were referred to as Geleit-Räumbooten, or escort minesweepers.   All twelve ships of this series formed the 21. Räumbootsflottille, and were based in Bergen Norway.

With cessation of hostilities, all surviving ships returned to Germany.  On 21st June 1945, the German Mine Sweeping Administration (GMSA) was formed by the Allies.   Their task was to clear some 600,000 naval mines that both sides had laid in the waters of the North Sea and Baltic.  To spare the lives of Allied seamen, it was decided to use not only captured ships, but also former crewmen of the Kriegsmarine, (approx. 300 and 27,000 respectively).    Until a proper new uniform became available, the crews continued to wear their former uniform, but without any eagles or swastikas, and also received a moderate pay.

The Soviets were very suspicious of this formation, thinking it was the beginnings of a new German navy.  As a result of this pressure, it was disbanded in January 1948.  It was replaced with a civilian organization "German mine sweeping formation Cuxhaven", but still used equipment and personnel from the previous organization.  R310 did serve in these post war mine sweeping duties, but was taken, along with many other r-boats, as a war prize by the Soviets in November of 1945.

regards,
Jack

  • Member since
    April 2006
  • From: ON, Canada
Posted by jgeratic on Tuesday, December 15, 2015 1:14 PM

Thanks Rob!

Typhoon is coming on great, I really need to get one of these.

regards,

Jack

  • Member since
    September 2003
  • From: AandF in the Badger State
Posted by checkmateking02 on Tuesday, December 15, 2015 11:39 AM

Moff and Rob S: sometimes it seems nothing wants to cooperate. Maybe it's a phase of the moon.

I've had photobucket issues from time to time, too, Rob; never seems to be a reason for it. It usually just clears up by itself.

Nice work going on! Looking really good.

Looking forward to seeing your photos, once the light box starts behaving, Moff.


  • Member since
    January 2014
  • From: Toronto
Posted by Rob S. on Tuesday, December 15, 2015 11:22 AM

______________________________________________________________________________


On the Bench: Nothing on the go ATM

  • Member since
    January 2014
  • From: Toronto
Posted by Rob S. on Tuesday, December 15, 2015 11:17 AM

Photobucket is really acting up today

______________________________________________________________________________


On the Bench: Nothing on the go ATM

  • Member since
    January 2014
  • From: Toronto
Posted by Rob S. on Tuesday, December 15, 2015 11:08 AM

One pic uploaded.


______________________________________________________________________________


On the Bench: Nothing on the go ATM

  • Member since
    January 2014
  • From: Toronto
Posted by Rob S. on Tuesday, December 15, 2015 11:02 AM

Jack...fantastic little boat. Love the idea of using the bag from inside the cereal box as a water medium. Very innovative.

I am really wanting to get the Typhoon done by year end. I got the Ocean Grey down with some subtle post shading and the Dark Green. I am in the process of masking off now for the RAF grey underside and hope to have that done tonight.

MAYBE when Photobucket starts to cooperate, cuz, for some reason it's not letting me upload, I'll try to get some pics up Crying

______________________________________________________________________________


On the Bench: Nothing on the go ATM

  • Member since
    January 2015
Posted by Moff on Tuesday, December 15, 2015 8:32 AM

Well, never mind about uploading pics in a few days. I'm trying to get my DIY light box up, but it's fighting me.

"Gaiety is the most outstanding feature of the Soviet Union." - Josef Stalin 

  • Member since
    December 2002
  • From: Bury St Edmunds, Suffolk, England
Posted by Bish on Monday, December 14, 2015 12:26 PM
Nice to see you getting started Tony.

I am a Norfolk man and i glory in being so


On the bench: Airfix 1/72nd Harrier GR.3/Fujimi 1/72nd Ju 87D-3

  • Member since
    April 2006
  • From: ON, Canada
Posted by jgeratic on Monday, December 14, 2015 9:50 AM

Thanks Check, Joe, Bish, Tony and Eric.

I actually wanted to try watercolour paper (140 lb cold press) for the sea surface area, would of been ideal for the scale and calm waters, but could not find any at home. I know I used some from my college days studying art, but maybe I forget where I stored them or gave them away...

Thanks for the heads up on the cotton.  The type I have at home wouldn't suit a bigger project as it has clumps of lint in it.  I actually  resorted to pulling apart a cotton swab for cleaner strands.  Been using mainly clear parts cement for the application, with a brush in one hand and a coctail stick in the other. 

Just have the rear wake to sort out and should be ready for the photo booth, though the sun is being a bit timid to come out.  Feels like Norway winter here, which is exactly where this particular boat was based at during the war.

regards,

Jack

  • Member since
    February 2010
  • From: Berkeley CA/St. Paul MN
Posted by EBergerud on Monday, December 14, 2015 2:56 AM
Very nice very little model. The base for something that scale looks fine and does look simple. If you do want to mess around with cotton to dress up a water base - and it will do that - I'd go on eBay and get something called "CelluCotton" which is made of 100% rayon. (A few brands use cotton - you don't want that.) I've tried them both and rayon is much easier to work with than cotton if you're doing a serious base. The stuff goes for about $5 for fifteen foot tubes of the stuff, enough to last a very long time. Seems to be popular with the ecig community of which I know nothing. If you want to check out a serious water base guru go on YouTube and search "Chris Flodberg." The guy's a professional artist and a top notch ship builder - bases are his specialty. Watching him do it is a lot easier than trial and error. If you want to see a blow by blow creation of a pretty advanced sea scape, check YTube "Admiral Graf Spee Sea-Scape Part 1" by a wonderful modeler Guido Hopp. There's a Part 2. For the occasional ship builder the "less is more" base works fine. But if you've got some kit you've worked on for three months and think it looks good, putting on a complex base adds a lot - similar to putting a tank in a nice diorama. It's actually not that hard if you get the hang of it - well not too hard. Ships aren't easy builds normally. I get nervous thinking about beginning one, but once underway they do get under your skin. I've got several coming up in the next year or two. Eric


A model boat is much cheaper than a real one and won't sink with you in it.

  • Member since
    April 2005
  • From: Australia
Posted by taxtp on Monday, December 14, 2015 12:43 AM

I agree, it looks really good. I've previously used acrylic gel medium which works pretty well too. I daresay your method is a fair bit cheaper though. It looks great.

I've cleared a couple of other builds over the weekend so I'm good to start on my French FW 190. I have planned to use this release of the Hasegawa kit:

as it includes two kits and I've already built one of them. However I do have the recent Airfix release and I'm just itching to build it too.

Anyways, this is what I am starting with, I hope to get cracking tonight.

Cheers

Tony

I'm just taking it one GB at a time.

  • Member since
    December 2002
  • From: Bury St Edmunds, Suffolk, England
Posted by Bish on Monday, December 14, 2015 12:28 AM

Realy likeing the look of that jack, and that water looks really effective. Great work.

I am a Norfolk man and i glory in being so


On the bench: Airfix 1/72nd Harrier GR.3/Fujimi 1/72nd Ju 87D-3

  • Member since
    August 2009
  • From: MOAB, UTAH
Posted by JOE RIX on Sunday, December 13, 2015 10:43 PM

Holy Smokes! That is really inpressive Jack. The boat looks great. Especially in that scale. Your water method is the first time I've ever seen that done. Very clever and effective. Thanks for sharing with us.

"Not only do I not know what's going on, I wouldn't know what to do about it if I did". George Carlin

  • Member since
    September 2003
  • From: AandF in the Badger State
Posted by checkmateking02 on Sunday, December 13, 2015 4:57 PM
That looks really good, Jack. I may have to give that water technique a try for the future.


  • Member since
    April 2006
  • From: ON, Canada
Posted by jgeratic on Sunday, December 13, 2015 4:47 PM

Getting close to the finish line...

Working on the base, using a bit of a variation of the crumpled tinfoil that Check had presented with his Shangri-La carrier.   Instead, I've used the inner plastic bag you find in cereal boxes. 

Also made a base from sheet plastic, with some framework to hold the water.  Should of taken the picture before I had sprayed it in gloss black - difficullt to see now.  I then trimmed the plastic paper to size, and also cut out a whole based on the ship hull size.

The simulated water surface was sprayed dark blue, and some lighter green shade around the ship area, as well as to the rear.  Then glued onto the home made frame.  I brushed about four layers of future acrylic clear onto the surface, all but the first were quite heavy applications.

Above, just a test shot of how it all looks combined thus far.  Below, the ship is now secured with super glue gel.  Also, Testors clear parts cement is used to fill in gaps between the water and hull, excess wiped up with a cotton swab.  It almost would look nice as it is now, but the white will dry clear.

The gel tube that I've pictured in the back is brand new, and seems quite a bit stronger than what I have been using during construction.  Could be just the older super glue has lost it's strength.

All that is left is some retouching of the green 'surf', trying out the technique of creating white caps and foam from cotton balls, and a nameplate.

regards,

Jack

  • Member since
    September 2003
  • From: AandF in the Badger State
Posted by checkmateking02 on Friday, December 11, 2015 12:26 PM
Thanks, Dan. CV-38 was only repainted in late February/early March of '45, so the sea wouldn't have battered her too much. The "sea" is aluminum foil, crinkled up, uncrinkled, then applied to a piece of cardboard, and painted. It's a cheap way to put a ship into natural surroundings.


  • Member since
    February 2006
  • From: Cincinnati Ohio
Posted by DantheMan85 on Friday, December 11, 2015 12:06 PM


Thanks Checkmateking: Excellent job on finishing your aircraft carrier, she looks like she just left the dry docks. Nice water effect to.

Thanks Ebergerud, GAF, Bish.

Thanks Jgeratic: Great work on your little ship.

Thanks Joe Rix my pleasure.

Rob S: Nice pre-shading on the Typhoon.


On my Work Bench: Tamiya Ford GT 1/24

Up Coming: ?


  • Member since
    August 2009
  • From: MOAB, UTAH
Posted by JOE RIX on Thursday, December 10, 2015 4:51 PM

Bish has pretty much got it. Use the reamer in the direction of airflow. I'm also unsure whether that's the issue with the moisture trap. Sure looking forward to some finished pics of the JS-2.

"Not only do I not know what's going on, I wouldn't know what to do about it if I did". George Carlin

  • Member since
    December 2002
  • From: Bury St Edmunds, Suffolk, England
Posted by Bish on Thursday, December 10, 2015 3:35 PM
Not sure about your airbrush, but on my badger I don't have to take the tip off and I use the reamer from the direction of the flow. I think it would risk damaging the tip to try and get it in from the other way and would not clean the inside. Not sure about your trap, but I guess its possible. Look forward to those pics.

I am a Norfolk man and i glory in being so


On the bench: Airfix 1/72nd Harrier GR.3/Fujimi 1/72nd Ju 87D-3

  • Member since
    January 2015
Posted by Moff on Thursday, December 10, 2015 3:22 PM

More off topic stuff about airbrush cleaning, but I was wondering which direction I should use the reamer from, in other words do I need to take the nozzle off and clean from the direction of airflow, or can I just stick the reamer through the tip of the airbrush/nozzle? 

Another thing is, part of the reason the moisture trap may not be working for me is that I've been using it horizontally, not vertically. 

Also, I basically finished the JS-3 last weekend, so I'll be uploading my final build update in a few days.

"Gaiety is the most outstanding feature of the Soviet Union." - Josef Stalin 

  • Member since
    December 2002
  • From: Bury St Edmunds, Suffolk, England
Posted by Bish on Thursday, December 10, 2015 12:46 AM

Jack, ye,i can imagine trying to handle that and add the PE would not be easy.

Now thats useful info. I didn't know the flags size depended on the size of the ship. I got some fabric ones for my 72nd U-boats and thoguht i could use those for my E-Boat as well, going to have to check that. Thanks, thats really useful.

I am a Norfolk man and i glory in being so


On the bench: Airfix 1/72nd Harrier GR.3/Fujimi 1/72nd Ju 87D-3

  • Member since
    April 2006
  • From: ON, Canada
Posted by jgeratic on Wednesday, December 9, 2015 11:45 PM

Rob, looking forward to the paint on the Tiffie.  Not too often I see pre-shading with solid blocks filled in  like that, but should be great.
--------------------------
Thanks Bish, Joe, Check and Rob.
I understand now (or maybe I had forgotten), the woes of knocking PE bits off a ship model.  Not much room to hold while adding the finishing touches.  So about half the bench time put in today was re-affixing both rails on port side, a couple AA mounts, and a crew figure.
Should of done more research on the Kriegsmarine flag.  Copying the dimensions provided in the kit results in one way too large.  I endeded up shrinking the artwork down 50% after reading this forum thread:

http://www.wehrmacht-awards.com/forums/showthread.php?t=267846&highlight=large+rkf

Based on ship tonnage, flag size as follows:

#3 (50x85cm), and #5 (80x135cm), both used on vessels up to 500 tons, such U/E-boats.

#6 (100x170cm), and #7 (150x250cm), used on ships between 500 to 1500 tons.

#8 (200x335cm), and #10 (300x500cm), for ships over 1500 tons, like the cruiser Leipzig (8,380 tons).

#11 (400x670cm), and #12 (450x750cm), used on ships over 10,000 tons, like the battleships Graf Spea (12K-16K tons), and the Bismarck (50,405 tons).

--------------------------------------------


Anyhow, here is the original one I put together (600 dpi) if anyone wants to save for a future project.  The size is likely good for a destroyer size vessel at 1/700 scale.

regards,
Jack

  • Member since
    September 2003
  • From: AandF in the Badger State
Posted by checkmateking02 on Wednesday, December 9, 2015 9:59 PM
Pre-shading always amazes me. Well-done!


  • Member since
    January 2014
  • From: Toronto
Posted by Rob S. on Wednesday, December 9, 2015 7:33 PM

Some progress on the Typhoon. Got the landing gear installed, canopy intalled and masked and the pre-shading done. 

______________________________________________________________________________


On the Bench: Nothing on the go ATM

  • Member since
    January 2014
  • From: Toronto
Posted by Rob S. on Wednesday, December 9, 2015 7:32 PM

Fantastic work guys!! Well done...Cool

______________________________________________________________________________


On the Bench: Nothing on the go ATM

JOIN OUR COMMUNITY!

Our community is FREE to join. To participate you must either login or register for an account.

SEARCH FORUMS
FREE NEWSLETTER
By signing up you may also receive reader surveys and occasional special offers. We do not sell, rent or trade our email lists. View our Privacy Policy.