SEARCH FINESCALE.COM

Enter keywords or a search phrase below:

1945 GB

95389 views
1851 replies
1 rating 2 rating 3 rating 4 rating 5 rating
  • Member since
    December 2002
  • From: Bury St Edmunds, Suffolk, England
Posted by Bish on Monday, December 21, 2015 12:18 PM

jgeratic

Here ya go, if anyone wants to try the string option for cables:

http://www.syrenshipmodelcompany.com/miniature-rope.php

regards,

Jack


I know what you mean about having troule with metal cables. I know normaly string is not very accurate but never thought about useing that rigging rope. I have 3 of the thinner ones, very handy for tieing kit onto tanks. But some of that thicker stuff will be ideal for tow cables.

I am a Norfolk man and i glory in being so


On the bench: Airfix 1/72nd Harrier GR.3/Fujimi 1/72nd Ju 87D-3

  • Member since
    December 2002
  • From: Bury St Edmunds, Suffolk, England
Posted by Bish on Monday, December 21, 2015 12:16 PM

Moff
 
Bish
Looks good there Moff. Couldn't read through your whole post this morning. I did read your comments about pigment fixer. I have never used that. I mix my pigments in water. This gives a nice dusty look. For mud, I mix them with a little plaster of paris but more often I will use the celluclay that I use for the base.


Yes, well, IMHO pigment fixer is good for heavy mud, just not for sealing lighter dirt or dust. 

And you use Celluclay? It always acts lumpy for me. I want to find the exact product that Hamilkar Barkas uses, it seems just about perfect.


I don't have a problem with it, but of course it depends if you wnat heavy mud or not.

What product is that.

I am a Norfolk man and i glory in being so


On the bench: Airfix 1/72nd Harrier GR.3/Fujimi 1/72nd Ju 87D-3

  • Member since
    April 2006
  • From: ON, Canada
Posted by jgeratic on Monday, December 21, 2015 12:14 PM

Here ya go, if anyone wants to try the string option for cables:

http://www.syrenshipmodelcompany.com/miniature-rope.php

regards,

Jack

  • Member since
    April 2006
  • From: ON, Canada
Posted by jgeratic on Monday, December 21, 2015 12:08 PM

Yeah tow cables,  I fight with those too when they are the metal type.  Pretty much have to shape them to fit while unattached to the vehicle.  Any bending has to be done past the point of the actual angle required.  I find too that severe bending runs a risk of creating an unnatural kink. 

Bill Plunk, a regular contributor to Finescale, is a huge proponent of using string.  I visited his webpage, and found this image of what he uses, 'crochet rope/thread':

Another well known name, Adam Wilder, has also done the JS-3.  You can scope out his results here:     http://www.network54.com/Forum/110741/thread/1286578285

regards,

Jack

ps, - I wonder if heating the wire cables created those black powder granules?


  • Member since
    January 2015
Posted by Moff on Monday, December 21, 2015 12:01 PM

checkmateking02
Very nice work on the tank, Moff. Gritty and realistic and menacing!
 

Thanks! Although I don't know how a tank that never saw combat could become as weathered as this Tongue Tied

"Gaiety is the most outstanding feature of the Soviet Union." - Josef Stalin 

  • Member since
    September 2003
  • From: AandF in the Badger State
Posted by checkmateking02 on Monday, December 21, 2015 11:26 AM
Nice progress with the ship painting, Josiah. I always find the Navy palette rather attractive. Very nice work on the tank, Moff. Gritty and realistic and menacing!


  • Member since
    January 2015
Posted by Moff on Monday, December 21, 2015 9:58 AM

Bish
Looks good there Moff. Couldn't read through your whole post this morning. I did read your comments about pigment fixer. I have never used that. I mix my pigments in water. This gives a nice dusty look. For mud, I mix them with a little plaster of paris but more often I will use the celluclay that I use for the base.


Yes, well, IMHO pigment fixer is good for heavy mud, just not for sealing lighter dirt or dust. 

And you use Celluclay? It always acts lumpy for me. I want to find the exact product that Hamilkar Barkas uses, it seems just about perfect.

"Gaiety is the most outstanding feature of the Soviet Union." - Josef Stalin 

  • Member since
    January 2015
Posted by Moff on Monday, December 21, 2015 9:53 AM

jgeratic

Looking fantastic Moff, and you definitely got some of the spanish school happening.   Might be just me, but I think the turret top sides could use just a slight yellowish highlight like you have happening elsewhere.  I like the fuel stains, they look spot on (pun intended).

For the cable, some prefer using string of an appropriate scale diameter, something that you might find wooden shipbuilders use.  It easily conforms to the surface it's lying on, and takes paint a whole lot better than metal.

regards,

Jack


I did try to add some highlights to the top of the turret, but it wasn't looking super realistic. I decided to limit it to just the hatches and panel centers. Next time I do a tank with a rounded turret (soon, trust me Smile) I'll work on giving it more realistic highlights. 

By the way, that must be the first time I've heard anyone say anything good about string tow cables. The Eureka metal ones probably would have worked out better if I had bought them and attached them before I started painting. There was also some weird black powder/granules that kept sifting out of the cables. It's too bad, because I had some really nice looking heat patina effects going with the metal ones.  

Thanks for the kind words, and thanks for giving me constructive criticism. I like compliments, but criticism lets me know what other people think I can improve.

"Gaiety is the most outstanding feature of the Soviet Union." - Josef Stalin 

  • Member since
    December 2002
  • From: Bury St Edmunds, Suffolk, England
Posted by Bish on Monday, December 21, 2015 12:41 AM
Looks good there Moff. Couldn't read through your whole post this morning. I did read your comments about pigment fixer. I have never used that. I mix my pigments in water. This gives a nice dusty look. For mud, I mix them with a little plaster of paris but more often I will use the celluclay that I use for the base.

I am a Norfolk man and i glory in being so


On the bench: Airfix 1/72nd Harrier GR.3/Fujimi 1/72nd Ju 87D-3

  • Member since
    April 2006
  • From: ON, Canada
Posted by jgeratic on Sunday, December 20, 2015 10:58 PM

Looking fantastic Moff, and you definitely got some of the spanish school happening.   Might be just me, but I think the turret top sides could use just a slight yellowish highlight like you have happening elsewhere.  I like the fuel stains, they look spot on (pun intended).

For the cable, some prefer using string of an appropriate scale diameter, something that you might find wooden shipbuilders use.  It easily conforms to the surface it's lying on, and takes paint a whole lot better than metal.

regards,

Jack


  • Member since
    January 2015
Posted by Moff on Sunday, December 20, 2015 10:16 PM

Lightning Run! Hide your graphics card! It's the huge, mutant, gamma-irradiated forum post of doom! Lightning  

Please let me know if I should...ahem...use less pictures in the future. 


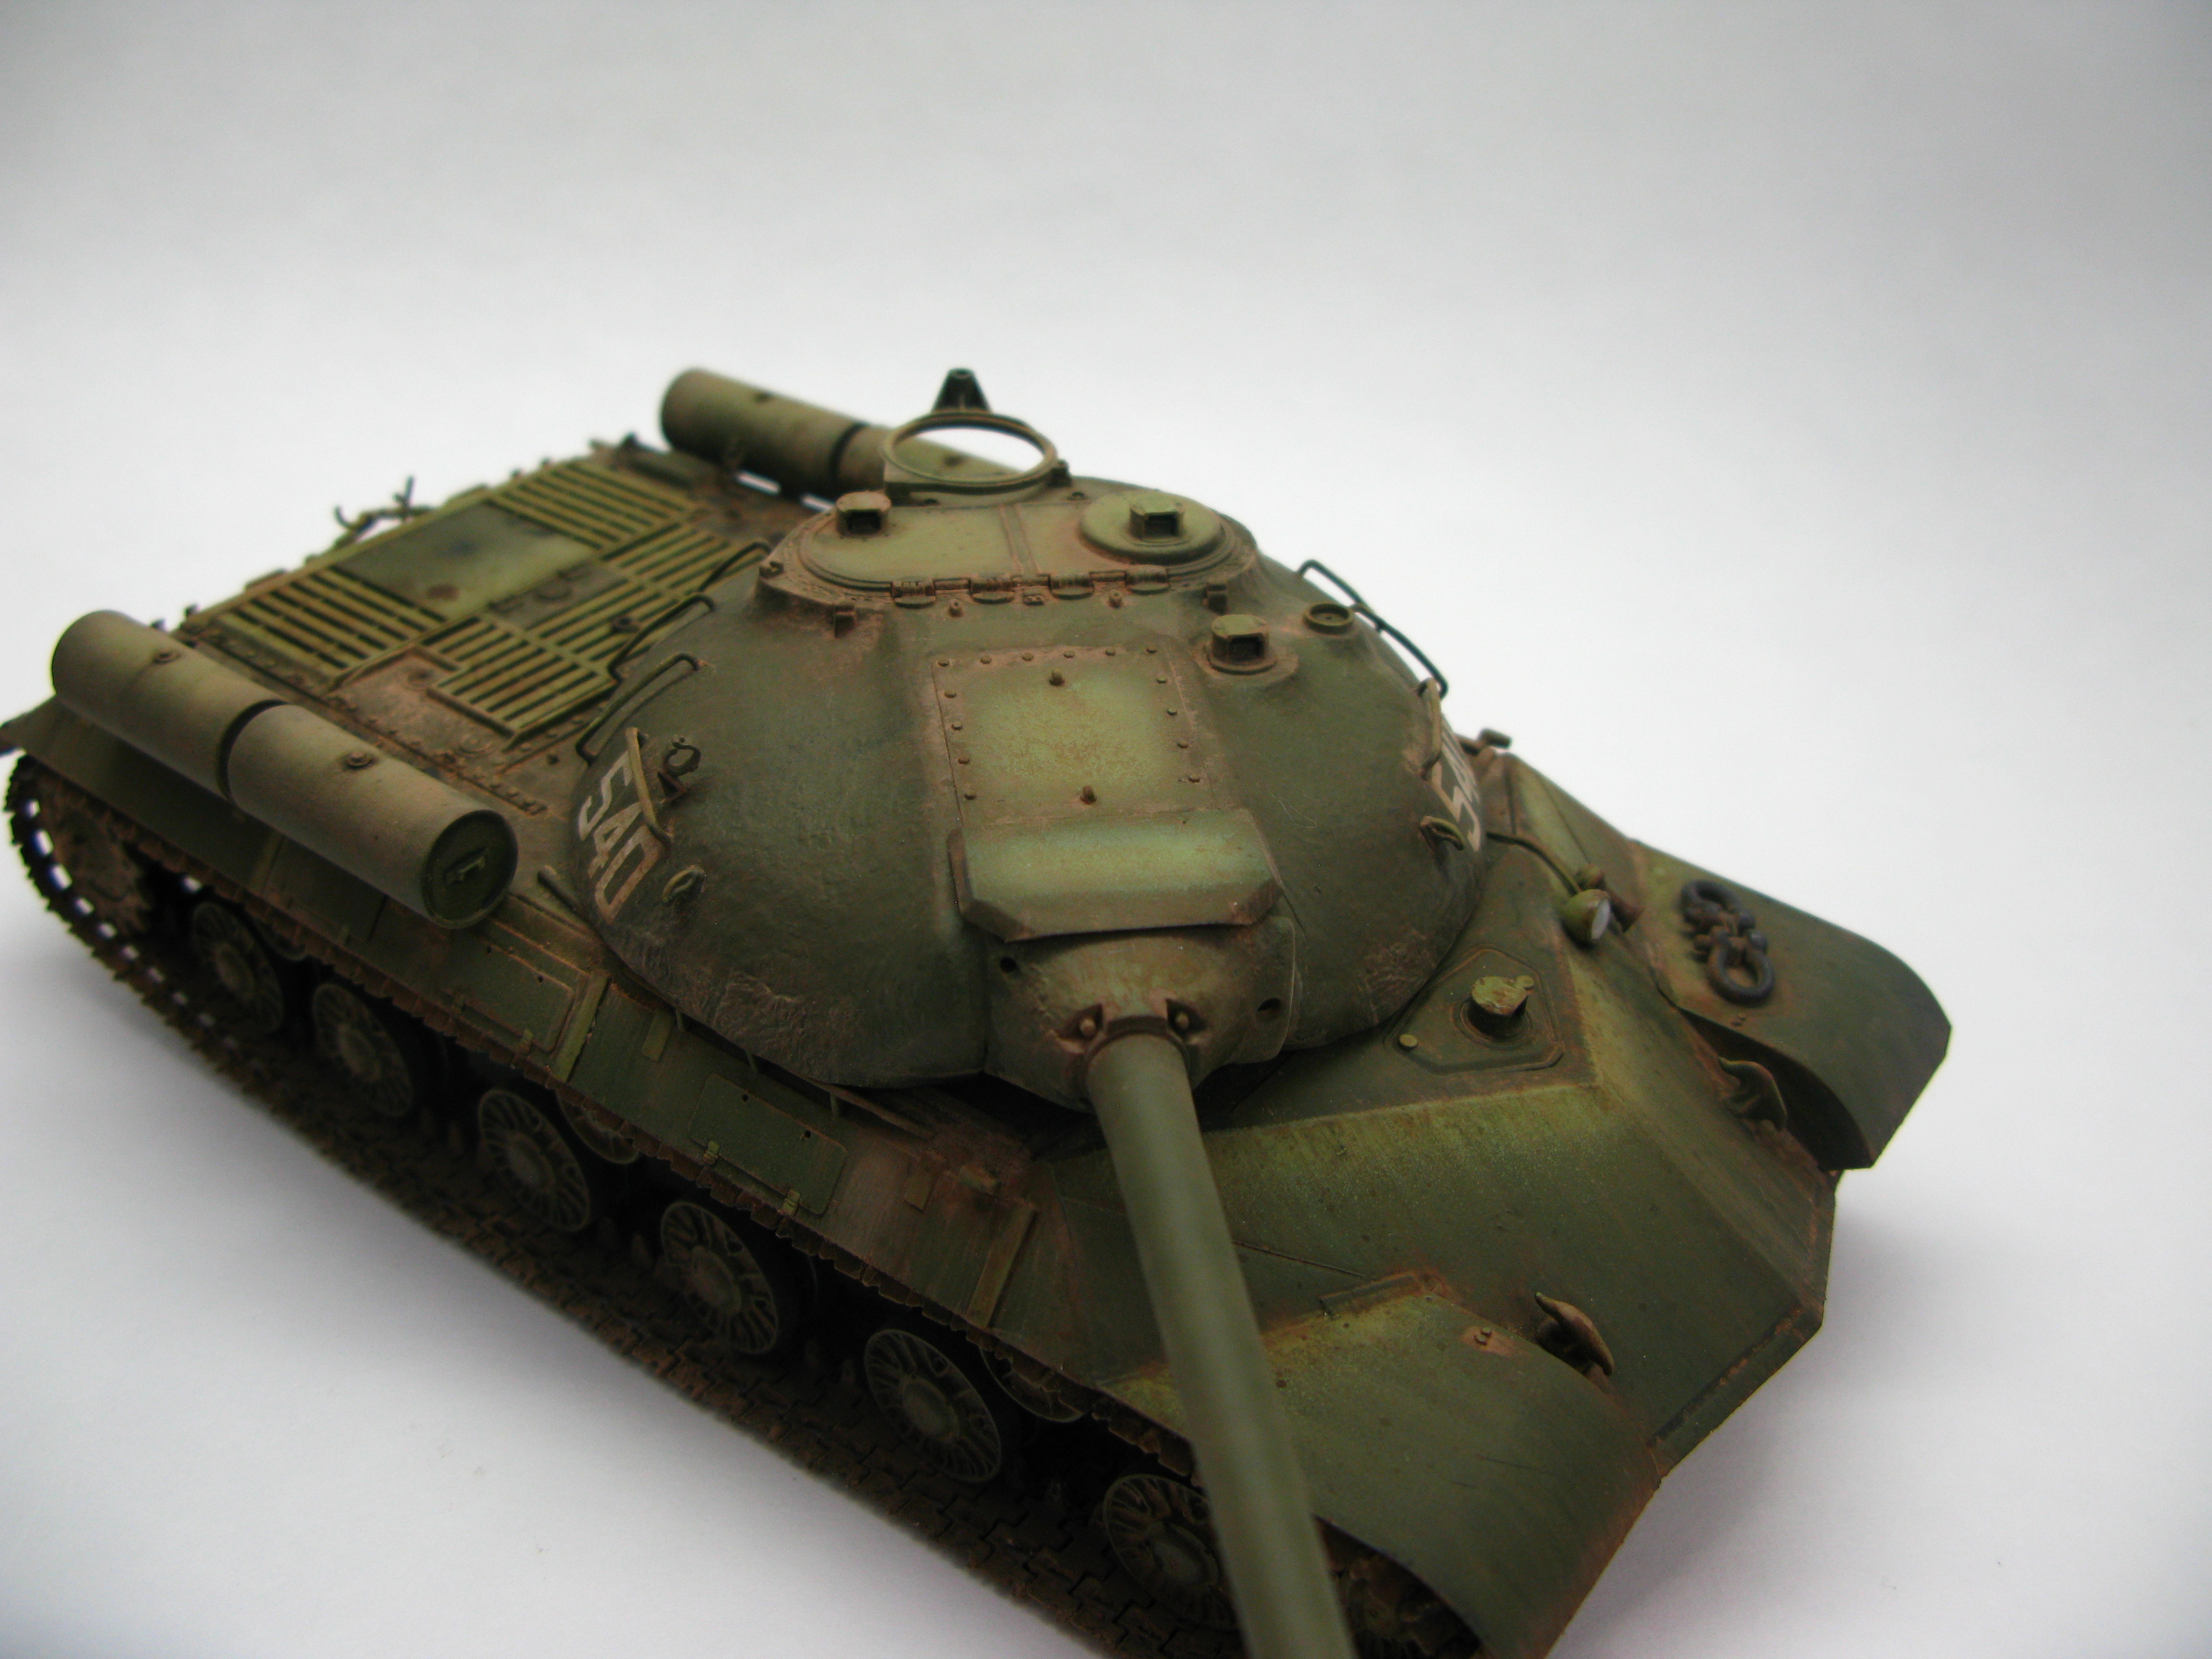
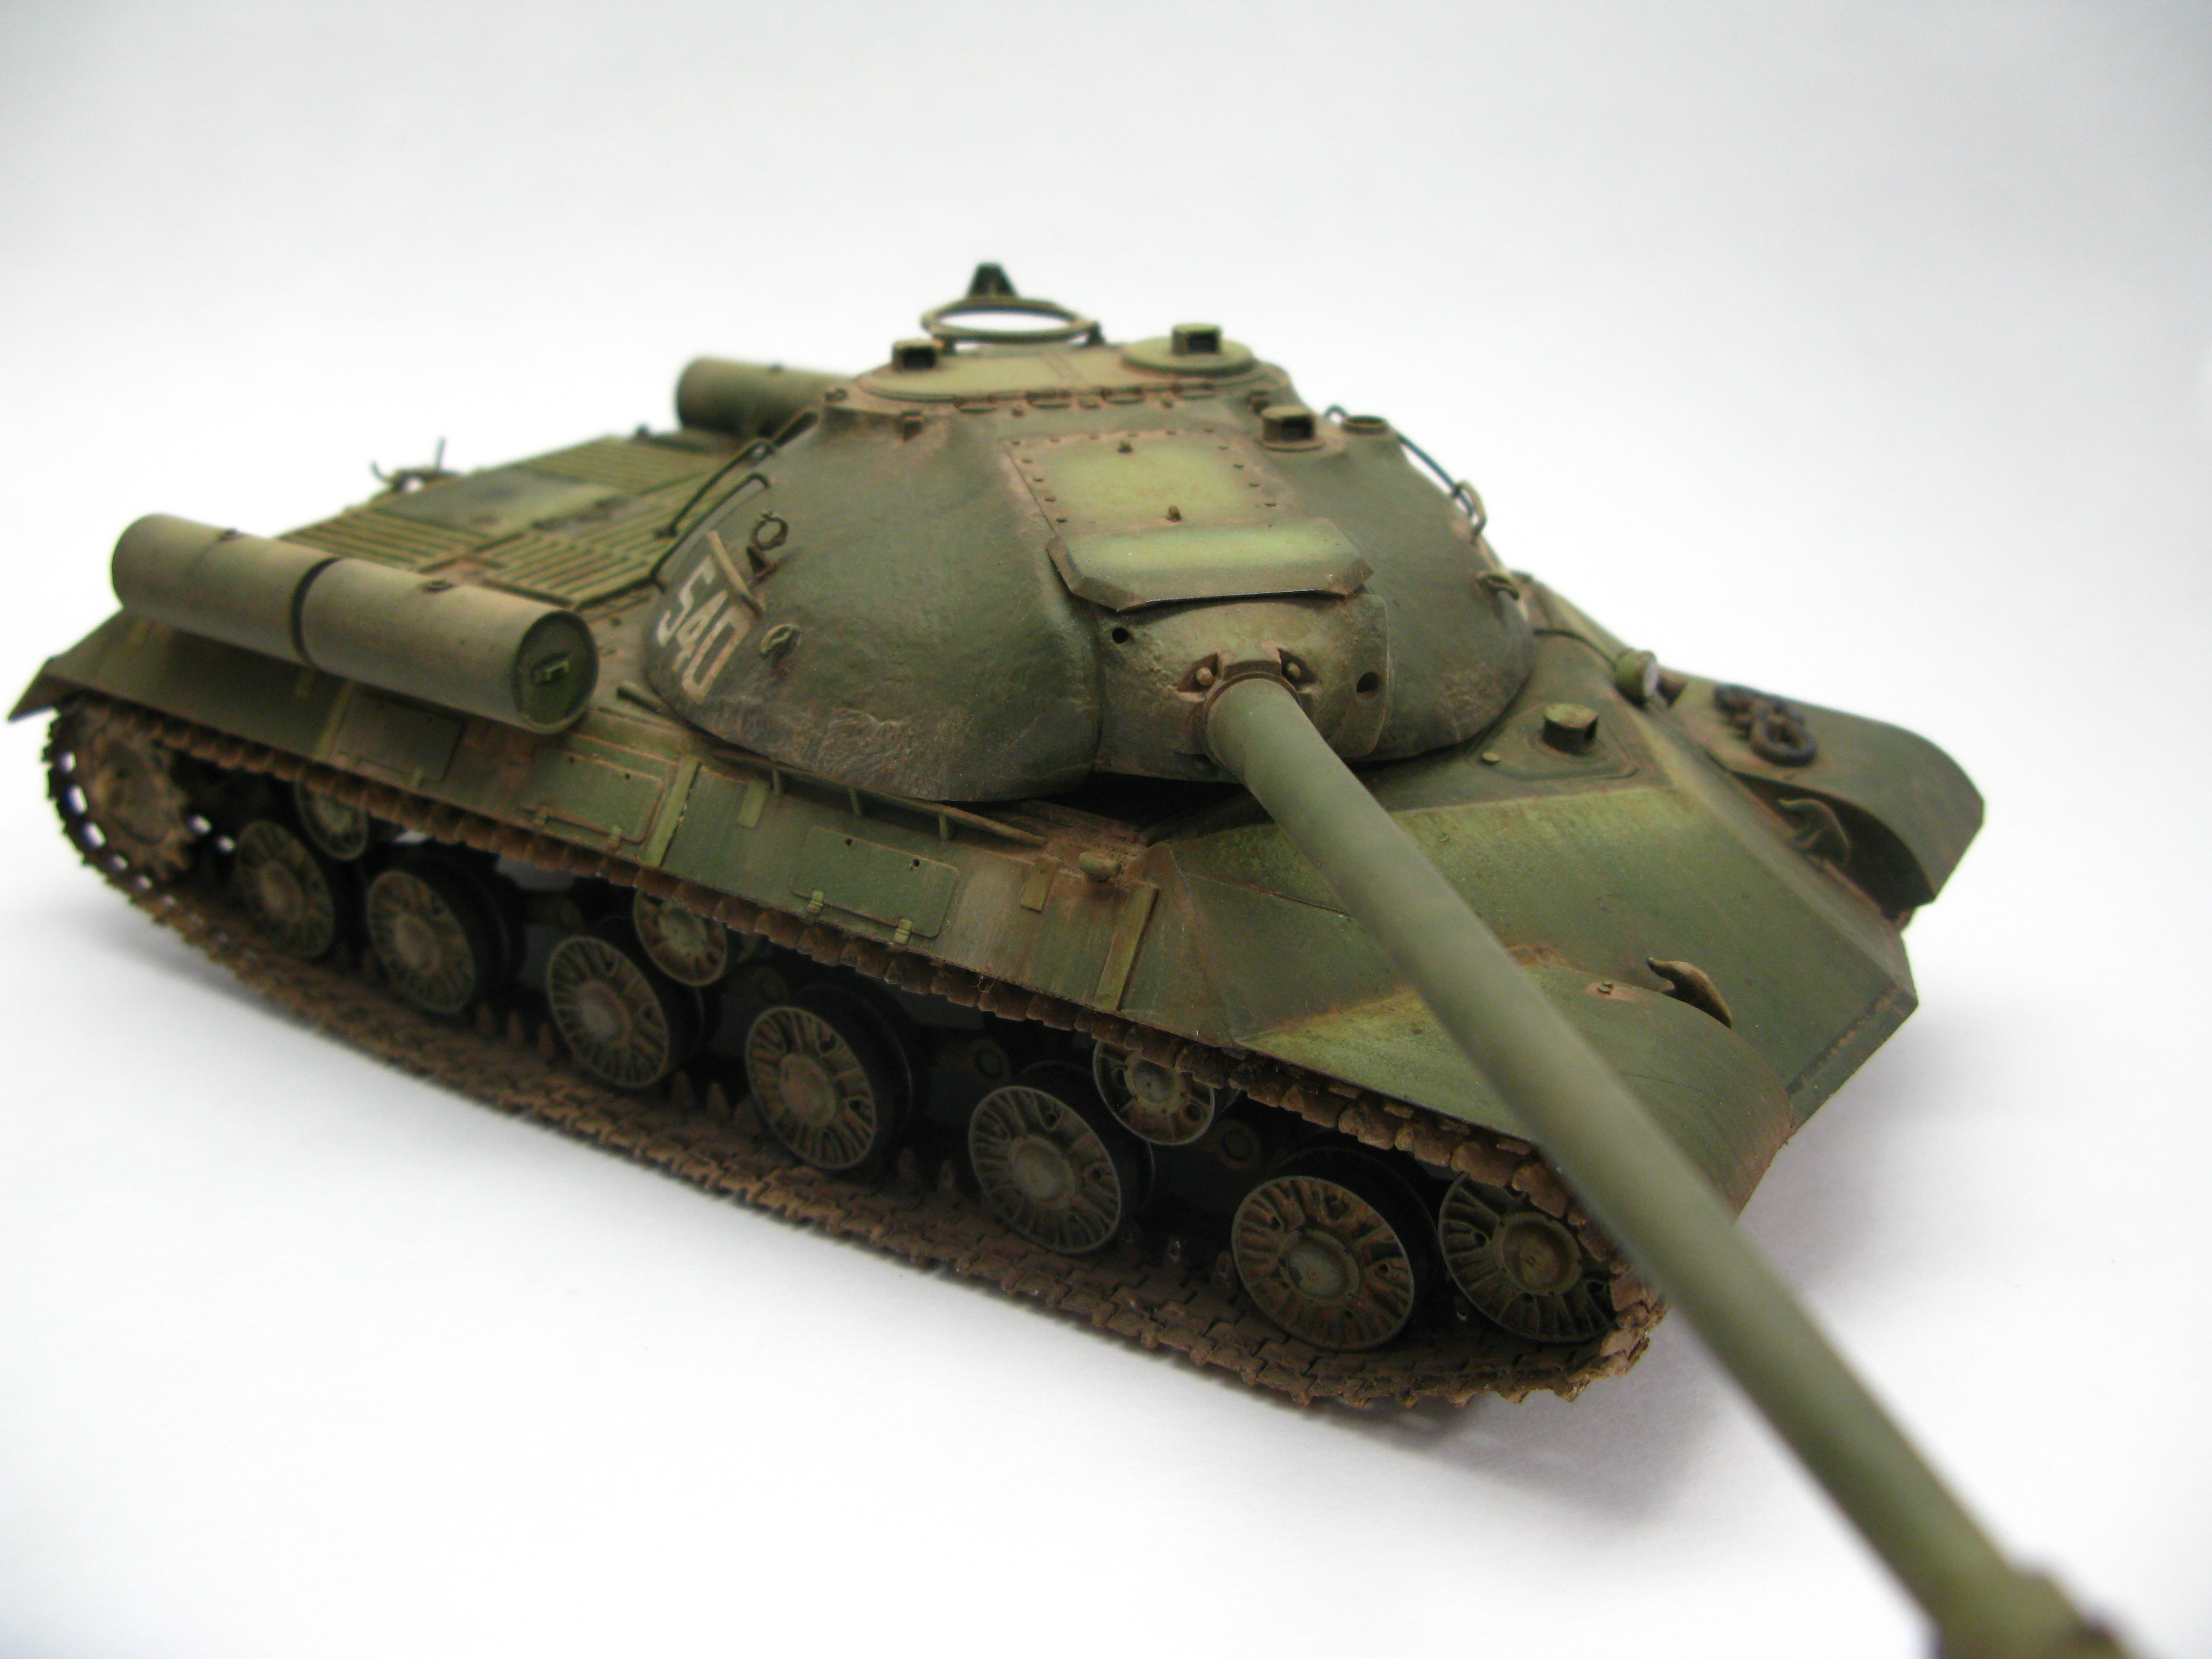
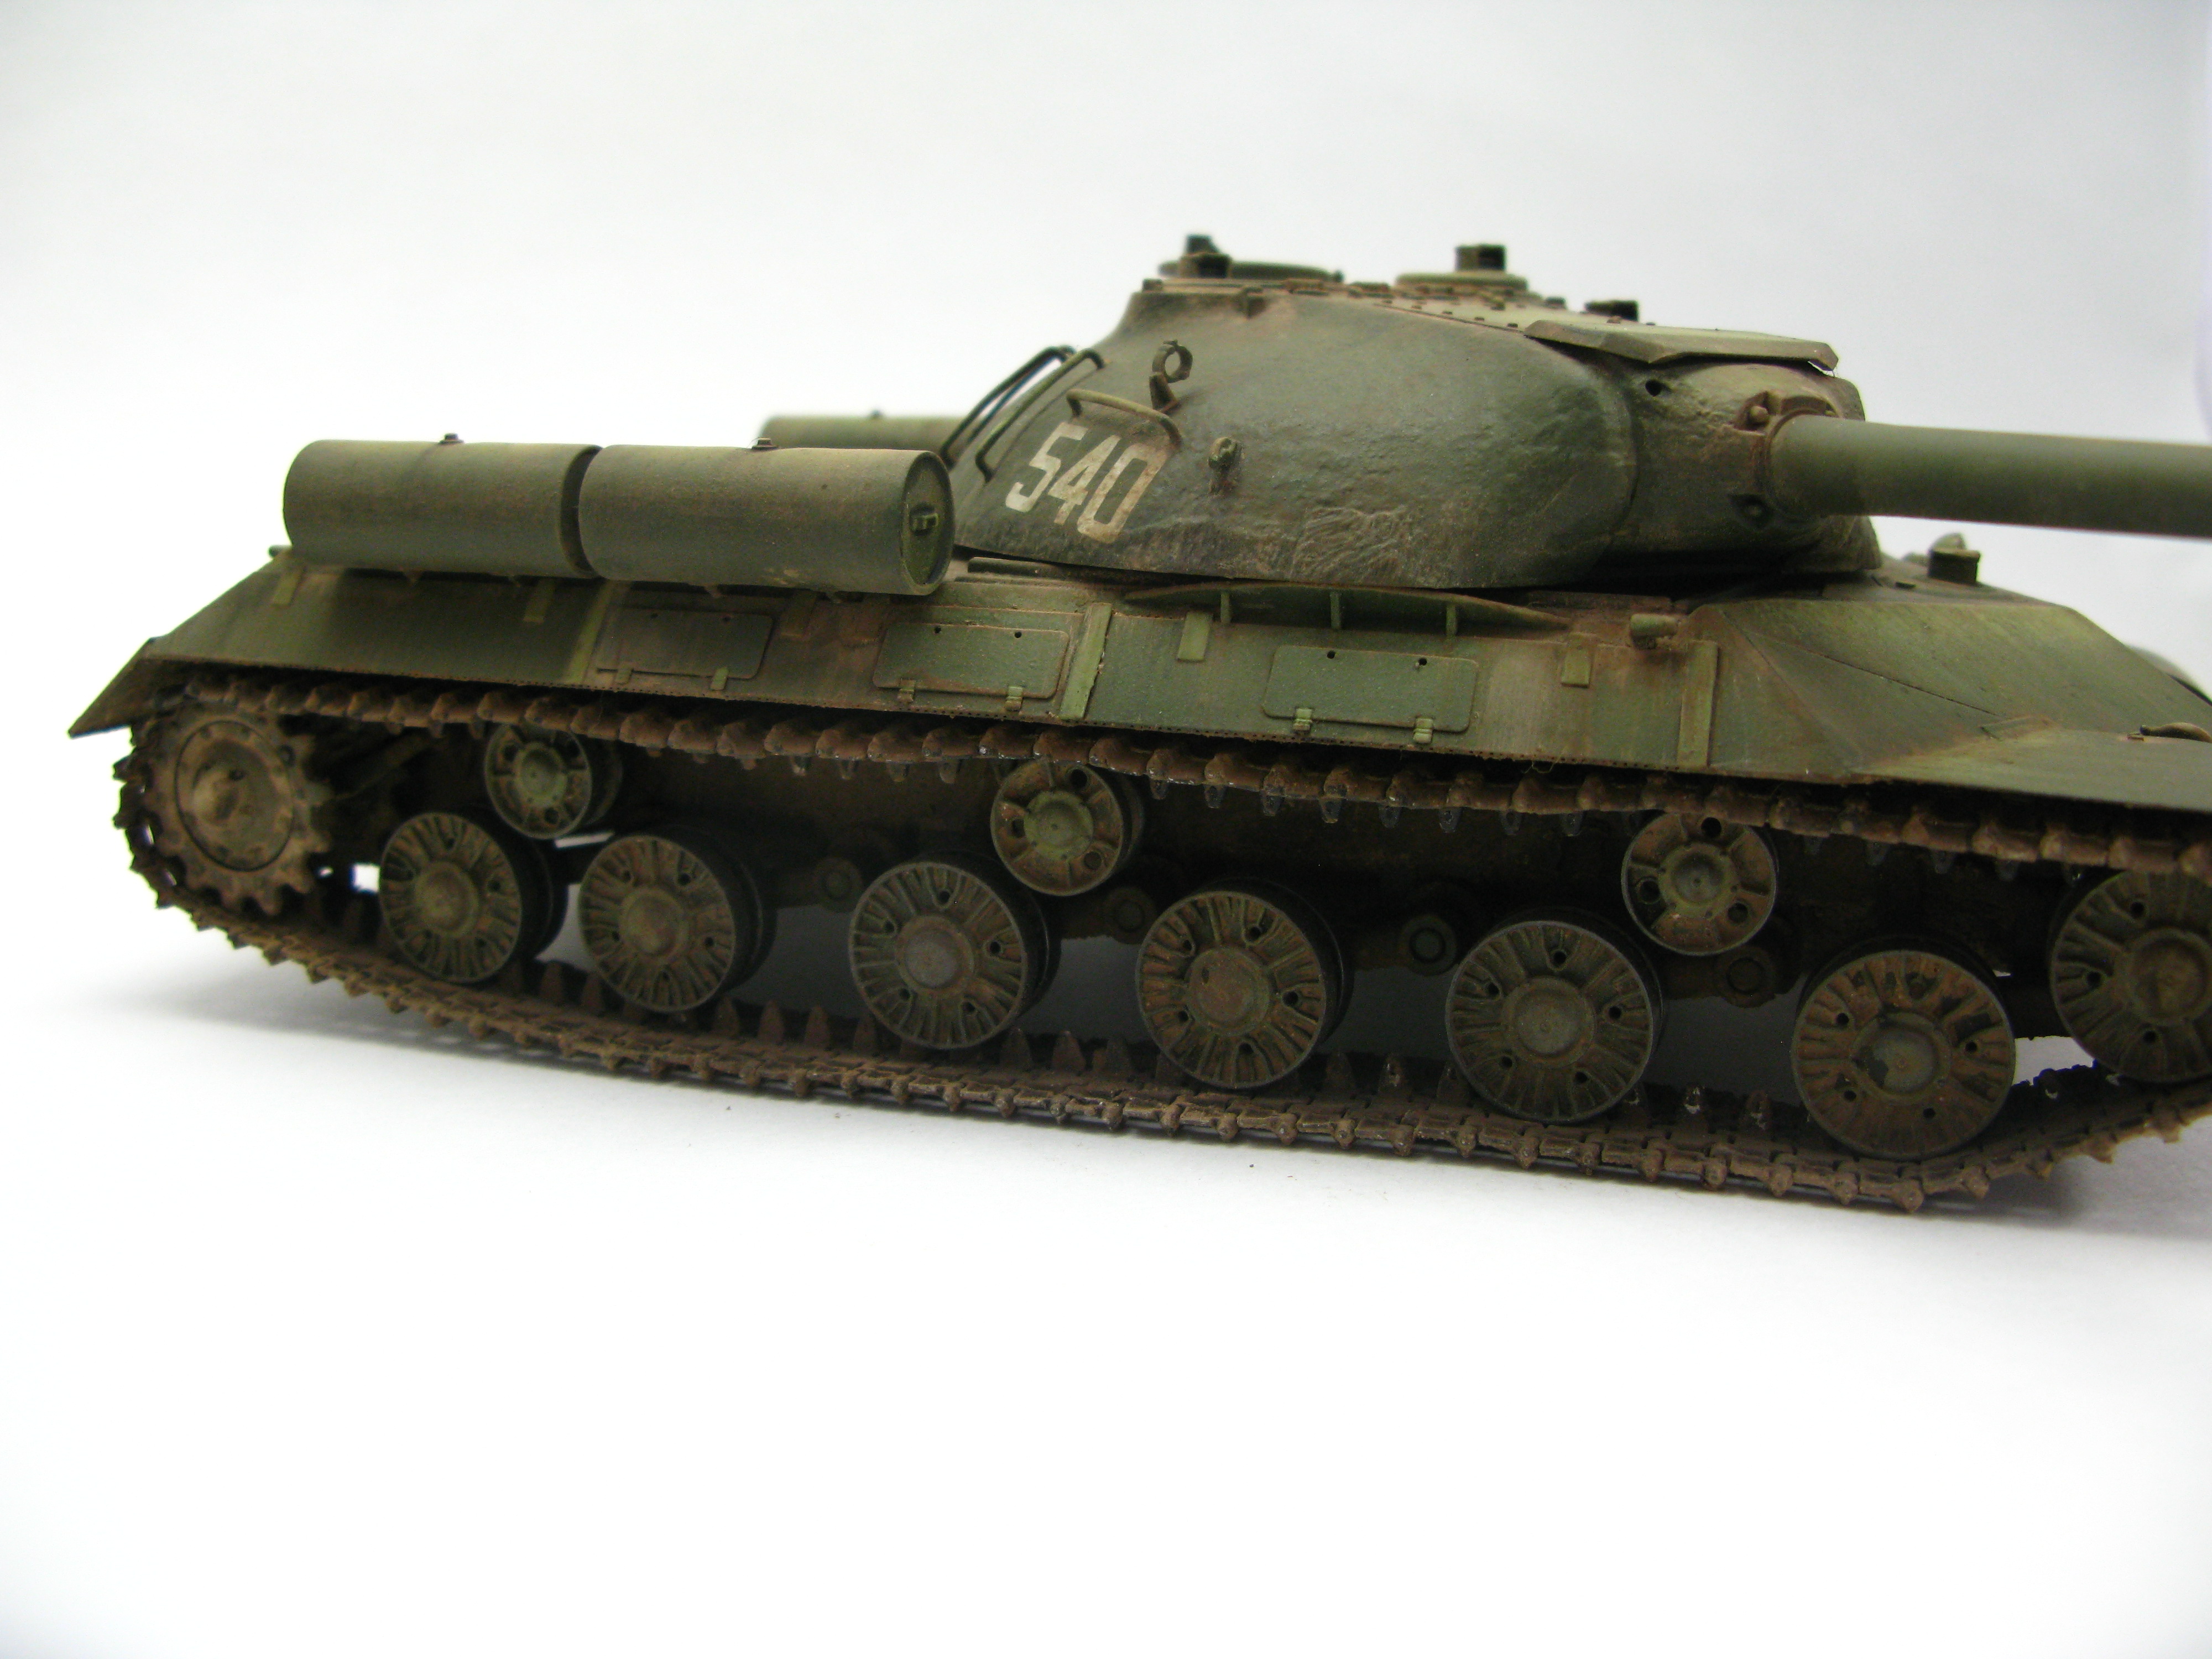
Anyway, on to the finale of my build of Tamiya's 1/35 JS-3. When last you saw the JS-3, I was (I think) just finished with the painting, but had not moved on to varnishing and decalling yet. In the proceeding 3+ weeks, I've completely finished the build, except for some small features which I'll have to add at some point in the future. So here's how things went: 

Decalling: 

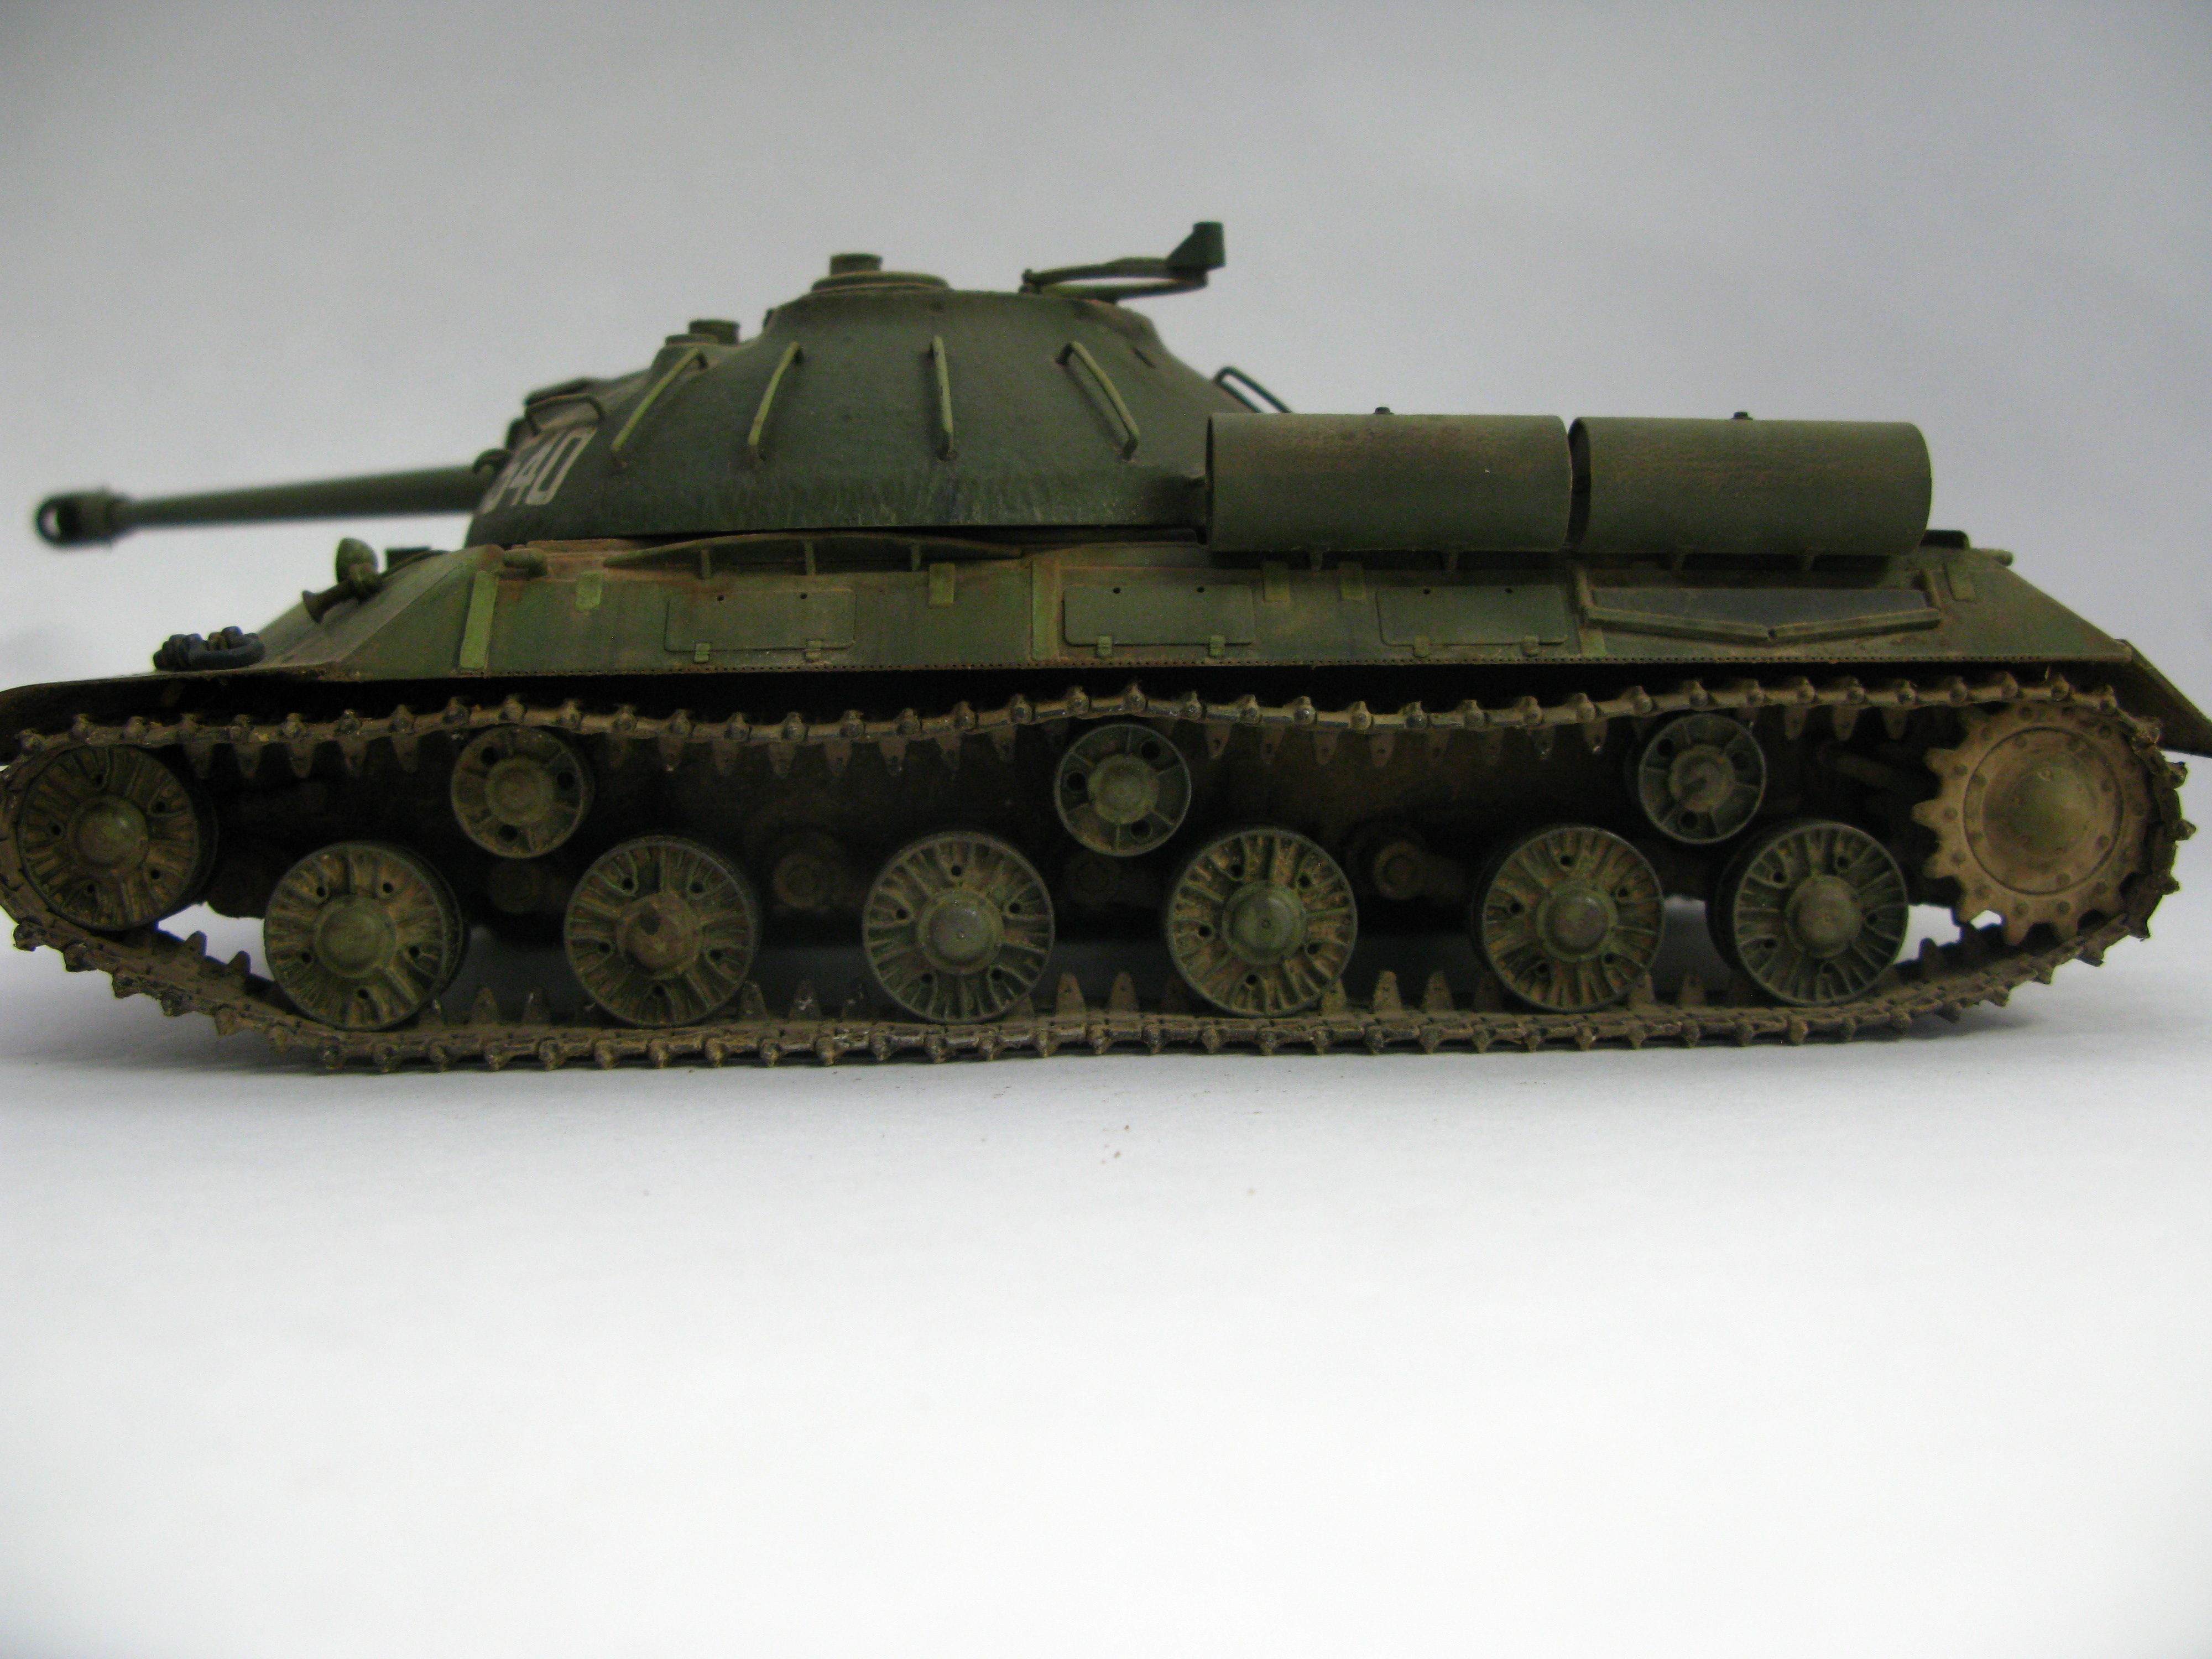
The decalling stage of the build caused me a lot of grief compared with the rest of the build. After I varnished with Testor's aerosol Glosscote, I started out planning on using some of Verlinden's dry transfer decals I had (VER 488). I decided on this because I had previously experienced Tamiya's well known problems with thick decals.

Upon trying to use the dry transfers however, they drove me crazy. First of all, none of the number fonts were a direct match to the Tamiya decal font. Second, you all but sneezed on them and they would start transfering to the backing paper. This made it difficult to find a way to hold to the decal sheet while cutting them out. The fresh #11 blade also caused decal transference very easily. Then, I had to position the decals flush on the back of a piece of masking paper, which was well nigh impossible. After a lot of hair pulling, I accidentally ripped off most of the transfered decals on the second side of the turret. Needless to say, I decided to throw in the towel on dry transfers this time around. 

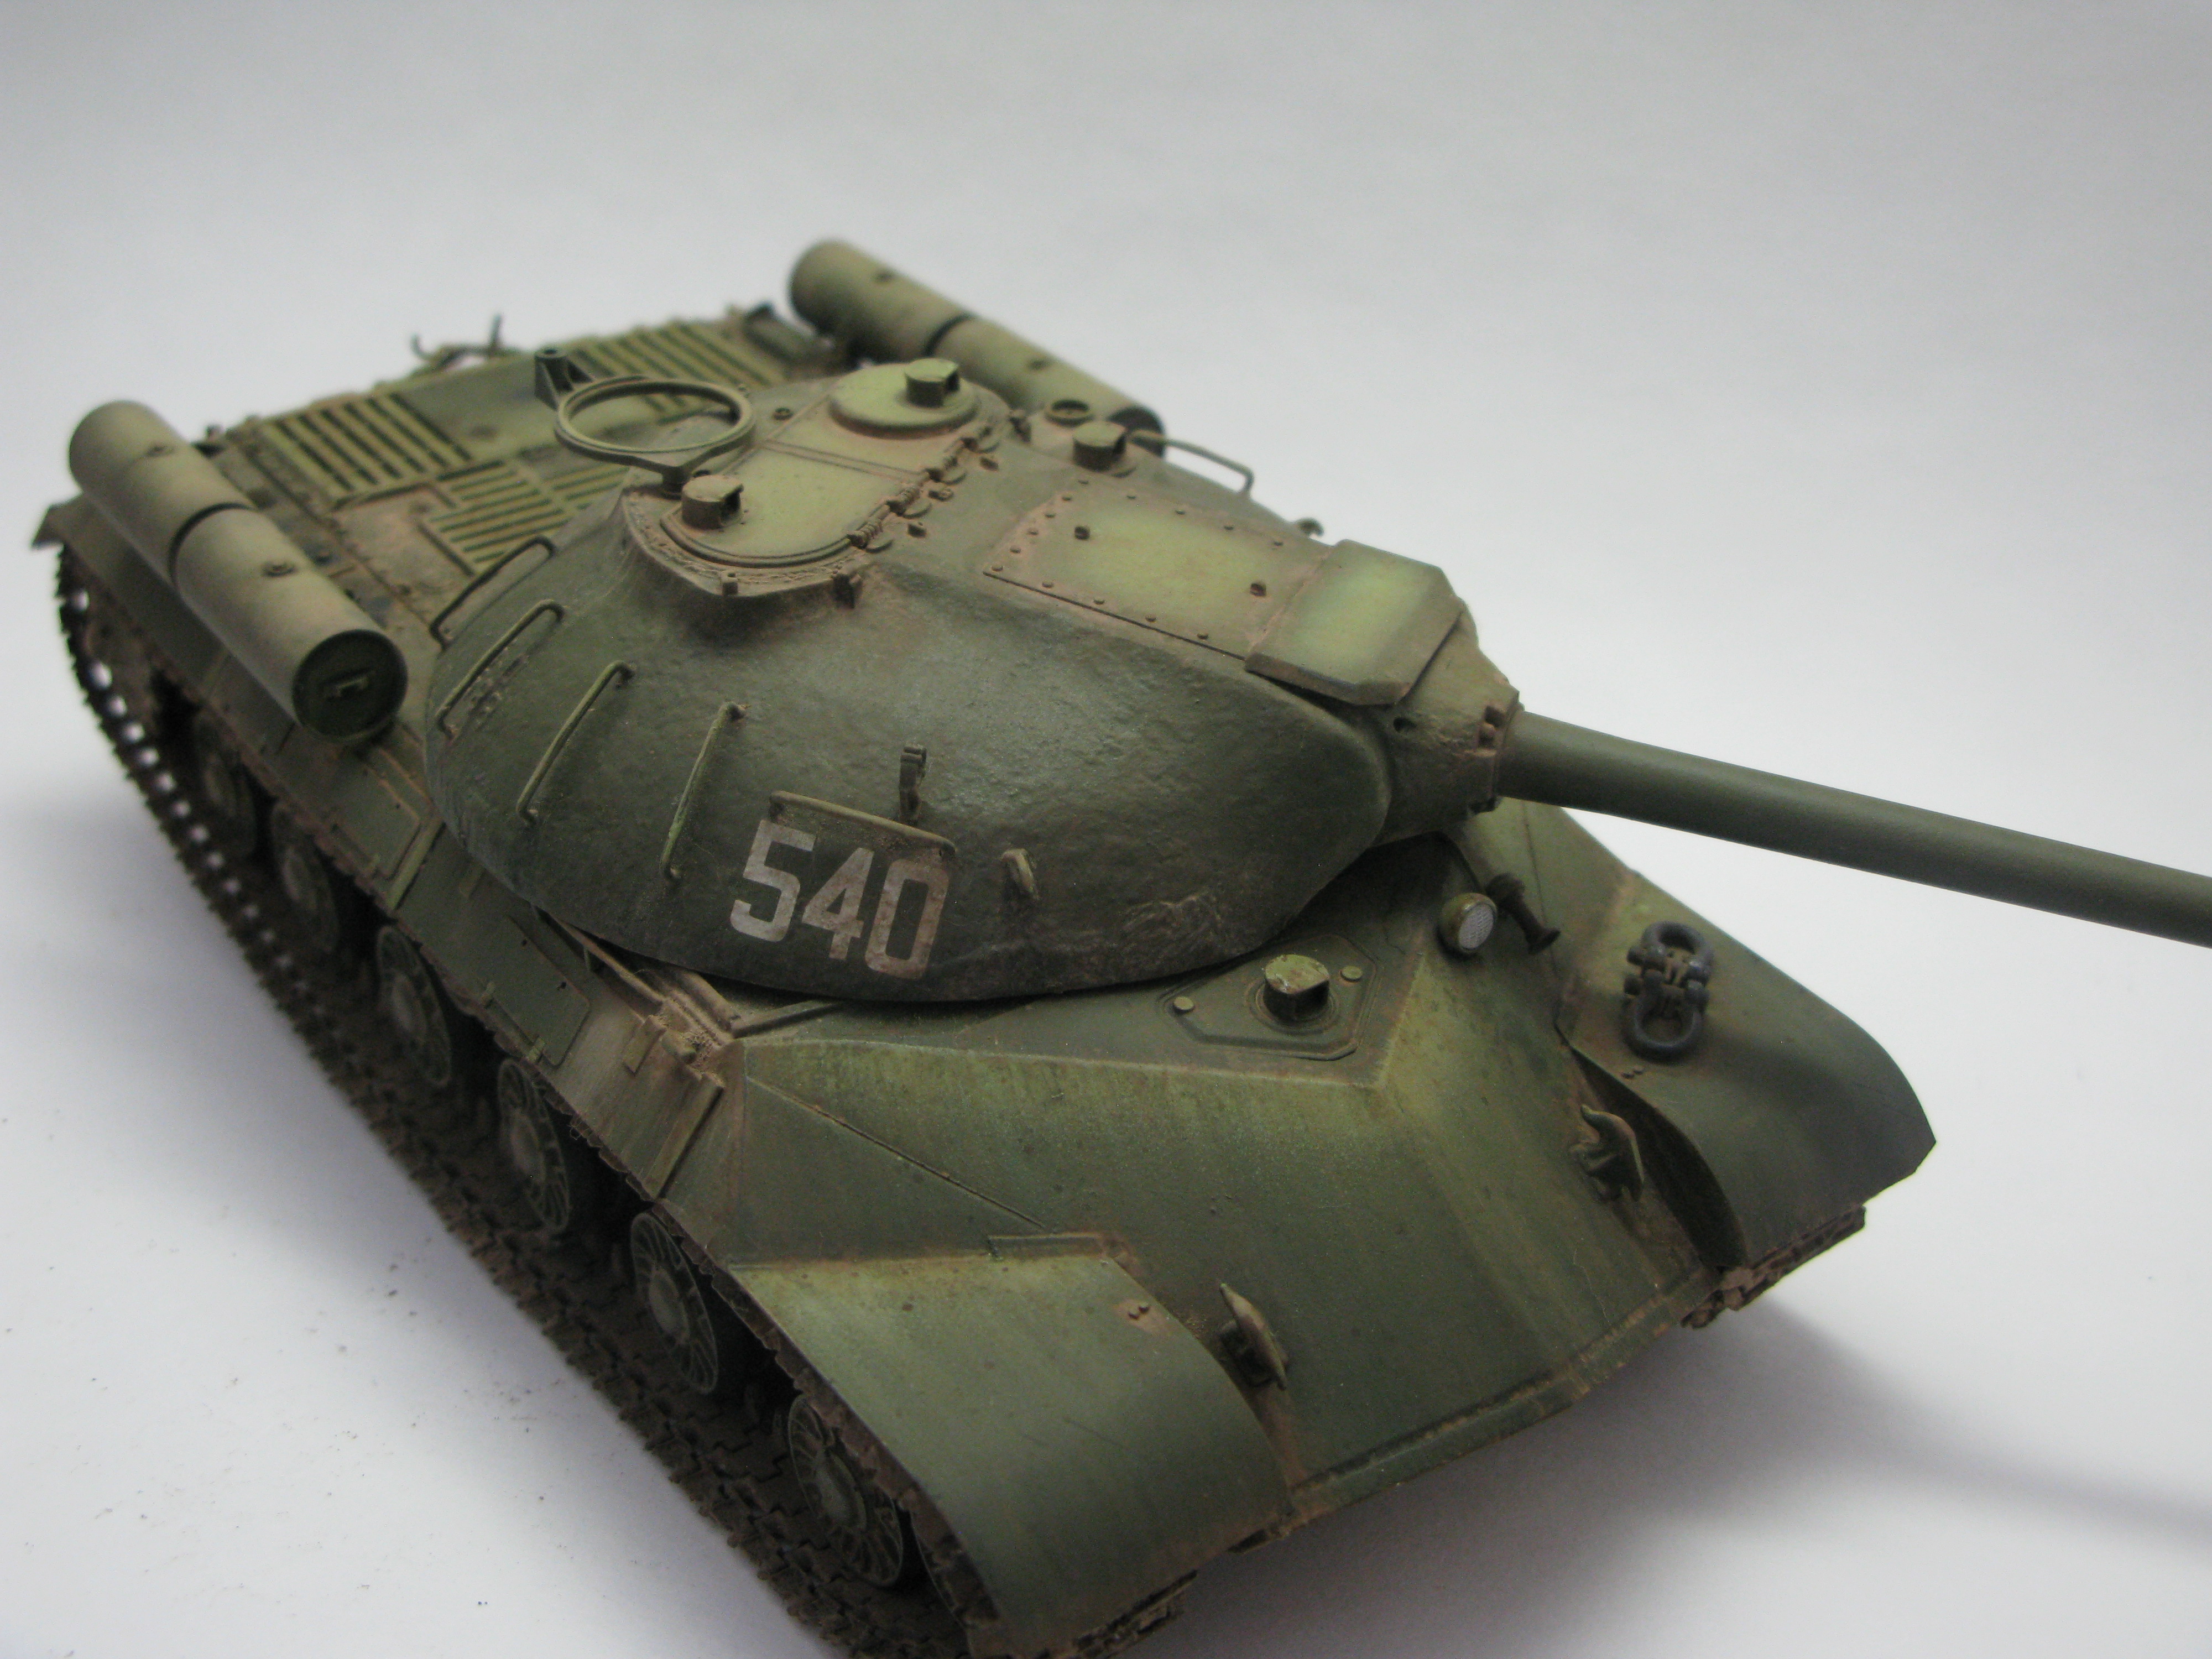
After crossing my fingers, I applied the Tamiya decals. I was pleasantly suprised by how nicely the decals laid down, with no silvering, and no discernible edge. I think my success with the Tamiya decals is due in large part to patiently allowing the decal solutions to really absorb, react with the decal, and dry naturally. In the past I basically dabbed all of the setting and softening solutions off without letting them evaporate naturally. BTW, if anyone's curious, I use Badger's decal solutions. 

Washes, Filters, and Oil Products: 

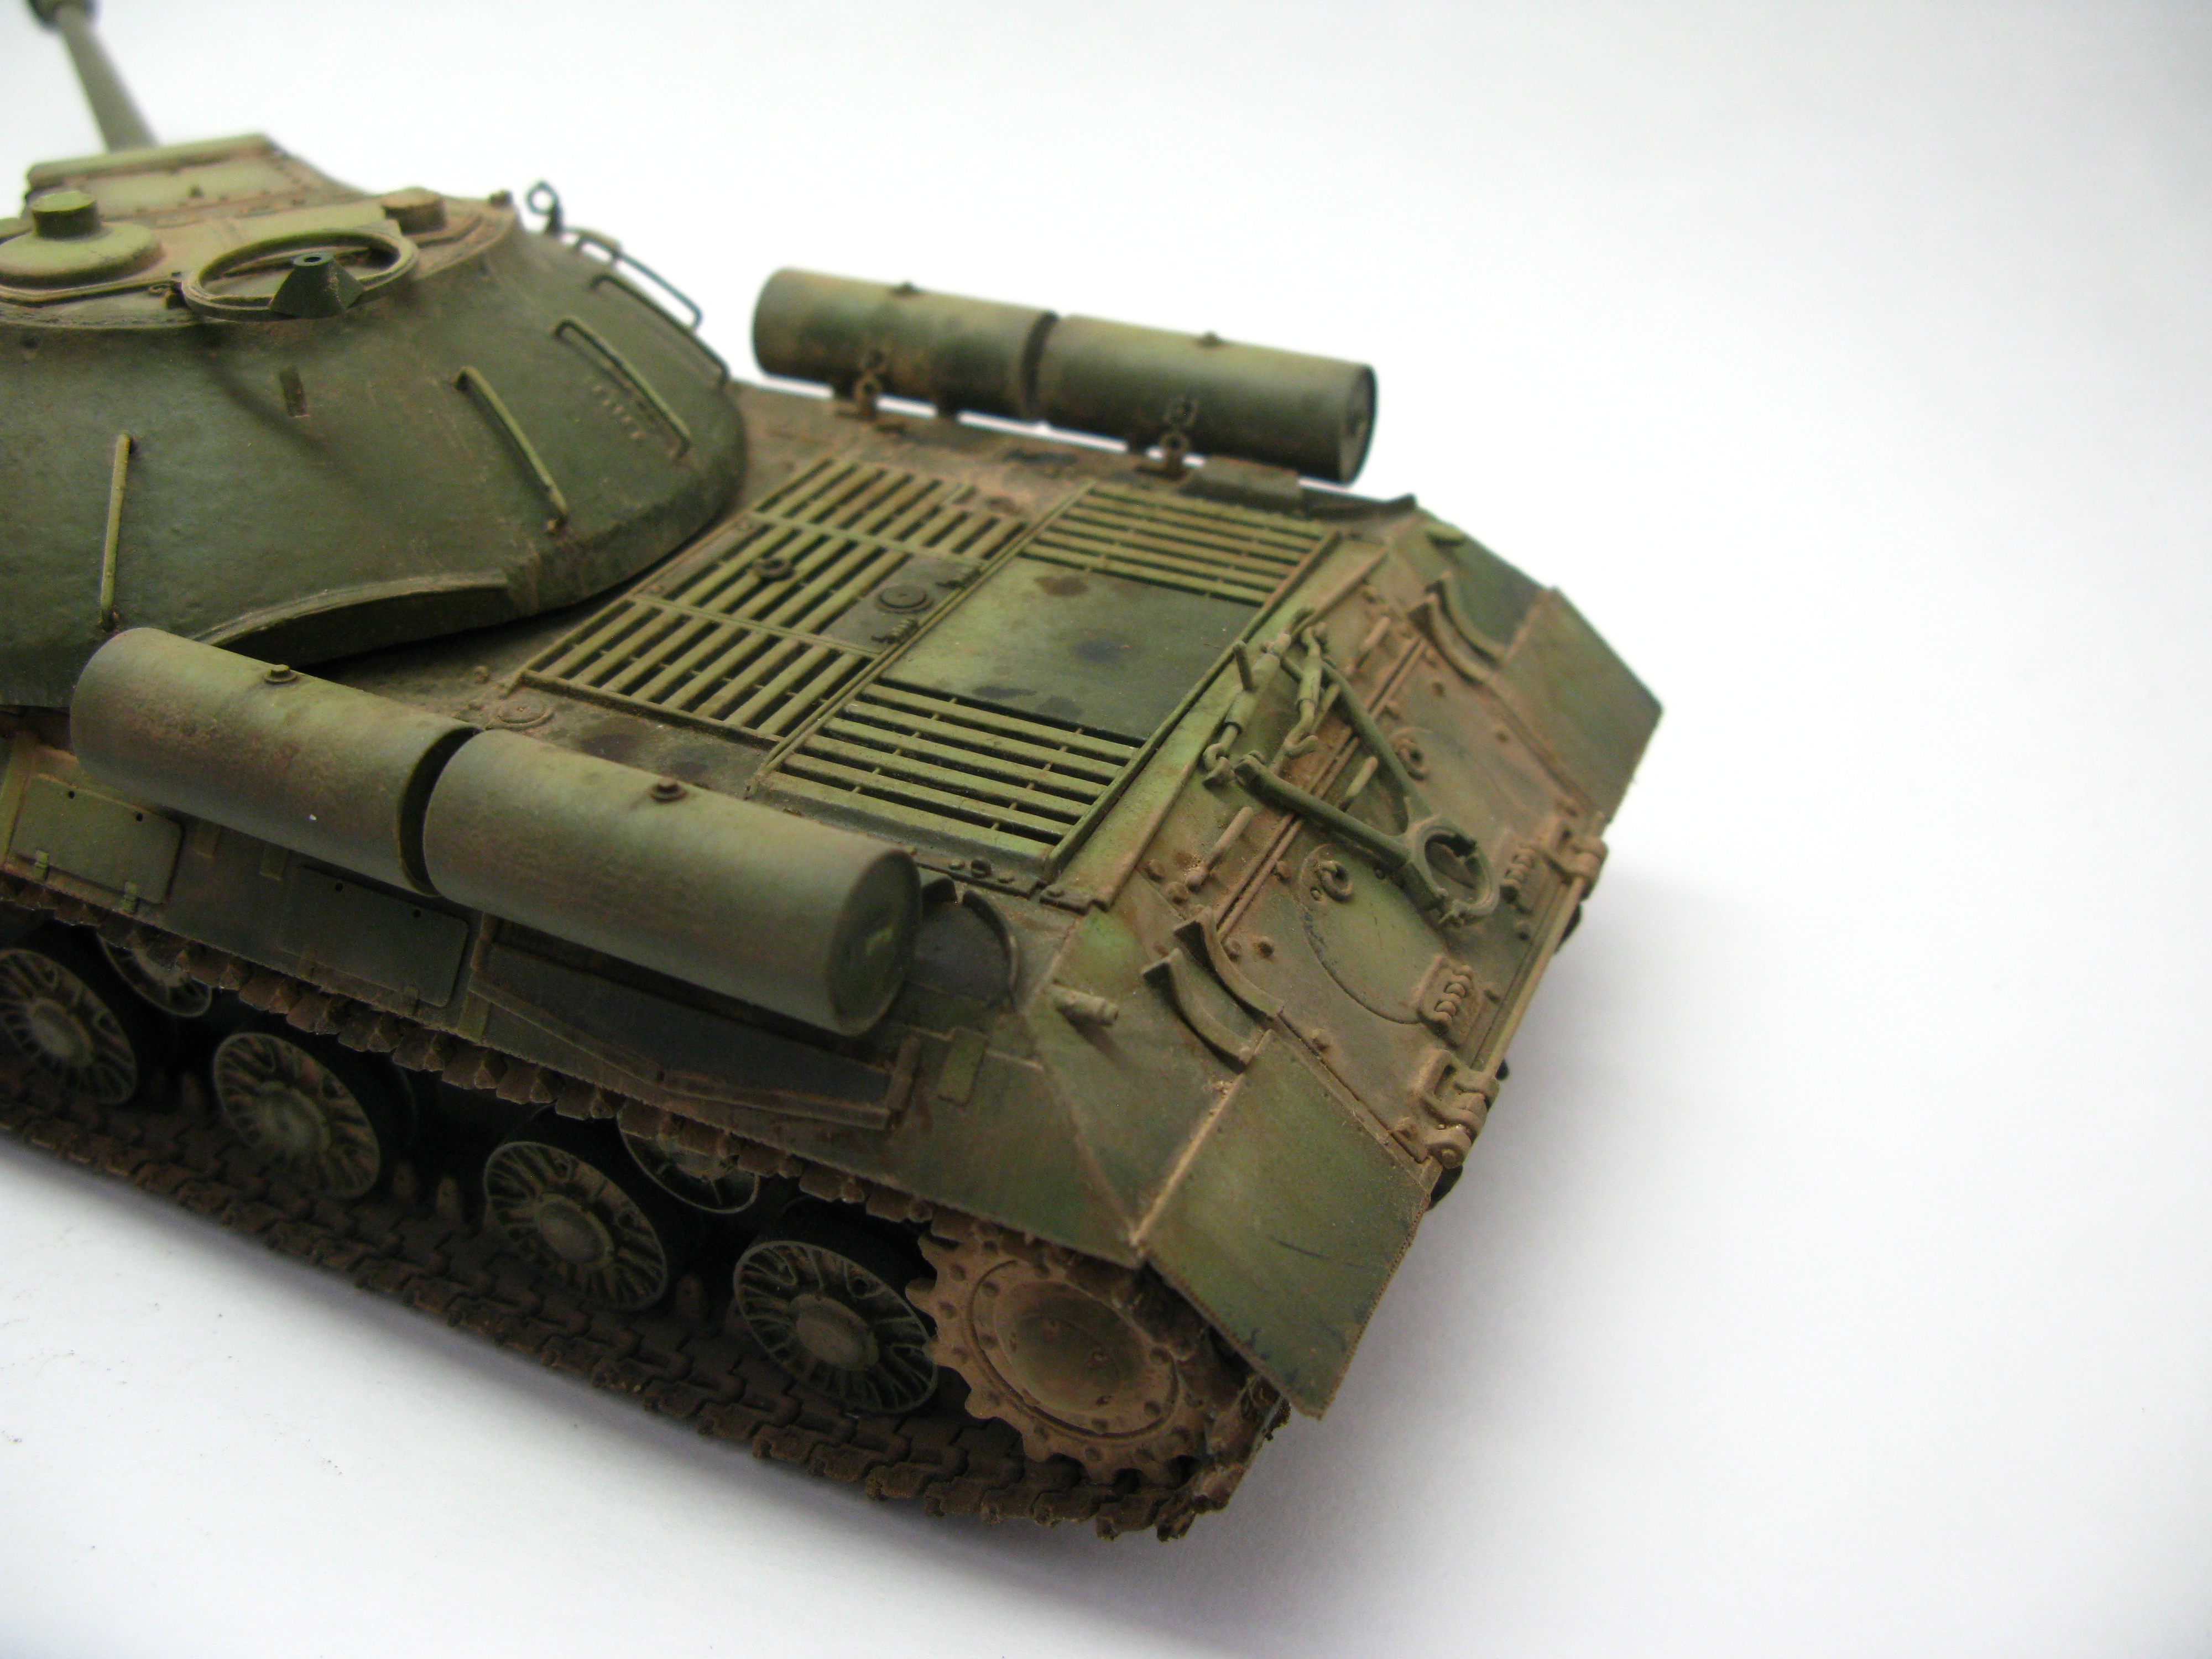
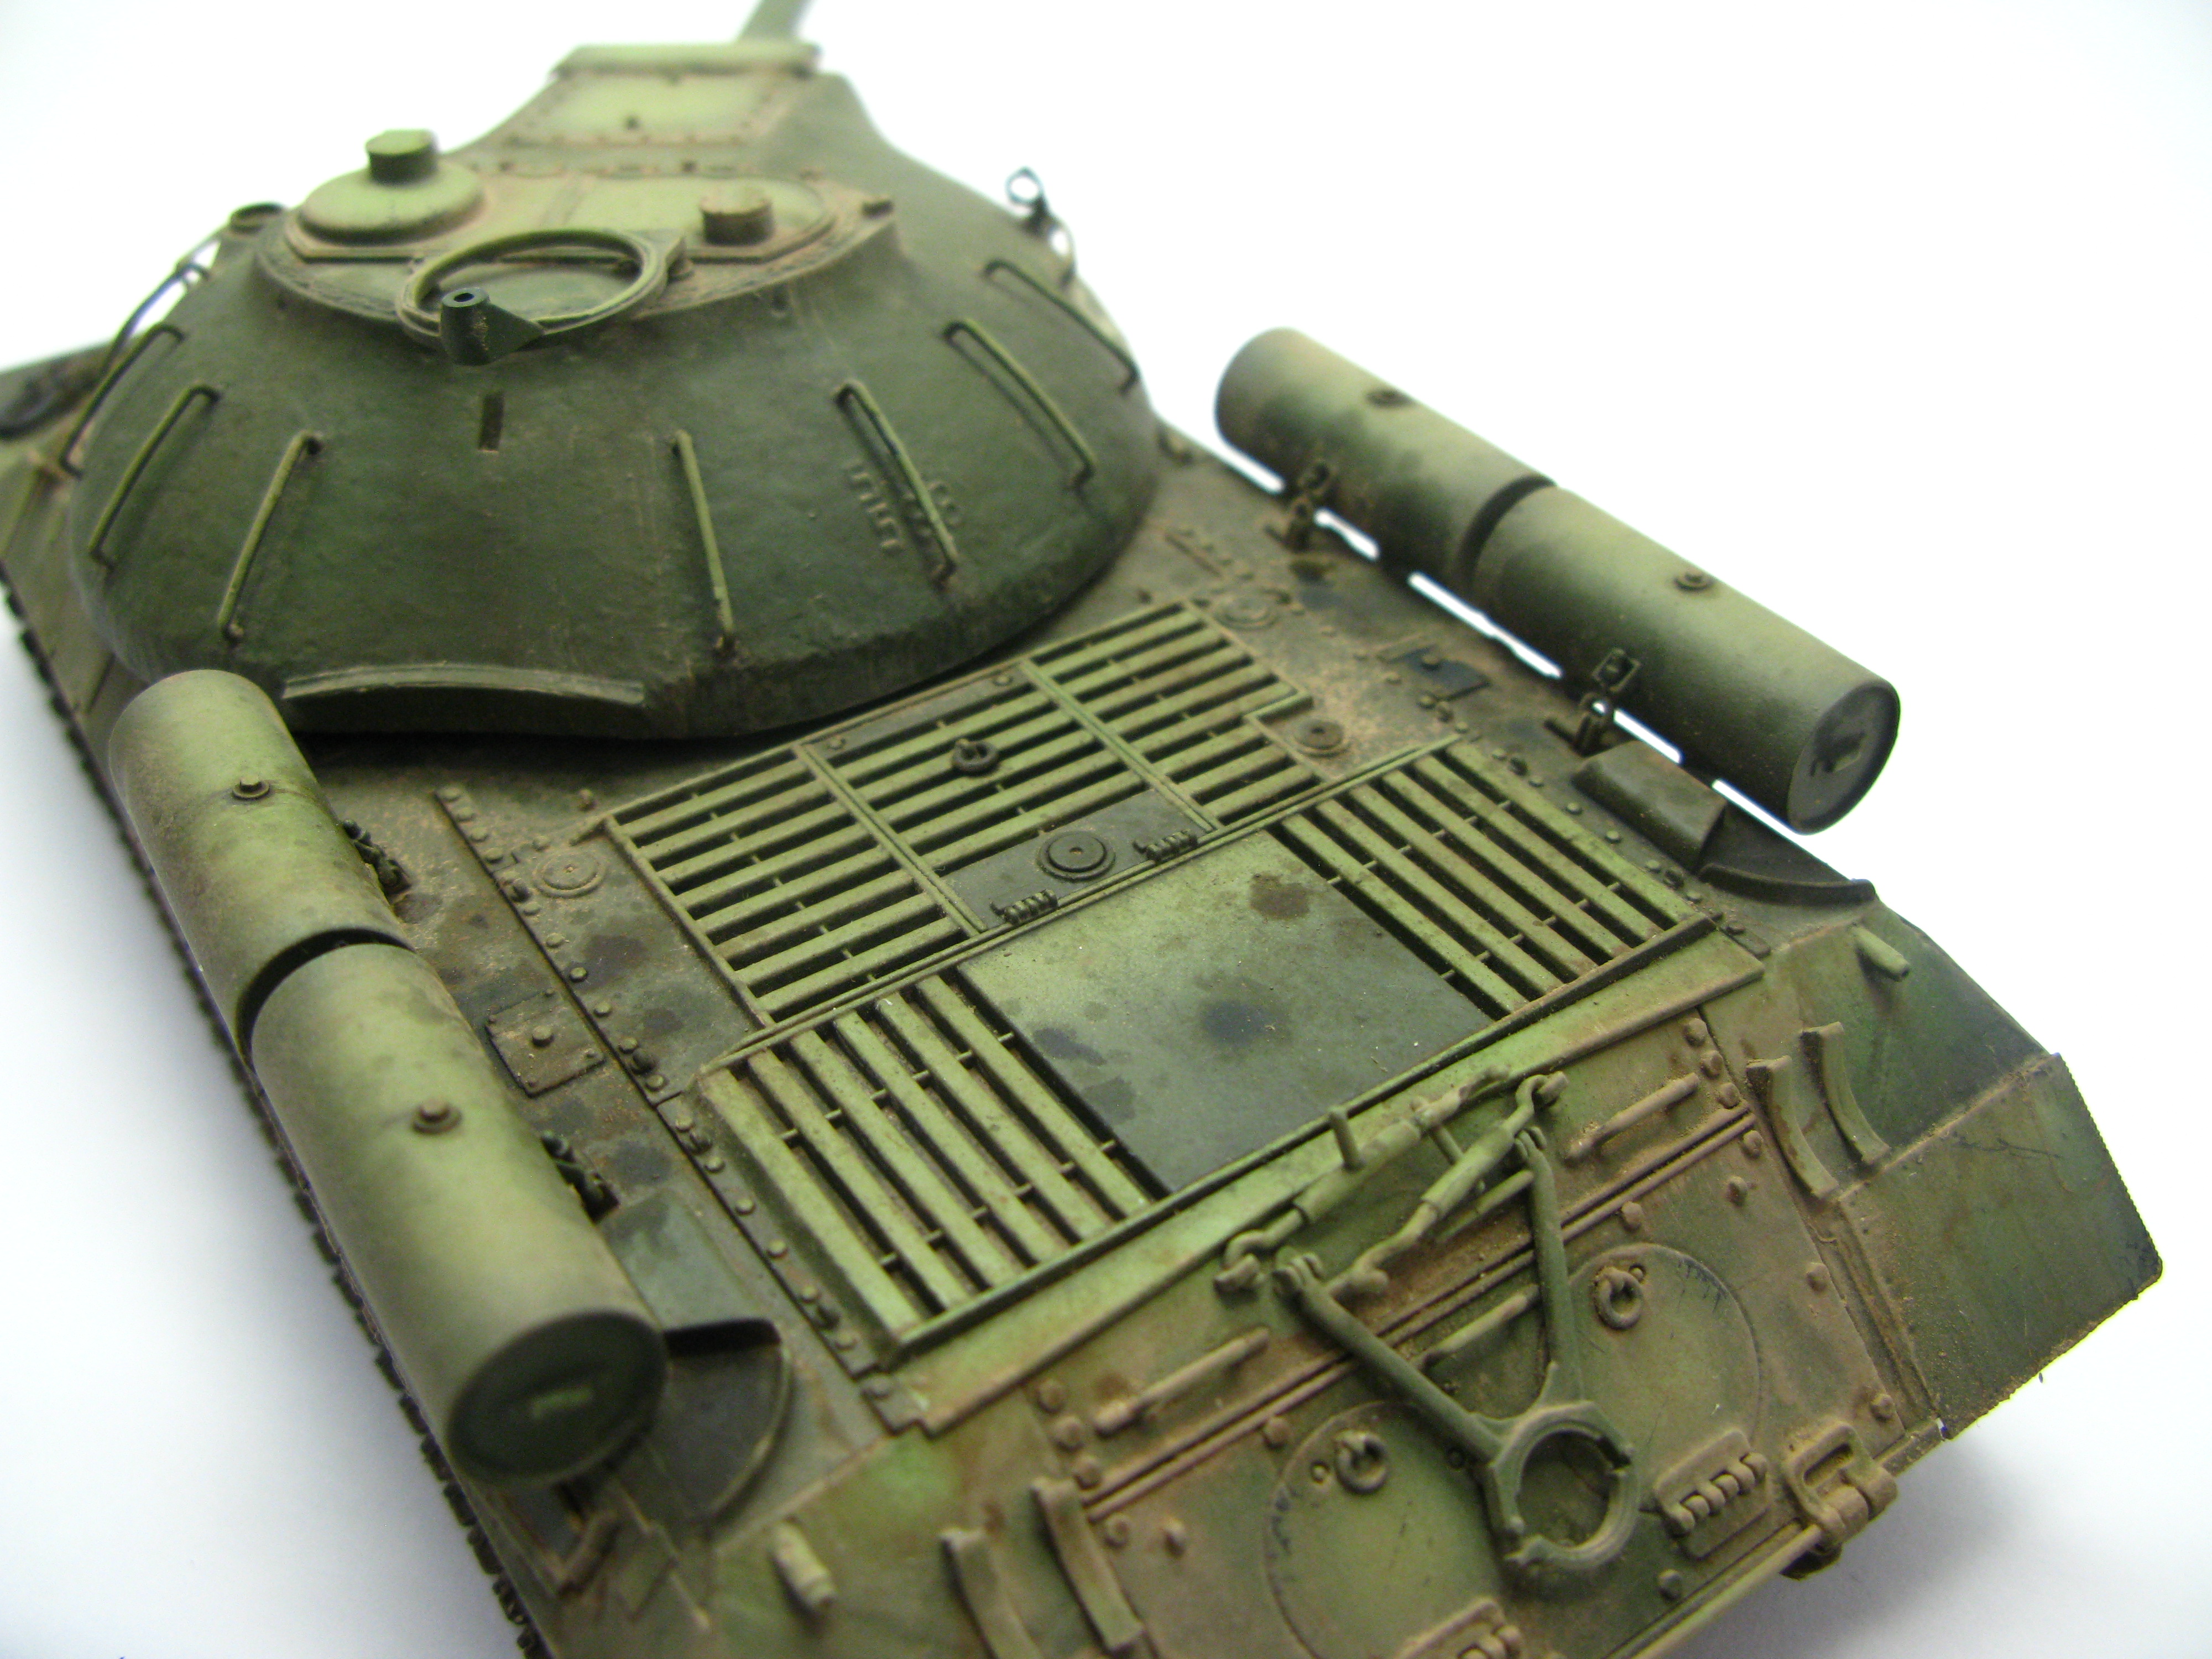
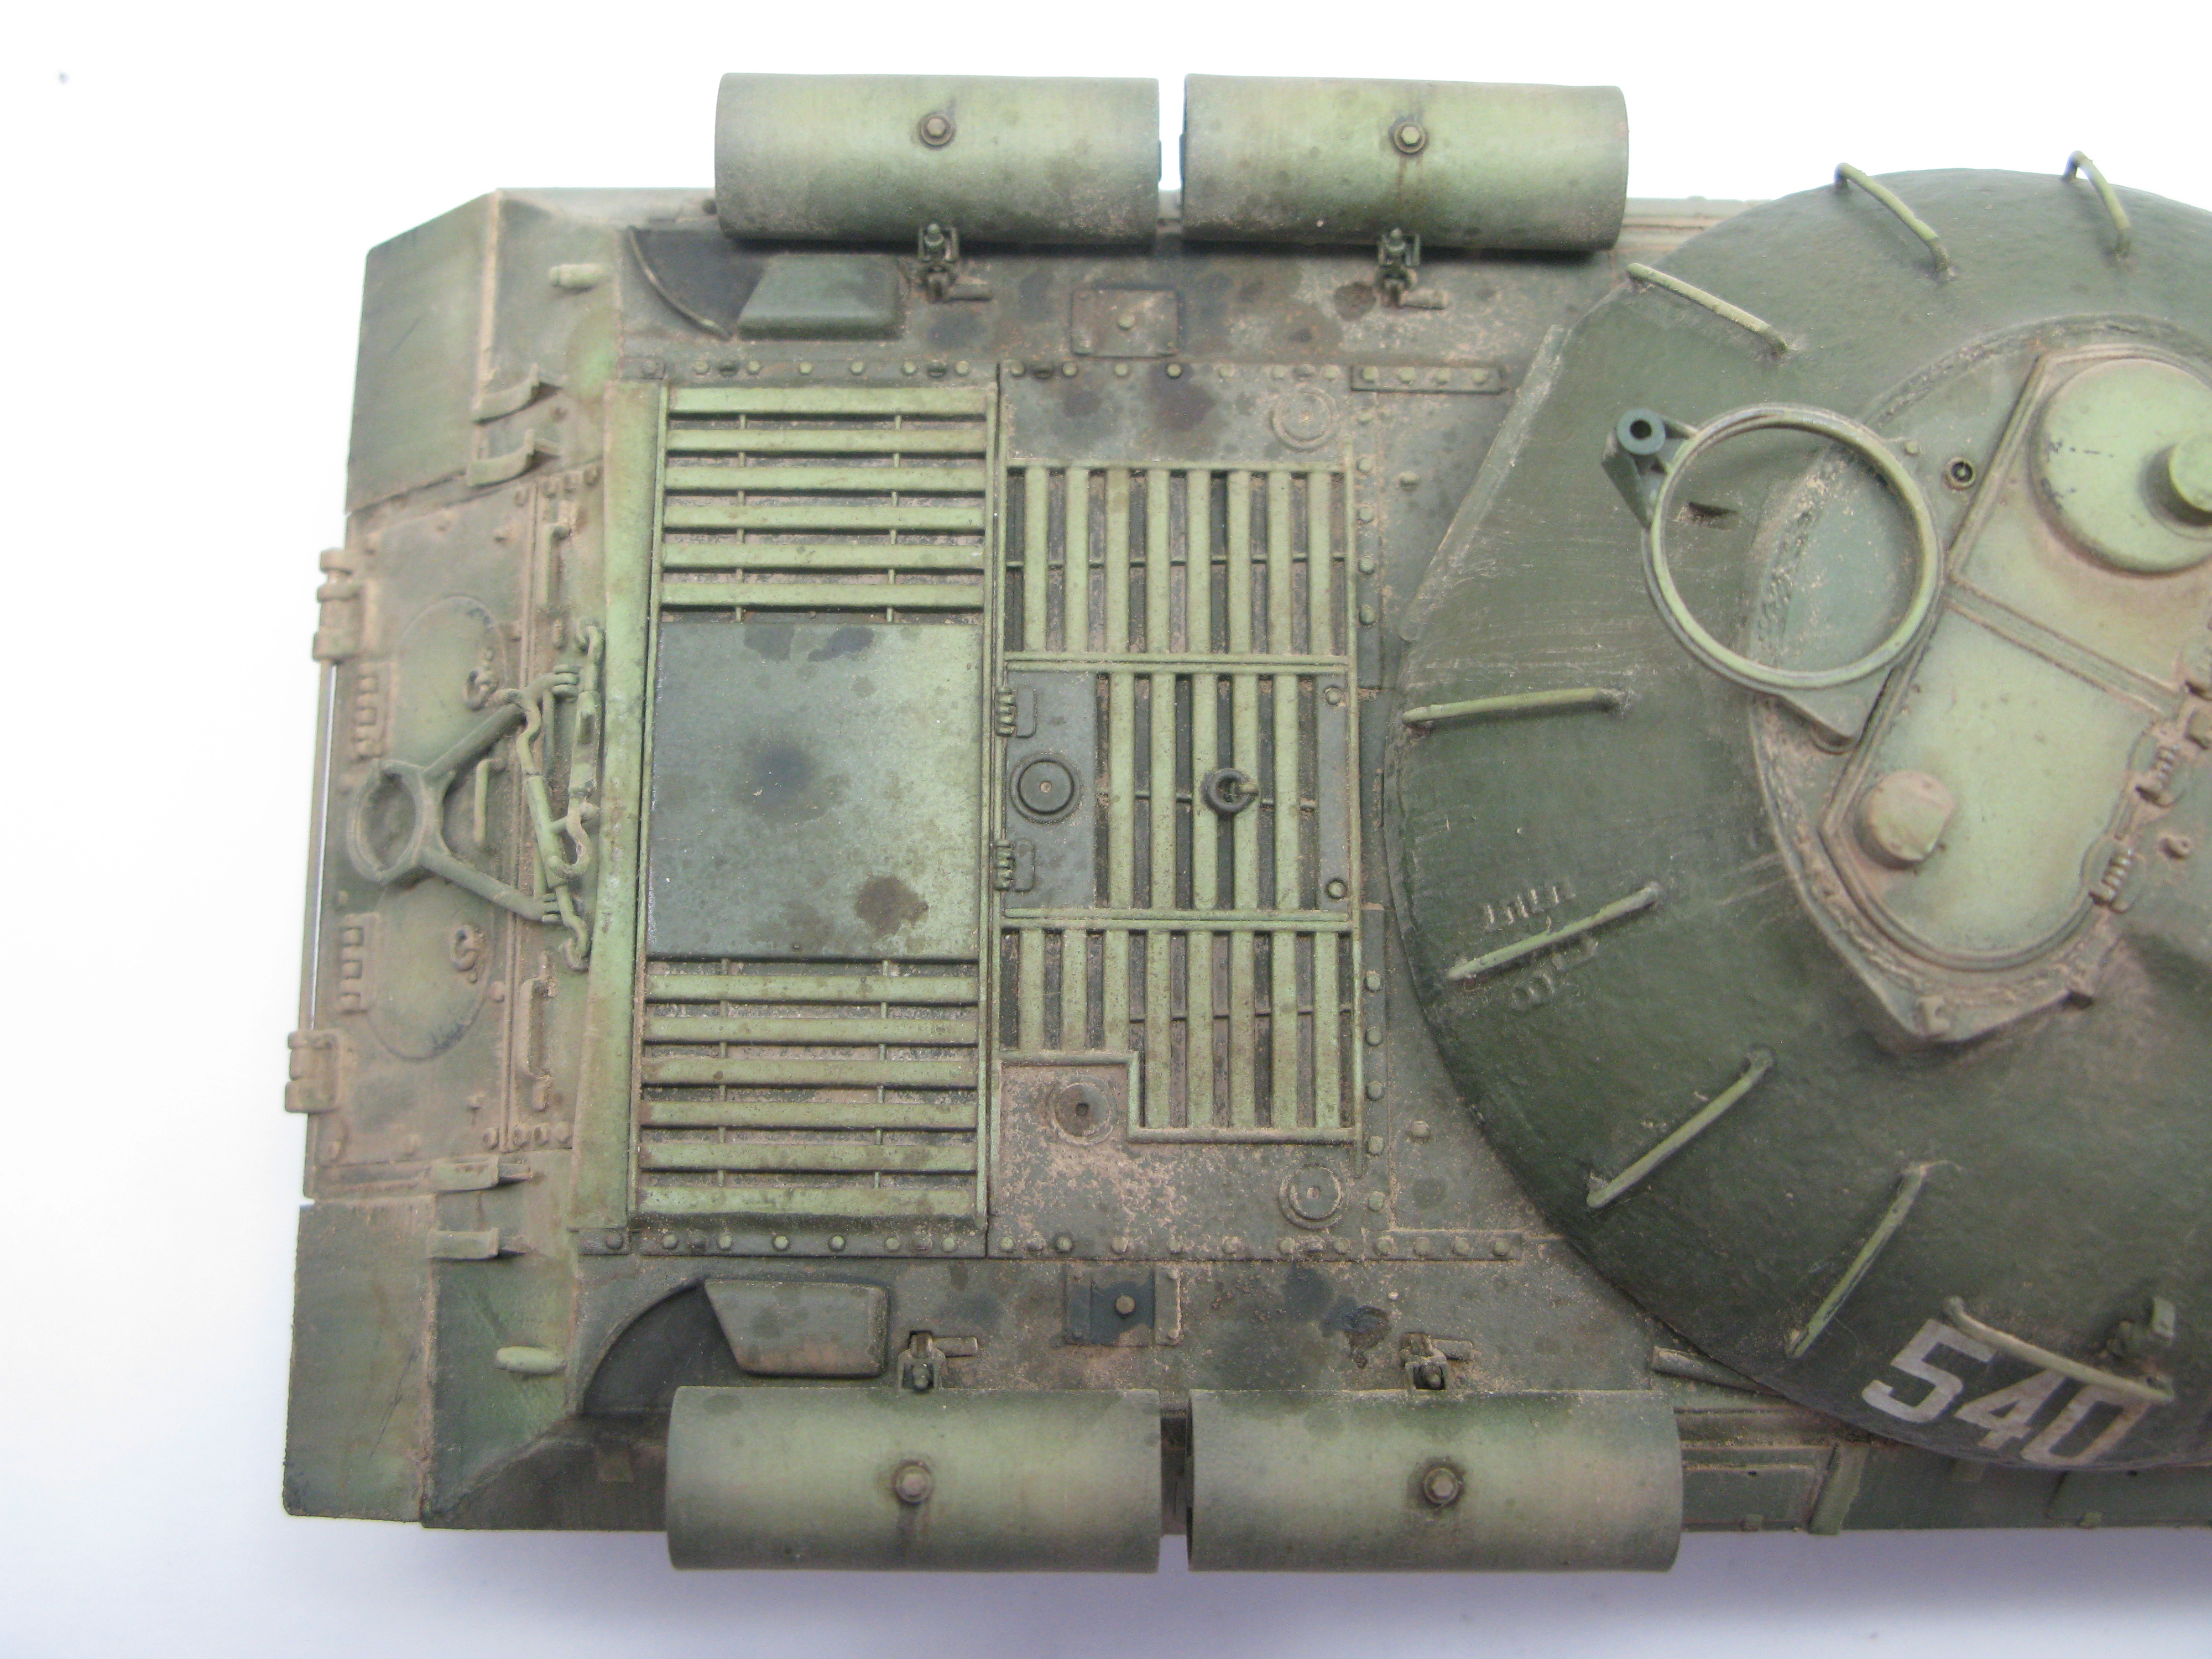
After decalling but before varnishing again, I applied pin washes using Mig Productions' Deep Green Wash (P302), and Moss Green Wash (P305). After the pin washes, I varnished again (this time Testors aerosol Dullcote). I then applied a more or less uniform and unfiltered coat of Mig Productions'/Sin Industries' filter, Green for Allied Tanks (P425). This went on well, and I noticed a nice increase in tonal harmony and depth. Yes Bish, after a second look, I did notice an increase in tonal depth. Or I imagined it, I don't know Stick out tongue.

After the filter, I started on the streaking grime. Here, I think I may have made a mistake. I did not apply another layer of varnish to the model to protect the filter before I started with the streaking grime. I think it caused the filter to become muddled and combined with the filter a bit. If there's anyone still reading this far into the massive wall of text, could you let me know what you think on this point? Well, back to the streaking grime. I used AK Interactive's Rust Streaks (AK013) and Dark Streaking Grime for Green (AK024). Everything went as planned, except for the possible problems with the filter mentioned above. 

Pigments: 

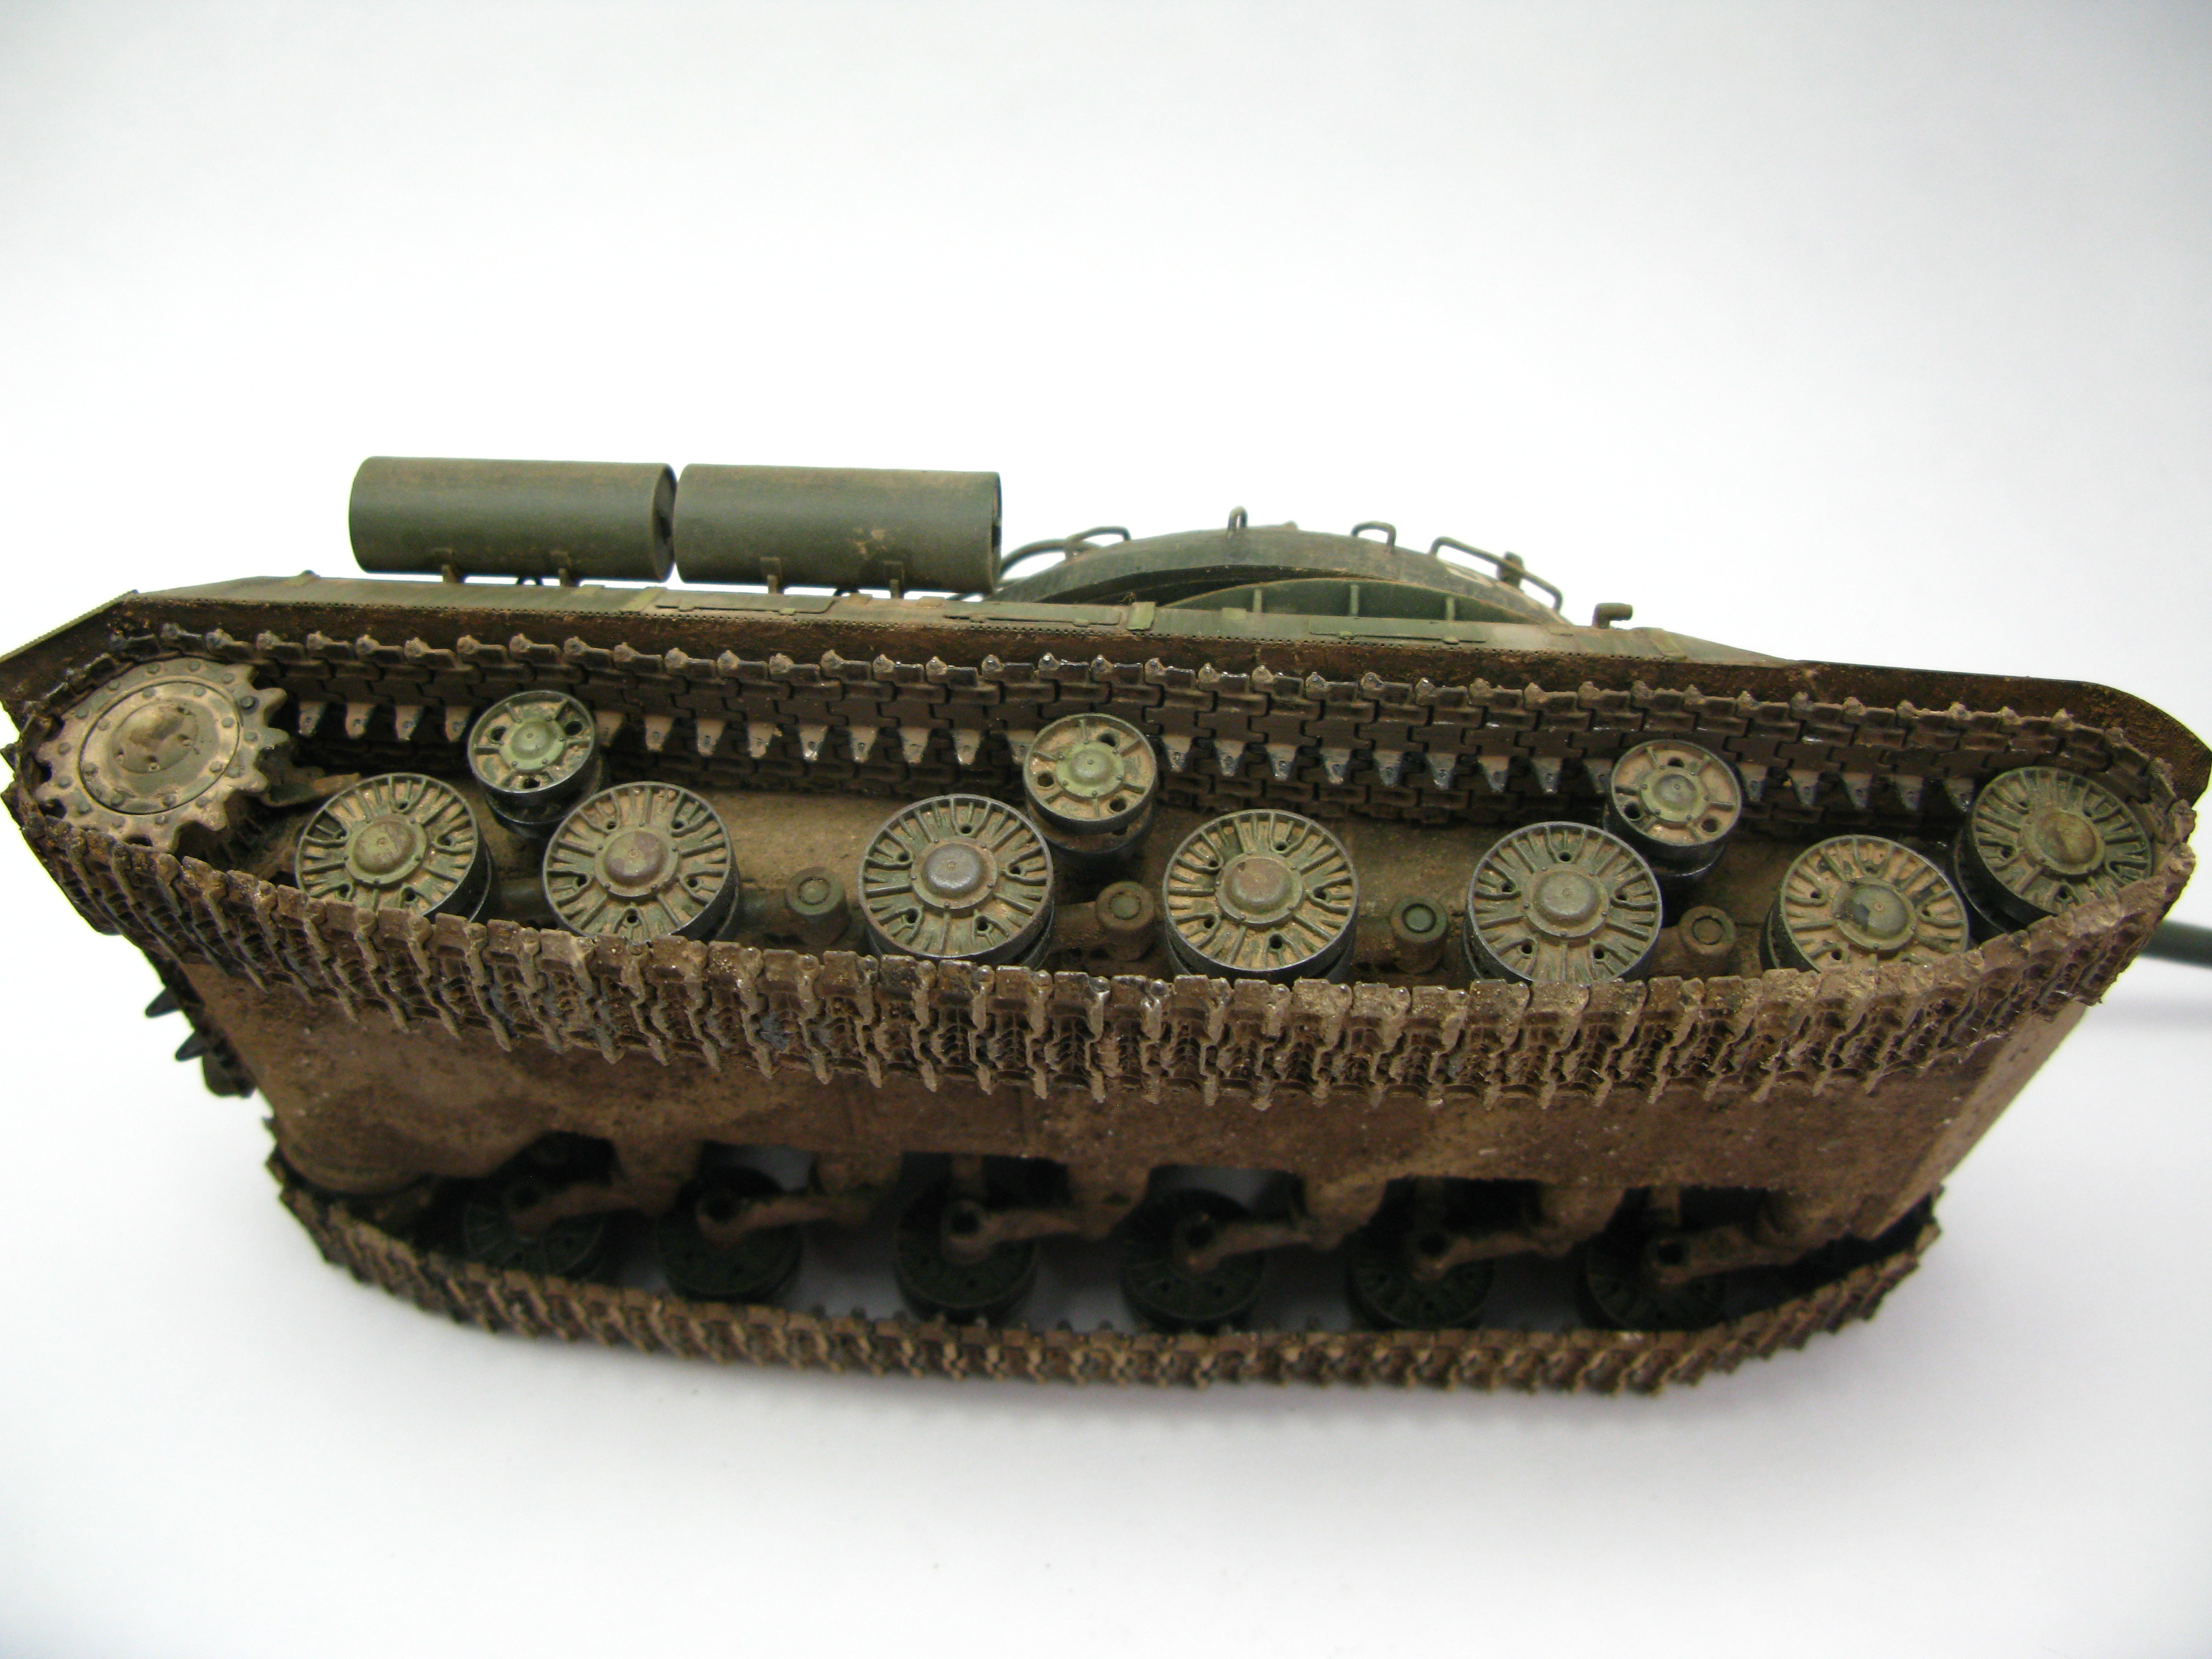
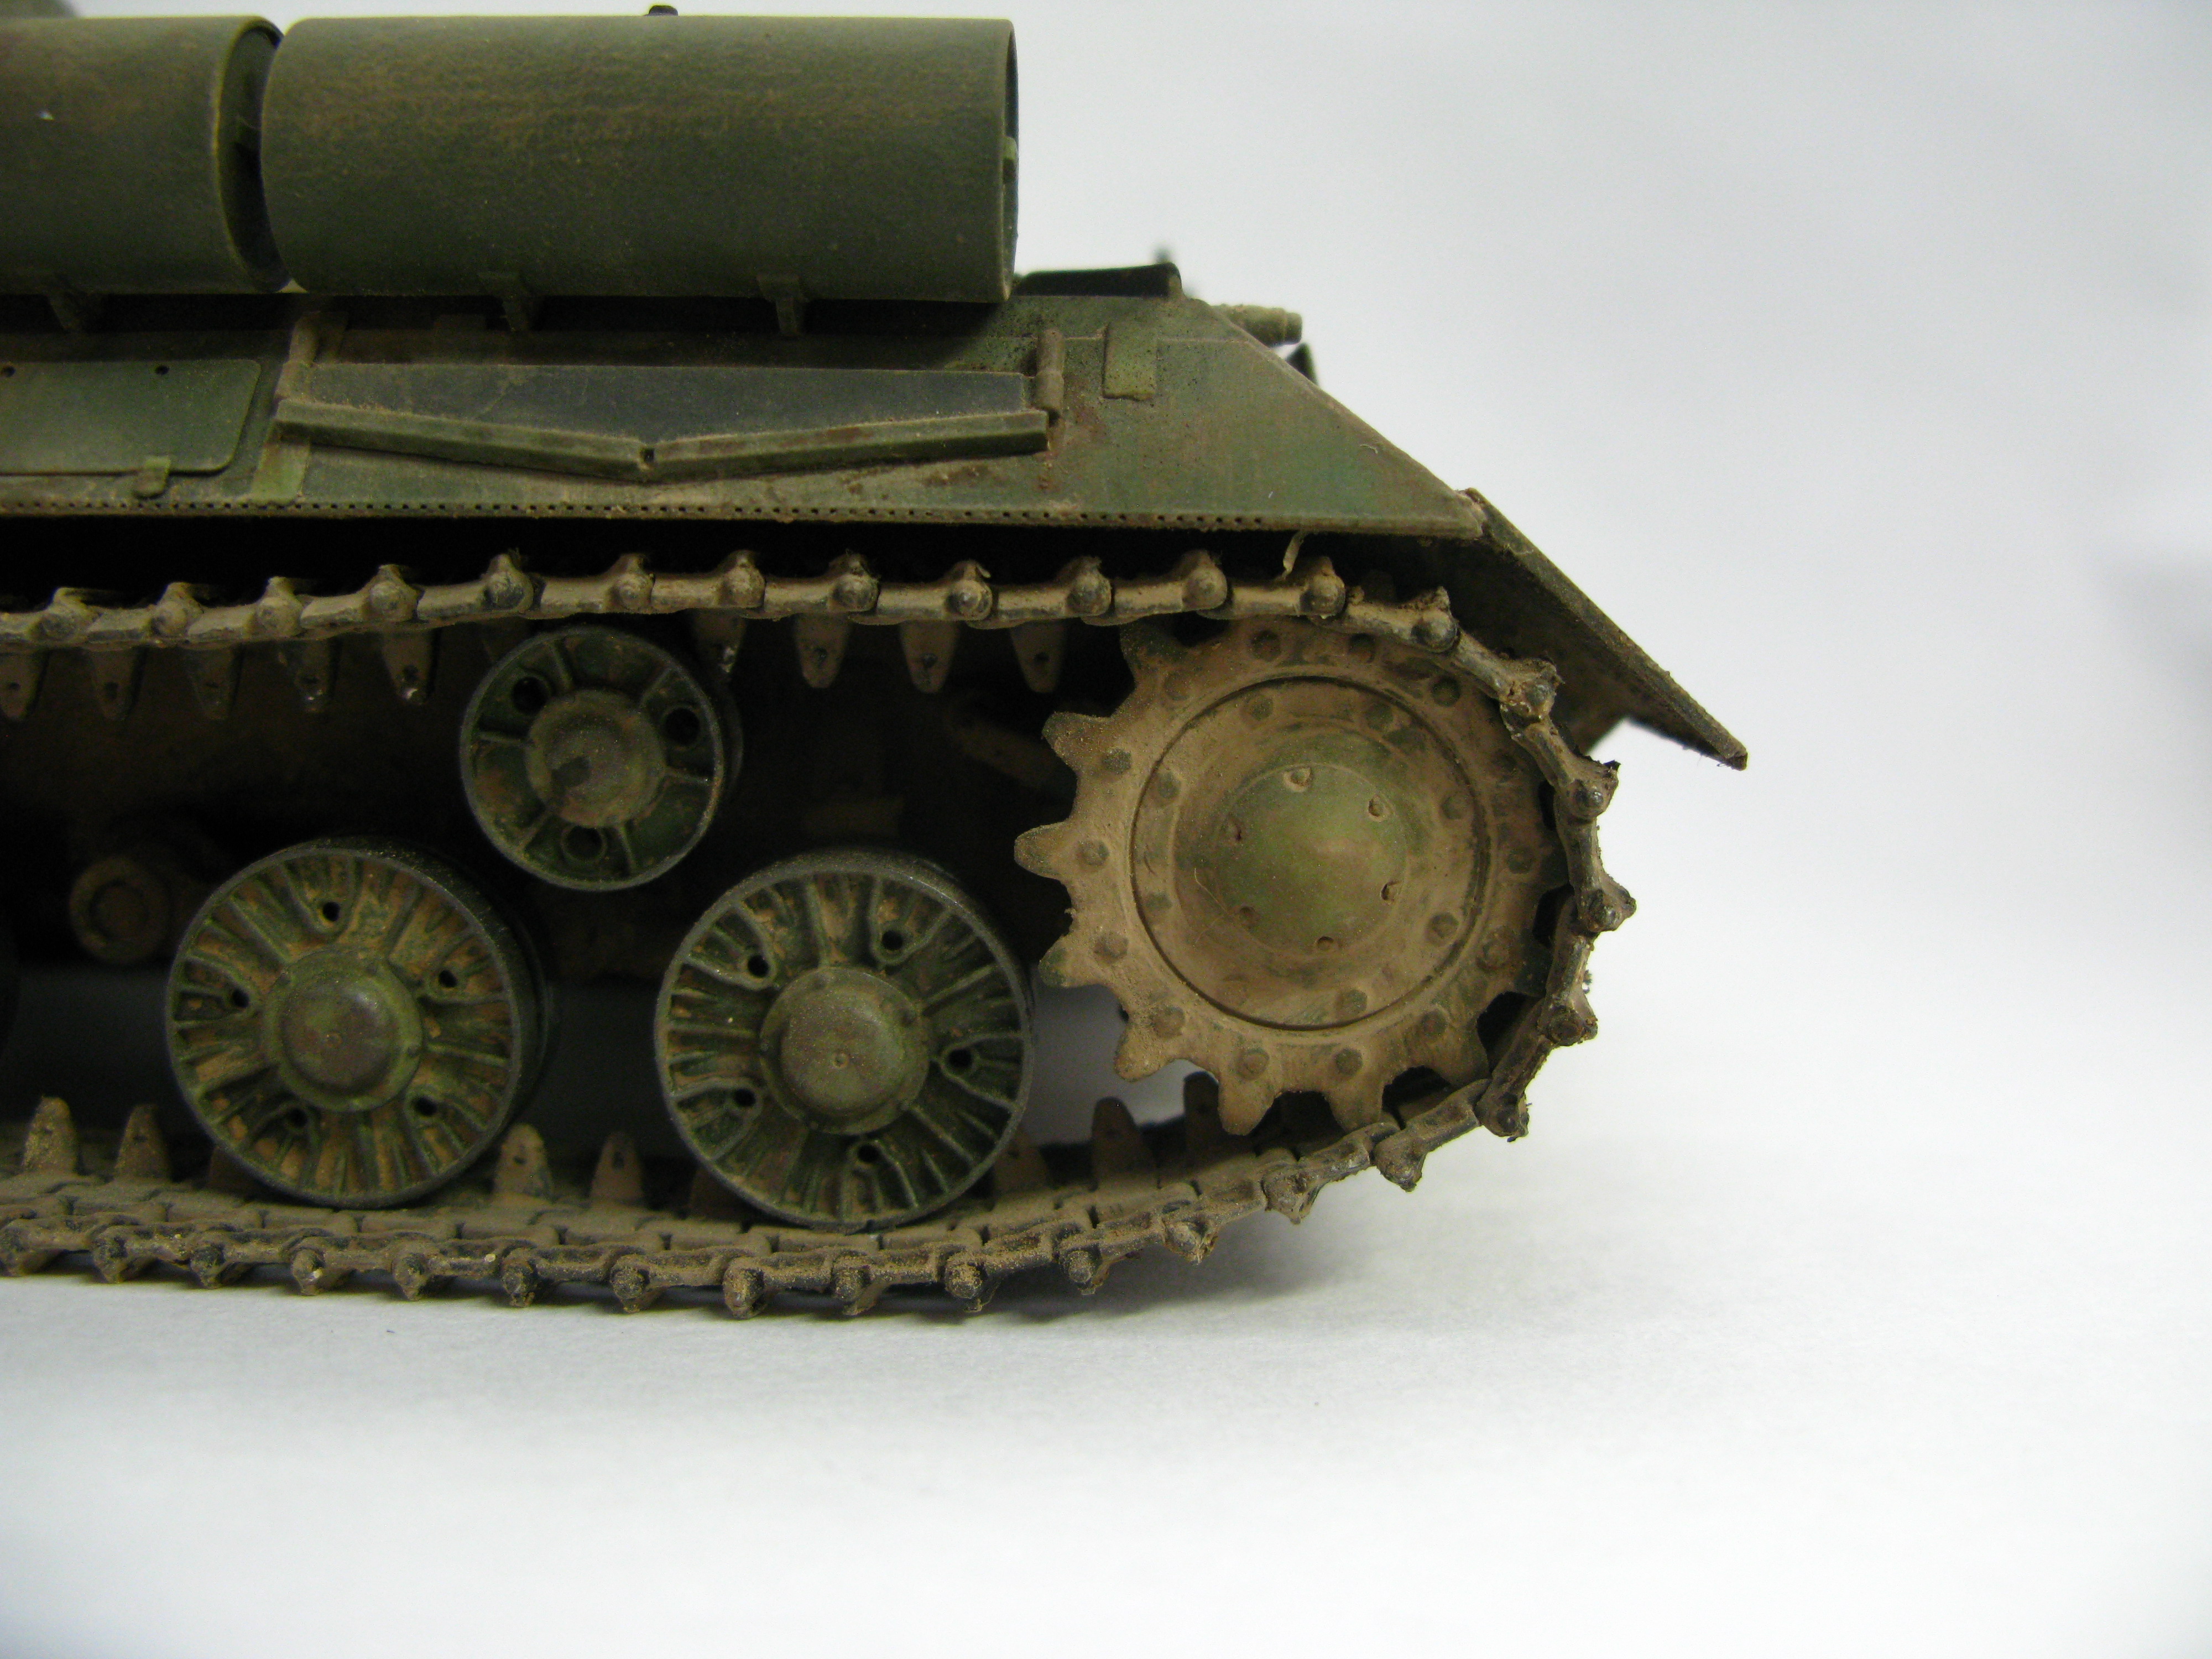
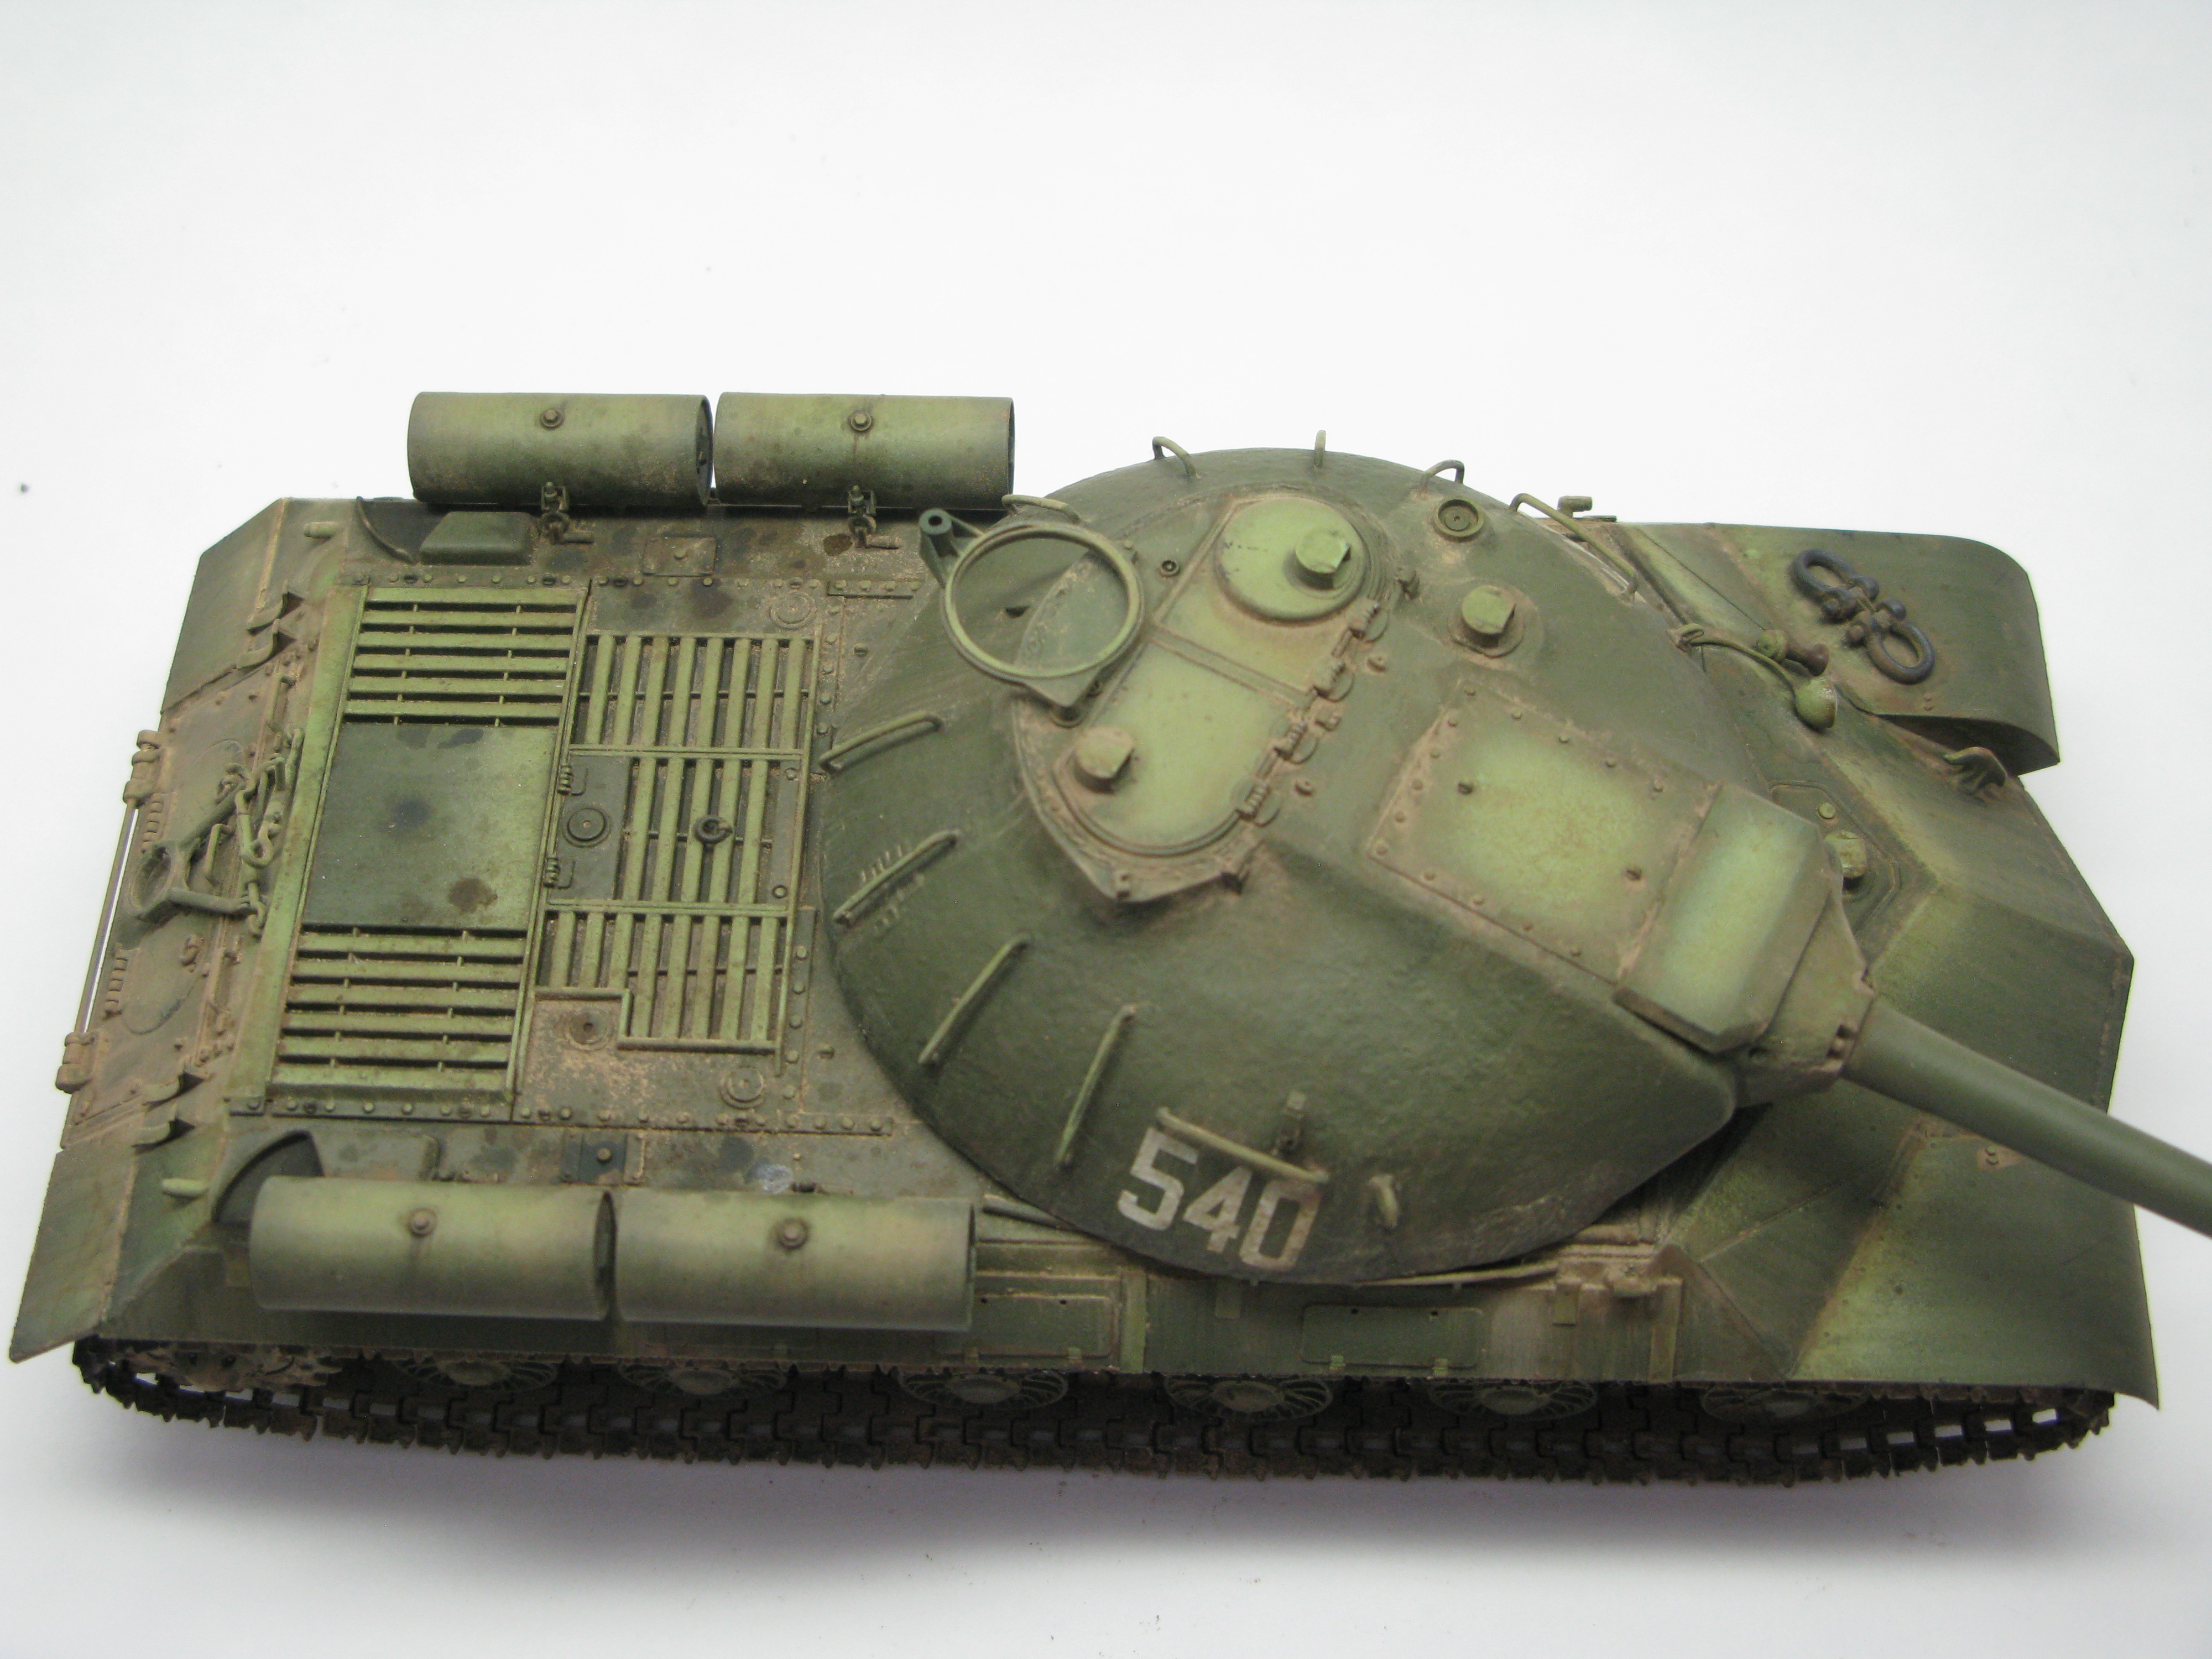
After the oil products, I sprayed the model again with Testors aerosol Dullcote. I then started on the pigment weathering process. For the dirt/mud I used Mig Productions' Dark Mud (P033), Russian Earth (P034), Dry Mud (P232), and AK Interactive's North Africa Dust (AK041). The pigment I used the most was Dry Mud, as you can probably tell from the pictures. I used Mig Productions' pigment fixer (P249) for binding the pigments. 

For the tracks, I basically copied Mig Jimenez's techniques from here: http://www.migjimenez.com/en/module/csblog/detailpost/14-2-finishing-tracks-with-ammo-products.html

For the rest of the lower hull, I alternated between applying the pigment fixer first, and applying the pigments first. JS-3 Suspension Weathering 
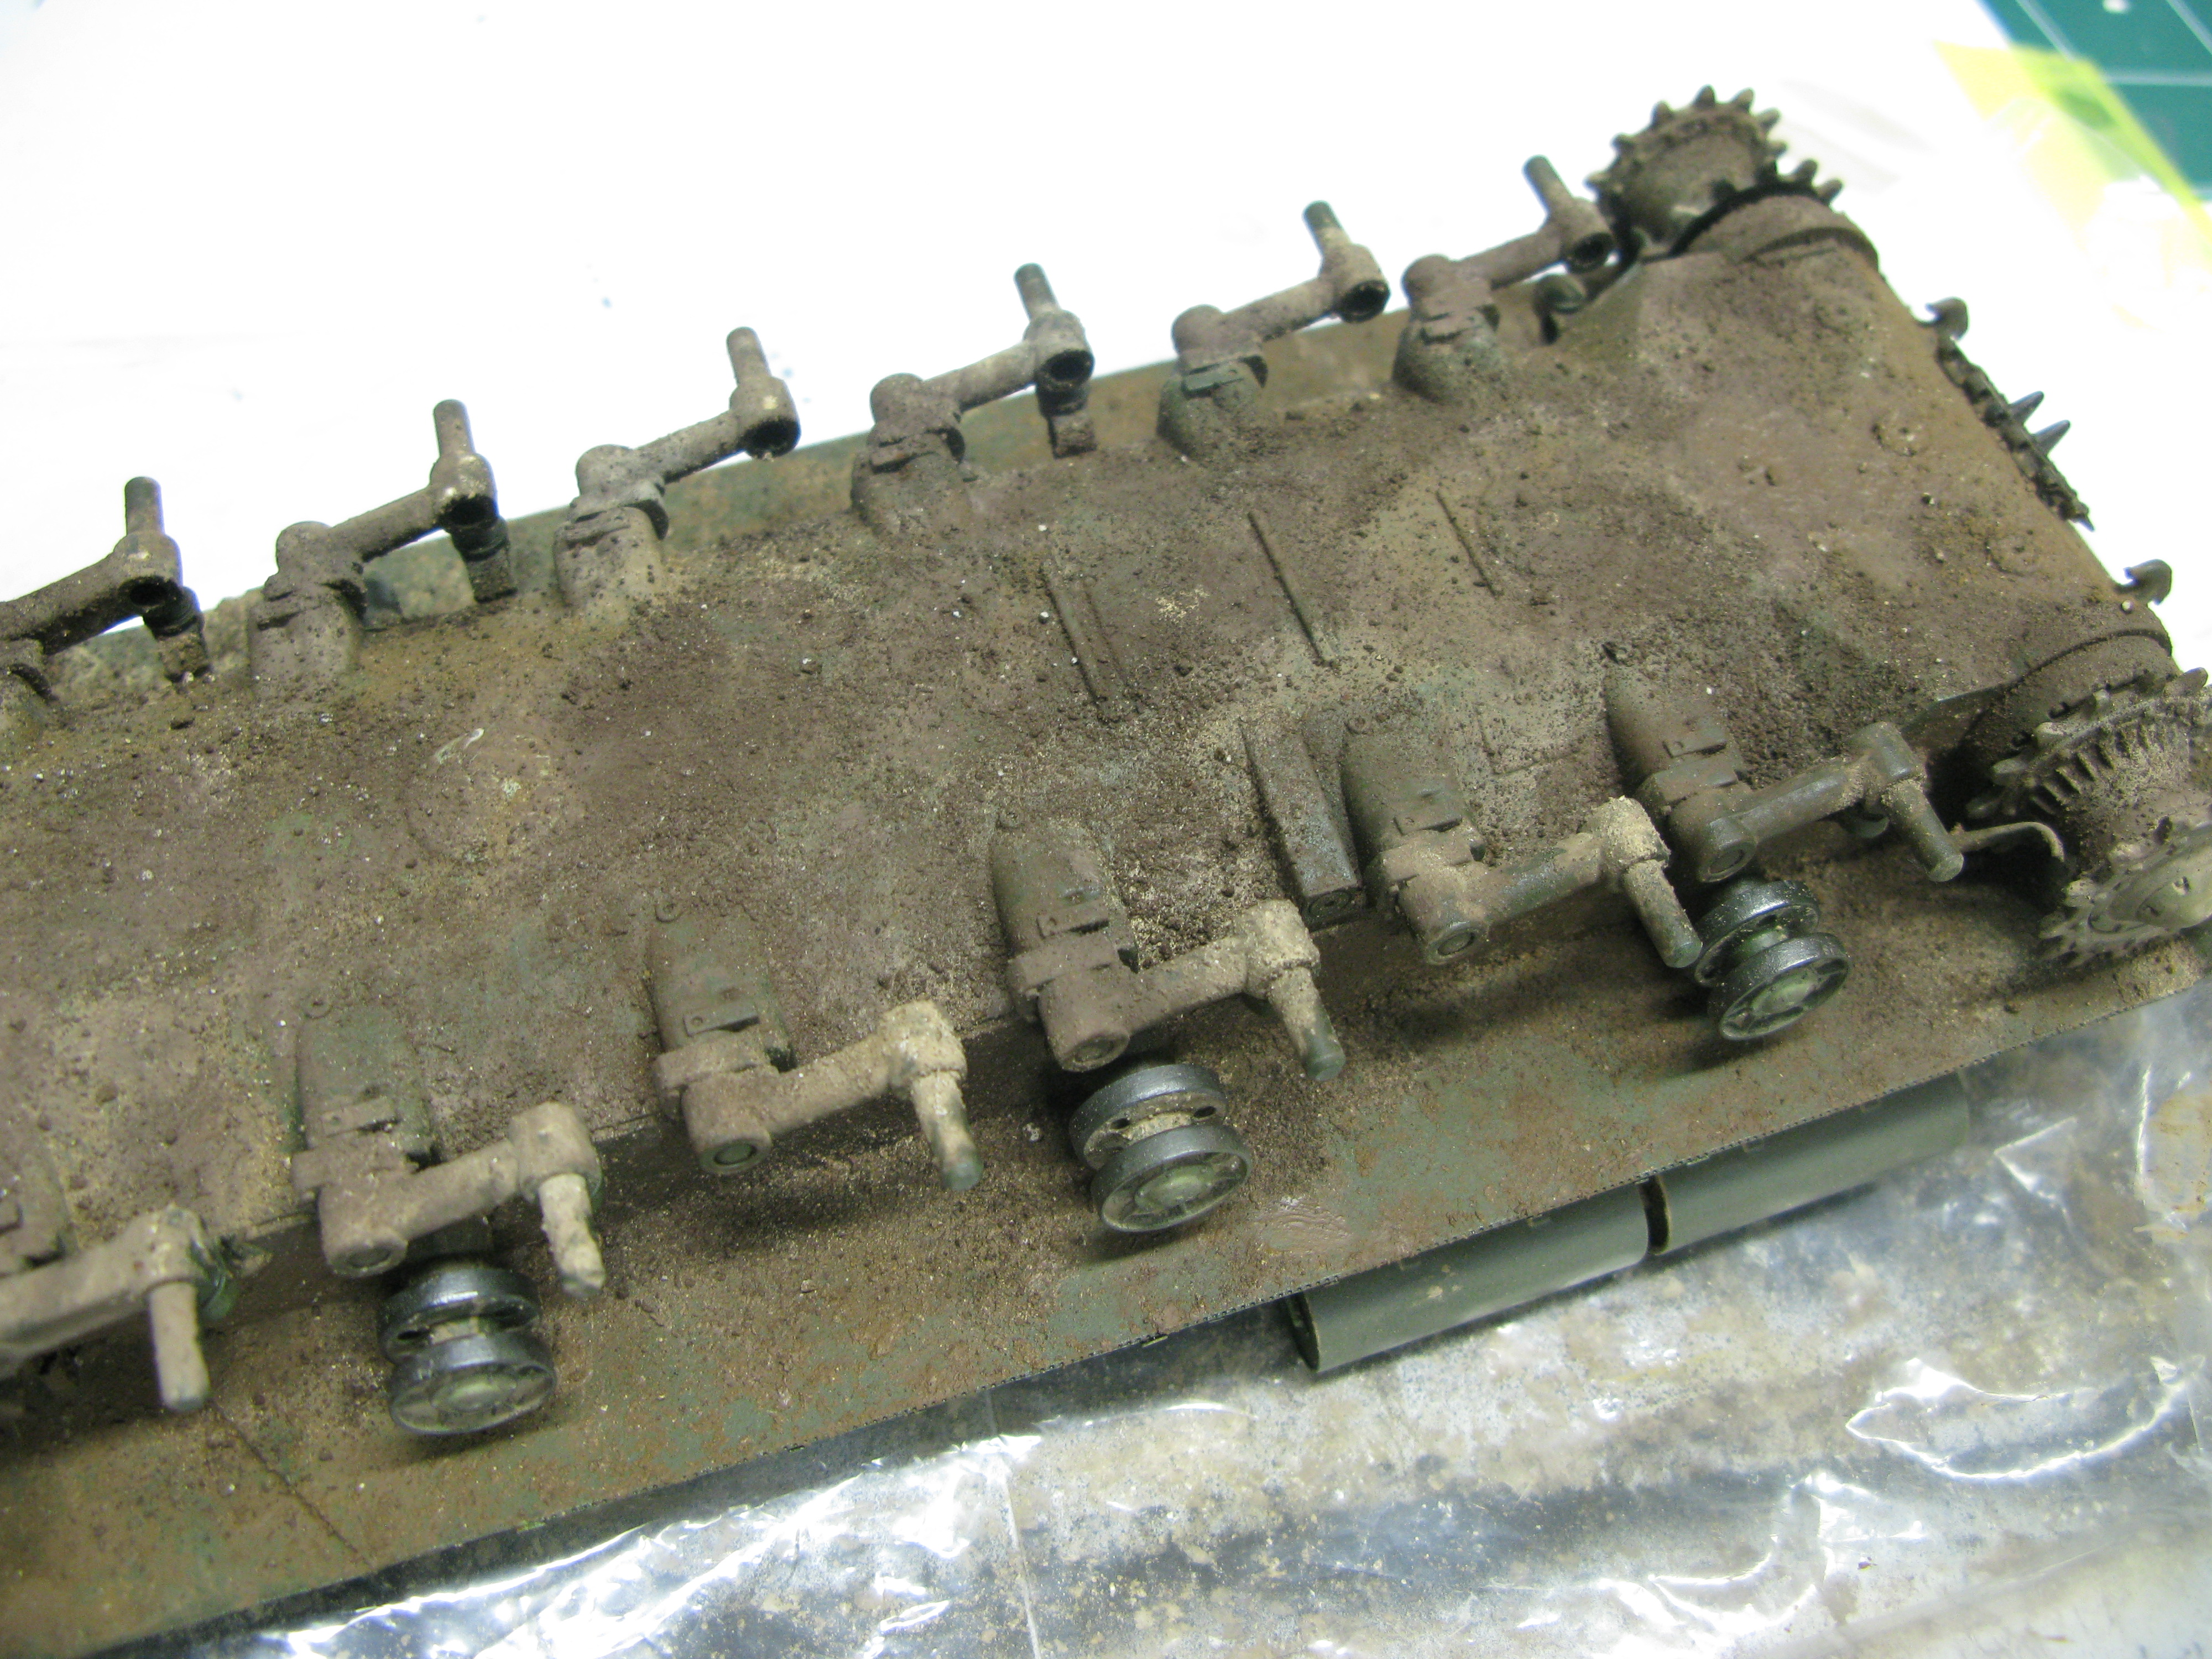
Something I have noticed is that pigment fixer is only useful on areas where you are planning to have heavy mud, like the underside of the vehicle. If you use it on areas where it does not completely absorb into pigment, it gets nasty semi-glossy coffee ring effect. Does anyone else know about this? If you've read this far, and you know what I'm talking about. could you leave a reply? 

After learning about the translucent glossy coffee ring effect, I ended up primarily just applying pigments straight to the surface on the upper hull and turret. Where I needed a little bit of extra grip I used some white spirit. 

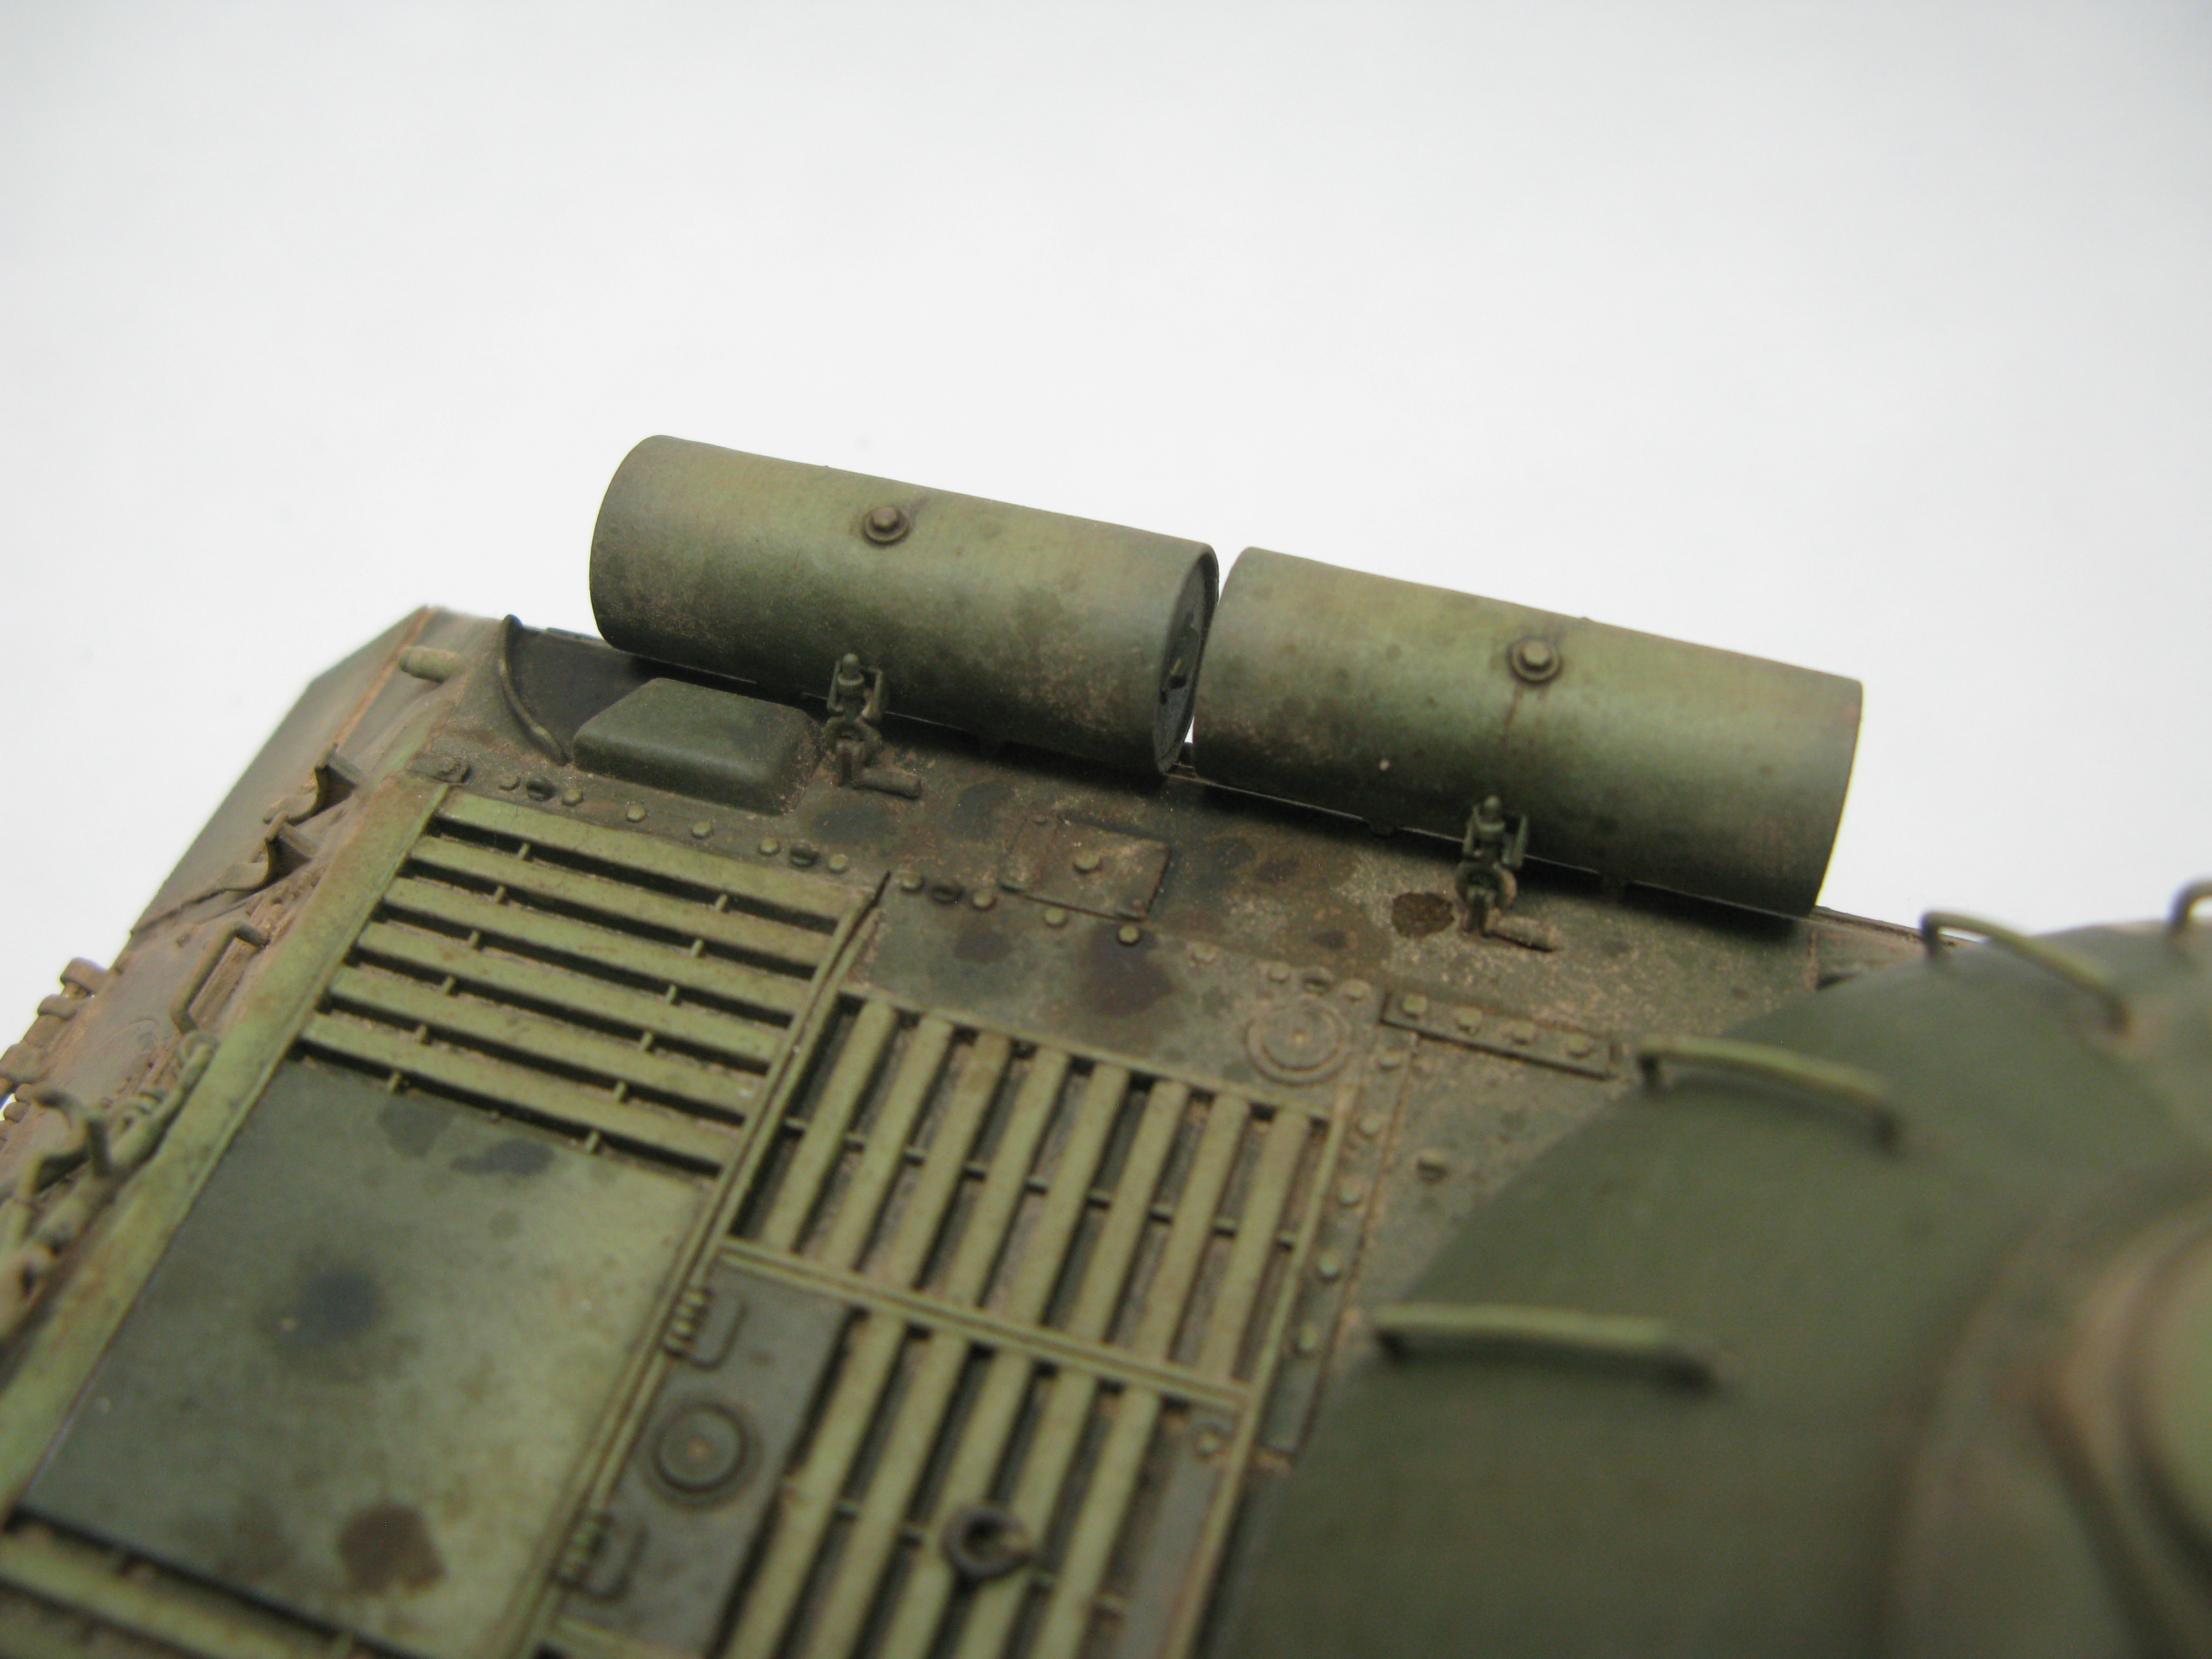
I added some fuel and oil spatter effects using mixtures of AK Interactive's Track Wash (AK083), Dark Streaking Grime for Green (AK024), and AMMO's Wet Effects (A-MIG 2015) thinned with white spirit. I also added a tiny smidgen of AK Interactive's black pigment (AK039) to the muzzle brake. 

Here are some photos when I was still in the process of adding pigments to the hull. I have included the undirtied turret for comparison: JS-3 Turret Removed 1/2 WeatherecJS-3 Full Port View 1/2 Weathered 

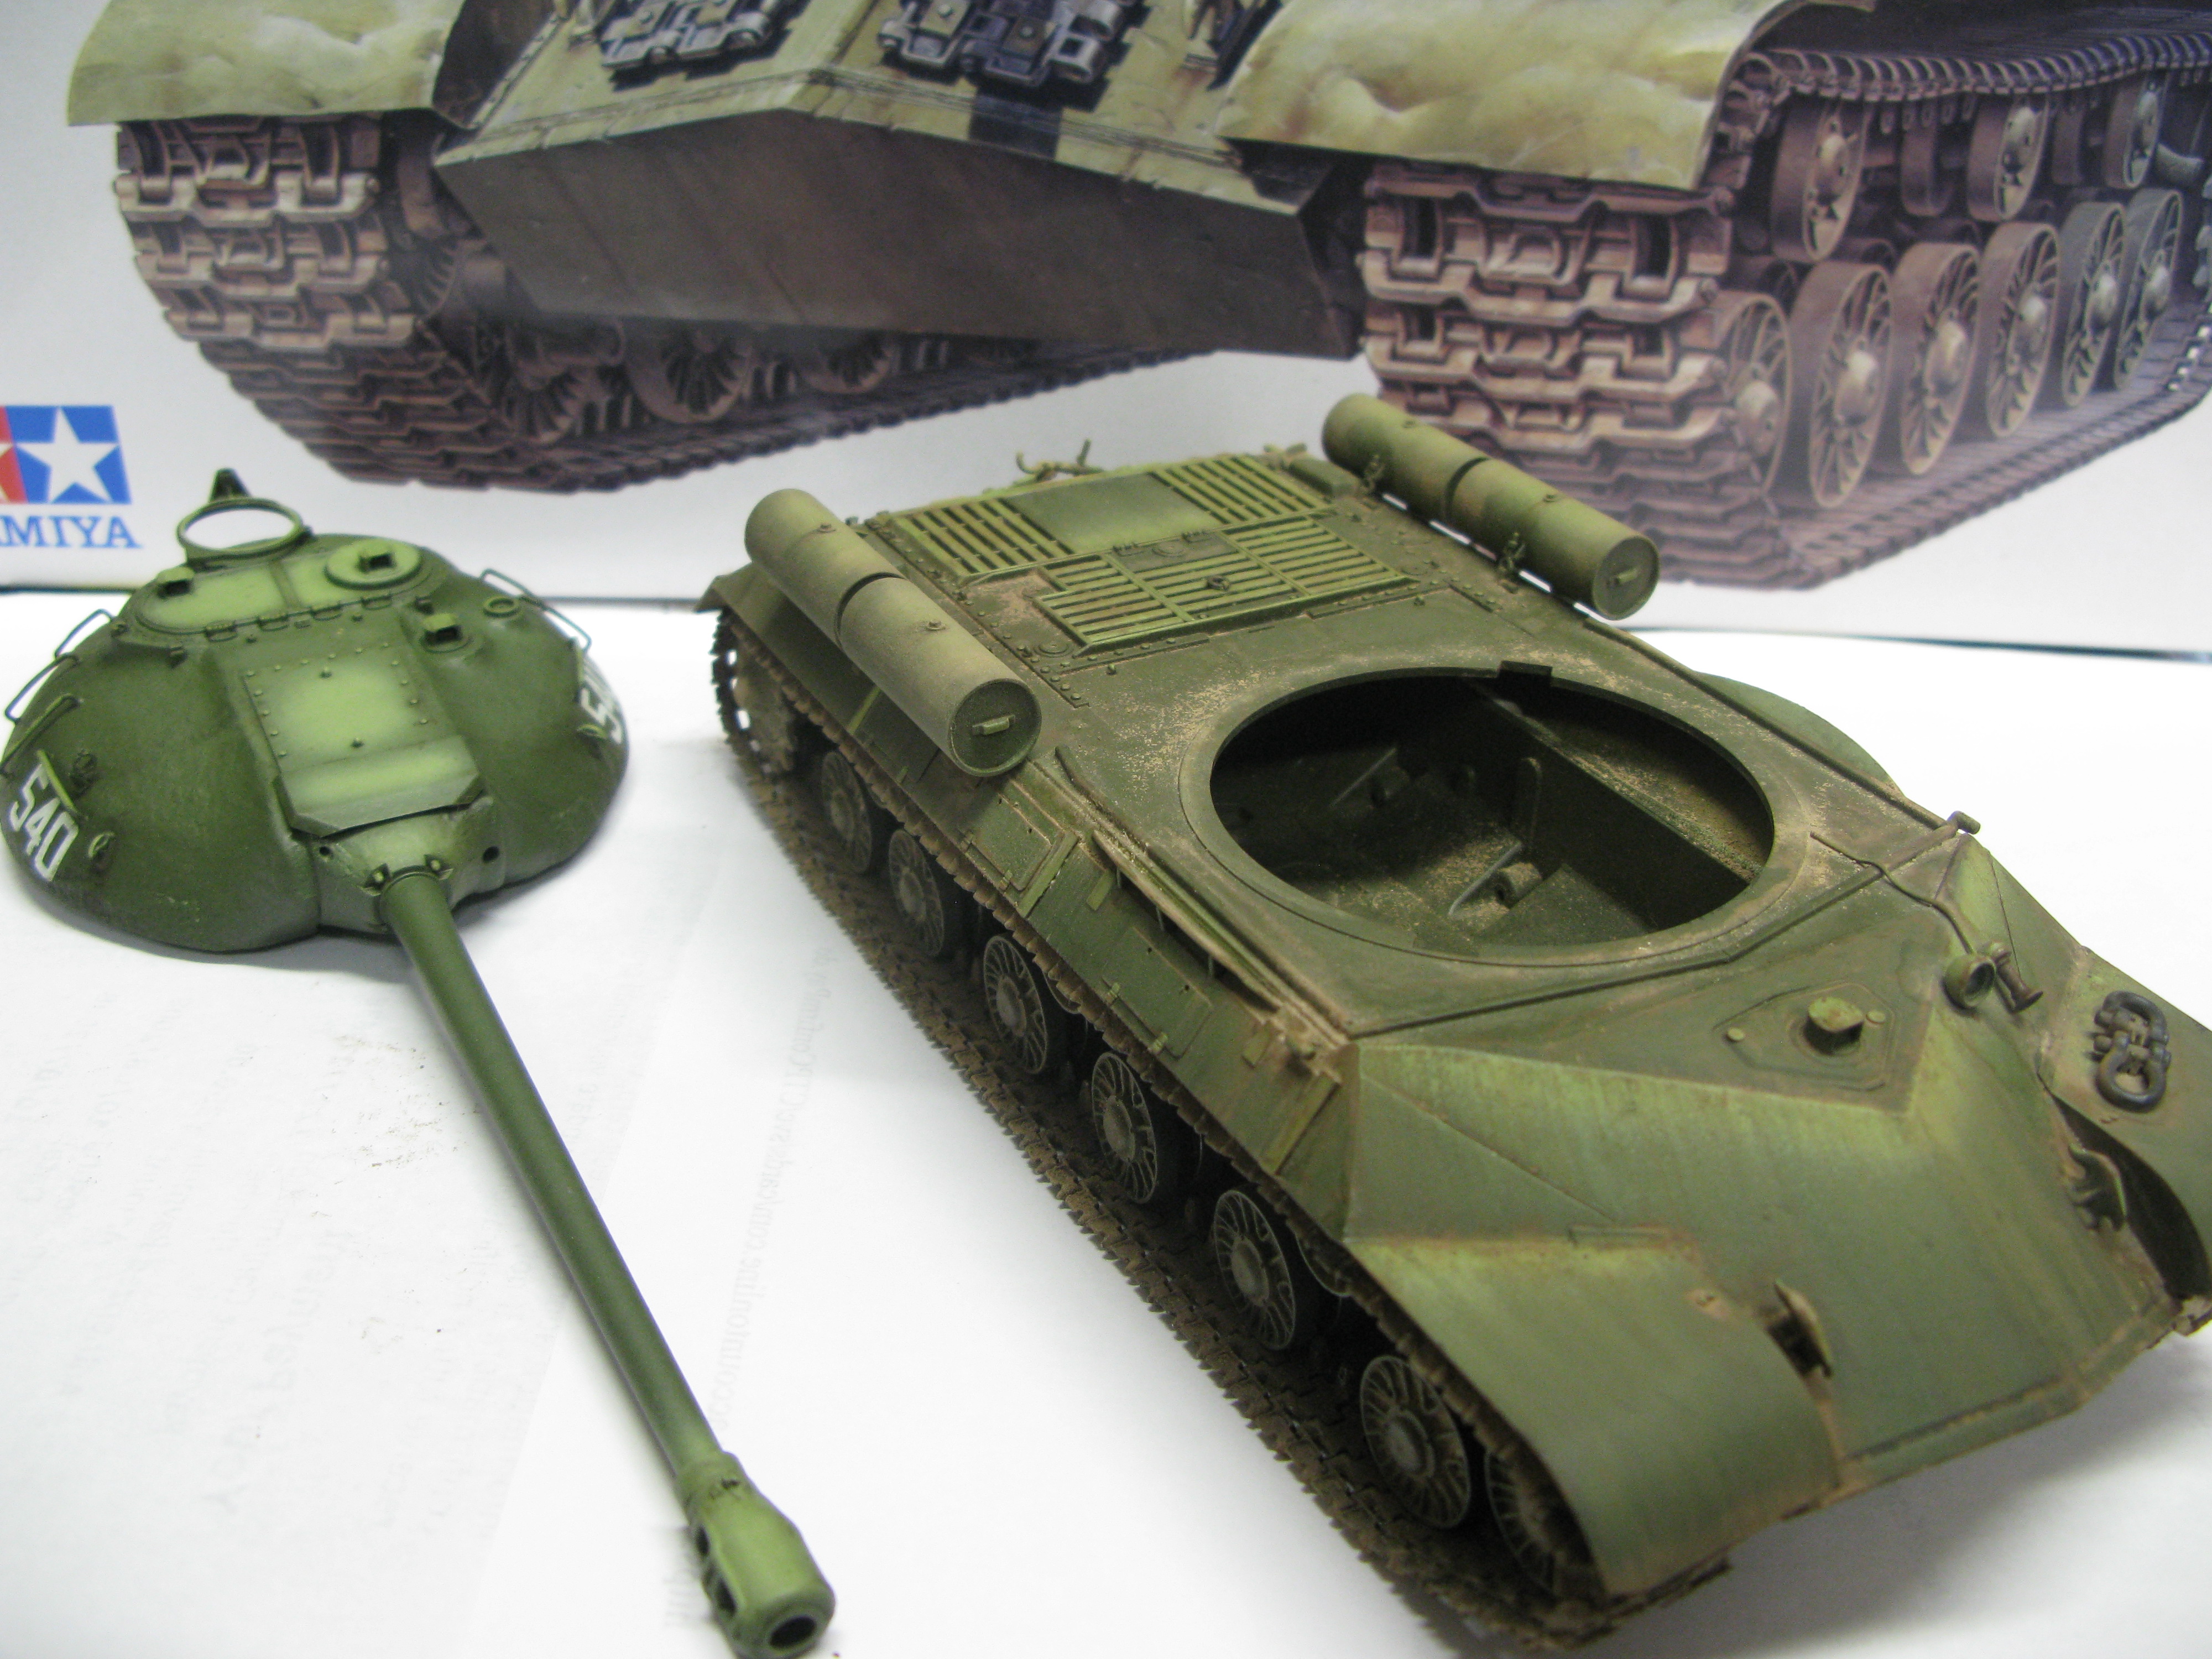
After the pigments, I tried to figure out what to do about the headlights. It tried self adhesive glitter things, but none of them looked accurate to the real headlights. Then I decided to try plastic headlight inserts. Unfortunately I had lost my set of clears from the Tamiya kit. While looking though I found my completely unused clear fret from my last build, Dragon's M7 Priest Early Production (DML 6627). One of the headlight pieces was just the right size! I used a little bit of silver paint in the hollow behind the headlight piece. Let me tell you, clear headlight parts work great! I couldn't have been happier with the result.

Conclusion: I'm quite happy with the final appearance of the model, however, I believe that there are probably some accuracy issues. For starters, the 1945 JS-3 production model with toolboxes always had extra tracks mounted on the pike nose (I think). I didn't use the Tamiya plastic ones because they looked unrealistic. I would have used some extra Friuls, but there seemed to be some kind of mounting brace which did not look like something I could easily scratchbuild. Secondly, I ended up scrapping my set of Eureka XXL tow cables because, despite annealing them, they remained stiff and difficult to position. This caused them to become near impossible to affix in a realistic looking way on the model (in addition to making the plastic tow cable mountings break numerous times). So my model is missing the extra tracks on the pike nose and the tow cables. Finally, the amount of weathering I applied is probably unrealistic given that the war would have been over (especially the slightly blackened muzzle brake).

These possible accuracy issues are most likely less glaring than I am making them out to be. Given my difficulty in finding any concrete data on JS-3 production types, I'm guessing very few people will know enough about the specs to be able to call me out on any of the points. Who knows, maybe at some point in time there was in fact a JS-3 Mod. 1945 covered in dirt without extra tracks mounted? Maybe some factories didn't add the tracks? The one thing I'm most dissapointed about are the tow cables. That's something that's basically been on every tank ever, and its absence will be pretty noticeable. What do you think of these possible accuracy errors (if you have read this far)?

There are also some things I will need to add in the future, including the DsHk machine gun and the antenna. Despite all that complaining, I like the way the JS-3 turned out! 

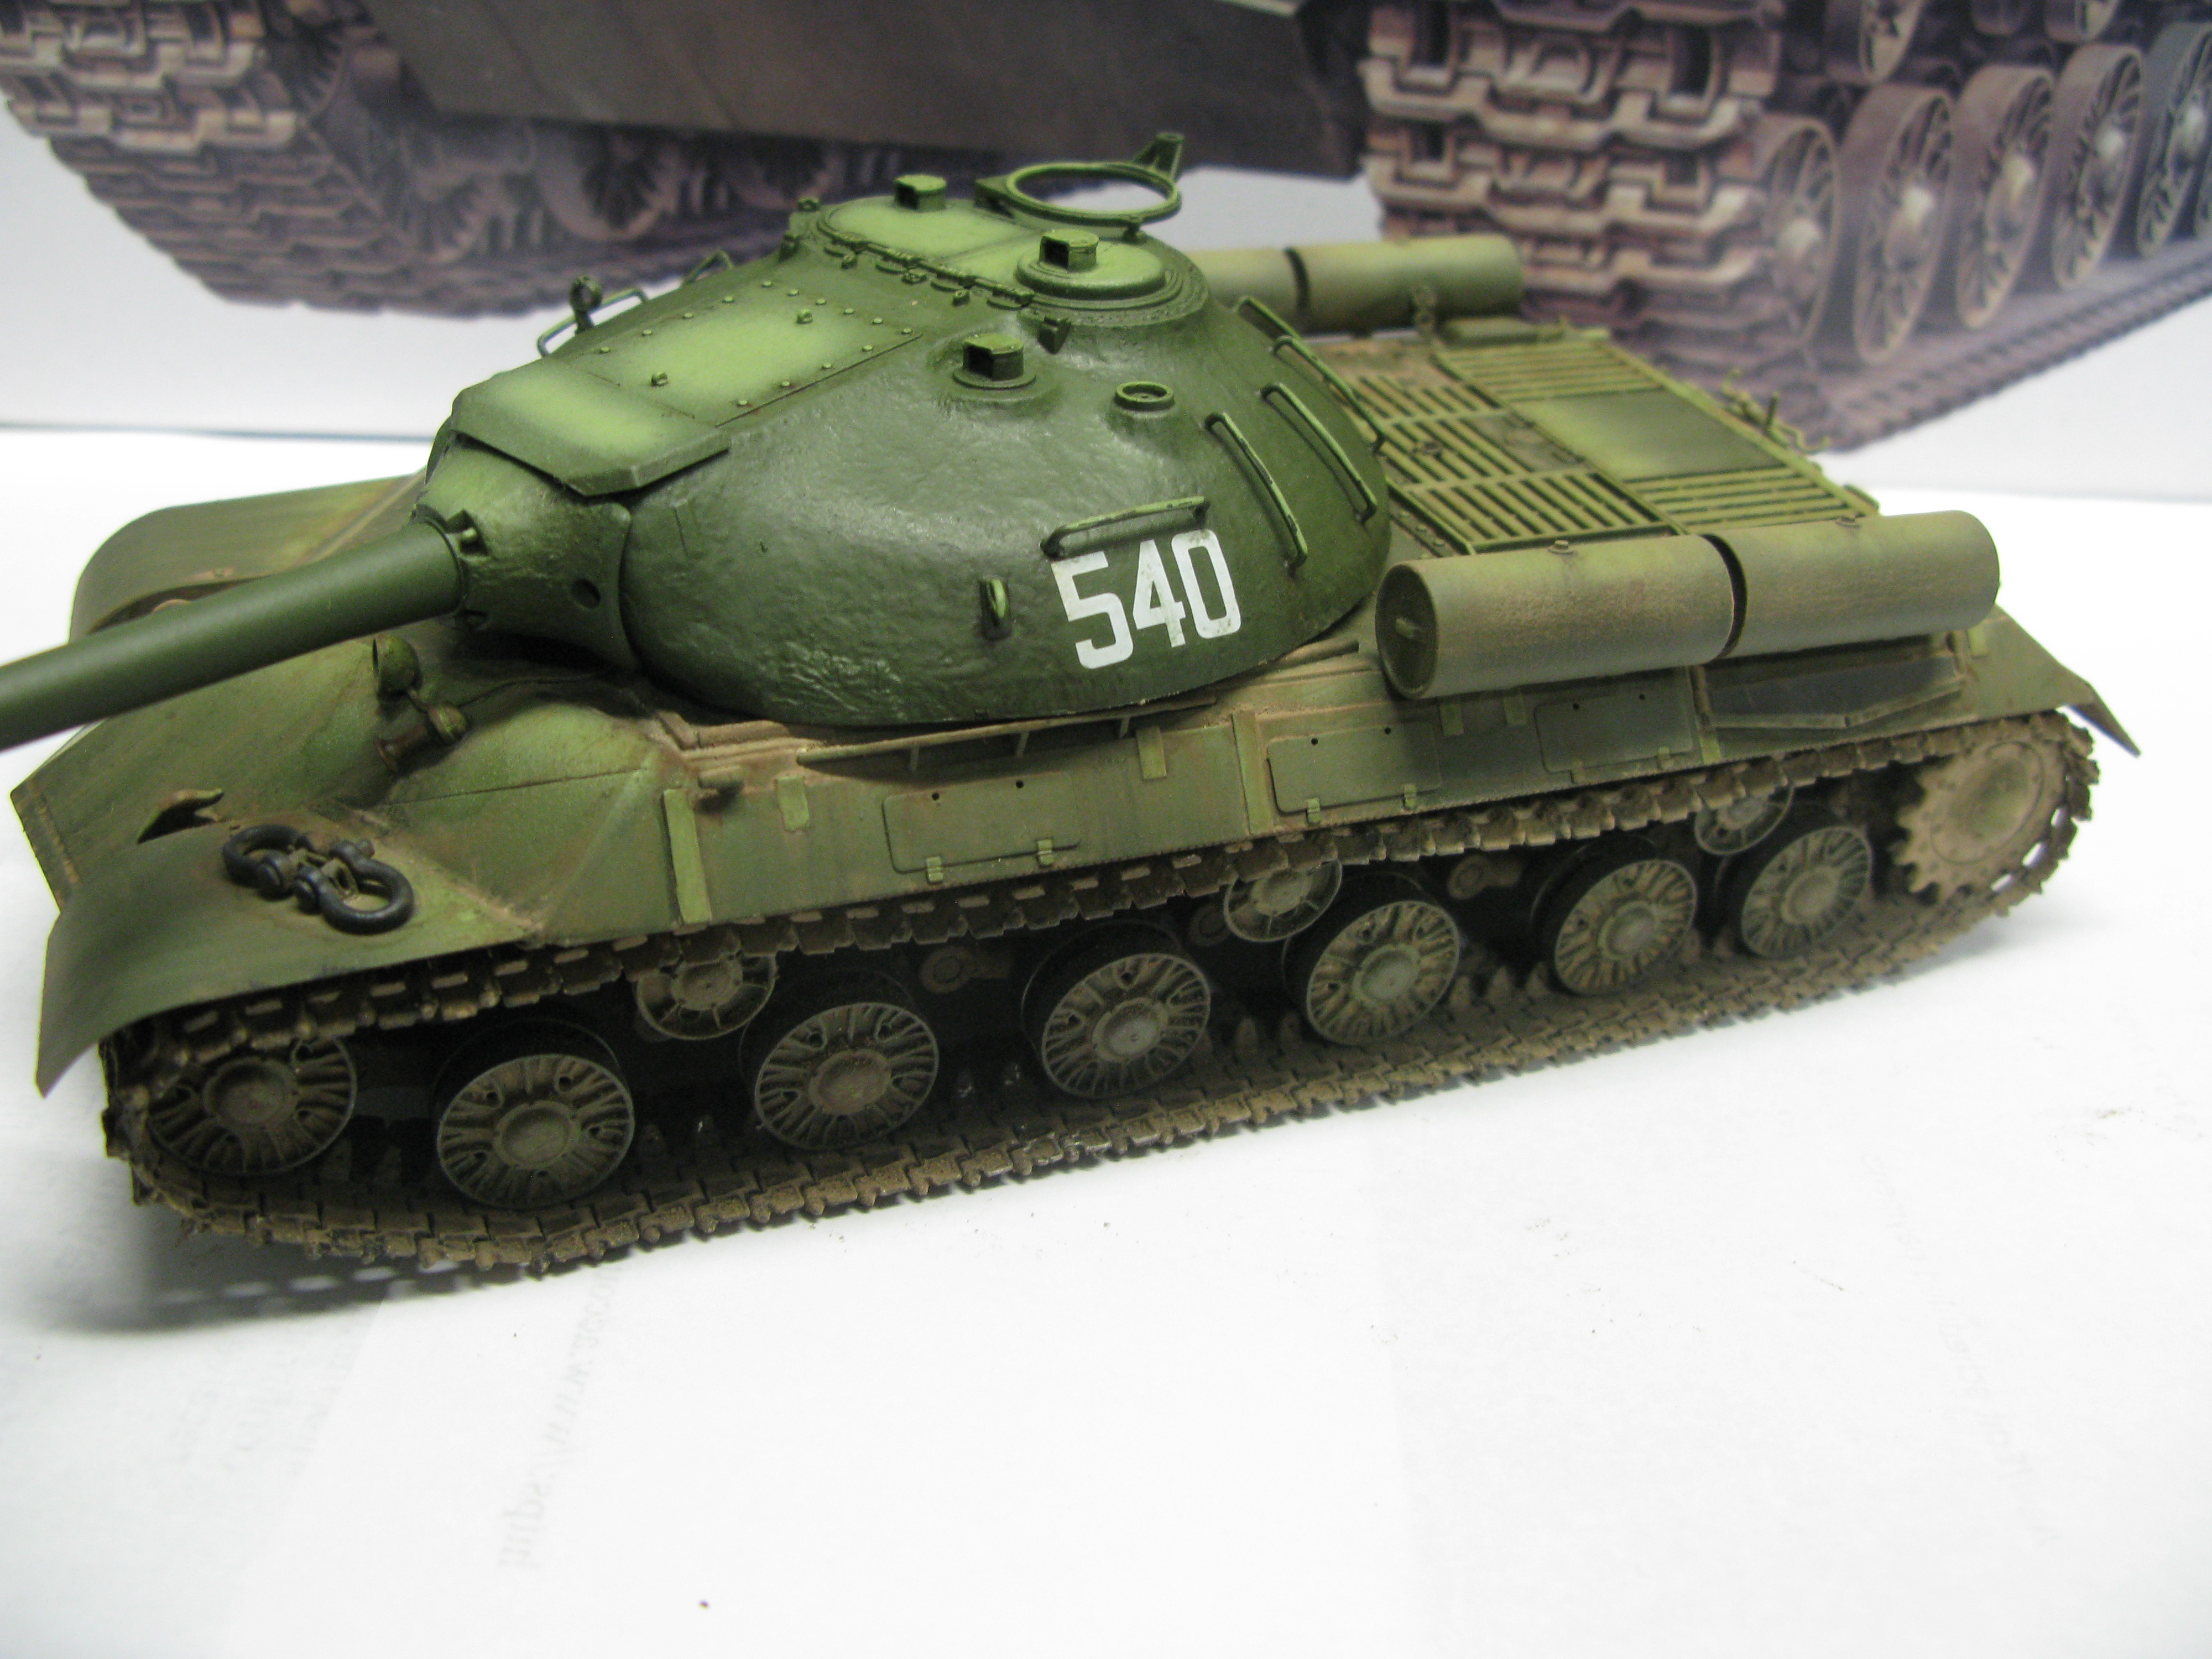
Here are the pics of the finished (but for the DsHk and antenna) build: 

JS-3 Full Front View Starboard #4JS-3 Full Front View Starboard #3JS-3Starboard Side FINISHEDJS-3 Tracks FINISHED

JS-3 Full Front View PortJS-3 Full Port View FINISHEDJS-3 Full Rear View FINISHEDJS-3 Drive Sprocket FINISHEDJS-3 Suspension Port #2 FINISHEDJS-3 Rear Deck #4 FINISHEDJS-3 Rear Deck #3 FINISHEDJS-3 Full Front View Starboard #2 FINISHEDJS-3 Muzzle Brake #2 FINISHEDJS-3 Full Top View FINISHEDJS-3 Rear Deck #2 FINISHED


"Gaiety is the most outstanding feature of the Soviet Union." - Josef Stalin 

  • Member since
    August 2009
  • From: MOAB, UTAH
Posted by JOE RIX on Sunday, December 20, 2015 9:43 AM

Bish
Joe, i really enjoyed it. A few surprises in there. Not a match for the priginals, but then nothing would be. But cerainly worth waiting for.

Aww, very excellent, especially coming from you. I'm all set to attend this afternoon for the matinee.

"Not only do I not know what's going on, I wouldn't know what to do about it if I did". George Carlin

  • Member since
    December 2002
  • From: Bury St Edmunds, Suffolk, England
Posted by Bish on Sunday, December 20, 2015 1:57 AM

Good to see the ship coming on Josiah, looks good.

Joe, i really enjoyed it. A few surprises in there. Not a match for the priginals, but then nothing would be. But cerainly worth waiting for.

I am a Norfolk man and i glory in being so


On the bench: Airfix 1/72nd Harrier GR.3/Fujimi 1/72nd Ju 87D-3

  • Member since
    August 2009
  • From: MOAB, UTAH
Posted by JOE RIX on Saturday, December 19, 2015 10:48 PM

So, Bish, How was it? You know, that new Star Wars movie.

"Not only do I not know what's going on, I wouldn't know what to do about it if I did". George Carlin

  • Member since
    August 2009
  • From: MOAB, UTAH
Posted by JOE RIX on Saturday, December 19, 2015 10:47 PM

It is very good indeed to see you back at it. Your ship is looking sweet.

"Not only do I not know what's going on, I wouldn't know what to do about it if I did". George Carlin

  • Member since
    October 2004
  • From: Northern Virginia
Posted by ygmodeler4 on Saturday, December 19, 2015 8:54 PM
I will also be putting this on a small simple base with my first attempt at water. I am going to try a method I recently read about in a magazine, but more on that later.

-Josiah

  • Member since
    October 2004
  • From: Northern Virginia
Posted by ygmodeler4 on Saturday, December 19, 2015 8:52 PM

Hey guys, my last progress update was on page 15...yikes...turns out that even if something is supposed to be a quick little build, it won't be quick if you don't spend any time at the bench for 6 months. Who'da thunk it eh?

Well here's how it stood up til tonight (1st pic) and then how it is now (2nd pic) after I painted the horizontal surfaces in the color for measure 22 as noted by several of you upstanding gentleman (and maybe women?) way back when on page 15/16.


I will see how she looks dry, this is enamel paints so it is weird having to wait so long for the paint to dry, however, HobbyTown did not have the correct colors in acrylics. In person it looks like I might have to do a third coat but I kind of like the faded look...not sure how to weather ships as this is my first.

-Josiah

  • Member since
    January 2014
  • From: Toronto
Posted by Rob S. on Saturday, December 19, 2015 6:57 PM

ygmodeler4
Another beautiful build Rob
 

Thanks Josiah!!

______________________________________________________________________________


On the Bench: Nothing on the go ATM

  • Member since
    December 2002
  • From: Bury St Edmunds, Suffolk, England
Posted by Bish on Saturday, December 19, 2015 1:45 AM

Some nice progress on the Kubel Eric.

I am a Norfolk man and i glory in being so


On the bench: Airfix 1/72nd Harrier GR.3/Fujimi 1/72nd Ju 87D-3

  • Member since
    December 2002
  • From: Bury St Edmunds, Suffolk, England
Posted by Bish on Saturday, December 19, 2015 1:44 AM

Rob, really nice job there, love the finish and there some great detail there. Thanks for sharing that with us.

I am a Norfolk man and i glory in being so


On the bench: Airfix 1/72nd Harrier GR.3/Fujimi 1/72nd Ju 87D-3

  • Member since
    August 2009
  • From: MOAB, UTAH
Posted by JOE RIX on Saturday, December 19, 2015 12:06 AM

Found that I had some extra undesired work. Like I mentioned earlier, I had set the P-47 aside over 2 yrs ago. At that time I had masked and painted the canopy and left it as is. The other day I decided I might as well finish it up and be done with it. I hit it with a shot of Alclad Light Sheen clear coat and then removed the masks. Much to my dismay I found that some of the blue paint had seeped under the mask in places some 2 yrs ago. Here's a shot of what it looked like after I had taken a blade and lightly scraped some of the errant paint off:

So, with some careful sanding with some polishing pads followed by some very careful rubbing with Novus polishing compound, I managed to get it dressed up quite nicely:

With that little mishap remedied I will be moving on to the primer coat right directly.

"Not only do I not know what's going on, I wouldn't know what to do about it if I did". George Carlin

  • Member since
    July 2004
  • From: Sonora Desert
Posted by stikpusher on Friday, December 18, 2015 11:56 PM

jgeratic


stikpusher

OK guys, the front page photos are updated. Jack, are you still doing the Sherman III ? Did I miss it?


Hi Stik,  unfortunately no, the Sherman has been shelved till maybe next year.


regards,

Jack


I know that feeling all too well lately... well at least I know next year we will be seeing another nice build of yours' that just happens to be a Sherman III.


F is for FIRE, That burns down the whole town!

U is for URANIUM... BOMBS!

N is for NO SURVIVORS...

       - Plankton

LSM


  • Member since
    April 2006
  • From: ON, Canada
Posted by jgeratic on Friday, December 18, 2015 11:51 PM

stikpusher

OK guys, the front page photos are updated. Jack, are you still doing the Sherman III ? Did I miss it?


Hi Stik,  unfortunately no, the Sherman has been shelved till maybe next year.


regards,

Jack

  • Member since
    July 2004
  • From: Sonora Desert
Posted by stikpusher on Friday, December 18, 2015 9:58 PM

OK guys, the front page photos are updated. Jack, are you still doing the Sherman III ? Did I miss it?


F is for FIRE, That burns down the whole town!

U is for URANIUM... BOMBS!

N is for NO SURVIVORS...

       - Plankton

LSM


  • Member since
    July 2004
  • From: Sonora Desert
Posted by stikpusher on Friday, December 18, 2015 9:45 PM

Rob S.

Here's some neutral background poses Wink


Toast beautiful!


F is for FIRE, That burns down the whole town!

U is for URANIUM... BOMBS!

N is for NO SURVIVORS...

       - Plankton

LSM


  • Member since
    October 2004
  • From: Northern Virginia
Posted by ygmodeler4 on Friday, December 18, 2015 9:41 PM
Another beautiful build Rob

-Josiah

  • Member since
    August 2009
  • From: MOAB, UTAH
Posted by JOE RIX on Friday, December 18, 2015 7:44 PM

Ooooh! Rob, Now thatsa very nice.

"Not only do I not know what's going on, I wouldn't know what to do about it if I did". George Carlin

  • Member since
    April 2006
  • From: ON, Canada
Posted by jgeratic on Friday, December 18, 2015 4:11 PM

Rob, sweet photos this second time around. Yes

With background clutter removed, it really allows the camera to smarter focus, resulting in much sharper images.

regards,

Jack


  • Member since
    January 2014
  • From: Toronto
Posted by Rob S. on Friday, December 18, 2015 3:58 PM

Here's some neutral background poses Wink

______________________________________________________________________________


On the Bench: Nothing on the go ATM

  • Member since
    August 2009
  • From: MOAB, UTAH
Posted by JOE RIX on Friday, December 18, 2015 6:29 AM

jgeratic

There is another branding of EZ type line for rigging by Uschi, and their smallest of three sizes available is 0.01mm, maybe still overscale for 1/700?

There is some photo examples of ship rigging on their webshop page:

http://www.uschivdr.com/products-in-detail/rigging/

regards,

Jack


I was actually just going to mention this Jack. I've already bought some of this with the thought of using it for 1/72 aerial wire but, I figured it would also suffice for 1/700 rigging. I will at least test it prior to rigging my ship. Thanks.

Eric: Your Kubelwagen is looking excellent. Funny, my mom has a VW Thing that my father fully restored. It is a great car. We don't drive it much save for taking it out for the annual car show here in Moab.

"Not only do I not know what's going on, I wouldn't know what to do about it if I did". George Carlin

JOIN OUR COMMUNITY!

Our community is FREE to join. To participate you must either login or register for an account.

SEARCH FORUMS
FREE NEWSLETTER
By signing up you may also receive reader surveys and occasional special offers. We do not sell, rent or trade our email lists. View our Privacy Policy.