SEARCH FINESCALE.COM

Enter keywords or a search phrase below:

Battle of Britain 75th Anniversary GB

21470 views
279 replies
1 rating 2 rating 3 rating 4 rating 5 rating
  • Member since
    September 2014
Posted by rooster513 on Monday, August 10, 2015 8:00 AM

Brandon the Hurricane is looking great! I'm looking forward to seeing how the painted flag comes out if you go that route!

-Andy

  • Member since
    June 2008
Posted by lewbud on Sunday, August 9, 2015 11:47 PM

Brandon, your Hurri is looking great! 

Aleksandr, if you can give a direct link to your build on the Polish website and it shows that you started the build after July 10 (which was the start date for this build), then I'll allow it.  If you started it before, then its a no go.  This build doesn't end until the middle of December, so depending on how quickly you build, you can still jump in with something.

Now for my dilemma, I have in my stash a new tool Airfix Spit, Hurricane, Defiant, 109 E-4, and bf-110C. I have no idea of which one to build.  I'm building the 109 for the 109 GB, so that one's out.  I picked up the new Bolton Paul Defiant today, and like the rest of Airfix's new 1:72 tools it is gorgeous.  Definitely going to need a mask set for this one.  Still need to get the Do-217Z.  Keep up the great work!

Buddy- Those who say there are no stupid questions have never worked in customer service.

  • Member since
    November 2007
  • From: Wisconsin Rapids, WI
Posted by moose421 on Saturday, August 8, 2015 6:06 AM

Brandon, I love the way the colors are looking.   She is looking good.


Hope to start on my E-4 soon.


Kim

  • Member since
    January 2003
  • From: Poland
Posted by Aleksander on Saturday, August 8, 2015 6:03 AM

May I join the Group? I'm just doing Italian Fiat G.50 (Magg. Bonzano's a/c) from Corpo Aereo Italiano in a Group Build on www.pwm.org.pl - can I show this project also here?

Here she is:

When is the deadline of the Project?

  • Member since
    January 2015
Posted by BrandonD on Saturday, August 8, 2015 3:25 AM

Lew, that looks like a lot of surgery, but I like where you're headed.

I got paint on my Hurricane, finishing the dark earth today. I will mask and re-shoot the rudder, since I freehanded it and it looks off compared to the rest. That'll be quick.

Still considering whether to decal or paint the tail red, white and blue. A this point, I am thinking it'll be easier to paint. I HATE tail/rudder decals since I can never get them to lay down correctly. But I'm not crazy about masking, even if I go the lazy route and just put a bag around 90 percent of the plane.

Here it is as it sits:

Next up is clear coats.

-BD-

  • Member since
    January 2015
Posted by BrandonD on Wednesday, August 5, 2015 1:57 AM

THanks, checkmateking.

As for the colors, yeah I picked up on UK modeling sites that the wheel wells were aluminum until sometime in 1940, when they started painting them the color of the underside to simplify things.

For what it's worth, Airfix calls for them to be aluminum.

-BD-

  • Member since
    September 2003
  • From: AandF in the Badger State
Posted by checkmateking02 on Tuesday, August 4, 2015 2:56 PM

Andy, from things I've picked up at UK modeling sites, the wheel wells might very well have been painted in the same colo(u)r as the undersurfaces.

Before Sky, and in some cases where the fuselage was aluminium colo(u)red, the wells would have been silver-ish, too.

You can check this site, and download the Camouflage and Markings book for the Hurricane:

ebookee.org/Camouflage-amp-Markings-Number-3-Hawker-Hurricane-RAF-Northern-Europe-1936-45_343034.html

It's pretty helpful.


  • Member since
    September 2003
  • From: AandF in the Badger State
Posted by checkmateking02 on Tuesday, August 4, 2015 2:45 PM

Nice work, Brandon and ajd.  You are bringing things along very well!


  • Member since
    October 2013
Posted by ajd3530 on Tuesday, August 4, 2015 9:39 AM

I was under the impression that Hurricanes usually had aluminum wheel bays on the earlier models, but I am by no means an RAF expert.

  • Member since
    September 2014
Posted by rooster513 on Tuesday, August 4, 2015 6:42 AM

Nice work ajd & BrandonD! Ajd, looks like you're making the best of the kit. I've been eyeing those snap together kits at WalMart with the idea of doing one with my nephew. Like you said it makes for good practice w/o spending a ton. BrandonD, I love the paint job so farYes

I've go a question regarding paint colors. The Airfix instructions call for the cockpit interior and the wheel bay color as aluminum. I have reference photos of the cockpit in the interior green and will be doing the cockpit that color. But as far as the wheel bay color I'm not sure what the right color would be? Would it be interior green, aluminum, or the same sky color that the underside gets painted? Thanks and everyone keep up the great work!

-Andy

  • Member since
    January 2015
Posted by BrandonD on Tuesday, August 4, 2015 1:45 AM

ajd - I don't know how close you are to a Hobby Lobby, but I'm lucky to be about 2 miles from one, and I am not above using their 40-percent-off coupon to buy one can of primer or bottle of paint :)

That said, I really do like the Aclad clear coat for the gloss, and the Tamiya dull coat for my finish. I hear Tamiya is also coming out with a semi-matte, which will be really nice for the Luftwaffe birds, and possibly the RAF ones?

-BD-

  • Member since
    October 2013
Posted by ajd3530 on Tuesday, August 4, 2015 1:39 AM
Brandon, I actually had planned on getting one of their Hurricanes soon, from the research i have done, it looksquite nice, better than the old tool Airfix and the Monogram kit, and a third of the price of the Hasegawa kit. And i have seen the Fw 190 worked up very well too

I feel you on the whole air brushing clear coat deal. That is going to be one of my next big technique learning steps. The last two Walmarts in the area to carry any kind of modeling stuffs just recently quite selling the Testors rattle can clear lacquers altogether. And with the almost $6-7 a can you have to pay at HobbyTown or Honby Lobby, that method just isn't economical anymore.
  • Member since
    October 2013
Posted by ajd3530 on Tuesday, August 4, 2015 1:06 AM
The cockpit put together. I suppose it is adequate for a closed canopy build. I hate to say, but the stick and seat suck. But, for $12.99, and to be an E-Z snap, I can look past that. (a recurring theme for this kit.) I added some belts to try to cover up the seat.


The canopy, like the rest of the kit, has large locking pins to attatch the parts. But the canopy fits extremely well, so I am removing the rear pin. With that in mind, I patched up the large hole that it would normally go in.


With the several locking lugs, plus some Tamiya extra thin cement, the fusalage halves are NEVER going to come apart again.

  • Member since
    January 2015
Posted by BrandonD on Tuesday, August 4, 2015 1:00 AM

So, speaking of Hurricanes (If you read my previous post, you know why there's a Hurricane-sized hole in my collection), here is an update.

I shot my base coat of black tonight, and I used Model Master flat black enamel thinned with Tamiya Lacquer Thinner 1:1 at 20 psi. It was a really light coat, and I let it dry an hour and half before I hit it with 12,000-grit Micro Mesh cloth.

I really was planning to wait till tomorrow to shoot the first color coat, but I lack discipline and patience, and I figured if I thinned my Tamiya acrylics with the same lacquer thinner, I can probably get away with it without worrying about paint curing issues. I shot it with Tamiya Sky/Lacquer Thinner 1:2 around 17 psi.

Well, it looks awful at the moment, but I'll come back (hopefully) tomorrow and hit the insides of the panels with a 50/50 mix of Sky and Flat White, then micro mesh it, then hit it with the blend coat to even out the shades.

Again, since I always forget and have to hunt through old posts when I find others' work and wonder, this is the 2015 tooling of the Airfix 1/48 Hurricane Mk.I.

Cheers,

-BD-

  • Member since
    January 2015
Posted by BrandonD on Tuesday, August 4, 2015 12:53 AM

ajd - Absolutely nothing wrong with building a Pegasus or other snap kit. The single most important thing is that you enjoy the hobby and have fun building. I built one of their Hurricanes before I had airbrushing down, and I didn't want to foul up my Tamiya Bf-109. And you know what? I learned a LOT doing it and had tons of fun. I also learned to shoot my clear coats with an airbrush, because I was way too heavy-handed on the rattle cans.

What did I do with the model? Well, I sailed it right into the trash can after a few months of completion, but it served its purpose, taught me a lot, and I had fun with it. I'm looking forward to seeing yours, and hopefully it comes out great and gets a proud spot on your shelf.

-BD-

  • Member since
    October 2013
Posted by ajd3530 on Monday, August 3, 2015 4:45 PM
Here is my safety build, 1/48 Pegasus Bf-109E-4. I know some of you may turn your nose up at an E-Z snap kit, but they really aren't bad kits. Plus they can be had of the internet, shipped to your front door, for less than $15 USD. Which is pefect, since this will be my first attempt at mottling. So if I screw it up beyond repair, I am not out that much. I have also done the P-51B from Pegasus, and while I feel the Mustang had better fit, this Emil has better engraved detail in my opinion.


The cockpit is kinda sparten, but you don't build one of these kits to super detail. The canopy will remain closed, so I'm ok with it. I brush painted the interior instead of airbrushing to save time.. Never going to do that again.


I cut some Evergreen strip for the coolant radiators so the wouldn't be see through.


  • Member since
    September 2003
  • From: AandF in the Badger State
Posted by checkmateking02 on Saturday, August 1, 2015 10:26 AM

I hear y'all's pain.  

Received an email back from Airfix.  They're asking for 8 GBP (a little less than $13) for postage and packaging to send me new parts.  i also requested a Spitfire wing to replace one incompletely molded when it came out of the box.

The Hurricane kit didn't cost that much--not to mention the cost of an overseas phone call to give them my credit card info, plus the exchange fee charged by the credit card company.

So I'm just going to start a new kit and hope the missing part turns up somewhere on the table or the floor.


  • Member since
    November 2007
  • From: Wisconsin Rapids, WI
Posted by moose421 on Saturday, August 1, 2015 9:15 AM

Hahaha Brandon.  Mine I hear the twink as it launches from my tweezers.  If I am lucky I might hear it hitting somewhere in my shop.  As for finding them, HA no chance.

Kim

  • Member since
    January 2015
Posted by BrandonD on Saturday, August 1, 2015 1:45 AM

Thanks, Checkmateking. As for the "lost" entry - I hate when that happens. I tend to find them with the vacuum cleaner... "click click click...gone for good."

-BD-

  • Member since
    September 2003
  • From: AandF in the Badger State
Posted by checkmateking02 on Monday, July 27, 2015 8:36 PM

Nice work on the cockpit, BD.  Very effective painting.  It looks excellent.

Another entry in the "lost" department.  One of the clear wing lenses from my Airfix 1/72 Hurricane went missing last night.  I ordered a replacement part from Airfix, but it'll take a while to get here.

I think I'll just begin another one, and work on that until the missing part arrives.

I loathe the carpet monster--but this piece disappeared into the kitchen tile!


  • Member since
    April 2006
  • From: ON, Canada
Posted by jgeratic on Monday, July 27, 2015 12:07 PM

Hey guys, great stuff going on in here! Yes

Regarding the 110 question:

ajd3530
For the 109 "safety build" I'll be doing a Pegasus 1/48 Bf 109E-4. This will be my first attempt at mottling, so an inexpensive kit is ideal.

For the 110, I'll be using the 1/48 Cyber Hobby Bf 110E-2 kit and dressing it up as a C-3 or -4. That is unless anyone can point out any noticeable cosmetic differences other than armament.

Only detail I notice different is the E-2 had the back end of the fuselage extended in order to carry a dinghy.  It also had improved engines, but assuming Eduard did their homework, no external changes according to their Royal boxing instructions of the 110 C/D/E:

http://www.eduard.com/store/out/media/r0005.pdf

regards,

Jack

  • Member since
    January 2015
Posted by BrandonD on Monday, July 27, 2015 1:00 AM

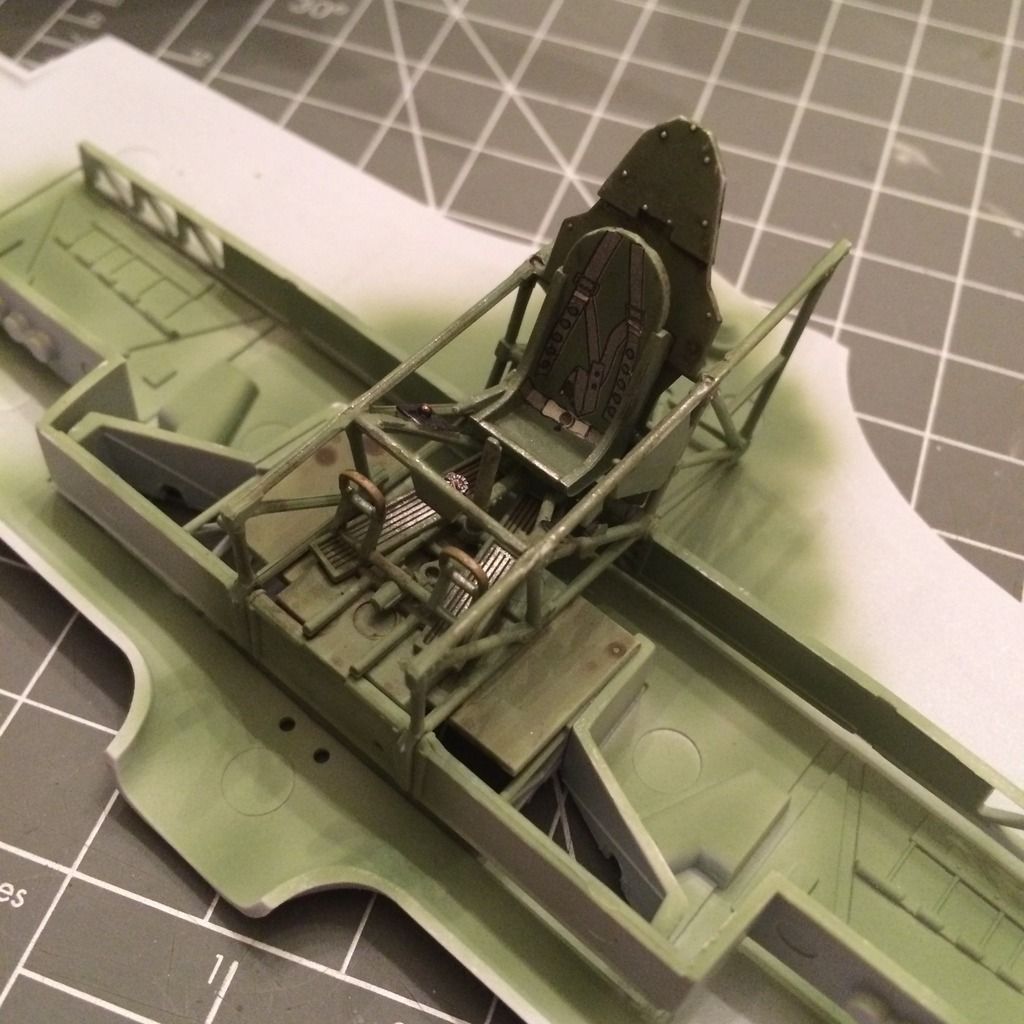
Alright, I had some time with my Hurricane again. I used a leftover Eduard PE compass from my Spitfire VIII kit, the Airfix instrument panel decal, and a decal from a Tamiya Spitfire V kit for the harness. I don't love the harness decal, but I suppose it's better than nothing. I probably should have used tape, but I may close up the cockpit, in which case it will not matter.

I got the majority of the large parts together. The wing tops went down over the spars and the lower wings really well, and the cockpit sat nicely. I then glued the fuselage halves together and glued them on top of the cockpit/wings. **Those building this kit, here's a tip** - The fuselage halves do not cover the bottom (it is a separate piece for the underside of the nose, and a separate piece for the underside from the rear of the wings to the tailwheel. When I added those parts, there was a 0.5 mm step from them to the bottom of the wings (when sitting upright, the wings hang slightly lower than the fuselage). To fix this, I would probably sand down the wing roots slightly, or consider inserting a small strip of styrene to space the lower fuselage parts. In my case, some filler feathered into the front and rear of the wing will have to suffice.

I hope that makes sense, since it reads confusingly to me even now, but hopefully if you're looking at the parts it will make sense.

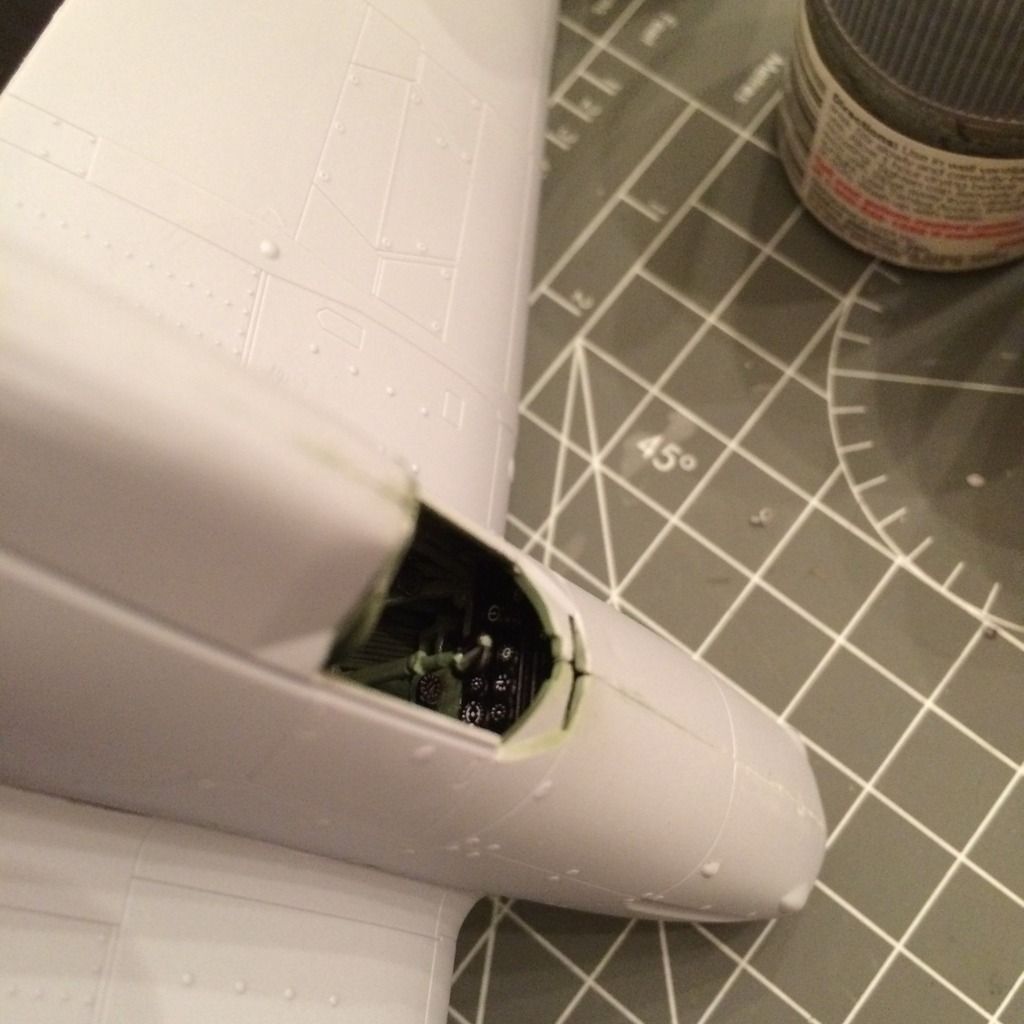
So here it is now - looking like a plane.

And here's a closeup of the instrument panel. It's a decal, and it went down well with some Micro Sol.

Next up is some filling of seams and then getting the elevators, rudder and a few other assorted parts mounted. Then paint!

-BD-

  • Member since
    January 2015
Posted by BrandonD on Monday, July 27, 2015 12:46 AM

Thank you, Stikpusher and Rooster. It's not as polished as some kits, but its fun to put together, and I like the engineering of it so far.

Craig - nice Spitfire! Looks like 1/72? I don't know how you can make those look so nice in such a small scale.

Steve - You, too, have a great-looking Spitfire. I think the scratchbuilt cockpit floor is great and more than does the job. Plus now you have the fun of knowing it's all your work and took more than gluing a few bits together from a kit.

-BD-

  • Member since
    November 2007
  • From: Wisconsin Rapids, WI
Posted by moose421 on Sunday, July 26, 2015 11:10 PM

Hahaha, it always works that way.  I found an oxygen regulator for my Bf 110 just recently.

moose

  • Member since
    September 2013
Posted by Raven728 on Sunday, July 26, 2015 6:56 PM

Thanks, Moose. Naturally, I found the missing pit today. Lol! If I couldn't laugh I'd lose it.

- Steve

  • Member since
    October 2013
Posted by ajd3530 on Saturday, July 25, 2015 11:17 PM
For the 109 "safety build" I'll be doing a Pegasus 1/48 Bf 109E-4. This will be my first attempt at mottling, so an inexpensive kit is ideal.

For the 110, I'll be using the 1/48 Cyber Hobby Bf 110E-2 kit and dressing it up as a C-3 or -4. That is unless anyone can point out any noticeable cosmetic differences other than armament.
  • Member since
    November 2007
  • From: Wisconsin Rapids, WI
Posted by moose421 on Saturday, July 25, 2015 8:44 PM

Nice save Raven, on the scratch building missing parts.  I feel you pain I have had it happen to much. Just not a large piece like the whole pit.

Looking good.

moose

  • Member since
    September 2013
Posted by Raven728 on Saturday, July 25, 2015 8:31 PM

Yeah, looking great Craig. I use MM Acryl "RAF Interior Green". Looks close enough to my eye when I compare to pics online.

Well, the missing cockpit never did turn up, despite my turning the entire house upside-down looking for it. I couldn't find any resin pits that seemed worth buying (most of them are just a seat), so I bought a Revell mk.ii kit to scavenge for parts. It turned out that the Revell kit doesn't have a floor, so I used the seat and cobbled everything together using styrene strip for a floor. Since it's barely visible anyway I'm not too worried about it. Anyway, here are some update pics after installing the pit and adding the wings. One of, if not the best wing/fuselage fits I've ever seen.

- Steve

  • Member since
    June 2008
Posted by lewbud on Saturday, July 25, 2015 4:29 PM

Ajd, just let me know and I'll make the necessary change.

Craig, I hope my Spit comes out as nice as yours.

Buddy- Those who say there are no stupid questions have never worked in customer service.

JOIN OUR COMMUNITY!

Our community is FREE to join. To participate you must either login or register for an account.

SEARCH FORUMS
FREE NEWSLETTER
By signing up you may also receive reader surveys and occasional special offers. We do not sell, rent or trade our email lists. View our Privacy Policy.