SEARCH FINESCALE.COM

Enter keywords or a search phrase below:

1946 What If GB

55230 views
1775 replies
1 rating 2 rating 3 rating 4 rating 5 rating
  • Member since
    April 2014
  • From: Australia
Posted by lostagain on Tuesday, February 21, 2017 5:47 AM

Good to see the paint on Joe.

I have used acrylic paint for ages now, mainly because of the odour issues. Every now and then something just doesn't work out for some reason, and I can't quite place it. (Probably just me)

Started to use Mr Leveling lacquer thinner with acrylic gloss paint - that gives a great result but you have to leave it a long time to dry...

  • Member since
    February 2006
  • From: Cincinnati Ohio
Posted by DantheMan85 on Tuesday, February 21, 2017 8:27 AM


I to like using Model Master Enamels, along with Tamiya acrylics. Awhile back I was not using Enamels because of the strong smell from the Testors thinner, then I cam across Odorless Mineral Spirits. I did a side by side test with the Testors thinner and the Mineral Spirits, there the same in color, and drying time, for both brush painting and airbrushing. My local Meijer sells the full quart (946ml) for just under $5.00 USD. Cool

 1 by Daniel Smith, on Flickr


On my Work Bench: Tamiya Ford GT 1/24

Up Coming: ?


  • Member since
    April 2014
  • From: Australia
Posted by lostagain on Wednesday, February 22, 2017 2:12 AM

Well here is my work with acrylics. The props got a mix of semi gloss and NATO blacks to give a slightly different colour to the gloss black spinners.

All looked really good until I dropped them - a small blemish on the spinner will have to be resprayed, probably not until next week.

Next, start glueing the fuselage together! Start with the back end, aligning everything as well as possible.

Then the top of the nose the next day - already filler on the rear top!

Then the bottom of the nose. You can see the solution for the formation lights, three pieces of styrene tube glued into the centreline.

So now starts the fill/sand/check/fill/sand/check/swear/fill/sand process

But as a teaser for now...

It's teasing me too

  • Member since
    November 2003
  • From: Naples, FL
Posted by tempestjohnny on Wednesday, February 22, 2017 5:37 AM
LA that is going to look great. Like the look of the contra props


  • Member since
    December 2002
  • From: Bury St Edmunds, Suffolk, England
Posted by Bish on Wednesday, February 22, 2017 6:02 AM

That is looking nice LA. Good luck with the next stage.

I am a Norfolk man and i glory in being so


On the bench: Airfix 1/72nd Harrier GR.3/Fujimi 1/72nd Ju 87D-3

  • Member since
    November 2009
  • From: SW Virginia
Posted by Gamera on Wednesday, February 22, 2017 7:22 AM

She does look great together LA. And I have to agree with TJ, love those crazy eggbeater contra-rotating props. 

"I dream in fire but work in clay." -Arthur Machen


  • Member since
    August 2009
  • From: MOAB, UTAH
Posted by JOE RIX on Wednesday, February 22, 2017 9:24 AM

Lost: Congrats on finally getting the fuselage together. It also looks great with the awesome props that you put so much work into. It's all very fine and impressive workmanship.

Dan: I've done the same thing myself and I felt that I just got better results with the MM thinner. Now, with that said, that was a few years ago and I may give the mineral spirits another test. I would love to get wonderful results from it in that we stock that very brand in my hardware store where I work plus I get 15% off. Lord knows, it's a great advantage for other modeling supplies. 

"Not only do I not know what's going on, I wouldn't know what to do about it if I did". George Carlin

  • Member since
    January 2015
Posted by Moff on Wednesday, February 22, 2017 2:46 PM

Trabi

Well it was attempt to create fighter what was cheap and easy to manufacture from materials what were easy to get. That´s why it was mostly made from plywood. Lots of problems occured and only 9 (some sources says 30) finished just at the end of the war.

https://en.wikipedia.org/wiki/Focke-Wulf_Ta_154


JOE RIX

Moff: Well, what I recall in my reading of the Ta-154 was that it was Germny's attempt to copy the RAF Mosquito. Hence the Luftwaffe name, Moskito. At least I think. The aircraft was built out of plywood and production was severly hampered by the fact that the RAF bombed the factory that manufactured the glue for the plywood and the German's were unable to recreate it in a timely manner. Someone here might be able to add better clarification.


Ah, I see. I didn't catch the "Moskito" designation before, but it makes sense now. 

"Gaiety is the most outstanding feature of the Soviet Union." - Josef Stalin 

  • Member since
    September 2003
  • From: Northern hemisphere - most of the time-
Posted by blkhwkmatt on Friday, February 24, 2017 2:58 AM

OK as promised, here is photographic evidence that I completed the Tamiya 1/48 Me-262.  The paint scheme is based off of a fighter bomber unit in northern Germany from the fall of 1944.  I took that scheme and removed the reichs defence bands and the unit insignia to bring it to 1946.  I used the later version of the nose wheel (it has no connecting parts on the strut), and left the cannon bays open.


Thanks for looking, all comments and critiques are welcome!

Thanks again for a blast of a Group Build!

<Matt

Quidquid latine dictum sit, altum videtur!!! - Anything said in Latin sounds profound!


  • Member since
    November 2009
  • From: SW Virginia
Posted by Gamera on Friday, February 24, 2017 7:35 AM

She turned out great Matt! Love the NM panels. Yes

"I dream in fire but work in clay." -Arthur Machen


  • Member since
    August 2009
  • From: MOAB, UTAH
Posted by JOE RIX on Friday, February 24, 2017 8:54 AM

Absolutely superb work Matt. You nailed your 262 on every level. The detailing, painting, weathering and overall workmanship is done with remarkable skill and excellence. Thank You for sharing your time and skills with us. It is awesome!

Joe 

"Not only do I not know what's going on, I wouldn't know what to do about it if I did". George Carlin

  • Member since
    April 2006
  • From: ON, Canada
Posted by jgeratic on Friday, February 24, 2017 9:26 AM

Hi Matt, now that is a real fine example of the 262.  Yes

I like the scheme, and the weathering suits the idea of a machine that has seen it's fair share of sorties - excellent!

regards,

Jack

  • Member since
    January 2015
Posted by Moff on Friday, February 24, 2017 9:46 AM

Beautiful, I love the 262! One of the first kits I ever built was the 1:48 Revell 262. 

Needless to say, your finished kit looks a lot better than mine did Smile 

Great paint scheme choice. 

"Gaiety is the most outstanding feature of the Soviet Union." - Josef Stalin 

  • Member since
    December 2002
  • From: Bury St Edmunds, Suffolk, England
Posted by Bish on Saturday, February 25, 2017 9:46 AM

Great job there Matt. I really like the finish and the NMF looks great.

Got you on the front page, thanks for taking part.

I am a Norfolk man and i glory in being so


On the bench: Airfix 1/72nd Harrier GR.3/Fujimi 1/72nd Ju 87D-3

  • Member since
    April 2014
  • From: Australia
Posted by lostagain on Sunday, February 26, 2017 6:17 AM

Matt, great work on the 262. Again your finish is great and there is the 'feel' of a tired late war warrior. An iconic subject beautifully treated.

Slowly the MB 5 marches on. This weekend was the main gear. I cut out oleo scissors for the struts. I used some shim brass, marked it out with a scribe, and then used the cutters on the right to get the shape and then file it to shape. A hole was drilled in - should be a slot but the brass was too delicate.

superglued together

and then some hinge ends were superglued on, Tamiya primer then Tamiya spray silver as a base coat. Also did the resin Barracudacast wheels and the retraction arms created earlier.

More painting to go and a few more details before they are done.

Bish, you asked about casting resins, the best results I have had was with a polyurethane resin Solid Cast 660. Think it may also known as Polytek Easyflow 60. What I look for is a low viscosity on mixing (say 60 cps) a couple of minutes of work time and usually demoulding in 30 minutes. The one I used for the props was not fluid enough.

  • Member since
    December 2002
  • From: Bury St Edmunds, Suffolk, England
Posted by Bish on Sunday, February 26, 2017 6:21 AM

Really impressive there LA. Did you make the main gear legs yourself as well.

I am a Norfolk man and i glory in being so


On the bench: Airfix 1/72nd Harrier GR.3/Fujimi 1/72nd Ju 87D-3

  • Member since
    April 2014
  • From: Australia
Posted by lostagain on Sunday, February 26, 2017 7:09 AM

Hi Bish,

Yes I made the legs from bent up brass tube lengths blended with a little epoxy putty. Seemed to go together pretty well after a few attempts.


  • Member since
    December 2002
  • From: Bury St Edmunds, Suffolk, England
Posted by Bish on Sunday, February 26, 2017 7:25 AM

Wel they lok real nice, if you had not mentioned you had made the oleo scissors, i would have thought it was a bought AM set.

I am a Norfolk man and i glory in being so


On the bench: Airfix 1/72nd Harrier GR.3/Fujimi 1/72nd Ju 87D-3

  • Member since
    August 2009
  • From: MOAB, UTAH
Posted by JOE RIX on Sunday, February 26, 2017 9:03 AM

Yet again, more incredible workmanship from the Lost man. Sheesh, you never cease to amaze.

"Not only do I not know what's going on, I wouldn't know what to do about it if I did". George Carlin

  • Member since
    April 2014
  • From: Australia
Posted by lostagain on Sunday, March 5, 2017 10:37 PM

Thanks guys you are way too kind. I haven't got to the vacform canopy yet...

The carby intake under the nose had no definition so it was shaped with a slice out of a bomb and contoured with milliput. Looks much better. After a few goes the radiator inlet also looks okay - in the end I used liquid sprue to enable me to get a good solid edge on the intakes.

As you can see, there is some stuffing in the wheel wells. after this I have sealed up the cockpit too and sprayed on a first coat of Tamiya primer to see how much work is left to do - and amazingly, there is not too much.  The seam under the nose is the only area on brief inspection that needs the seam tidied up.

So it is still progressing slowly...

  • Member since
    December 2002
  • From: Bury St Edmunds, Suffolk, England
Posted by Bish on Sunday, March 5, 2017 10:42 PM

Looks like its progressing nicley to me LA. Should almost be ready for some paint.

I am a Norfolk man and i glory in being so


On the bench: Airfix 1/72nd Harrier GR.3/Fujimi 1/72nd Ju 87D-3

  • Member since
    November 2009
  • From: SW Virginia
Posted by Gamera on Monday, March 6, 2017 7:15 AM

Very cool LA, nice to see her all tidied up for paint. 

"I dream in fire but work in clay." -Arthur Machen


  • Member since
    August 2009
  • From: MOAB, UTAH
Posted by JOE RIX on Monday, March 6, 2017 9:00 PM

It is indeed wonderful to see you moving on to the paint stage. Good show.

"Not only do I not know what's going on, I wouldn't know what to do about it if I did". George Carlin

  • Member since
    January 2015
Posted by Moff on Tuesday, March 7, 2017 1:19 PM

Coming along nicely Lostagain! 

"Gaiety is the most outstanding feature of the Soviet Union." - Josef Stalin 

  • Member since
    April 2014
  • From: Australia
Posted by lostagain on Tuesday, March 21, 2017 12:45 AM

Thanks for the support guys.

All I can say at the moment is ARRRRRRRGGGGGHHHHHHH YELLOW

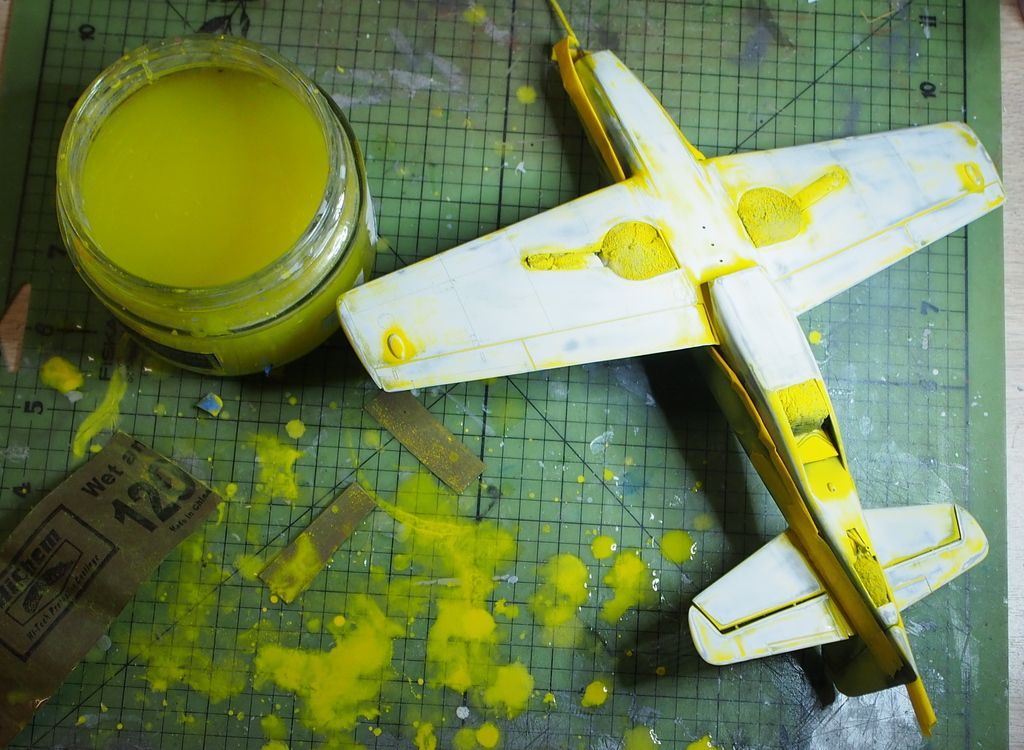
Stupidly tried to do preshading before yellow:

It looks okay in the photo, but was really cruddy in reality. No amount of extra yellow was going to cover it up so start again:

Sanded off the yellow, washed it off, rescribed panel lines and tried again, looked better:

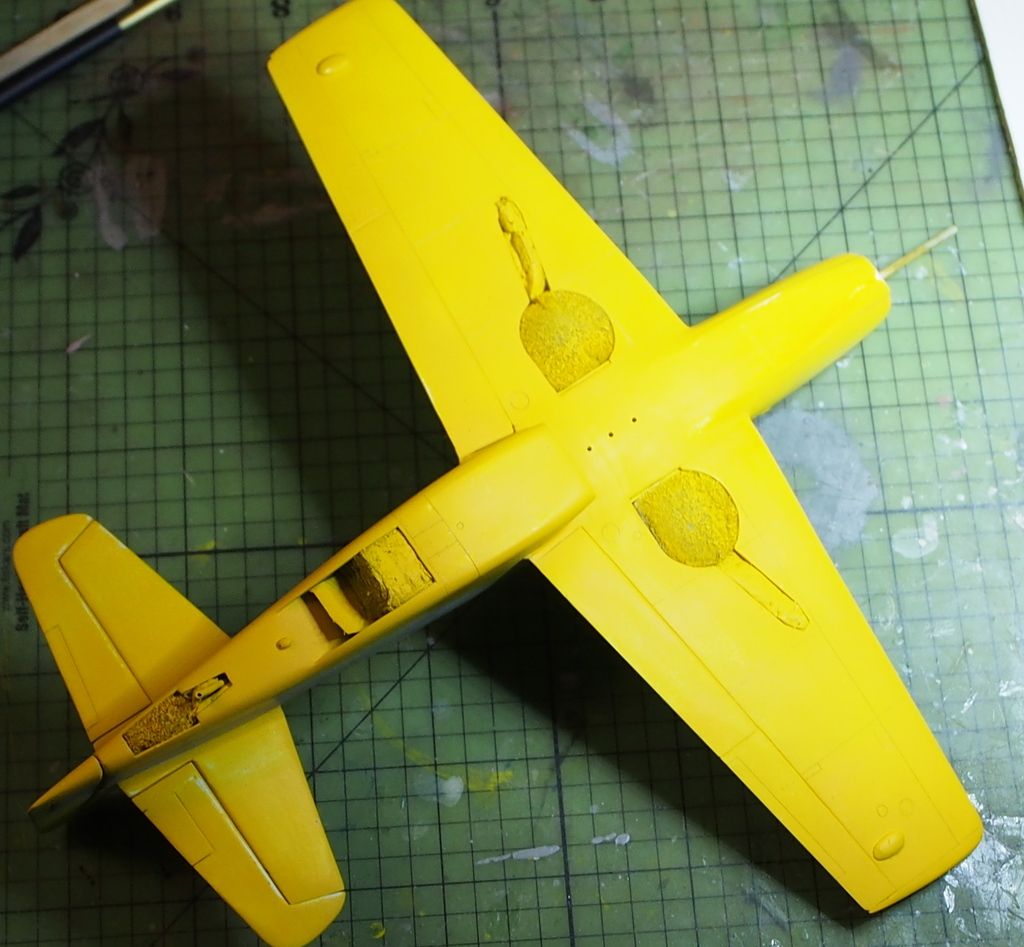
BUT the day was too hot, too humid, and the paint has dried before reaching the model, so it is very rough. So sand it smooth, just enough to lose the texture, before the third shot at a uniform yellow colour. One of my problems is poor lighting in the shed, so I don't get enough perception of the evenness of the colour density.

So, try again in a couple of days, wish me luck...

  • Member since
    December 2002
  • From: Bury St Edmunds, Suffolk, England
Posted by Bish on Tuesday, March 21, 2017 12:50 AM

I am sure we have all been there with yellow paint LA. But its coming on well.

I am a Norfolk man and i glory in being so


On the bench: Airfix 1/72nd Harrier GR.3/Fujimi 1/72nd Ju 87D-3

  • Member since
    November 2009
  • From: SW Virginia
Posted by Gamera on Tuesday, March 21, 2017 8:03 AM

She looks good in the photos LA, sucks that she ended up that rough. Good luck with sanding it out. 

The few times I tried to pre-shade yellow I went with orange. I'm mostly happy with how it came out. 

"I dream in fire but work in clay." -Arthur Machen


  • Member since
    December 2002
  • From: Bury St Edmunds, Suffolk, England
Posted by Bish on Tuesday, March 21, 2017 8:08 AM

Gamera

She looks good in the photos LA, sucks that she ended up that rough. Good luck with sanding it out. 

The few times I tried to pre-shade yellow I went with orange. I'm mostly happy with how it came out. 


Now thats a good tip, not thought of that. I don't usually pre shade but i find getting the look of yellowright on a weatherted finish a bit tricky. Going to have to try that one.

I am a Norfolk man and i glory in being so


On the bench: Airfix 1/72nd Harrier GR.3/Fujimi 1/72nd Ju 87D-3

  • Member since
    January 2015
Posted by Moff on Tuesday, March 21, 2017 8:46 AM

I feel your pain Lostagain...yellow can be real trouble. Color saturation looks pretty good though. I hope you manage to get it sorted out!


By the way, I've forgotten, what paint brand do you use? 

"Gaiety is the most outstanding feature of the Soviet Union." - Josef Stalin 

  • Member since
    November 2009
  • From: SW Virginia
Posted by Gamera on Tuesday, March 21, 2017 10:34 AM

Hope it works for you Bish. I'll admit I've only tried it on the yellow ID leading edge stripes on RAF and Japanese fighters. It might not look as good on a larger surface.  

"I dream in fire but work in clay." -Arthur Machen


JOIN OUR COMMUNITY!

Our community is FREE to join. To participate you must either login or register for an account.

SEARCH FORUMS
FREE NEWSLETTER
By signing up you may also receive reader surveys and occasional special offers. We do not sell, rent or trade our email lists. View our Privacy Policy.