SEARCH FINESCALE.COM

Enter keywords or a search phrase below:

RAF 100th Anniversay GB

84944 views
3404 replies
1 rating 2 rating 3 rating 4 rating 5 rating
  • Member since
    May 2013
  • From: Indiana, USA
Posted by Greg on Saturday, February 3, 2018 8:57 PM

Bish
........and can you imagine the looks given to the guy who suggested it.

That's no kidding.

Welcome Sign to your first GB, Steve. Looks like you have posting pics under control.

  • Member since
    November 2003
  • From: Naples, FL
Posted by tempestjohnny on Sunday, February 4, 2018 3:24 PM

Well it's taken 5 years from the time the kit was put together to its first coat of paint


  • Member since
    December 2002
  • From: Bury St Edmunds, Suffolk, England
Posted by Bish on Sunday, February 4, 2018 4:27 PM

tempestjohnny

Well it's taken 5 years from the time the kit was put together to its first coat of paint


Well you know what they say, better late than never. God to see it covered up.

Quick remnder guys, theres 8 weeks left until the GB ends. But as always, please don't rush to meet a deadline. Please keep building and posting those pics if you have not done by then. As long as you keep posted finished builds, i'l keep adding them to the list.

And for those who have not had their fil of roundels, the Comonwealth GB wil now start on May 1st. Build thread will be up for that once this GB offically ends.

I am a Norfolk man and i glory in being so


On the bench: Airfix 1/72nd Harrier GR.3/Fujimi 1/72nd Ju 87D-3

  • Member since
    November 2009
  • From: SW Virginia
Posted by Gamera on Sunday, February 4, 2018 5:29 PM

TJ: Looks really good!!! Same here, I did a little work on my Tempest and then stalled out, stuck her back in the box for over five years and then pulled her out for this GB.


Anyway as I said the top, bottom, and starboard side are done, working on the port now. Then there's a little stenciling but not too much.

"I dream in fire but work in clay." -Arthur Machen


  • Member since
    December 2002
  • From: Northern California
Posted by jeaton01 on Sunday, February 4, 2018 6:06 PM

Gamera

Yeah, if you don't mind me expending on what you said Nick? The V-1 was fast but the Meteor as well as the Typhoon and Tempest were a little faster yet. So they'd be on standby to intercept V-1s as they flew across the Channel. 

The RAF pilots started out just shooting the things. My joking aside it didn't take much ammo, the V-1 carried a ton of high explosive and if hit a few times would detonate in the air. Sometimes the RAF planes would get hit by flying debris from the V-1 though. So later on they started just pulling up beside the flying bomb and sticking their wing under it's wing. Then they could jerk the wing up, slapping the V-1 and tipping it over. The V-1's had only a simple guidance system, you aimed it and the gyroscopes kept it flying straight and level. Flipped over the gyroscopes couldn't handle it and the drone would fall out of control into the Channel or the English countryside. It's some interesting stuff if you ever get the chance to look it up. 


I have read that it was not necessary to actually make contact with the V-1, just get close and the airflow over the fighter's wing would tip the V-1 and tumble the gyros.  Sort of the same thing as wake turbulence behind a large aircraft.  The old gyros were not like modern ones.  There was a caging knob which was used to lock them down when doing aerobatics.  The first gyro I had that you could do aerobatics with was a J-8 and it was post war.

John

To see build logs for my models:  http://goldeneramodel.com/mymodels/mymodels.html


  • Member since
    December 2002
  • From: Bury St Edmunds, Suffolk, England
Posted by Bish on Monday, February 5, 2018 2:08 AM

G, that is looking great, really nice choice of markings with that lightning flash.

I am a Norfolk man and i glory in being so


On the bench: Airfix 1/72nd Harrier GR.3/Fujimi 1/72nd Ju 87D-3

  • Member since
    December 2002
  • From: Bury St Edmunds, Suffolk, England
Posted by Bish on Monday, February 5, 2018 2:10 AM

John, that how i understand it, the air between the aircrafts wing and the V-1 almost becomes a cushion so you don't actually make contanct.

I am a Norfolk man and i glory in being so


On the bench: Airfix 1/72nd Harrier GR.3/Fujimi 1/72nd Ju 87D-3

  • Member since
    January 2015
Posted by BrandonD on Monday, February 5, 2018 12:07 PM

TempestJohnny - that Mossie is looking sweet. Love those birds.

Gamera - I like that scheme. The question mark on the cowl is an interesting touch.

-BD-

  • Member since
    January 2015
Posted by BrandonD on Monday, February 5, 2018 12:08 PM

Well, I got the prop mounted to the front of my Eduard 1/48 Bristol F.2B. I think I'll hit it with a satin coat to tone down the brightness.

The prop boss for the carved wood (which isn't perfect, but is more symmetrical than the photo angle makes it appear) is a PE piece from Part. I used a Flory Dark Dirt wash on it to pick out the details, and am really happy with what they supply.

Untitled

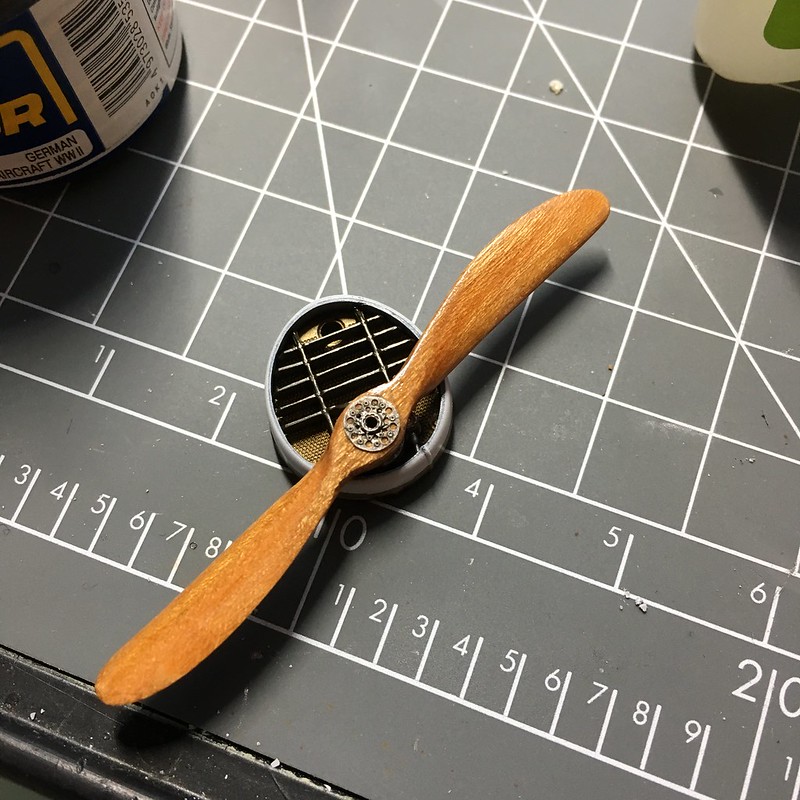
Ideally, I would have recessed it about 0.5mm into the prop face, but I don't have a drill press and mill set, and didn't know how else to pull that off.

I also started to tackle the rigging, and actually am really enjoying it so far!

I used EZ line and extra-thin CA glue after drilling holes for all the mounting points. I used the GLue Looper to apply small amounts of the CA.

Untitled


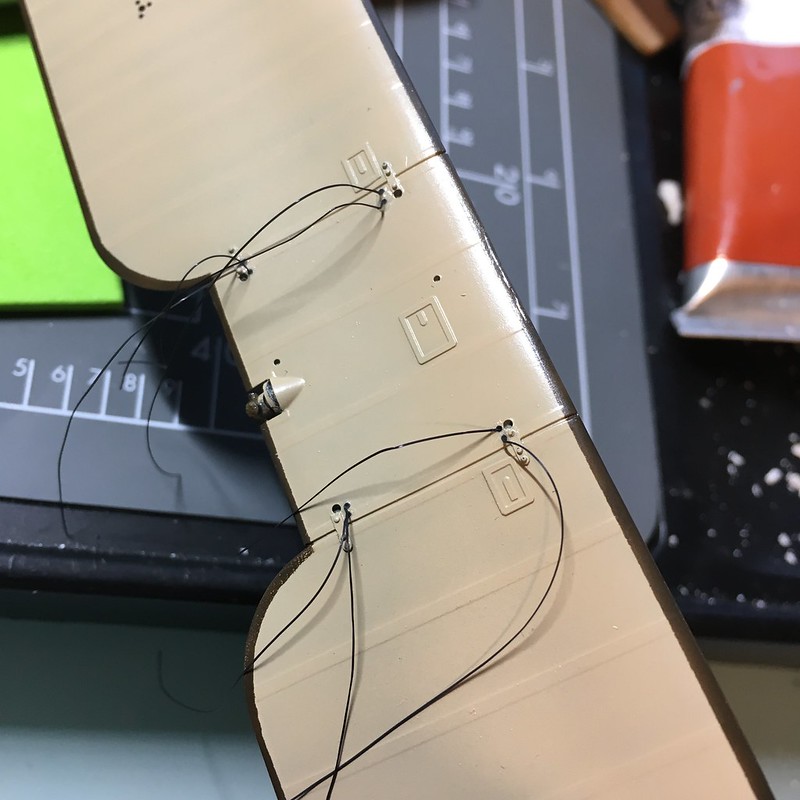
The only problem now is that I waited way too long to paint the cabane and interplane struts, and the oils I used to replicate the wood grain are still drying, so I can't proceed, and I just have an upper wing sitting on the jig with a bunch of whiskers hanging off of it.

I did get the rigging lines for the undercarriage (all two of them) installed, making them the first rigging lines I've ever done. Now for those struts to hurry up and dry so I can get going on attaching the upper wing!

My plan is to work from the center out of the wings. The elevator control wires are also external and run from the outside of the cckpit to the elevators, so I will add those actuator arms before I add the upper wing, and leave the rigging loose, since I don't want to horizontal stabilizers and tail installed before I'm done with the rigging, just to keep them out of the way.

It's getting close, and I can't wait to see it done.

-BD-


  • Member since
    December 2002
  • From: Bury St Edmunds, Suffolk, England
Posted by Bish on Monday, February 5, 2018 1:21 PM

Very nice BD. I am always impressed when people do this old wooden props, and yours is right up there. Rigging comeing along nicley as well. Looking forward to seeing more of that.

I am a Norfolk man and i glory in being so


On the bench: Airfix 1/72nd Harrier GR.3/Fujimi 1/72nd Ju 87D-3

  • Member since
    May 2013
  • From: Indiana, USA
Posted by Greg on Monday, February 5, 2018 2:53 PM

Johnny, 5 yrs is quite a queue. I'm sure it will be worth the wait.

Gamera, looking better with each update. This one has me wanting to go redo my wing leading edges. Argghh.

John, that makes perfect sense. I never would have guessed had you not explained. Bet good 'ol Bernouilli woulda' been proud to see his principle in action tossing V1's about. Big Smile

Brandon, that's some fine-looking work you have going there.


  • Member since
    February 2010
  • From: Berkeley CA/St. Paul MN
Posted by EBergerud on Tuesday, February 6, 2018 1:19 AM

I like the look of the Tempest and the BrisFit. I have an Eduard 1/48 Nieuport - never considered doing a biplane in 1/48, nice to see how it works out. The Sunderland actually needs some rigging and I bought some Gaspatch white metal attachment points for turnbuckles and they look very good. You could make good buckles with those and some fine plastic fly fishing tubing. The Sunderland is so big that just handling it while doing fiddly stuff appears challenging. (Wingnut did a 1/32 Gotha: 29" wingspan and 430 parts. Yikes. Sunderland is about 21-2" wingspan. Sold out of course. We all could have made a killer investment if we'd bought every WNW kit as they came out - people will pay tons of money on EBay as only a handful are available from dealers. Of course nothing to stop a rebox I suppose.) Brisfit was an extremely good plane: performance near to a Spad VII and a gun in the rear. If you could tell what they were, Germans didn't attack them eagerly. Low loss rates - for a WWI combat plane.

Not sure how RAF training went, but early in the war pilots that got serious training in the three plane "Vic" formation learned to fly extremely close - often almost overlapping their wings. That was the problem - had to watch formation and nobody watched out for "the Hun in the Sun." On the other hand, a close Vic could turn 3 fighters MGs (that would have been 24 303 MGs firing at once in 1940) on a bomber: that's a lot of rounds and they worked like a buzz-saw. Even if bomber survived chances were excellent of wounding half the crew - very bad for LW morale. Late war 262s often used the Vic when only one pilot knew what he was doing: so what? 12 30mm cannon? Hats off to anyone that flew in a bomber - bad way to do your duty.

Really have to get my stupid article done and get to what's important.

Eric


A model boat is much cheaper than a real one and won't sink with you in it.

  • Member since
    November 2009
  • From: SW Virginia
Posted by Gamera on Tuesday, February 6, 2018 7:23 AM

BD: Wow! That 'wooden' prop and the rigging look amazing! 

And thanks guys. I went with that decal scheme mainly because I thought the lightning bolt and question mark were interesting. 

And thanks guys for the information on the V-1 and wing buffeting attack. I only knew the most basic of details, this is fascinating stuff. 

"I dream in fire but work in clay." -Arthur Machen


  • Member since
    August 2015
  • From: the redlands Fl
Posted by crown r n7 on Tuesday, February 6, 2018 6:21 PM

tempestjohnny smooth paint on that mosquito!

gamera nice tempest looks real good

brandonB nice prop and radiator!

well I have just some landing gear and a completed v1 and the v1 from the gloster kit.


 Nick.

  • Member since
    December 2002
  • From: Bury St Edmunds, Suffolk, England
Posted by Bish on Wednesday, February 7, 2018 2:02 AM

Coming along very nicely there Nick.

I am a Norfolk man and i glory in being so


On the bench: Airfix 1/72nd Harrier GR.3/Fujimi 1/72nd Ju 87D-3

  • Member since
    November 2009
  • From: SW Virginia
Posted by Gamera on Wednesday, February 7, 2018 7:52 AM

Yeah, nice work there Nick on the landing gears and the buzz bombs. 

"I dream in fire but work in clay." -Arthur Machen


  • Member since
    May 2013
  • From: Indiana, USA
Posted by Greg on Wednesday, February 7, 2018 4:56 PM

First time I've seen fenders on aircraft landing gear. They look exceptionally cool down at scale, Nick. Yes

  • Member since
    May 2013
  • From: Indiana, USA
Posted by Greg on Wednesday, February 7, 2018 10:55 PM

I wonder if anyone enjoys masking canopies? I put it off, and off, and more. Then when I start it always amazes me how well the Eduard masks go on (I'm spoiled and pretty much won't buy a model airplane unless it has canopy masks).

I've never masked inside before, I know some folk do. This will be a car door version of the Tiffy and I stupidly chose to build it open so I kinda had to mask the inside of at least the door and the top. If anyone looks at it in real life and complains that the inside of the canopy is unmasked, I'll be very surprised. :)

Eduard was not thoughtful enough to supply those inside masks. I was surprised at how easy they were to cut and install.

I know this is a pretty pointless post, but I've been at it off and on all night and am a bit giddy.

  • Member since
    December 2002
  • From: Bury St Edmunds, Suffolk, England
Posted by Bish on Thursday, February 8, 2018 2:01 AM

Nice masking job Greg. I use pre made masks for most of my builds now, so much easier. I am surprised Eduard have not done masks for the inside. Some Montex do and its so much nice being able to paint the inside colour on the inside, just have to make sure theyare lined up properly. I am largely goping for the Montex masks now, though i did have an issue with my current 109 build.

I am a Norfolk man and i glory in being so


On the bench: Airfix 1/72nd Harrier GR.3/Fujimi 1/72nd Ju 87D-3

  • Member since
    November 2009
  • From: SW Virginia
Posted by Gamera on Thursday, February 8, 2018 9:15 AM

Greg: Looks good, I still haven't masked my canopy yet even though with the bubbletop there's not much to mask. 

I've masked the interior I think once, thankfully I've not built many subjects where it was necessary. 

"I dream in fire but work in clay." -Arthur Machen


  • Member since
    May 2013
  • From: Indiana, USA
Posted by Greg on Thursday, February 8, 2018 2:22 PM

Bish, I keep thinking and then forgetting to try Montex mask sets. They sound good. Thanks for commenting.

Gammy, so I beat you on the 'putting it off' dept on this build, eh? Smile


  • Member since
    December 2002
  • From: Bury St Edmunds, Suffolk, England
Posted by Bish on Thursday, February 8, 2018 3:23 PM

I like them, thoguh i have just found one weakness on my 109 build. they don't like curves in the canopy, especially when its clse to an edge. I found no matter what i did it would not stick down. I am hoping its just a one off, but i had no issues at all on my Stuka.

I am a Norfolk man and i glory in being so


On the bench: Airfix 1/72nd Harrier GR.3/Fujimi 1/72nd Ju 87D-3

  • Member since
    May 2013
  • From: Indiana, USA
Posted by Greg on Thursday, February 8, 2018 9:32 PM

Hmmm, haven't had that with Eduard as I'm sure you have not either.

In fact, sometimes the Eduard masks lay down on those curves as if they know where they are supposed to go.

  • Member since
    February 2010
  • From: Berkeley CA/St. Paul MN
Posted by EBergerud on Thursday, February 8, 2018 9:59 PM
Tamiya is selling a tape punch - makes 2 or 3mm circles depending on how configured. I'm not sure it will be worth the money, but the tool is for canopy masking. Almost all masks are a little off somewhere. If you have a small circle of tape (or half circle) you can use it to fill in areas that don't take curves readily. In theory you could get very clean lines - might even make it easier to mask your own. We'll see. I don't mask the inside - lot harder to fit in, although most Eduard masks I have do have inside masks. Uber guru Paul Pudzik uses adhesive metal foil and cuts it off with a pointed scalpel. I tried it once and was unsuccessful. If you use acrylic paints however, you can take some chances - maybe even paint a simple one free-style. If it fails, plop the clear part into some Lysol for 30 minutes and the paint is gone. Splendid paint striper and airbrush cleaning fluid - but it's got ammonia so you'd want to use a mask for brush cleaning. I've got the Tamiya tool - will report in when I use it. It sure does make tape circles though so tool is sound - have to see about the concept.


A model boat is much cheaper than a real one and won't sink with you in it.

  • Member since
    December 2002
  • From: Bury St Edmunds, Suffolk, England
Posted by Bish on Friday, February 9, 2018 1:58 AM

Greg

Hmmm, haven't had that with Eduard as I'm sure you have not either.

In fact, sometimes the Eduard masks lay down on those curves as if they know where they are supposed to go.


I have never had a problem either. With Eduard i find thay often use to pieces of mask, which usually overlap and you hgave to fill in the middle with liquid mask. This is often on curved sections. So that clearly helps. The problem with the 109 is that the top section corved on both sides of the canopy and just after the curve was the edge of that clear panel, and this was covered with one mask. So its deffinetly some to watch out for.

I am a Norfolk man and i glory in being so


On the bench: Airfix 1/72nd Harrier GR.3/Fujimi 1/72nd Ju 87D-3

  • Member since
    November 2009
  • From: SW Virginia
Posted by Gamera on Friday, February 9, 2018 8:13 AM

Greg: Guilty as charged. Though I did dunk the canopy in Future the night before you posted to get her ready for masking. 

Eric: Thanks for the head's up about the tape punch. I hadn't heard about it. 

I've been using Eduard masks on most stuff. Four-seven bucks for a little square of pre-cut tape is highway robbery but honest to god I hate masking so much I'm glad to pay it. So far I've had very little problems with their masks. After masking I spray a little Future right into the masks. That 'seals' it since if anything is going to leak the Future is what leaks though and it seals up behind it. And since it's clear leaked Future doesn't show. 

"I dream in fire but work in clay." -Arthur Machen


  • Member since
    May 2013
  • From: Indiana, USA
Posted by Greg on Friday, February 9, 2018 12:48 PM

Bish, yes, one big mask not good for 3D contours with curved edges. I have taken for granted how well-designed the Eduard masks are, I guess.

Eric, looked up that punch. Thx. I'd buy one if the punch set was more than 2 sizes.

Gamera, you may have inadvertantly saved my day with you comment about spraying future over masked canopies before spraying color. Here's why, in case you're interested;

I didn't future this bare canopy. Sometimes I don't. I noticed whilst applying liquid mask on the canopy, it beaded leaving bare spots and I had to reappy. Same day, brush painting a clear part, noticed the paint beaded up. So I'm worried about paint adhering to my canonpy.

But since the dreaded Future seems to act as a pretty decent primer, all I have to do is blow on some future and hopefully problem solved. (can't prime 'cuz it'd be wrong interior color.

So long story, but thank you!!

Big snowstorm here, we even closed our work. So if I don't get some modeling accomplished today, shame on me!

  • Member since
    January 2016
  • From: Winnipeg, Manitoba Canada
Posted by iSteve on Friday, February 9, 2018 12:54 PM

Thank you Greg for the nice welcome! I had signed on to an earlier group build here at FSM, but got too far behind to complete my commitment. This one should proceed nicely as I have plenty of time to finish.

Keep an eye out for new tooled actual 1/72 scale Space: 1999 kits Bish. Round 2 has a Hawk on deck completely retooled and in actaul 1/72 scale as opposed to the whatever scale of the old Airfix kit. After that, the Eagle is planned next, again completely new tool and again real 1/72 scale which should make it a bit bigger than the old MPC/Fundimensions/AMT kit and much more detailed. I've already pre-ordered the Hawk.

One of the reasons why I chose this kit Eric is because of the wonderful experience I had building the new tool Airfix 1/48 Vb (and the new Hurricane tool). It's very well engineered kit (with the glaring exception of the wheel struts), with very nice details and overall accuracy. I highly recommend both kits. You can see my build of the Vb here. My site is very much a "work in progress" right now, so there's not too much else to see there - yet. The kits coming out of Airfix lately have been really great. I have several other subjects in the stash from Airfix that I'm looking forward to building.

I'll be posting more build progress this weekend.

  • Member since
    November 2009
  • From: SW Virginia
Posted by Gamera on Friday, February 9, 2018 12:56 PM

Greg: Never thought of using it like that. I pretty much always dunk my clear parts these days beforehand. Hope it works for you. 

And hope the snowstorm isn't too bad and you don't lose power or anything like that. We're just scheduled for a load of rain over the weekend. 

"I dream in fire but work in clay." -Arthur Machen


  • Member since
    July 2004
  • From: Sonora Desert
Posted by stikpusher on Friday, February 9, 2018 1:05 PM

Ok, now that all my other in progress projects are completed and out of the way, I am turning here. I have not had the chance to pick up what I needed for my Hunter, so I will get on with what I have on hand... this one


besides, I have not seen a Vampire in here yet...


F is for FIRE, That burns down the whole town!

U is for URANIUM... BOMBS!

N is for NO SURVIVORS...

       - Plankton

LSM


JOIN OUR COMMUNITY!

Our community is FREE to join. To participate you must either login or register for an account.

SEARCH FORUMS
FREE NEWSLETTER
By signing up you may also receive reader surveys and occasional special offers. We do not sell, rent or trade our email lists. View our Privacy Policy.