SEARCH FINESCALE.COM

Enter keywords or a search phrase below:

The Race Into Space GB, October 2018 - July 2019 (Ended)

56171 views
1682 replies
1 rating 2 rating 3 rating 4 rating 5 rating
  • Member since
    January 2015
Posted by PFJN on Saturday, October 27, 2018 11:59 PM

Hi,

I kind of find scratchbuilding fun, because it gives me a chance to try alot of different ideas and approaches.  One thing that has been working particularly well so far on this build is using both Bondo and Mr Dissolved Putty as a filler.  For some areas, like the vertical tail and the canopy I have been able to roughly mock something up then give it a coat of Bondo, followed shortly after with a coating of Mr Dissolved putty.  I try not to put the Bondo on too thick anywhere, because (like the Squadron Green and White putties) I think it has Toluene (or something similar in it) and can dissolve your plastic.  Lately I have also been applying it with a 1/4" or so wide flat paint brush.

I find also brushing the Mr Dissolved Putty on with the same brush, after the Bondo has started to dry just a little, but before it really begis to harden, lets me smooth the Bondo out a bit and do some additional shaping.  

I also try to let the stuff harden/dry, preferably over nite, before doing any sanding or filing.  Unfortunately yesterday I didn't let it dry long enough, and now my files (that I use for coarse shaping) are a bit "gunked" up, and once Bondo sets it really doesn't want to let go that much.

Speaking of files, that reminds me of another thing that I find that I am constantly relearning.  Specifically, I find that sometimes I try and get too ahead of myself, and start trying to clean something up starting with too fine a grit sand paper or sanding block.  Whenever I do that I usually end up finding that I have smoothed out the fine "bumps" and rough spots, but haven't really done anything to any of the larger "bumps" or discontinuities in the surface (other that smoothing their edges Stick out tongue).

As such I find that I am constantly havig to relearn "use the right tool for each job", and if I have big gaps or "steps" between surfaces, its often best to start with a file, then a coarse sanding block, before moving to the finer, and finer grit stuff Smile.

PF

PS.  I also don't know if this is fully true or not, but it kind of seems to me at least a little, that I make less dust when I sand my model down if I applied a coat of Mr. Dissolved Putty, or sanding sealer, or clear dope, than if I hadn't.  Like I said I can't say for certain but it at least seems to me to be that way Smile

1st Group BuildSP

  • Member since
    July 2014
Posted by modelcrazy on Saturday, October 27, 2018 10:52 PM

Drums, the asent stage is really coming along.

Mach, the escape tower is looking oustanding.

PF, wow, I don't have the nerve to try a scratching project like that.

Steve

Building a kit from your stash is like cutting a head off a Hydra, two more take it's place.


http://www.spamodeler.com/forum/

  • Member since
    January 2015
Posted by PFJN on Saturday, October 27, 2018 9:22 PM

Wow,

It's nice to see so many builds coming along now Smile.

For my mini shuttle, I tried a couple different ideas for the canopy, including trying to 3D print something.  But in the end the best results seemed to come from just starting by fitting a cross section cut out, and then filling in around it with scrap pieces of plastic and bondo/filler.  Once I got something clos to the right shape, I sanded and sealed it, and gave it a quick coat of primer to see how it looked and where I needed to clean things up.  When scratchbuilding/kit bashing I have found that sometimes it really helps me to apply a quick coat of primer, because it can get hard to see details when a have a lot of putty and/or other things going on.

Below, you can see an intial picture of my rough scratch canopy.

Clean

[Sorry it came out so overly bright]

Next, I started filing down the rough shape (concentrating on the right side of the model 1st) to try and clean up the shaping a little.  After that, I highlighted a couple areas here I could see that I might need to build up a little with putty (using a green marker as shown below).

12

In the images above you can see how the left side is still a bit rougher than the right, and also where I maybe got a little too agressive with my files on the right side, and made the shape a little too flat.  Anyway, though, I'm pretty happy with how everything is coming along. 

On additional thing I also did last night, was try and alter the nose shape just a little.  Although I don't have alot of info on this mini shuttle, the few sketches and such that I do have kind of suggest that the tip of the nose might be a little higher on this earlier concept for a shuttle, than what eventually got built.  As such, I cut the nose off my model last night and added a shim along the bottom (but not the top) of the kit between the two pieces, prior to reglueing everything. I then filled any gaps with putty and sanded stuff reasonably smooth, prior to covering this, and the stuff I had done for the canopy with primer.

Later I could see that there was maybe a little bit of a bump along the bottom, so I re-filed and sanded that area as shown below.

Bottom

Here you can kind of see the trace of the shim and the putty where I made the mods. Stick out tongue

PF 


1st Group BuildSP

  • Member since
    July 2014
  • From: Franklin Wi
Posted by Bakster on Saturday, October 27, 2018 8:29 PM

mach71
I think I've got the tank remounted. It's not perfect but its the best I can get and get the instrument joins close.

It looks like a nice recovery that you did. Way to go! If it's off, we'd never know it.

Ben, your Lem continues to evolve looking even better.

Me, I am in irritation mode. I just sprayed that white ring I was talking about earlier and  the paint didn't go down too well. It sort of separated in areas. So, now I have to wait for it to dry, sand it sooth, and apply another coat. What a rediculous pain. It's stuff like this that drive me nuts. Round two at this going on round three. All over a small band of white paint. I shall persevere. Lol.

  • Member since
    March 2010
  • From: Boston
Posted by mach71 on Saturday, October 27, 2018 4:09 PM

Very nice!

I think thats the best looking LM/AS I've seen!


I think I've got the tank remounted. It's not perfect but its the best I can get and get the instrument joins close.


Its off center by about 1/3mm.

I've started filling the gap at the bottom with putty for 2/3 and bakeing powder set with thin CA for the last 3rd. I did this for added strength. The putty is drying now.

The capsule mateing ring is molded in 3 pieces, the fit is off a bit and will require some filling.


On to the antenna section.

  • Member since
    June 2018
  • From: Ohio (USA)
Posted by DRUMS01 on Saturday, October 27, 2018 2:54 PM

Either Vette would've been a great build in my mind. Here is a couple photos showing more progress. I still have to reduce / soften the panel lines alot. I created several items, check it out so far...

I want to still add several vents, some rivets, correct some antenna mounts, etc. 

Ben

"Everyones the normal until you get to know them" (Unknown)

LAST COMPLETED:

1/35 Churchill Mk IV AVRE with bridge - DONE

NEXT PROJECT:

1/35 CH-54A Tarhe Helicopter


  • Member since
    July 2014
  • From: Franklin Wi
Posted by Bakster on Saturday, October 27, 2018 9:25 AM

GAF
As for the Corvettes,  if you don't like the gold ones, maybe the Apollo 15 Corvettes might be more to your tastes?

How did you know I didn't like the gold ones? You must be psychic. I will take the black one, thank you.

If you don't mind... I will take the lunar rover too. I can tool around with the other cruisers here. I'd be the talk of the town.

GAF
  • Member since
    June 2012
  • From: Anniston, AL
Posted by GAF on Saturday, October 27, 2018 9:14 AM

Mach71>  Thanks!  I'm feeling somewhat better this morning.

I have all the RCS thrusters I need for the LMs.  Somehow I managed to keep these tiny parts over the years.  Don't know how!

Bakster> One part a day, that's my goal.  Big Smile  (265 days to go!)  Glad you caught the decal gaff early enough.  Decals are a distant thought for me.

As for the Corvettes,  if you don't like the gold ones, maybe the Apollo 15 Corvettes might be more to your tastes?

Gary

  • Member since
    July 2014
  • From: Franklin Wi
Posted by Bakster on Saturday, October 27, 2018 8:47 AM

DRUMS01
In my case, the do-overs are making this a great GB for me. Funny saying that but reworking something in a type of build I normally do not do helps me learn more and overcome an obstacle; whi

Ben, that is the correct mindset, making you perfect for this hobby. I can usually handle a few setbacks, but there is a point where I lose patience, and that's when the fun goes with it. That whole patience thing often makes me wonder if I am in the right hobby. Lol.

Thanks about the hatches!

Btw, I found another goof that I did. I have decaled the capsule and I thought that I was done. Whilst looking at some other builds of the same rocket/capsule, I happened to notice a decal on theirs that was not on mine. I thought, "what the..." I took another look at my plans and sure enough, there it was, buried in a jumble of notes. It was pretty tiny and these old eyes missed it. I am glad the error was caught before I dull coated the thing. Sigh. That would have really irritated me, then the whole fun thing happens. Lol.

Gaf: That is a good point about the cars. It would have been fun to see someone build one. 


  • Member since
    March 2010
  • From: Boston
Posted by mach71 on Saturday, October 27, 2018 8:37 AM

Thanks everyone for the support. Thats the 2nd best part of a group build.

The best part is the synergy of ideas.

DRUMS01, Your work looks outstanding. Have you thought of modifing the base? filling the old pad divots and dremeling some new ones? It might be too much trouble.

I'm also working on the MPC big eagle and I have the metal RCS bells. I'm happy to send them to you or GAF for your build. I'll have to check on the size.

I'll head down to my workbench in a bit, I was up late last night watching my Red Sox lose.


GAF, I hope you feel better. Take care of yourself. Thats most important.


GAF
  • Member since
    June 2012
  • From: Anniston, AL
Posted by GAF on Saturday, October 27, 2018 2:03 AM

I'm a little late as I was once again FLC today.  Not sure what's wrong, but I'm beginning to suspect I may have what my sister is suffering from.  Don't think it's catching, but I do know it runs in families.  Oh, well.  Guess this is why I'm up at 2 AM.


Looking at all of your work, I sure am glad I suggested you keep things simple!  Any more complex and I think you might be attempting a manned space launch with a homemade rocket! Big Smile


Bakster>  The Humbrol varnish certainly seems to have worked well.  That's a nice satin coat, not too glossy.  Sorry to hear about the masking problem.

Thanks for the comments on the movie "First Man".  I do not plan on going to see it, as it's more of a biopic than a attempt to look at Armstrong's career and eventual moon landing.  Probably see it once it's released on disc.  Speaking of watching horror movies, I watched "Apollo 18" the other day.  Not something I would recommend.

Ben>  I must admit you're making me jealous.  That spiral antenna is just great!  As for the pen tips, it's something I've been looking at for use to replace some engine nozzles on the Titan II model.  Just finding the right shape is key.

Hope you will still enjoy the GB as it continues, even with the do-overs.  We'll try to make it entertaining, if nothing else.   It's funny (since you're nomally an auto guy) that no one thought about doing one of these --


PFJN>  Sorry to hear about the laptop.  I understand your pain, as my monitor kept going out on me last night, and I had to switch over to a smaller one for my main computer.  Funny thing is, I hooked it up to my secondary computer and it works fine.  Not sure what is going on there.

The shuttle is looking good now that the pieces are being assembled.  Good luck with getting the canopy built up.  I'm a bit of a procrastinator about building things as I probably over-think the problems.  Maybe I don't think about them enough!


Hypertex>  Wow!  Having a lathe is so neat!  Wish I had one so I could turn out small nozzles, nose cones, etc.  If you ever decide to go into business making small parts, let me know.

Mach71>  Bummer about the LES!   I might have suggested freezing the part and then plunging it into hot water, but I don't know that it would have made a difference.  Cutting is sometimes the only solution as I have found out while working on the Command and Service Modules for my own project.  Luckily for me, the glue was 50 years old and not very well secured.  You'll come up with some fix, I'm sure.  Duct tape.  Lots of duct tape.  Smile

Gamera>  Add me to the Halloween Horror Movie Club.  I've been recording a few old ones for a bing watch on Halloween.

 
Progess Report:


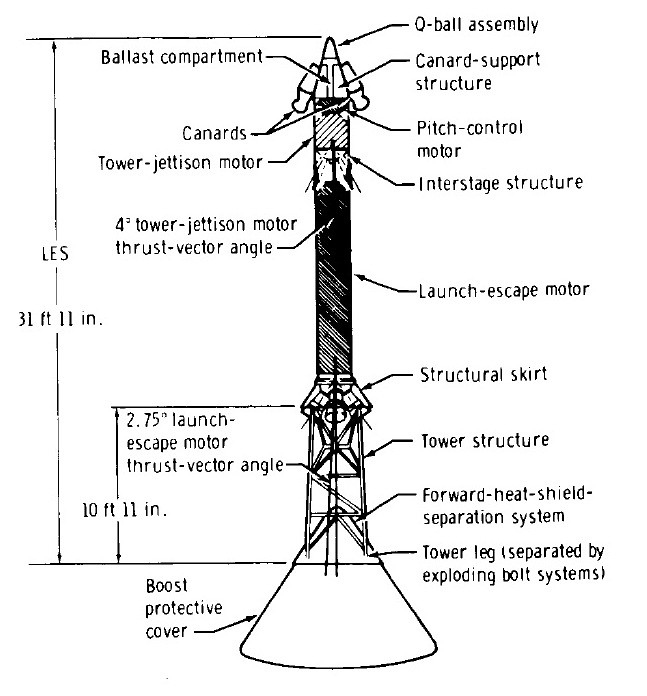
Not much.  I've moved back to the LES system, and have put the paper skin on the tower body and attached the q-ball to the ballast section.  The paper skin over the wooden dowel is a guide for where to attach the piping running down the side of the main body, and the jettison nozzle openings on the side.  Once these things are cut out and applied, the paper will be glossed over and painted.  As for the nose cone, I'm already considering a "do-over" as the q-ball is actually slightly smaller at the base where it meets the ballast compartment.

Meanwhile, I have a bunch of plastic parts to see what I can use to help form the flared ring at the base where the nozzles for the main rockets protrude (as shown here).

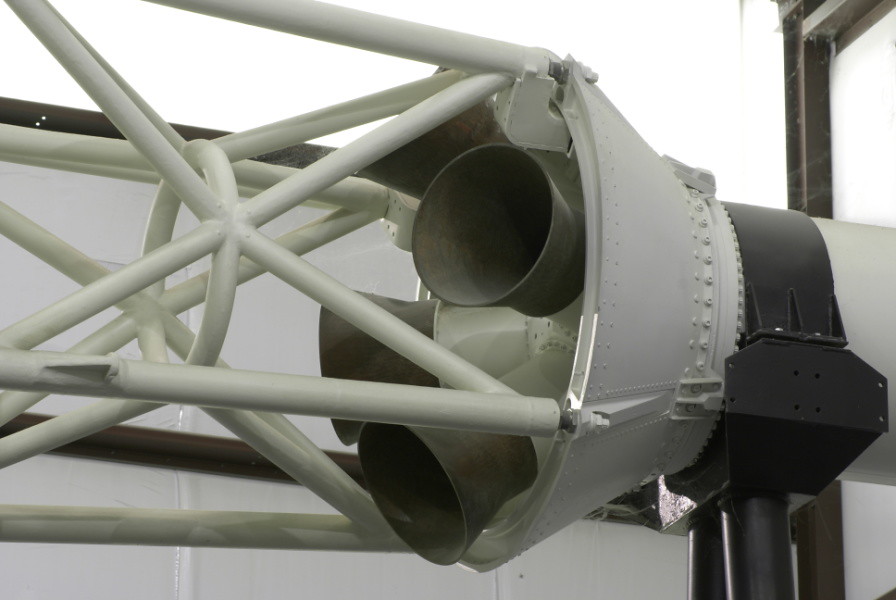
  The silver cone shaped object is from an old mechanical pencil.  While I will not use it for the nozzles, it may come in handy for forming some nozzles.  We'll see what works best.

That's all for now.

Mission Director (GAF)

Today in Space History:

1961 October 27 - . 15:06 GMT - . Launch Site: Cape Canaveral. Launch Complex: Cape Canaveral LC34. LV Family: Saturn I. Launch Vehicle: Saturn C-1.

Nation: USA. Agency: NASA. Apogee
: 136 km (84 mi).

  • Largest known rocket launch to date, the Saturn I 1st stage booster, successful on first test flight from Atlantic Missile Range. With its eight clustered engines developing almost 1.3 million pounds of thrust at launch, the Saturn (SA-1) hurled waterfilled dummy upper stages to an altitude of 84.8 miles and 214.7 miles down range. In a postlaunch statement, Administrator Webb said: "The flight today was a splendid demonstration of the strength of our national space program and an important milestone in the buildup of our national capacity to launch heavy payloads necessary to carry out the program projected by President Kennedy on May 25."

1967 October 27 - Cosmos 186 -. 09:29 GMT - . Launch Site: Baikonur. Launch Complex: Baikonur LC31. LV Family: R-7. Launch Vehicle: Soyuz 11A511Payload: Soyuz 7K-OK (A) s/n 6. Mass: 6,530 kg (14,390 lb). Nation: Russia. Agency: MOM. Program: Soyuz. Class: Manned. Type: Manned spacecraft. Spacecraft Bus: Soyuz. Spacecraft: Soyuz 7K-OK. Duration: 3.95 days. Decay Date: 1967-10-31 . USAF Sat Cat: 3014 . COSPAR: 1967-105A. Apogee: 223 km (138 mi). Perigee: 179 km (111 mi). Inclination: 51.6000 deg. Period: 88.60 min.

  • Docked with Cosmos 188; first automated rendezvous and docking of two spacecraft. The dockings were timed to celebrate the 50th Anniversary of the October Revolution (in lieu of a succession of manned space feats that all had to be cancelled due to schedule delays). Achieved automatic rendezvous on second attempt. Capture achieved but hard docking and electric connections unsuccessful due to misallignment of spacecraft. Star tracker failed and had to make a high-G ballistic re-entry. Recovered October 31, 1967 08:20 GMT.

1969 October 27 - Cosmonauts tours - . Nation: Russia. Related Persons: Beregovoi, Feoktistov, Khrunov, Popovich, Tereshkova, Titov. Program: Soyuz. Flight: Soyuz 6, Soyuz 7, Soyuz 8.

  • Kamanin assigns cosmonauts to upcoming foreign propaganda tours. Beregovoi and Feoktistov are to go to the United States, Tereshkova to Hungary, Popovich to France, Khrunov to Odessa. Titov will not be given this privilege because of his numerous automobile accidents, run-ins with the militia, and motorcycle habit. (editor - Titov was a BAD boy!) 


1970 October 27 - X-24 Flight 19 - . Crew: Manke. Payload: X-24A flight 19. Nation: USA. Related Persons: Manke. Class: Manned. Type: Manned spaceplane. Spacecraft Bus: X-24. Spacecraft: X-24A. Maximum Speed - 1446 kph. Maximum Altitude - 21763 m. Flight Time - 417 sec.

  • Member since
    June 2018
  • From: Ohio (USA)
Posted by DRUMS01 on Friday, October 26, 2018 11:50 PM

I might as well chime in too... I had a do-over for the scratch built egress platform and hand rails (actually it was a do-over times two Tongue Tied)

I am not going to do-over the stance of the decent module to fit the Monogram base. I have accepted that it sits square and flat, and trying to rebuild the module just is not in the picture for this GB. It may sit in a scratch made base (?).

In my case, the do-overs are making this a great GB for me. Funny saying that but reworking something in a type of build I normally do not do helps me learn more and overcome an obstacle; which is a "win" in my book. I try to be a glass half full type of person.... Big Smile That works for me.

By the way, the lathe work looks fantastic and the other updates shown look great too. That little shuttle sure has come a long way since the beginning of this GB. Mach71, I have no doubt you will remedy rework on the Mercury build. Bakster, your molding work for the Mercury capsule window was a great job, I like it.

Ben


"Everyones the normal until you get to know them" (Unknown)

LAST COMPLETED:

1/35 Churchill Mk IV AVRE with bridge - DONE

NEXT PROJECT:

1/35 CH-54A Tarhe Helicopter


  • Member since
    March 2010
  • From: Boston
Posted by mach71 on Friday, October 26, 2018 7:26 PM

yah, I hate doing things over. I have the tank roughed in, its not perfect but I'm not sure I can get it any better.

I'll look at it again tomorrow.

  • Member since
    July 2014
  • From: Franklin Wi
Posted by Bakster on Friday, October 26, 2018 6:02 PM

mach71
Getting it back together will be interesting, but it can be done. I made the cut as clean as I could but there will have to be some filling. 2 of the main motors came off, I re attached them. Once they are dry I'll start to re glue the rocket body.

You'll get er done. Let us know how it comes out.

Btw. I just had a do-over as well. I told you that I'd goof too. I didn't like how my masking came out on the piece just above the capsule. There is a small area that needs to be painted white and it came out jagged. If I hadn't been so impatient earlier on, I would have waited to attach the ring that the tower anchors to. Doing that would have burried the paint join below the ring and out of sight. Instead, I had to do it above. So, out came the Superclean to strip the paint of that piece. It's not a crisis but a do-over none the less. I HATE do-overs.  Ah well... it comes with the territory.

  • Member since
    March 2010
  • From: Boston
Posted by mach71 on Friday, October 26, 2018 1:43 PM

I cut.


Here is where I was:


And here is where I am now:


Getting it back together will be interesting, but it can be done. I made the cut as clean as I could but there will have to be some filling. 2 of the main motors came off, I re attached them. Once they are dry I'll start to re glue the rocket body.

  • Member since
    March 2010
  • From: Boston
Posted by mach71 on Friday, October 26, 2018 12:27 PM

Freezing didnt work. :-(

I'm thinking Its going to have to be cut.


  • Member since
    November 2009
  • From: SW Virginia
Posted by Gamera on Friday, October 26, 2018 11:41 AM

Mach71: Yeah, I'm not sure what else to do other than trying to slowly work it loose. Either that or just cut it off. Sorry, no better ideas here. 

Bakster: Thanks! I'm going to have to see 'First Man' eventually. Hopefully it will be still running after Halloween. Big fan of Hammer movies here too, though this year I've been watching mostly stuff including some weird Asian horror films. 

PF: Sorry about your electronics- maybe it's the gremlins out of Halloween? Looks like she's coming along well from the photos.  

"I dream in fire but work in clay." -Arthur Machen


  • Member since
    January 2015
Posted by PFJN on Friday, October 26, 2018 11:25 AM

Hi,

Unfortunately for me, my laptop stopped working the other day.  I do have a different computer that I can use, but it doesn't have all the same software on it (yet).  As such, I haven't been able to progress too far on my mini shuttle build this week.

I did, however, manage to fit the forward wheel well into the fuselage and then close the front end of the fuselage up, as shown below.

BottomTop

Sorry that the 2nd image is a little fuzzy.  My phone has also been acting a little odd lately.  Every now and then it will act like I clicked a button or icon, when I hadn't.  Today it kept taking pictures even though I hadn't clicked the icon yet Tongue Tied.  I'm beginning to think that maybe all my electronics are haunted or something.  Must be that time of year Stick out tongue.

Anyway, I have been working on how best to assemble the canopy, based on the actual shape of the fuselage, and in the end have kind of come to the assumption that maybe I should try and build it up slowly, in  stages.   Hopefully tonight or tomorrow I will be able to show a little more progress Smile.

PF

1st Group BuildSP

  • Member since
    July 2014
  • From: Franklin Wi
Posted by Bakster on Friday, October 26, 2018 11:24 AM

Hey Gamera... about the movie: I found it pretty dark in the sence that it heavily chronicles Armstrong's mood throughout that period of his life. He suffered some losses and the movie depicts a very somber, or even depressed individual. Accurate or not, I can't say. But... one needs to be in the mood for that, or at least prepared for it. I was neither. Having said that, I still appreciated it for what it was. Some of the effects are stunning. I really appreciated the in-capsule scenes as their rockets ascended. You get a real feel for how confined the space was, and at how jarring the ride must have been. "Spam in a can." You should see it. I think that you will enjoy elements of it.

Funny that you are watching horror movies. I am doing the same. In my case, mostly the older stuff like with mummies and such. I love the Hammer movies.

Hypertex: That is awesome work on the parabolic. It looks fantastic.

Mach71: I am sorry to hear what happend. If it's any consolation, I am sure that I will mess something up too. And I hear you about the instructions. In general... what we get really suck. Others can offer you better advice than me in how to deal with the fix. In my opinion, you are already doing it. I'd just try to work the piece loose. Putting it in the fridge sounds like a good idea. Hopefully others can chime in.

  • Member since
    March 2010
  • From: Boston
Posted by mach71 on Friday, October 26, 2018 8:01 AM

Lots of talent here with scratch building!

Unfortunatly I guess I'm not.

I was working on the escape tower yesterday and it turns out I glued the escape rocket about 10 deg off. It would have been nice if the instructions noted this, I even checked details from the SIM book. I just screwed up. Now I have to try and remove the rocket tank from the base. It was glued with Testors liquid cement. Its in the freezer now. Hopefully that will work. 

Does anyone have any other sugestions?

  • Member since
    November 2009
  • From: SW Virginia
Posted by Gamera on Friday, October 26, 2018 7:56 AM

Ben & Bakster: Those both look awesome! Pretty amazing work there on scratchbuilt parts that look waaaaaaayyyyyyyy better than the kit parts! 

Hypertex: Wow!!! One of the guys in our club has a lathe and has showed off some the stuff he's made. It's friggin' amazing. Love what you've done here! Looking forward to seeing the other parts you're building. 


Bakster: Please give us your opinion of 'First Man'. I want to go see it but right now I'm in a Halloween mood and have been watching a horror movie about every other night. Just not in the mood for a 'real' movie! 

"I dream in fire but work in clay." -Arthur Machen


  • Member since
    October 2010
Posted by hypertex on Friday, October 26, 2018 6:53 AM

Wow, lots of good progress being made here. I guess I'll have to post some progress pics of my own.

In between the process of texturing my LM ascent stage, I am working on some fidly bits. Specifically, the rendezvous radar. The dish as supplied in the kit, is too deep and is conical instead of parabolic. There is no way to modify it so I built a new one from scratch.

Here is an in-progress pic of me turning the dish on my lathe. I used some casting resin to make the blank--it dries white.

As I was shaping the back of the dish, the thing broke off of the blank. So I reversed it and mounted it between centers to finish the rear.

Here is the new dish next to the kit part (on the left). The depth and shape of my replacement is much closer to the actual dish.

Here I have added some surface detail to the inner surface. I layed out the marks using a watch gear (which you can just see in the upper right).

Up next: building the hyperbolic secondary reflector and supports (which were not included in the Dragon kit).

Stay tuned.

  • Member since
    July 2014
  • From: Franklin Wi
Posted by Bakster on Friday, October 26, 2018 6:24 AM

DRUMS01
Never thought I would be getting into this as much, as I normally build autos.. THIS GB IS FUN!!!

That's what it's all about; let's just have fun with it. I am having fun with it too.

Your model is gonna be awesome!

  • Member since
    June 2018
  • From: Ohio (USA)
Posted by DRUMS01 on Thursday, October 25, 2018 11:44 PM

Thanks Backster, I still want to add other lights, vents, surface details, improve (build) the antennas and sensors, docking port, etc., but its getting there.

I want to join both stages together so I can align the plume deflectors on the decent module. I have made an egress platform to fit on the decent module below the forward hatch. The RTG fuel cask has also been added.

Never thought I would be getting into this as much, as I normally build autos.. THIS GB IS FUN!!!

v/r,

Ben 

"Everyones the normal until you get to know them" (Unknown)

LAST COMPLETED:

1/35 Churchill Mk IV AVRE with bridge - DONE

NEXT PROJECT:

1/35 CH-54A Tarhe Helicopter


  • Member since
    July 2014
  • From: Franklin Wi
Posted by Bakster on Thursday, October 25, 2018 8:43 PM

Hey Ben, that Looks great! I like it. It has the feel of the actual thing. Great job!

  • Member since
    June 2018
  • From: Ohio (USA)
Posted by DRUMS01 on Thursday, October 25, 2018 7:39 PM

GAF, Those are indeed the RCS nozzles I am referring to. I've already looked in Shapeways, Hobbylobby, and other locations for replacement cones; but the old pen tips are a neat thought (humm...)

Well, without investing more $ into this build, here is my take on the RCS nozzles. I also have added an antenna (made of wire), the docking window (spare P.E.), nav. lights (small gem stones), etc.....

Still much more to do...


Ben

"Everyones the normal until you get to know them" (Unknown)

LAST COMPLETED:

1/35 Churchill Mk IV AVRE with bridge - DONE

NEXT PROJECT:

1/35 CH-54A Tarhe Helicopter


  • Member since
    July 2014
  • From: Franklin Wi
Posted by Bakster on Thursday, October 25, 2018 2:08 PM

Yup--me again. I am on vacation from work this week, more time to post. I just want to share some info on a product that I tried.  I decided to try Humbrols Clear Gloss Varnish, for decaling purposes. It is an acrylic and supposedly able to handle washes and such. I ordered the thinner as well.

Anyway-- my first test was with a 50/50 varnish/thinner mix. It sprayed well, but the finish came out more on the matt side of things. My second test was with no thinner at all, and that was the ticket. I was able to draw out a nice thin layer of gloss.

I have to say that I am impressed thus far. It sprayed on like a dream. It had gone on wet and leveled out nicely. Straight from the bottle it is slightly thicker than water. In my opinion it does not need thinning. Just my two cents.

I am leaving shortly to see the new movie, First Man. Treating myself, and it's fitting to the GB at hand.


GAF
  • Member since
    June 2012
  • From: Anniston, AL
Posted by GAF on Thursday, October 25, 2018 12:49 PM

PFJN

It looks like your stuff is really coming along.  I'm glad you were able to get the paint off

Thanks, guys!  It may not look like much, but it sure seems like I've gotten something accomplished with all the paint removal. [:)

Still not sure about a paint scheme.  Do I go with the overall white as shown in the Revell instruction book, or a later scheme with the aluminum SM and silver CM?  For simplicity, I will probably go with the "white" scheme as this represents more of a "mock-up" than an actual spacecraft.  Saves some painting and masking.  Big Smile

At the moment, I'm back to the Launch Escape System and figuring out how to scratch-build the parts.  We'll see how that turns out!

Glad you enjoy the space history bits.  I've got some stuff to post as we go along, some more photos and things.

Gary

  • Member since
    January 2015
Posted by PFJN on Thursday, October 25, 2018 11:54 AM

Big Smile

GAF,

It looks like your stuff is really coming along.  I'm glad you were able to get the paint off

1st Group BuildSP

  • Member since
    July 2014
  • From: Franklin Wi
Posted by Bakster on Thursday, October 25, 2018 10:12 AM

Thanks everyone for the kudos on my hatches...

Gary, I didn't think of trying a hole punch. That is an interesting idea. I suspect it would damage the PE, but it would have been worth testing! I will test it someday just to see.

It is great to see your model stripped of paint. Way to persevere! Now, you have a new canvas to work from. I am excited to see it progress.

Lastly, I am enjoying the space history that you are posting. It is very interesting and it is a nice touch for this group build.

Good job everyone!


JOIN OUR COMMUNITY!

Our community is FREE to join. To participate you must either login or register for an account.

SEARCH FORUMS
FREE NEWSLETTER
By signing up you may also receive reader surveys and occasional special offers. We do not sell, rent or trade our email lists. View our Privacy Policy.