SEARCH FINESCALE.COM

Enter keywords or a search phrase below:

80 Years of Airfix GB

108582 views
1664 replies
1 rating 2 rating 3 rating 4 rating 5 rating
  • Member since
    June 2017
  • From: Winter Park, FL
Posted by fotofrank on Wednesday, February 13, 2019 12:53 PM

The Clipper is primed and ready. I polished the primer with a 12,000 grit pad. Now it's ready for the Alclad. So if the rain would finally stop, I could go out on to the patio and shoot some paint.


OK. In the stash: Way too much to build in one lifetime...

  • Member since
    March 2017
Posted by Armor_Aficionado on Tuesday, February 12, 2019 4:04 PM

Light frosting?  No, heavy buttercream frosting!   

Seriously, though, just Revell Aluminum rattle can spray, with a gloss coat applied before decal placement, then a dull overcoat.  Glad you like it!

  • Member since
    December 2005
  • From: Goteborg / Sverige
Posted by Svenne Duva on Tuesday, February 12, 2019 1:41 PM

@ cwalker3,

The camo looks just right so far, nice job!

@ Jack,

I do remember the swinging wings, you are doing a great job on the F-14! 

sic transit gloria mundi

  • Member since
    December 2005
  • From: Goteborg / Sverige
Posted by Svenne Duva on Tuesday, February 12, 2019 1:34 PM

Congratulations on your competed build AA!

Your P51 has come out nicely Cool

Just one question, is that a light frosting to the alluminium?

Thank you for sharing your build with us!

Svenne


sic transit gloria mundi

  • Member since
    December 2002
  • From: Bury St Edmunds, Suffolk, England
Posted by Bish on Tuesday, February 12, 2019 3:10 AM

Looks good Jack. I recall those large slabs of plastic, if i remember right, they came out of slots in the front of the wing gloves when you moved the wings.

I am a Norfolk man and i glory in being so


On the bench: Airfix 1/72nd Harrier GR.3/Fujimi 1/72nd Ju 87D-3

  • Member since
    October 2009
Posted by JacknewbIII on Monday, February 11, 2019 3:32 PM

I cant wait to see what you do with the figures Stik. I am just getting ready to try some myself for the first time.

That Lancaster is really looking nice so far as well!

So things were going along as normal on the F-14 until I encountered this step in the instructions. In an effort to add cool wings that retract they had to add some huge slabs of plastic that protruded out out of the sides (it was the 70's) of the craft and obviously need to be addressed.

I rigged my own system using their parts but elimited the areas that stuck out of the craft. I am not quite able to get them all the way back but they move nicely and I am happy with the results. She is all sanded and primed now so I will check back in soon once I add some paint.


  • Member since
    July 2014
Posted by modelcrazy on Monday, February 11, 2019 10:01 AM

Svenne

Yes not bad at all. I'm going to hand paint most of them. I just don't want to spend days masking.

Fotofrank

Neither, I'm trying the Vallejo black primer, so far I like it, it sprays very smooth. Enamel goes over it well, I don't know about lacquer yet.

Steve

Building a kit from your stash is like cutting a head off a Hydra, two more take it's place.


http://www.spamodeler.com/forum/

  • Member since
    December 2002
  • From: Bury St Edmunds, Suffolk, England
Posted by Bish on Monday, February 11, 2019 9:26 AM

stikpusher


Bish


stikpusher

I was able to wrap up building the crew figures yesterday... 


Painting them will probably be my biggest challenge...


They look like nice figures, i am sure you will have no trouble painting those.


Thanks Bish. They are very nice figures indeed. Painting the uniforms on them is not a big deal. It’s getting the flesh areas to look right that is always my challenge. 


Same here. And the eyes are always the thing i struggle with. I have found painting 1/10th scale busts has helped a lot.

I am a Norfolk man and i glory in being so


On the bench: Airfix 1/72nd Harrier GR.3/Fujimi 1/72nd Ju 87D-3

  • Member since
    July 2004
  • From: Sonora Desert
Posted by stikpusher on Monday, February 11, 2019 9:19 AM

Bish


stikpusher

I was able to wrap up building the crew figures yesterday... 


Painting them will probably be my biggest challenge...


They look like nice figures, i am sure you will have no trouble painting those.


Thanks Bish. They are very nice figures indeed. Painting the uniforms on them is not a big deal. It’s getting the flesh areas to look right that is always my challenge. 


F is for FIRE, That burns down the whole town!

U is for URANIUM... BOMBS!

N is for NO SURVIVORS...

       - Plankton

LSM


  • Member since
    August 2004
  • From: Forest Hill, Maryland
Posted by cwalker3 on Monday, February 11, 2019 8:05 AM

Bish

The camo has come out well. have you sprayed the clear parts seperat;y or are you brush painting those.


I masked with Eduard masks and sprayed. I'll wait unti after the final flat coat before unmasking. Hopefully, everything's fine.

Cary


  • Member since
    December 2002
  • From: Bury St Edmunds, Suffolk, England
Posted by Bish on Monday, February 11, 2019 6:32 AM

The camo has come out well. have you sprayed the clear parts seperat;y or are you brush painting those.

I am a Norfolk man and i glory in being so


On the bench: Airfix 1/72nd Harrier GR.3/Fujimi 1/72nd Ju 87D-3

  • Member since
    August 2004
  • From: Forest Hill, Maryland
Posted by cwalker3 on Monday, February 11, 2019 6:29 AM

Painting stage on the Lanc is finally finished. There were a couple of mistakes that I had to go back and fix, and a couple of other areas that I think I can address with weathering, but overall I think this is my best camo effort to date.

For one of the repairs I had a chance to experiment with Silly Putty. Before I used it I worked it a good bit with just my hands. The I layed it out thin and sprayed a light coat of paint on it. When dry I worked it again in my hands. Then I used it to mask off the areas I needed to repair. It worked fine. Thanks to all for their advice on using this.

Anyway, here are a few pics.

Cary


  • Member since
    December 2002
  • From: Bury St Edmunds, Suffolk, England
Posted by Bish on Monday, February 11, 2019 6:25 AM

stikpusher

I was able to wrap up building the crew figures yesterday... 


Painting them will probably be my biggest challenge...


They look like nice figures, i am sure you will have no trouble painting those.

I am a Norfolk man and i glory in being so


On the bench: Airfix 1/72nd Harrier GR.3/Fujimi 1/72nd Ju 87D-3

  • Member since
    June 2017
  • From: Winter Park, FL
Posted by fotofrank on Monday, February 11, 2019 6:20 AM

modelcrazy

Nice looking 51 AA.

I started on the BV. It's typical of the old Airfix, lots of flash, nonexistent detail, raised panel lines and oversized rivets.....OK the rivets constitute some detail. It should go together quickly and probably take twice as long to fill the seams.

I started in my usual way with a black primer.


Modelcrazy, what did you use as a primer? A lacquer or emanel?

OK. In the stash: Way too much to build in one lifetime...

  • Member since
    December 2002
  • From: Bury St Edmunds, Suffolk, England
Posted by Bish on Monday, February 11, 2019 2:10 AM

AA, i can't see you 51 at the minute, your pics don't show up at work. But i will have a look and update the front page tonight. Thanks for taking part.

I am a Norfolk man and i glory in being so


On the bench: Airfix 1/72nd Harrier GR.3/Fujimi 1/72nd Ju 87D-3

  • Member since
    December 2005
  • From: Goteborg / Sverige
Posted by Svenne Duva on Monday, February 11, 2019 1:31 AM

Hi Steve,

How are the clear parts? Any good?

Svenne

sic transit gloria mundi

  • Member since
    July 2014
Posted by modelcrazy on Sunday, February 10, 2019 10:19 PM

Nice looking 51 AA.

I started on the BV. It's typical of the old Airfix, lots of flash, nonexistent detail, raised panel lines and oversized rivets.....OK the rivets constitute some detail. It should go together quickly and probably take twice as long to fill the seams.

I started in my usual way with a black primer.

Steve

Building a kit from your stash is like cutting a head off a Hydra, two more take it's place.


http://www.spamodeler.com/forum/

  • Member since
    March 2017
Posted by Armor_Aficionado on Sunday, February 10, 2019 3:53 PM

Alright, you can mark this one as DONE!  Here's the final result on the P-51D:


  • Member since
    July 2004
  • From: Sonora Desert
Posted by stikpusher on Saturday, February 9, 2019 1:59 PM

I was able to wrap up building the crew figures yesterday... 


Painting them will probably be my biggest challenge...


F is for FIRE, That burns down the whole town!

U is for URANIUM... BOMBS!

N is for NO SURVIVORS...

       - Plankton

LSM


  • Member since
    December 2002
  • From: Bury St Edmunds, Suffolk, England
Posted by Bish on Saturday, February 9, 2019 1:10 PM

Looks good AA.

I am a Norfolk man and i glory in being so


On the bench: Airfix 1/72nd Harrier GR.3/Fujimi 1/72nd Ju 87D-3

  • Member since
    December 2002
  • From: Bury St Edmunds, Suffolk, England
Posted by Bish on Saturday, February 9, 2019 1:04 PM

Nice one Mark, good fix.

I am a Norfolk man and i glory in being so


On the bench: Airfix 1/72nd Harrier GR.3/Fujimi 1/72nd Ju 87D-3

  • Member since
    December 2005
  • From: Goteborg / Sverige
Posted by Svenne Duva on Saturday, February 9, 2019 12:35 PM

Hi Mark,

Thx,

Good to see that the hot water treatment worked out.

I was going to suggest get the walls up and start getting some shere to push the missalignment.

Looks as if you are good now. looking forward to your next update :)

Svenne

sic transit gloria mundi

  • Member since
    May 2017
  • From: Denver, Colorado
Posted by MrStecks on Saturday, February 9, 2019 11:02 AM

Tales of the Omnibus - Chapter 1  (cont.)

Well, I watched a number of Youtube videos on correcting warped parts, and spent about an hour last night trying variations of the hot water method.  Some recommended hot tap water, others recommended boiling water.  I started with hot tap water and when that didn't work I started microwaving the water at longer durations until...  Success!

The floor is almost completely flat.  There is still a very small deviation, but I think it's okay.
Here are before and after pics:

Actually, I'm kind of amazed it worked.  I don't know what the temperature of the water was, but it wasn't too far short of boiling.  I live at 6000 ft. altitude, so water usually boils somewhere around 205 F.  I'm guessing the water that worked here was around 170 F.

Alright, on with the adventure!

Cheers,
Mark


On the bench:  Revel 1/48 B-25J Mitchell

In the queue: Tamiya 1/48 F4U-1A Corsair

  • Member since
    May 2017
  • From: Denver, Colorado
Posted by MrStecks on Saturday, February 9, 2019 10:49 AM

Svenne Duva - Sorry about all the mishaps you've had.  I hope things get better for you.  A good airbrush is like a good friend.  It sucks to lose one.

AA - Looking good.  Looking forward to seeing the decals.  A plane always seems to come alive when the decals go on.


Cheers,
Mark


On the bench:  Revel 1/48 B-25J Mitchell

In the queue: Tamiya 1/48 F4U-1A Corsair

  • Member since
    March 2017
Posted by Armor_Aficionado on Saturday, February 9, 2019 9:43 AM

  Thanks, Bish.  I used Revell Enamel, RV32152, Gloss Blue.  Painting and assembly is al done now; just waiting for the gloss coat to dry so I can start with the decals.

  • Member since
    December 2005
  • From: Goteborg / Sverige
Posted by Svenne Duva on Friday, February 8, 2019 11:54 AM

Forgott to mention,
the painting session created so much fumes the fire alarm went off, nice bill to follow there...

And it is raining...

Crap - tomorrow is another day :|

sic transit gloria mundi

  • Member since
    December 2005
  • From: Goteborg / Sverige
Posted by Svenne Duva on Friday, February 8, 2019 11:23 AM

Bad day in paradise...

The trusty old AB gave up, after +20 years of service, she sort of looked at me and said:
"hey dude, my o-rings are older then your kids"...
Been spitting badly lately the old lady :|

No good Carma...

Then on to my new favourit line of AC, the Hawker family...

First off, and this will be a different thread, my new 1/48" Tempest (the brand name will not be mentioned in this thread) :)

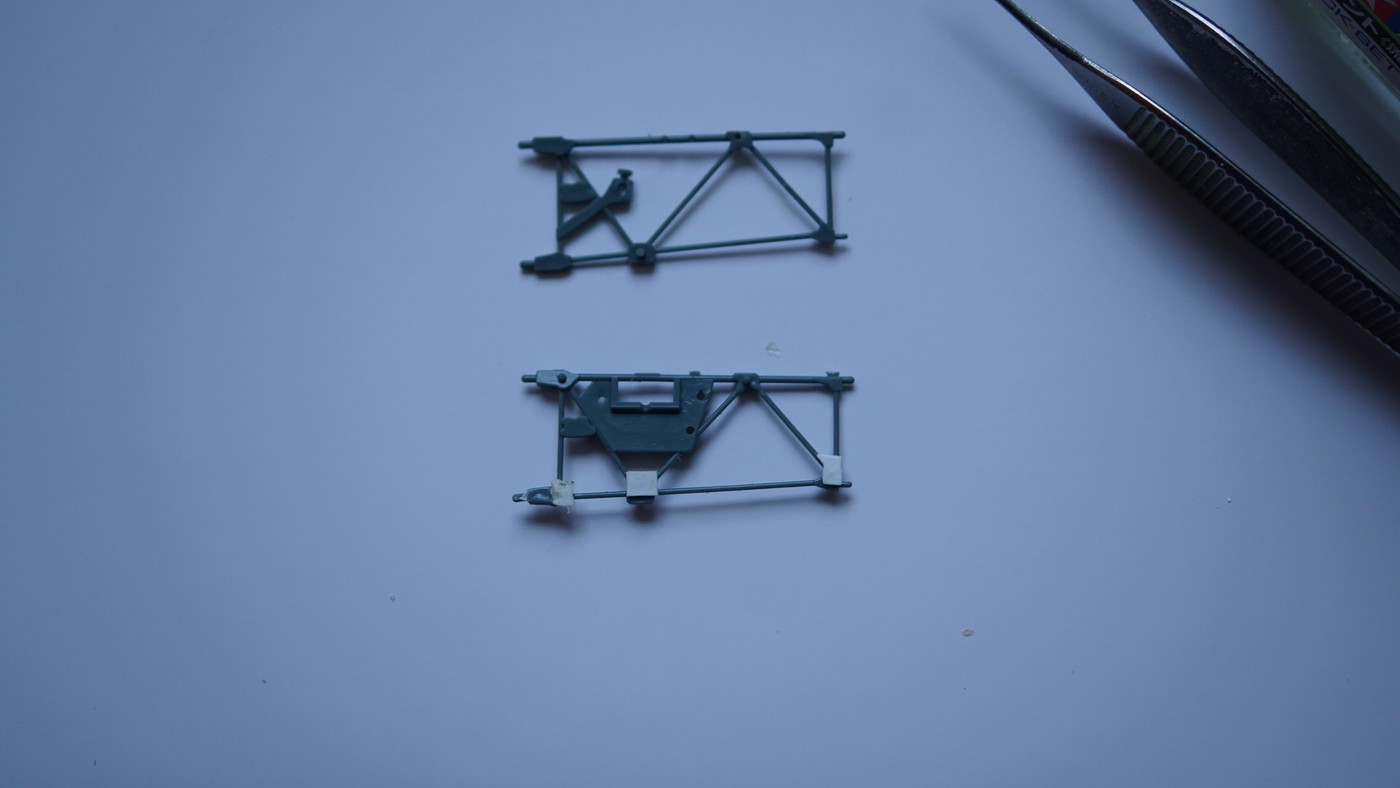
Trying to prepare myself for the big "Tiffy" I decided to go 1/48 (nonamementioned) as well.

So I got this kit, was warned that the parts are brittle, decided to cut the sprues open to relive any any tention and... the xxx dremel disc gets stuck in the carrier frame and the part is ripped in 3.
Repair on its way...

No good Carma...

But it has been a long day.

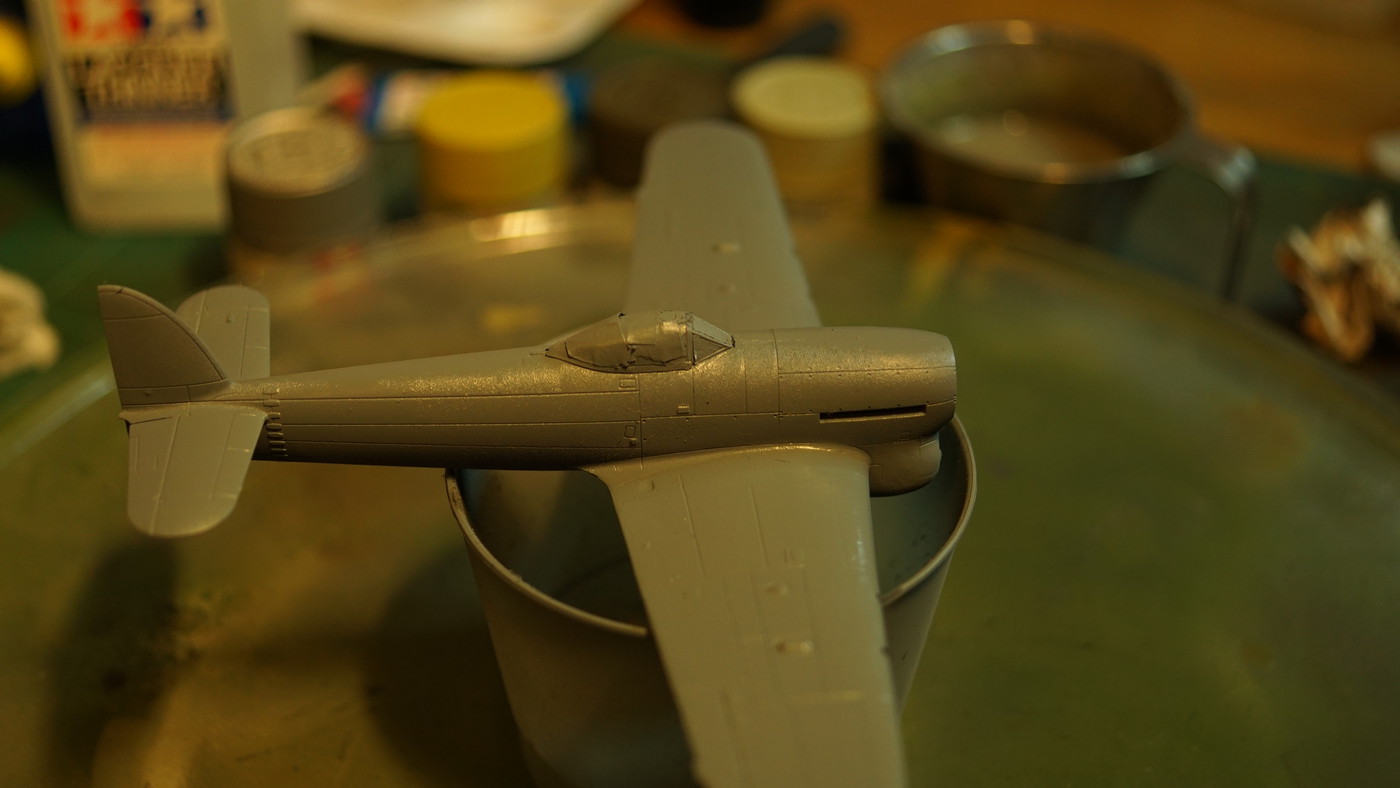
So next is the 1/72 Typhoone I have been working on.
Putty was  done, masking was done and I had put on a layer of Vallejo primer.

Cut some Tamiya XF-82 with the yellow cap thinner and started the compressor:

The frosty surface is something I have not seen before. 

Moved on to XF-83, same procedure, paint cut with yellow cap until milky...

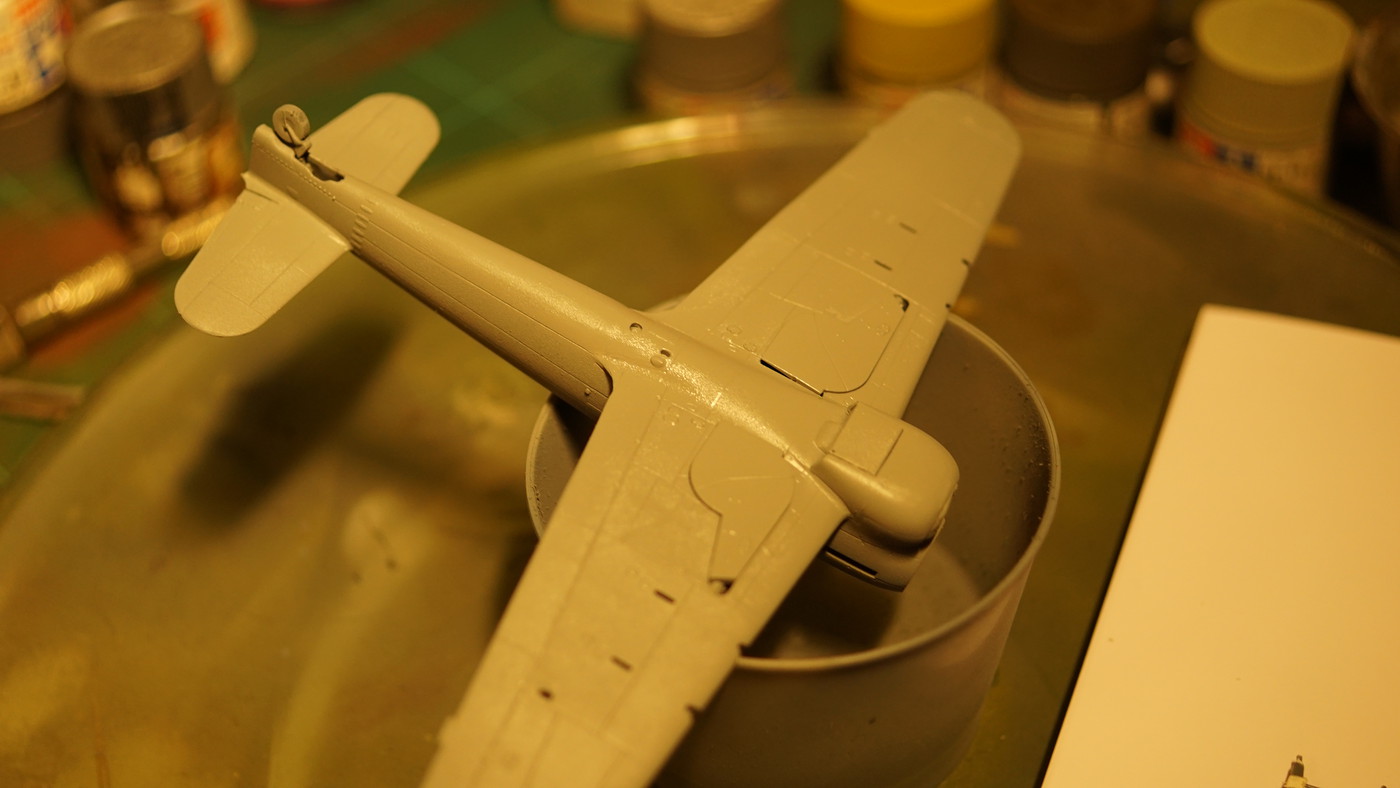
What I think is happening is that the Tamiya Yellow cap reacts with the Valejo primer.

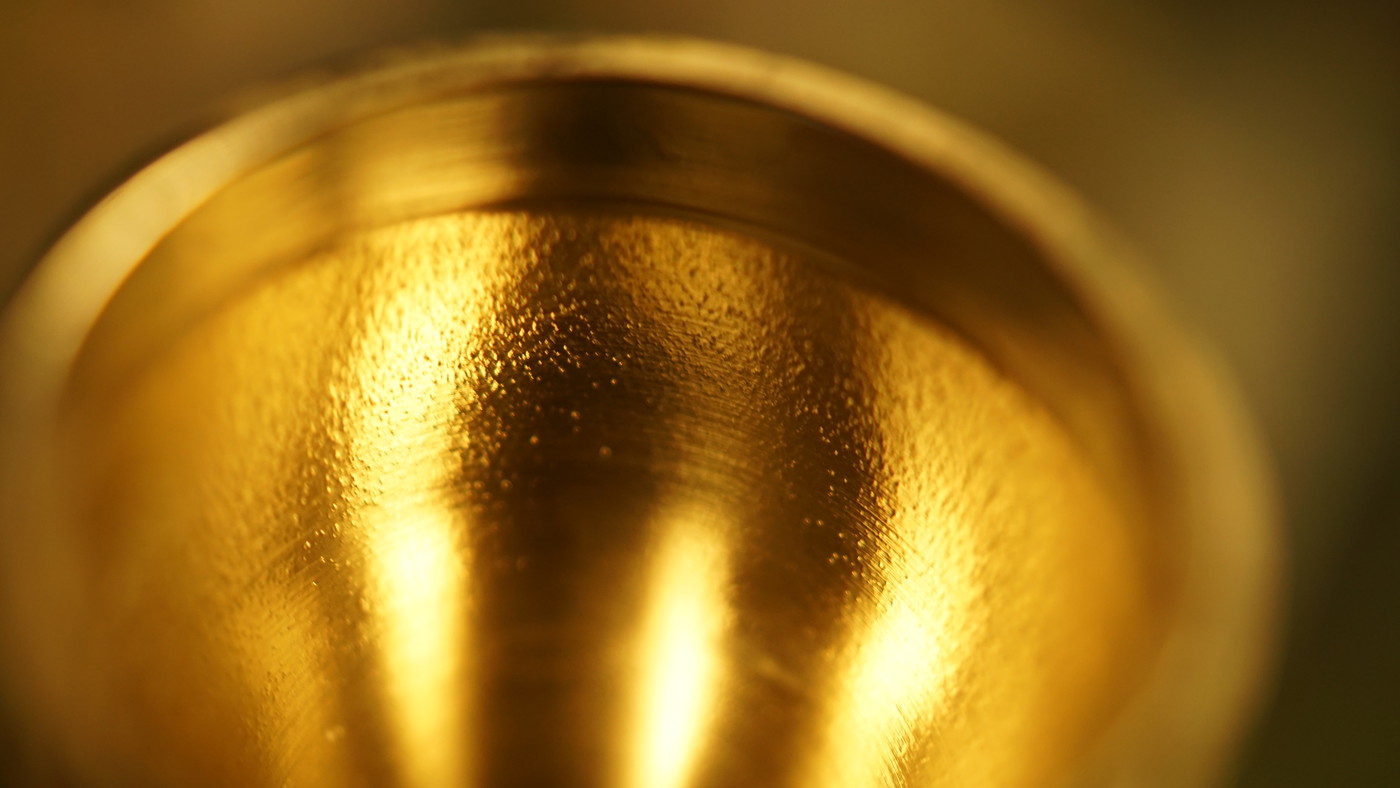
This is how the cup looks when I clean it with Valejo cleaner:

No good Carma...

So, tomorrow is a new day.

I will add a 1/48 Sea Hurricane to my lst if you do not mind Bish?

@ Frank, sorry it has been a bad week.

sic transit gloria mundi

  • Member since
    May 2017
  • From: Denver, Colorado
Posted by MrStecks on Friday, February 8, 2019 10:56 AM

Tales of the Omnibus - Chapter 1

Hey guys.  As you can see in the picture below, the floor of the Omnibus is pretty badly warped.  This is a thick chunk of plastic and the foundation for the whole vehicle, so I know if I glue the chassis and body to this it's all going to end up wonky.

Any thoughts on how to square up this floor?  My only idea is to screw it down to a plank of wood and the glue in some brass rod (in strategically hidden areas), to keep it straight.  Would that work, or is there a better solution?

Cheers,
Mark


On the bench:  Revel 1/48 B-25J Mitchell

In the queue: Tamiya 1/48 F4U-1A Corsair

  • Member since
    May 2017
  • From: Denver, Colorado
Posted by MrStecks on Friday, February 8, 2019 10:48 AM

stikpusher

Any feedback on if this is sufficient or needs change would be appreciated


Stikpusher, I really like the OD over the black.  It has a very natural "aged" look to it.  Nicely done.  Yes

Cheers,
Mark


On the bench:  Revel 1/48 B-25J Mitchell

In the queue: Tamiya 1/48 F4U-1A Corsair

  • Member since
    December 2002
  • From: Bury St Edmunds, Suffolk, England
Posted by Bish on Friday, February 8, 2019 8:18 AM

Andy, yep, thats fine. Welcome aboard.

I am a Norfolk man and i glory in being so


On the bench: Airfix 1/72nd Harrier GR.3/Fujimi 1/72nd Ju 87D-3

JOIN OUR COMMUNITY!

Our community is FREE to join. To participate you must either login or register for an account.

SEARCH FORUMS
FREE NEWSLETTER
By signing up you may also receive reader surveys and occasional special offers. We do not sell, rent or trade our email lists. View our Privacy Policy.