SEARCH FINESCALE.COM

Enter keywords or a search phrase below:

IDF group build 2019/2020

10491 views
141 replies
1 rating 2 rating 3 rating 4 rating 5 rating
  • Member since
    November 2008
  • From: Far Northern CA
Posted by mrmike on Sunday, September 1, 2019 11:23 PM

Hi Theuns;

Yes I would participate, but unfortunately not until after first of the year. Benchtime has been at a premium since Fall, and the rest of the year looks about the same. Best of luck getting your GB off the ground; there are plenty of unique and interesting subjects.

  • Member since
    February 2011
Posted by GreySnake on Monday, September 2, 2019 1:11 AM

I’m interested. 

  • Member since
    February 2016
  • From: Ice coated north 40 saskatchewan
Posted by German Armour on Monday, September 2, 2019 10:20 AM

Sounds like an interesting idea!

 Never give up, never quit, never stop modelling.Idea


  • Member since
    April 2019
  • From: Earth, Milky Way Galaxy
Posted by John 3:16 KJV on Monday, September 2, 2019 10:48 PM

I’ve got a kit that I could enter! Big Smile  

     “For God so loved the world, that he gave his only begotten Son, that whosoever believeth in him should not perish, but have everlasting life.

     For God sent not his Son into the world to condemn the world; but that the world through him might be saved.”  - John 3:16-17


  • Member since
    July 2014
Posted by modelcrazy on Monday, September 2, 2019 11:25 PM

Sure, I have a 1/72 Hase F-16 Sufa I'd like to get into.

Steve

Building a kit from your stash is like cutting a head off a Hydra, two more take it's place.


http://www.spamodeler.com/forum/

  • Member since
    April 2010
Posted by Theuns on Tuesday, September 3, 2019 9:20 AM

OK great, I have the front page build roster up and running , for the guys not stating a model yet please let me know what you will be building.


This is then basically open now so get cracking.


I am open to sugestions for a group badge, if you have one post so we can see please.


Theuns

  • Member since
    July 2014
Posted by modelcrazy on Tuesday, September 3, 2019 9:35 AM

Maybe something with this?

Or too much?

Steve

Building a kit from your stash is like cutting a head off a Hydra, two more take it's place.


http://www.spamodeler.com/forum/

  • Member since
    April 2019
  • From: Earth, Milky Way Galaxy
Posted by John 3:16 KJV on Tuesday, September 3, 2019 9:39 AM

Theuns: I can make one or a few for you and submit them, if you’d like. I can try to work with that, modelcrazy. Big Smile

     “For God so loved the world, that he gave his only begotten Son, that whosoever believeth in him should not perish, but have everlasting life.

     For God sent not his Son into the world to condemn the world; but that the world through him might be saved.”  - John 3:16-17


  • Member since
    February 2011
Posted by GreySnake on Tuesday, September 3, 2019 9:51 AM

My build will be the Tamiya 1/35 Merkava. 

  • Member since
    September 2011
  • From: Milaca, Minnesota
Posted by falconmod on Tuesday, September 3, 2019 9:52 AM

I'd be interested, either a 1/48 ESCI Kfir,  or a 1/48 Italeri F-16B

John

On the Bench: 1/72 Ki-67, 1/48 T-38

1/144 AC-130, 1/72 AV-8A Harrier

  • Member since
    April 2019
  • From: Earth, Milky Way Galaxy
Posted by John 3:16 KJV on Tuesday, September 3, 2019 12:40 PM

Here are some GB badge options: 

Some images from the internet plus some editing and...

The GB dates aren’t too clearly visible on the last one; if you like that one and want me to redo it, just please let me know.  :)

     “For God so loved the world, that he gave his only begotten Son, that whosoever believeth in him should not perish, but have everlasting life.

     For God sent not his Son into the world to condemn the world; but that the world through him might be saved.”  - John 3:16-17


  • Member since
    April 2010
Posted by Theuns on Tuesday, September 3, 2019 1:24 PM

Thanx for the feedback sofar guys, I like it.


Just a heads up, I am in South Africa, about 8 hour or so ahead of US eastern seabord so my responces might seem to be late to you guys, its 20h23 here now ;-)


Theuns

  • Member since
    April 2019
  • From: Earth, Milky Way Galaxy
Posted by John 3:16 KJV on Tuesday, September 3, 2019 1:47 PM

No problem! :) Also, my model is the Monogram 1/35 M48A2 Patton Tank. 

     “For God so loved the world, that he gave his only begotten Son, that whosoever believeth in him should not perish, but have everlasting life.

     For God sent not his Son into the world to condemn the world; but that the world through him might be saved.”  - John 3:16-17


  • Member since
    July 2008
Posted by Est.1961 on Tuesday, September 3, 2019 3:22 PM

Hi Theuns,

I have a 1/72 AH-1S cobra that I can come in with thank you. 

  • Member since
    February 2011
Posted by GreySnake on Tuesday, September 3, 2019 9:57 PM
Had sometime to night so cracked open the Tamiya Merkava. Here is the box.
 
The kit first came out thirty five years ago! It’s interesting to note in the instructions on the history of the vehicle it’s stated that the Merkava did well against T-72s in the recent Lebanon conflict. Makes you realize how long ago this kit came out.
 
Here are the sprues. Not a lot going on with this kit when compared to kits nowadays. I believe this is a pretty recent reissue of the molds appear to be in pretty good shape still.
Like most pre 1990’s Tamiya tank models there are holes in the lower hull for a motor that will need filled. I’ve just glued some styrene on the inside and will fill the holes with some putty. Put tape around where the putty goes, no point making a mess and causing myself extra work.
 
The hull is lacking sponsons so you can see underneath the tank. Normally I’d fix this with styrene, however I’m using the side skirts and with the tracks installed it will hardly be noticeable if at all. I’ll make a final decision after doing a little improving on the upper and lower hull.
 
Did a little test fit on the turret and the kit is showing its age somewhat, nothing that can’t be fixed with a little effort.
Now from reading the Tamiya kit supposedly represents the prototype Merkava and not the MK. I and because Tamiya didn’t get full access to the tank some parts is wrong or just not there to begin with. A lot the then new MBT’s Tamiya made back then suffered the same problem.  So I’m going to have some scratch building ahead of me. I’m going to see what I can do with what I have on hand versus using aftermarket.  I could go crazy buying aftermarket for the kit and at that point might as well buy the more accurate Takom kit.
 
 I can’t find it now but did come across on my online travels that supposedly Merkava prototypes did see action in Lebanon. At the very least I am going to see what I can do to make it look like a MK. I. 


  • Member since
    July 2008
  • From: Vancouver, the "wet coast"
Posted by castelnuovo on Tuesday, September 3, 2019 11:02 PM

I am also in with Tamiya's Merkava in 1/35. Bought it a while ago, just waited for an excuse to open it as my motivation for building has been in a doldrums lately.

  • Member since
    April 2010
Posted by Theuns on Tuesday, September 3, 2019 11:29 PM

Cool, seems we are off to a good start here :-)


Nice work sofar on that Merkava Greysnake, I have also looked at a few of the Tamiya 1/35 armour kits and might get one in the future, armour is not really my thng, I just want to try a few new weathering stuff I saw.


My build moejoe for this year has also been as low as can be but I made a start on my academy Maghac and sofar it is progressing well. I have assembled the road and drive wheels to see the track fit.

It seems the tracks are a few mm to short enev with the reat drive wheel axle moved as far forward as it can go...will have to think about this one for a bit.

The turret has the up armoured plates installed on the one side sofar, I had to wrangle it into place but I am sure it must be something I did wrong somewhere.

I had a look at some of the weathering powders and washes that one can buy but here in SA they are very expensive so I will play with oil paints and chalk pastels for now.


Academy's Merkava is also a very tempting subject, I may lool at getting one next year to compliment the one I am doing now.


Gues here in SA we sometimes have breaks in the internet so if I am offlin for a few days please continue, I will be back ;-)


Theuns

  • Member since
    June 2008
Posted by lewbud on Wednesday, September 4, 2019 3:03 AM

I'd like to join up with Ezer Weizman's Black 57 Spitfire. Scale will be 1/72, don't know which kit yet.

Buddy- Those who say there are no stupid questions have never worked in customer service.

  • Member since
    September 2012
Posted by GMorrison on Wednesday, September 4, 2019 3:18 AM

Oh goodness, or Oy Vay!

I've got quite a few, mostly aircraft.

Vautour probably my first choice,

 Modeling is an excuse to buy books.


  • Member since
    July 2014
Posted by modelcrazy on Wednesday, September 4, 2019 10:31 AM

Here's a pic of mine. I'll start as soon as I get the paint together.

Steve

Building a kit from your stash is like cutting a head off a Hydra, two more take it's place.


http://www.spamodeler.com/forum/

  • Member since
    April 2010
Posted by Theuns on Wednesday, September 4, 2019 11:16 AM

Build roster updated


T

  • Member since
    April 2019
  • From: Earth, Milky Way Galaxy
Posted by John 3:16 KJV on Wednesday, September 4, 2019 3:53 PM

Mine, to be done in Israeli markings of courseBig Smile

Installment 1 - General


     “For God so loved the world, that he gave his only begotten Son, that whosoever believeth in him should not perish, but have everlasting life.

     For God sent not his Son into the world to condemn the world; but that the world through him might be saved.”  - John 3:16-17


  • Member since
    February 2011
Posted by GreySnake on Wednesday, September 4, 2019 6:55 PM
Progress was made on the Merkava today, I keep finding little things that need fixed. One thing to be aware of is the Mk. I a lot of upgrades during its service life so looking at reference photos can be tricky. The Mk. I’s were upgraded to hybrid versions later in service using parts from the Mk. II so you have to be careful not to add the incorrect part unless you are making a hybrid. The good thing about building a very early MK. I is the anti-skid coating can be skipped along with the annoying ball and chain setup on the back of the turret. Both of those were starting to show up during 1982 but not all Merkava’s had them at the time.
 
The putty work on the bottom of the hull came out fine.
 
A couple vents need to be filled with sheet styrene as can be seen. Otherwise you'll see into an empty hull.
 
On both the right and left sides of the hull there should be exhaust pipes that aren’t included and just leave a giant opening. I used some sprue and drilled it out to make a couple exhaust pipes. I then had to make a little setup using more styrene so they’d fit correctly. The pipes don’t need to be fancy as the area is going to be painted black.
 
The turret on the Tamiya kit sits way too high and depending how the model is held you can see daylight. I started off by sanding the bottom of the turret ring.  There’s a small spot on the hull that can be sanded down lightly as well where the pencil is pointing. After doing that the turret sits much better. I couldn’t get a good angle to show the difference with a camera so now before and after shots.
 
 
While working on the turret some styrene was added to two little openings on the inside of the turret. I’m going to add a commander so with the hatch open some daylight can poke through the openings. With the hatches buttoned up this step can be disregarded.
 
In the end I did decide to close up some of the sponsons. The way the side skirts on the Merkava are you can see through some parts directly into the empty inside hull. Other parts you can’t so I’ve left those open for now. Really don’t need to be perfect just close off the hull, with the tracks and side skirts added you won’t be able to see much in the end.  I may or may not cover the entire area but at this point I might as well. Just realized I didn’t take a finished photo of the filled in sponsons. I’ll take one tomorrow. 
 
 
I “think” all the big fixes on the model are more or less done at this point. I’ll probably add some casting numbers to the turret. The tow hooks need the recesses cut out along with casting texture, rivets for the front mud flaps, towing shackles added to the turret and a few other fixes. So there’s still some work ahead of me.   
  • Member since
    September 2011
  • From: Milaca, Minnesota
Posted by falconmod on Thursday, September 5, 2019 12:28 PM

Here's the Kfir I'm working with.  the cockpit was short shot so I needed to add to that. The triangular intake on top needs to be remade cause it's way too wide, all panel lines will need to be etched as they are the raised type.

John


On the Bench: 1/72 Ki-67, 1/48 T-38

1/144 AC-130, 1/72 AV-8A Harrier

  • Member since
    April 2010
Posted by Theuns on Thursday, September 5, 2019 11:43 PM

Ah man I remeber thos Esci kits from way bask in the 80's :-)


For interest sake, here is the new italeri 1/32 Mirage I did last year.

 Italeri 1/32 Mirage 3 cj by Theunis van Vuuren, on Flickr

 Italeri 1/32 Mirage 3 cj by Theunis van Vuuren, on Flickr


As for the tank, this is what I got done sofar, there are loafds of little brackets and things to put on.

 IMG_20190904_063114 by Theunis van Vuuren, on Flickr

1/2 of the turret armout installed

 IMG_20190904_063056 by Theunis van Vuuren, on Flickr

 IMG_20190904_065719 by Theunis van Vuuren, on Flickr


Theuns

  • Member since
    September 2012
Posted by GMorrison on Thursday, September 5, 2019 11:58 PM

Israel acquired 31 Sud Vautour fighter bombers starting in 1958. While Israel was unable to obtain weapons from most countries following the Suez Crisis, France was a main supplier of armor and aircraft as well as small arms.

Early Israeli jets such as the Ouragon, the Mystere and the Vautour provided the basis of the IDF following the very ad hoc procurement of Avias, Spitfires, B-17s,C-47s, Dragons and so forth. Mirages came later.

The Vautour was initially developed as a small sized nuclear weapon delivery system for the AdeA, but was inadequate as a bomber because it did not carry any radar.

With 4 30mm cannon however, it replaced the Mosquitoes in IDF use and was a counter to the IL-28 Egypt was operating.

Vautours provided a main part of the Israeli ground attacks that precipitated the Six Day War. They shot up Egyptian, Jordanian, Iraqi and Syrian air bases, with some losses and one A 2 A kill.

It's kind of an unusual design, having the same bicycle landing gear as the earlier B-47 and the later Harrier.

My entry, Air Marshall.

 Modeling is an excuse to buy books.


  • Member since
    April 2010
Posted by Theuns on Friday, September 6, 2019 6:25 AM

That is an interesting entry, looking forward to see it done.

The Magach is starting to look like a modern MBT now...loads of little things to glue on !

 IMG_20190906_130742 by Theunis van Vuuren, on Flickr

 IMG_20190906_130840 by Theunis van Vuuren, on Flickr


Theuns

  • Member since
    April 2019
  • From: Earth, Milky Way Galaxy
Posted by John 3:16 KJV on Friday, September 6, 2019 11:35 PM

Installment Two - Some Assembly

Below: Can anyone see the defect?- Ah, what to do?....Tongue TiedWink


     “For God so loved the world, that he gave his only begotten Son, that whosoever believeth in him should not perish, but have everlasting life.

     For God sent not his Son into the world to condemn the world; but that the world through him might be saved.”  - John 3:16-17


  • Member since
    June 2019
Posted by Mach1 on Sunday, September 8, 2019 1:14 PM

Would you put me down as a TBD please? I'll need to do some digging to see what I have.

  • Member since
    April 2019
  • From: Earth, Milky Way Galaxy
Posted by John 3:16 KJV on Sunday, September 8, 2019 10:05 PM

Installment Three - More Assembly

Fixed well enough-

Main gun -

I drilled the hole as seen below with my modeling knife...; and, no, I didn’t assemble the main gun to the cupola area...Wink

Main body-

—————————————————————


     “For God so loved the world, that he gave his only begotten Son, that whosoever believeth in him should not perish, but have everlasting life.

     For God sent not his Son into the world to condemn the world; but that the world through him might be saved.”  - John 3:16-17


  • Member since
    April 2010
Posted by Theuns on Sunday, September 8, 2019 11:35 PM

Nice progress on that, interesting that the hole for the turret is solid.

I have been adding "stuff" to my hull and it seems to not make a dent in the sprue count LOL

Mach1 welcome


Theuns

  • Member since
    April 2019
  • From: Earth, Milky Way Galaxy
Posted by John 3:16 KJV on Monday, September 9, 2019 12:15 PM

Thank you, Theuns. The copyright on the plastic was dated in the sixties. I don’t have to deal with an overload of pieces; but yours probably is better quality. Big Smile 

By the way, what color will you use to prime your tank?


     “For God so loved the world, that he gave his only begotten Son, that whosoever believeth in him should not perish, but have everlasting life.

     For God sent not his Son into the world to condemn the world; but that the world through him might be saved.”  - John 3:16-17


  • Member since
    April 2010
Posted by Theuns on Monday, September 9, 2019 11:35 PM

I saw a vid of a guy building this model of mine and he sprayed the whole thing black, then white over the areas he wanted to lighten up. The IDF grey then went over it with the black and white being the preshading basically.


I usually preshade only the areas I want dark but in this case there are ao many little areas one might have a hard to time to shade I will follow his idea.

I will use a grey on the sudae and bottom instead of the white to modlate the paint a little more.


As for weathering, I will do some light paint chipping and very light rust and maybe some streaking of the dust but I still need to figure out most of these things as I go.


Theuns

  • Member since
    April 2010
Posted by Theuns on Tuesday, September 10, 2019 10:48 AM

As an interesting sidenote, I was visiting someone is a nearby hanger to where I work and saw he was working on a super cub. He told me it actually was an ex Israeli L-21 that served in the IAF :-)


Theuns

  • Member since
    April 2019
  • From: Earth, Milky Way Galaxy
Posted by John 3:16 KJV on Tuesday, September 10, 2019 3:29 PM

     Sweet! Big Smile Actually, the last model I completed was a Piper L4 Cub, not Israeli, though. An IAF Cub would probably make for a nice model!

     For priming generally, I‘ve got a Flat Light Aircraft Gray, but I’ve got to figure out preshading (what precise areas to preshade for one thing). 

————————————————————

Installment 4 - Turret rails! 

My kit didn’t provide pieces for the turret rails (Is that the correct name for them?). So, I scratchbuilt some rails out of metal (.025 music wire). Maybe they’re not perfect; but they’ve got to be better than the plastic extensions that had been molded onto the turret which I cut and sanded down. Here are some pics:


     “For God so loved the world, that he gave his only begotten Son, that whosoever believeth in him should not perish, but have everlasting life.

     For God sent not his Son into the world to condemn the world; but that the world through him might be saved.”  - John 3:16-17


  • Member since
    April 2010
Posted by Theuns on Tuesday, September 10, 2019 11:37 PM

Those look way more convincing than the plastic rails I am sure ;-)


My project is still in the box the way I left it over the weekend....I come hyome when the light is not  good anymore and after a whole day of "real work" models are not high up on my wish list LOL

I cant build fine detail with artificial light anymore so tend to wait till weekends to build.


As for the pre shading, I think the idea of doing the whole thing in black ad then white highlights is because it will be very hard to try and preshade only the "reccesses" being so deep in some areas without getting loads of paint in the wrong places, highlighting the areas you want light seems easier


Sone buildes do this on aircraft but I find it easy to access aircraft areas I want to shade. This tank on the other hand is more tricky so will do it in reverse order.


There are loads of vids on the interweb showing this "black base" idea.


Theuns

  • Member since
    April 2019
  • From: Earth, Milky Way Galaxy
Posted by John 3:16 KJV on Wednesday, September 11, 2019 11:26 PM

Thx, Theuns. :)

Work....Why can’t folks get paid for every model built?Wink 

————————————————————

Installment Five - Turret Rail Assembly / Primer

So, I put on the turret rails (pictures three and four); and I went ahead with preshading the way you said - black first, then white (rather, in my case, that gray I had).  I did a little work by hand, too. 

Here are the pictures:


     “For God so loved the world, that he gave his only begotten Son, that whosoever believeth in him should not perish, but have everlasting life.

     For God sent not his Son into the world to condemn the world; but that the world through him might be saved.”  - John 3:16-17


  • Member since
    April 2010
Posted by Theuns on Thursday, September 12, 2019 11:04 AM

I got primer on and then a black basecoat over all , this will be lightened in some areas to give "shade" effect when the colour goes on.

 IMG_20190912_161148 by Theunis van Vuuren, on Flickr

 IMG_20190912_173806 by Theunis van Vuuren, on Flickr


This is my "day job" since I cant build models for a living LOL

 IMG_20190911_090523 by Theunis van Vuuren, on Flickr

 IMG_20190910_113952 by Theunis van Vuuren, on Flickr


Theuns

  • Member since
    April 2019
  • From: Earth, Milky Way Galaxy
Posted by John 3:16 KJV on Thursday, September 12, 2019 3:39 PM

What kind of plane is that one? Big Smile

—————————————-—————-

Do you think I used too much gray and covered up too much preshading on my model? 


     “For God so loved the world, that he gave his only begotten Son, that whosoever believeth in him should not perish, but have everlasting life.

     For God sent not his Son into the world to condemn the world; but that the world through him might be saved.”  - John 3:16-17


  • Member since
    April 2010
Posted by Theuns on Thursday, September 12, 2019 11:33 PM

The wing is a topwing of a Pitts S2b I am completing today if the weather is good and the plane being masked is a Super Decthlon I hope to have flying very soon.


Theuns

  • Member since
    April 2010
Posted by Theuns on Friday, September 13, 2019 11:06 AM

As an experiment I looked at Humbrol yellow sand but was to "yellow to me" so I tried Tamiya 74 enamels. 

Here is the base with the highlights on it

 IMG_20190913_141724 by Theunis van Vuuren, on Flickr

Then I sht the tamiya over it in thin coats till I got an even look with shadows just showing through, the sides and bottom O added a drop of black to look like it is bleached a little less. 

This is an interesting colour indeed, in bright sun it looks very grey

 IMG_20190913_144230 by Theunis van Vuuren, on Flickr

But indoors where it will be viewed mostly the clopor changes to a more tan.

 IMG_20190913_171529 by Theunis van Vuuren, on Flickr

 IMG_20190913_171553 by Theunis van Vuuren, on Flickr


Now I need to weather it a little and complete the hull.


Theuns


  • Member since
    April 2019
  • From: Earth, Milky Way Galaxy
Posted by John 3:16 KJV on Friday, September 13, 2019 10:33 PM

Comin’ along, Theuns! Lighting sure does things. :)

     “For God so loved the world, that he gave his only begotten Son, that whosoever believeth in him should not perish, but have everlasting life.

     For God sent not his Son into the world to condemn the world; but that the world through him might be saved.”  - John 3:16-17


  • Member since
    April 2010
Posted by Theuns on Friday, September 13, 2019 11:14 PM

I did mess up the turret by trying chipping of the paint, will have to repaint the turret and maybe just go for a factory new tank. 

  • Member since
    April 2010
Posted by Theuns on Saturday, September 14, 2019 5:45 AM

This time Im hapy with the colour. I ysed my Tamiya buff and added about 25% humbrol green 155. Ths gave a nice sand with a subttle green heu to it in shade and a grey /sand in sunlight.

 IMG_20190914_122247 by Theunis van Vuuren, on Flickr

 IMG_20190914_122307 by Theunis van Vuuren, on Flickr

 IMG_20190914_120702 by Theunis van Vuuren, on Flickr


Theuns

  • Member since
    April 2010
Posted by Theuns on Sunday, September 15, 2019 9:50 AM

Looking at loads of magach pix I tried my habd at doing the dust weathering using a mix of different chalk pastles and the "wear surface" I used a graphite pencle to look like bare steel.

The tracks I had to tie together with cotton thread as onlt one set of the pins reached the holes but kept comming off, lucky the sideskirts will hide this

 IMG_20190915_150253 by Theunis van Vuuren, on Flickr

 IMG_20190915_150204 by Theunis van Vuuren, on Flickr

 IMG_20190915_144505 by Theunis van Vuuren, on Flickr


Theuns

  • Member since
    April 2019
  • From: Earth, Milky Way Galaxy
Posted by John 3:16 KJV on Sunday, September 15, 2019 10:23 PM

Good paint job on the tank, Theuns. Yes

     “For God so loved the world, that he gave his only begotten Son, that whosoever believeth in him should not perish, but have everlasting life.

     For God sent not his Son into the world to condemn the world; but that the world through him might be saved.”  - John 3:16-17


  • Member since
    April 2010
Posted by Theuns on Sunday, September 15, 2019 11:24 PM

Thanx, pity you cant really get the effect of the modulation where the green has 'faded" into a green/brown as my camera in direct sunlight makes it all to bright.


When I mixed the green, I used tamiya buff and added hunbrol green with a little grey aswell.

I sprayed the bottom of the tank with this mox that looked nce and green, I planned to lighten to top sides with some white but I saw that the paint has settled a little into a lighter green/brown shade....dumb luck LOL

I have seen that faded green had a slight brown heu to it and it just happen to work out well.The tonal differences are ther but seems to blend well as it is the same basic paint


Theuns

  • Member since
    February 2011
Posted by GreySnake on Wednesday, September 18, 2019 5:10 PM
Theuns and John both of your builds look to be progressing nicely. The paint on the Magach came out good Theuns. 
 
I’ve been slowly chipping away at my build for the past couple weeks. It’s cold off a little in Arizona so I’ve been doing a lot of yard work which hasn’t left me with much time to work on models. But I have gotten the Merkava close to the painting stage.
 
The wheels and suspension pieces had some pretty nasty seams so clean up took awhile.
 
After adding a few parts to the upper hull it was done.
 
The gun barrel cleaned up nicely with a little careful sanding.
In a previous post I noted the fit on the turret wasn’t great and this was the worst area by far. A little putty and sanding took care of the issue.
Added most of the parts to the turret and here is where I am at. Still need to clean up the machine gun mounts and glue those on. The gun barrel and mantlet cover haven’t been glued on yet. As the mantlet cover is khaki it’s easier to paint separately.  

  • Member since
    April 2010
Posted by Theuns on Wednesday, September 18, 2019 11:35 PM

That looks really nice, it is interesting to see that the Merkava has a mush "cleaner" hull than my Megach that has bobs and bits/boxes welded on all over the place....clearly a retro fit :-)


I have almost completed my tank, I dusted the hull and turret with my chalk pastels and it now really looks "used" maybe a little to much as some of the nice paint modulation has been lost in places but I am learning still LOL


Theuns

  • Member since
    July 2008
  • From: Vancouver, the "wet coast"
Posted by castelnuovo on Friday, September 20, 2019 1:32 PM

Some good progress here. My Merkva is also progressing nicely, turett is done the wheels are instaled. Unfortunately, about 10 days ago my computer decided that it is beyond outdated and packed it in. It does not recognize the wi fi or the cammera. So I bought a new computer but it will not be here for another week or so. So the WIP pics will be posted with much delay.

 Cheers...


  • Member since
    April 2019
  • From: Earth, Milky Way Galaxy
Posted by John 3:16 KJV on Friday, September 20, 2019 4:30 PM

Hi, all; and thank you, Greysnake! I’m finally gonna post installment six.

Installment 6-

Got milk?

Chocolate milk that is...; for my tank ended up a chocolate milk-like color which in other lighting struck me as somewhat pinkish; but, hey, Testors Flat Tan was what the instructions recommended. Wink

So, what do y’all think? What‘s next? Can anyone tell me how to get a paint color like the color in the illustration below? (I prefer enamels and I would prefer not to mix, but I may have to compromise somewhere...so, I invite all options.)

     “For God so loved the world, that he gave his only begotten Son, that whosoever believeth in him should not perish, but have everlasting life.

     For God sent not his Son into the world to condemn the world; but that the world through him might be saved.”  - John 3:16-17


  • Member since
    September 2012
Posted by GMorrison on Friday, September 20, 2019 5:14 PM

I think it looks good. After I scanned through your post I looked at MM paint chips. I'd forgotten what you tried, but I came up with....Flat Tan. It's probably a good base to start building up lighter areas against, mixing with drop or two of EDIT: light gray at a time.

 Modeling is an excuse to buy books.


  • Member since
    April 2019
  • From: Earth, Milky Way Galaxy
Posted by John 3:16 KJV on Friday, September 20, 2019 7:55 PM

Thanks, GM. :) The paint seems, though, to have a pink undertone. 

     “For God so loved the world, that he gave his only begotten Son, that whosoever believeth in him should not perish, but have everlasting life.

     For God sent not his Son into the world to condemn the world; but that the world through him might be saved.”  - John 3:16-17


  • Member since
    April 2010
Posted by Theuns on Saturday, September 21, 2019 8:53 AM

I dont think a pink undertone is a bad thing, paint in the desert fades into totally odd colours. Here in South Africa green fades into a strange brown tone.


What you can try maybe is a filter to alter the tone a little but still leave the basic colour. I did this with very thined water colour , look at the slight difference between the front (filtered) panel of the LH side skirt and the rest of it/

 Academy 1/35 Magach 7 by Theunis van Vuuren, on Flickr

 Academy 1/35 Magach 7 by Theunis van Vuuren, on Flickr

To me it looks like a repainted or replaces part that has weathered at a different rate.

 Academy 1/35 Magach 7 by Theunis van Vuuren, on Flickr

 Academy 1/35 Magach 7 by Theunis van Vuuren, on Flickr

 Academy 1/35 Magach 7 by Theunis van Vuuren, on Flickr

 Academy 1/35 Magach 7 by Theunis van Vuuren, on Flickr

 Academy 1/35 Magach 7 by Theunis van Vuuren, on Flickr

 Academy 1/35 Magach 7 by Theunis van Vuuren, on Flickr

 Academy 1/35 Magach 7 by Theunis van Vuuren, on Flickr


Im caling this one dune, was a fun build, came out better than I expected.


Theuns

  • Member since
    April 2019
  • From: Earth, Milky Way Galaxy
Posted by John 3:16 KJV on Saturday, September 21, 2019 3:21 PM

Good job, Thuens! Congrats! Big Smile

     “For God so loved the world, that he gave his only begotten Son, that whosoever believeth in him should not perish, but have everlasting life.

     For God sent not his Son into the world to condemn the world; but that the world through him might be saved.”  - John 3:16-17


  • Member since
    April 2010
Posted by Theuns on Sunday, September 22, 2019 12:15 AM

Thanx :-)

  • Member since
    February 2011
Posted by GreySnake on Sunday, September 22, 2019 4:42 PM
Thank you Theuns! The Magach turned out great!
 
John, the paint looks good as is to me.
 
I’ve been working on painting the Merkava for the past few days. Started out with Tamiya’s NATO black to do some pre shading and then moved onto the base color, using a 1:1 mix of Tamiya Medium Grey and Buff.  Here is how it looks so far.
 
 
Here is one picture taken in direct sunlight gives it a different look.
 
Next up will be painting the rubber on the road wheels. The misses is going to be gone for a week visting family so I’ll have a lot of time to work.
  • Member since
    April 2010
Posted by Theuns on Monday, September 23, 2019 4:21 AM

Nice work on the Merkava, I see you also got the same effect of the colour changing from a grey to grey/green as the light changes :-)


Theuns

  • Member since
    April 2019
  • From: Earth, Milky Way Galaxy
Posted by John 3:16 KJV on Monday, September 23, 2019 11:07 AM

Thanks, Greysnake. :)

You’ve done a great job!

     “For God so loved the world, that he gave his only begotten Son, that whosoever believeth in him should not perish, but have everlasting life.

     For God sent not his Son into the world to condemn the world; but that the world through him might be saved.”  - John 3:16-17


  • Member since
    July 2014
Posted by modelcrazy on Tuesday, September 24, 2019 1:44 PM

Looks good GreySnake


I started on the Sufa. They have far more electronics and other items on the fuse than the US version. 

Steve

Building a kit from your stash is like cutting a head off a Hydra, two more take it's place.


http://www.spamodeler.com/forum/

  • Member since
    April 2010
Posted by Theuns on Tuesday, September 24, 2019 11:13 PM

The Hump on the SUFA reminds me of the Avionlcs hump of the A4 E :-)


Theuns

  • Member since
    February 2011
Posted by GreySnake on Wednesday, September 25, 2019 4:03 PM
Thanks for the comments guys. Haven’t had a lot of time to get much work done on the Merkava. Got the road wheels painted and started painting the cover on the gun mantlet. Here’s one photo I’ll take a few more later.
 
The misses is visiting family for a week so I should get a lot more modeling time in.
  • Member since
    July 2014
Posted by modelcrazy on Friday, September 27, 2019 10:19 AM

I got further on the Sufa. took a picture and realized I hadn't painted the cockpit. Ooops.

Oh well, I'll deal with it. It looks mean to me with the electronics spine and CTF's


Steve

Building a kit from your stash is like cutting a head off a Hydra, two more take it's place.


http://www.spamodeler.com/forum/

  • Member since
    February 2011
Posted by GreySnake on Tuesday, October 1, 2019 11:34 AM
Managed to gloss the Merkava and apply the decals. They went on “okay” it seems the old Tamiya armor kit’s decals aren’t that great.
 
Right now I’m waiting some Tamiya black panel liner to do a wash around the suspension parts. It should arrive today and I can resume work.  
  • Member since
    April 2010
Posted by Theuns on Tuesday, October 1, 2019 11:41 AM

The sufa is coming allong well, I am sure you will sort out the cockpit :-)


The turret on the Merkeva realy does have a "space age" look to it.


Theuns

  • Member since
    July 2008
  • From: Vancouver, the "wet coast"
Posted by castelnuovo on Friday, October 4, 2019 12:31 AM

My computer is finaly back online, so here are few WIP pix. The progress has been quite significant from the time these were taken, new pix coming soon

  • Member since
    April 2019
  • From: Earth, Milky Way Galaxy
Posted by John 3:16 KJV on Friday, October 4, 2019 1:23 AM

Hi again, everybody!Big Smile

Nice turret, castel! What paint color did you use?

modelcrazy- Are you going to have its landing gear up or down? May the painting of the cockpit go well! :)

GreySnake- Good job! 

     “For God so loved the world, that he gave his only begotten Son, that whosoever believeth in him should not perish, but have everlasting life.

     For God sent not his Son into the world to condemn the world; but that the world through him might be saved.”  - John 3:16-17


  • Member since
    July 2014
Posted by modelcrazy on Sunday, October 6, 2019 10:44 PM

I finished the cockpit paint. I need to mask the canopy and spray the interior smoke then off to the base coat.

Steve

Building a kit from your stash is like cutting a head off a Hydra, two more take it's place.


http://www.spamodeler.com/forum/

  • Member since
    April 2010
Posted by Theuns on Monday, October 7, 2019 11:25 PM

Nice save on doing the cockpit paint :-)

The the black for reverse shading tecnique?


Theuns

  • Member since
    July 2008
  • From: Vancouver, the "wet coast"
Posted by castelnuovo on Monday, October 7, 2019 11:42 PM

This is what a brand new Merkava would look like Smile. It is painted with Tamiya dessert yellow and the mantlet is buff. The dessert yellow was probably sometimes in the past mixed with some other colour, but it is good enough. The towing cable around the turret broke when I tried to bend it. The instructions said "bend gently", I guess I wasn't gentel enough Sad. Now just need some weathering, don't quite know what to do...Maybe a wash of raw amber and some black?


  • Member since
    July 2014
Posted by modelcrazy on Tuesday, October 8, 2019 10:59 AM

Theuns

Nice save on doing the cockpit paint :-)

The the black for reverse shading tecnique?


Theuns


Yes, I black base everything anymore.

Steve

Building a kit from your stash is like cutting a head off a Hydra, two more take it's place.


http://www.spamodeler.com/forum/

  • Member since
    April 2019
  • From: Earth, Milky Way Galaxy
Posted by John 3:16 KJV on Sunday, October 13, 2019 8:50 PM

Installment Seven -

Thank you, guys, for the encouragement on the tan! However, I decided to repaint with Rustoleum after all. I still have some more airbrushing to do; but here are two pics. Big Smile

     “For God so loved the world, that he gave his only begotten Son, that whosoever believeth in him should not perish, but have everlasting life.

     For God sent not his Son into the world to condemn the world; but that the world through him might be saved.”  - John 3:16-17


  • Member since
    April 2010
Posted by Theuns on Tuesday, October 15, 2019 11:37 PM

That is interesting painting with Rostellium :-)


Castleneuvo , I would play arround with a pin wash just to make the detail pop a little and for the cable, can you not maybe cut off the thimble ends, drill them out and clue in a piece of thread? This is how the cable on my takn came in the kit. When painted it looks good.


Theuns

  • Member since
    July 2014
Posted by modelcrazy on Sunday, October 20, 2019 10:57 PM

A little further on the Sufa.

Steve

Building a kit from your stash is like cutting a head off a Hydra, two more take it's place.


http://www.spamodeler.com/forum/

  • Member since
    July 2014
Posted by modelcrazy on Sunday, October 27, 2019 9:09 PM

Thunes,

I,m done with the Sufa. Thanks for another fun GB.

Steve

Building a kit from your stash is like cutting a head off a Hydra, two more take it's place.


http://www.spamodeler.com/forum/

  • Member since
    June 2008
Posted by lewbud on Sunday, October 27, 2019 9:30 PM

Great job as usual Steve! I like the tail markings, are they the kit decals?

Buddy- Those who say there are no stupid questions have never worked in customer service.

  • Member since
    July 2014
Posted by modelcrazy on Sunday, October 27, 2019 11:13 PM

Thanks Buddy.

Yes, it also comes with the Bat squadron.

Steve

Building a kit from your stash is like cutting a head off a Hydra, two more take it's place.


http://www.spamodeler.com/forum/

  • Member since
    April 2010
Posted by Theuns on Sunday, October 27, 2019 11:39 PM

Wow niw that looks good, love the paintwork. 

Thanx for taking part.


I updated the front page with a pic and also added the "insignea" GB badge that I think represents the whole IDF.


Theuns

  • Member since
    July 2008
  • From: Vancouver, the "wet coast"
Posted by castelnuovo on Monday, October 28, 2019 12:00 AM

Well, for better or worse, I am done with this one

  • Member since
    April 2010
Posted by Theuns on Monday, October 28, 2019 9:24 AM

I think you nailed that Merkava, just love the subtle weathering and stains.

Thanx for taknig part :-)


I will update the front page.


Theuns

  • Member since
    July 2014
Posted by modelcrazy on Monday, October 28, 2019 10:41 AM

Thanks Theuns.

Looks good Castel.

Steve

Building a kit from your stash is like cutting a head off a Hydra, two more take it's place.


http://www.spamodeler.com/forum/

  • Member since
    July 2008
  • From: Vancouver, the "wet coast"
Posted by castelnuovo on Thursday, October 31, 2019 12:38 AM

Thank you getlemen, see you in the next GB Smile

  • Member since
    February 2011
Posted by GreySnake on Monday, November 4, 2019 1:31 PM
Apologies for my absence, October was a really busy month for me. Chipped away at the Merkava when I could just never had time to sit down at my desktop.
 
Nice work on the Sufa Steve. The decals really make it pop.
 
Castlenuovo, The Merkava really good I like it!
 
I ended up forgetting to take a lot of in progress shots while working on the Merkava, sorry! That’s why I’ll never write a magazine article or do a Youtube video I get so caught up in my work.
 
Added some Tamiya black panel liner to try to add some depth to the panel lines, it came out alright. I much prefer using Ammo as it seems to clean up easier then Tamiya’s brand. Also did some detail work and added the tracks.
 
The gun manlet cover was painted buff and looked too clean and tried fixing that as you will see in a minute.
 
Added the tools. 
And like I said because I’m horrible at taking enough pictures here’s the completed build.
 
The black thing is one of the antenna I knocked off while taking photos.
And my mediocre painted commander.
Did some weathering that didn’t turn out the way I liked. All and all it looks alright. Doesn’t help I;m getting burned out on building armor so I more or less forced myself to finish the tank which is never a good thing.
  • Member since
    April 2010
Posted by Theuns on Monday, November 4, 2019 10:29 PM

Grey Snake I think that came out really well, the subtle weatheing looks just right.

I usually tend to go overboard with weathering and it looks way beat up inatead of "slightly used" LOL

Thanx for taking part, I will update the front page.


Theuns

  • Member since
    April 2010
Posted by Theuns on Monday, December 9, 2019 10:02 PM

Hallo everone  ;-)


Theuns

  • Member since
    June 2014
Posted by BrandonK on Monday, December 9, 2019 10:14 PM

I've been so turned upside down this past half the year I missed this one completely. I've agreed to build 9 GB's this coming year. Let's just make it an even 10 and this gives me an excuse to get that sweet Academy 1/48 M-51 Super Sherman IDF I've been eyeballing. I'll do my level best to get it done.

BK


On the bench:

A lot !! And I mean A LOT!!

2024 Kits on deck / in process / completed   

                         14 / 5 / 2  

                              Tongue Tied

  • Member since
    April 2010
Posted by Theuns on Tuesday, December 10, 2019 10:36 PM

welcome Mr B, your on the list :-)


Theuns

  • Member since
    April 2019
  • From: Earth, Milky Way Galaxy
Posted by John 3:16 KJV on Sunday, January 5, 2020 3:47 PM

Hey, guys! I’m back finally with...

Installment 8 - Cool

So, since the last installment, the turret has come together a bit more:

The smaller turret is on the main turret and the antenna is on. The hatch cover directly on the main turret probably should be either left open or pressed down and glued shut, though.

Some pieces have been airbrushed:

I repainted the fronts of the wheels and the little caps for the wheels. However, I have more airbrushing on the to-do list. Many of the road wheels are face-down in the silly-putty as pictured.

The gun cover/tarp is on:

So, these gun covers...

I might have left out this detail; but I found a material to make it with. I turned a gum wrapper into a gun wrapper. I still have to paint it yet, though.

Here’s the main gun attached to the turret:


     “For God so loved the world, that he gave his only begotten Son, that whosoever believeth in him should not perish, but have everlasting life.

     For God sent not his Son into the world to condemn the world; but that the world through him might be saved.”  - John 3:16-17


  • Member since
    April 2010
Posted by Theuns on Sunday, January 5, 2020 10:04 PM

Comming allong nicely indeed. Cool idea for the gun/gum wrapper.


Theuns

  • Member since
    April 2019
  • From: Earth, Milky Way Galaxy
Posted by John 3:16 KJV on Tuesday, January 7, 2020 7:45 PM

Thank you! :)

     “For God so loved the world, that he gave his only begotten Son, that whosoever believeth in him should not perish, but have everlasting life.

     For God sent not his Son into the world to condemn the world; but that the world through him might be saved.”  - John 3:16-17


  • Member since
    September 2012
Posted by GMorrison on Tuesday, January 7, 2020 7:55 PM

John, that mantlet cover looks good. One detail to add. See on yout turret there are a series of little indented rectangles in a ring around the outside of the mantlet. If you look closely at your most excellent photo of that Magach, you can see those are for clips that hold the edges of the cover down on the turret itself. Important detail.

 Modeling is an excuse to buy books.


  • Member since
    April 2005
  • From: Australia
Posted by taxtp on Tuesday, January 7, 2020 10:12 PM
Hi Theuns, I'd like to join please. I'll pick a subject and let you know. Cheers Tony

I'm just taking it one GB at a time.

  • Member since
    April 2019
  • From: Earth, Milky Way Galaxy
Posted by John 3:16 KJV on Wednesday, January 8, 2020 8:17 PM

GMorrison

John, that mantlet cover looks good. One detail to add. See on yout turret there are a series of little indented rectangles in a ring around the outside of the mantlet. If you look closely at your most excellent photo of that Magach, you can see those are for clips that hold the edges of the cover down on the turret itself. Important detail.


Thank you for your comment, GM!

Man, now how do I fix that cover?...Even if I can add a gum wrapper(s) to extend the tarp, any suggestions on how to make the connection to the turret look realistic? 

     “For God so loved the world, that he gave his only begotten Son, that whosoever believeth in him should not perish, but have everlasting life.

     For God sent not his Son into the world to condemn the world; but that the world through him might be saved.”  - John 3:16-17


  • Member since
    April 2010
Posted by Theuns on Thursday, January 9, 2020 9:59 PM

Cool Tony, I got you up.


Theuns

  • Member since
    June 2014
Posted by BrandonK on Sunday, January 12, 2020 10:52 AM

Steve, Greysnake, and CN, well done on those kits. They are all super nice and completed very quickly. You three have set the bar pretty high for the rest of us.

BK

On the bench:

A lot !! And I mean A LOT!!

2024 Kits on deck / in process / completed   

                         14 / 5 / 2  

                              Tongue Tied

  • Member since
    April 2019
  • From: Earth, Milky Way Galaxy
Posted by John 3:16 KJV on Sunday, January 12, 2020 4:56 PM

Installment 9 - 

I extended the gun cover; but now, I have to figure out how to realistically make it look clipped to the turret....Any tips on how to do that? 

     “For God so loved the world, that he gave his only begotten Son, that whosoever believeth in him should not perish, but have everlasting life.

     For God sent not his Son into the world to condemn the world; but that the world through him might be saved.”  - John 3:16-17


  • Member since
    April 2010
Posted by Theuns on Monday, January 13, 2020 10:25 PM

Thin strips of plastic glued on??


Theuns

  • Member since
    April 2019
  • From: Earth, Milky Way Galaxy
Posted by John 3:16 KJV on Thursday, January 16, 2020 8:11 PM
Thx, Theuns. :)

     “For God so loved the world, that he gave his only begotten Son, that whosoever believeth in him should not perish, but have everlasting life.

     For God sent not his Son into the world to condemn the world; but that the world through him might be saved.”  - John 3:16-17


  • Member since
    September 2012
Posted by GMorrison on Friday, January 17, 2020 1:00 AM

Here's a model I built a while back.

After WW2 the Avia factory in Czechoslovakia built Gs called the S-99.

Those had the DB 605 engine.

When the supply of those ran out, the factory built the S-199 with the Jumo 211 engine. Lower performance, used in the He 111 among others. Big fat paddle prop.

Israel bought 25 in 1948. Modi Alon scored the IAF's first victory, shooting down two Egyptian C47 bombers over Tel Aviv on June 3, 1948.

 Modeling is an excuse to buy books.


  • Member since
    June 2017
Posted by UnwaryPaladin on Saturday, January 18, 2020 10:13 AM

Theuns, I'd like to join. I have a Syrian MiG 17 obtained by the IDF in 1968, has IDF markings. Kit is a 1/48 Hobbyboss Plaaf J5

Joe

  • Member since
    April 2010
Posted by Theuns on Saturday, January 18, 2020 10:46 PM

Welcome Joe, your on the front page.


I saw a documentry about the start of the IAF and they showed the guyes going to collect the "109's" aswell B17's and how they were used during the first of the arab/israeli conflicts.


The planes that were assembled in a closed hanger had no time to do post assembly testflights, the first combat sorty was the testflight.

Quite interesting.

Theuns

  • Member since
    June 2017
Posted by UnwaryPaladin on Monday, January 20, 2020 8:23 AM

Theuns

Welcome Joe, your on the front page.


I saw a documentry about the start of the IAF and they showed the guyes going to collect the "109's" aswell B17's and how they were used during the first of the arab/israeli conflicts.


The planes that were assembled in a closed hanger had no time to do post assembly testflights, the first combat sorty was the testflight.

Quite interesting.

Theuns


Thank you!

I don't know much about the Isreali Air Force and it's history, looking forward to learning more through this group build. 

Joe

  • Member since
    April 2019
  • From: Earth, Milky Way Galaxy
Posted by John 3:16 KJV on Wednesday, February 12, 2020 4:06 PM

Installment 10:

Theuns

Thin strips of plastic glued on??


Theuns


Thank you for your advice, Theuns! I used a straw, cut it, and made little plastic pieces. Here’s a strip of pieces:

...and the clips:

 Still needs painting, though.  

     “For God so loved the world, that he gave his only begotten Son, that whosoever believeth in him should not perish, but have everlasting life.

     For God sent not his Son into the world to condemn the world; but that the world through him might be saved.”  - John 3:16-17


  • Member since
    April 2010
Posted by Theuns on Thursday, February 13, 2020 8:47 AM

That worked out well :-)


Theuns

  • Member since
    April 2019
  • From: Earth, Milky Way Galaxy
Posted by John 3:16 KJV on Friday, February 14, 2020 8:20 PM

Thanks!Yes

     “For God so loved the world, that he gave his only begotten Son, that whosoever believeth in him should not perish, but have everlasting life.

     For God sent not his Son into the world to condemn the world; but that the world through him might be saved.”  - John 3:16-17


  • Member since
    February 2011
Posted by GreySnake on Thursday, February 27, 2020 12:01 PM
BradonK, thanks!
 
 
John, the M48 is coming along nicely.
 
GMorrison, nice work. 
 
I might try to sneak in an Academy Merkava MK. IV before the deadline just not sure yet. There’s about eight other builds in front of it right now. So I will let you know.
  • Member since
    February 2016
  • From: Ice coated north 40 saskatchewan
Posted by German Armour on Thursday, February 27, 2020 8:07 PM

Here's my entry.

 Never give up, never quit, never stop modelling.Idea


  • Member since
    April 2010
Posted by Theuns on Thursday, February 27, 2020 11:24 PM

Cool, lets hope we get another 2 Merkavas on here, front page updated.


Theuns

  • Member since
    February 2011
Posted by GreySnake on Friday, February 28, 2020 10:31 AM
German Amour, looking forward to seeing how that Merkava builds up.
  • Member since
    September 2011
  • From: Milaca, Minnesota
Posted by falconmod on Wednesday, March 11, 2020 7:17 AM

You can change my entry to this  1/72 Revell of Germany  Kfir C.2

John

On the Bench: 1/72 Ki-67, 1/48 T-38

1/144 AC-130, 1/72 AV-8A Harrier

  • Member since
    February 2011
Posted by GreySnake on Wednesday, March 11, 2020 9:22 AM

Cool a Kfir! Always liked how that airplane looked every since I had a diecast one as a child. Not that big into building airplanes anymore but a Kfir is one of the few I’m interested in building

  • Member since
    April 2010
Posted by Theuns on Wednesday, March 11, 2020 11:42 PM

I changed the entry to the revell Kfir.

I once built the italeri 1/72 Kfir and when I sanded the wing leading sdegs ripped a nice gash in my finger on ths very sharp leading edge dog tooth ! LOL


Theuns

  • Member since
    April 2010
Posted by Theuns on Thursday, April 9, 2020 11:41 AM

I started on my academy 1/48 F-15 e IDF.

Cockpit is nice, I dressed up the seat with seat covers and seatbelts.

 Academy 1/48 F-15 E by Theunis van Vuuren, on Flickr

 Academy 1/48 F-15 E by Theunis van Vuuren, on Flickr

The intakes need to be installed carefully

 Academy 1/48 F-15 E by Theunis van Vuuren, on Flickr

I dropped the flaps to add some "feel" to it

 Academy 1/48 F-15 E by Theunis van Vuuren, on Flickr

Getting the nose section to fit was not fun, loads of fitting , sanding and repeat.

 IMG_20200406_093745 by Theunis van Vuuren, on Flickr

rescribed

 IMG_20200409_080330 by Theunis van Vuuren, on Flickr

wingseats are not good, stretched sprue as a fliller on the top parts.

 IMG_20200409_152743 by Theunis van Vuuren, on Flickr

Intakes also need loads of putty

 IMG_20200409_152816 by Theunis van Vuuren, on Flickr


Theuns


  • Member since
    April 2010
Posted by Theuns on Sunday, April 12, 2020 12:01 PM

This was quite an undertaking in preshading...

 IMG_20200412_164850 by Theunis van Vuuren, on Flickr

I also  added a little mottling to brek up the paint.

 IMG_20200412_164911 by Theunis van Vuuren, on Flickr

Alclad allumunium over dull black, I didnt want it to be to shiny

 IMG_20200412_170551 by Theunis van Vuuren, on Flickr

 IMG_20200412_170603 by Theunis van Vuuren, on Flickr


Theuns

  • Member since
    June 2014
Posted by BrandonK on Wednesday, April 15, 2020 2:15 PM

Your preshading looks impressive. The bare metal aft area looks very nice as well. This will be a super good looking bird when done.

BK

On the bench:

A lot !! And I mean A LOT!!

2024 Kits on deck / in process / completed   

                         14 / 5 / 2  

                              Tongue Tied

  • Member since
    April 2010
Posted by Theuns on Thursday, April 16, 2020 12:01 AM

Thanx, I had to totally repait the bare metal areas as the paint came off when I tested the masking on it. No big deal, I could rubb off the alclad and just resparay it.

The basoc camo is on and I got the glosscoat on aswell, hoping to get to doing the decals and washes this week. I do not have all the fine stencling for the IDF but so be it, I will just put on the big decals I have and call it a day.


Theuns

  • Member since
    April 2010
Posted by Theuns on Thursday, April 16, 2020 10:46 AM

I had to redo the metal, but I think it came out well.

 IMG_20200415_134433 by Theunis van Vuuren, on Flickr

Top camo was my own mix, think it is close enough.

 IMG_20200415_134452 by Theunis van Vuuren, on Flickr

 IMG_20200415_134624 by Theunis van Vuuren, on Flickr

I also had to redo the top metal part as I had it to far forward :-( ill post pic of that later 


Theuns


  • Member since
    November 2008
  • From: Far Northern CA
Posted by mrmike on Thursday, April 16, 2020 1:02 PM

Looks great Theuns! It was a tough fight, but you won - look forward to the completed build. 

  • Member since
    April 2010
Posted by Theuns on Saturday, April 25, 2020 6:22 AM

Calling it done, with all the filling and sanding required to get stuff to fit it came out nice.

 Academy 1/48 F15 IDF by Theunis van Vuuren, on Flickr

 Academy 1/48 F15 IDF by Theunis van Vuuren, on Flickr

 Academy 1/48 F15 IDF by Theunis van Vuuren, on Flickr

Its configured for a long range bombing mission 8 Mk 83 1000 Lb's

 Academy 1/48 F15 IDF by Theunis van Vuuren, on Flickr

 Academy 1/48 F15 IDF by Theunis van Vuuren, on Flickr

 Academy 1/48 F15 IDF by Theunis van Vuuren, on Flickr

 Academy 1/48 F15 IDF by Theunis van Vuuren, on Flickr

 Academy 1/48 F15 IDF by Theunis van Vuuren, on Flickr

 Academy 1/48 F15 IDF by Theunis van Vuuren, on Flickr


Theuns

  • Member since
    June 2014
Posted by BrandonK on Sunday, April 26, 2020 11:14 AM

Wow, Theuns, that has to be one of the best looking F-15's I've ever seen. Super nice work. Well done!!

BK

On the bench:

A lot !! And I mean A LOT!!

2024 Kits on deck / in process / completed   

                         14 / 5 / 2  

                              Tongue Tied

  • Member since
    April 2010
Posted by Theuns on Tuesday, April 28, 2020 1:34 AM

Thanx Brandon, I m happy with it.


Theuns

  • Member since
    April 2019
  • From: Earth, Milky Way Galaxy
Posted by John 3:16 KJV on Tuesday, April 28, 2020 11:24 AM

Nice jet, Theuns!

     “For God so loved the world, that he gave his only begotten Son, that whosoever believeth in him should not perish, but have everlasting life.

     For God sent not his Son into the world to condemn the world; but that the world through him might be saved.”  - John 3:16-17


  • Member since
    April 2010
Posted by Theuns on Monday, May 4, 2020 12:33 AM

Thanx.


Hi Guys, week 6 of our lockown and we are still going ;-)

I ran ut of IF models to build though


Theuns

  • Member since
    September 2011
  • From: Milaca, Minnesota
Posted by falconmod on Monday, May 4, 2020 1:23 PM

Great work on the Israeli F-15,  fabulous paint

John

On the Bench: 1/72 Ki-67, 1/48 T-38

1/144 AC-130, 1/72 AV-8A Harrier

  • Member since
    April 2010
Posted by Theuns on Tuesday, May 5, 2020 11:00 AM

Ta John.


Theuns

  • Member since
    July 2008
Posted by Est.1961 on Sunday, May 10, 2020 4:50 PM

The F15 is looking great, I'm also liking the the tanks on this GB. 

Joe

  • Member since
    June 2014
Posted by BrandonK on Monday, August 3, 2020 10:37 AM

I'm moving quite quickly on the M-41 and Challenger II so I should be starting on the Super Sherman in the next couple of weeks. I'm stoked to get this one going.

BK

On the bench:

A lot !! And I mean A LOT!!

2024 Kits on deck / in process / completed   

                         14 / 5 / 2  

                              Tongue Tied

  • Member since
    February 2011
Posted by GreySnake on Monday, August 3, 2020 11:16 AM

Looking forward to seeing it BK. 

  • Member since
    June 2014
Posted by BrandonK on Wednesday, August 19, 2020 11:00 AM

Okay, let's get the party started on the Super Sherman. I love sand road wheels. I mean, it's the end all be all of modeling. I just can't get enough of that fun. Tongue Tied I should move quickly on this, I hope.

BK

On the bench:

A lot !! And I mean A LOT!!

2024 Kits on deck / in process / completed   

                         14 / 5 / 2  

                              Tongue Tied

  • Member since
    February 2011
Posted by GreySnake on Thursday, August 20, 2020 9:43 AM
That’s a lot of road wheels.
  • Member since
    June 2008
Posted by lewbud on Friday, August 28, 2020 1:18 AM

A brief inbox review of my next build, Sword's 1/72 Spitfire Mk. IXe.  First time I've built a Sword kit (won't be the last as they have several aircraft I want to build). The instructions, parts, and decals come in Ziploc bag that's about the size of a set of aftermarket decals.  There are two smaller Ziploc bags one contains the clear parts, the other two nicely cast sets of resin exhausts and the 20mm cannon for the wings.  The decals see made by Techmod and provide markings for a Czech, Polish Sqn 302, and a postwar Israeli bird.  Now for a look at what's inside.  First off, the plastic parts.  The panel lines are delicately molded.  There are no locator pins for the fuselage or wings, the horizontal stabilizers have a slight step molded in to aid in alignment, but no tab and slot to keep them in place (better than a butt joint, but not by much).

The resin parts.

The clear.  Unfortunately, I don't have any masks in the stash for a late model Spit, so I'll have to mask the old fashioned way.  I hate masking canopies.

The decals.

This should be a fun build.  I was going to do Weizman's Black 57, but I don't have an elliptical winged Mk. XIV in the stash.  More tomorrow.


Buddy- Those who say there are no stupid questions have never worked in customer service.

  • Member since
    June 2014
Posted by BrandonK on Friday, August 28, 2020 10:02 AM

lewbud

A brief inbox review of my next build, Sword's 1/72 Spitfire Mk. IXe.  First time I've built a Sword kit (won't be the last as they have several aircraft I want to build). The instructions, parts, and decals come in Ziploc bag that's about the size of a set of aftermarket decals.  There are two smaller Ziploc bags one contains the clear parts, the other two nicely cast sets of resin exhausts and the 20mm cannon for the wings.  The decals see made by Techmod and provide markings for a Czech, Polish Sqn 302, and a postwar Israeli bird.  Now for a look at what's inside.  First off, the plastic parts.  The panel lines are delicately molded.  There are no locator pins for the fuselage or wings, the horizontal stabilizers have a slight step molded in to aid in alignment, but no tab and slot to keep them in place (better than a butt joint, but not by much).

The resin parts.

The clear.  Unfortunately, I don't have any masks in the stash for a late model Spit, so I'll have to mask the old fashioned way.  I hate masking canopies.

The decals.

This should be a fun build.  I was going to do Weizman's Black 57, but I don't have an elliptical winged Mk. XIV in the stash.  More tomorrow.


That looks like a decent little kit. Should be fun.

BK

On the bench:

A lot !! And I mean A LOT!!

2024 Kits on deck / in process / completed   

                         14 / 5 / 2  

                              Tongue Tied

  • Member since
    April 2010
Posted by Theuns on Friday, August 28, 2020 10:18 AM

looks very interesting

  • Member since
    February 2011
Posted by GreySnake on Friday, August 28, 2020 9:18 PM
The Spitfire looks like an interesting little kit.
  • Member since
    June 2008
Posted by lewbud on Sunday, August 30, 2020 5:52 PM

Thanks guys, it's definitely a different experience.

Sorry for not posting sooner, just didn't feel like hitting the table again until last night.  This is my second attempt at a low volume, Eastern European kit. (The first, MPM's XP-55 Ascender sits so far in the depths of the Shelf of Doom that not even Indiana Jones could find it.  Not that he'd want to.). Let's get to the pics.
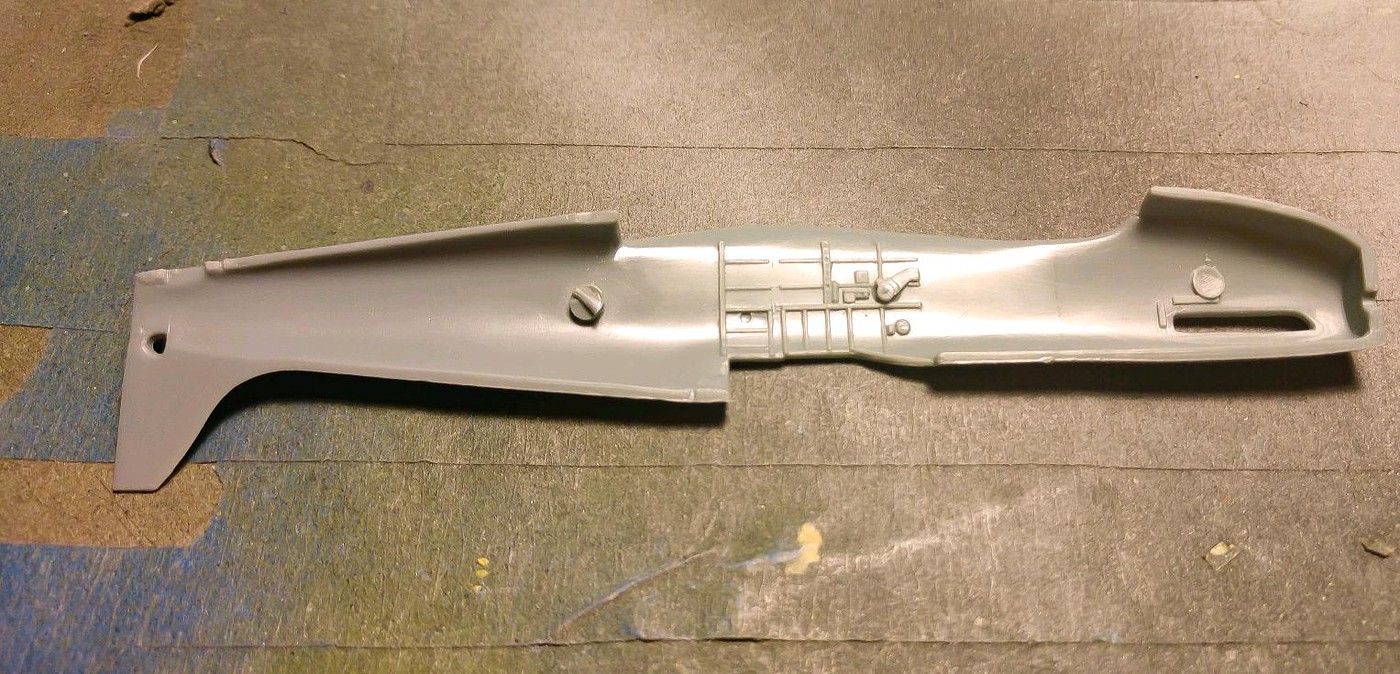
The fuselage.

You get used to certain things when you build a kit from one of the major manufacturers, parts numbers molded on the sprue and the exhaust backing plates are molded into the fuselage.  Not so with this kit.  The sprue diagram with the parts numbers is close at hand and properly oriented so I can find the parts   Here's a pic of the right fuselage half without the mounting plate for the exhausts.

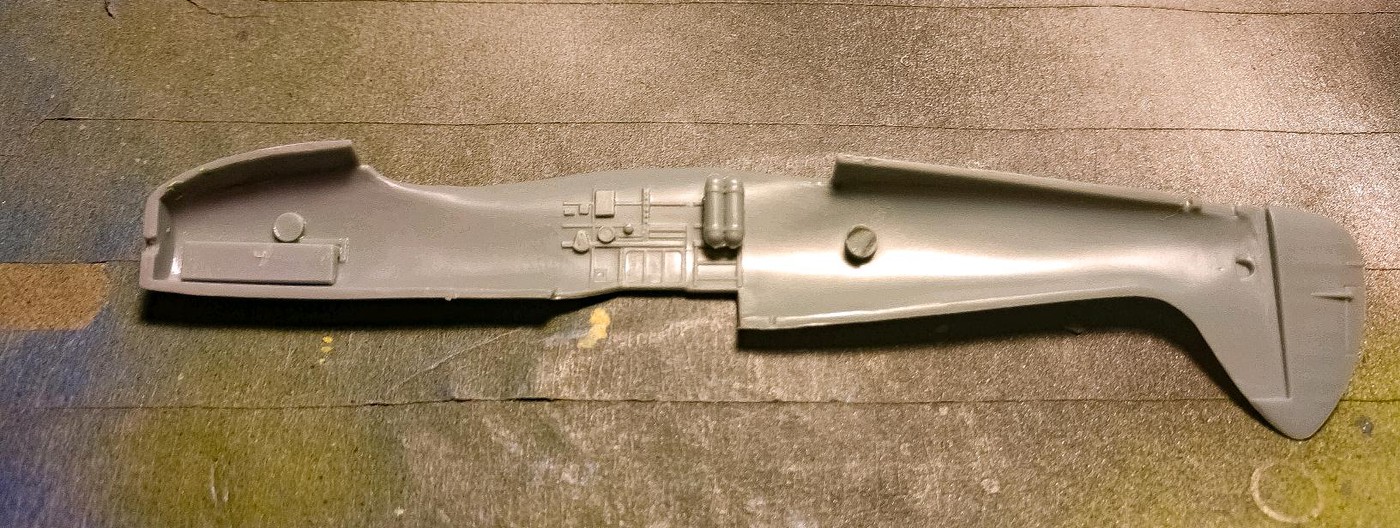
The left side with the plate installed.

The wings, topside.

The topsides of the wings are molded smooth and you have to apply the gun and tire bulges separately.  This makes sense because the aircraft in question may or may not have had them.  From what I can tell, the IDF Mk. IXs had the gun bulges, but not the tire bulges.

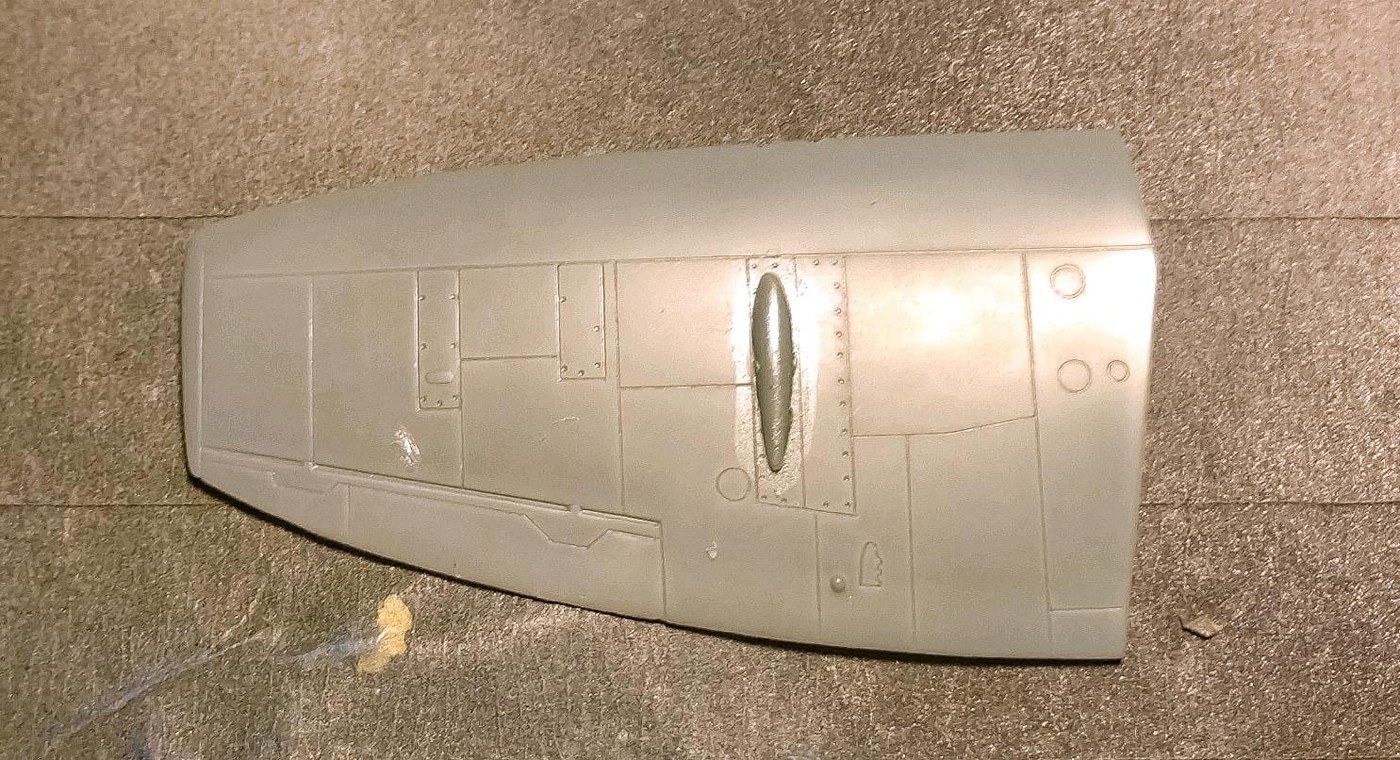
The instructions also called for a couple of pieces to box in the undercarriage, but I couldn't get the wing halves to fit properly so I removed them.  They're not noticeable so I'm not worried.

The cockpit.

Normally a pretty straight forward assembly, not so much with this kit.  The main hassle was getting the supports for the armor plate seat back to line up.  They're individual pieces that are glued to the rear frame of the cockpit and have nothing to locate them for proper alignment.  I think I did all right.  In looking for a review of this kit, it seems like this has been fixed in later editions so this is probably a moot point.  Here's the pit as it is now.

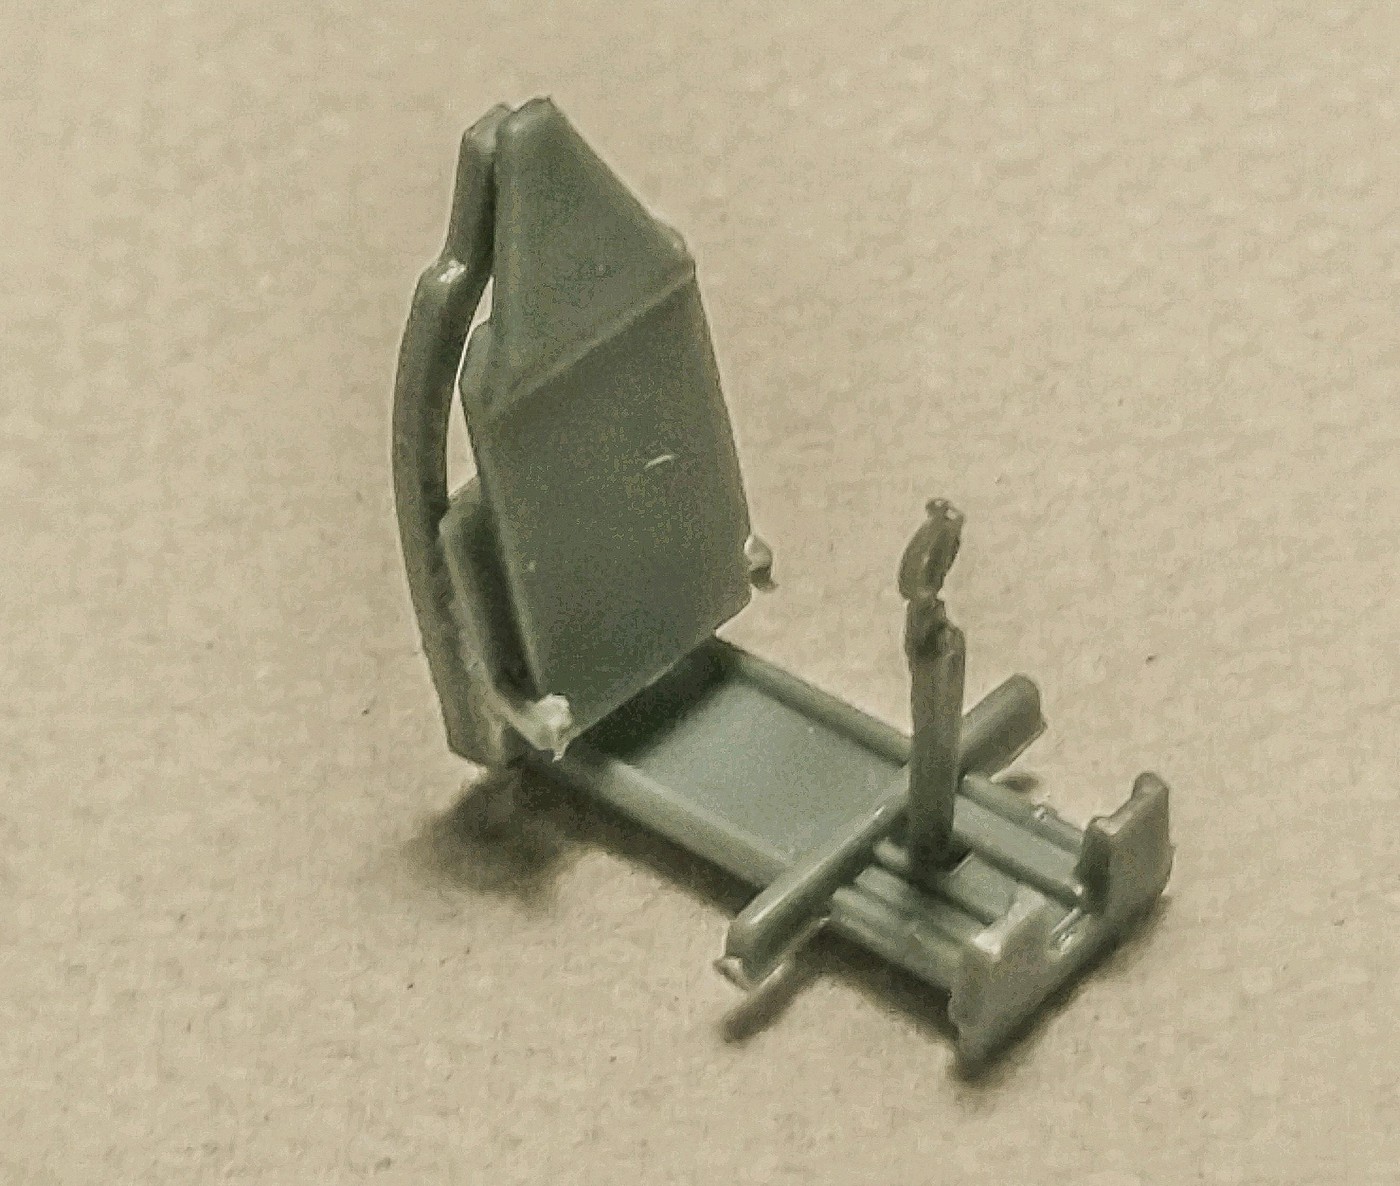
In looking at the picture, it looks like I still have some clean up to do.  All I have to is shoot some British Interior Green, install the seat and instrument panel and she'll be ready to button up.  Fortunately, I have already tested the fact that the pit can be installed from the bottom of the fuselage.  

The instructions.

Aren't too bad.  The assembly drawings appear to be hand drawn, but do a good job of showing you where the parts go.  The bad thing about them is they don't tell you what parts go on which version.  As I said in my first post, three aircraft can be built from the markings provided.  The kit provides two different exhausts and two sets of wheels, instructions don't tell you what goes with which plane.  From what I've been able to figure out, it's possible that this is the same plane in various stages of it's service life.  She started out in the RAF.  After WWII, she went to the Czech AF.  Due to the Soviets forcing the Czech AF to use their equipment, she was sold to the Israelis in 1948. Which means that I'll be using the fishtail exhaust stacks and four spoke wheels. (Thanks Google).  More soon.


Buddy- Those who say there are no stupid questions have never worked in customer service.

  • Member since
    June 2014
Posted by BrandonK on Monday, August 31, 2020 12:25 PM

Lord have mercy this Sherman has a ton of bits and bobs to hang after painting. This kit is not hurting in the part count area for sure. I am off to the booth for some primer and then paint, and then all the detail painting that this kit needs. Well, can't finish if I don't start.

BK

On the bench:

A lot !! And I mean A LOT!!

2024 Kits on deck / in process / completed   

                         14 / 5 / 2  

                              Tongue Tied

  • Member since
    June 2008
Posted by lewbud on Monday, August 31, 2020 1:32 PM

Looking good BK!


Buddy- Those who say there are no stupid questions have never worked in customer service.

  • Member since
    February 2011
Posted by GreySnake on Tuesday, September 1, 2020 11:29 AM
Nice work lewbud. I know what a hassle Eastern European kits can be sometimes of course I can only comment from the armor side of things.
 
 
That’s a lot of parts BK.
  • Member since
    June 2014
Posted by BrandonK on Wednesday, October 28, 2020 3:36 PM

Okay, I'm finally back on this one. I have the bulk of the paint work done, just some detial painting and figure painting. This should wrap up in a week or three, depends on how busy I am. I am really happy with how this one is turning out.

BK

On the bench:

A lot !! And I mean A LOT!!

2024 Kits on deck / in process / completed   

                         14 / 5 / 2  

                              Tongue Tied

  • Member since
    June 2014
Posted by BrandonK on Friday, November 20, 2020 11:39 AM

Okay, for those still watching I have this one wrapped up. I am very happy with how this one turned out. I was going for a look of a tank that has been bombing around in the desert with all the dust and sand and I think I pulled it off.

I used Vallejo IDF paint set and Mig dust effect and Mig pigments. I topped it all off with a dusting of pastels. This was  super good kit and I will most likely do another. Later, after I move this one will end up in a small scene, but right now I don't have the space. 

I hope you like it and thanks for motivating me to build this one up.

BK

On the bench:

A lot !! And I mean A LOT!!

2024 Kits on deck / in process / completed   

                         14 / 5 / 2  

                              Tongue Tied

  • Member since
    April 2010
Posted by Theuns on Friday, November 20, 2020 11:01 PM

Brandon that looks really good, well done. Love the paintwork


I have updated the pix page, thanx for taking part


Theuns

JOIN OUR COMMUNITY!

Our community is FREE to join. To participate you must either login or register for an account.

SEARCH FORUMS
FREE NEWSLETTER
By signing up you may also receive reader surveys and occasional special offers. We do not sell, rent or trade our email lists. View our Privacy Policy.